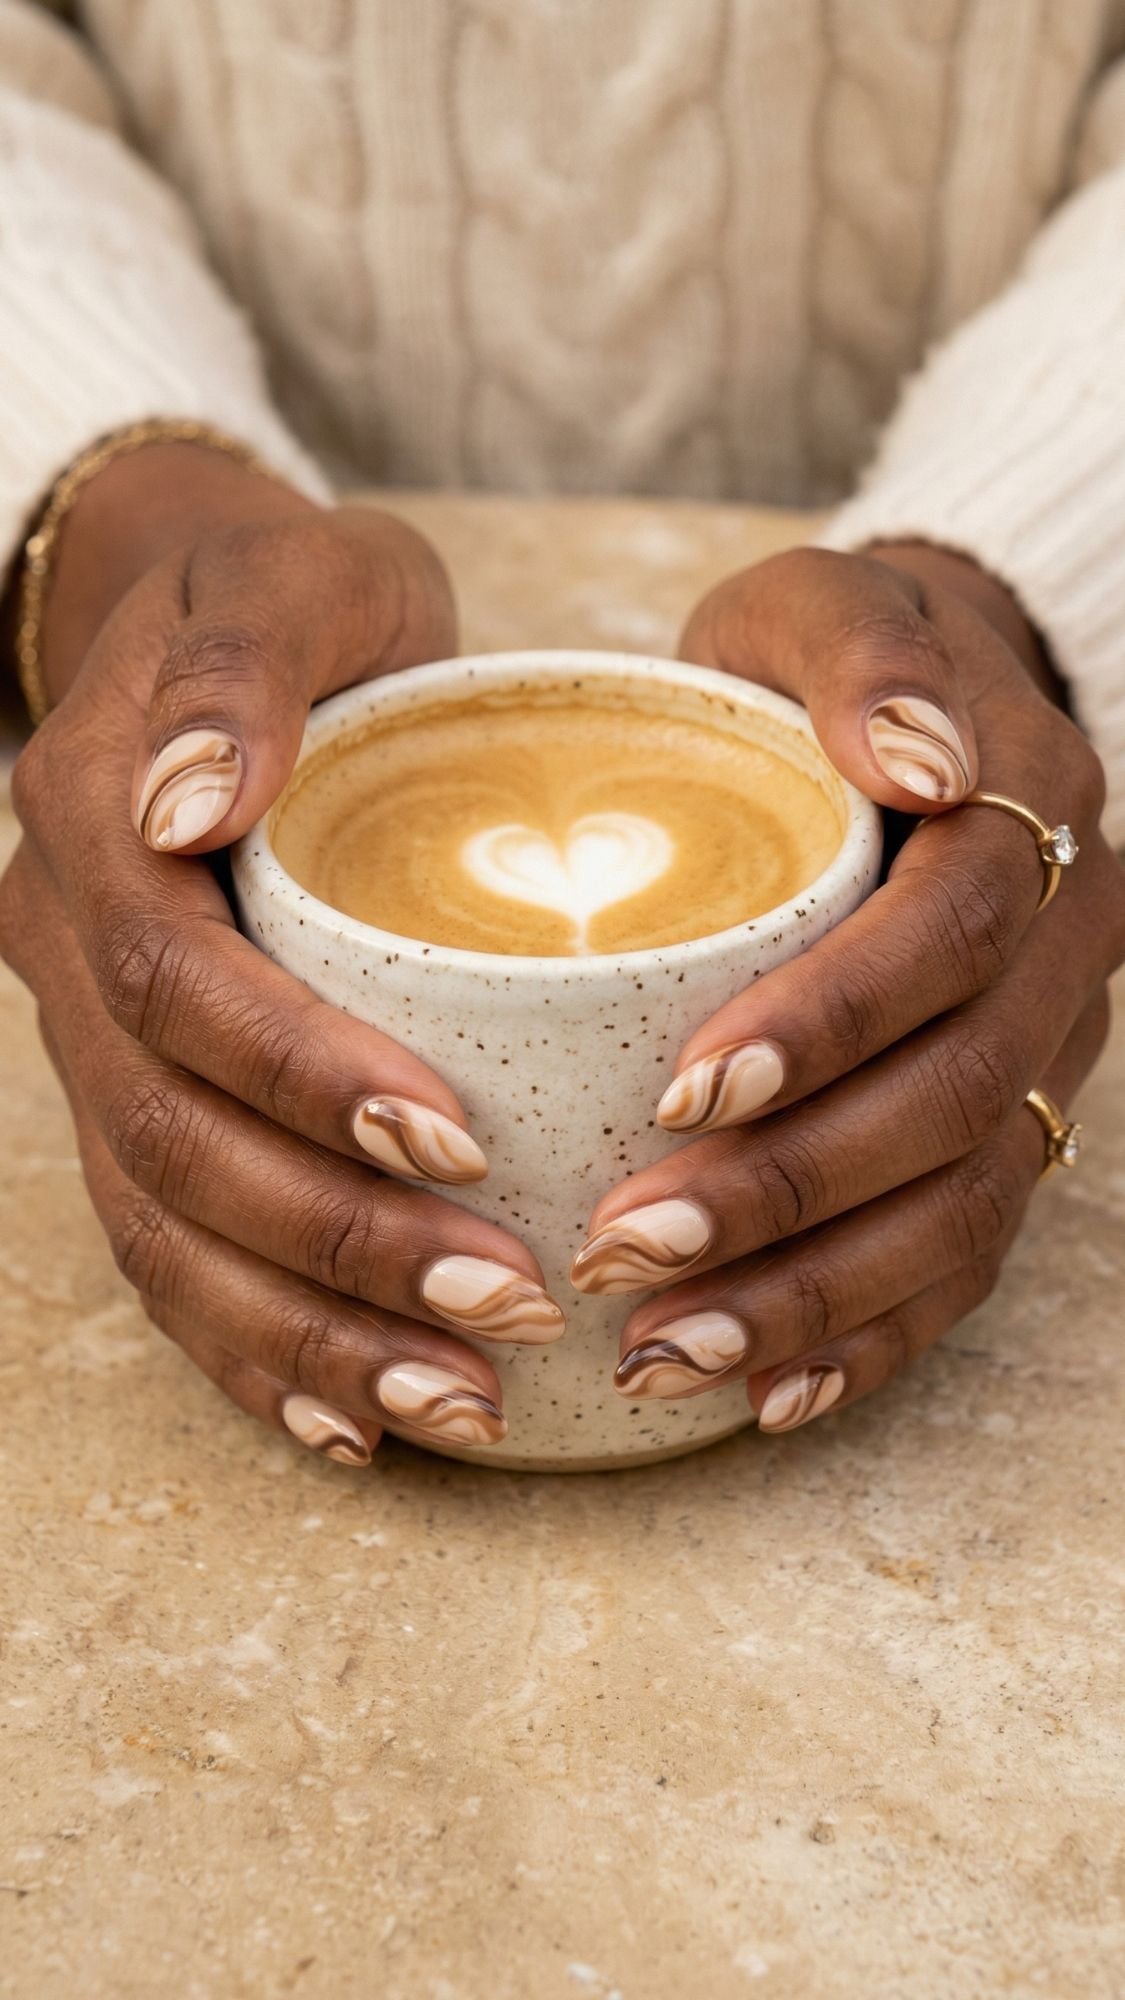
Why Almond Nails Flatter Almost Everyone
Almond nails sit in that sweet spot where your hands look longer, your fingers look a little more elegant, and you still function like a normal human who has to open soda cans. Have you ever noticed how the same polish shade can look totally different depending on the nail shape? Almond does that thing where it visually narrows the nail bed and stretches the finger line, so even simple colors look more “done.” I’ve shaped thousands of nails over the years, and if someone tells me, “My hands look short,” or “My nail beds look wide,” almond almost always fixes the vibe fast.
That said, almond only looks flattering when the taper stays balanced. The mistake most people make with this technique is filing too much off the sidewalls too quickly. That turns almond into a pointy triangle, then chips show up in 48 hours, and nobody has time for that.
Key Takeaways
- Almond elongates fingers and makes nail beds look more balanced.
- Short-to-medium almond flatters the most hands and feels easiest to live with.
- The look depends on prep + a clean taper, not just the color.
Quick Results Snapshot
- What this look solves: Short-looking fingers, wide nail beds, “my nails never look polished enough”
- Best for: Natural nails, beginners, short nails growing out, anyone who wants a universally flattering shape
- Time required: 20 to 45 minutes DIY, depending on design
- Budget range: $10 to $60 DIY, $45 to $120 salon
- Expected timeline: Instant visual improvement, stronger nails in 2 to 4 weeks with consistent cuticle oil and gentle removal
- Biggest mistakes people make:
- Over-filing the sides, then wondering why the tips peel
- Using thick coats, then getting dents, bubbles, and shrinkage
Nail Prep, This Is The Difference Maker
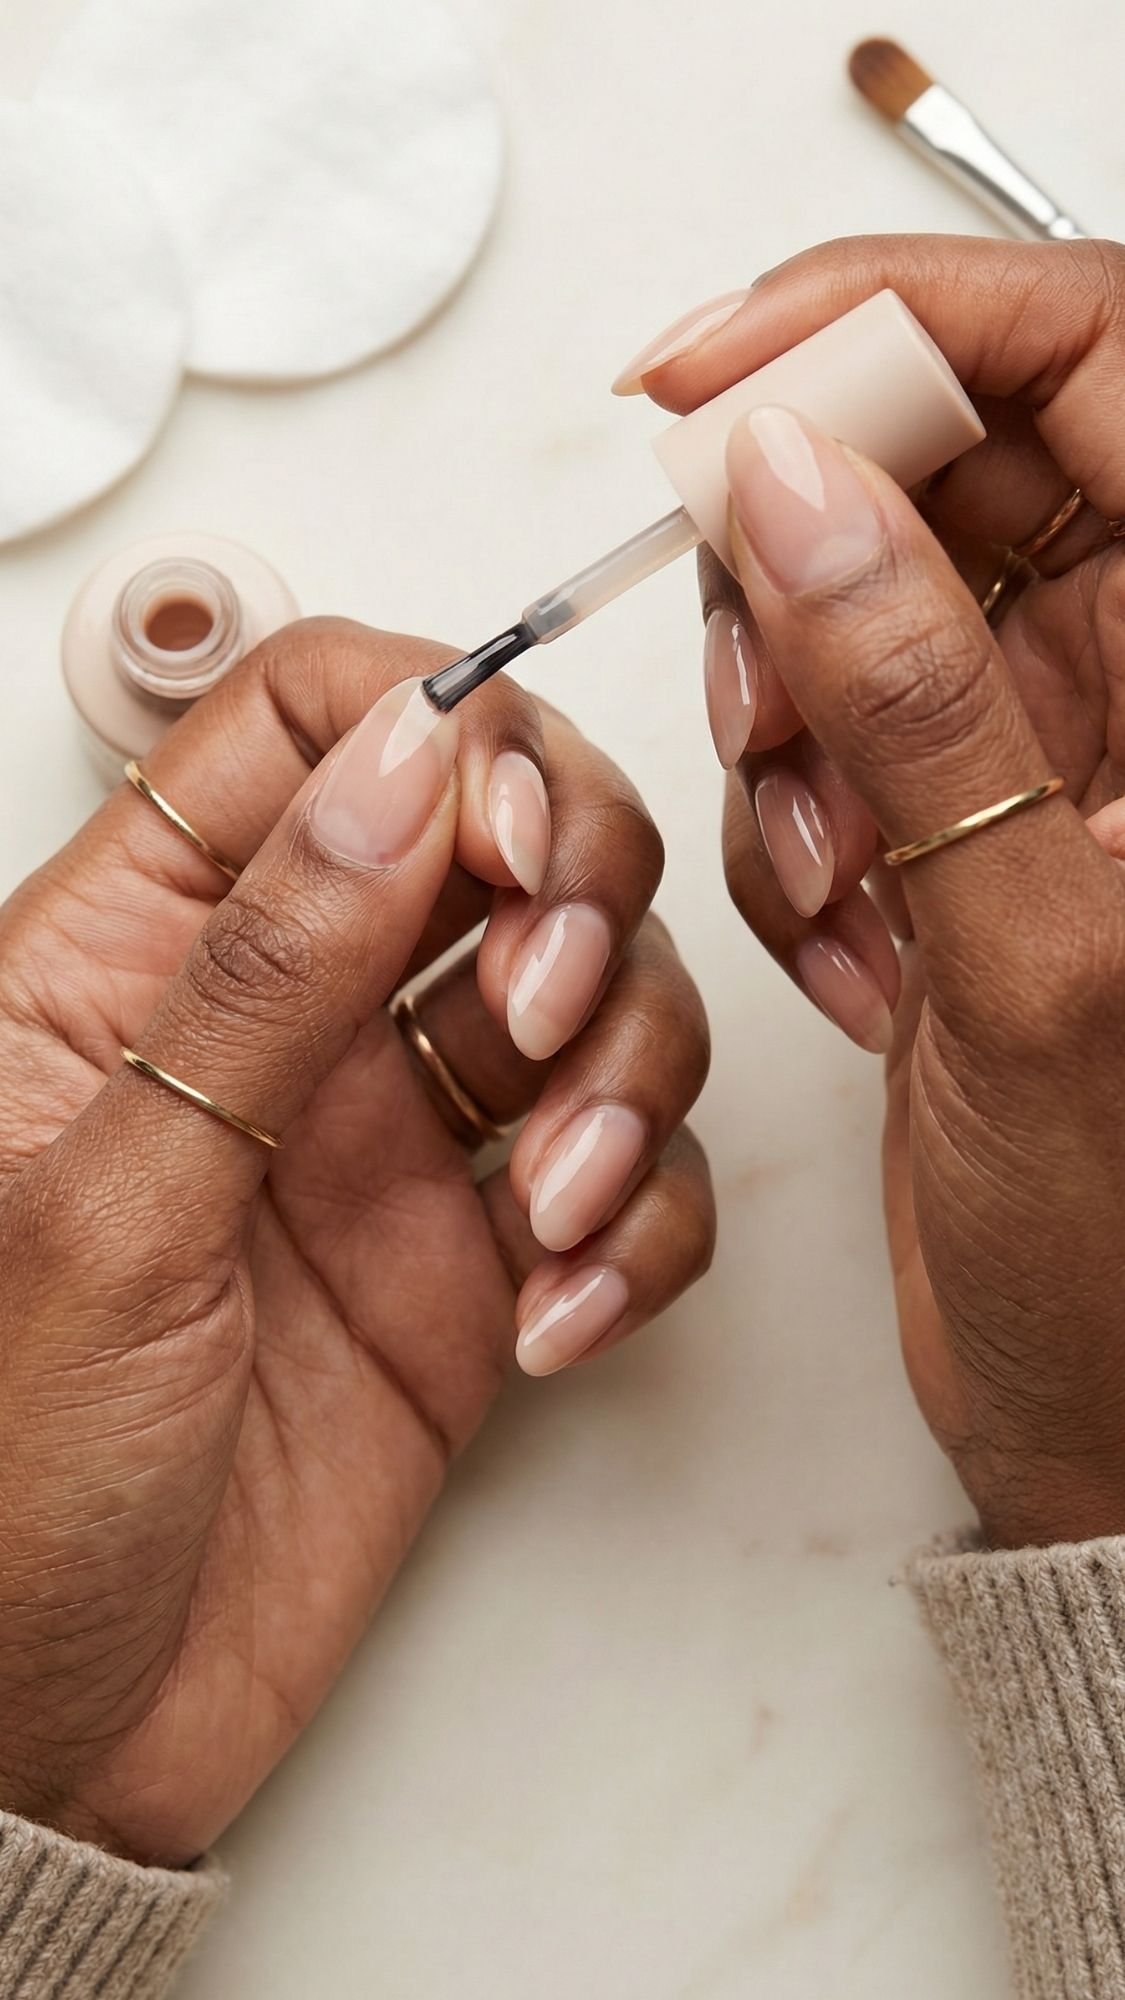
If almond nails look incredible on some people and weirdly “off” on others, prep usually explains it. Prep controls smoothness, adhesion, and how clean the cuticle area looks in photos, which matters more than people admit. The mistake most people make is rushing through prep, then blaming the polish when it chips. I treat prep like setting a canvas, because the prettiest design in the world cannot save a slick, oily nail plate.
Also, quick reality check, almond looks best when the cuticle line looks neat. You don’t need aggressive cutting. You need consistent, gentle cleanup that keeps skin from creeping up onto the nail plate.
Step-by-Step Nail Prep (Do This In Order)
- Remove old product completely
- Use remover and a lint-free pad until the nail looks clean and feels smooth.
- Why it matters: leftover base coat causes uneven texture and weak spots that lift early.
- Common mistake + fix: you stop when it “looks” clean, wipe again until the pad comes away clear.
- Wash hands, then dry thoroughly
- Yes, wash, then wait a minute.
- Why it matters: moisture trapped near the cuticle can lead to bubbling or early peeling.
- Common mistake + fix: painting right after washing, wait 3 to 5 minutes.
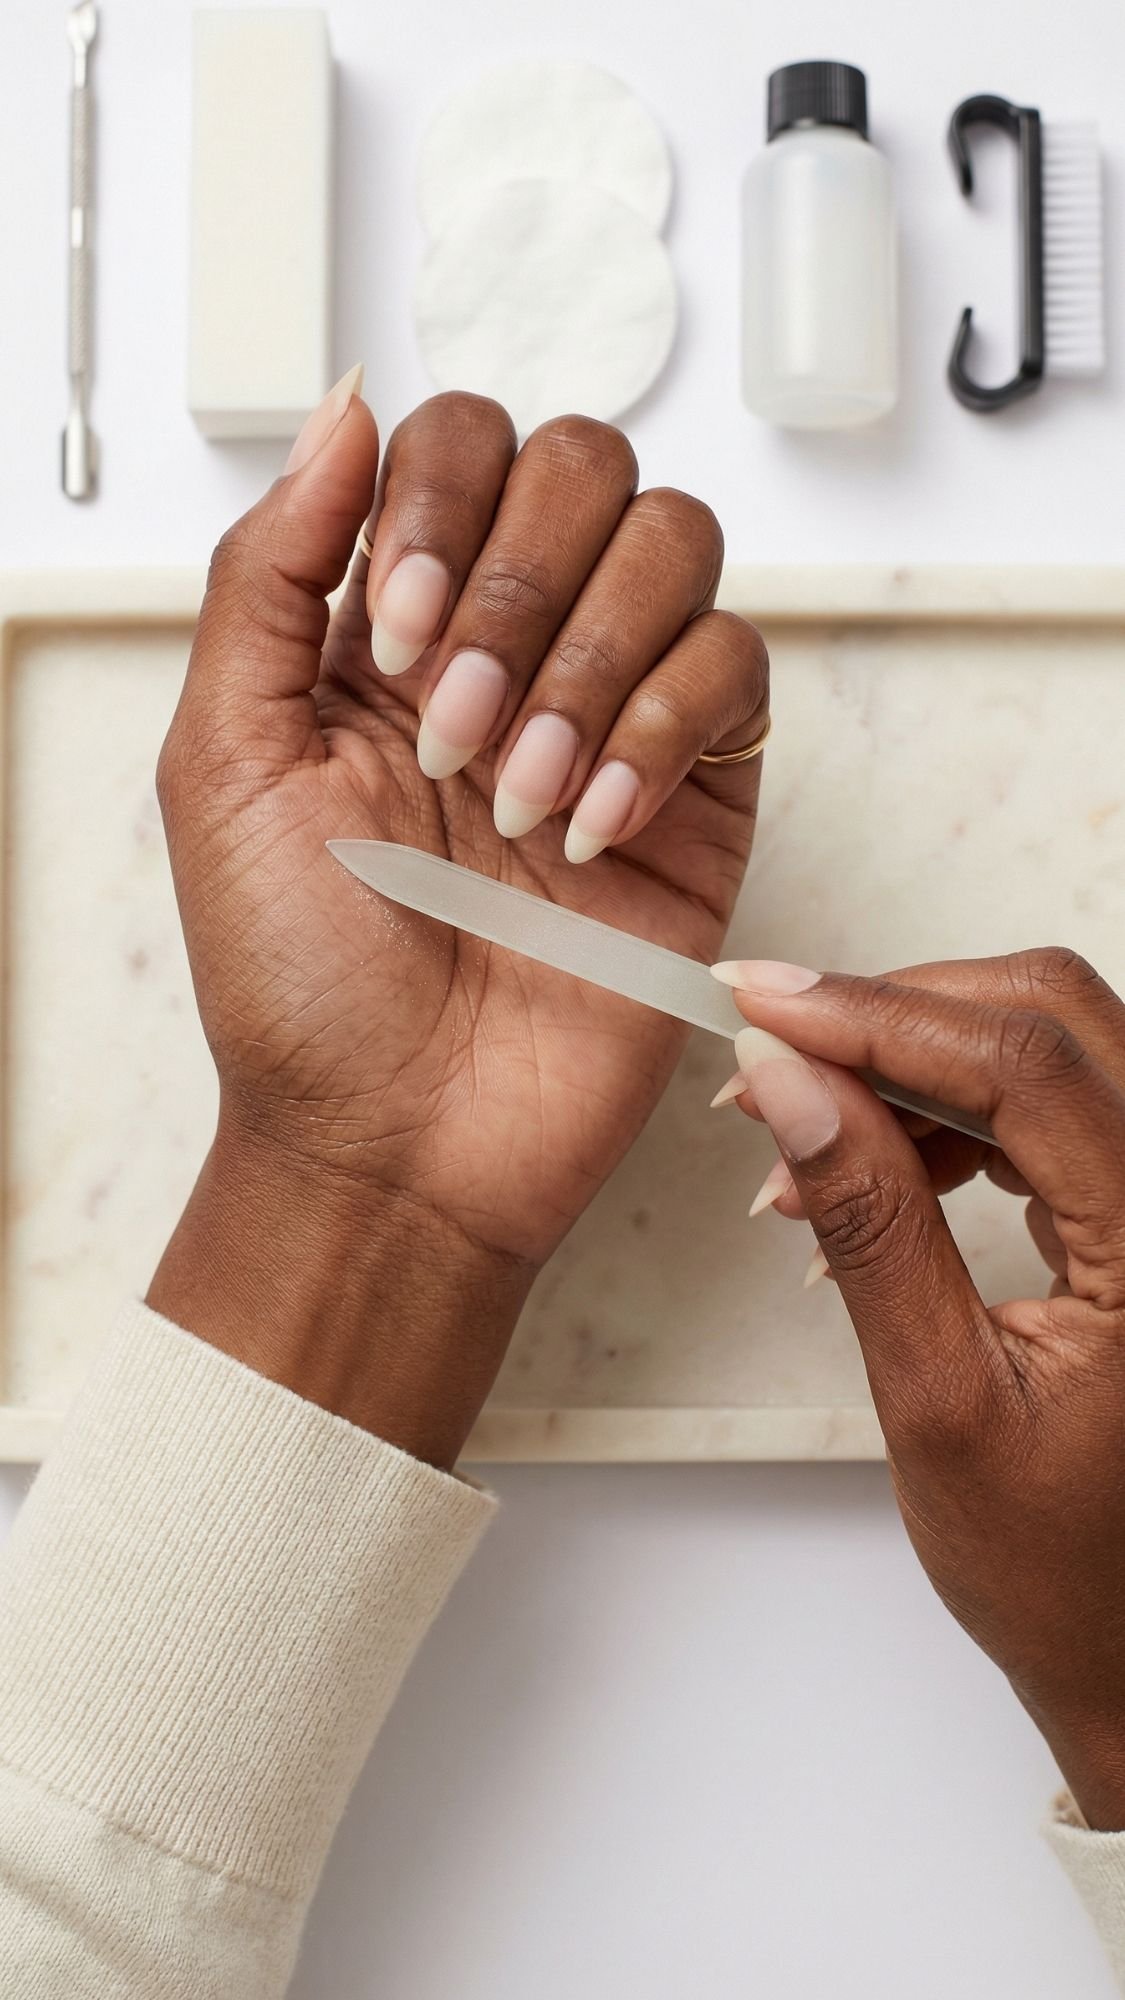
- Shape first, then refine
- File into almond before you touch cuticles.
- Why it matters: shaping changes the edge, you don’t want to redo cleanup after.
- Pro tip: file in controlled strokes, keep checking both hands from a top-down view so one hand doesn’t end up pointier.
- Gentle cuticle work
- Push back cuticles with a soft pusher after a quick shower, or use cuticle remover for 15 to 30 seconds.
- Why it matters: polish sticks to nail, not to skin. Clean edges equal longer wear.
- Common mistake + fix: cutting too much, only nip hangnails, never dig.
- Light buff only if you need it
- Use a very light buffer to smooth ridges, then stop.
- Why it matters: over-buffing thins the nail plate and increases peeling.
- Pro tip: if you can see dust clouds, you already buffed enough.
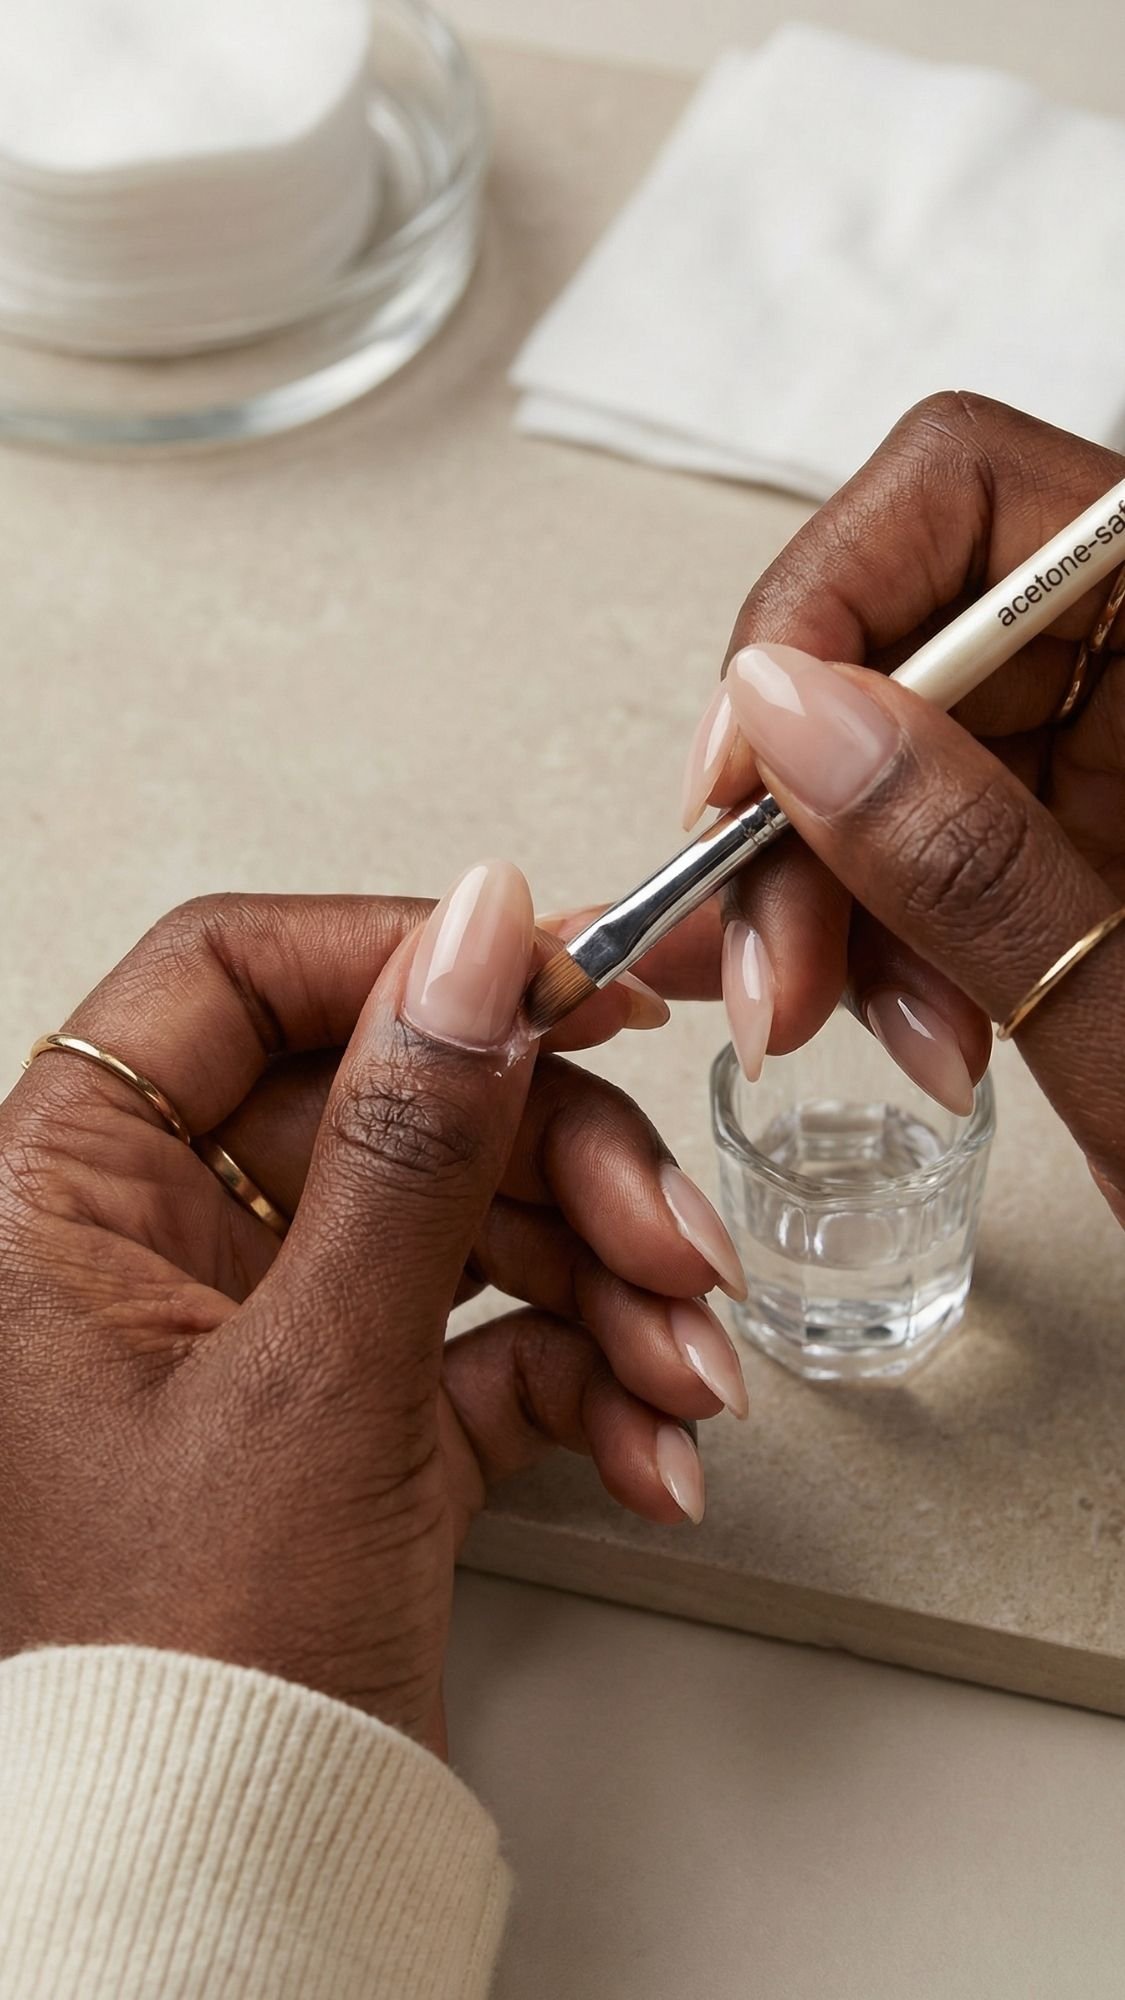
- Cleanse and dehydrate
- Swipe each nail with acetone or alcohol on a lint-free pad.
- Why it matters: it removes oil, residue, and dust so base coat grips.
- Sensory detail: the nail plate feels squeaky and slightly “grippy” when it’s truly clean, not slick.
Sensitive Nail Alternative (If You Peel Easily)
- Skip heavy buffing completely.
- Use a ridge-filling base coat instead of trying to sand ridges away.
- Oil your cuticles daily, but never right before polish.
Key Takeaways
- Prep makes the manicure, not the nail art.
- Shape before cuticles so your edges stay crisp.
- Dehydrate last, and do not touch your nails after.
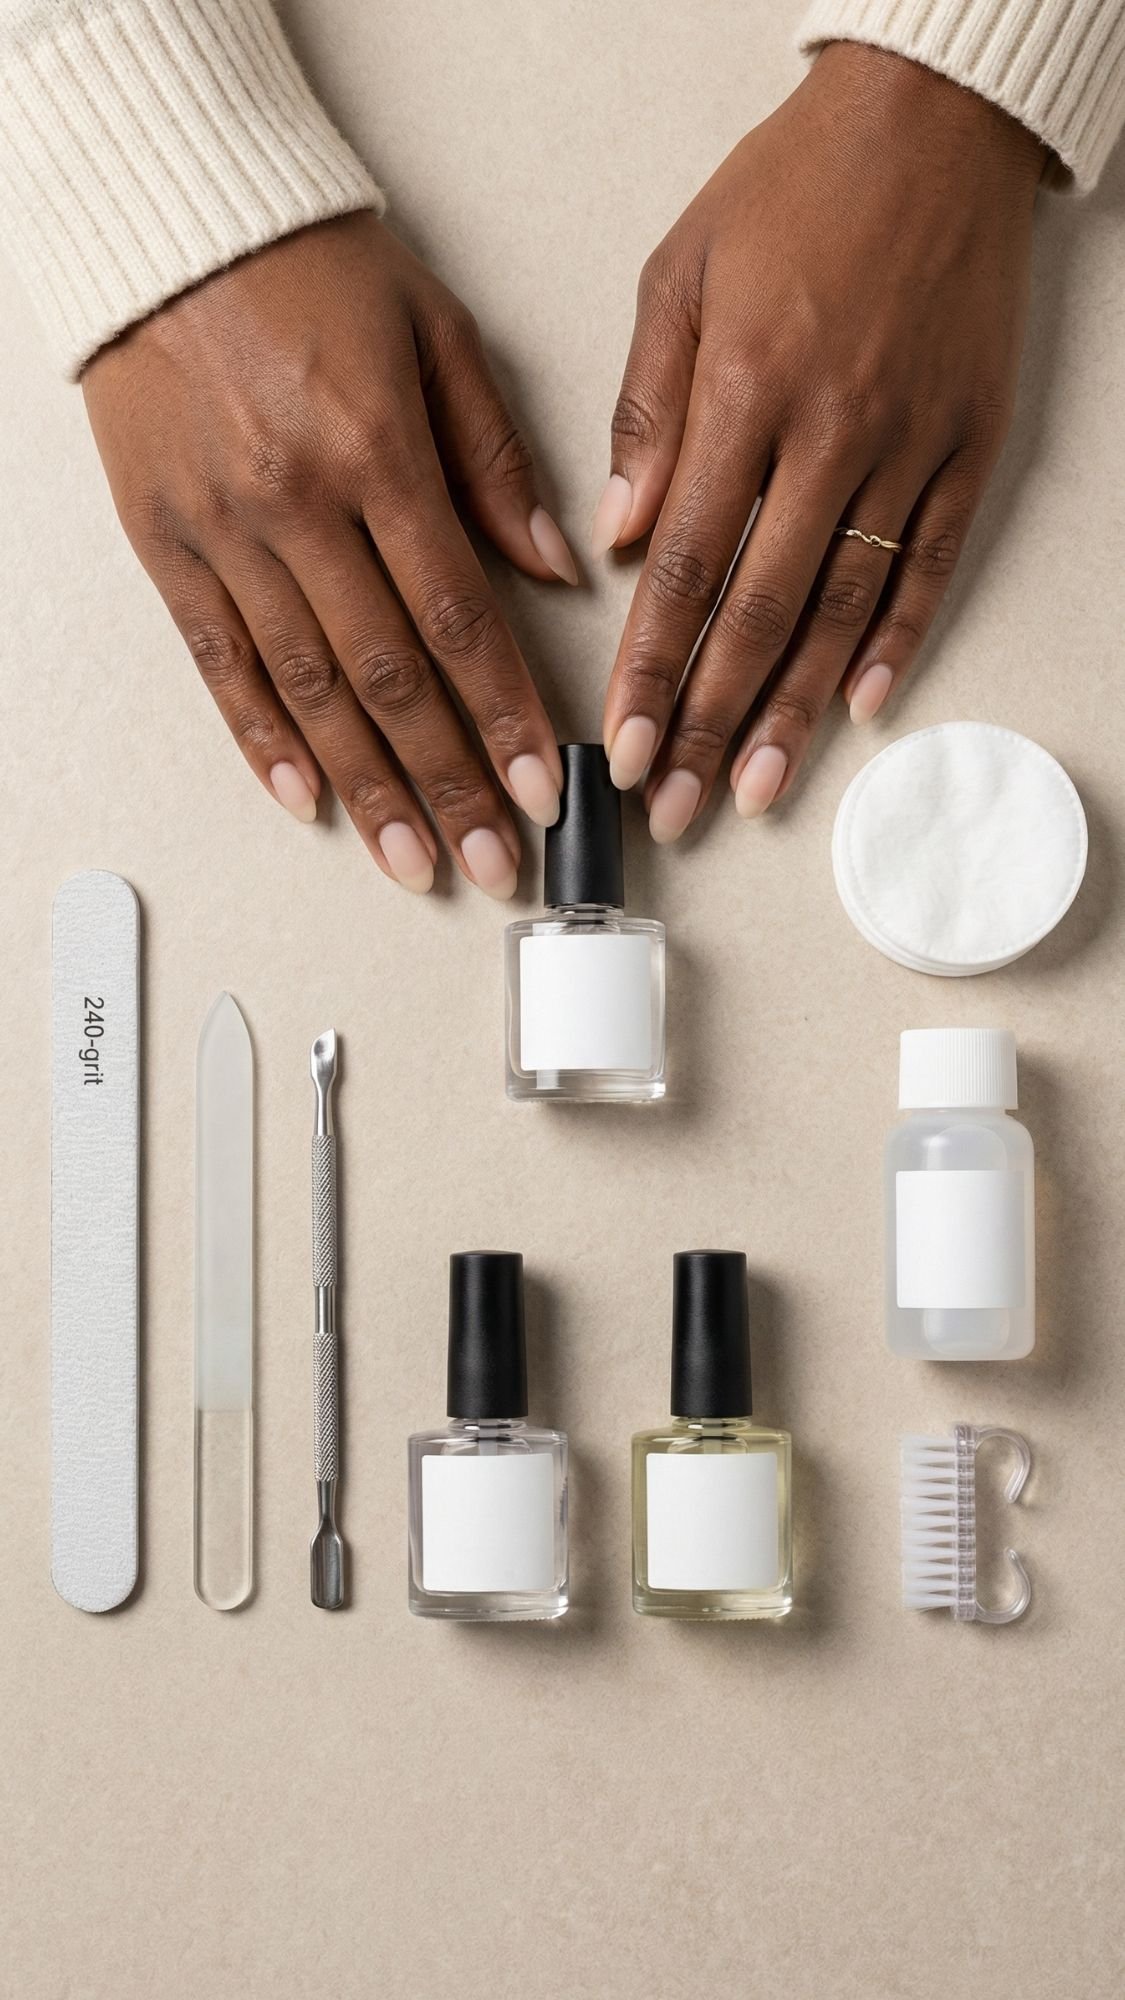
Tools + Products You Actually Need (Must-Haves vs Nice-To-Haves)
Let’s keep this real, you do not need a drawer full of gadgets to get flattering almond nails. You need a few basics that do the heavy lifting: shape control, clean cuticle edges, and a glossy finish that lasts. The mistake most people make is buying cute nail art stuff first, then using a flimsy file and wondering why their shape looks uneven. Start with the boring tools. They make everything else look expensive.
Must-Haves (Buy These First)
- Nail file (180 to 240 grit)
- What to look for: a quality file that feels firm, not bendy.
- Why it matters: it shapes smoothly without shredding the free edge.
- Pro tip: use 240 grit for natural nails if you peel easily.
- Cuticle pusher
- What to look for: gentle edge, comfortable grip.
- Why it matters: clean cuticle lines help polish grip and look crisp.
- Nippers (only for hangnails)
- What to look for: sharp, precise tip.
- Why it matters: ragged hangnails make everything look messy fast.
- Common mistake + fix: cutting living cuticle, stop, only snip what’s already lifting.
- Lint-free pads
- What to look for: no fuzz.
- Why it matters: cotton fuzz under polish ruins smoothness and causes lifting.
- Dehydrator option
- Pick one: acetone, or 70% isopropyl alcohol.
- Why it matters: removes oil and residue so base coat grips.
- Base coat
- Choose based on your nails:
- Ridge-filling base if you see texture
- Sticky base if you chip quickly
- Strengthening base if you bend and tear easily
- Common mistake + fix: using the wrong base, match it to the problem.
- Choose based on your nails:
- Top coat
- What to look for: high shine, fast leveling.
- Why it matters: top coat decides how expensive your manicure looks.
- Sensory detail: a good quick-dry topcoat smells sharp for a few seconds and feels slightly tacky before it levels into that smooth glass finish.
Nice-To-Haves (They Make Life Easier)
- Cleanup brush
- Why it matters: it fixes sloppy edges and makes the cuticle line look salon-clean.
- Budget hack: a small angled eyeliner brush works great.
- Quick-dry drops
- Why it matters: reduces denting if you always mess up your nails right after painting, which, same.
- Ridge filler or blurring base
- Why it matters: gives that smooth “gel-like” look with regular polish.
- Dotting tool + striping brush
- Why it matters: easy nail art without chaos.
- Budget hack: use a bobby pin tip for dots and a thin paintbrush for lines.
What I’d Skip Until You Nail the Basics
- Most “strengthening” gimmick kits if your nails peel from over-buffing or harsh removal.
- Random cheap files in bulk packs, they shred edges and make shaping harder.
Key Takeaways
- A good file and top coat do more for flattering almond nails than any nail art.
- Match your base coat to your problem, chips, ridges, or peeling.
- A cleanup brush makes everything look pro, even if your hand shakes a little.
Step-By-Step Application, Regular Polish Method (The “Looks Like Gel, Removes Like Polish” Route)
If you want almond nails that flatter your hands and survive real life, you need two things, thin coats and patience for dry time. I know, patience sounds boring, but so does repainting your nails every other day, so pick your struggle. Ever wondered why your polish looks thick at the cuticle but bare at the tip? Brush control and coat thickness cause that, not bad luck.
Step 1: Base Coat, Pick The Right One For Your Nail Type
What to use (product category): base coat
What to look for:
- Ridge-filling base if you see texture or little ripples
- Sticky, grippy base if your polish chips fast
- Strengthening base if your nails bend and tear, but do not stack five “strengtheners” at once
How to apply:
- Use one thin coat, then cap the free edge with the leftover on the brush.
- Keep the base coat off your skin, it should sit on the nail only.
Why it matters:
- Base coat acts like double-sided tape for polish. It grips the nail plate and prevents staining.
Common mistake + fix:
- Mistake: you apply base coat like you paint a wall.
- Fix: wipe one side of the brush, then apply a thin layer that looks slightly glossy, not wet and thick.
Sensitive-nail alternative:
- If you peel easily, use ridge filler and skip buffing, then keep removal gentle.
Step 2: Color, The Thin Coat Technique That Changes Everything
What to use: polish color, crème, jelly, sheer, shimmer
What to look for:
- For “flatter every hand,” start with sheer milky, blush nude, jelly pink, or soft beige.
- Choose formulas that self-level. Thick, sticky polish fights you.
How to apply (my go-to 3-stroke method):
- Wipe one side of the brush on the bottle neck. Keep a small bead on the other side.
- Place the bead slightly away from the cuticle, then gently push it closer without flooding.
- Pull down the center, then one stroke down each side.
- Repeat for coat two, still thin.
Why it matters:
- Thin coats dry evenly and resist dents.
- On almond nails, thin coats keep the taper crisp instead of bulky.
Common mistake + fix:
- Mistake: thick coats to “finish faster.”
- Fix: do 2 to 3 thin coats instead. Thin looks smoother, lasts longer, and photographs better.
Micro pro tip for extra flattering almond:
- Keep the sidewalls clean. When polish pools on the sides, the nail looks wider.
Step 3: Dry Time Strategy (So You Stop Smudging Everything)
What to do:
- Wait 2 to 4 minutes between thin color coats.
- After top coat, give yourself 15 to 20 minutes before you do anything risky like jeans buttons or keys. Yes, I said it.
Why it matters:
- Polish can feel dry on top but stay soft underneath. That’s how you get mystery dents.
Common mistake + fix:
- Mistake: waving hands in the air like that speeds drying.
- Fix: use a quick-dry top coat and stop touching things.
Step 4: Top Coat, Make It Glossy and Locked In
What to use: glossy top coat (quick-dry or long-wear)
What to look for:
- High shine and good leveling
- A brush wide enough to cover the nail in 2 passes
How to apply:
- Apply a generous but controlled layer.
- Cap the free edge with the top coat, especially on almond tips.
- Clean the cuticle line with a brush before it sets.
Why it matters:
- Top coat decides your finish, your shine, and how long your manicure stays smooth.
Sensory detail:
- A great top coat smells sharp for a few seconds, then it levels and the surface goes from slightly tacky to that glass-slick feel.
Common mistake + fix:
- Mistake: you skip capping the free edge.
- Fix: cap it every time, chips love exposed edges.
Step 5: The Re-Top Schedule (This Is The “My Nails Always Look Fresh” Trick)
- Reapply top coat on day 3 or day 4.
- Cap the free edge again.
- Add cuticle oil at night once the coat sets.
Key Takeaways
- Thin coats beat thick coats, every time.
- Cap the free edge on base and top coat, almond tips need it.
- A day 3 re-top makes a regular polish manicure look salon-fresh longer.

Longevity + Maintenance Plan (Day 1 Through Day 7)
You finished your almond manicure, it looks glossy, it looks expensive, and now you want it to stay that way. You can absolutely make regular polish last a full week if you treat it like jewelry, not like armor. I see the same pattern every time, people do gorgeous nails, then they deep-clean the kitchen with bare hands and act shocked when the tips chip. Would you wear suede heels in the rain and blame the shoes? Exactly.
Here’s the simple maintenance plan I use when I want my nails to look fresh without repainting them midweek.
Day 1: Lock It In
- Avoid hot water for the first couple hours, especially right after top coat.
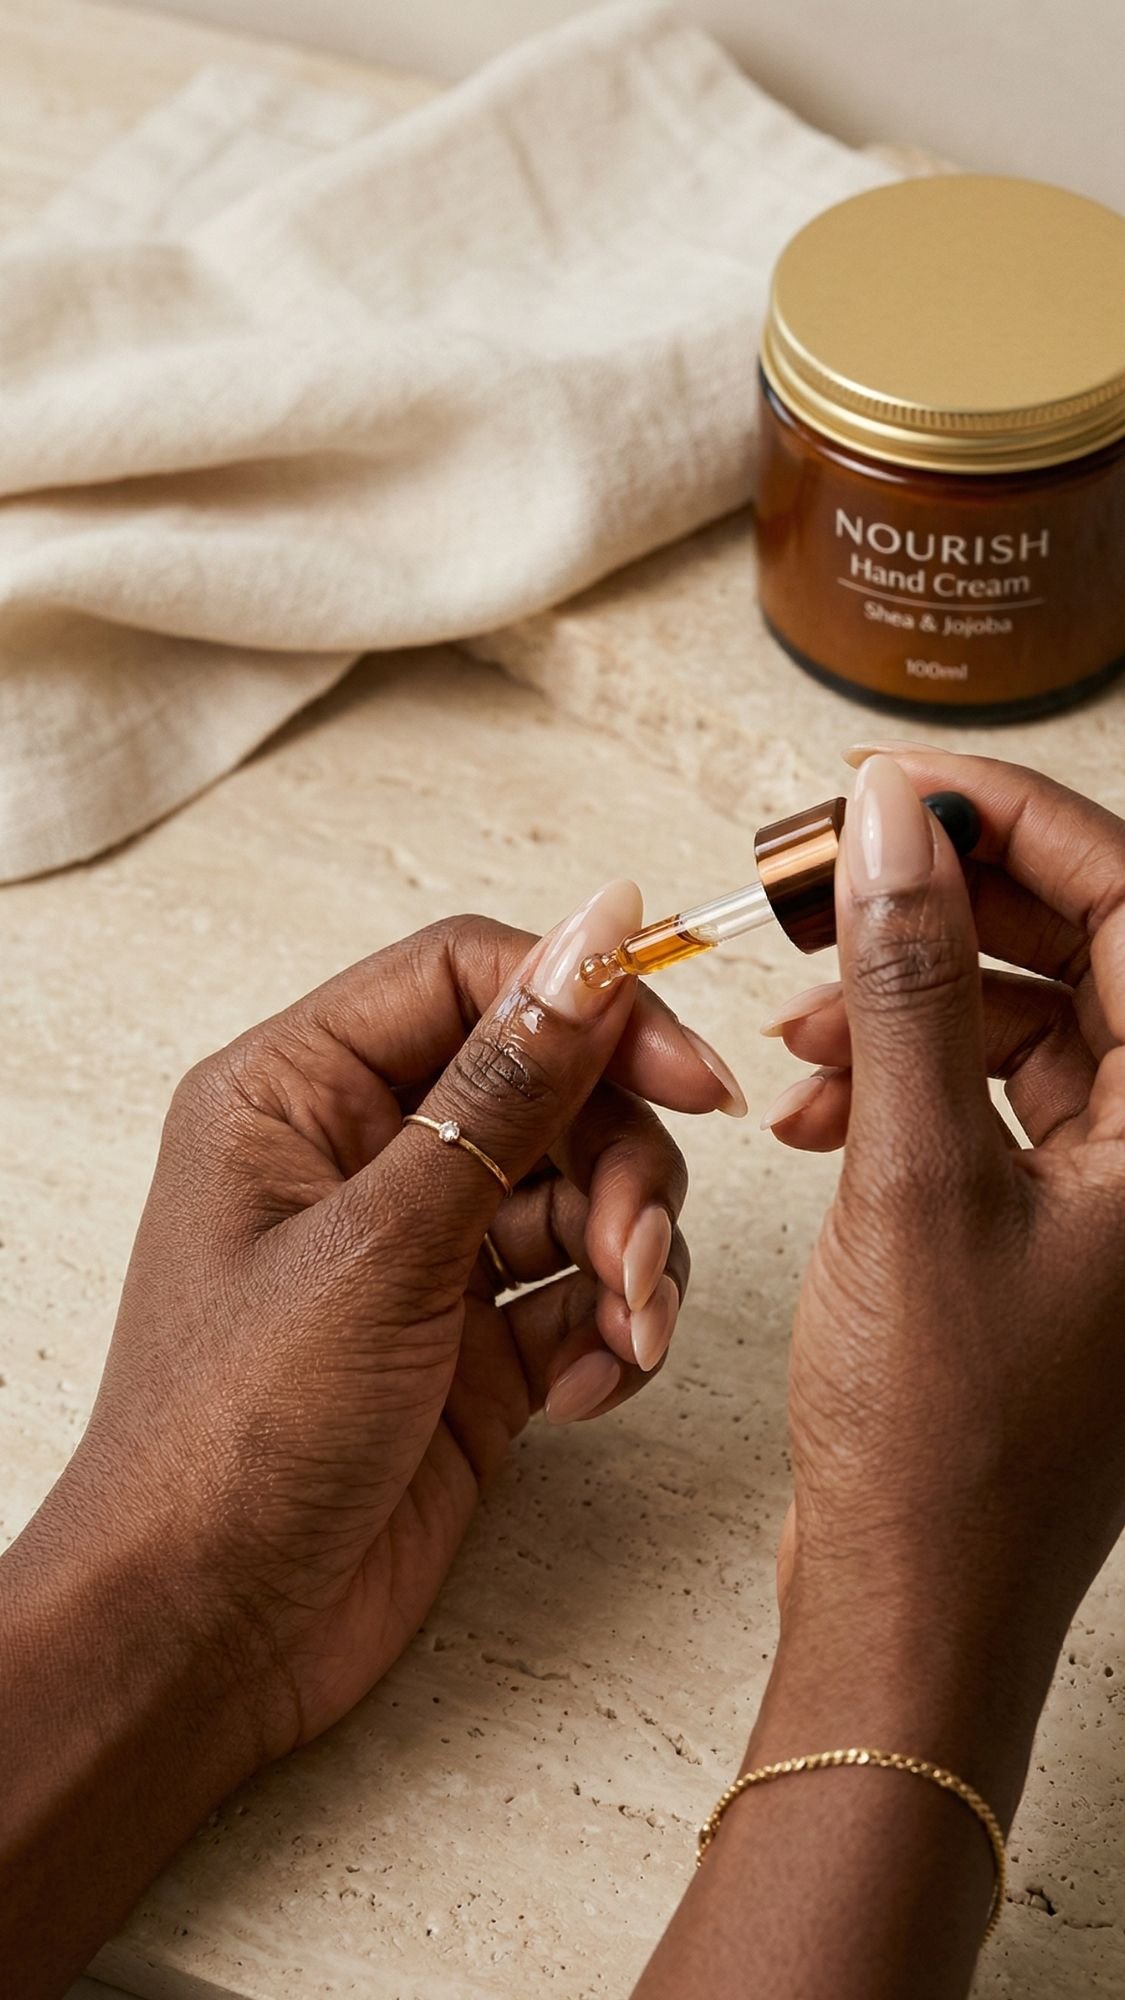
- Use cuticle oil once the polish fully sets.
- Pro tip: I rub oil around the cuticle, then I press my fingertip pad into the oil for 2 seconds, it softens the skin without making the nail plate slippery.
Day 2: Prevent Micro Chips Before They Start
- Apply hand cream after every hand wash.
- Add a tiny drop of cuticle oil at night.
- Keep a nail file nearby and smooth any tiny snag immediately, because snags turn into chips fast.
Day 3: The “Fresh Manicure Again” Reset
- Add one thin coat of top coat.
- Cap the free edge again.
- If you see dullness, the fresh top coat brings the shine line back instantly.
Day 4: Protect The Shape
- Wear gloves for dishes, cleaning, hair dye, anything that soaks hands.
- Keep nails out of hot baths and long showers when you can.
- If you love long showers, at least oil after, your cuticles will feel less tight and dry.
Day 5: Spot Fix Without Repainting Everything
- If you get a small chip, lightly file the edge smooth.
- Add a dab of color just on the chipped area, then top coat the full nail.
- Pro tip: keep the patch thin so it does not create a bump that catches your hair.
Day 6: Watch The Cuticle Line
- Remove any hangnails gently, do not rip them.
- Oil at night, then seal with a thicker hand cream.
- Sensory detail I always notice, a good hand cream feels slightly waxy for 10 seconds, then it melts in and leaves that soft “glove” feeling.
Day 7: Remove Like You Love Your Nails
- Use remover and patience, do not peel.
- Wash, dry, then oil immediately after removal.
- If you plan to repaint, wait an hour after oiling so your base coat grips.
Quick Fixes That Save A Manicure
- Snagged tip: file it smooth, then top coat the edge.
- Dull shine: top coat refresh on day 3 or day 4.
- Polish lifting at the side: trim the lifted bit carefully, patch with color, then seal with top coat.
Key Takeaways
- A manicure lasts longer when you treat it like a finish, not a chore tool.
- Day 3 re-topcoat gives you the biggest payoff for the least effort.
- Oil helps nails look better, but you apply it at the right time so it doesn’t ruin adhesion.
Troubleshooting, Fix It Like A Pro (Before You Rage-Quit Your Manicure)
Let’s be honest, most nail “problems” come from three things, too much product, not enough dry time, or a nail plate that still has oil on it. Ever painted your nails, felt proud, then spotted bubbles like your polish just got the hiccups? Same. The good news, you can fix almost everything without starting over.
1) Polish Pooling At The Cuticle
What’s happening: You’re flooding the cuticle area, then the polish lifts faster and looks messy.
Fix it:
- Wipe one side of the brush, keep less product.
- Place the bead slightly away from the cuticle, then nudge it close.
- Use a cleanup brush with acetone before it sets.
Common cause: you hold your finger angled down while painting, gravity drags polish into the cuticle.
Quick save: tilt your fingertip slightly up while you paint.
2) Streaky Polish
What’s happening: Your coats go on too dry, or you overwork the brush.
Fix it:
- Use thin coats, but not “dry brush” thin.
- Float the brush, do 3 strokes, then stop touching it.
- Add a leveling top coat, it smooths minor streaks.
Pro tip: Some sheer nudes streak on purpose. I apply three thin coats instead of two and let each one set for a couple minutes.
3) Bubbles In Polish
What’s happening: Air gets trapped from shaking the bottle, thick coats, or airflow.
Fix it:
- Roll the bottle between your palms, do not shake it.
- Paint away from fans and vents.
- Let the polish rest for a minute after you open it.
Quick reality check: Thick coats bubble more, because the surface skins over while the layer underneath stays wet.
4) Top Coat Shrinkage At The Tips
What’s happening: The top coat pulls back as it dries, usually because you did not seal the edge, or you waited too long after color.
Fix it:
- Top coat while the color still feels slightly tacky, not fully cured-dry.
- Cap the free edge every time.
- Swap to a different top coat if shrinkage keeps happening, some formulas do it more.
5) Chipping In 24 to 48 Hours
What’s happening: Oil, water, or flexing breaks the seal.
Fix it:
- Dehydrate nails right before base coat, then avoid touching the nail plate.
- Cap the free edge on base and top coat.
- Choose a base coat that matches your issue, sticky base for chips, ridge filler for texture.
Pro tip: If you chip at the same nail every time, you probably use that finger like a tool. I know, I know, but stop opening cans with your nails.
6) Peeling Nails Under Polish
What’s happening: Over-buffing, picking polish off, harsh removal, or dehydration.
Fix it:
- Stop buffing unless you absolutely need it.
- Remove polish gently, do not peel it.
- Use cuticle oil daily, morning and night.
- Use a ridge-filling base, it smooths without thinning your nail plate.
Watch for this: If your nail surface looks matte and chalky, you buffed too much.
7) Rough, Angry Cuticles
What’s happening: You cut too much, you skip oil, or you wash hands constantly.
Fix it:
- Oil twice a day, then seal with hand cream at night.
- Trim only hangnails, do not “clean up” live cuticle.
- Wear gloves for cleaning, even quick chores.
Fast improvement trick: Apply oil, then rub it in for 20 seconds. The warmth helps it sink in.
Key Takeaways
- You fix most manicure problems with less product, better timing, and cleaner prep.
- If you only change one thing, cap the free edge.
- A cleanup brush saves the cuticle line, and your sanity.
Nail Health + Recovery (So Your Natural Nails Don’t Hate You)
If you want almond nails to flatter your hands long-term, you have to treat your natural nails like the foundation, not an afterthought. I’ve noticed over the years that most “weak nails” don’t actually start weak, they get weak from peeling polish off, over-buffing, and living in water without protection. Do you know what wrecks nails faster than a dark polish stain? Picking at a tiny lift like it’s a scratch-off ticket. It strips layers off the nail plate, then you end up with peeling that makes every manicure look rough.
The Simple Strength Routine (5 Minutes A Day)
- Cuticle oil, twice daily
- Massage oil into the cuticle and the sidewalls, then swipe whatever’s left across the nail surface.
- Pro tip: I oil after handwashing at night, then I add hand cream on top so it actually stays put.
- Hand cream after every wash
- It sounds basic, but consistency changes everything.
- Sensory detail: a richer cream can feel a little waxy for 10 seconds, then it melts in and leaves that soft “glove” finish.
- Gloves for wet chores
- Dishes, cleaning, hair dye, anything that keeps hands damp.
- Water makes nails swell and shrink, and that flexing can lead to more peeling.
What Helps vs What’s Hype (Real Talk)
- Helps: gentle shaping with a fine file, cuticle oil consistency, careful removal, a ridge-filling base coat if you have texture.
- Helps: keeping almond length realistic for your lifestyle, because long fragile tips snap and start a peel cycle.
- Hype, for most people: aggressive buffing to “smooth everything,” because it usually creates more peeling later.
- Hype, sometimes: stacking multiple “strengtheners” at once. Too many layers can feel hard, then they crack and peel.
Breaks Between Manicures, When You Actually Need Them
You don’t need a break just because TikTok yelled at you. Take a short break if you see:
- Peeling layers at the tip that keep spreading
- Soreness, thinning, or tenderness when you press the nail plate
- White, chalky patches from over-buffing
What to do on a break:
- Keep nails shorter and softly almond.
- Oil twice a day, hand cream after every wash.
- Use a clear ridge filler or a sheer protective polish if you want a tidy look without heavy layers.
Safe Removal, No Ripping, No Drama
- Use remover and a lint-free pad, press and hold for a few seconds, then wipe.
- If glitter or heavy layers fight you, give it more time instead of scraping.
- Pro tip: after removal, wash, dry, then oil immediately. Your nails will feel tight and dry without it.
When To See A Professional
If you notice pain, swelling, warmth, green discoloration, a weird odor, or lifting that spreads, skip the DIY fixes and see a licensed nail pro or a dermatologist. You don’t need to play detective with nail health when your body clearly asks for help.
Key Takeaways
- Nail health comes from gentle habits, not aggressive tools.
- Oil plus hand cream beats random “miracle” strength tricks.
- Careful removal protects your nail plate, and your next manicure looks smoother.
Shade + Shape Guidance (Make Almond Nails Look Even More Flattering)
Almond nails already do a lot of the heavy lifting, but color placement and taper choices can make the effect even stronger. I’ve noticed that most people blame their hand shape when a manicure looks “off,” but the issue usually comes from two things, the tip width and the color contrast. Ever tried a thick French tip and thought, why do my nails suddenly look wider? That’s exactly why.
Shape Rules That Flatter Every Hand
If you want your fingers to look longer
- Keep the almond taper gradual, not sharp.
- Aim for a tip that looks softly rounded, not pointy.
- Keep the sidewalls clean so the nail looks slimmer.
If you have wide nail beds
- Choose a slightly narrower tip, but do not over-file the sides.
- Avoid thick French tips, they widen the look.
- Ask for a micro French or a soft ombré instead, both visually narrow the nail.
If your nails flare at the free edge
- File in tiny increments.
- Check symmetry by holding hands up at eye level and comparing shape side-by-side.
- Do not chase perfection by filing “one more time,” that’s how you thin the edges.
If your nails curve down
- Keep the length short to medium.
- Use softer almond, more rounded tip.
- Skip super sharp tapers that make the downward curve look more dramatic.
Shade Picks That Flatter Different Skin Tones and Undertones
This is where people get frustrated, because “nude” isn’t one color. Nude should match your undertone vibe, not disappear completely.
If you have warm undertones
- Try peachy nudes, caramel, honey beige, warm pinks, soft browns
- Warm sheers look “healthy” instead of chalky.
If you have cool undertones
- Try rosy beige, mauve nudes, soft berry sheers, milky pinks
- Cool nudes keep the hand looking bright and balanced.
If you have neutral undertones
- You get the most options, lucky.
- Try milky beige, blush nude, soft taupe, jelly pink
Pro tip that saves a lot of disappointment
- If a nude looks gray or ashy on you, pick one shade warmer or add a sheer pink glaze over it. That tiny warmth makes hands look more lively.
Color Placement Tricks That Make Hands Look Longer
- Micro French: thin tip = longer nail bed illusion.
- Ombré: soft gradient blurs the harsh line where nails start.
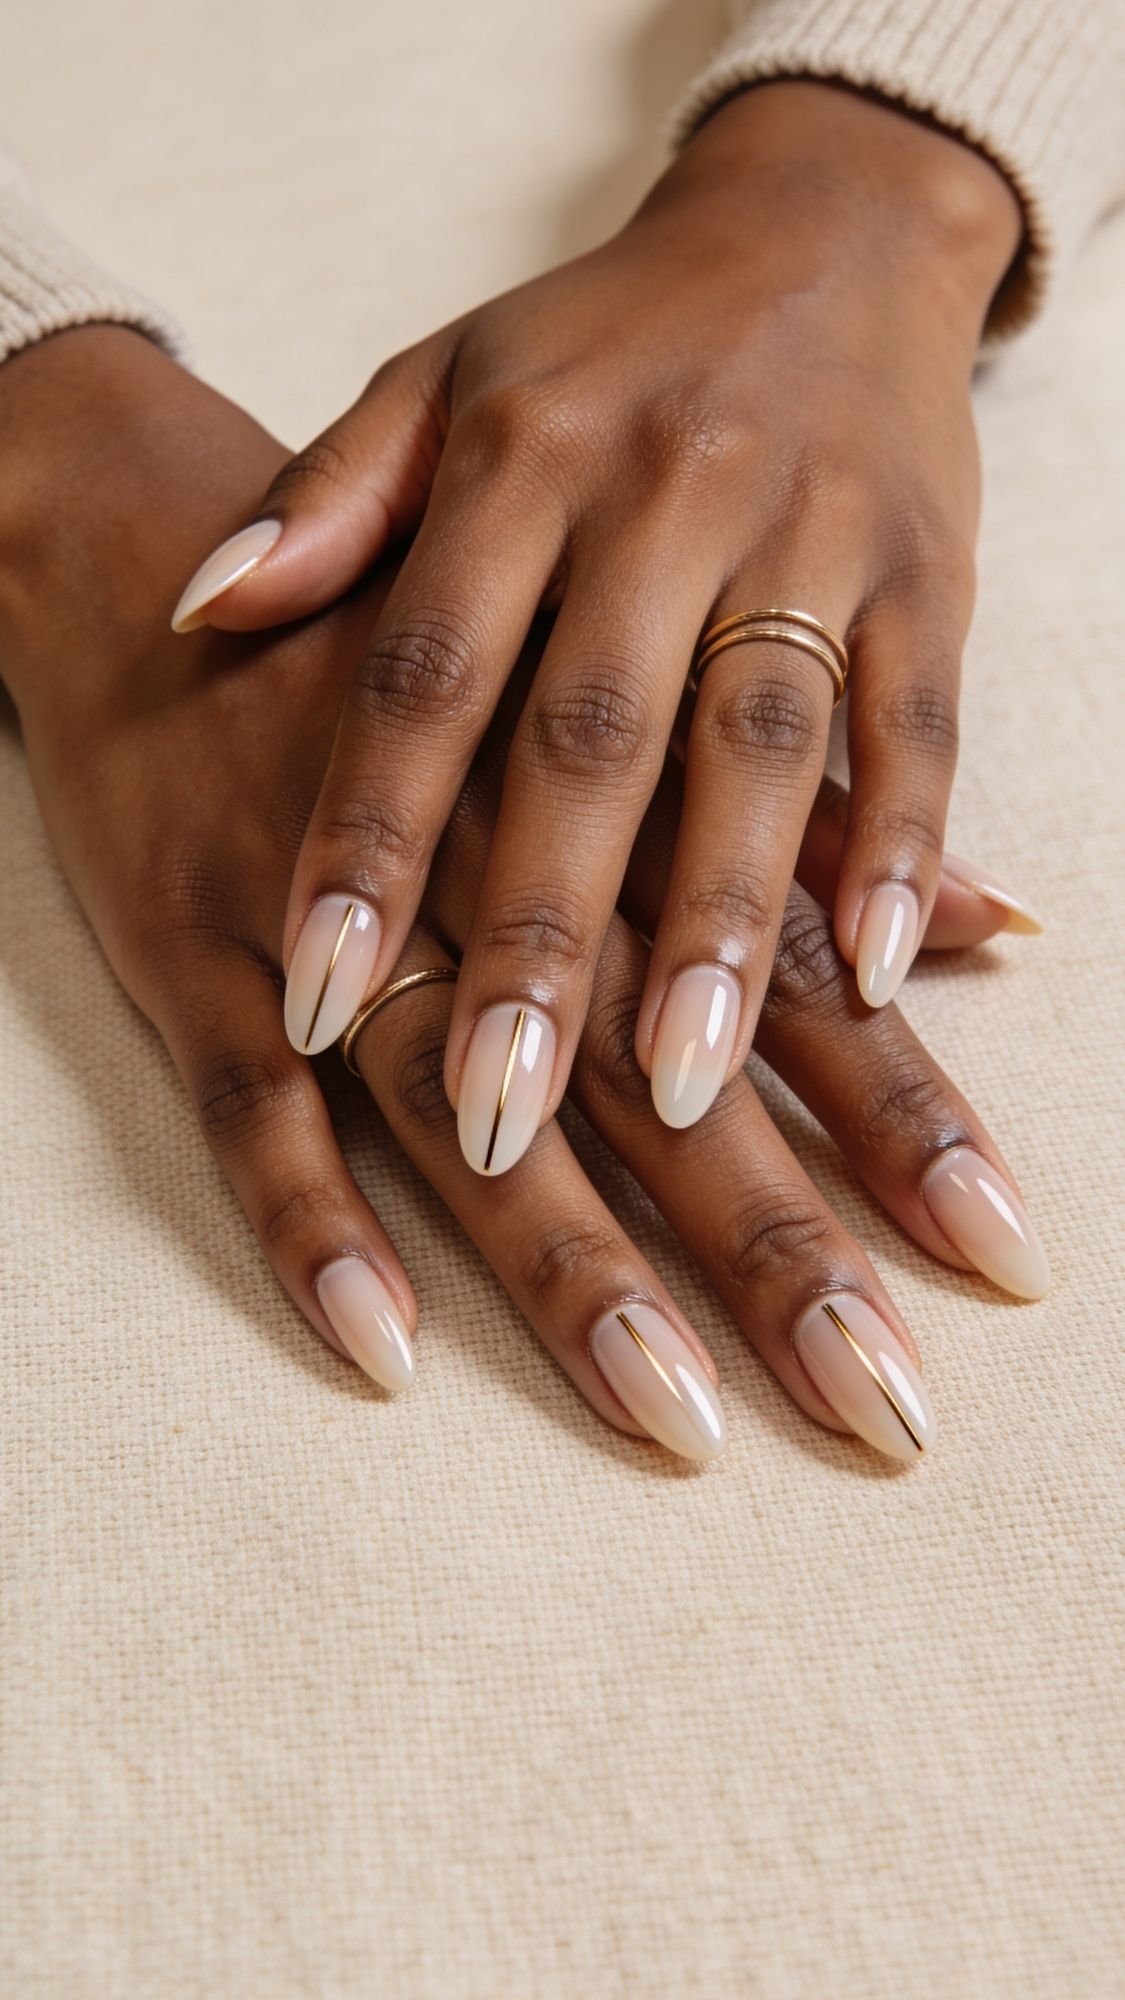
- Vertical accents: thin stripes or a centered chrome beam elongates the nail visually.
- Avoid heavy horizontal lines: thick tips, thick stripes, blocky color blocking can widen the look.
Key Takeaways
- Almond flatters most when the taper stays gradual and balanced.
- “Nude” should match undertone, not vanish completely.
- Micro French, ombré, and vertical accents make hands look longer.
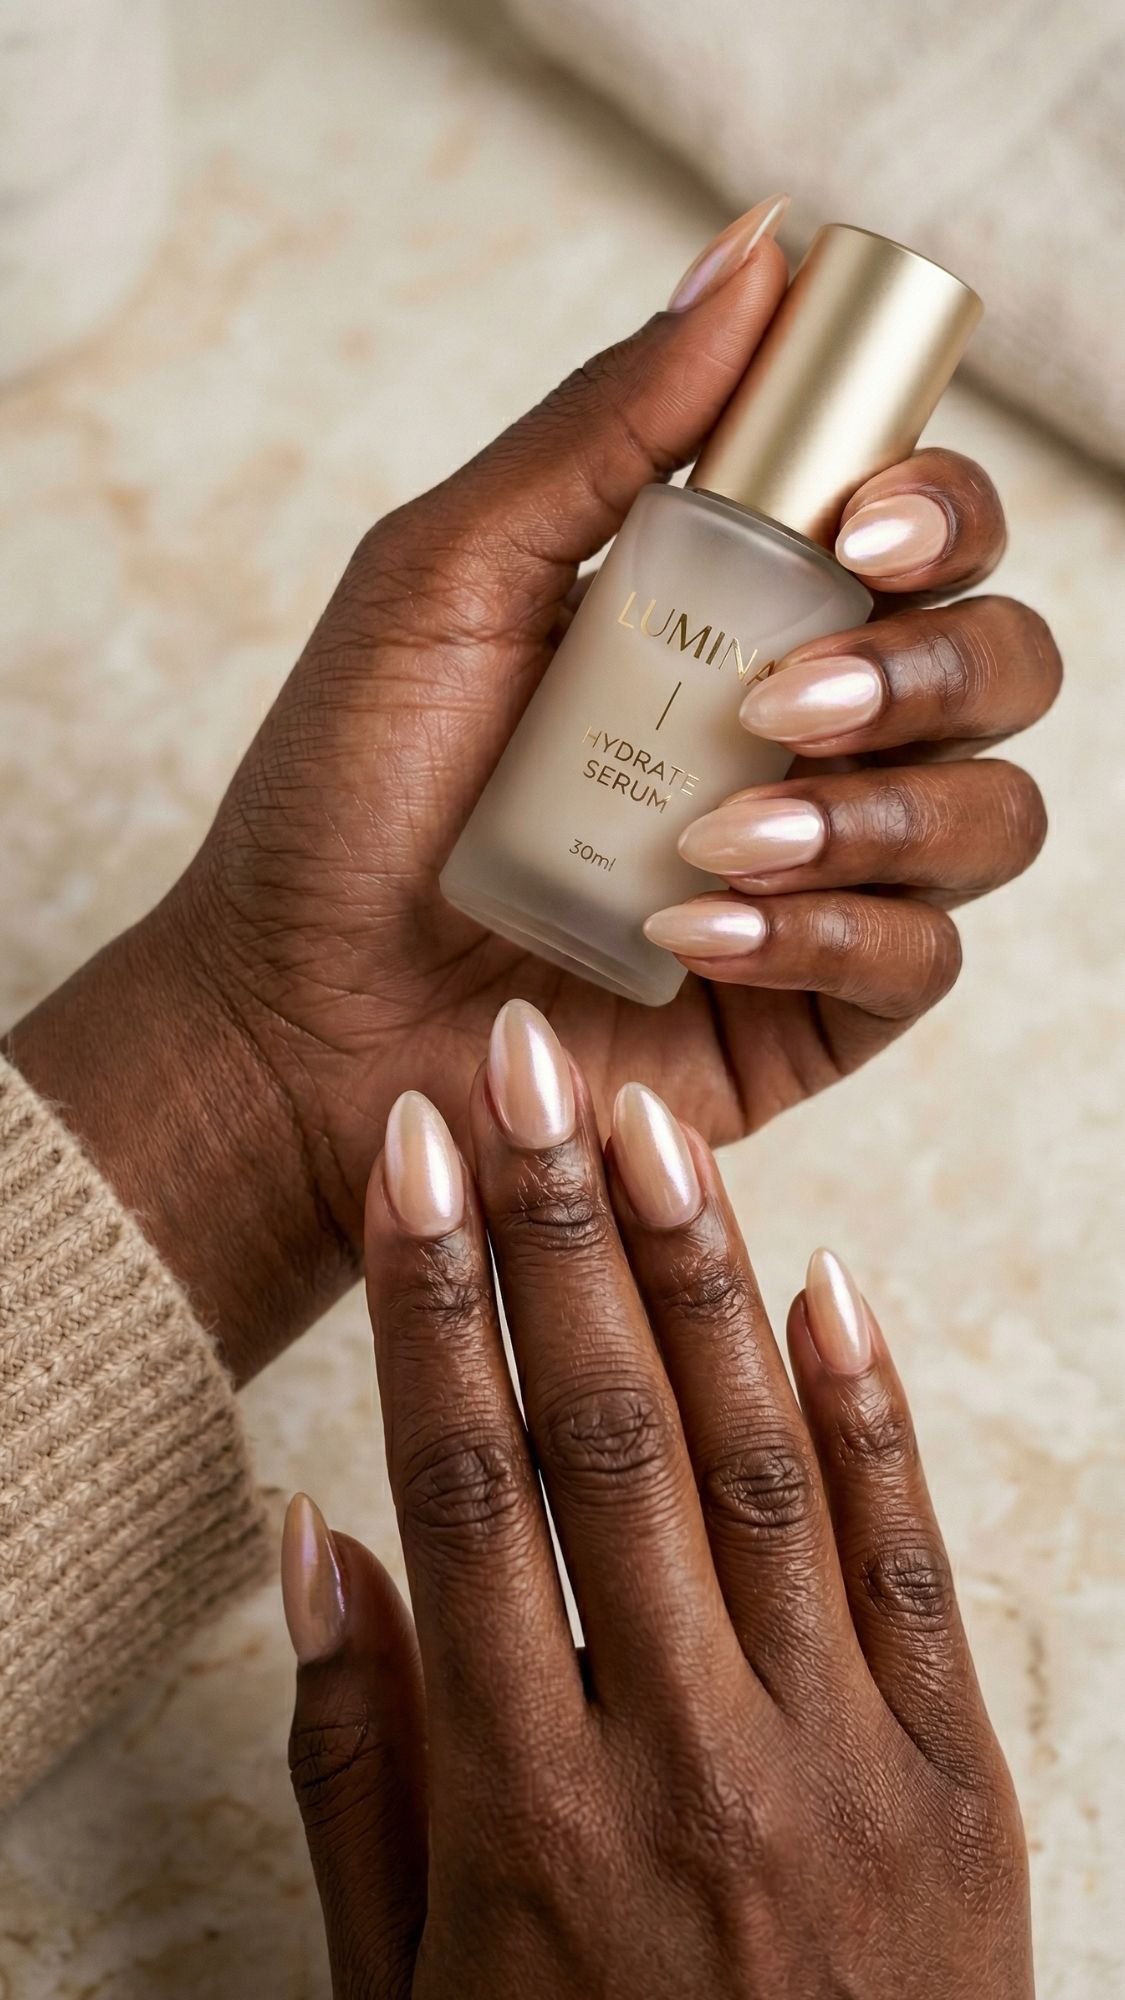
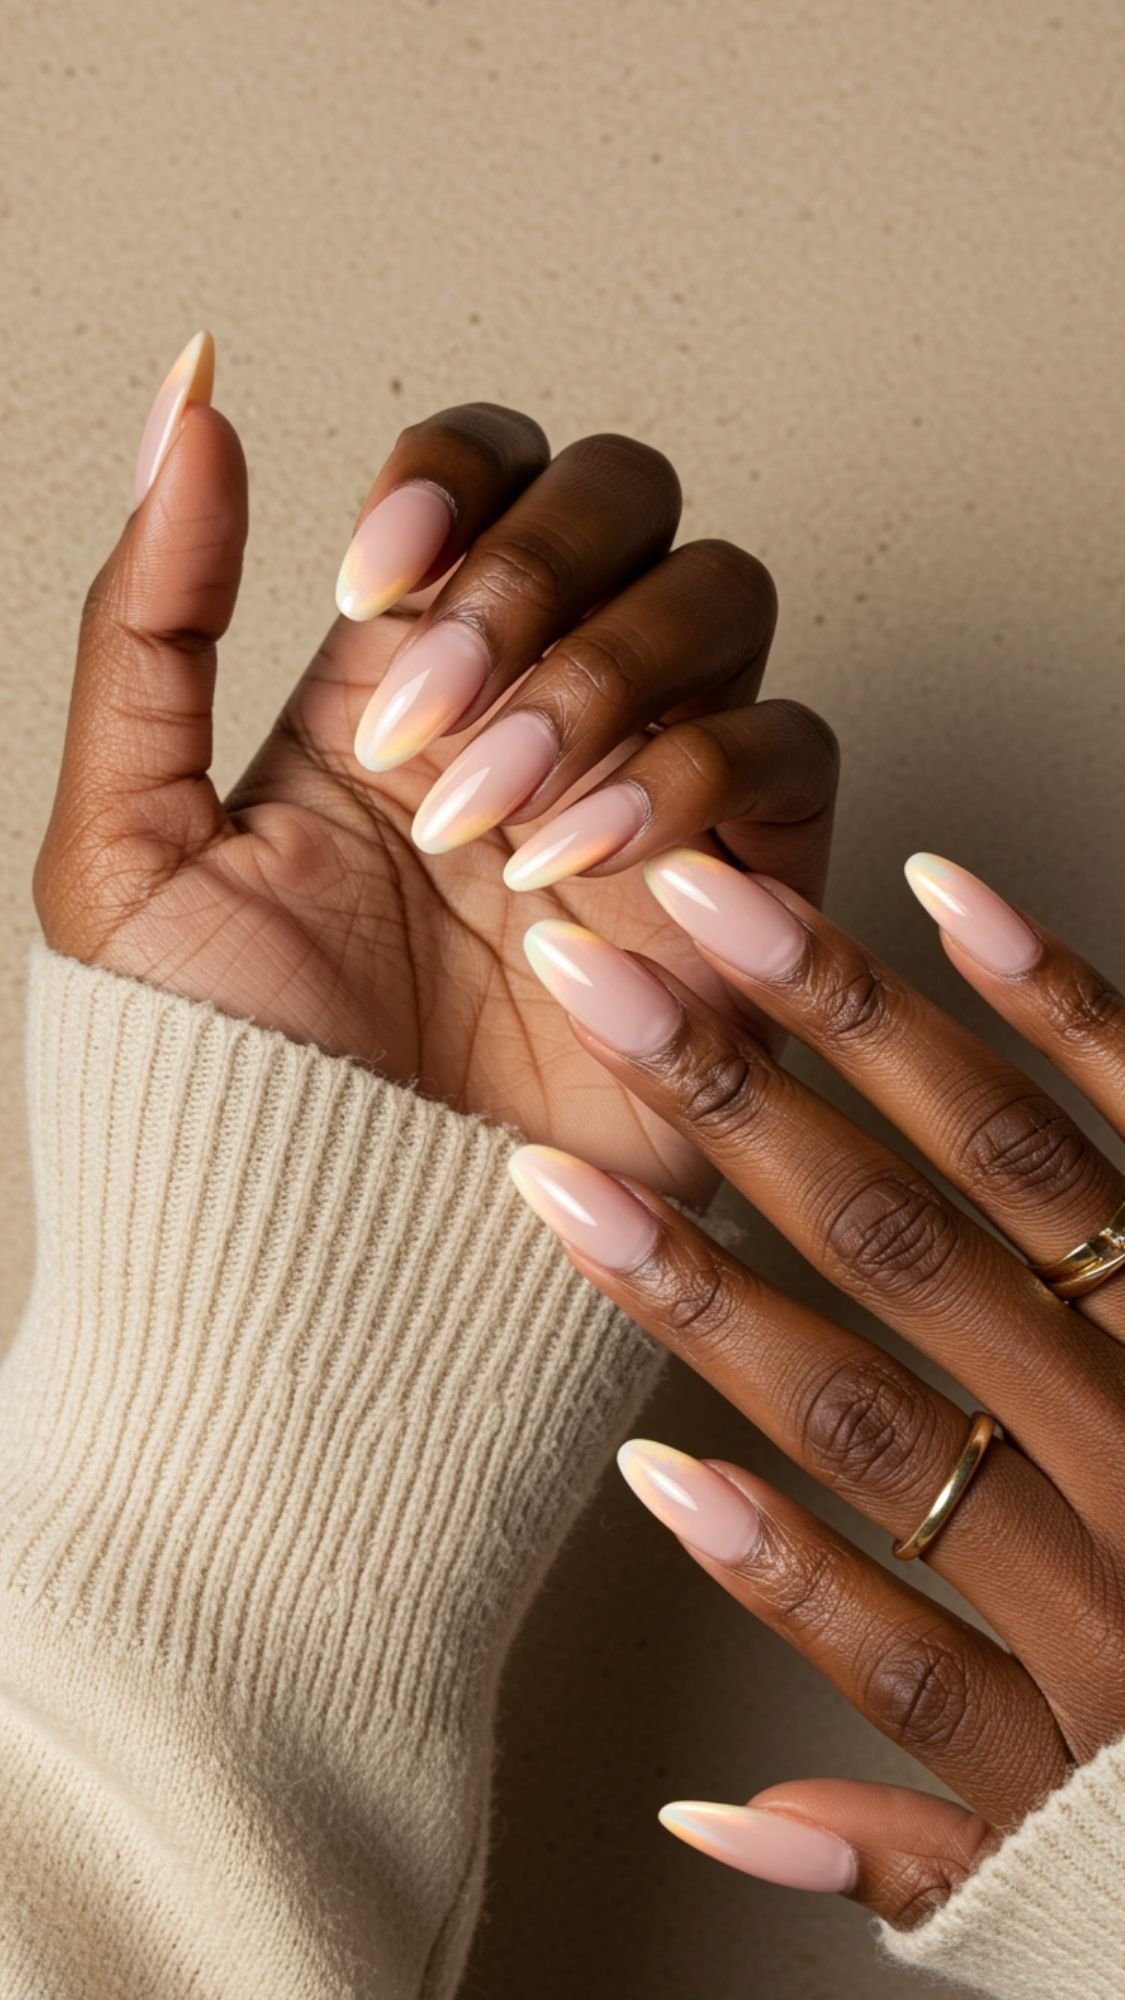
1) Milky “Soap” Almond Nails (The Clean, Glossy Set That Never Betrays You)
Milky soap nails work because they make your hands look instantly cleaner and more polished without screaming for attention. The semi-sheer finish softens ridges and minor discoloration, and the almond shape adds that subtle lengthening effect, so your fingers look more tapered. I’ve noticed this combo flatters every hand because it keeps the contrast low, your eye reads “smooth and glossy” first, not “wow, that color is loud.” Ever seen a nude look a little chalky or harsh? Milky soap avoids that, it looks like your nails, just healthier and shinier.
Why This Flatters Every Hand
- Soft translucency lets your natural tone glow through, so it looks good across skin tones.
- Glossy topcoat creates a clean highlight line that makes nails look longer.
- Almond taper balances wide nail beds without needing bold designs.
How To Choose The Right Milky Shade
- If your hands lean warm, pick a milky beige or peachy milk.
- If your hands lean cool, pick a milky pink or rosy milk.
- If you hate streaks, choose a jelly-milky formula, it levels better than an opaque milky white.
How To Get The Look At Home
- Prep and dehydrate, then apply a thin base coat and cap the edge.
- Apply 2 thin coats of a milky sheer, keep it translucent instead of opaque.
- Apply a glossy topcoat and cap the free edge again.
- Re-top on day 3 for that fresh “wet” shine line.
Sensory detail: a good milky sheer feels slightly slippery as you paint, then it settles smooth, and the shine looks like wet glass once the topcoat levels.
Salon Script (What To Ask For)
- “Short to medium almond, milky sheer nude, super glossy finish, clean cuticle line.”
- If you want extra polish, ask for “a slightly pink milky tone,” it makes hands look brighter.
Common Mistakes + Easy Fixes
- Mistake: you apply the milky shade too thick, it turns chalky.
- Fix: keep it sheer, build in thin layers.
- Mistake: you skip capping the edge, the tips chip fast.
- Fix: cap the free edge with base and top coat, every time.
Sensitive-Nail Alternative
- Use a ridge-filling base instead of buffing.
- Keep length short to medium almond so tips do not flex and peel.
Key Takeaways
- Milky soap nails flatter because they stay low-contrast, glossy, and softly translucent.
- Thin coats keep the finish smooth and not chalky.
- Day 3 re-topcoat keeps the look fresh all week.
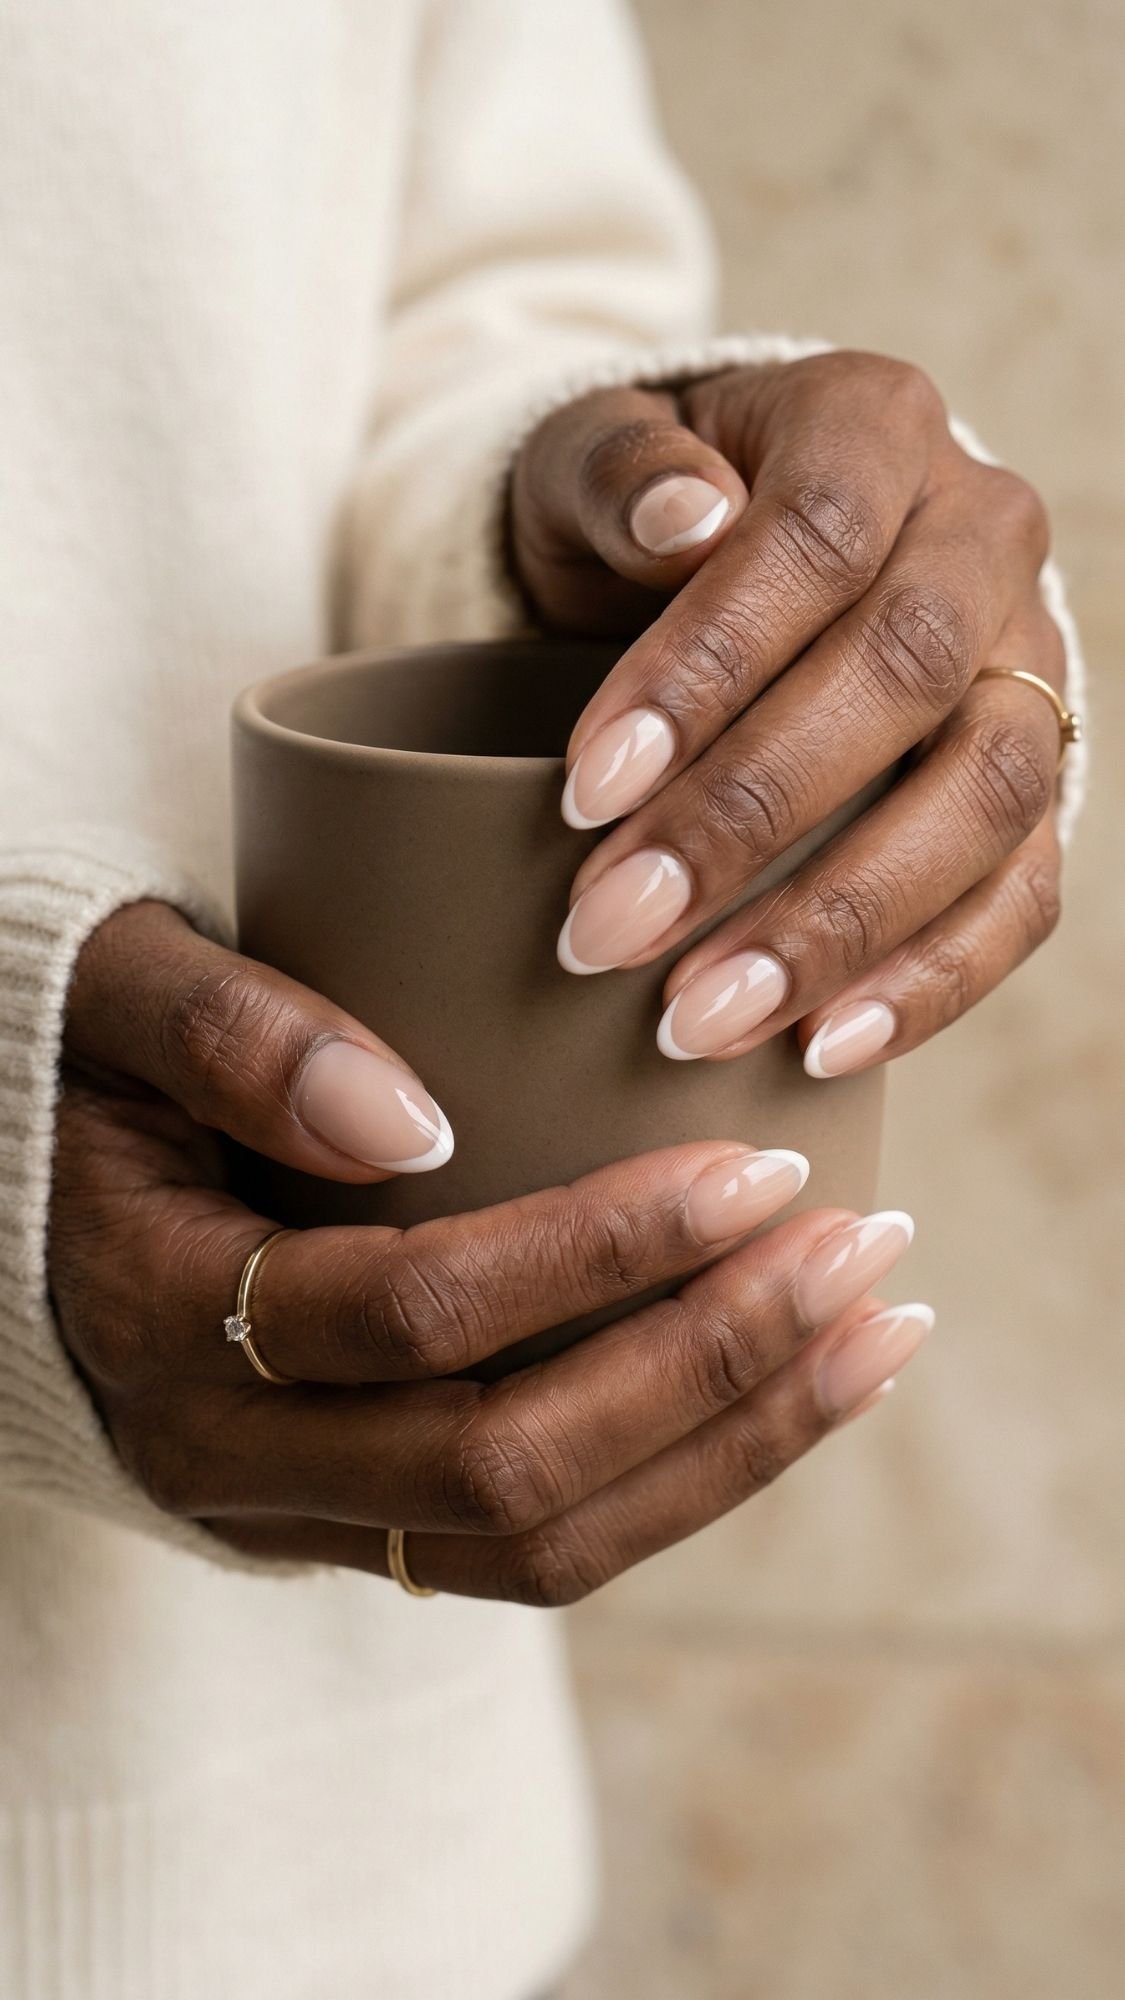
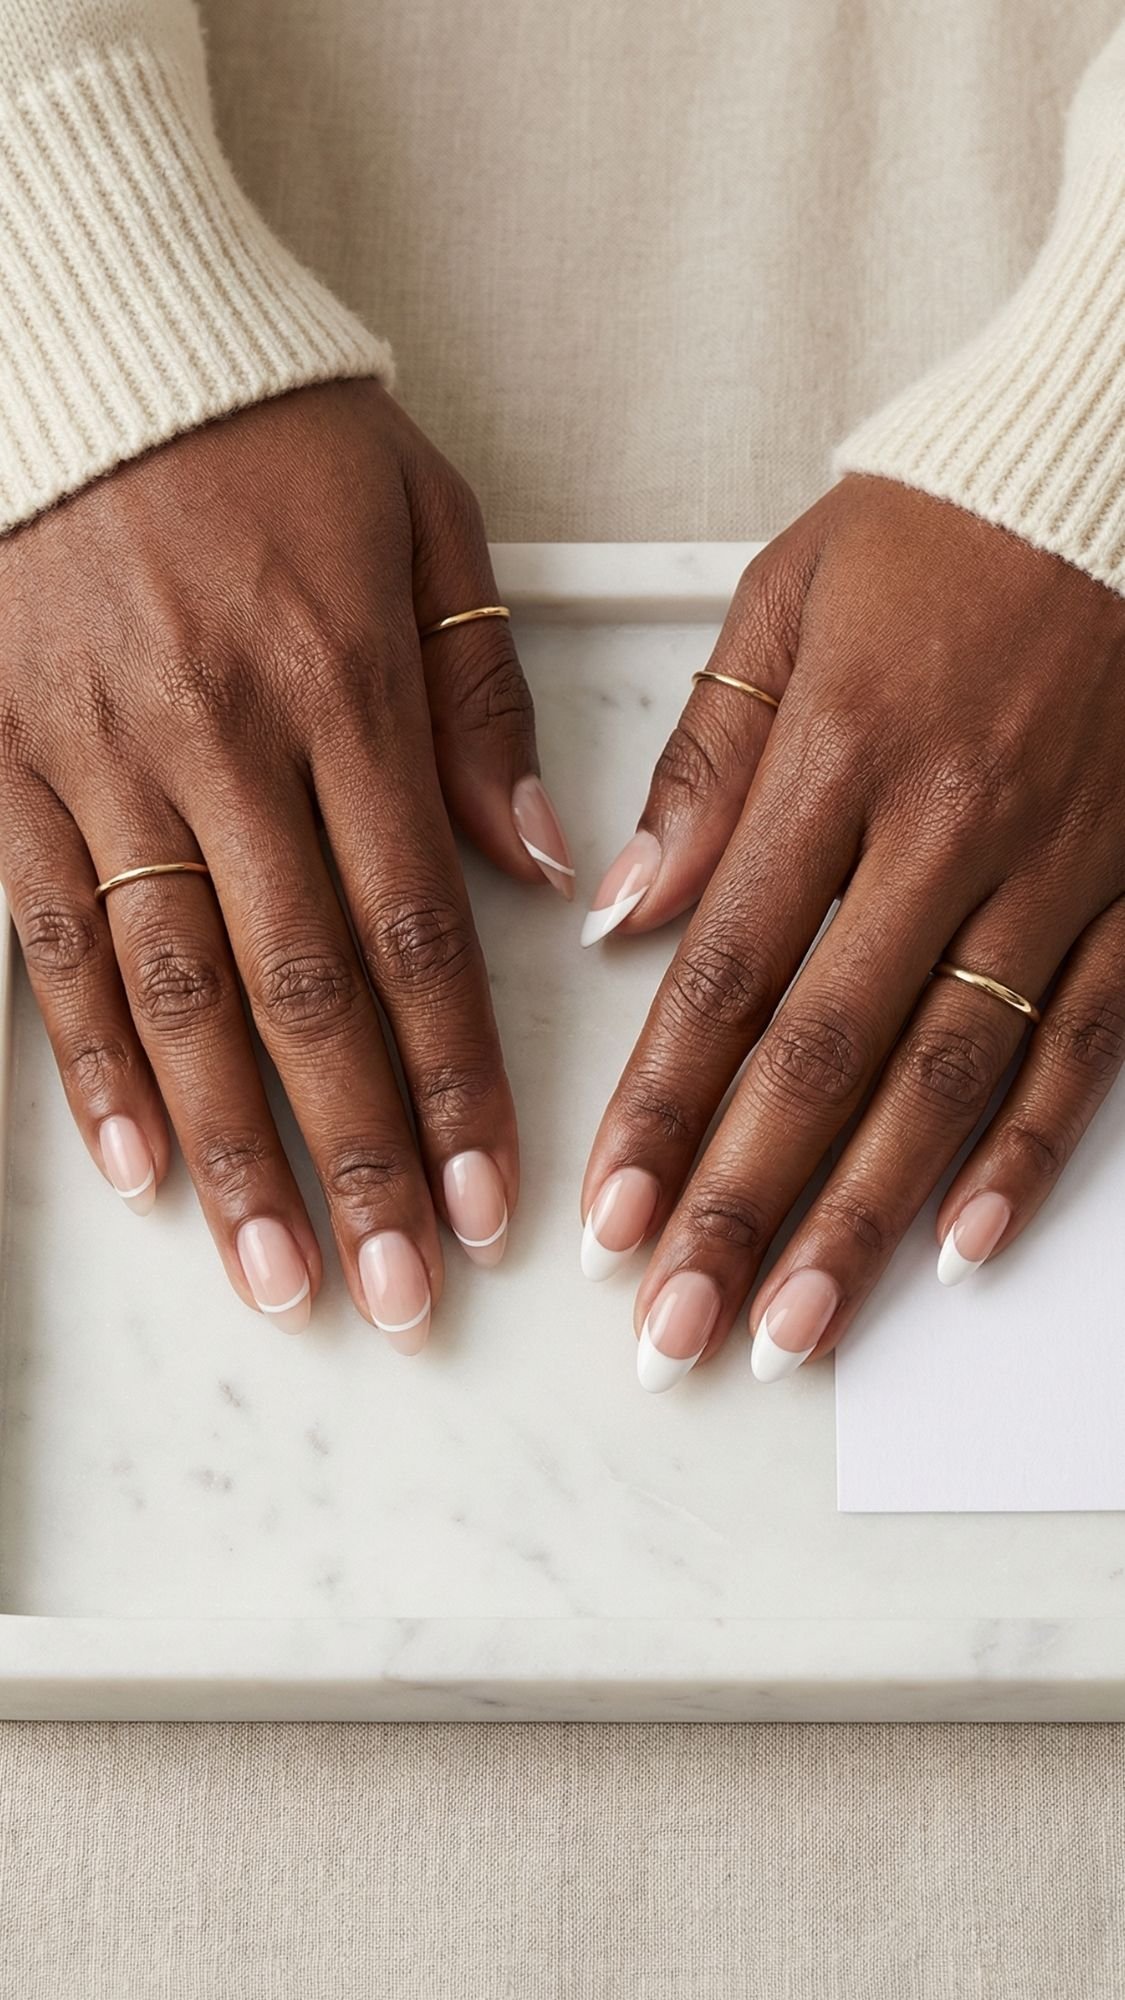
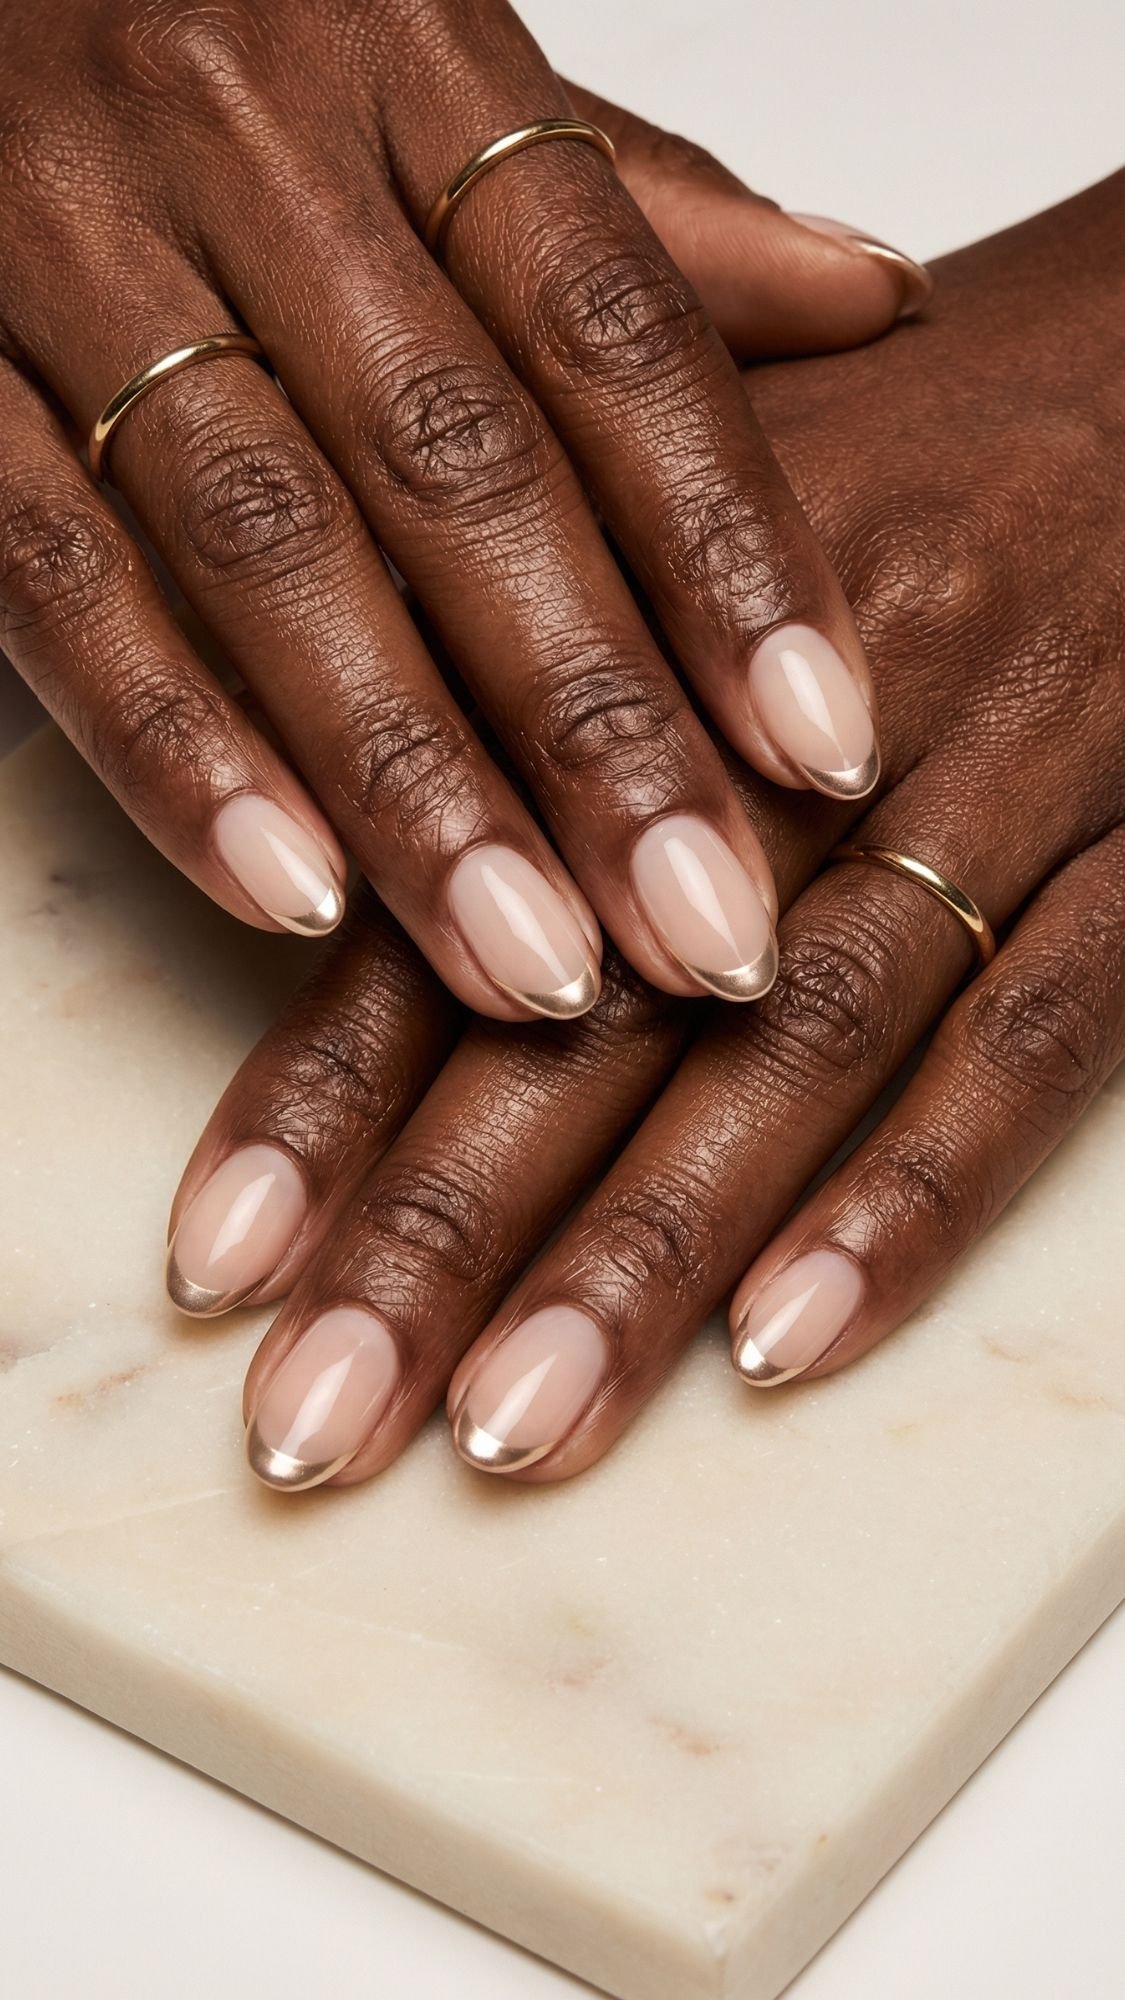
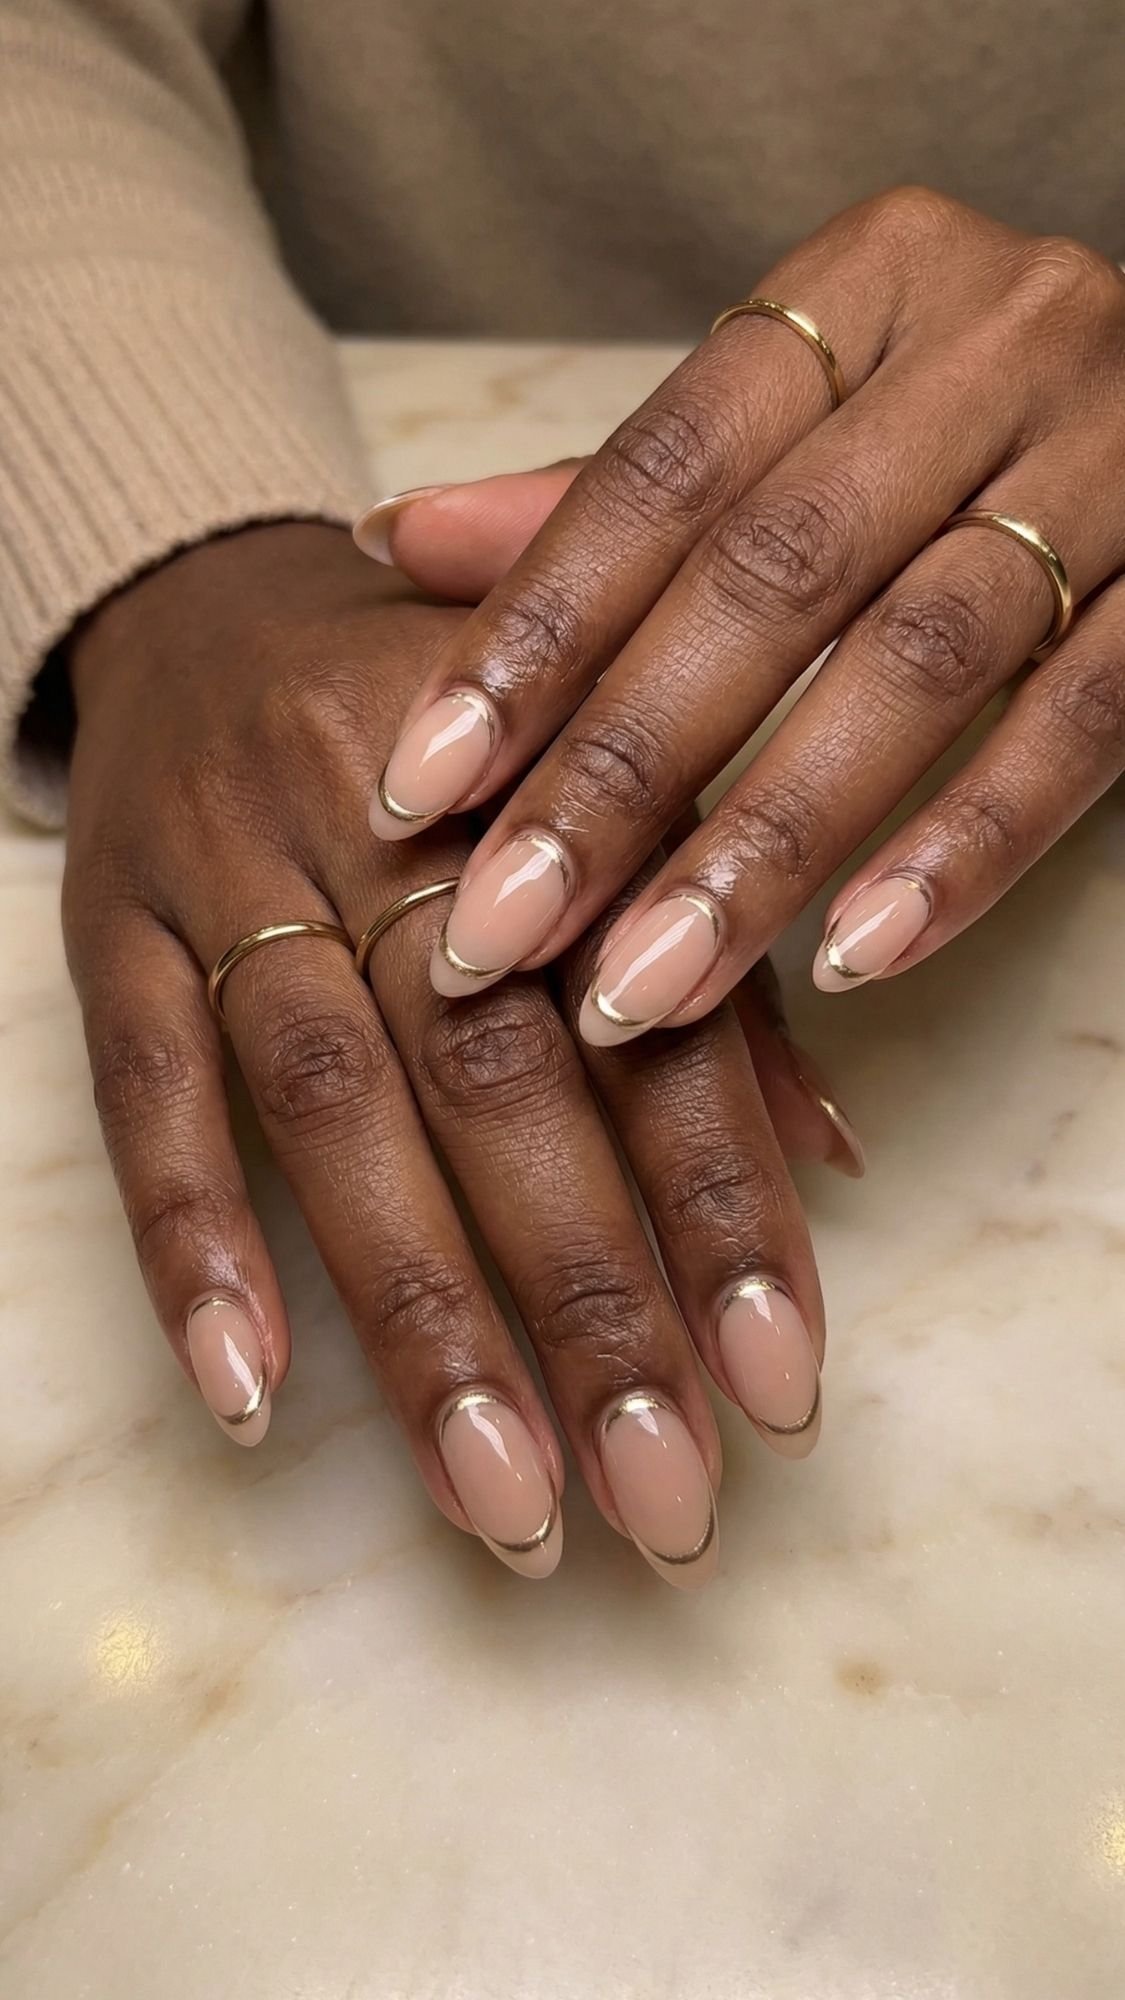
2) Micro French Almond Nails (The “My Hands Look Longer” Cheat Code)
Micro French on almond nails looks insanely flattering because it tricks the eye. You keep the base close to your natural nail tone, then you add the tiniest whisper of a tip, which makes the nail bed look longer and cleaner. I’ve noticed the micro version flatters more hands than a classic thick French because it doesn’t create a big horizontal line that visually widens the nail. Ever tried a chunky French and thought, why do my nails look stubby now? Yeah, that’s why.
Why This Flatters Every Hand
- The thin tip elongates instead of widening.
- The neutral base blends with your nail bed, so grow-out looks softer.
- Almond shape plus micro tip creates a long, tapered illusion without extra length.
How To Choose Your Micro French Color
- Soft white: crisp, classic, clean-girl vibe.
- Creamy ivory: warmer and softer, looks expensive on warm undertones.
- Chocolate micro tip: subtle and chic, especially on deeper skin tones.
- Chrome micro tip: when you want sparkle without going full disco.
How To Get The Look At Home (Without Losing Your Mind)
- Apply base and a sheer nude or milky base shade, keep it thin.
- Use a thin brush or a striping brush to paint a hairline tip.
- Keep the tip thickness consistent across nails, the ring finger always tries to go rogue.
- Top coat and cap the edge.
Pro tip: If you want the most flattering shape, keep the micro tip slightly higher in the center and slightly thinner on the sides. It visually narrows the nail.
Salon Script (What To Ask For)
- “Short to medium almond, sheer nude base, micro French tip, super thin, clean smile line.”
- If your nail beds look wide: “Make the tip thinner at the sides, not straight across.”
Common Mistakes + Easy Fixes
- Mistake: you make the tip too thick, it widens the nail.
- Fix: wipe most polish off your brush, build the tip slowly.
- Mistake: crooked smile line.
- Fix: use a guide strip, or clean it up with a small brush before top coat.
- Mistake: tip chips first.
- Fix: cap the free edge with top coat, and re-top on day 3.
Sensitive-Nail Alternative
- Keep nails short almond.
- Use ridge filler base and a sheer nude to avoid buffing.
Key Takeaways
- Micro French works because it creates a long nail bed illusion.
- The thinner the tip, the more flattering it looks.
- A crisp top coat makes the design look salon-clean.
3) Blush Nude Almond Nails (Your Nails, But Prettier and More Expensive-Looking)
Blush nude on almond nails gives that polished “I have my life together” vibe without trying too hard. The almond shape already elongates, and the blush tone adds just enough warmth to make hands look softer and brighter. I’ve noticed blush nudes outperform beige nudes for a lot of people because beige can pull gray or flat in certain lighting, especially in photos. Blush keeps the look lively, which matters when you want nails that flatter every hand, not just one perfectly lit selfie.
Why This Flatters Every Hand
- Blush tones mimic natural flush, so hands look healthier.
- Almond shape plus a soft nude creates a long, clean line.
- The color grows out gracefully, so it stays flattering longer.
Shade Guidance (So Your Nude Doesn’t Turn Weird)
- Warm undertones: peachy blush, caramel-pink nude, warm rosy beige.
- Cool undertones: mauve blush, rosy nude, pink-beige.
- Neutral undertones: classic blush nude, soft taupe-rose.
Pro tip: If a nude looks a little ashy, layer a sheer pink glaze over it. It fixes the vibe instantly.
How To Get The Look At Home
- Prep, dehydrate, base coat, cap the edge.
- Apply 2 thin coats of blush nude, let each coat set 2 to 4 minutes.
- Add a glossy topcoat and cap the free edge.
- Re-top on day 3 or day 4 to keep that fresh shine line.
Sensory detail: Blush nude polish often looks slightly streaky on the first coat, then it evens out on the second coat and turns into that smooth, creamy finish once top coat hits it.
Salon Script (What To Ask For)
- “Short to medium almond, blush nude that matches my undertone, high-gloss top coat, clean cuticle line.”
- If you want extra flattering: “Make it slightly sheer, not fully opaque.”
Common Mistakes + Easy Fixes
- Mistake: choosing a nude that’s too light and chalky.
- Fix: go one shade deeper or choose a jelly/blush formula.
- Mistake: thick coats, then dents show up later.
- Fix: thin coats, quick-dry topcoat, and hands off for 15 minutes.
Sensitive-Nail Alternative
- Use ridge-filling base to smooth without buffing.
- Keep nails short almond if you peel easily.
Key Takeaways
- Blush nude flatters because it adds soft warmth and keeps contrast low.
- Undertone matching matters more than “finding the perfect nude.”
- Sheer or jelly blush looks more natural and forgiving.
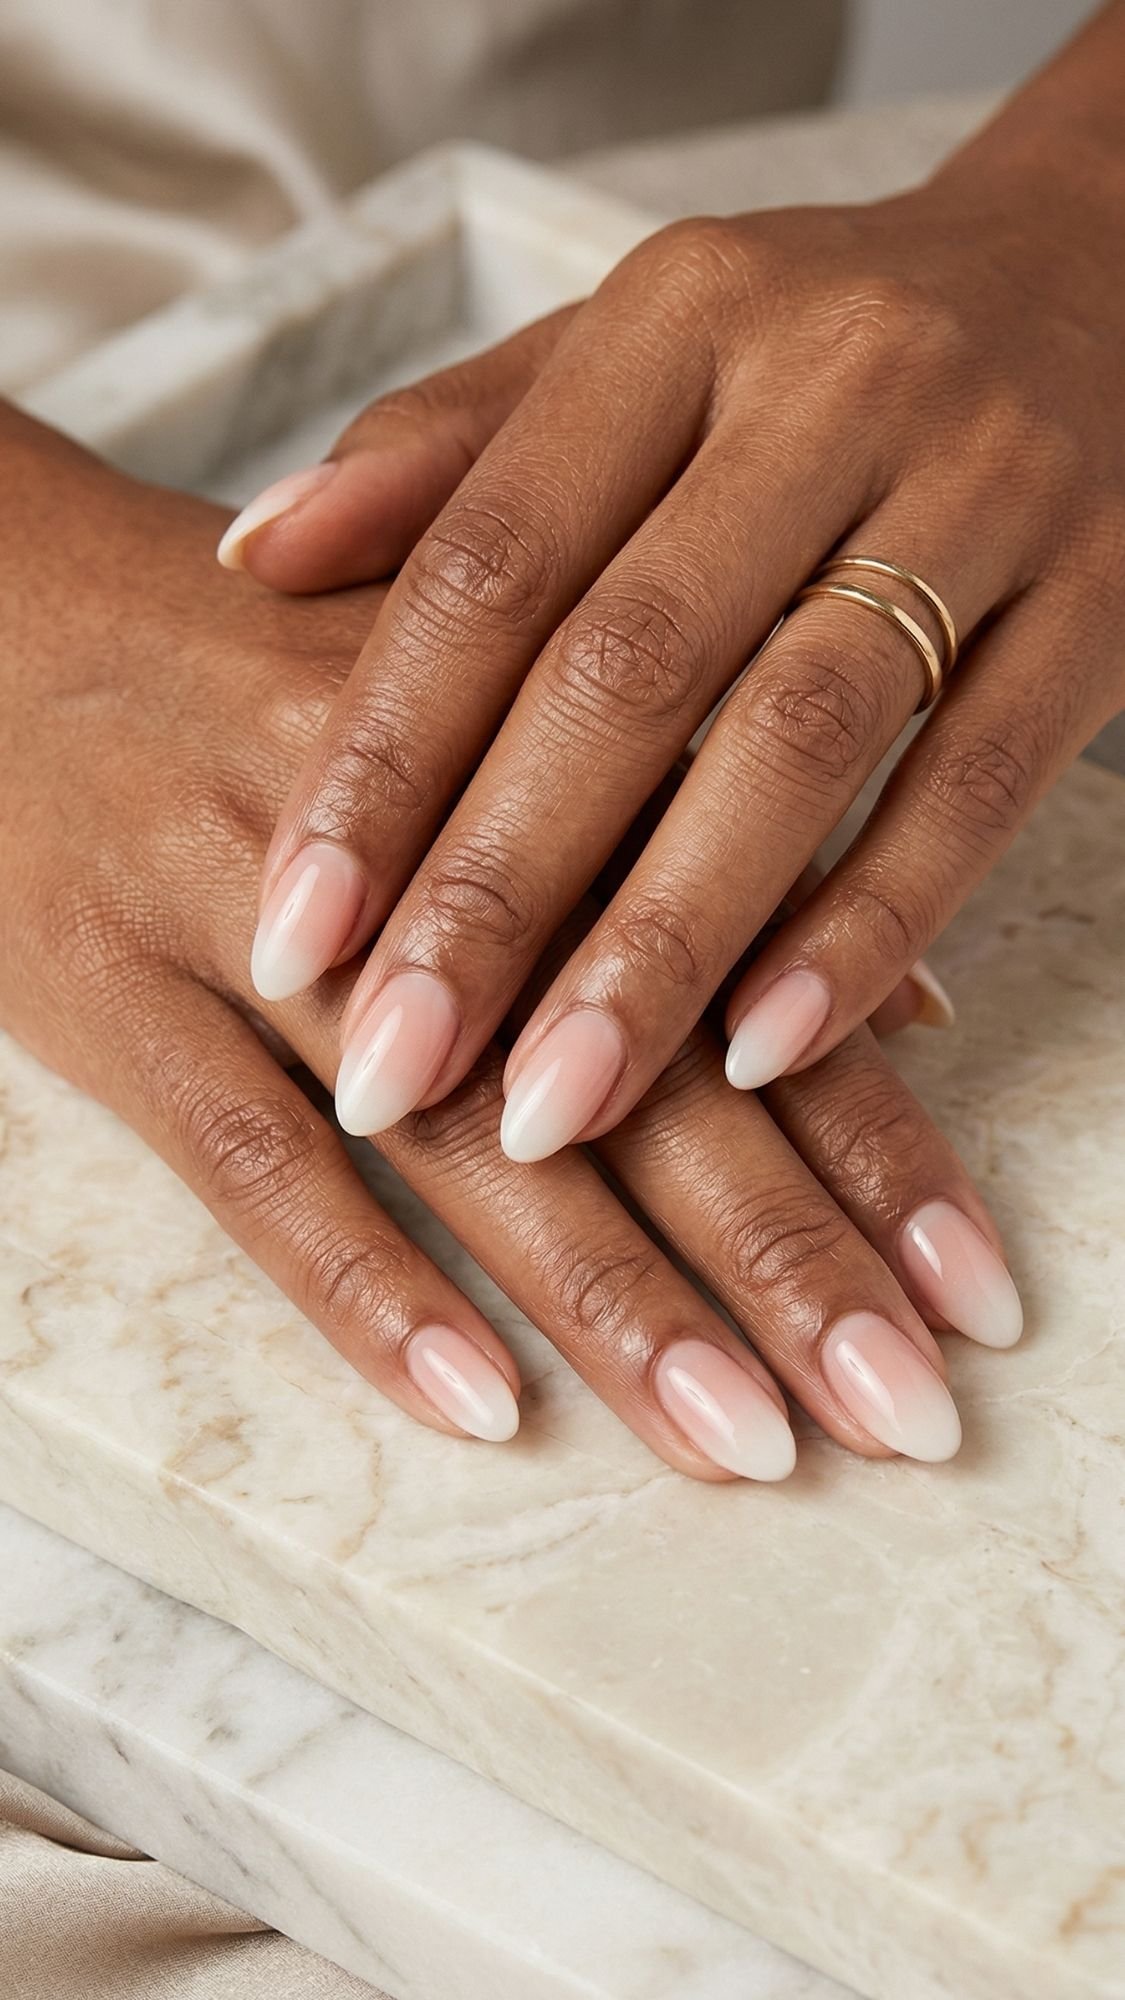
4) Soft Ombré “Baby Boomer” Almond Nails (The Most Forgiving, Most Flattering Fade)
Soft ombré on almond nails flatters basically everyone because it blurs the harsh lines that make nails look shorter or wider. The gradient stretches the nail visually, and almond shape makes the fade look even smoother because the tip narrows naturally. I’ve noticed this is one of the best choices for people who worry about grow-out, because the base stays soft and blended instead of showing a sharp line. Ever wanted nails that look fresh even when you’re two weeks deep and pretending you don’t see the regrowth? This is that set.
Why This Flatters Every Hand
- The fade creates a long nail bed illusion without harsh contrast.
- It hides mild ridges and discoloration better than a solid nude.
- It grows out softly and still looks intentional.
How To Pick Your Ombré Colors
- Classic: soft pink base fading into milky white tip.
- Warmer version: peachy pink fading into creamy ivory.
- Deeper-skin flattering tweak: choose a rosier or caramel-pink base, not a pale baby pink that can look chalky in photos.
Pro tip: Keep the lightest part at the very tip and do not bring white too far down. Too much white can widen the nail and look harsh.
How To Do It At Home (Beginner-Friendly Version)
- Apply base coat, then one thin coat of your sheer pink or nude.
- On a makeup sponge, apply a stripe of your base shade and a stripe of milky white touching it.
- Tap the sponge lightly onto the nail, focusing more color near the tip and less near the cuticle.
- Repeat tapping in thin layers until the fade looks smooth.
- Add top coat to blur everything together and cap the free edge.
Sensory detail: The sponge tapping feels slightly grabby and uneven while you work, then the top coat hits and everything suddenly looks airbrushed, like magic, but the useful kind.
Salon Script (What To Ask For)
- “Short to medium almond, soft pink-to-milky ombré, no harsh line, glossy finish.”
- If you want maximum flattering: “Keep the white only at the tip, blend it gently.”
Common Mistakes + Easy Fixes
- Mistake: a harsh gradient line.
- Fix: tap lighter, build in thin layers, then use a glossy leveling top coat.
- Mistake: chalky white tips.
- Fix: use a milky white instead of bright white, and keep layers thin.
- Mistake: sponge texture looks bumpy.
- Fix: one extra top coat layer usually smooths it out.
Sensitive-Nail Alternative
- Skip buffing, use ridge-filling base.
- Keep length short to medium to reduce tip flex.
Key Takeaways
- Ombré flatters because it elongates and softens the whole look.
- Milky white beats bright white for a natural fade.
- A glossy top coat makes the blend look seamless.
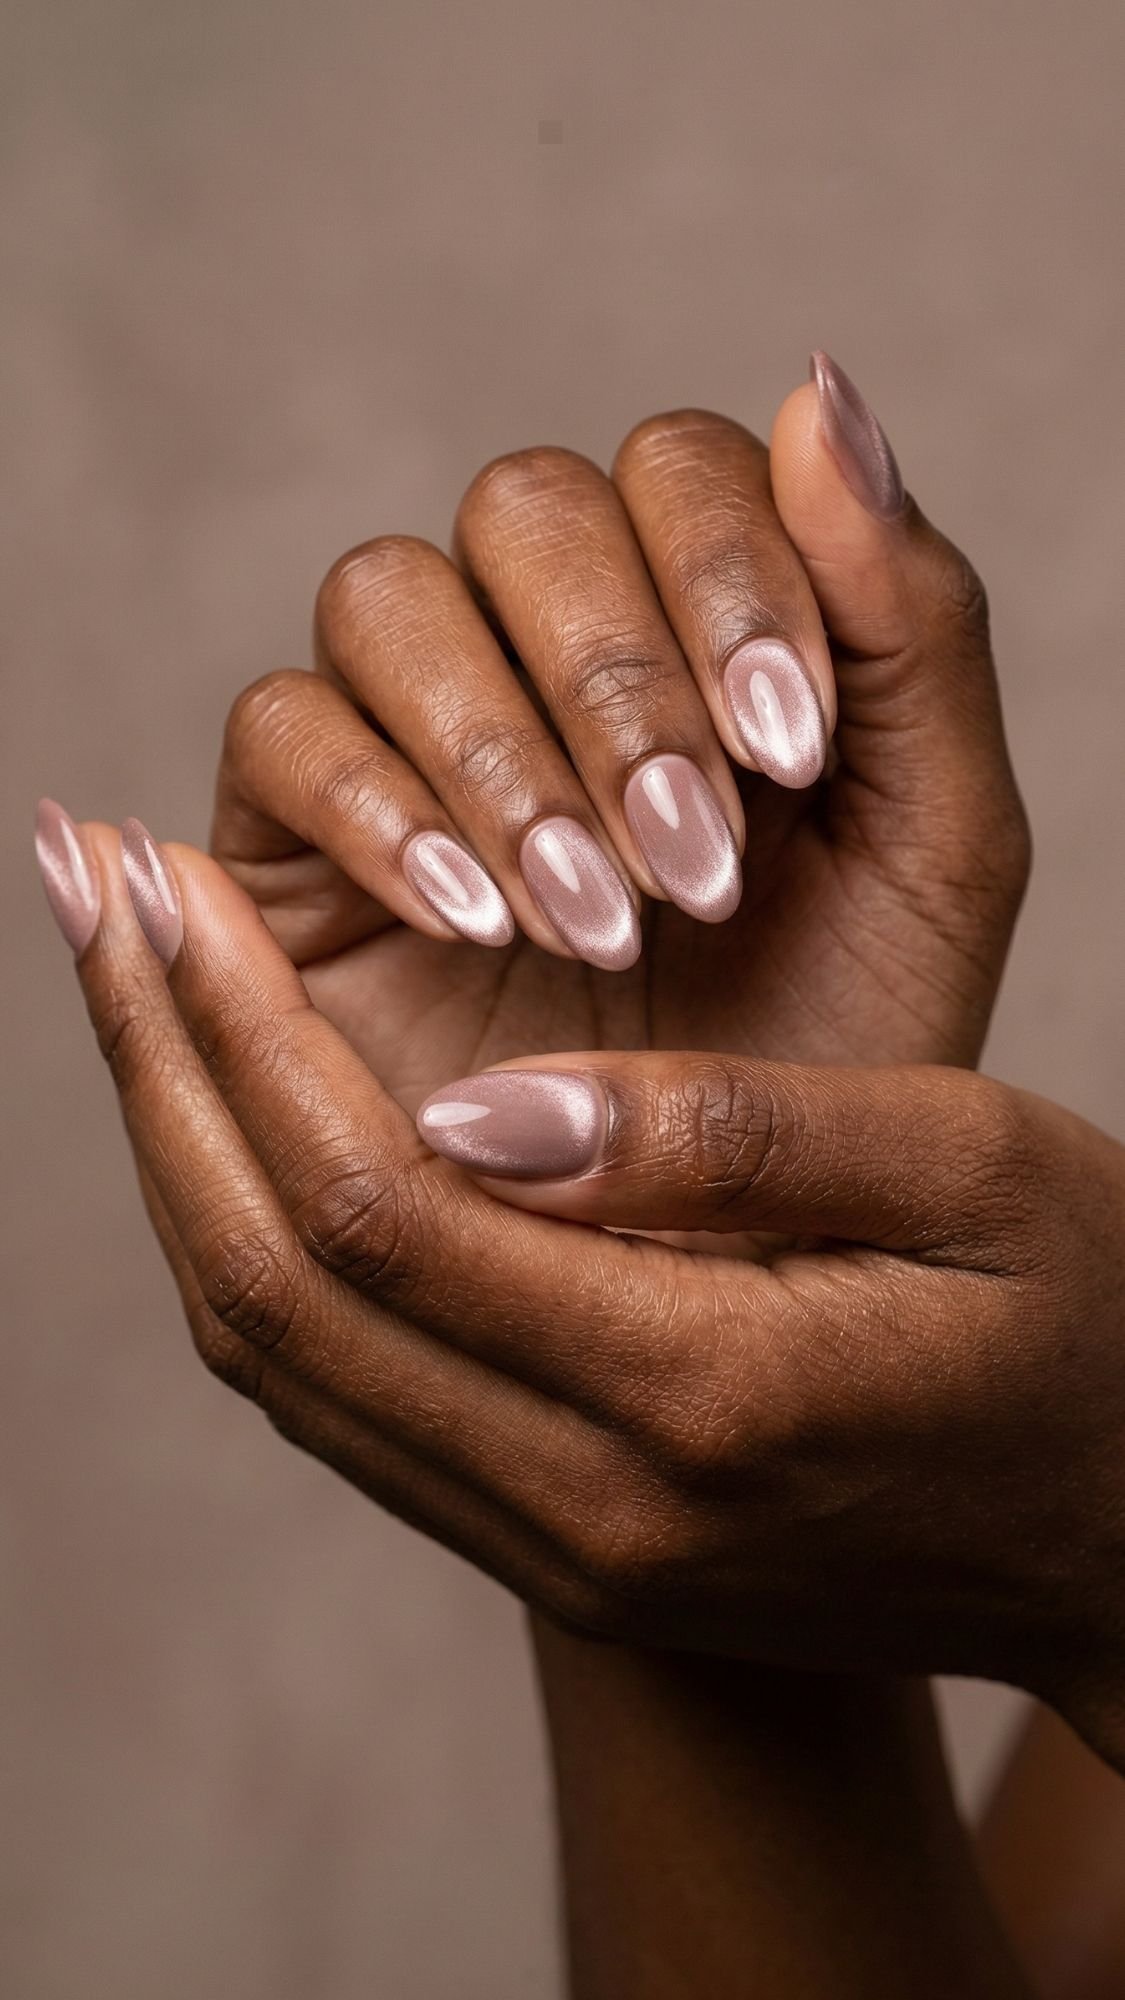
5) Glazed Almond Nails (The Glow That Makes Hands Look Instantly More Polished)
Glazed almond nails give you that soft, light-catching shine that looks expensive in every photo. You don’t need full mirror chrome to get the effect, you want a pearly glaze that sits on top of a sheer base and makes the nails look smooth and bright. I’ve noticed glaze looks especially flattering on almond because the tapered shape stretches the highlight line, so your nails look longer even at short length. Ever put on a sheer nude and thought, cute but kind of flat? The glaze fixes that in one step.
Why This Flatters Every Hand
- The finish reflects light softly, so it brightens the hands without harsh contrast.
- It looks good on short almond nails and long almond nails, because shine always reads “fresh.”
- It hides minor surface texture better than a plain crème nude.
How To Choose Your Glaze Finish
- Pearl glaze: soft, neutral, most universally flattering.
- Pink glaze: brightens and looks extra “clean” on most skin tones.
- Champagne glaze: warm, glowy, great if you love gold jewelry.
- If you want a safer DIY route, pick a sheer shimmer topper or a “glazed” top coat instead of loose powder.
Pro tip: Keep the base coat sheer and milky. When you put glaze on an opaque nude, it can look a little frosty instead of glossy.
How To Get The Look At Home (Regular Polish Friendly)
- Prep, dehydrate, apply base coat, cap the edge.
- Apply 1 to 2 thin coats of sheer milky nude or jelly pink.
- Apply a pearly shimmer topper in a thin layer, focus it on the center of the nail for a “lit-from-within” look.
- Finish with a glossy top coat and cap the free edge.
Sensory detail: The shimmer topper can feel slightly gritty for a second as you brush it on, then the glossy top coat melts it down and the surface feels glass-slick and smooth.
If You Want The “True” Glaze Powder Look
- Use a no-wipe style top coat that grabs powder, then buff powder lightly and seal again.
- Keep product off skin, especially if you use gel products, because skin contact can irritate some people.
- Use a soft eye brush for buffing, it gives you more control than a sponge.
Common Mistakes + Easy Fixes
- Mistake: glaze looks frosty or gray.
- Fix: switch to a warmer base, or use a champagne glaze instead of icy pearl.
- Mistake: the shine looks dull by day 3.
- Fix: re-topcoat on day 3 or day 4, cap the edge again.
- Mistake: texture shows through.
- Fix: use ridge-filling base, keep color sheer, and let top coat level.
Sensitive-Nail Alternative
- Skip loose powders if they tempt you to over-buff.
- Use ridge-filling base plus a sheer shimmer topper, it gives the same vibe with less fuss.
Key Takeaways
- Glazed almond nails flatter because they add soft light reflection, not harsh color contrast.
- Sheer bases look better than opaque bases for the glazed effect.
- A day 3 re-topcoat keeps the shine looking fresh.
6) Chrome Micro French Almond Nails (Sparkle, But Make It Grown)
Chrome micro French gives you that “wow” moment without looking like a full-on mirror manicure. You keep the base soft and flattering, then you add a tiny chrome tip that catches light every time your hands move. I’ve noticed this design works especially well on almond because the taper makes the chrome line look sleek instead of blocky. Ever wanted chrome but worried it would feel too loud for everyday? This is the version that still looks polished in normal lighting and still pops in photos.
Why This Flatters Every Hand
- The chrome sits at the tip, so the nail bed still looks long and clean.
- The base stays neutral, so it flatters across skin tones.
- Almond shape makes the chrome edge look slimmer and more elegant.
Best Chrome Colors For Micro Tips
- Silver chrome: the crisp classic, very reflective.
- Champagne chrome: warm, soft, looks luxe with gold jewelry.
- Rose chrome: flattering and pretty, reads softer than silver.
- Chocolate chrome: subtle but stunning, especially on deeper skin tones.
Pro tip: Pick chrome based on your jewelry vibe. If you wear gold rings daily, champagne chrome looks more cohesive than icy silver.
How To Get The Look At Home
- Apply base and a sheer nude or milky base color, keep it thin.
- Create a micro French guide using a striping brush or a very thin angled brush.
- Apply chrome effect at the tip:
- For polish-only: use a chrome-look metallic polish in a thin line.
- For powder systems: apply a top coat that grabs powder, lightly buff chrome on the tip only, then seal with top coat.
- Seal with a glossy top coat and cap the free edge, chrome tips chip when you skip this.
Sensory detail: Chrome powders feel silky and almost weightless as you buff them on, then the top coat can look slightly cloudy for a few seconds before it levels clear and turns mirror-bright.
Salon Script (What To Ask For)
- “Short to medium almond, sheer nude base, micro French chrome tips, super thin, glossy finish.”
- If you want extra flattering: “Keep the chrome line thinner at the sides and slightly higher in the center.”
Common Mistakes + Easy Fixes
- Mistake: chrome line looks thick and wide.
- Fix: apply it like eyeliner, tiny brush, build slowly.
- Mistake: chrome chips first.
- Fix: cap the free edge, re-top on day 3.
- Mistake: chrome looks dull after sealing.
- Fix: use a high-gloss top coat, thin but thorough, and avoid over-brushing.
Sensitive-Nail Alternative
- Skip loose powder if your nails peel easily or you tend to over-buff.
- Use a metallic polish line instead, then top coat.
Key Takeaways
- Chrome micro French flatters because the sparkle stays controlled and elongating.
- Thin placement makes the design look sleek, not bulky.
- Capping the free edge matters even more with chrome tips.
7) Velvet Cat-Eye Almond Nails (The “Liquid Fabric” Shine That Looks Unreal)
Velvet cat-eye on almond nails looks like you dipped your fingertips in liquid silk. It’s that magnetic shimmer that shifts when you move your hands, and almond shape makes the effect look longer and smoother because the light beam follows the taper. I’ve noticed cat-eye looks the most flattering when you keep the shade soft and wearable, like nude-mauve, taupe, cocoa, or a sheer berry, because the texture becomes the star, not the color screaming for attention. Ever caught the light on a velvet nail and immediately stared at your own hands for five minutes? Yeah, it’s that.
Why This Flatters Every Hand
- The magnetic “beam” creates a vertical highlight, which visually elongates nails.
- The finish looks rich on every skin tone because the shine adds dimension.
- Almond shape makes the beam look sleek instead of wide.
Shade Picks That Work Every Time
- Nude-mauve velvet: soft glam, flattering, never too much.
- Taupe velvet: neutral, elegant, looks expensive.
- Cocoa velvet: rich and warm, amazing with gold jewelry.
- Deep berry velvet: still wearable, adds drama without going goth.
Pro tip: Choose a cat-eye shade that matches your undertone, then let the magnet create the drama.
How To Get The Velvet Effect (At-Home Technique)
- Apply base coat and your chosen cat-eye polish in a thin coat.
- Apply a second thin coat, then work one nail at a time.
- Hold the magnet close, but not touching the nail, for 10 to 20 seconds.
- For the velvet look, hold the magnet at the sidewalls and slightly above the center, not directly over the middle the whole time.
- Seal with glossy top coat, cap the free edge.
Sensory detail: Cat-eye polish feels slightly thicker than regular polish, and you can literally see the shimmer particles “pull” into place when the magnet hits, it’s oddly satisfying.
Salon Script (What To Ask For)
- “Short to medium almond, velvet cat-eye in nude-mauve, soft beam effect, super glossy finish.”
- If you want extra flattering: “Keep the beam centered and vertical, not diagonal.”
Common Mistakes + Easy Fixes
- Mistake: weak cat-eye effect.
- Fix: hold the magnet closer and longer, and do one nail at a time.
- Mistake: beam looks crooked.
- Fix: center your magnet placement, and keep your finger steady on a flat surface.
- Mistake: chipping at the tips.
- Fix: cap the free edge, and re-topcoat day 3.
Sensitive-Nail Alternative
- Keep nails short almond so the tip flexes less.
- Use ridge-filling base instead of buffing.
Key Takeaways
- Velvet cat-eye flatters because it creates a long vertical highlight.
- Magnet technique matters more than the exact color.
- Glossy top coat makes the velvet look deeper and smoother.
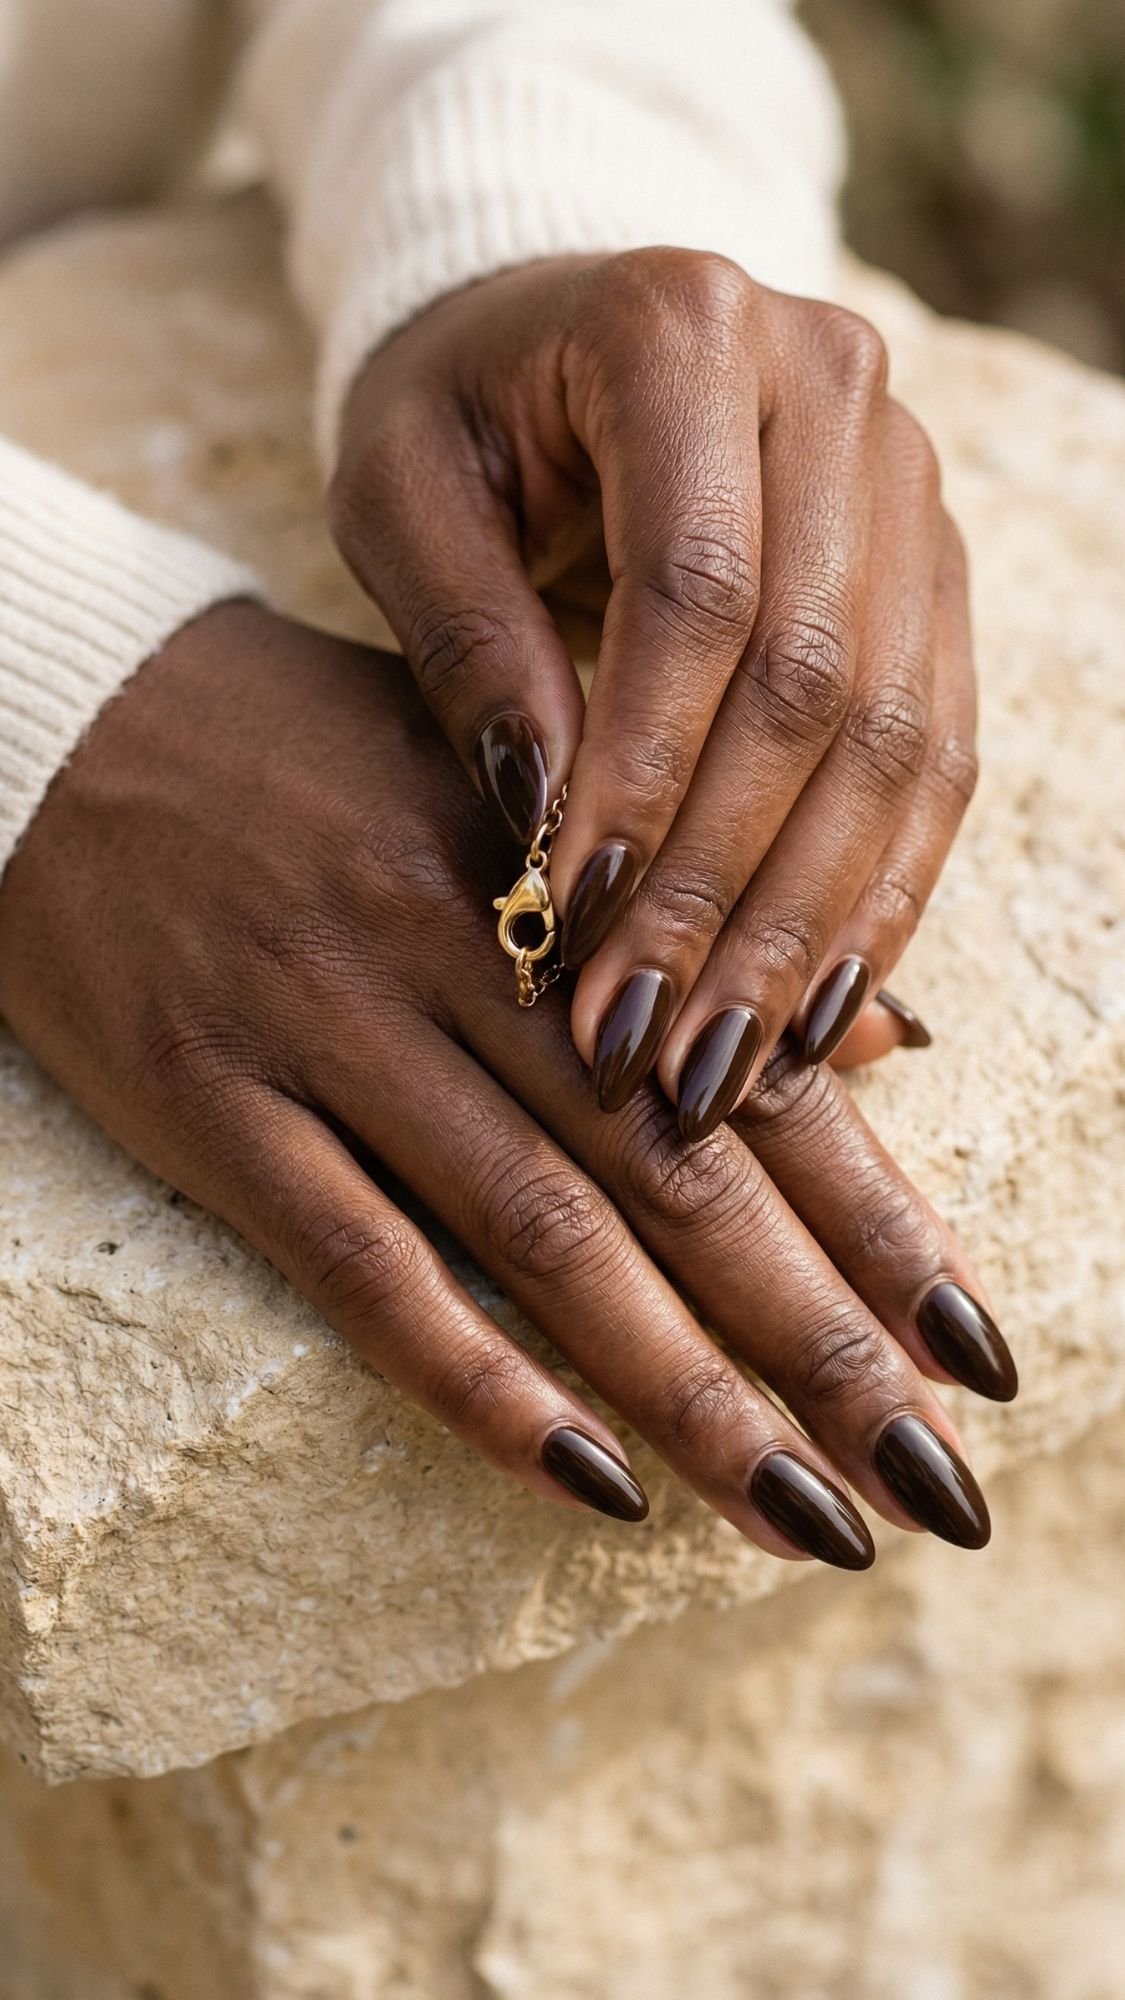
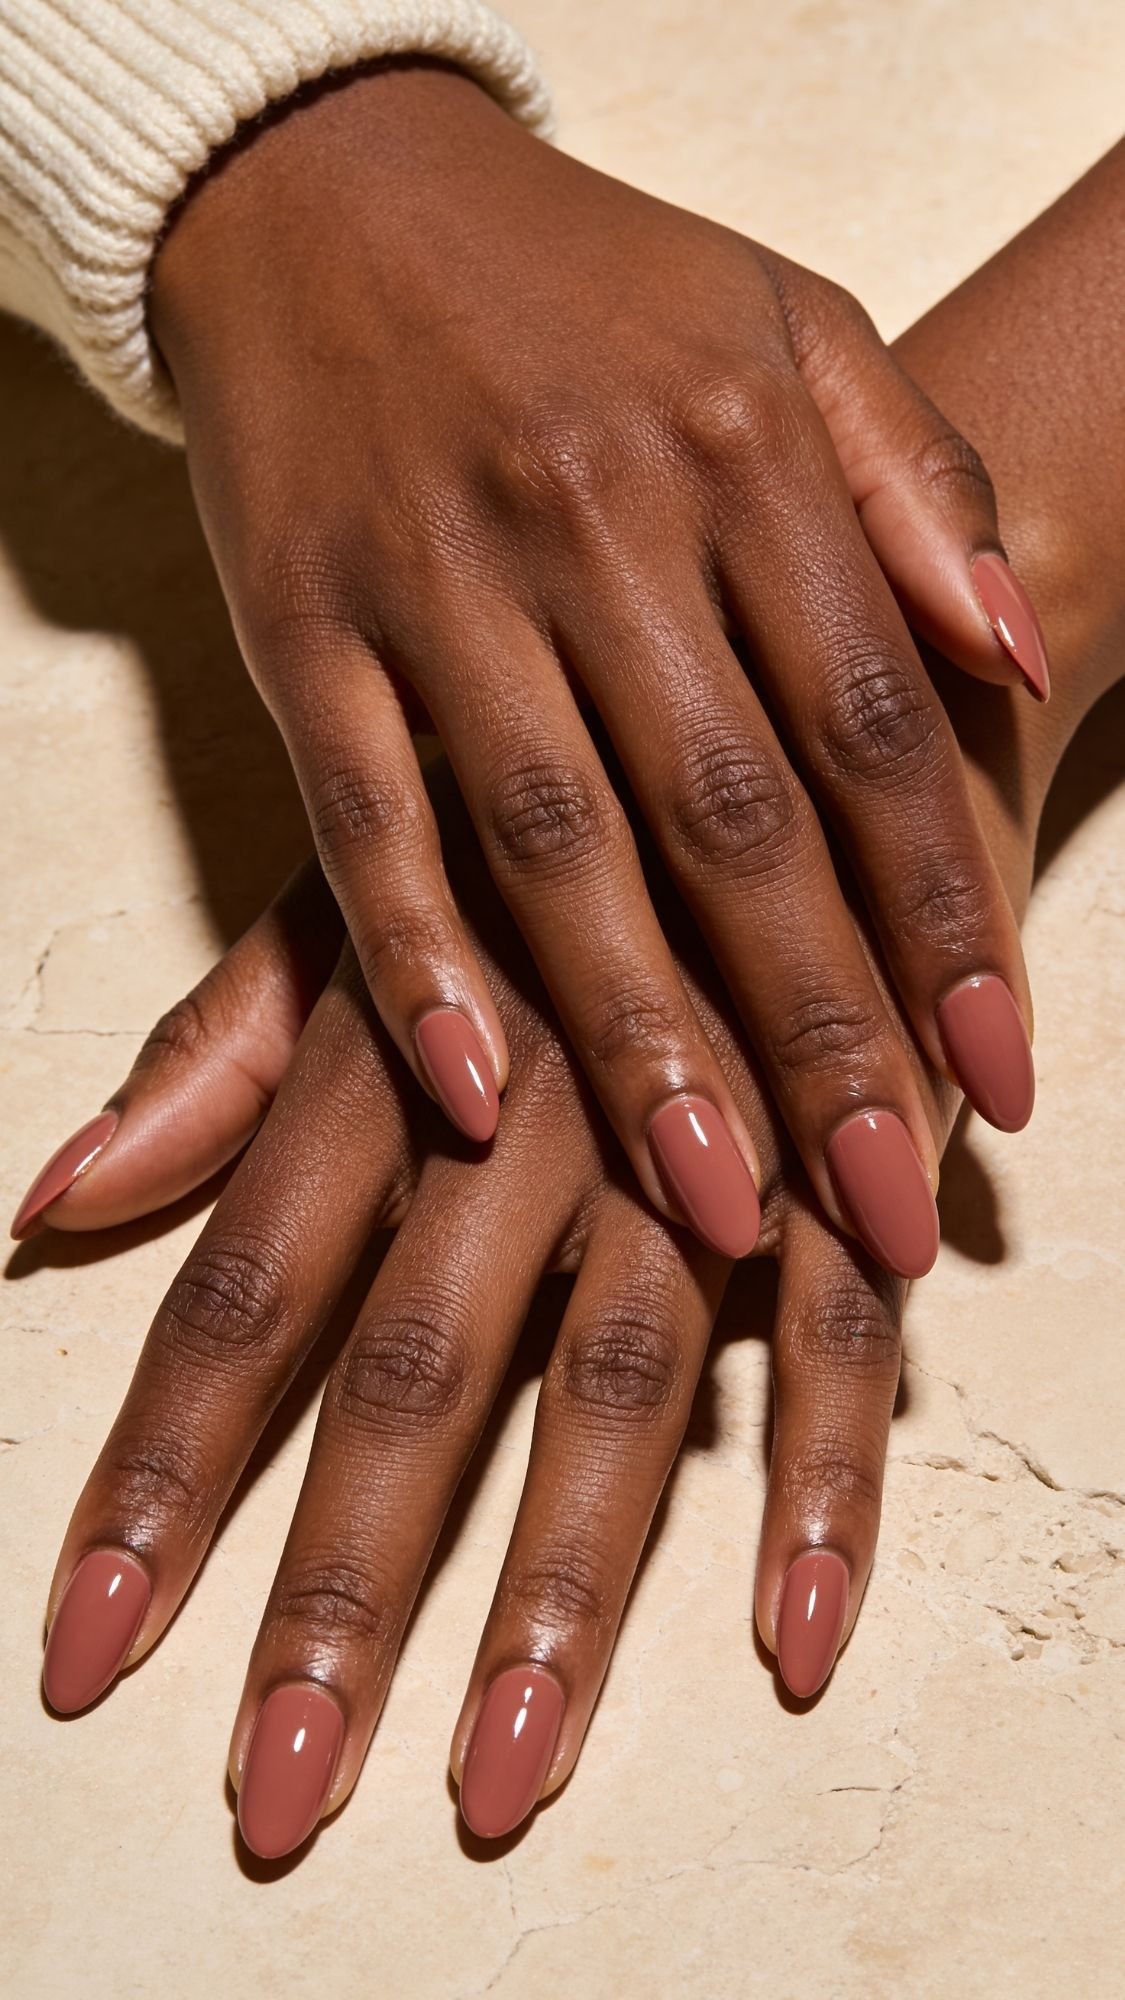
8) Chocolate Brown Almond Nails (Rich, Warm, and Weirdly Slimming)
Chocolate brown on almond nails gives “quiet luxury” without being boring. The shade feels grounded, it looks polished in every season, and it flatters hands because it creates a clean, uninterrupted color line along the almond taper. I’ve noticed chocolate brown can actually make nails look more refined than black, because black can feel harsh or show chips faster, while brown looks intentional and softer. Ever tried a dark manicure and felt like it swallowed your whole hand? Chocolate brown avoids that, it’s deep but still warm.
Why This Flatters Every Hand
- Deep brown creates a sleek line that emphasizes the almond shape.
- Warm undertones make hands look softer, not stark.
- The color looks expensive with both gold and silver jewelry, depending on the finish.
How To Pick Your Best Chocolate Brown
- Warm chocolate: looks caramel-rich, flattering with warm undertones.
- Cool cocoa: slightly deeper and more neutral, flattering with cool undertones.
- Espresso brown: very deep, dramatic but still softer than black.
Pro tip: If you want the most flattering “hand-slimming” effect, choose a brown that looks rich, not muddy. Muddy browns look flat in photos.
How To Get The Look At Home
- Prep and dehydrate, base coat, cap the edge.
- Apply 2 thin coats of chocolate brown.
- Use a glossy top coat to keep it looking plush and dimensional.
- Re-top on day 3 to refresh shine, dark colors look best when glossy.
Sensory detail: Creamy dark polishes feel thicker and more pigmented, and they can tug if you overwork the brush, so do three strokes and stop.
Salon Script (What To Ask For)
- “Short to medium almond, rich chocolate brown crème, high gloss finish, clean cuticle line.”
- If you want extra depth: “Top it with a super shiny gel-like top coat.”
Common Mistakes + Easy Fixes
- Mistake: streaks show up more with dark polish.
- Fix: use thin coats, float the brush, do not over-brush.
- Mistake: chips look obvious on dark colors.
- Fix: cap the free edge, re-top on day 3, wear gloves for chores.
- Mistake: brown looks dull.
- Fix: add a glossy top coat, matte kills the richness unless you specifically want velvet-matte.
Sensitive-Nail Alternative
- Keep nails short almond, reduce flex.
- Use ridge filler base so the dark shade looks smoother without buffing.
Key Takeaways
- Chocolate brown flatters because it reads rich, warm, and sleek along the almond shape.
- Glossy finish makes the color look more expensive.
- Day 3 re-topcoat keeps dark polish from looking tired.
9) Latte Swirl Almond Nails (Neutral Nail Art That Still Looks Clean)
Latte swirls look flattering because they add movement without adding chaos. You stay in the same warm-neutral family, so the design reads soft and blended, not loud and busy. Almond shape makes swirls look extra elegant because the tapered tip naturally guides the eye along the design. I’ve noticed this style converts hard on Pinterest because it feels like “I did nail art,” but it still matches every outfit. Ever wanted something more interesting than plain nude, but you also don’t want to commit to neon? Latte swirls live right there.
Why This Flatters Every Hand
- Neutral-on-neutral swirls keep contrast low, so hands still look longer.
- The design hides minor chips better than a solid crème, because the pattern distracts the eye.
- It pairs beautifully with gold jewelry and cozy textures.
Best Color Combos For Latte Swirls
- Milky beige + caramel
- Creamy nude + cocoa
- Sheer pink nude + warm tan
- Taupe + soft chocolate
Pro tip: Pick one light, one medium, and one deeper shade max. Too many colors turns latte into “confused marbling.”
How To Get The Look At Home (Easy Swirl Method)
- Apply your base shade and let it get tacky-dry.
- Add a few thin lines of your swirl color using a striping brush or a toothpick.
- Use a clean thin brush to gently drag and curve the lines into soft swirls.
- Do one nail at a time so the polish stays workable.
- Seal with a glossy top coat, cap the free edge.
Sensory detail: Swirl polish feels slippery and wants to spread, so you’ll feel the brush “glide” more than usual. That’s why thin lines matter.
Salon Script (What To Ask For)
- “Short to medium almond, warm nude base, latte swirls in caramel and cocoa, soft blended lines, high gloss.”
- If you want extra flattering: “Keep the swirls vertical and curved, not horizontal bands.”
Common Mistakes + Easy Fixes
- Mistake: swirls look thick and messy.
- Fix: use less polish on the brush and build with thin lines.
- Mistake: swirls look too high contrast.
- Fix: choose shades closer together, more tonal.
- Mistake: top coat drags the design.
- Fix: float the top coat gently, do not press hard.
Sensitive-Nail Alternative
- Skip heavy buffing, use ridge filler base.
- Keep length short almond so tips don’t flex.
Key Takeaways
- Latte swirls flatter because they stay neutral and elongating.
- Tonal colors keep the look clean and wearable.
- Float your top coat so you don’t smear the design.
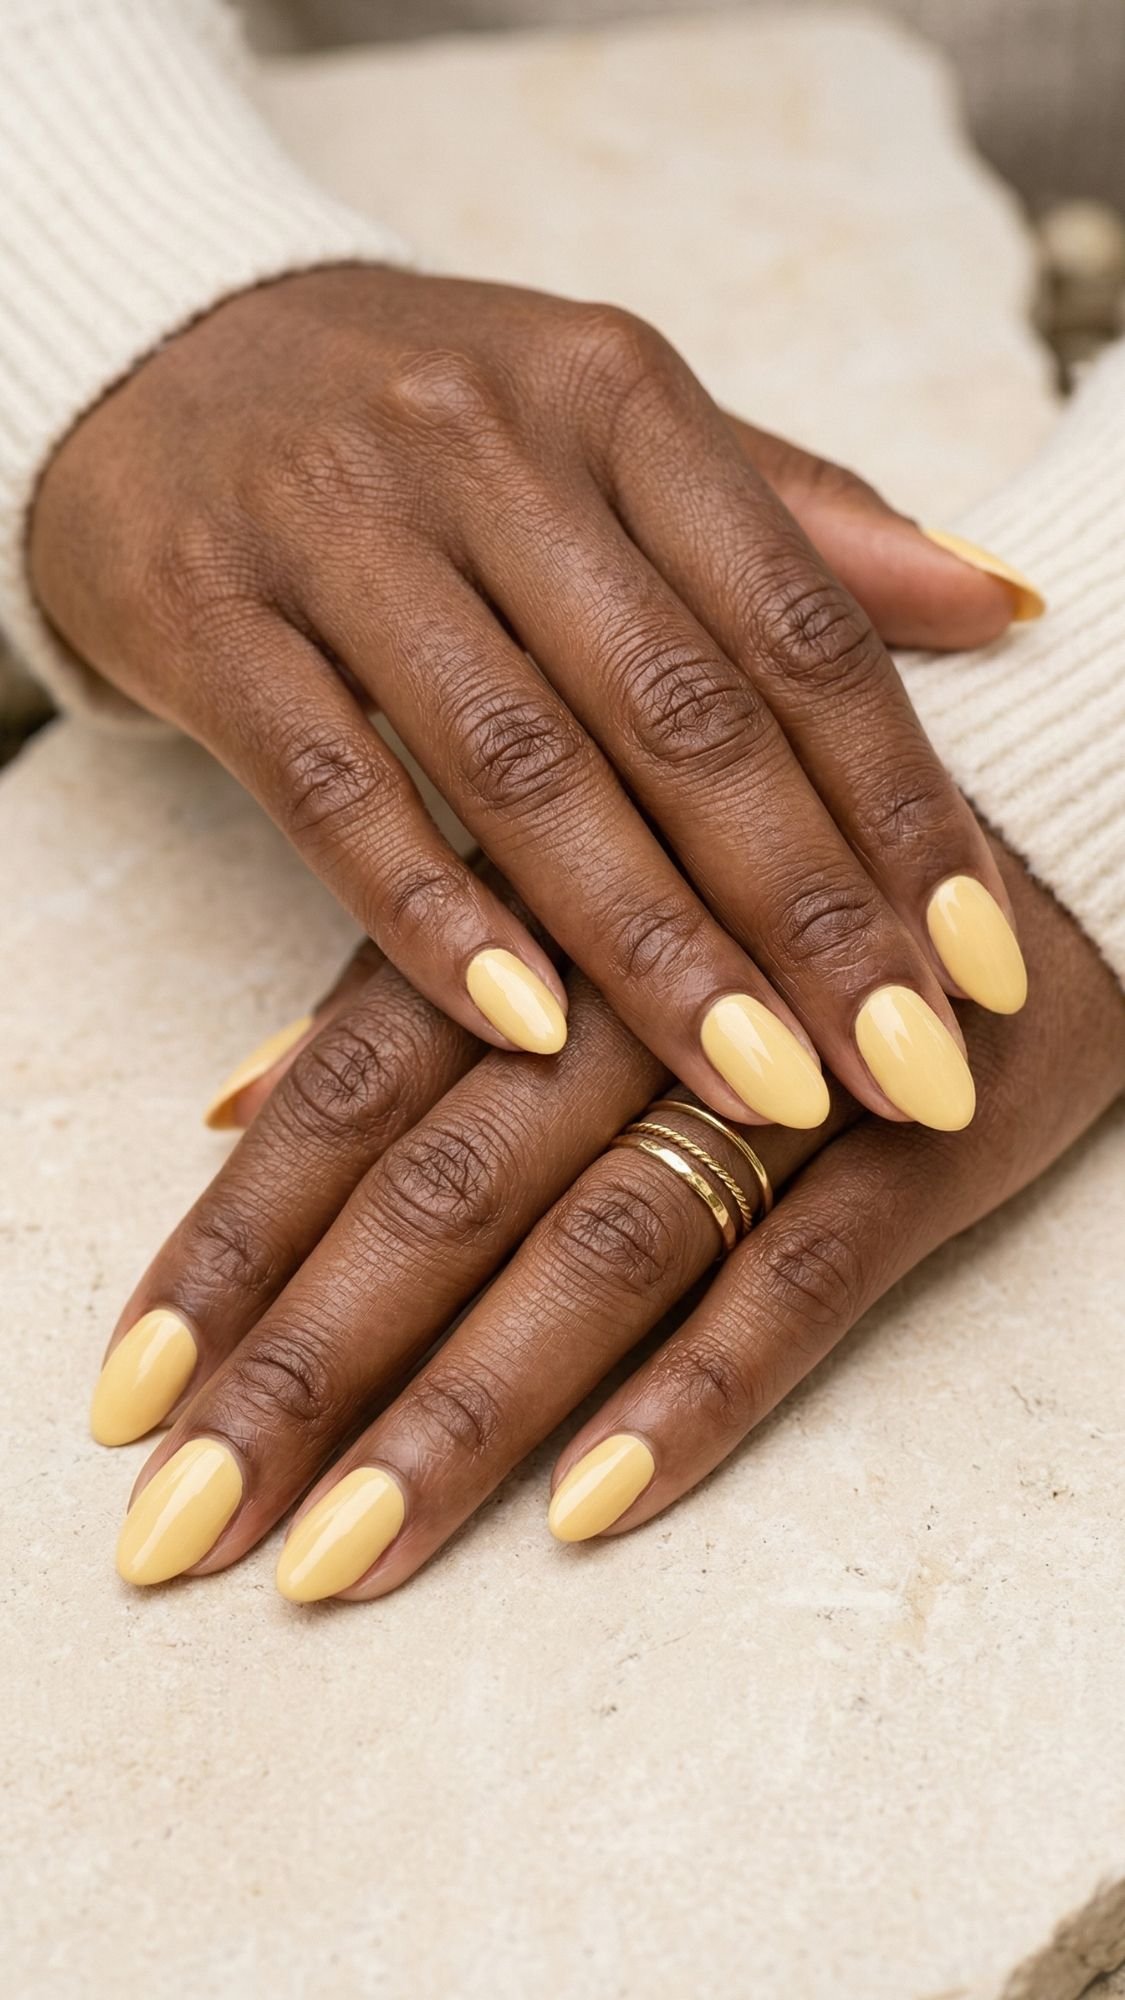
10) Buttercream Yellow Almond Nails (Soft Sunshine, Not Highlighter Chaos)
Buttercream yellow looks flattering when you keep it milky and creamy, not neon. The almond shape helps a lot here because it makes the color look intentional and elegant instead of “why are my nails yelling at me?” I’ve noticed pastel yellow reads surprisingly neutral on hands when you choose the right undertone. It gives that clean, spring-ready vibe without clashing with your outfit every five seconds.
Why This Flatters Every Hand
- A milky pastel keeps the contrast soft, so the color brightens instead of overpowering.
- Almond shape stretches the color line, which makes fingers look longer.
- The shade pops in photos without looking loud in real life.
How To Pick The Right Buttercream Yellow
- Choose butter, vanilla, or creamy custard tones, not lemon-lime yellow.
- If you want it more wearable, pick a jelly pastel yellow so your natural nail tone peeks through.
- If you love gold jewelry, buttercream yellow looks extra cohesive, it’s warm on warm, and it just works.
Pro tip: If yellow looks a little chalky on you, layer one coat of a sheer nude underneath first. That tiny base layer makes the yellow look smoother and more expensive.
How To Get The Look At Home
- Prep and dehydrate, then apply base coat and cap the edge.
- Apply 2 to 3 thin coats of buttercream yellow. Pastels often need that third coat.
- Use a glossy top coat and cap the free edge again.
- Re-top on day 3 for a fresh shine line.
Sensory detail: Pastel polishes can feel slightly draggy on the first coat, then they suddenly smooth out once the second coat goes on and the top coat levels everything.
Salon Script (What To Ask For)
- “Short to medium almond, creamy butter-yellow, not neon, glossy finish, clean cuticle line.”
- If you want it super flattering: “Keep it milky, not opaque white-yellow.”
Common Mistakes + Easy Fixes
- Mistake: yellow looks streaky.
- Fix: do 3 thin coats, and let each coat set a few minutes.
- Mistake: yellow looks chalky.
- Fix: use a sheer nude base layer, or choose a jelly pastel yellow.
- Mistake: chips show up fast.
- Fix: cap the free edge and do the day 3 top coat refresh.
Sensitive-Nail Alternative
- Skip buffing, use a ridge-filling base coat.
- Keep length short almond so the tips do not flex and peel.
Key Takeaways
- Buttercream yellow flatters when you keep it milky, creamy, and glossy.
- Extra thin coats beat one thick coat, especially with pastels.
- A sheer nude base layer can make yellow look smoother and less chalky.
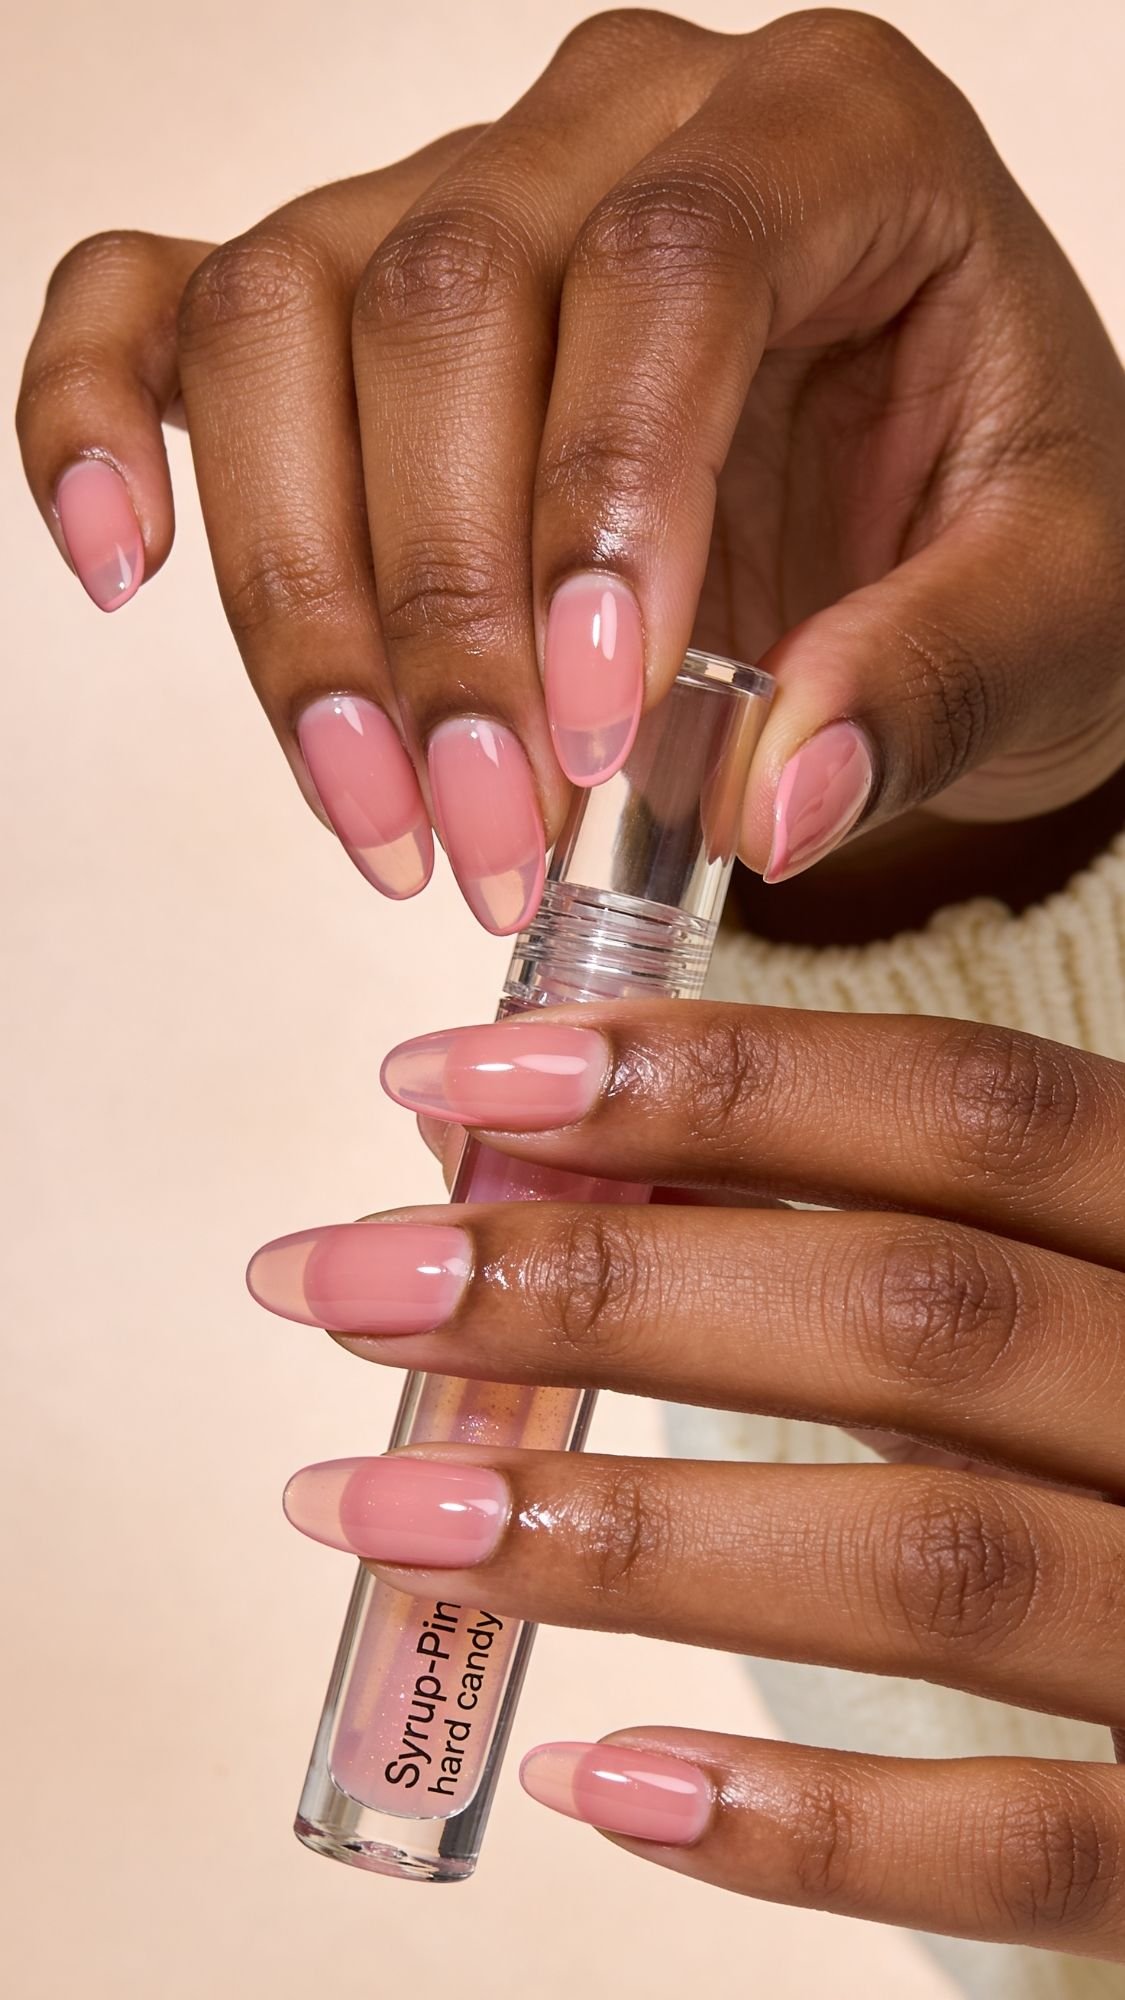
11) Sheer Jelly Pink Almond Nails (The Most “Healthy Nails” Looking Manicure)
Sheer jelly pink looks flattering because it mimics what you wish your natural nails looked like on their best day. It’s translucent, juicy, and glossy, so it smooths the vibe without covering everything up. On almond nails, jelly pink reads extra elegant because the shine line stretches down the taper and makes fingers look longer. I’ve noticed jelly finishes photograph better than opaque nudes because they catch light and look dimensional instead of flat. Ever put on a nude and thought, why do my hands look dull? Jelly pink fixes that, it adds life.
Why This Flatters Every Hand
- The translucency lets your natural tone show through, so it adapts to your skin tone.
- The finish looks “clean” even when it grows out.
- Glossy jelly makes nails look smoother and more hydrated.
How To Choose The Right Jelly Pink
- Cool jelly pink: rosy, slightly blue-pink, brightens the hand.
- Warm jelly pink: peachy pink, looks soft and natural.
- Neutral jelly pink: balanced pink, the safest option if you’re unsure.
Pro tip: If your nails have uneven tone, apply a ridge-filling base or a blurring base first. It makes jelly pink look more even without turning it opaque.
How To Get The Look At Home
- Prep, dehydrate, base coat, cap the edge.
- Apply 2 thin coats of jelly pink. Keep it translucent.
- If you want more color, add a third thin coat, but do not go thick.
- Apply glossy top coat and cap the free edge.
- Re-top on day 3 to keep the jelly shine looking fresh.
Sensory detail: Jelly polish feels slick and lightweight, almost like tinted lip gloss for nails. It can look uneven mid-application, then it settles into a smooth, glassy layer once it dries.
Salon Script (What To Ask For)
- “Short to medium almond, sheer jelly pink, glossy finish, clean cuticle line.”
- If you want extra flattering: “Keep it translucent, not opaque.”
Common Mistakes + Easy Fixes
- Mistake: jelly looks patchy.
- Fix: thin layers, let each coat set, and use a smoothing base coat.
- Mistake: you make it too opaque and lose the jelly effect.
- Fix: stop at 2 coats, rely on top coat shine instead of more pigment.
- Mistake: shrinkage at the tips.
- Fix: cap the free edge and top coat while color feels slightly tacky.
Sensitive-Nail Alternative
- Use ridge-filling base to smooth without buffing.
- Keep nails short almond for less flex and peeling.
Key Takeaways
- Jelly pink flatters because it looks natural, glossy, and adaptable across skin tones.
- A blurring base coat makes the translucency look more even.
- Top coat shine is the secret to that “healthy nails” finish.
12) Aura Almond Nails (The Soft Halo That Makes Your Hands Look Longer)
Aura nails look like your manicure has its own little glow. You create a soft, airbrushed halo in the center of the nail, and almond shape makes it extra flattering because the center placement pulls the eye inward and lengthens the look. I’ve noticed aura nails only look universally flattering when the aura stays soft and slightly transparent, not neon and harsh. Ever seen aura nails that look like a target logo? Yeah, we are not doing that.
Why This Flatters Every Hand
- The aura sits in the center, which makes the nail bed look longer and slimmer.
- Soft gradients keep contrast low, so the design stays flattering across skin tones.
- The look feels artsy but still clean when you use neutral shades.
Best Aura Color Combos (Wearable, Not Loud)
- Peach aura on nude base: warm, bright, easy.
- Soft pink aura on milky base: clean and romantic.
- Caramel aura on sheer beige: stunning and subtle, especially on deeper skin tones.
- Mauve aura on blush nude: soft glam, very flattering.
Pro tip: Keep the halo slightly higher than the center of the nail, closer to the cuticle area. It visually lengthens the nail bed.
How To Get The Look At Home (Beginner-Friendly Aura Method)
- Apply your base shade, sheer nude or milky, and let it set.
- Use a small makeup sponge or eyeshadow applicator.
- Dab a small amount of aura color onto the center of the nail, then tap outward softly.
- Build the aura in thin layers, do not try to do it in one heavy dab.
- Top coat and cap the free edge.
Sensory detail: The sponge dabbing feels slightly uneven, then the top coat smooths it out and the aura suddenly looks more airbrushed and glowy.
Salon Script (What To Ask For)
- “Short to medium almond, nude base with soft aura glow in the center, blended and sheer, high gloss.”
- If you want extra flattering: “Keep the aura centered and soft, no harsh edges.”
Common Mistakes + Easy Fixes
- Mistake: aura looks harsh or patchy.
- Fix: less pigment, more tapping, build slowly.
- Mistake: aura shifts too far to the side.
- Fix: center your first dab and keep your finger steady on a flat surface.
- Mistake: aura looks too bright.
- Fix: pick a softer shade, or add a thin sheer base coat over it to tone it down.
Sensitive-Nail Alternative
- Use ridge-filling base instead of buffing.
- Keep nails short almond so tips do not flex.
Key Takeaways
- Aura nails flatter because they create a centered glow that elongates the nail.
- Soft, sheer gradients look more expensive than harsh high-contrast halos.
- Build the aura slowly in thin layers, then let top coat do the smoothing.
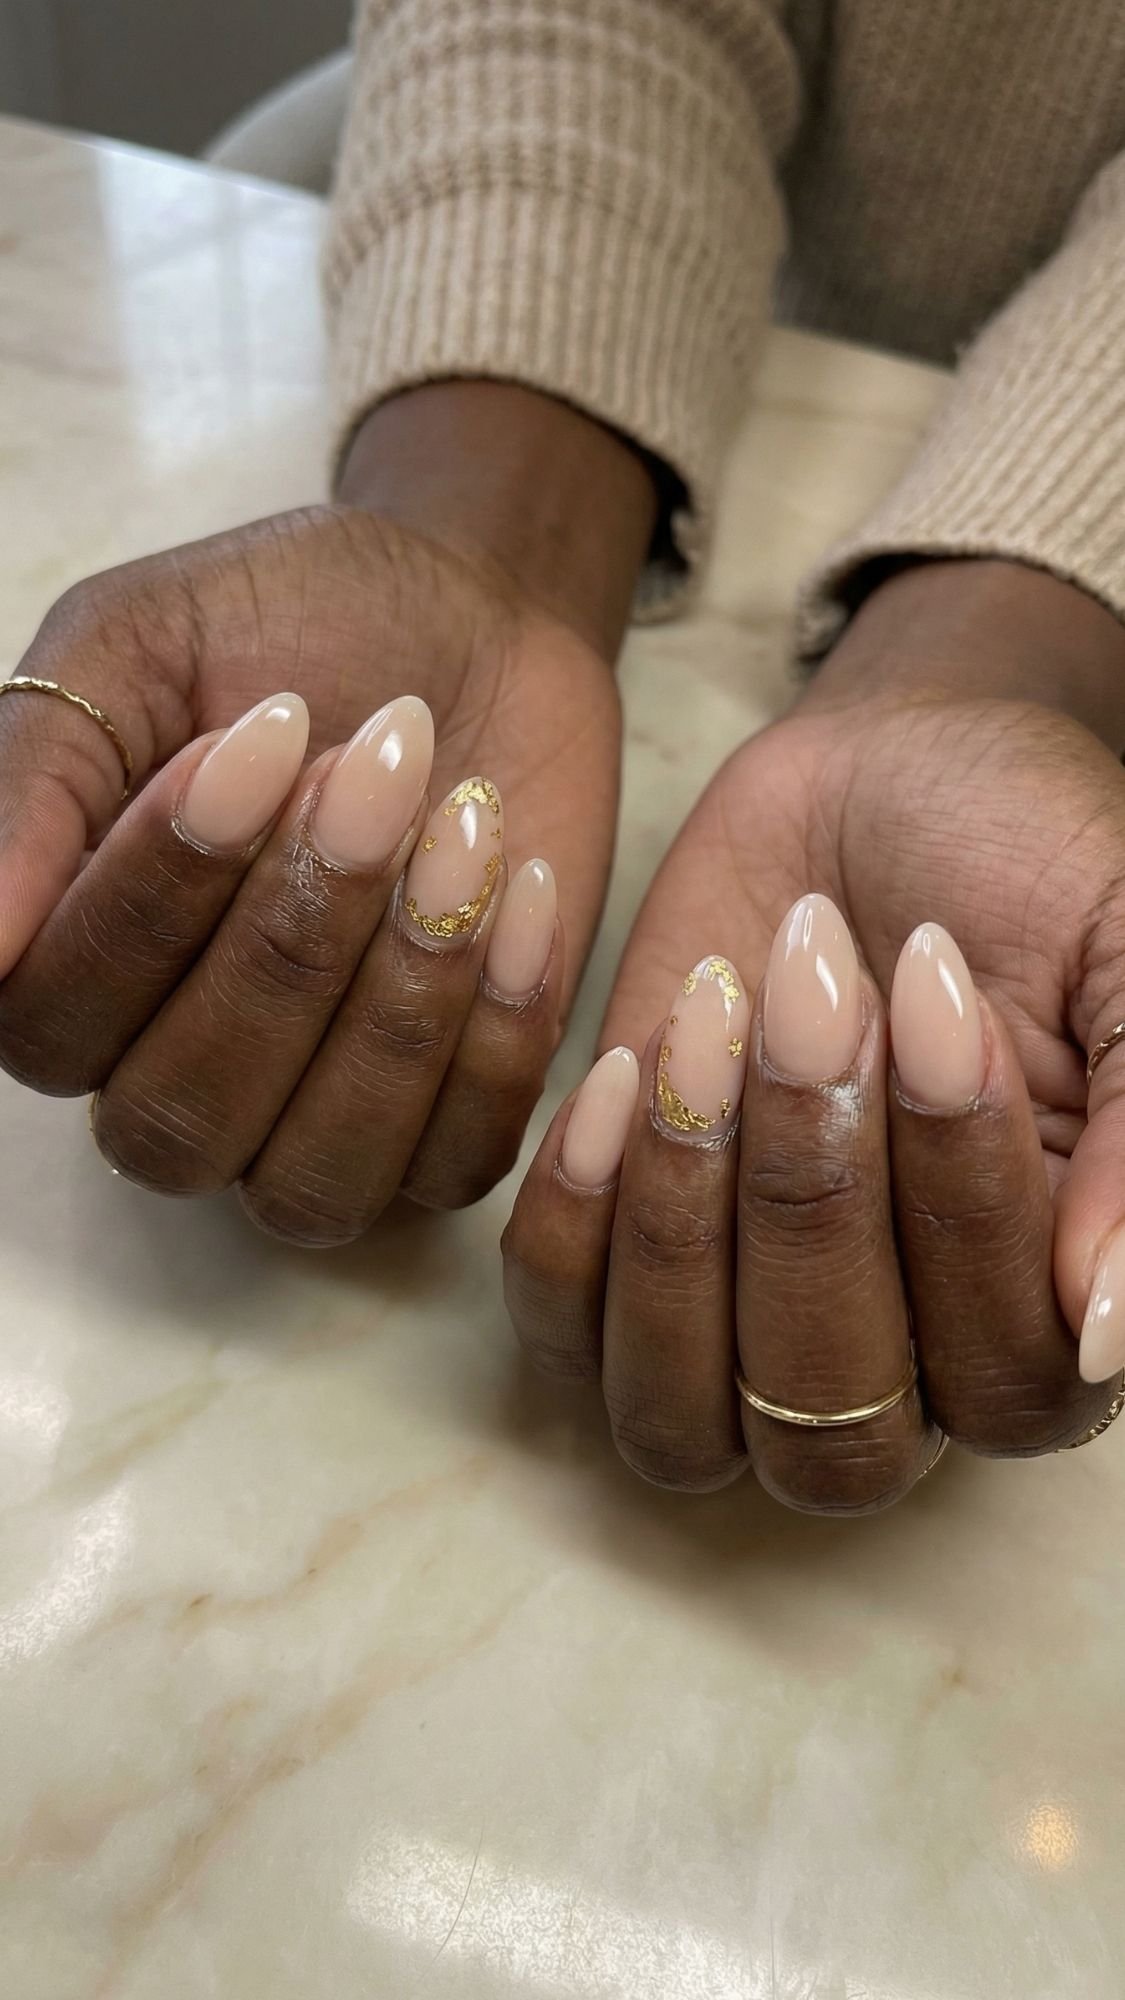
13) Minimal Gold Foil Almond Nails (Tiny Sparkle, Major “Put Together” Energy)
Gold foil looks flattering because it catches light in a way plain polish can’t, but you keep it minimal so it still feels clean. On almond nails, a little foil placed strategically makes your hands look more elegant, not busier. I’ve noticed gold foil works best when you treat it like jewelry, not confetti. Ever seen foil nails that look messy and thick? That usually happens when people use too much foil or place it randomly.
Why This Flatters Every Hand
- Gold reflects warm light, so hands look brighter and more glowy.
- Minimal placement keeps the design sleek and elongating.
- The look pairs with almost any base shade, milky nude, blush, jelly pink, even chocolate.
Best Base Shades For Gold Foil
- Milky nude: the cleanest, most universal.
- Blush nude: soft and flattering, looks romantic.
- Sheer jelly pink: fresh and glossy with sparkle.
- Warm beige or caramel nude: especially stunning on deeper skin tones.
Pro tip: If you want the most flattering placement, add foil near the cuticle or along one side of the nail. Side placement elongates more than centered foil blobs.
How To Get The Look At Home (Easy, Low Stress)
- Apply your base color and let it get tacky-dry.
- Use tweezers or a silicone tool to place tiny foil flakes.
- Press foil gently flat, do not leave edges sticking up.
- Seal with a glossy top coat, and cap the free edge.
Sensory detail: Foil feels weightless, but the edges can feel slightly sharp if they stick up. When you press and top coat properly, the surface goes smooth and glassy again.
Salon Script (What To Ask For)
- “Short to medium almond, sheer nude base, minimal gold foil accents, glossy finish.”
- If you want it extra flattering: “Place foil near the cuticle and along one side, not random chunks.”
Common Mistakes + Easy Fixes
- Mistake: foil lifts and catches hair.
- Fix: press it flat, then use a slightly thicker top coat layer to encapsulate it.
- Mistake: too much foil looks messy.
- Fix: use fewer, smaller pieces, keep it intentional.
- Mistake: foil looks dull.
- Fix: use a high-gloss top coat and avoid matte finish.
Sensitive-Nail Alternative
- Keep foil on accent nails only.
- Use ridge-filling base to smooth without buffing.
Key Takeaways
- Minimal foil flatters because it adds light without adding bulk.
- Side or cuticle placement looks cleaner than random placement.
- Encapsulate foil with top coat so it stays smooth and snag-free.

14) Tiny Gem Accent Almond Nails (Cute, Clean, and Not Snaggy)
Tiny gems can look incredibly flattering when you place them like a detail, not like a craft project. On almond nails, one small gem can make the whole manicure look more “finished” because it adds a focal point without widening the nail. I’ve noticed most gem fails happen for one reason, placement too close to the free edge. That’s how you get hair snags, sweater snags, and the classic “where did my gem go?” moment.
Why This Flatters Every Hand
- A small gem adds sparkle without changing the base color, so it stays wearable.
- Minimal accents keep the almond shape looking long and sleek.
- The design looks good in photos because the gem catches light instantly.
Best Bases For Tiny Gem Accents
- Milky nude, blush nude, jelly pink, soft ombré, even chocolate brown.
- If you want the most elegant look, stick to one gem on one nail per hand, usually ring finger.
Pro tip: Place the gem slightly above the cuticle area, not on the very edge of the cuticle, and not near the tip. That placement looks intentional and avoids snags.
How To Apply Tiny Gems At Home (So They Actually Stay On)
- Paint your base color and top coat, then let it set until it’s not wet-runny.
- Add a small dot of nail glue or a thick top coat where you want the gem.
- Place the gem with tweezers or a wax pencil, then press lightly.
- Seal around the gem with top coat, like you’re building a little “moat” around it. Do not paint directly over the gem if you want maximum sparkle.
- Cap the free edge, let it fully dry.
Sensory detail: When you press the gem into place, you’ll feel a tiny “click” as it settles into the glue, and then the top coat around it smooths the edges so it feels less sharp.
Salon Script (What To Ask For)
- “Short to medium almond, sheer nude base, tiny gem accent near the cuticle on the ring finger only, glossy finish.”
- If you want extra durable: “Encapsulate the gem edges so it won’t snag.”
Common Mistakes + Easy Fixes
- Mistake: gems pop off in a day.
- Fix: use a thicker adhesive and seal around the base of the gem.
- Mistake: gems snag hair.
- Fix: avoid placing gems near the free edge, and build a smooth seal around them.
- Mistake: too many gems look bulky.
- Fix: keep it to one or two accent nails, tiny gems only.
Sensitive-Nail Alternative
- Use flat-back micro gems, they sit smoother than taller rhinestones.
- Keep gems on one accent nail to reduce catching and lifting.
Key Takeaways
- Tiny gems flatter when they stay minimal and strategically placed.
- Place gems near the cuticle area, not at the tip.
- Seal around the gem so it feels smooth and lasts longer.
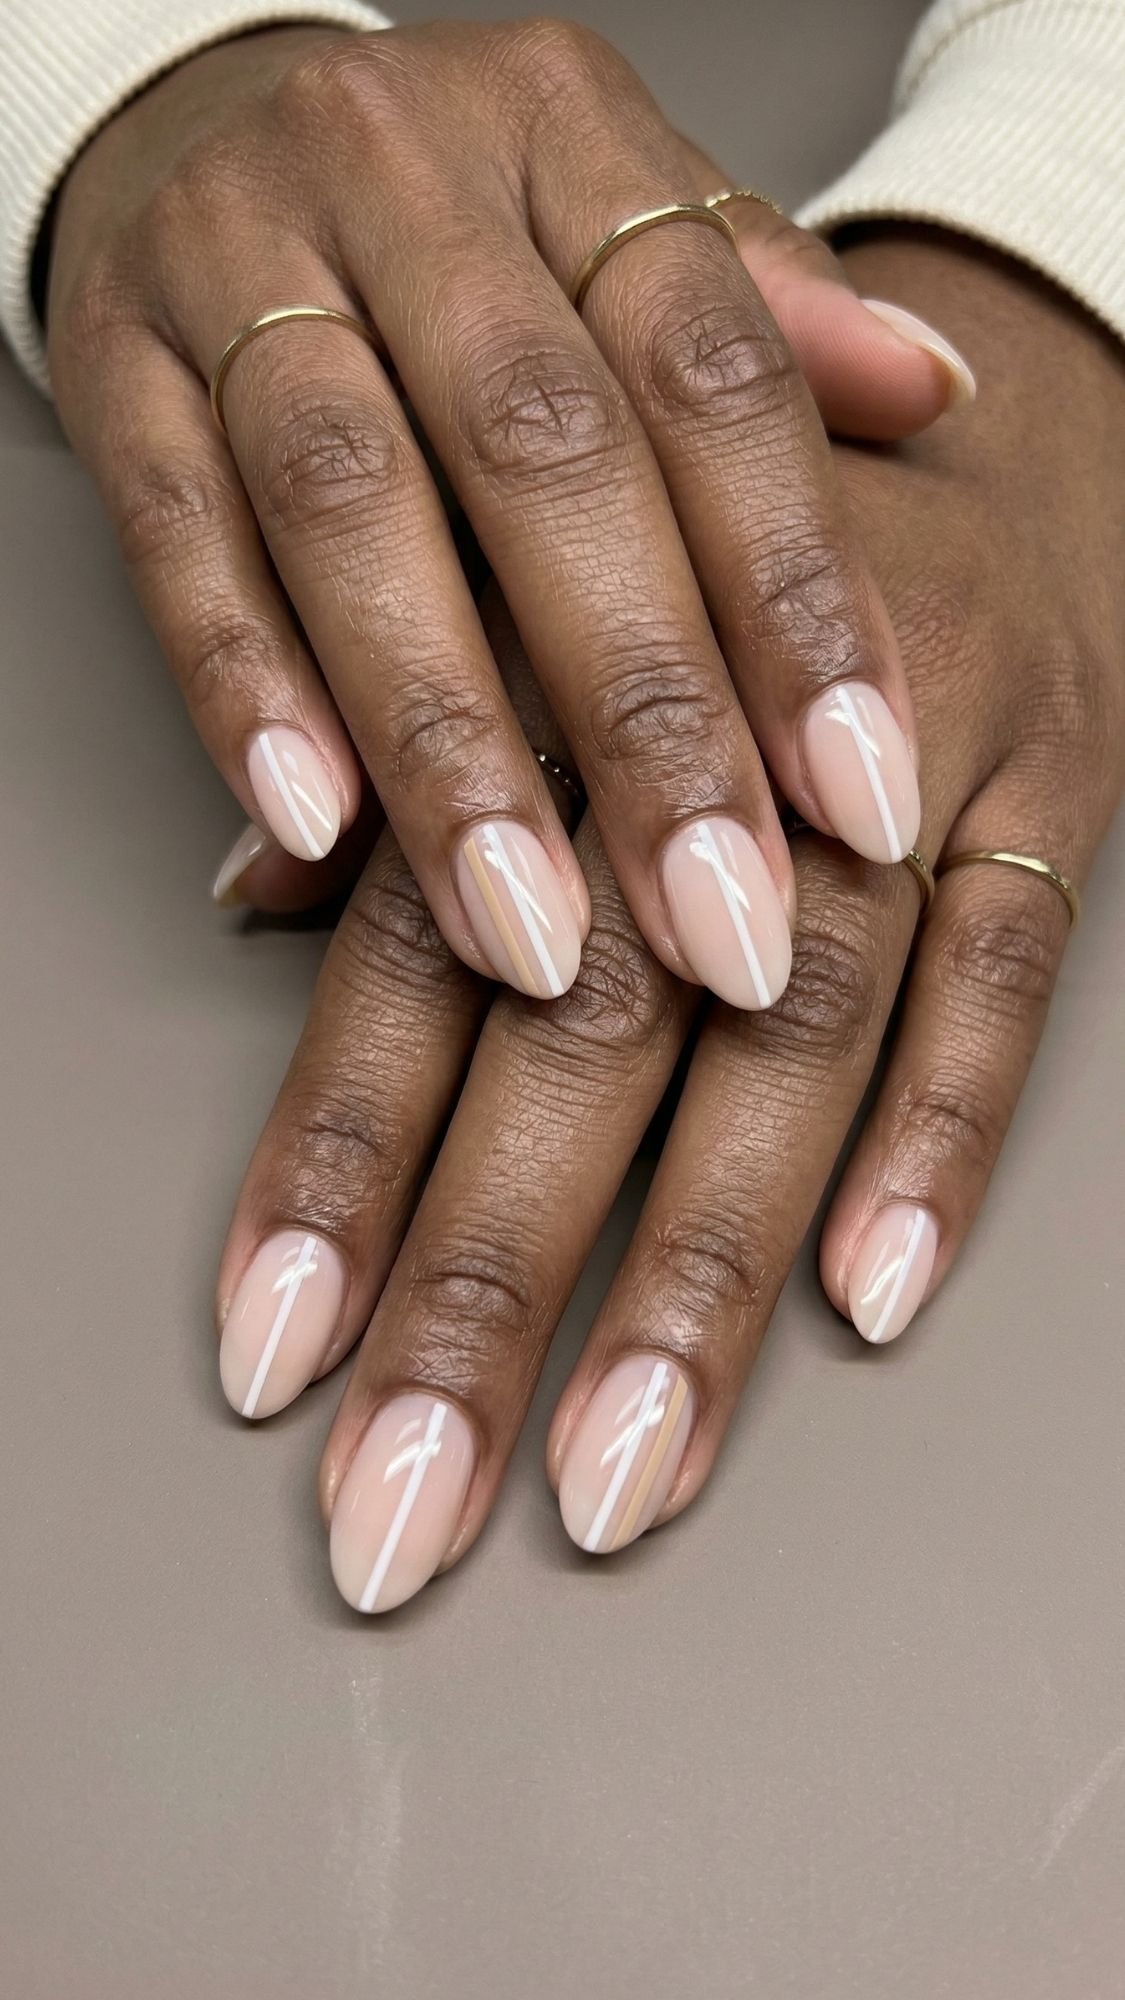
15) Soft Stripe Almond Nails (Preppy, Clean, and Surprisingly Slimming)
Soft stripes look flattering because they create gentle direction on the nail, and direction changes everything. When you place stripes vertically or slightly curved, you make the nail look longer and slimmer, especially on almond. I’ve noticed people get nervous about stripes because they picture harsh lines and loud contrast, but you can keep this design super wearable with tonal shades. Ever wanted nail art that looks intentional but still “neutral girl approved”? This is that set.
Why This Flatters Every Hand
- Vertical or curved stripes pull the eye upward, so nails look longer.
- Tonal colors keep the design soft, so it won’t overpower your hands.
- Almond shape naturally supports the stripe flow, it looks sleek instead of boxy.
Best Color Combos For Soft Stripes
- Milky nude base + soft white stripe
- Blush nude base + rose-beige stripe
- Sheer beige base + caramel stripe
- Taupe base + cocoa stripe
Pro tip: Keep one stripe slightly off-center. That tiny asymmetry looks modern and makes the nail look narrower.
How To Get The Look At Home (Simple Stripe Method)
- Apply your base shade and let it set until it feels tacky-dry.
- Use striping tape or a thin striping brush to paint one to two thin lines per nail.
- For the most flattering look, start the stripe near the cuticle and carry it to the tip in one smooth pass.
- Remove tape carefully while the polish still feels slightly soft so you don’t peel edges.
- Float a glossy top coat over everything and cap the free edge.
Sensory detail: Striping feels a little nerve-wracking at first because the brush glides fast. Your hand steadies once you anchor your pinky on the table and move your finger, not your brush.
Salon Script (What To Ask For)
- “Short to medium almond, sheer nude base, soft tonal stripes, thin lines, mostly vertical, high gloss.”
- If you want extra flattering: “Keep stripes narrow and slightly off-center, no thick bands.”
Common Mistakes + Easy Fixes
- Mistake: stripes look thick and clunky.
- Fix: use less polish on the brush and do one clean pass instead of going back and forth.
- Mistake: stripes look wobbly.
- Fix: anchor your painting hand, and pull the line in one motion, then clean up with a small brush.
- Mistake: top coat smears the line.
- Fix: float the top coat, do not press down, and avoid over-brushing.
Sensitive-Nail Alternative
- Skip tape if removal lifts your base. Use a thin brush and a very light hand.
- Use ridge-filling base so the stripes look smoother without buffing.
Key Takeaways
- Soft stripes flatter most when you keep them thin, tonal, and vertical.
- One off-center stripe can make nails look slimmer.
- Float top coat gently to keep lines crisp.
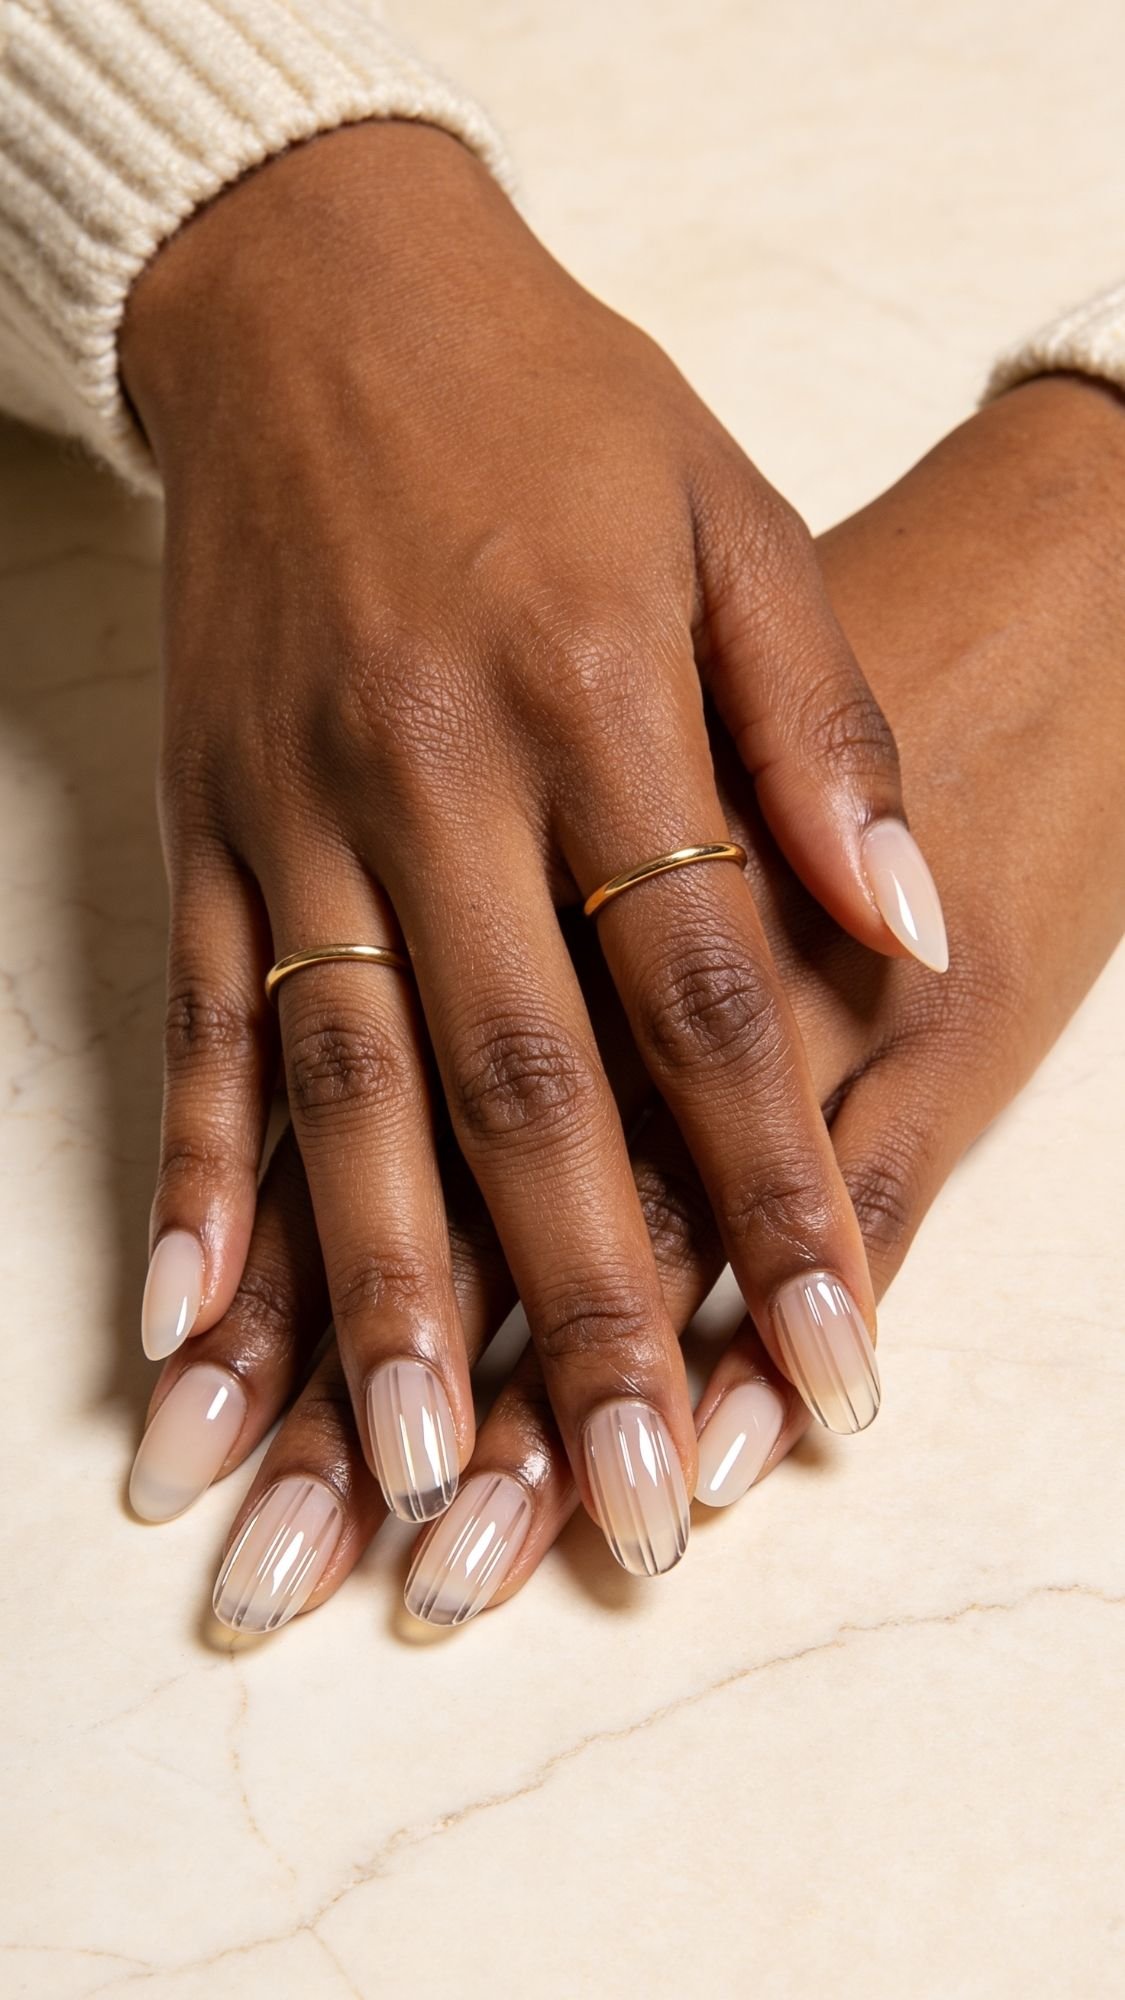
16) Ribbed Glass Almond Nails (That Subtle Texture That Looks Expensive Up Close)
Ribbed glass nails give you that low-key luxury effect where people lean in and go, “Wait, what is that?” You add faint raised lines over a sheer base, then you top it with a glassy shine so the texture catches light in a really clean way. I’ve noticed ribbed texture looks especially flattering on almond nails because the taper makes the ribs look longer and more delicate, not chunky. Ever seen 3D nails that look a little clumsy and heavy? This is the opposite, when you keep it subtle.
Why This Flatters Every Hand
- The raised lines create vertical dimension, so nails look longer.
- The sheer base keeps contrast low, so it stays wearable on every skin tone.
- The glossy finish makes the texture look intentional, not rough.
Best Base Shades For Ribbed Glass
- Sheer milky nude
- Jelly pink
- Blush nude
- Warm beige “latte” nude
Pro tip: Keep ribs thin and evenly spaced. Thick ribs can make nails look wider.
How To Get The Look (Two Options)
Option A: Gel With Lamp (Most Realistic Ribbed “Glass” Result)
What you’re using: clear builder gel or 3D gel, fine liner brush, lamp, glossy top coat.
How to do it:
- Apply your sheer base color and cure.
- Use a fine liner brush to paint thin clear gel lines from cuticle to tip.
- Cure, then add a glossy top coat and cure again.
Safety note: Keep gel off your skin. Under-curing and skin contact can trigger irritation for some people, so work carefully and clean edges before curing.
Sensory detail: Builder gel feels thick and syrupy, then it self-levels slightly. You see the ribs look sharper right after cure, then the top coat makes them look smoother and glassy.
Option B: No-Lamp “Gel-Effect” Alternative (Subtle Texture, Still Pretty)
What you’re using: sheer polish base, a thick gel-effect top coat, and either clear striping polish or a tiny amount of top coat used as “lines.”
How to do it:
- Apply your sheer base and let it get tacky-dry.
- Use a striping brush to paint very thin clear lines using a thick top coat or clear striping polish.
- Let it dry fully, then top coat again to seal and smooth.
Pro tip: Do one nail at a time so your lines stay crisp instead of spreading.
Salon Script (What To Ask For)
- “Short to medium almond, sheer milky nude base, subtle ribbed clear texture, glossy glass finish.”
- If you want it extra flattering: “Keep ribs thin, mostly vertical, evenly spaced, not chunky.”
Common Mistakes + Easy Fixes
- Mistake: ribs look too thick or uneven.
- Fix: use a finer brush and less product, build slowly.
- Mistake: texture snags hair.
- Fix: keep ribs low-profile and encapsulate with a glossy top coat.
- Mistake: the look turns cloudy.
- Fix: use a clearer top coat, avoid overworking layers, keep coats thin.
Sensitive-Nail Alternative
- Skip raised texture if your nails peel easily or you pick at lifted edges.
- Try a sheer base plus a high-gloss top coat and a tiny shimmer glaze instead, it gives dimension without texture.
Key Takeaways
- Ribbed glass flatters because it adds vertical texture and glossy shine without loud color.
- Thin, subtle ribs look more expensive than thick 3D lines.
- Encapsulating with top coat keeps the finish smooth and snag-free.
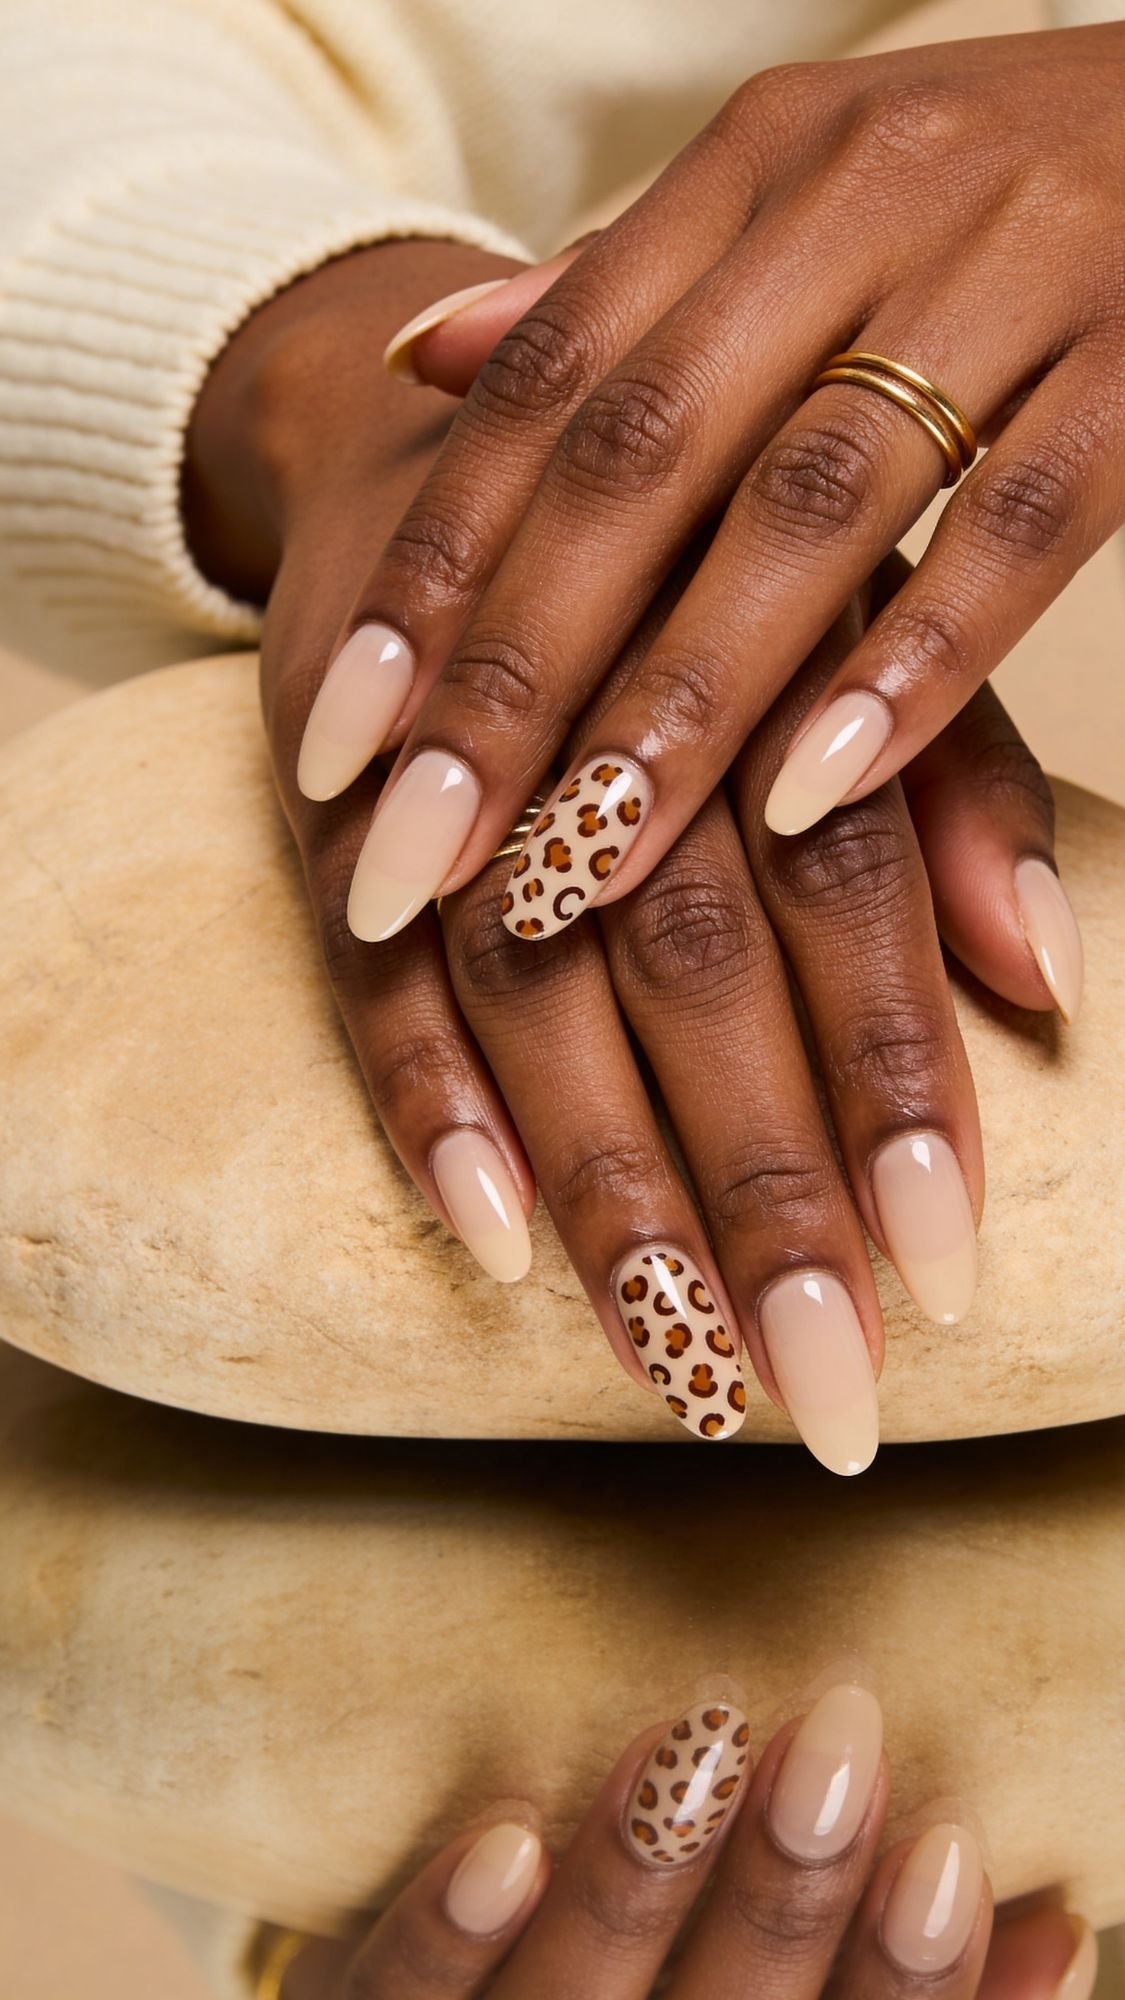
17) Delicate Animal Print Accent Almond Nails (Pinterest-Cute, Not Loud Leopard Everywhere)
Delicate animal print looks flattering when you keep it small, soft, and intentional. I’m talking micro spots, tiny tortoiseshell vibes, or a subtle “fawn” pattern on one or two nails, not a full safari across all ten fingers. Almond nails make animal print look more elegant because the tapered shape keeps the pattern from reading bulky. I’ve noticed animal print only stops flattering when the contrast gets too harsh or the spots get too big, then it can visually widen the nail. Ever seen leopard nails that feel like they’re shouting? Yeah, we’re doing the quiet version.
Why This Flatters Every Hand
- Accent placement keeps the look clean and elongating.
- Micro patterns add interest without widening the nail.
- Neutral animal prints pair with everything and grow out nicely.
The Most Flattering “Soft Animal” Color Palettes
- Nude base + warm brown micro spots
- Milky beige base + caramel and cocoa dots
- Sheer pink nude base + soft taupe micro spots
- Tortoiseshell accent in warm amber tones on a nude base
Pro tip: Keep the print on one or two accent nails per hand, usually ring finger and maybe middle finger if you want more.
How To Do Micro Animal Print At Home (Easy Dot Method)
- Apply your base shade and let it set.
- Use a dotting tool, bobby pin tip, or toothpick.
- Create tiny irregular dots in a warm brown.
- Add a few smaller dots in a deeper cocoa shade for dimension.
- Keep dots clustered lightly, do not cover the entire nail.
- Seal with glossy top coat, cap the free edge.
Sensory detail: Dotting feels slower than painting, and you’ll notice your hand steadies once you rest your wrist on the table. Small dots look better than “perfect” dots, so don’t overthink it.
Salon Script (What To Ask For)
- “Short to medium almond, nude base, micro animal print accent on ring finger only, soft neutral tones, glossy finish.”
- If you want it extra flattering: “Keep the print tiny and tonal, not high contrast.”
Common Mistakes + Easy Fixes
- Mistake: spots are too big and widen the nail.
- Fix: scale the dots down and leave more negative space.
- Mistake: print looks messy.
- Fix: use fewer dots, add them gradually, and keep the palette tight.
- Mistake: top coat smears the design.
- Fix: let dots set a few minutes, then float top coat gently.
Sensitive-Nail Alternative
- Keep animal print to one accent nail and use a sheer base so you don’t need thick layers.
- Skip heavy buffing, use ridge filler base.
Key Takeaways
- Delicate animal print flatters when it stays micro, neutral, and minimal.
- Accent nails keep the look elegant and wearable.
- Negative space is your friend, it keeps the design elongating.
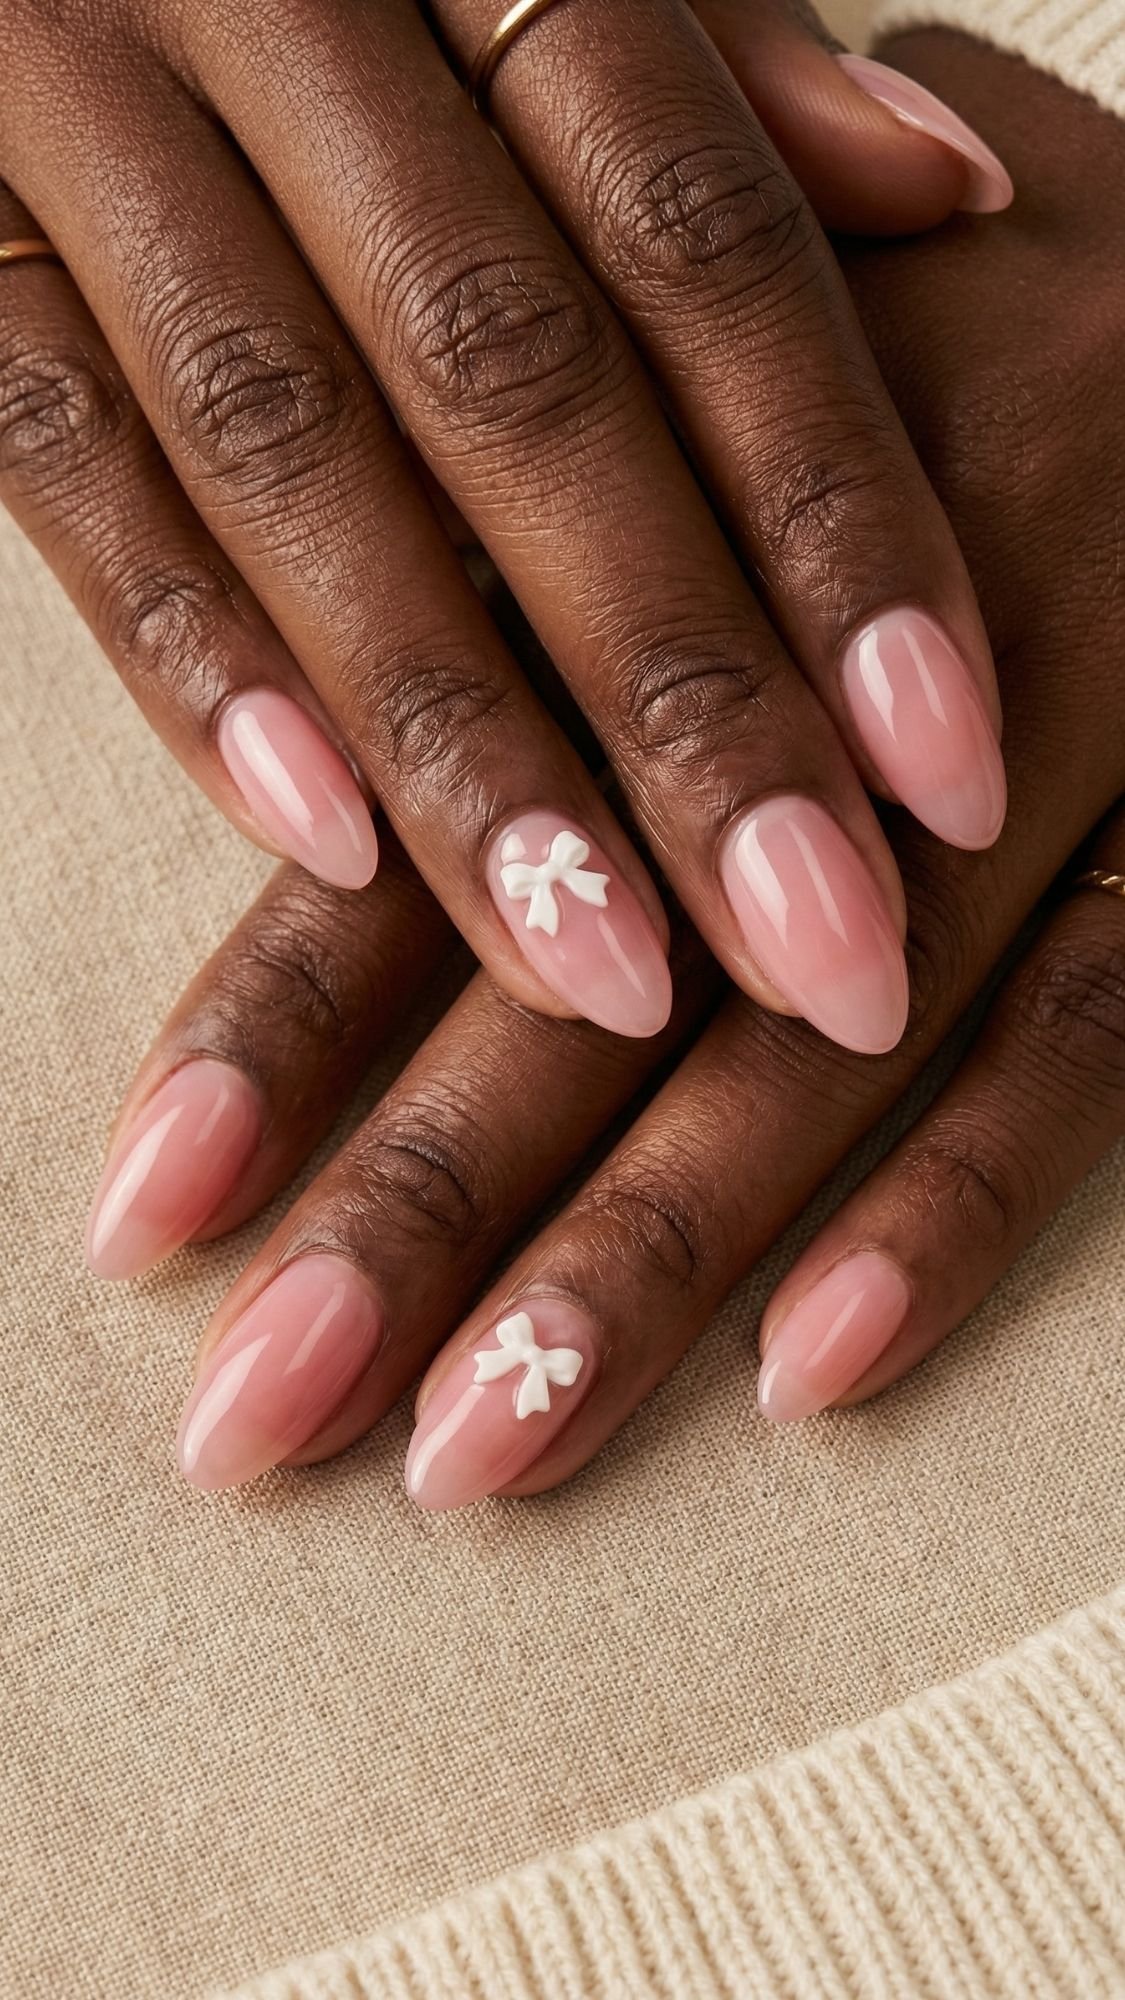
18) Coquette Bow Detail Almond Nails (Tiny Bow, Big “Soft Girl” Energy)
Coquette nails can look adorable or they can look like you hot-glued a craft aisle onto your fingertips. The flattering version keeps the bow detail micro and minimal, so the almond shape still looks long and clean. I’ve noticed bows look best when they sit near the cuticle on one accent nail, because that placement feels intentional and doesn’t mess with the taper. Ever seen big 3D charms that catch hair and pop off in two days? Yeah, we’re not doing that. We want cute and functional.
Why This Flatters Every Hand
- One tiny bow creates a focal point without widening the nail.
- Neutral or sheer bases keep the look clean and elongating.
- Almond shape balances the “sweet” detail so it still looks grown.
Best Base Shades For Coquette Bows
- Sheer jelly pink
- Milky nude
- Blush nude
- Soft ombré
- If you want more contrast: a warm beige base with a white bow
Pro tip: Use a bow detail on one nail per hand. If you do bows on every nail, the design can look busy fast.
How To Get The Look At Home (Three Easy Options)
Option A: Bow Decals (Easiest, Most Beginner-Friendly)
- Apply your base shade and top coat.
- Place a tiny bow decal near the cuticle area.
- Seal with another top coat, floating it gently.
Option B: Micro Bow Nail Art (Painted)
- Use a dotting tool to place two tiny dots side-by-side.
- Pull each dot inward slightly with a thin brush to form the bow loops.
- Add a tiny center dot for the knot.
- Top coat carefully.
Option C: Micro Charm Bow (Only If You Want 3D)
- Place a tiny flat-back bow charm near the cuticle.
- Use nail glue or thick top coat.
- Seal around the edges to reduce snagging.
Sensory detail: Decals feel like nothing once sealed, but 3D charms can feel slightly raised until you encapsulate the edges properly.
Salon Script (What To Ask For)
- “Short to medium almond, sheer pink or milky nude base, one tiny bow accent near the cuticle on the ring finger, glossy finish.”
- If you want it extra flattering: “Keep the bow small and flat, no bulky charm.”
Common Mistakes + Easy Fixes
- Mistake: bow looks bulky and catches hair.
- Fix: use a decal or painted bow, or seal around charm edges smoothly.
- Mistake: too many accents looks busy.
- Fix: one accent nail per hand, keep the rest clean.
- Mistake: bow placement looks off.
- Fix: place it slightly above the cuticle centerline, not too low and not too close to the side.
Sensitive-Nail Alternative
- Skip glue if you react to adhesives.
- Use a painted bow or a simple bow outline instead.
Key Takeaways
- Coquette bows flatter when they stay tiny, flat, and minimal.
- Cuticle-area placement looks intentional and avoids snagging.
- One accent nail per hand keeps it clean and wearable.
19) “Bangle” Metallic Strip Almond Nails (Nails That Look Accessorized)
Bangle nails give you the vibe of jewelry built into the manicure. You add one curved metallic strip or arc that looks like a tiny bangle hugging the nail, and it instantly feels modern and expensive. Almond shape makes this design especially flattering because the curve follows the taper, so your nails look longer and more sculpted. I’ve noticed this design works best when you keep the base neutral and the metal detail clean. Ever seen metallic accents that look messy or wrinkled? That usually comes from thick striping tape or not sealing it smoothly.
Why This Flatters Every Hand
- The metallic arc creates a sleek focal point without widening the nail.
- The base stays soft and neutral, so it flatters every skin tone.
- The curved line works with the almond taper to elongate the look.
Best Metallic Choices (Pick One)
- Champagne gold: warm, luxe, blends beautifully with gold rings.
- Silver chrome: crisp and modern, pops against neutral bases.
- Rose gold: softer, pretty, and flattering.
- Bronze: rich and subtle, especially stunning on deeper skin tones.
Pro tip: Place the arc slightly above the center of the nail, not right at the middle. That placement keeps the nail bed looking longer.
How To Get The Look At Home
- Apply a sheer nude or milky base and let it set.
- Add the bangle detail using one of these:
- Thin metallic striping tape cut into a gentle curve
- Metallic liner polish for a painted arc
- Chrome powder applied just in a curved band if you use powder systems
- Press striping tape flat so no edges lift.
- Seal with a glossy top coat, then add a second top coat if you feel any texture.
- Cap the free edge, because metallic accents love to chip if you skip this.
Sensory detail: Striping tape can feel slightly raised at first, then the second top coat makes it feel smooth and “sealed in,” like it’s part of the nail.
Salon Script (What To Ask For)
- “Short to medium almond, sheer nude base, one curved metallic bangle accent per nail or on accent nails, clean and minimal, glossy finish.”
- If you want it extra flattering: “Keep the metal line thin and curved, no thick bands.”
Common Mistakes + Easy Fixes
- Mistake: metallic strip wrinkles or lifts.
- Fix: press it down firmly, trim edges clean, and seal with two top coats.
- Mistake: the line looks too thick.
- Fix: choose thinner tape or a liner brush instead of a wide strip.
- Mistake: it looks random.
- Fix: keep placement consistent across nails, same height and curve direction.
Sensitive-Nail Alternative
- Use metallic liner polish instead of tape if tape edges irritate you or lift.
- Keep the design to accent nails only for fewer layers.
Key Takeaways
- Bangle nails flatter because the curved metal detail looks like jewelry and follows the almond taper.
- Thin, clean metallic lines look more expensive than thick bands.
- Seal metallic accents well so they stay smooth and snag-free.
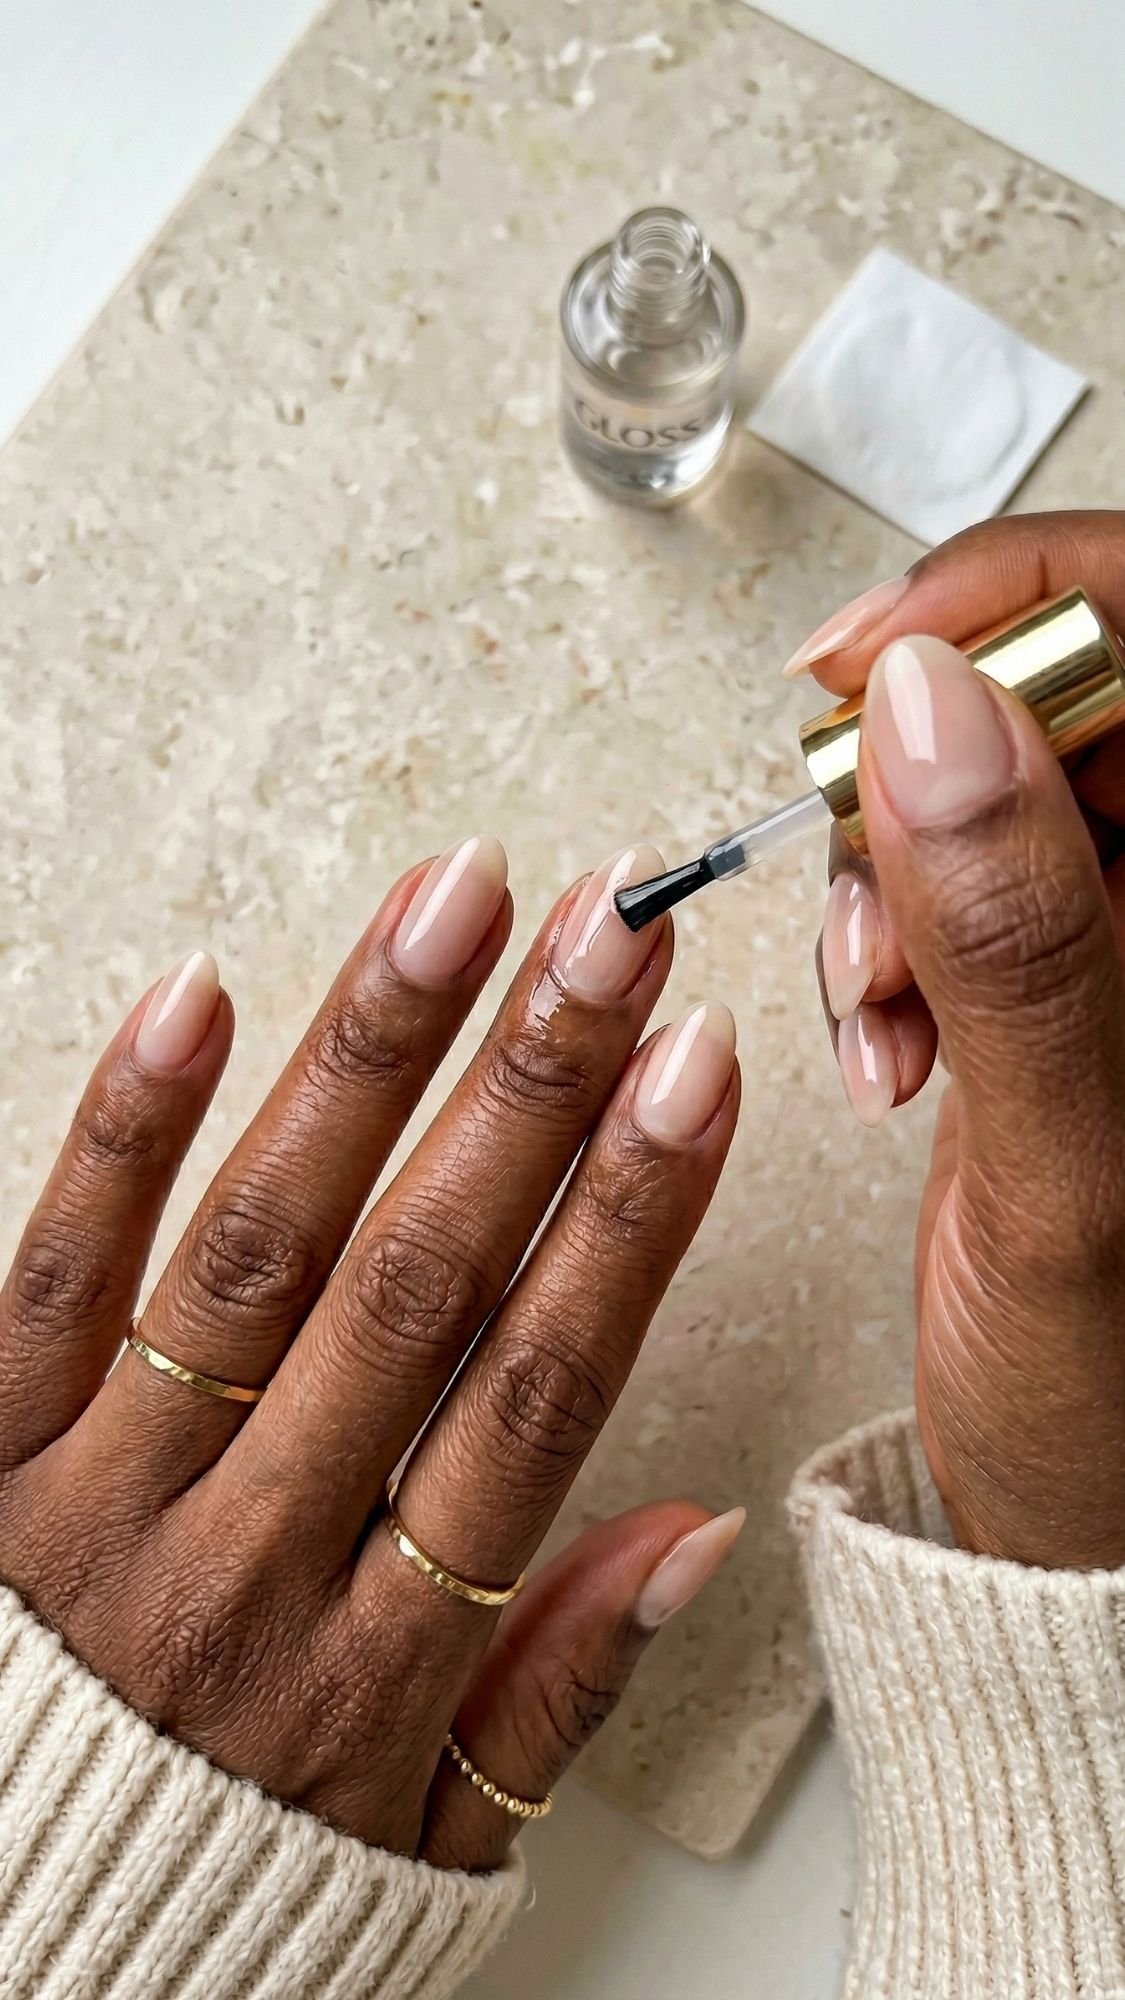
Beginner Version, Good Almond Nails In 15–20 Minutes (No Extra Drama)
If you want almond nails that flatter your hands without turning it into a whole event, this is the fastest version that still looks clean. I use this routine when I need my nails to look polished for photos, plans, or just because I feel like having my life together for once. The key is short almond, thin coats, and a glossy top coat that levels well. You can absolutely get a flattering result even if your nail art skills stop at “I can paint inside the lines… sometimes.” Ready?
The 15–20 Minute Routine
- Shape (3–5 minutes)
- File into short almond, keep the tip softly rounded.
- Check both hands from a top-down view so one hand does not turn pointier.
- Quick cuticle tidy (2 minutes)
- Push back gently, snip only hangnails.
- Skip heavy cuticle cutting, it makes cuticles look worse later.
- Clean and dehydrate (1 minute)
- Swipe each nail with acetone or alcohol on a lint-free pad.
- Do not touch your nails after this, oil and lotion ruin grip.
- Base coat (1 minute)
- Apply one thin coat, cap the free edge.
- Use ridge filler if you peel or have texture.
- Color (5–7 minutes)
- Apply 2 thin coats of a sheer milky nude or jelly pink.
- Wait 2 minutes between coats if you can, it prevents dents.
- Top coat (2 minutes)
- Apply a glossy top coat, cap the free edge.
- Then do not poke anything sharp for 15 minutes, yes even your phone case button. :/
Sensory detail: When you do thin coats right, the polish feels like it glides on, then the top coat levels and the nails feel glass-slick instead of tacky.
Quick Takeaways
- Short almond flatters the fastest, it looks intentional and wears better.
- Sheer milky or jelly shades look clean even if application is not perfect.
- Capping the free edge prevents most chips.
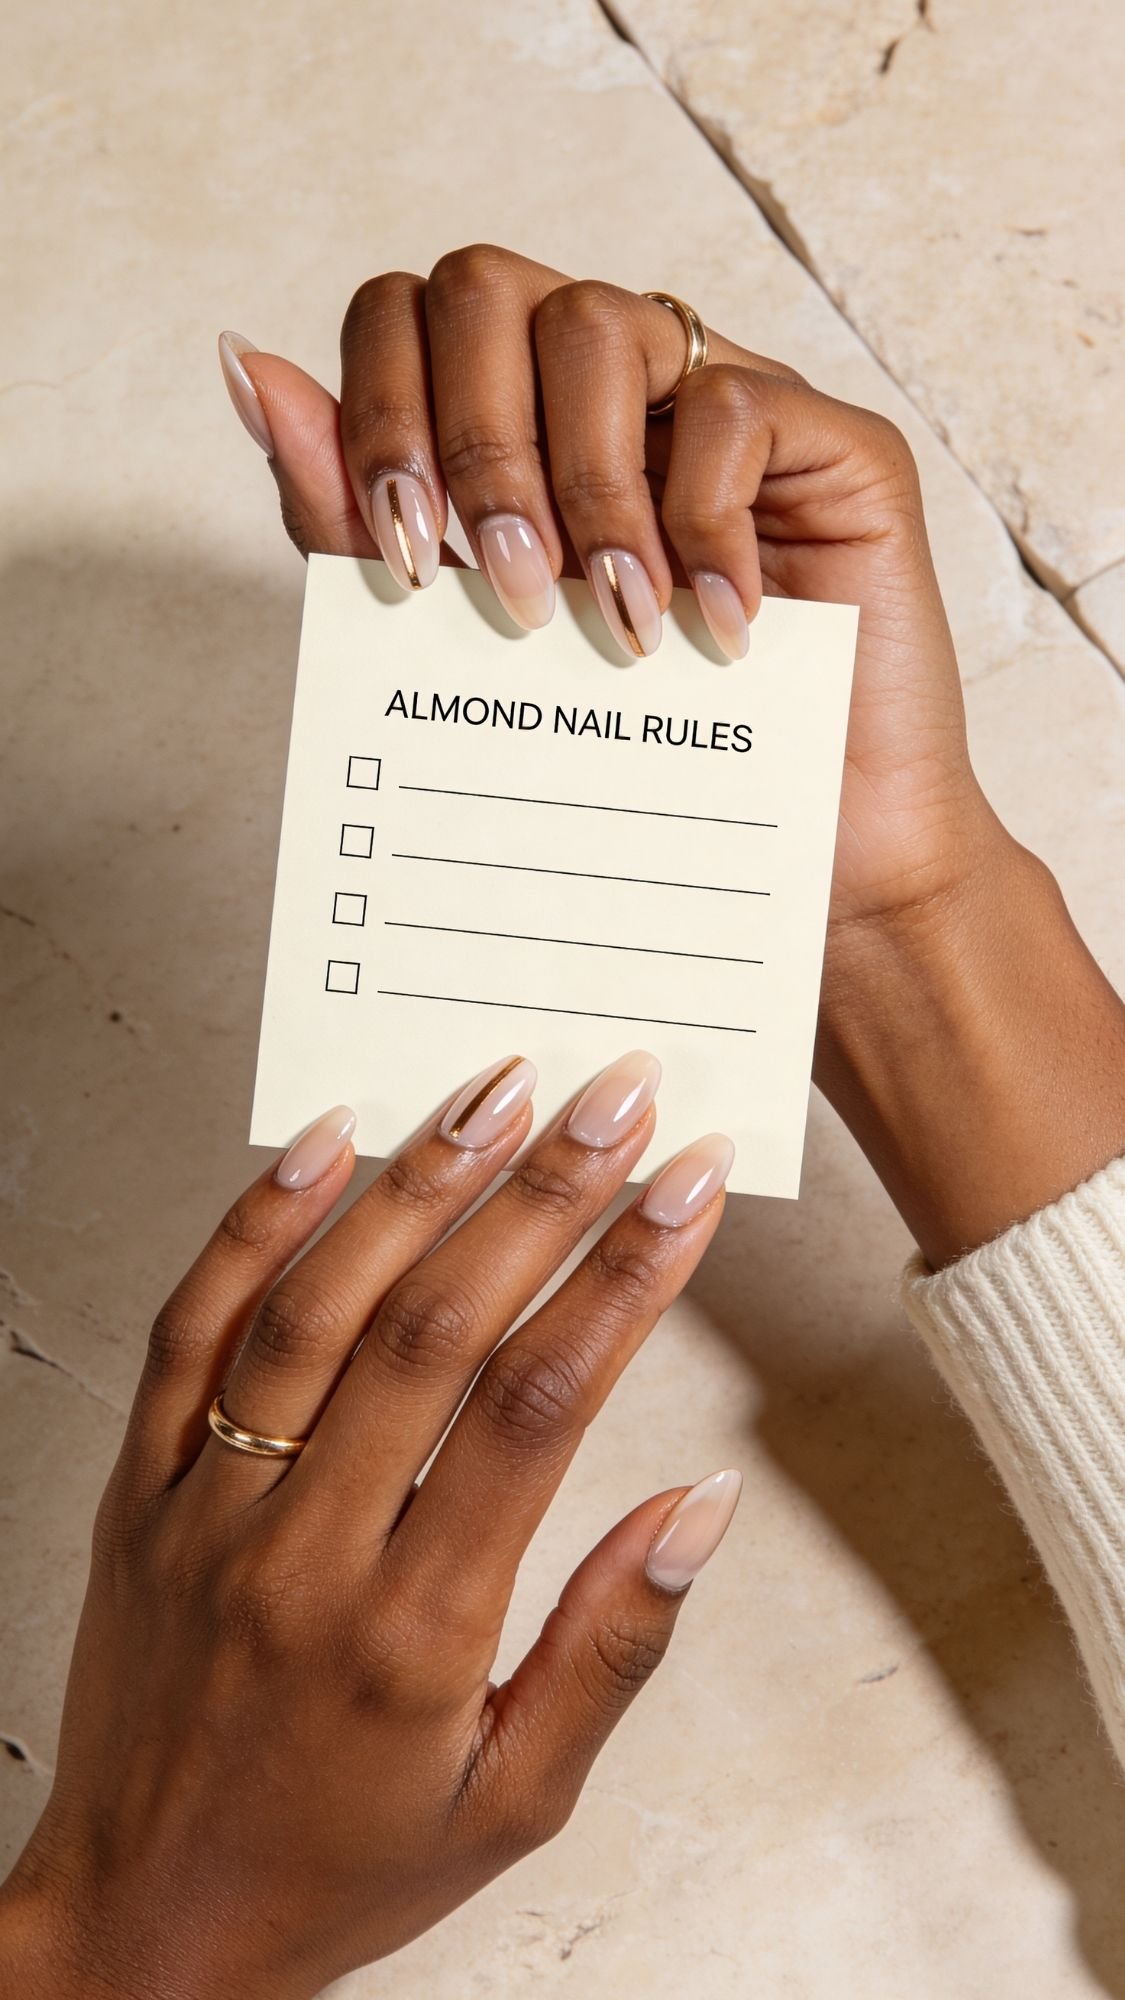
Beauty Rules Of Thumb For Almond Nails (The Stuff That Saves You From Regret)
I swear these little rules matter more than the design. When you follow them, almond nails look cleaner, last longer, and flatter your hands way more.
The Rules
- Shape first, paint second. If you shape after polish, you rough up the edges and invite chips.
- Keep the taper gradual. I file straight along the sidewalls first, then I taper, that’s how you avoid the triangle tip.
- Stop filing when it looks good from 2 feet away. Over-filing makes tips thin, then peeling starts.
- Thin coats always win. Thick coats dent, bubble, and shrink at the tip.
- Cap the free edge with base and top coat. This one habit fixes half the “my nails chip fast” complaints.
- Clean up the cuticle line before it sets. A crisp edge makes any manicure look salon-level.
- Do not oil right before polish. Oil belongs after everything dries, not before base coat.
- Re-top on day 3. That refresh makes regular polish look new again.
- Use gloves for wet chores. Water makes nails swell and shrink, then polish cracks and peels.
- Remove gently, never peel. Peeling takes layers of nail with it, then every manicure looks rough.
Key Takeaways
- These rules make almond nails look more flattering than any trendy design.
- Thin coats plus capped edges give you the biggest longevity boost.
- Small habits beat expensive products.
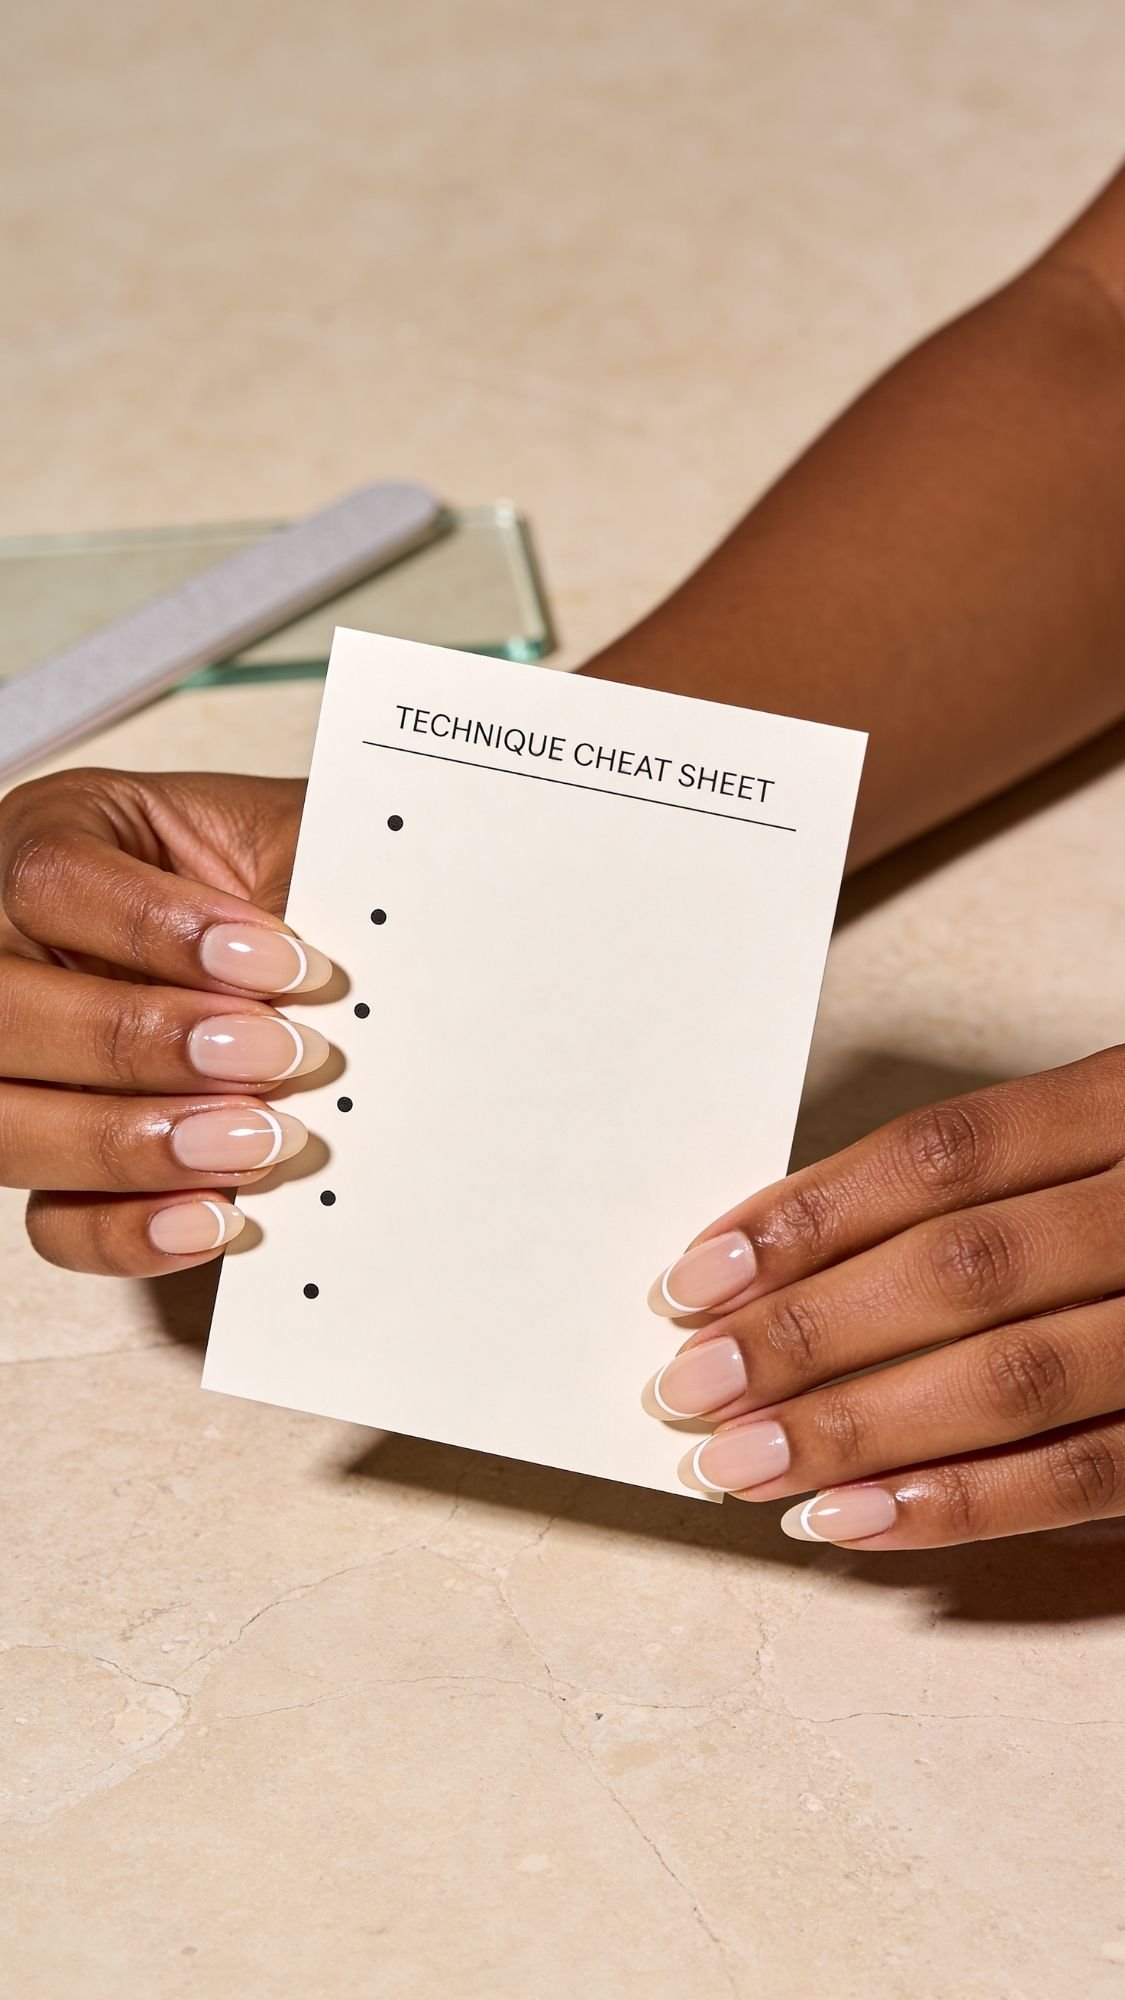
Technique Cheat Sheet (Save This, It’s the Whole Game)
This is the scannable version of everything that makes almond nails look flattering and last. If you follow these steps, you can basically rescue any manicure, even when your polish skills feel a little shaky.
Almond Shaping Cheat Sheet
- Pick your length first. Short-to-medium almond flatters most hands and breaks less.
- File the sidewalls straight first. Do not taper immediately, that’s how you get triangle nails.
- Then taper the tip slowly. Use small strokes and check symmetry often.
- Round the very tip slightly. Sharp points chip faster and look less universal.
- Match both hands by comparing from above. Hold fingertips at eye level and look straight down.
Clean Cuticle Line Cheat Sheet
- Push back gently, do not dig.
- Snip only hangnails, never living cuticle.
- Dehydrate the nail plate last.
- Use a cleanup brush with acetone to perfect the edge before it sets.
Thin Coat Cheat Sheet (3-Stroke Method)
- Wipe one side of the brush, keep a small bead on the other.
- Place bead slightly away from cuticle, nudge close carefully.
- Pull one stroke down center, then one on each side.
- Stop brushing once it starts setting.
Dry Time Cheat Sheet
- Wait 2 to 4 minutes between thin coats.
- Give yourself 15 to 20 minutes after top coat before doing anything risky.
- Use quick-dry top coat if you always dent polish.
Longevity Cheat Sheet
- Cap the free edge on base and top coat.
- Re-top on day 3 or day 4.
- File snags immediately, snags become chips fast.
- Oil at night once polish fully sets.
Quick Fix Cheat Sheet
- Chip: file edge smooth, patch color thin, top coat whole nail.
- Smudge: wait until fully dry, then add top coat to disguise.
- Dullness: one coat top coat refresh.
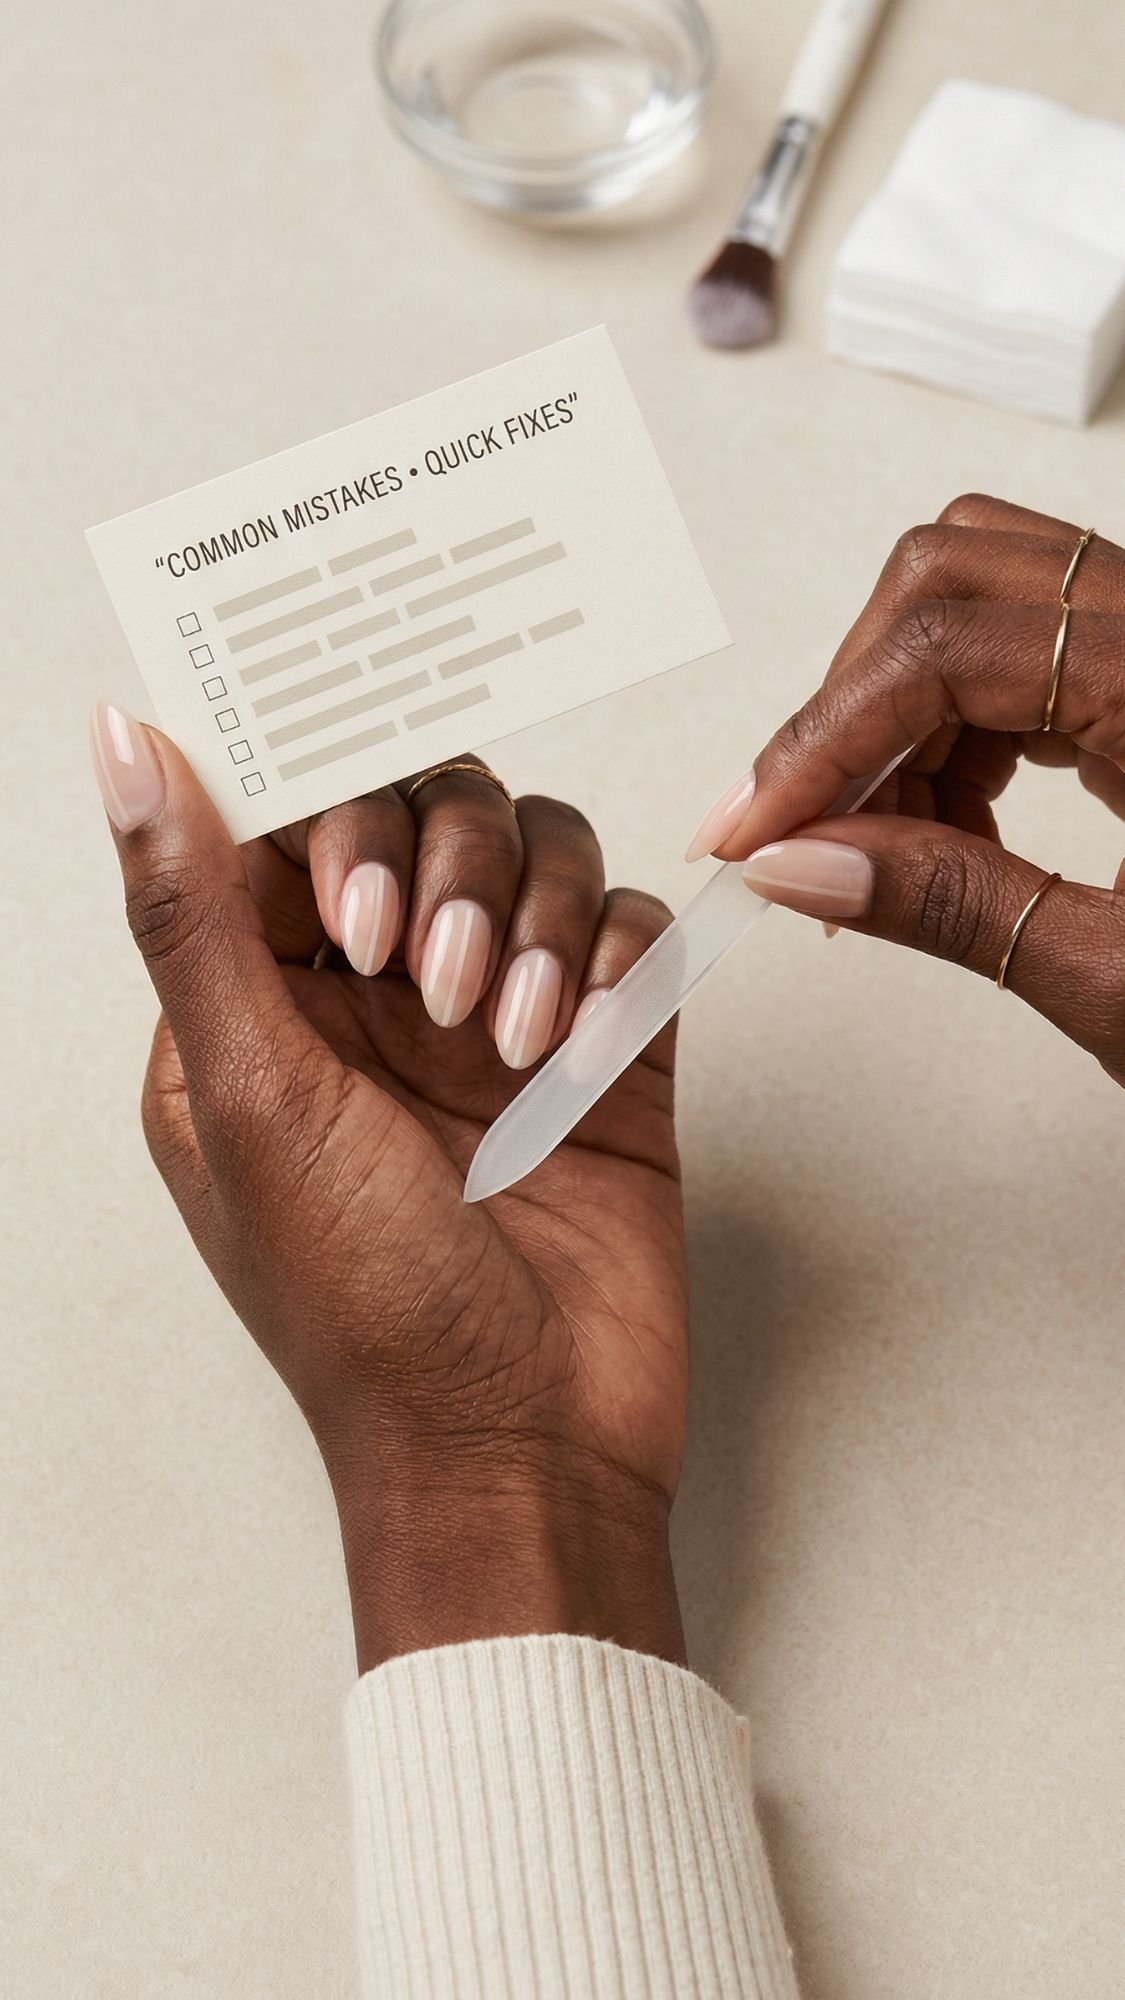
Common Mistakes And Easy Fixes (Because Nails Humble Everyone)
Even people who do nails all the time mess up, they just know how to fix it fast. I’ve noticed most almond nail issues come from tiny habits that stack up, like over-filing, rushing dry time, or using nails as tools. If you want almond nails that flatter every hand, you want clean edges, balanced taper, and a smooth glossy finish. Everything else is optional.
Mistake 1: Over-Filing The Sidewalls
What happens: almond turns into a triangle, tips get thin, peeling starts.
Easy fix:
- File straight along the sides first, taper last.
- Stop when the shape looks good from normal distance.
- If you already over-filed, shorten length slightly and round the tip more.
Mistake 2: Thick Coats To “Save Time”
What happens: dents, bubbles, smudges, shrinkage at the tip.
Easy fix:
- Do 2 to 3 thin coats instead.
- Use quick-dry top coat and let it level.
- Wait 2 to 4 minutes between coats.
Mistake 3: Flooding The Cuticle Area
What happens: polish lifts early and looks messy.
Easy fix:
- Wipe one side of your brush before applying.
- Start slightly away from the cuticle and nudge closer.
- Clean the edge with a brush dipped in acetone before it sets.
Mistake 4: Skipping The Dehydrate Step
What happens: polish peels like a sticker.
Easy fix:
- Wipe each nail with acetone or alcohol right before base coat.
- Do not touch your nail plate after that.
Mistake 5: Forgetting To Cap The Free Edge
What happens: tips chip first, especially with almond.
Easy fix:
- Cap the edge with base coat and top coat.
- Re-top on day 3 or day 4.
Mistake 6: Over-Buffing To Chase Smoothness
What happens: thinning, peeling, weak nails.
Easy fix:
- Buff lightly only if needed, then stop.
- Use ridge-filling base instead of sanding your nail plate down.
Mistake 7: Picking Or Peeling Polish
What happens: layers of nail come off, then every manicure looks rough.
Easy fix:
- Remove with remover and patience.
- Oil immediately after removal.
Mistake 8: Doing Chores Bare-Handed
What happens: water swelling, shrinkage, chips, rough cuticles.
Easy fix:
- Gloves for dishes and cleaning.
- Oil and hand cream after washing.
Key Takeaways
- Almond nails flatter most when you avoid over-filing and thick coats.
- Clean cuticle edges and capped tips make polish last longer.
- Gentle habits protect your nails and keep manicures looking smooth.

Beginner Shopping List (What To Buy First vs What Can Wait)
If you want almond nails that flatter your hands, you don’t need to buy a million things. You need a small kit that helps you shape cleanly, prep properly, and seal with shine. I’ve noticed beginners waste money on trendy nail art extras before they buy a decent file and top coat, then they wonder why their manicure looks uneven or chips fast. Start with the basics, then add the fun stuff once your foundation is solid.
Buy First (These Give You The Biggest Results)
- 240 grit nail file
- This grit shapes natural nails smoothly without shredding edges.
- Cuticle pusher
- Clean cuticle area = better adhesion and a cleaner look.
- Lint-free pads
- No fuzz under polish, no weird bumps.
- Acetone or 70% isopropyl alcohol
- Dehydrates the nail plate so polish grips.
- Base coat
- Ridge-filling if you have texture, sticky if you chip fast.
- Sheer milky nude or jelly pink polish
- The most forgiving beginner shades, flattering and clean.
- Glossy top coat
- This is your “make it look expensive” product.
Buy Next (Nice-To-Haves That Make You Look Pro)
- Cleanup brush
- Makes the cuticle line look salon-clean.
- Budget hack: a small angled eyeliner brush.
- Quick-dry drops or quick-dry top coat
- Helps if you always dent polish.
- Ridge filler or blurring base
- Smooths without over-buffing.
Buy Later (Fun Extras, Not Required)
- Striping brush or dotting tool
- For swirls, stripes, aura nails.
- Foil flakes and tiny gems
- Only after you get top coat sealing down.
- Metallic liner polish or striping tape
- For bangle arcs and clean lines.
What I’d Skip At First (Save Your Money)
- Bulk packs of cheap files, they shred edges and make shaping harder.
- Overly aggressive buffers, they can cause peeling.
- Random “miracle strength kits” if you peel from bad removal habits.
Key Takeaways
- A great file plus a great top coat beats most “extra” nail products.
- Sheer milky and jelly shades make beginner manicures look cleaner.
- Add nail art tools after you master prep and thin coats.
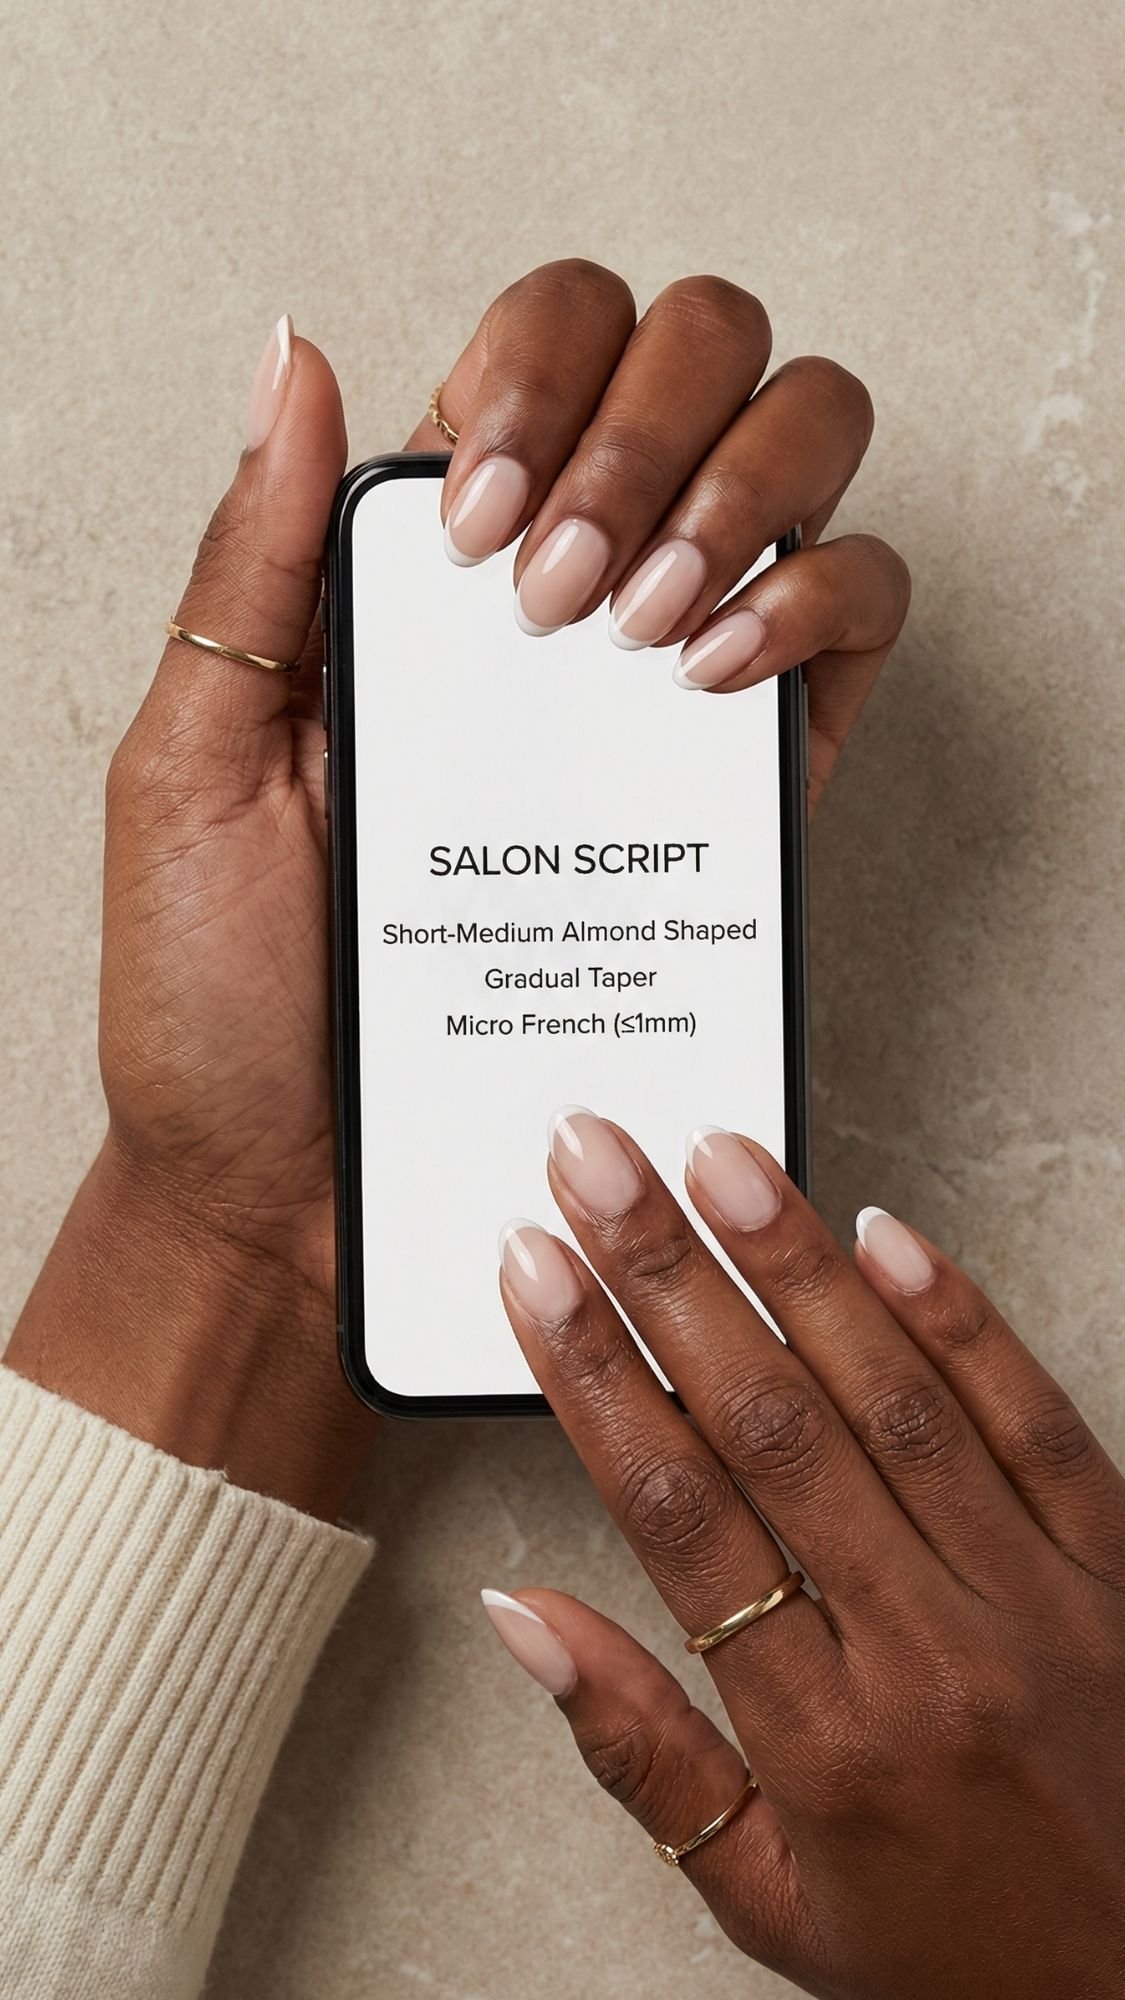
FAQ (The Questions Everyone Asks Right Before They File Too Much)
1) What almond length looks the most natural and flattering?
Short to medium almond flatters the most hands because it elongates without looking pointy. I keep the tip softly rounded, not sharp, so it looks elegant and wears better.
2) Can I do almond nails on short natural nails?
Yes. You just keep the almond subtle. Start by filing the sidewalls straight, then taper the tip slightly. If you taper too early, you lose width fast and the nail looks triangular.
3) How do I make almond nails flatter wide nail beds?
Use a gradual taper and keep the tip a little narrower than the base, but don’t over-file the sides. Choose designs that elongate, like micro French, ombré, aura, or vertical accents. Thick French tips and bold horizontal stripes can make nails look wider.
4) Why does my top coat shrink at the tip?
Top coat shrinkage usually happens when you wait too long after your color dries, or you skip capping the free edge. Top coat while the color still feels slightly tacky, then cap the edge. If it keeps happening, try a different top coat formula.
5) How do I stop bubbling polish?
Do not shake your polish. Roll it between your palms instead. Paint away from fans and vents, and keep coats thin. Thick coats trap air and bubble more.
6) What’s the most beginner-friendly almond nail design?
Milky “soap” nails or sheer jelly pink. They’re forgiving, they grow out softly, and they look polished even if your application isn’t perfect.
7) How often should I oil my cuticles for stronger nails?
Twice daily, morning and night. Oil, then add hand cream on top at night so it stays put. Just don’t oil right before you paint, because oil kills adhesion.
8) What’s the best design for pretty grow-out?
Ombré and sheer finishes win. Soft gradients and translucent shades don’t show a harsh line, so they still look intentional longer.
9) Why do my nails peel under polish?
Most peeling comes from over-buffing or peeling polish off. Use a ridge-filling base instead of buffing, remove polish gently, and oil consistently.
10) What do I ask for at the salon to get flattering almond nails?
Say: “Short to medium almond, gradual taper, softly rounded tip, clean cuticle line, glossy finish.” If your nail beds look wide, add: “Keep the tip slim but do not over-file the sidewalls.”
Your Hands Are About To Look So Much More Polished
Almond nails flatter every hand when you keep the shape balanced, the cuticle line clean, and the finish glossy. You don’t need extreme length or complicated nail art to get that “my hands look expensive” effect. You just need a gradual taper, thin coats, and the boring habits that actually work, cap the free edge, re-top on day 3, and stop using your nails as tools. If you take one thing from this whole post, let it be this, prep and shape matter more than the color.
Now pick one look from the list and commit to it for a week. Go classic with milky soap or micro French if you want low effort, go glazed or velvet cat-eye if you want that light-catching moment, or try latte swirls and aura if you want something artsy that still stays flattering. Which one are you trying first?