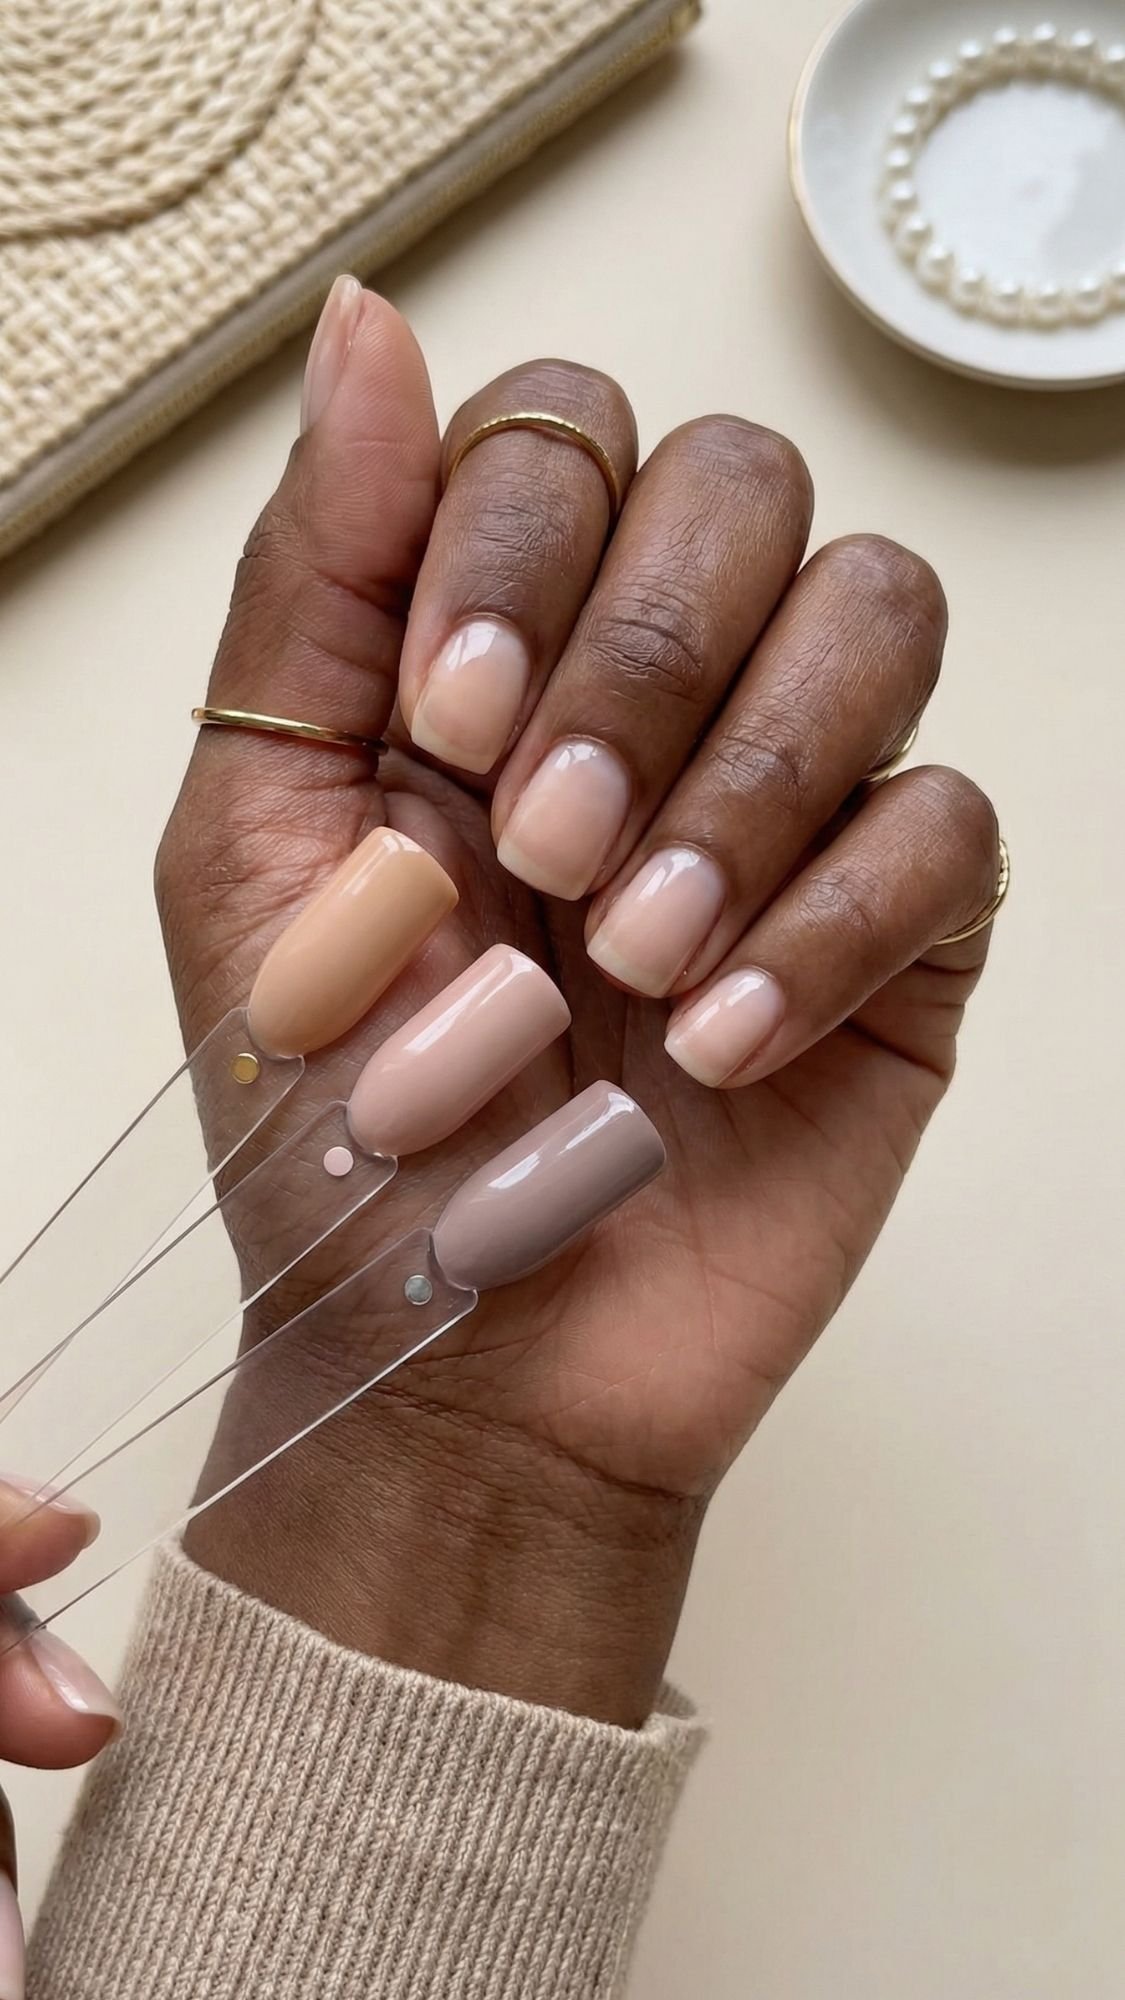
You know that tiny panic moment when you realize you will take about 600 photos at this wedding, and every single one will include your hands? Holding a drink, fixing your hair, waving at someone across the room, clutching your phone like it owes you money. So yeah, your nails matter.
Over the years, I’ve watched one truth stay undefeated. The best wedding guest nails do not “match the dress,” they match the entire vibe. They look clean in daylight, flattering in warm reception lighting, and they never compete with your jewelry, bouquet, or handbag. Ever wondered why some neutral wedding guest nails look insanely expensive while others look… kind of flat? It almost always comes down to undertone choice, prep, and shine.
Quick Results Snapshot
- What this look solves: Nails that look polished in photos, feel appropriate for any dress code, and pair with literally any outfit color.
- Who it’s best for: Anyone who wants wedding guest nails that match any dress, especially if you might change outfits or accessories last minute.
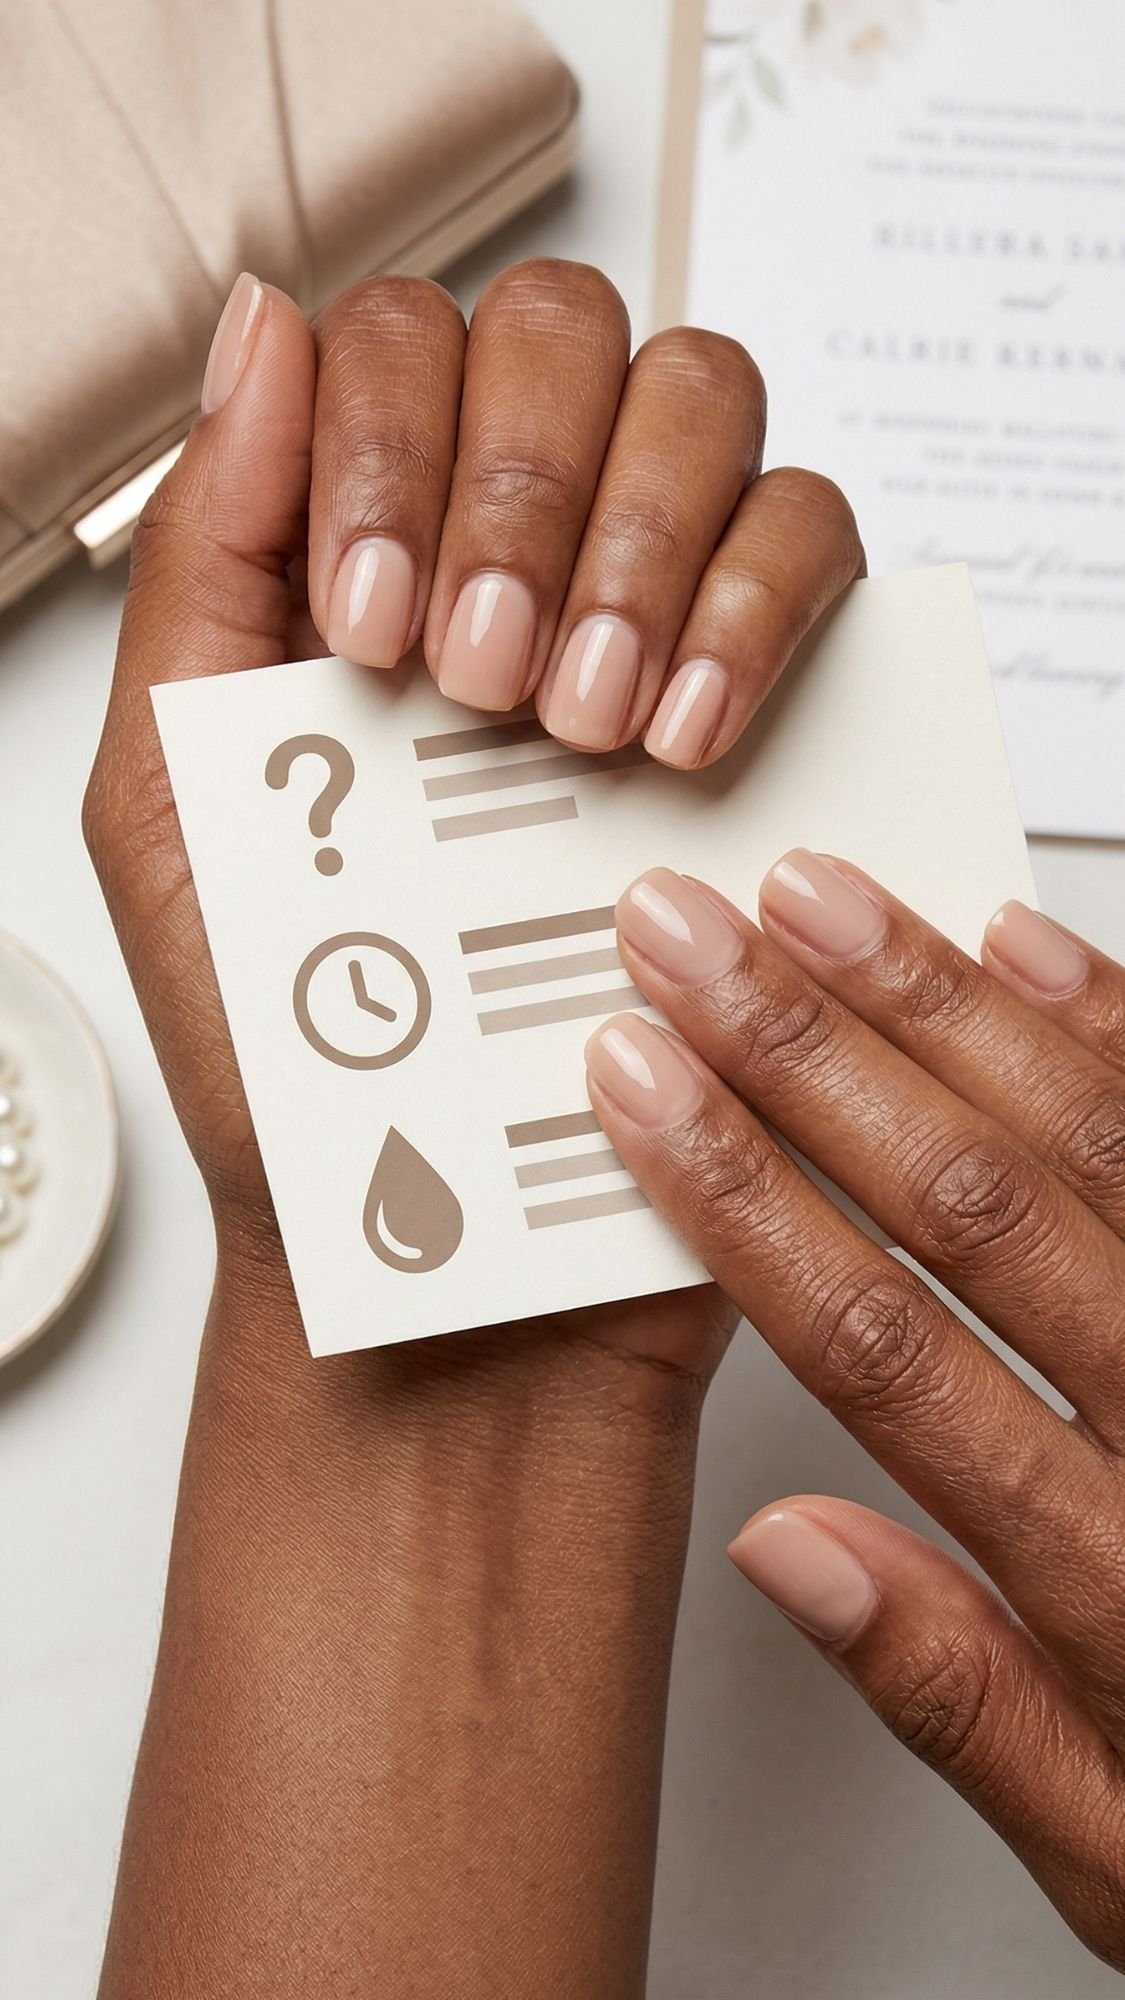
- Time required:
- Regular polish: 60 to 90 minutes
- Press-ons: 20 to 40 minutes
- Gel: 60 to 120 minutes
- Budget range: Drugstore-friendly to salon splurge, you can make it work either way.
- Expected timeline: Instant results, with typical wear of 3 to 7 days (polish), 7 to 14 days (gel), and 1 to 7 days (press-ons, depending on adhesive and prep).
- Biggest mistakes people make:
- They skip prep, then wonder why the manicure chips or press-ons pop off early.
- They pick a nude that turns ashy or orange in flash photos.
Key Takeaways
- Neutral does not mean boring, it means flexible, timeless, and outfit-proof.
- Prep controls longevity more than your polish brand does.
- High-gloss finishes read more expensive than thick layers or chunky glitter.
Goal + Who It’s For
If you want nails that match any dress, you need a look that stays neutral without looking dull. The goal is simple: clean, intentional nails that look good in every type of lighting. Daylight outside the venue, warm candlelight at dinner, random flash photos when someone yells “Wait, group pic.” Sound familiar?
What I’ve noticed is that most people chase the wrong “match.” They try to match the exact dress color, then their nails clash with jewelry, shoes, or the overall vibe. Instead, aim for a flattering neutral base plus a finish that looks expensive, like glassy shine, soft pearl, or a low-contrast French.
Best For
- Indecisive outfit planners, because this manicure does not care if you wear emerald, black, blush, or a print
- Short nails, since sheer, milky, and micro-French styles make short lengths look tidy and elevated
- Wide nail beds, because soft fades and low-contrast tips visually slim the nail
- Beginner-friendly nails, since neutral mistakes show less than bold colors
- Anyone who wants “quiet luxury” energy without the fuss
Who Should Skip
I’m not trying to scare anyone, but I do want you to keep your nails healthy and your skin calm.
- If you have known allergies to gel, acrylic, or adhesives, skip those methods and stick to regular polish or see a licensed pro
- If your nail bed looks inflamed, painful, or discolored, do not cover it up for the wedding. Get it checked
- If you recently peeled off gel or acrylic and your nails feel thin and sensitive, skip heavy buffing and aggressive removal
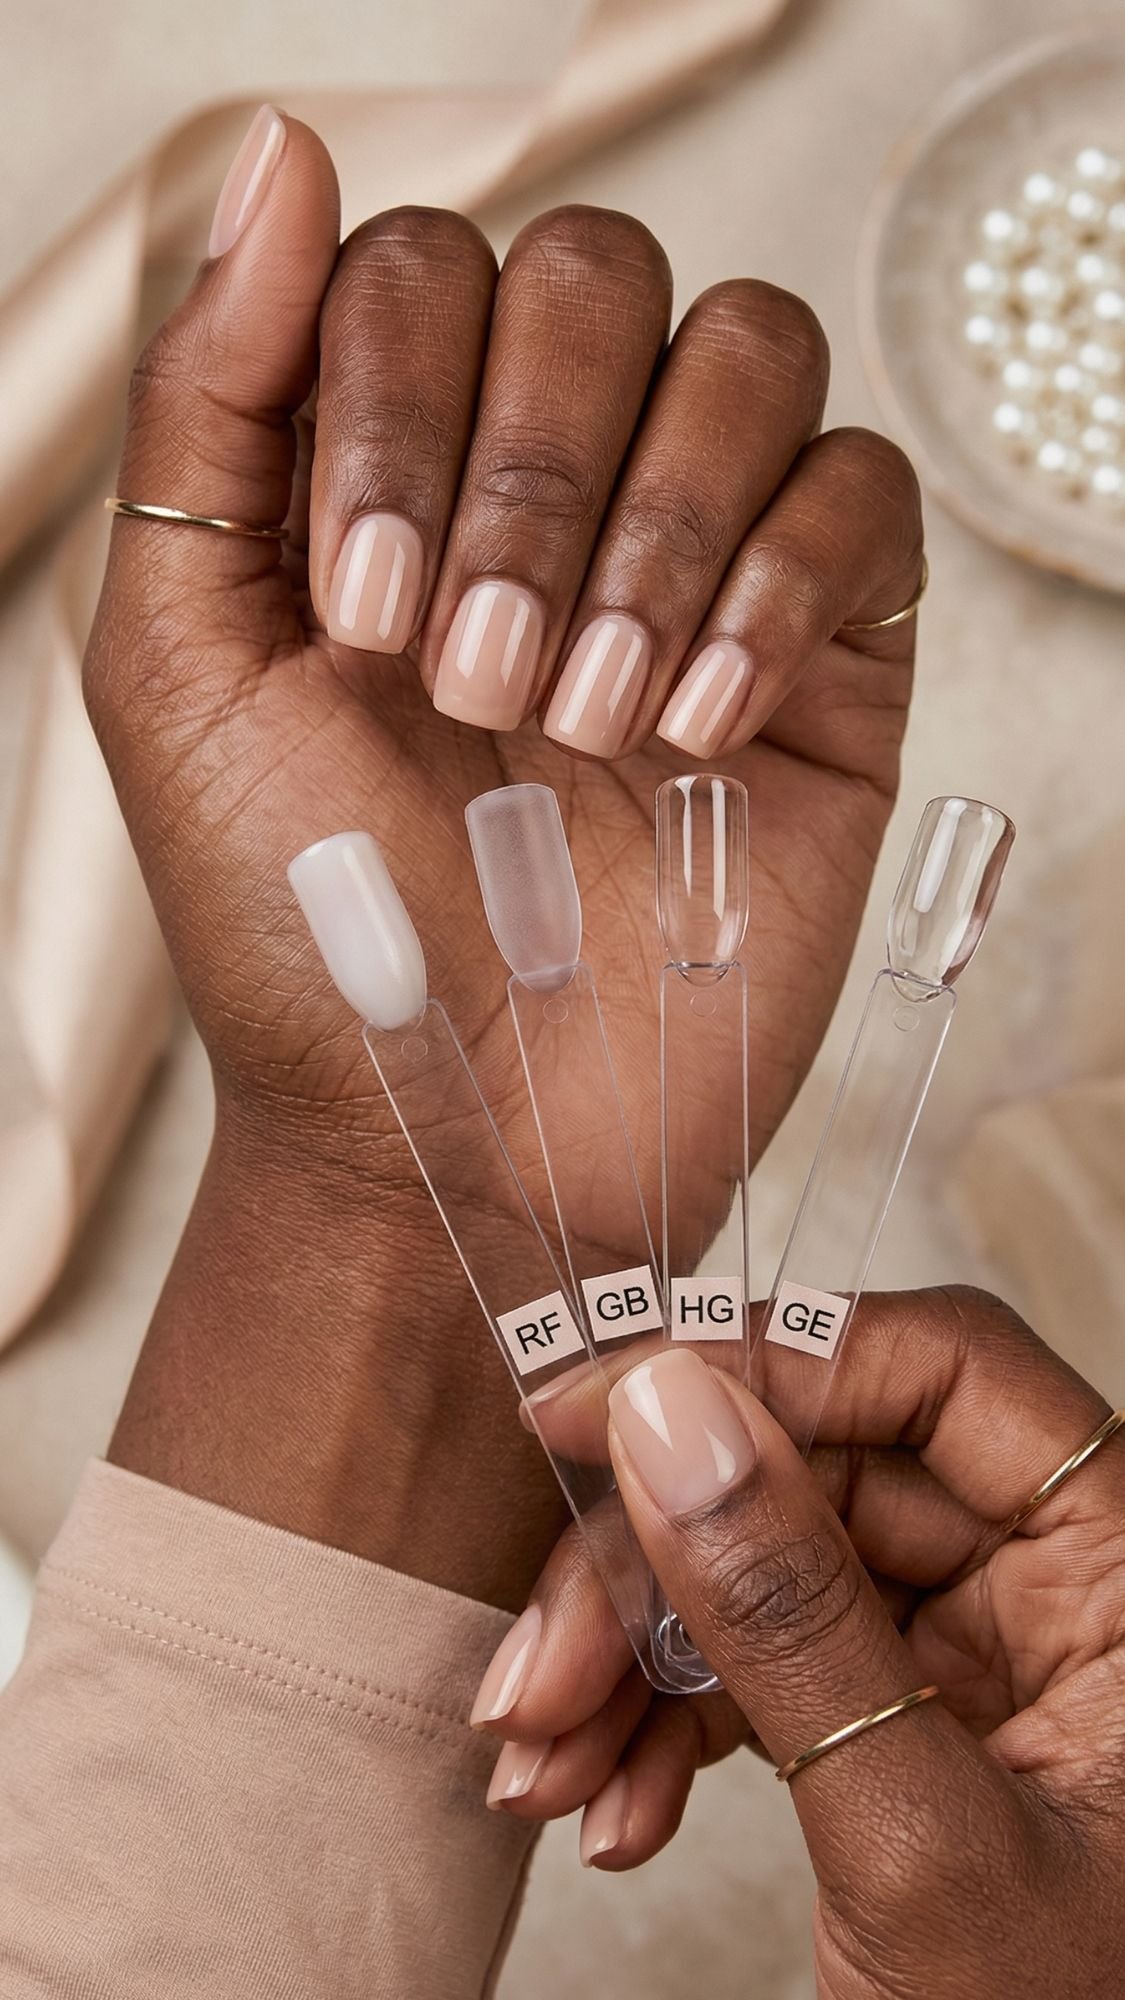
My “Matches Any Dress” Rule
Match your undertone, not your outfit.
A neutral that suits your undertone will look intentional with every dress color. A neutral that fights your undertone will look off, even if the shade looks pretty in the bottle. IMO, this is the difference between “polished” and “why do my hands look weird in photos?” :/
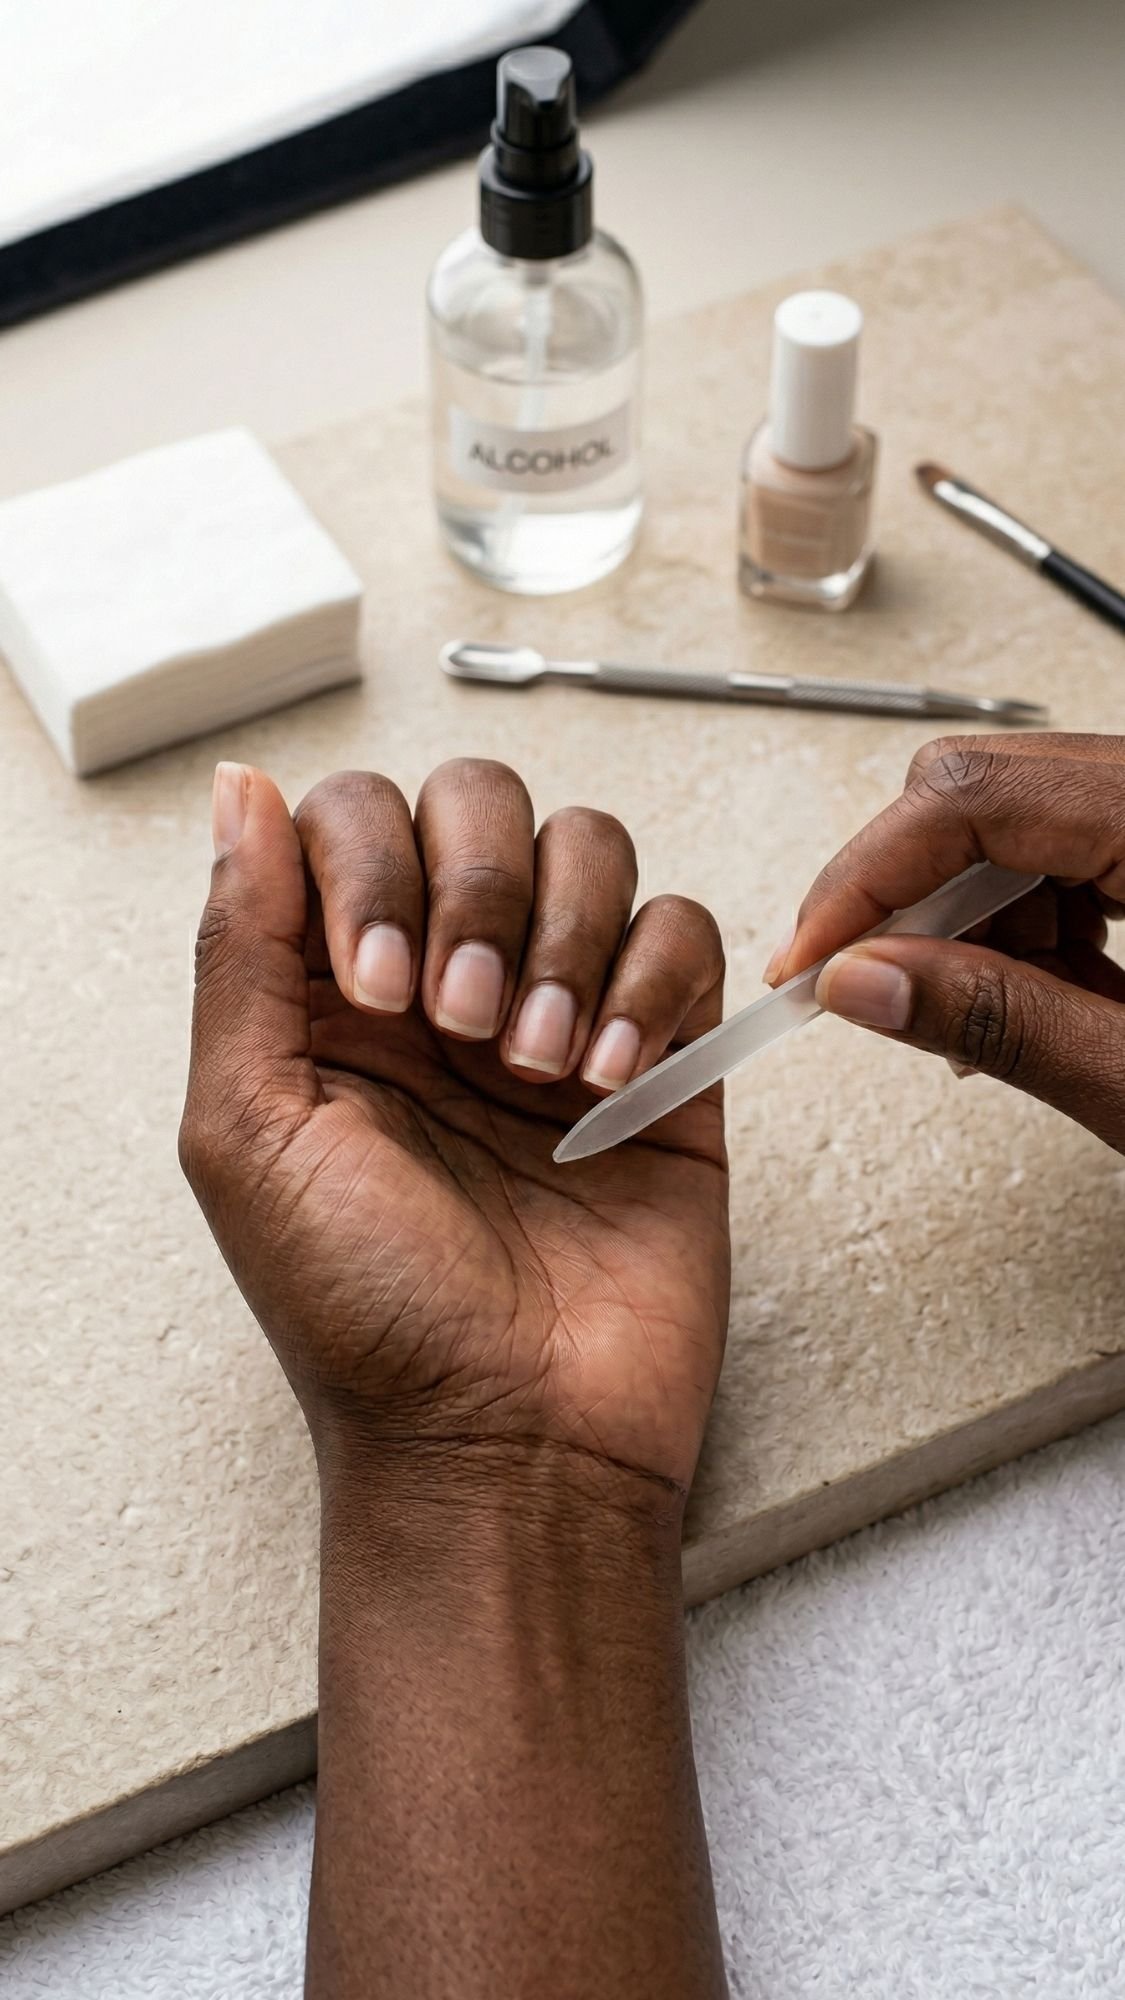
Nail Prep, This Is The Difference Maker
If you want wedding guest nails that match any dress, you need the manicure to look smooth and stay put. Prep decides that, not the brand name on your polish. I’ve noticed people blame chipping on “cheap polish,” when their nails still had lotion residue, cuticle dust, or a shiny surface that repels product. Your nail plate needs to feel clean and slightly grippy, not slick. You should smell a quick alcohol-cleanser moment here, that sharp clean scent that tells you the nail plate feels truly bare. Then you stop touching your nails like you forgot they exist, because your fingertips add oil back immediately.
What To Do, Step-By-Step
- Remove old product completely: Use remover, then wash hands, then dry well.
- Shape first: Pick your shape, file in one direction, then refine edges.
- Gentle cuticle work: Push back cuticles after a warm shower or after a quick soak, then wipe dry.
- Buff only if needed: Use a light buff to smooth ridges, not to “thin the nail.”
- Cleanse and dehydrate: Wipe nails with alcohol or nail cleanser, then wait 30 to 60 seconds.
- Base coat goes on next: Apply a thin layer and cap the free edge.
Why It Matters
- Clean nails grip product better, so polish chips less and press-ons hold longer.
- Smooth shaping makes every color look more expensive, even a basic nude.
- Cuticle cleanup creates that salon line, the clean space near the cuticle that makes nails look intentional.
- Dehydration prevents lifting, especially if you use press-ons or gel-like systems.
Pro Tips I Rely On
- I keep a tiny detail brush nearby, I dip it in remover, then I clean the cuticle line before it dries.
- I cap the free edge with base coat, color, and top coat, because this step stops those annoying tip chips.
- I apply polish in thin coats, then I wait until it feels tack-free before I add the next layer.
- I avoid hand cream until after top coat sets, lotion sabotages adhesion.
Common Mistakes + Easy Fixes
- Mistake: You flood the cuticle with polish, then it lifts fast.
- Fix: Leave a hairline gap, then push product closer with the brush tip instead of overloading it.
- Mistake: You buff aggressively because you want “smooth.”
- Fix: Buff lightly, then let ridge-filling base coat do the heavy lifting.
- Mistake: You touch your nails after cleansing.
- Fix: Cleanse last, then go straight to base coat, no detours.
Safety Notes
- If you feel burning, itching, or see redness during gel or adhesive use, stop right away and rinse.
- If you see green discoloration, pain, swelling, or separation from the nail bed, skip covering it and talk to a professional.
- If you have sensitive skin, choose regular polish, keep remover off your skin, and moisturize after everything dries.
Key Takeaways
- Prep controls wear time more than product price.
- Thin coats last longer and look smoother in photos.
- Clean cuticle lines make neutrals look luxe.
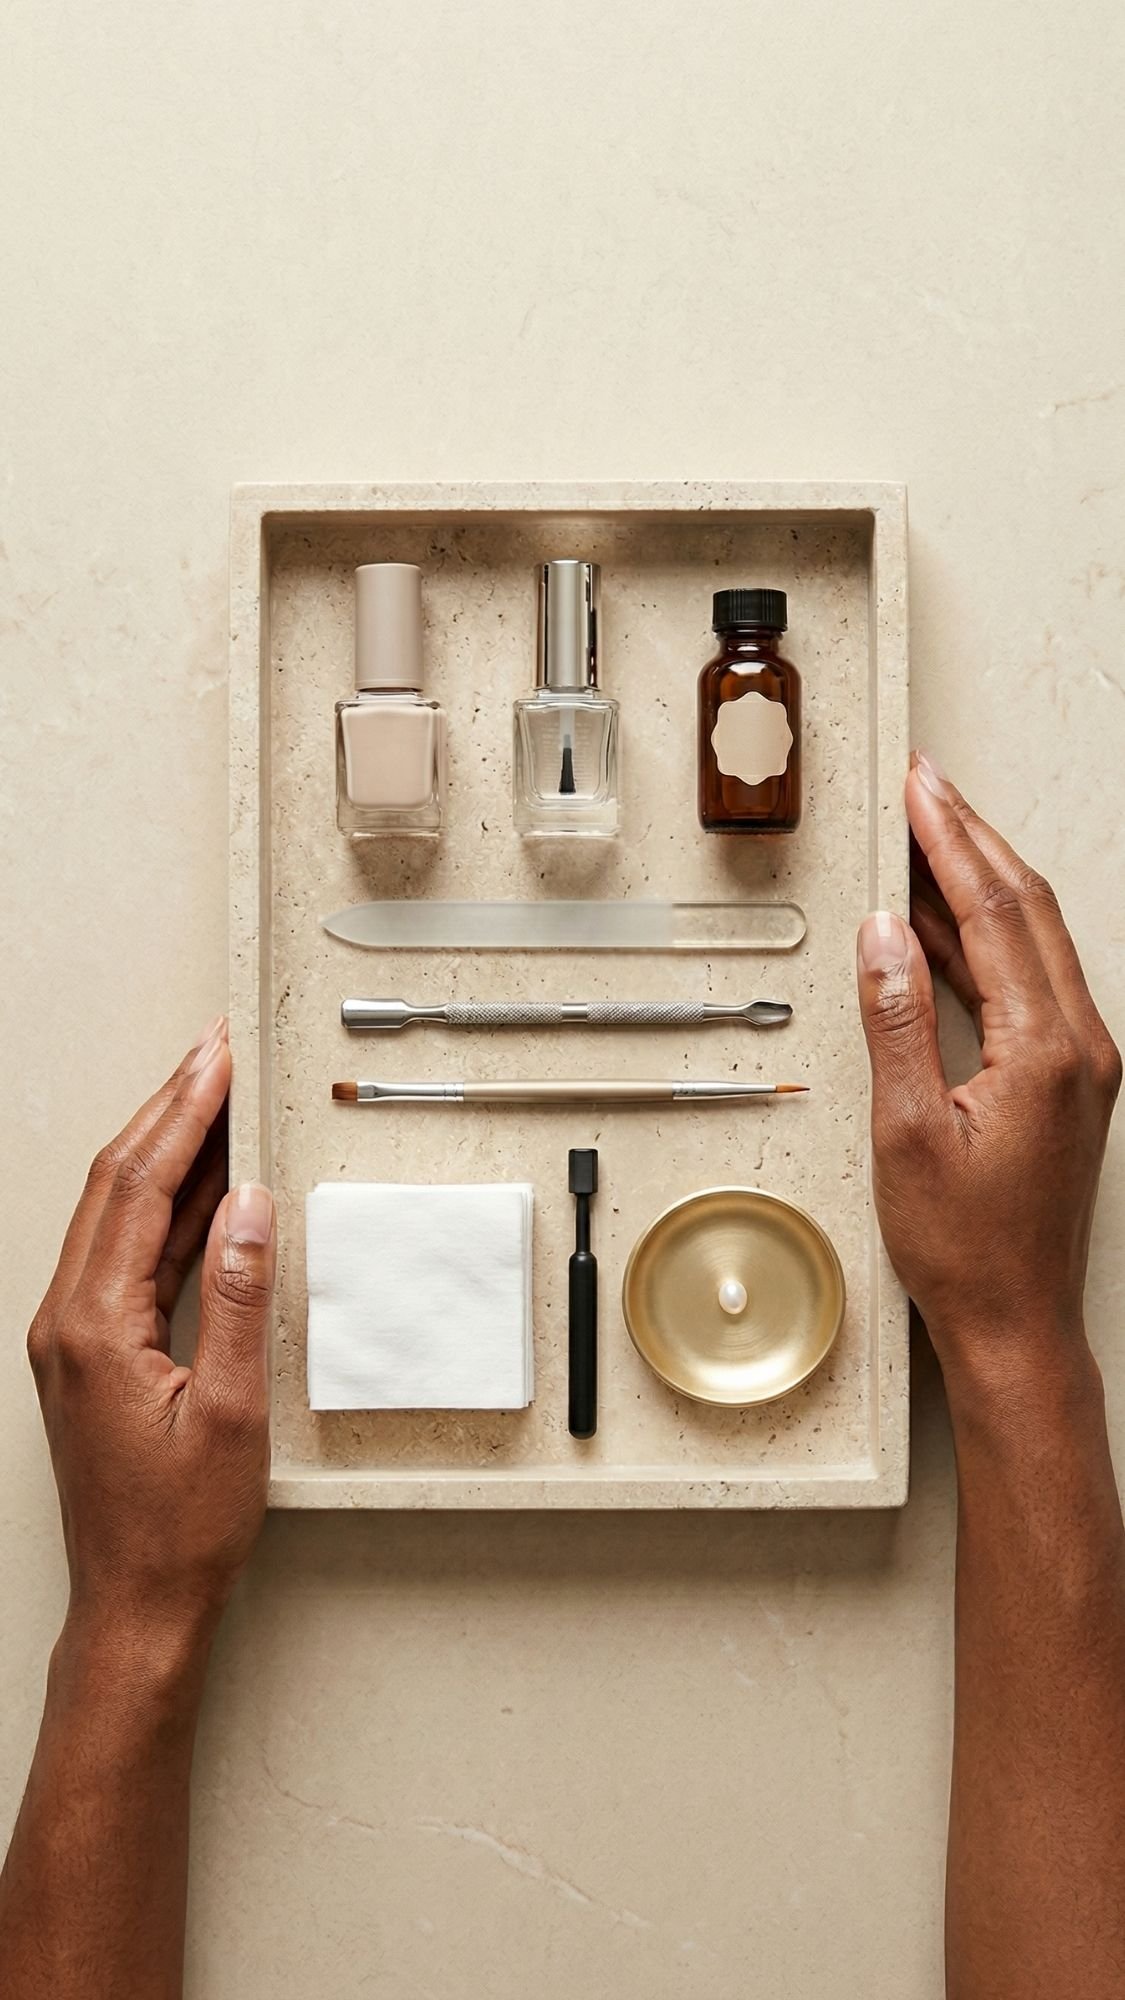
Tools + Products Needed
You can absolutely pull off wedding guest nails that match any dress without owning a salon’s worth of supplies. But you do need the right basics, because the wrong tools turn a simple neutral manicure into a streaky, chipped mess. People spend on trendy colors while using a shredded file and a base coat from 2019. That combo never ends well.
Must-Haves (Do Not Skip These)
- Nail file: Glass file or fine grit, because it shapes cleanly without shredding edges
- Buffer (optional but helpful): Use it lightly, only to smooth, not to thin
- Cuticle pusher: Gentle pressure only, you want clean edges, not angry skin
- Lint-free wipes: These keep fuzz from getting trapped under polish
- Alcohol or nail cleanser: This removes oils right before base coat
- Base coat: This protects nails and helps polish grip
- Polish color: Sheer pink, milky nude, or neutral taupe works best for versatility
- Top coat: The real star, because shine makes neutrals look expensive
Nice-To-Haves (These Make It Look Like You Tried, In A Good Way)
- Ridge-filling base coat: If you have ridges, this gives that smooth “photo filter” look
- Quick-dry drops: Great if you always smudge nails at the worst time
- Clean-up brush: One tiny brush instantly upgrades your cuticle line
- Cuticle oil: Use it after everything sets, it makes hands look polished in photos
- Magnetic wand: Only if you want velvet or cat-eye looks without drama
- Press-on kit essentials: Nail glue or tabs, orange stick, mini file for sizing
What To Look For (So You Don’t Buy Random Stuff That Fails)
Base Coat Types
- Ridge-filling: Best for ridged nails, makes sheer shades look smoother
- Sticky/grippy: Best for longevity, helps color adhere
- Strengthening: Fine if your nails feel soft, but do not expect miracles
Top Coat Types
- High-gloss: Best for that “expensive” finish
- Quick-dry: Best if you always smudge nails
- Gel-like top coat (no lamp): Best if you want thickness and shine without a lamp
Press-On Adhesion Options
- Glue: Longest wear, best for events, but removal matters
- Tabs: Shorter wear, gentler removal, great if you only need one night FYI, tabs can still look seamless if you size perfectly and seal edges well.
Pro Tip From Experience
If you only splurge on one thing, splurge on a top coat you love. I’ve watched a basic drugstore nude look high-end with a glassy top coat, and I’ve seen expensive polish look sad with a dull finish. Shine tells the whole story.
Key Takeaways
- A great top coat matters more than trendy colors.
- Ridge filler makes sheer nudes look smoother and more expensive.
- Press-ons depend on sizing and prep, not luck.
Step-by-Step Application Options (Pick Your Method)
This is where people overcomplicate things. You do not need to master every method on earth, you just need one that fits your schedule and your patience level. Wedding guests fall into two groups. Group one wants a classic polish moment that looks timeless. Group two wants something fast and bulletproof because they have errands, fittings, and zero time for a smudge meltdown. Which one are you?
A) Regular Polish Method (Classic, Versatile, Very “Guest Appropriate”)
What you’re trying to achieve: A smooth, glossy finish that looks clean in photos and lasts through the weekend.
Step-by-step
- Base coat: Apply a thin layer, then cap the free edge.
- First color coat: Go thin, you should almost feel like it looks too sheer at first.
- Second color coat: Float the brush, do not press hard, let the polish self-level.
- Dry time strategy: Wait 2 to 5 minutes between coats, then wait 10 to 15 minutes before top coat.
- Top coat: Seal the tips, then do not touch anything for at least 10 minutes.
Why this works
- Thin coats dry more evenly and resist dents.
- A proper base coat anchors color, which reduces chipping.
- A glossy top coat smooths the surface so the manicure looks expensive.
Common mistake + fix
- Mistake: You rush and add top coat too soon, then the whole manicure wrinkles.
- Fix: If the color still looks wet, wait. If it looks matte-tacky, you can top coat.
Sensitive-skin alternative
- Use fragrance-free cuticle oil after everything dries, and limit acetone contact with skin.
B) Press-On Method (Fastest “I Need This Done Tonight” Fix)
What you’re trying to achieve: A seamless set that looks like a salon manicure, with no lifting corners that catch your hair at dinner.
Sizing strategy
- Lay sizes out for every finger before you glue anything.
- If you’re between sizes, size down and file the edges to fit. A too-big nail screams press-on.
Adhesion options
- Tabs: Best for one-night wear, easy removal.
- Glue: Best for multi-day wear and stronger hold.
Glue placement technique
- Add a small dot of glue near the cuticle area and a thin swipe down the center.
- Press from cuticle to tip, then hold.
- If glue floods out the sides, you used too much.
Press + hold timing
- Hold for 20 to 30 seconds, then avoid water for at least 1 hour.
Edge sealing so hair does not catch
- After the nail sets, gently file the side edges so they blend into your natural nail.
- Run a tiny bit of top coat around the cuticle line if the set allows it, this helps it look seamless.
Removal that protects natural nails
- Soak in warm soapy water and oil, then gently lift.
- Never rip them off. Ever. That’s how you take layers of your nail with you.
Common mistake + fix
- Mistake: Press-ons pop off because nails still have lotion or oil.
- Fix: Cleanse with alcohol, then apply right away.
Sensitive-skin alternative
- Choose tabs for minimal exposure, and avoid getting glue on the skin.
C) Gel-Like / No Lamp Method (Longer Wear Without A Lamp)
What you’re trying to achieve: A thicker, shinier polish look with better durability than standard polish.
Layering rules
- Thin layers, always. Thick layers stay soft and dent.
- Let each layer set fully before the next.
Removal
- Use remover and patience. If you start peeling, stop and soak more.
Common mistake + fix
- Mistake: Peeling off product because it “looks ready.”
- Fix: Soak, then slide product off gently, no scraping.
D) Gel With Lamp (Only If You Already Do Gel Safely)
I’m going to be blunt here because I’ve seen too many reactions. Avoid getting gel on the skin. Skin contact increases the risk of developing a sensitivity over time, and once you develop it, gel becomes a whole ordeal.
Safety notes
- Apply carefully, keep gel off cuticles and skin.
- Cure fully, under-curing leaves product soft and can irritate skin.
- Clean up edges before curing.
Removal best practices
- Soak off gently, do not pry, do not peel.
Key Takeaways
- Regular polish wins for flexibility and simplicity.
- Press-ons win for speed, but prep and sizing decide everything.
- Gel methods need careful technique, especially around the skin.
1) No-Mani Mani, But Make It Glossy
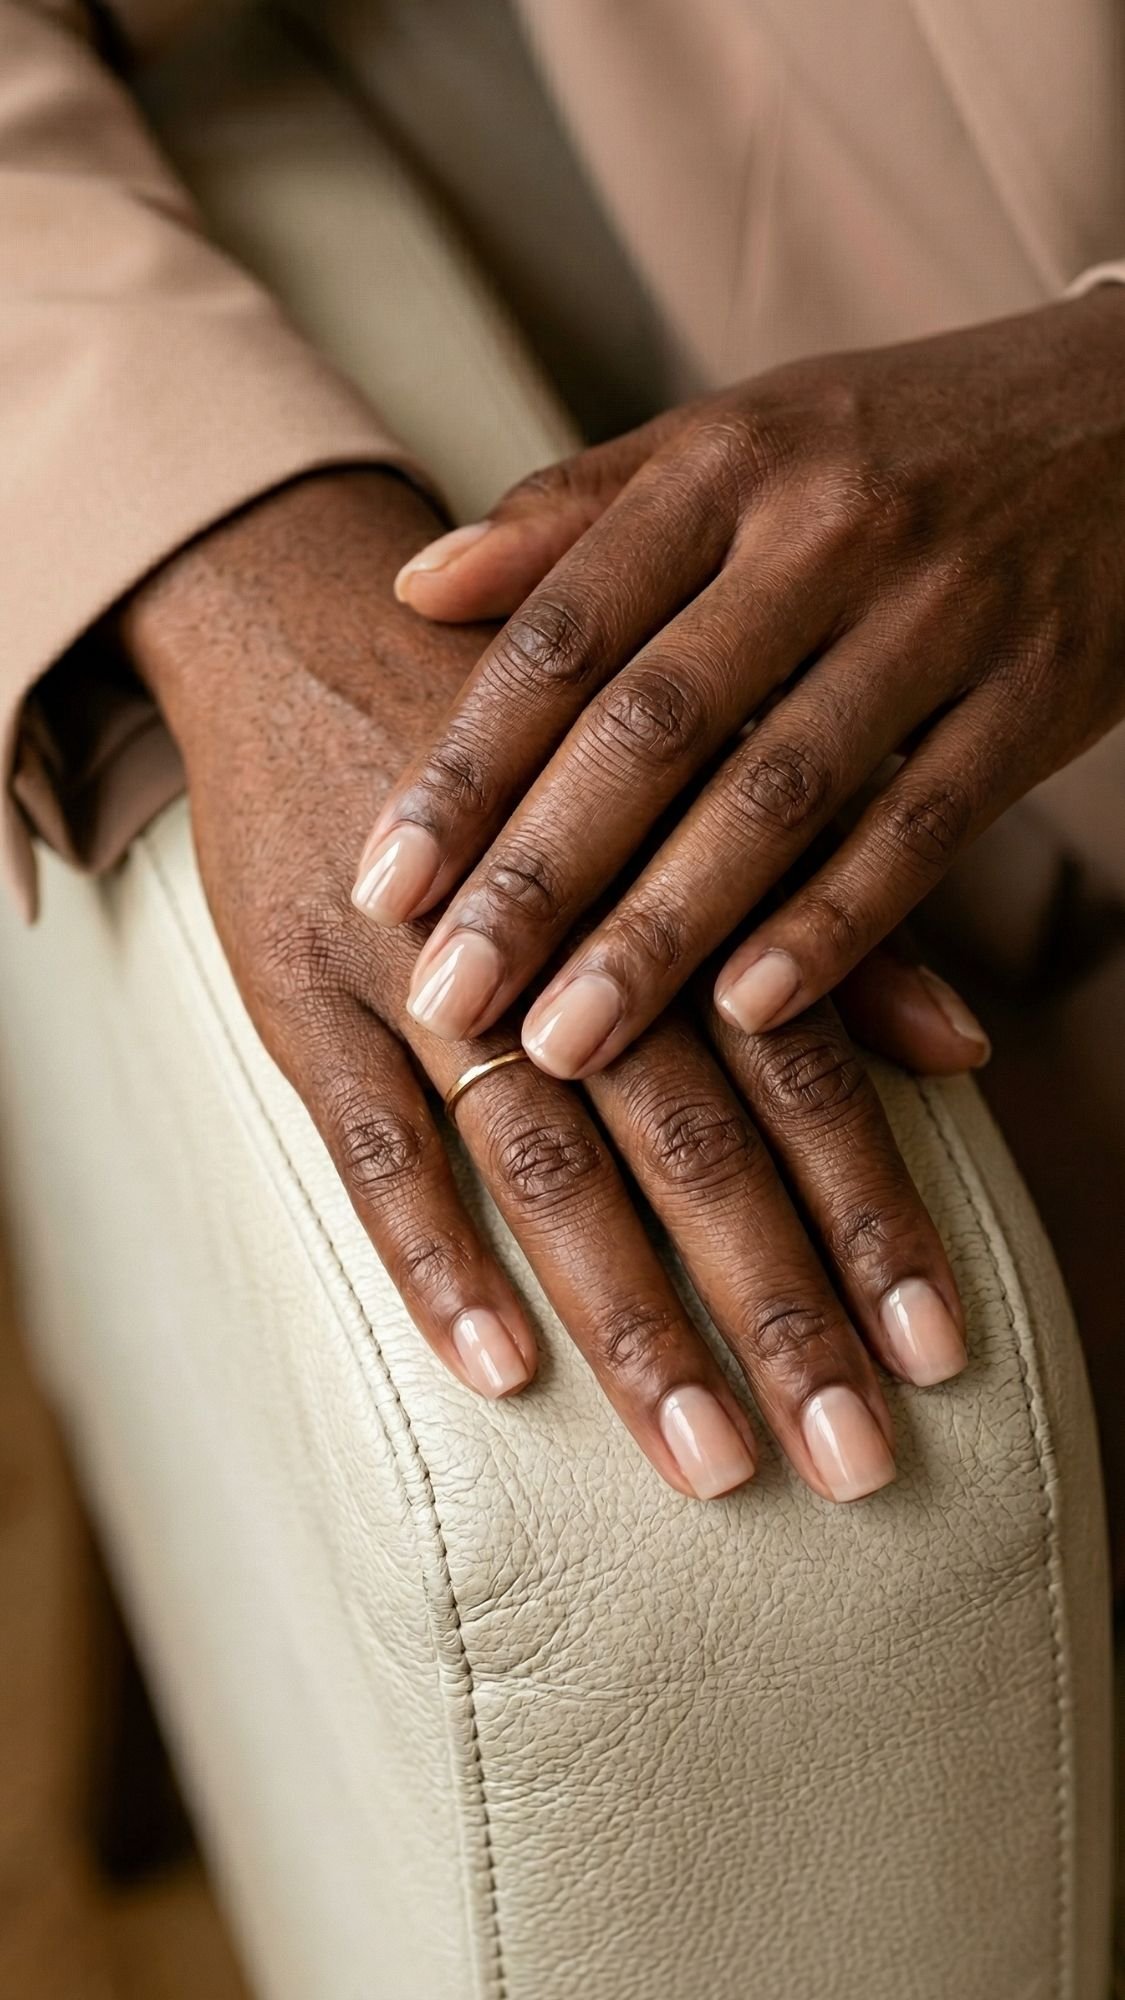
If you want wedding guest nails that match any dress, this is the safest bet that still looks intentional. I keep coming back to the no-mani mani because it looks like you just have naturally perfect nails, which feels mildly unfair, but I’ll take it. You get that clean, polished vibe without committing to a color that might fight your outfit. The shine does all the heavy lifting here. What I’ve noticed is that people think “natural” means “skip everything,” then they end up with a dull finish that looks unfinished in photos. You want “barely there,” not “I forgot.”
Why It Matches Any Dress
- It reads neutral in every lighting situation, daylight, warm reception lighting, flash photos
- It never competes with jewelry, clutches, or bold dresses
- It looks appropriate for every dress code, cocktail, formal, black tie, garden, all of it
Who It Flatters Most
- Short nails and shorter nail beds, because gloss makes them look tidy and healthy
- Anyone who hates upkeep, because grow-out looks invisible
- People who switch outfits last minute, because this manicure does not care
How To Ask For It At The Salon
Say: “I want a no-mani mani with a sheer neutral base and a glassy top coat, keep it low-contrast and ultra glossy.”
If you want a little extra polish without color, ask for a smoothing base under the sheer layer.
DIY Mini Steps (This Is The Pro Version)
- Cleanse nails with alcohol after shaping, then do not touch the nail plate.
- Apply a ridge-filling or smoothing base coat in a thin layer.
- Add one sheer coat in a pinky-nude or milky nude that matches your undertone.
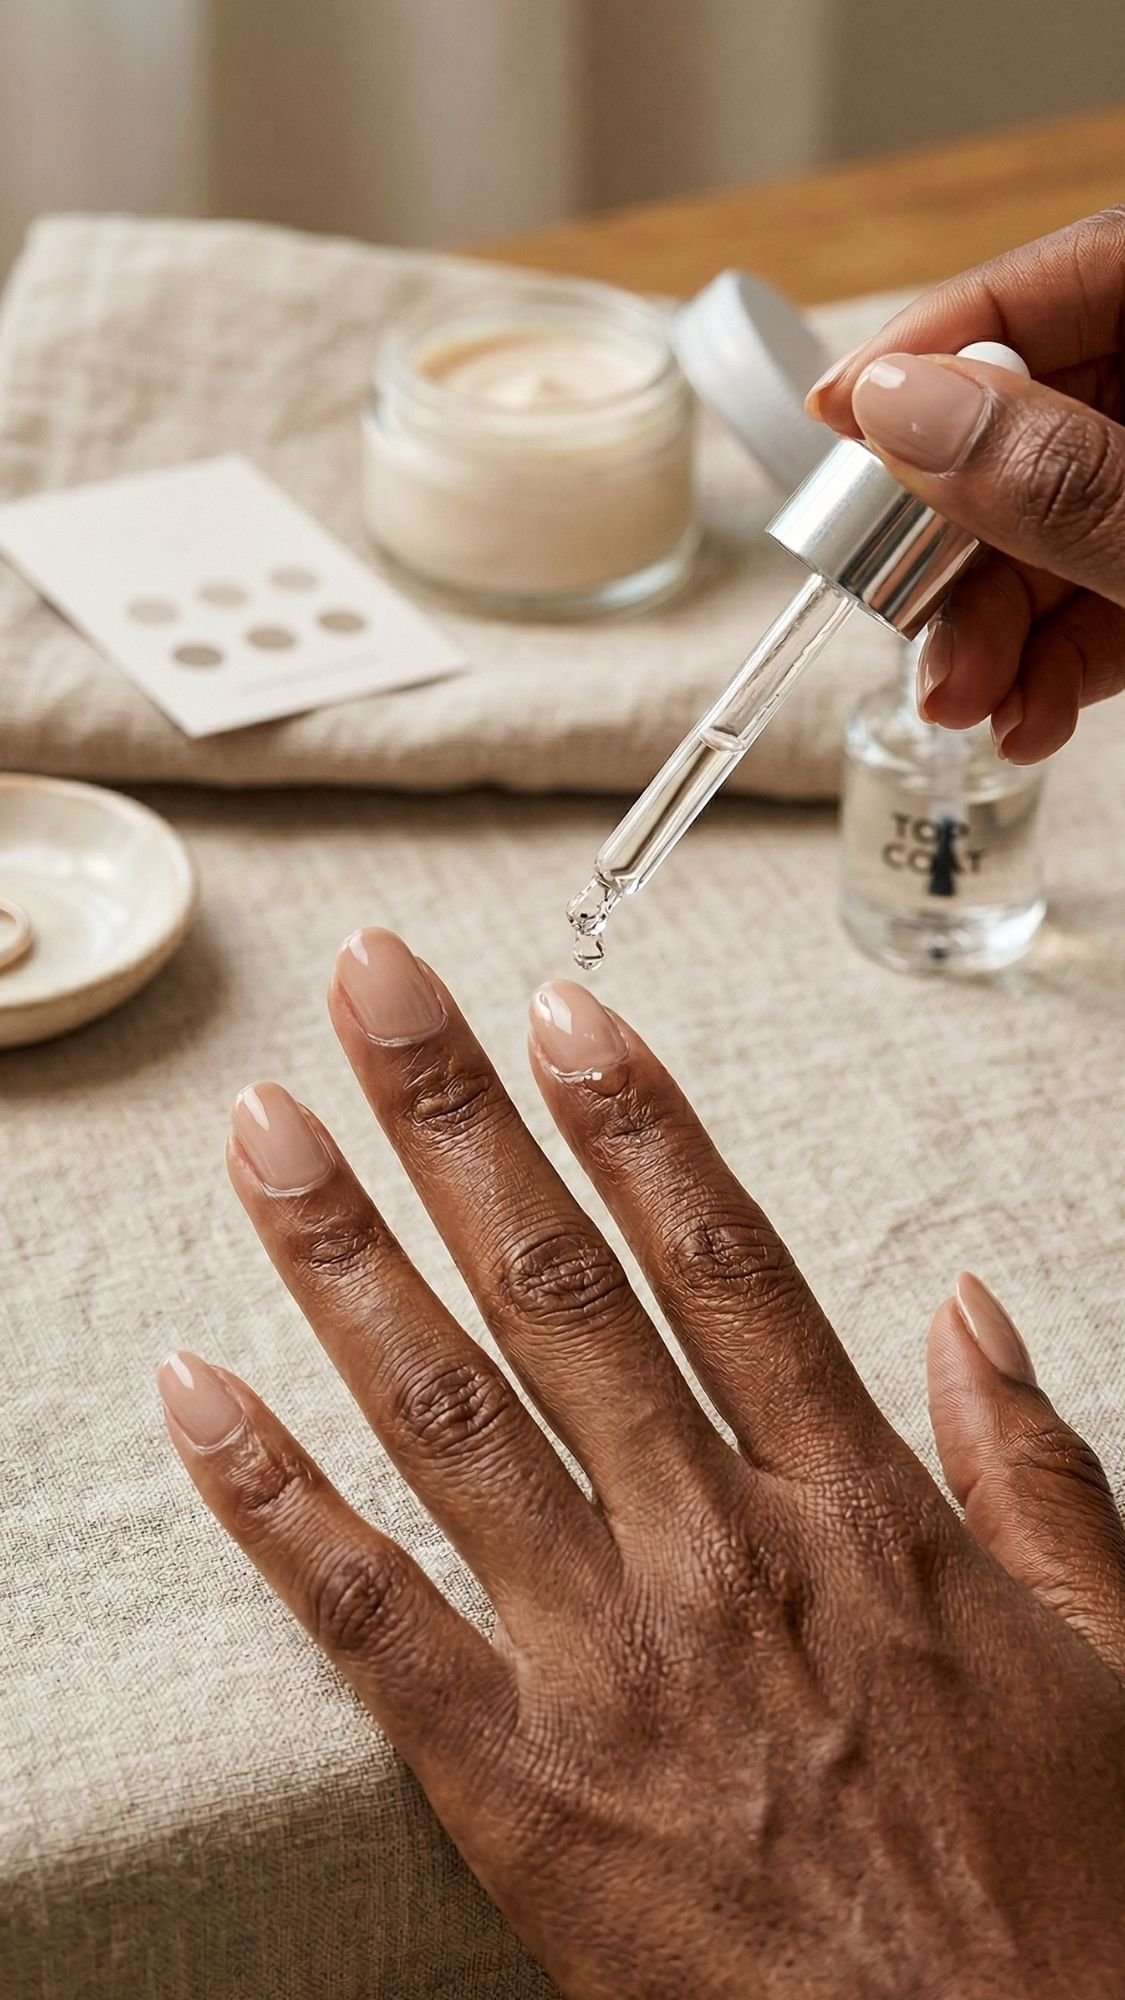
- Finish with a high-gloss top coat, cap the free edge. Pro tip: your top coat will smell a little solvent-y, and it will feel tacky for about 20 to 30 seconds, then it levels out if you stop hovering and poking at it.
Common Mistake + Easy Fix
- Mistake: You choose a sheer shade that looks ashy or too peach on your skin tone.
- Fix: Match undertone, not bottle color. If you look cool-toned, pick a cooler sheer pink. If you look warm, pick a peachy nude. If you sit neutral, pick a milky beige-pink.
Key Takeaways
- Gloss makes “natural” look expensive.
- Ridge-filling base transforms sheer shades.
- Undertone choice keeps this photo-friendly.
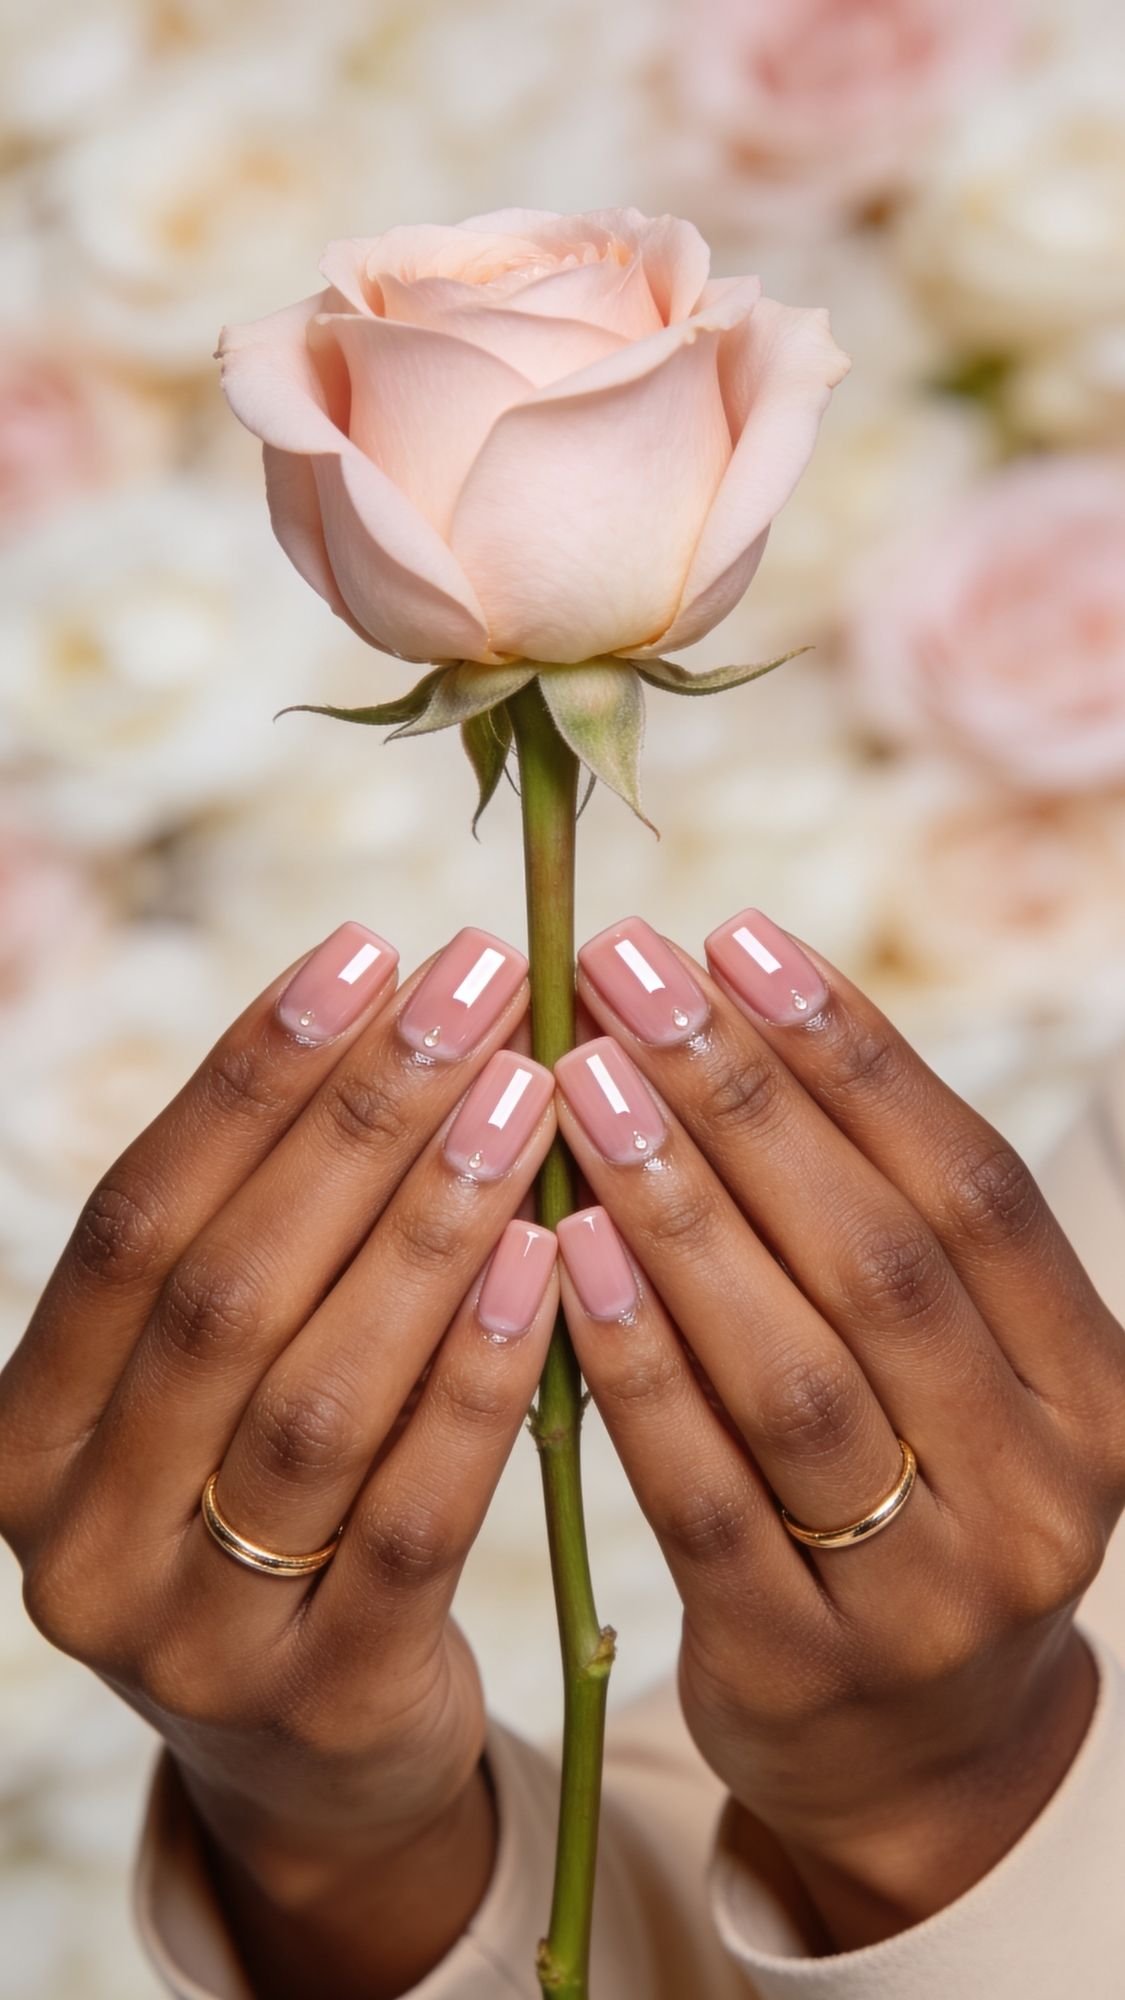
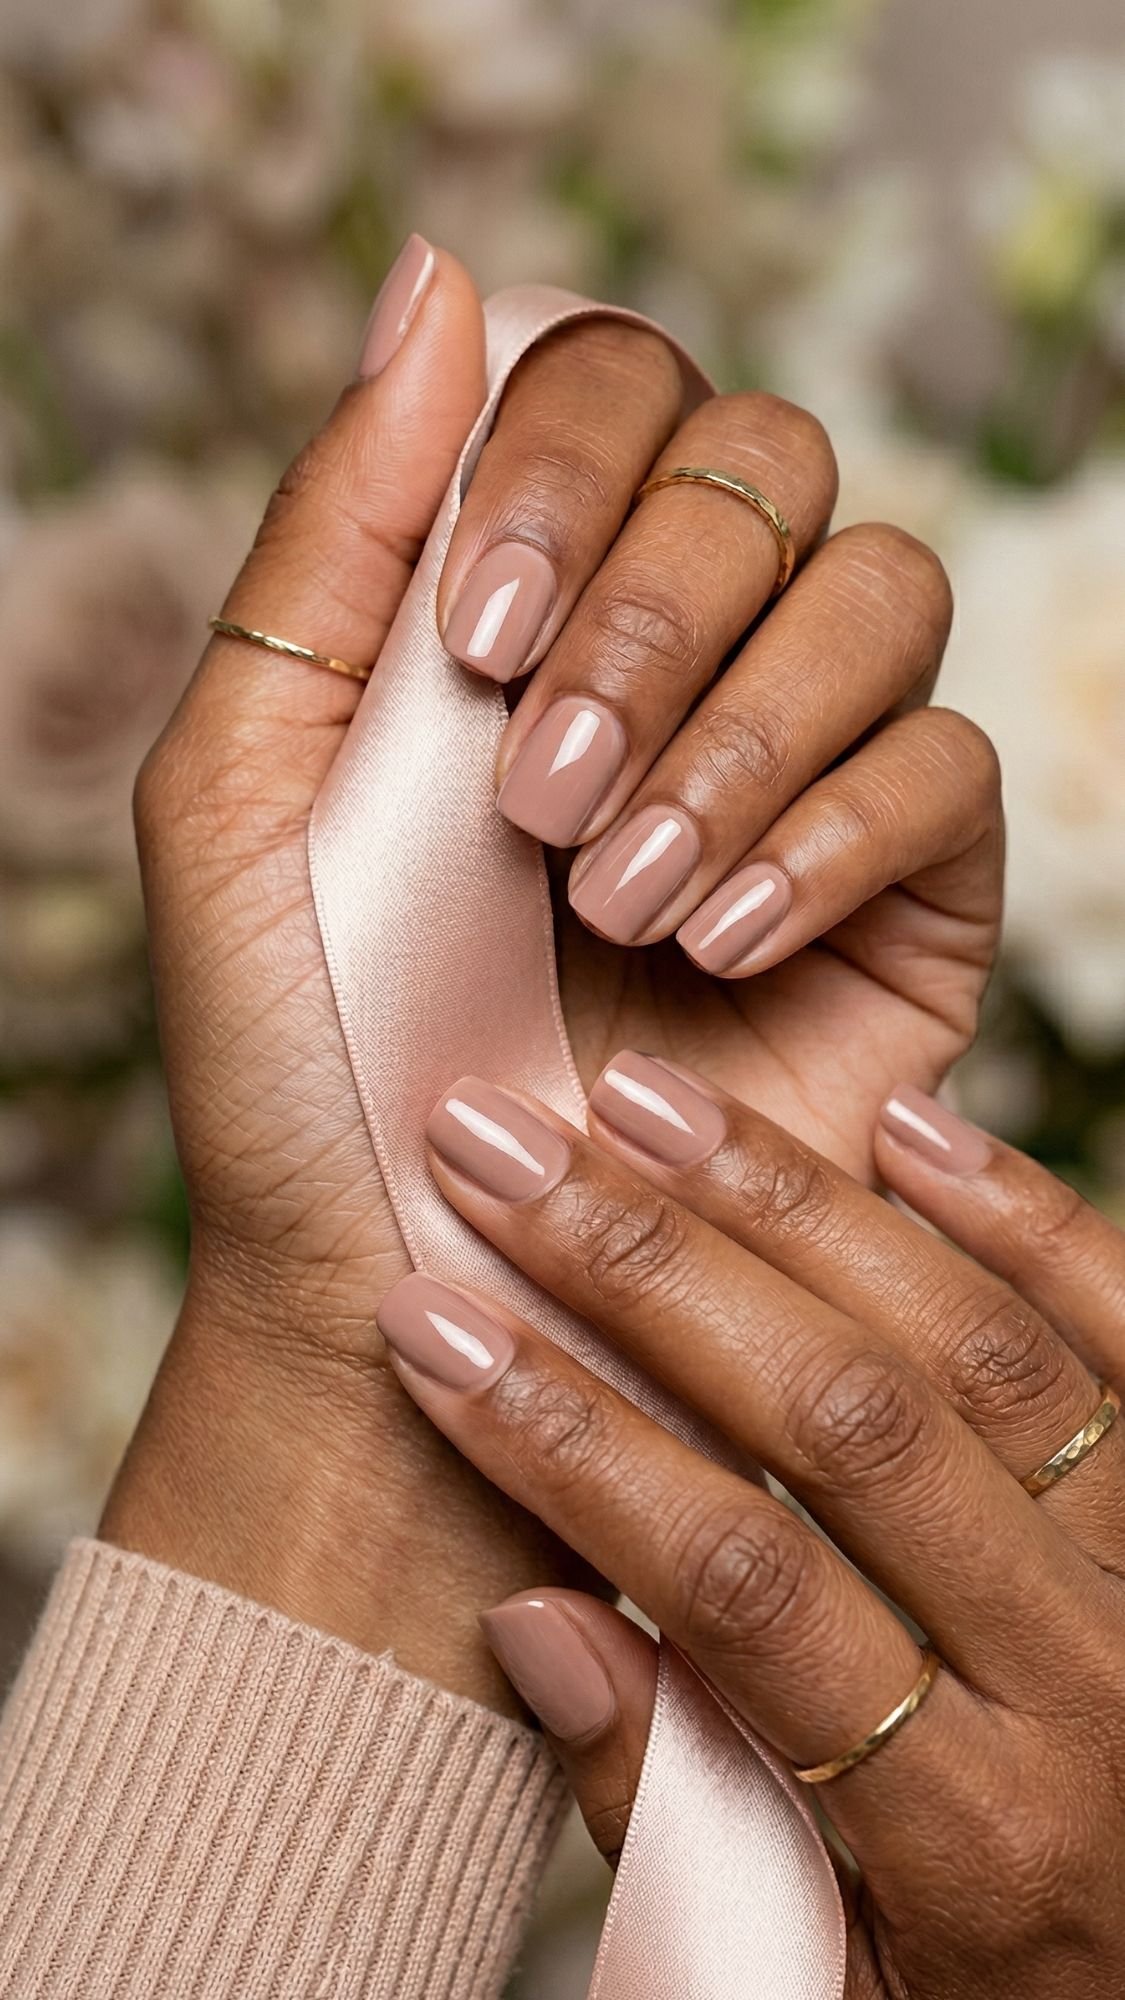
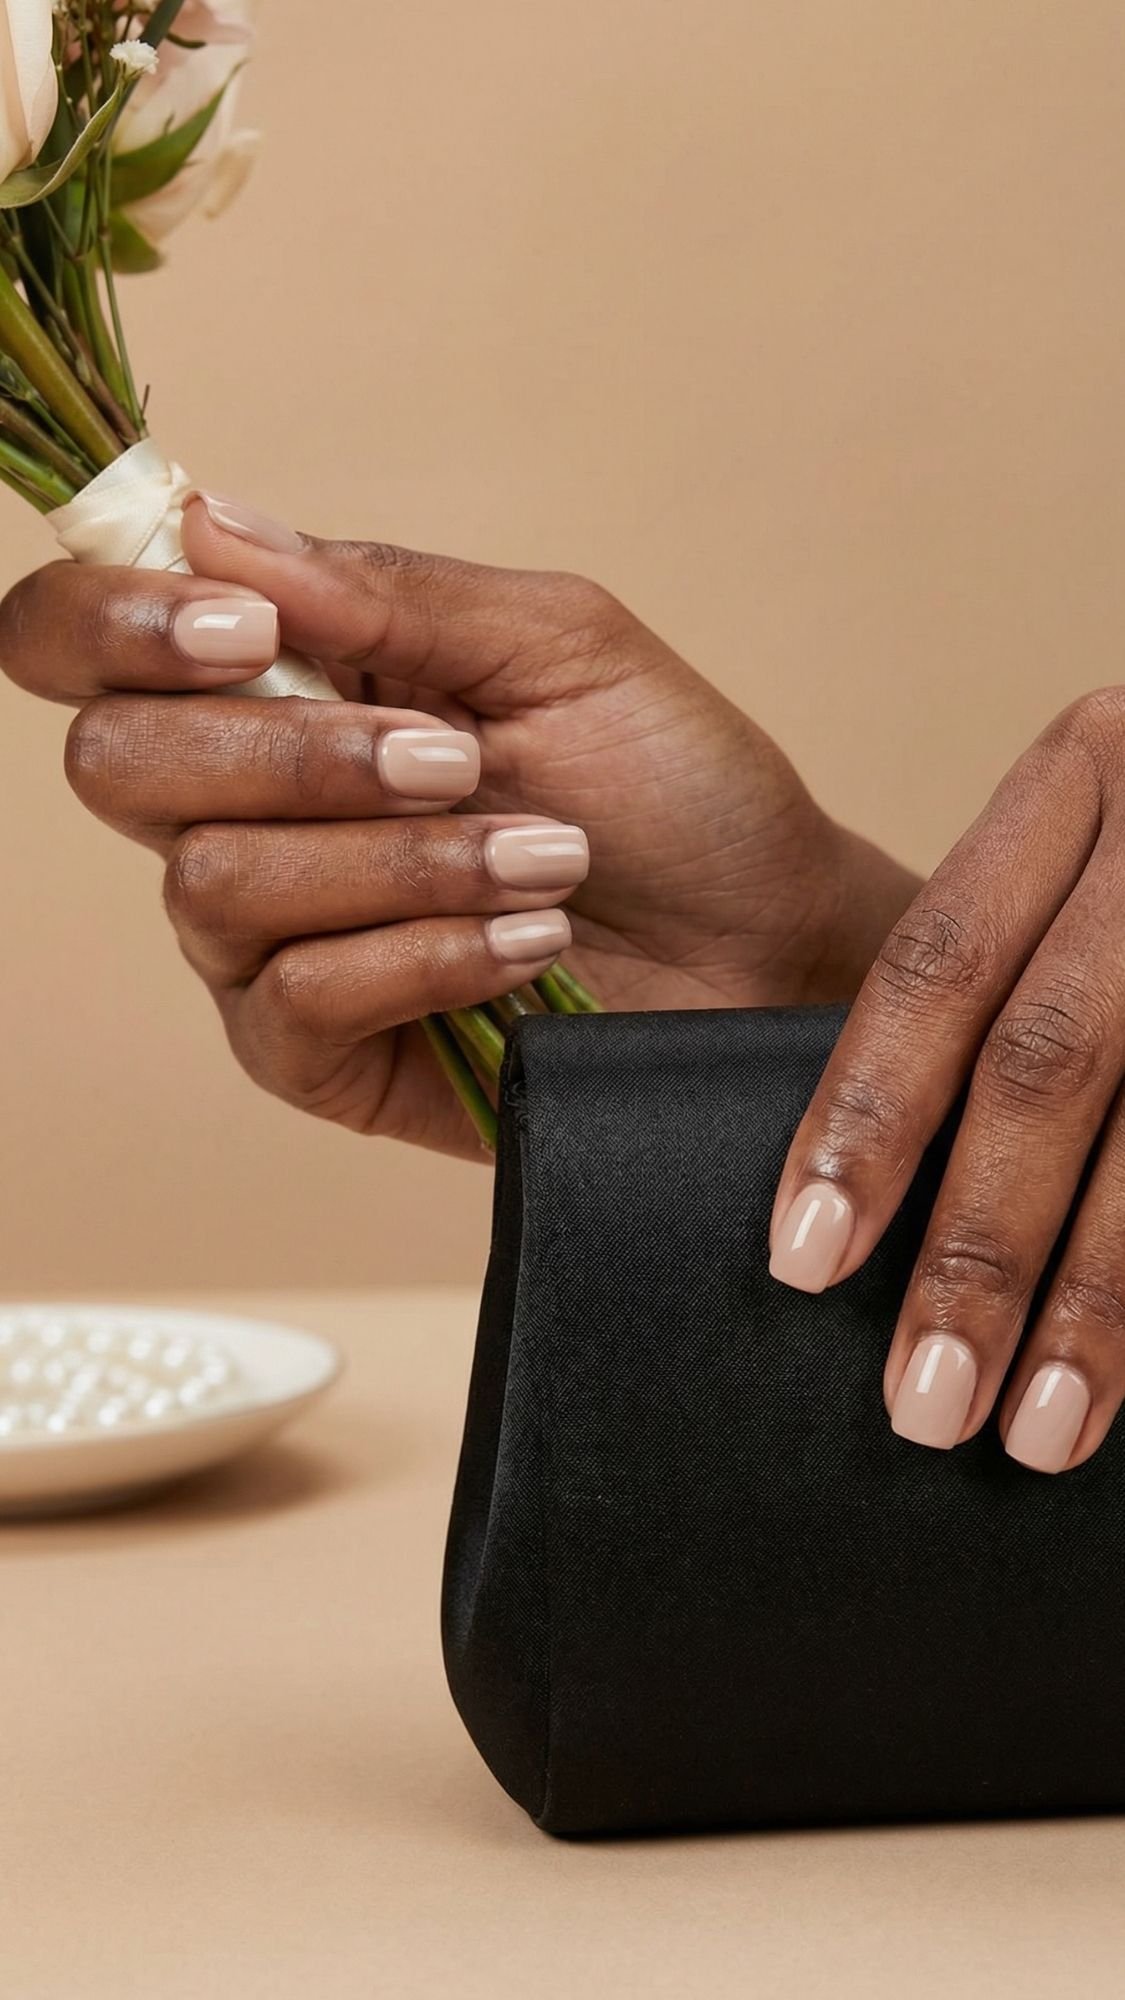
2) Silky Sheer Pink, The “Healthy Nail” Illusion
This one feels like a cheat code, because silky sheer pink makes hands look fresh and polished without screaming “look at my nails.” This shade family wins in wedding photos for one simple reason. It reflects light softly, so nails look smooth and clean even when you zoom in. If you ever picked a nude that looked perfect indoors, then turned weird outside, sheer pink fixes a lot of that drama because it keeps some translucency. It also pairs with literally everything, florals, jewel tones, neutrals, black, metallics. Your manicure just quietly behaves, which feels rare these days.
Why It Matches Any Dress
- Sheer pink sits close to the natural nail tone, so it never clashes
- It looks appropriate for every dress code, from casual garden weddings to black tie
- It stays flattering in photos because the finish looks soft, not flat
Who It Flatters Most
- Anyone who wants a subtle manicure that still looks “done”
- People with shorter nails who want a clean, elongated look
- Anyone who loves minimal jewelry, because it keeps the vibe elegant
Shade Guidance Across Skin Tones
This is where people mess up, so let’s not do that.
- If you lean cool, pick a sheer pink with a cooler, rosier tint
- If you lean warm, pick a sheer pink with a peachy or beige-pink tint
- If you lean neutral, pick a balanced blush that does not pull gray or orange Pro move: hold the bottle next to your palm, not the back of your hand. Your palm undertone usually tells the truth.
How To Ask For It At The Salon
Say: “I want a sheer pink manicure that looks like healthy nails, keep it glossy and even, no bright white tips.”
If you want it extra photo-friendly, add: “Make it silky and buildable, not streaky.”
DIY Mini Steps (How I Keep Sheer Pink From Streaking)
- Apply a smoothing or ridge-filling base coat, sheer shades expose every ridge.
- Wipe excess polish off one side of the brush, then use the fuller side for the center stroke.
- Apply one thin coat, then wait 2 to 3 minutes.
- Apply a second thin coat, stop there unless you want it more opaque.
- Top coat, cap the free edge. Pro tip: if your sheer polish looks uneven, do not keep piling on thick coats. Add one more thin coat, then let top coat level it out.
Common Mistake + Easy Fix
- Mistake: You overbuild sheer pink until it looks chalky and loses that “natural” vibe.
- Fix: Keep it at 2 coats max, then rely on gloss to make it look luxe.
Key Takeaways
- Sheer pink gives the cleanest “wedding guest” vibe with zero outfit conflict.
- Ridge-filling base prevents that streaky, uneven look.
- Two thin coats beat one thick coat every time.
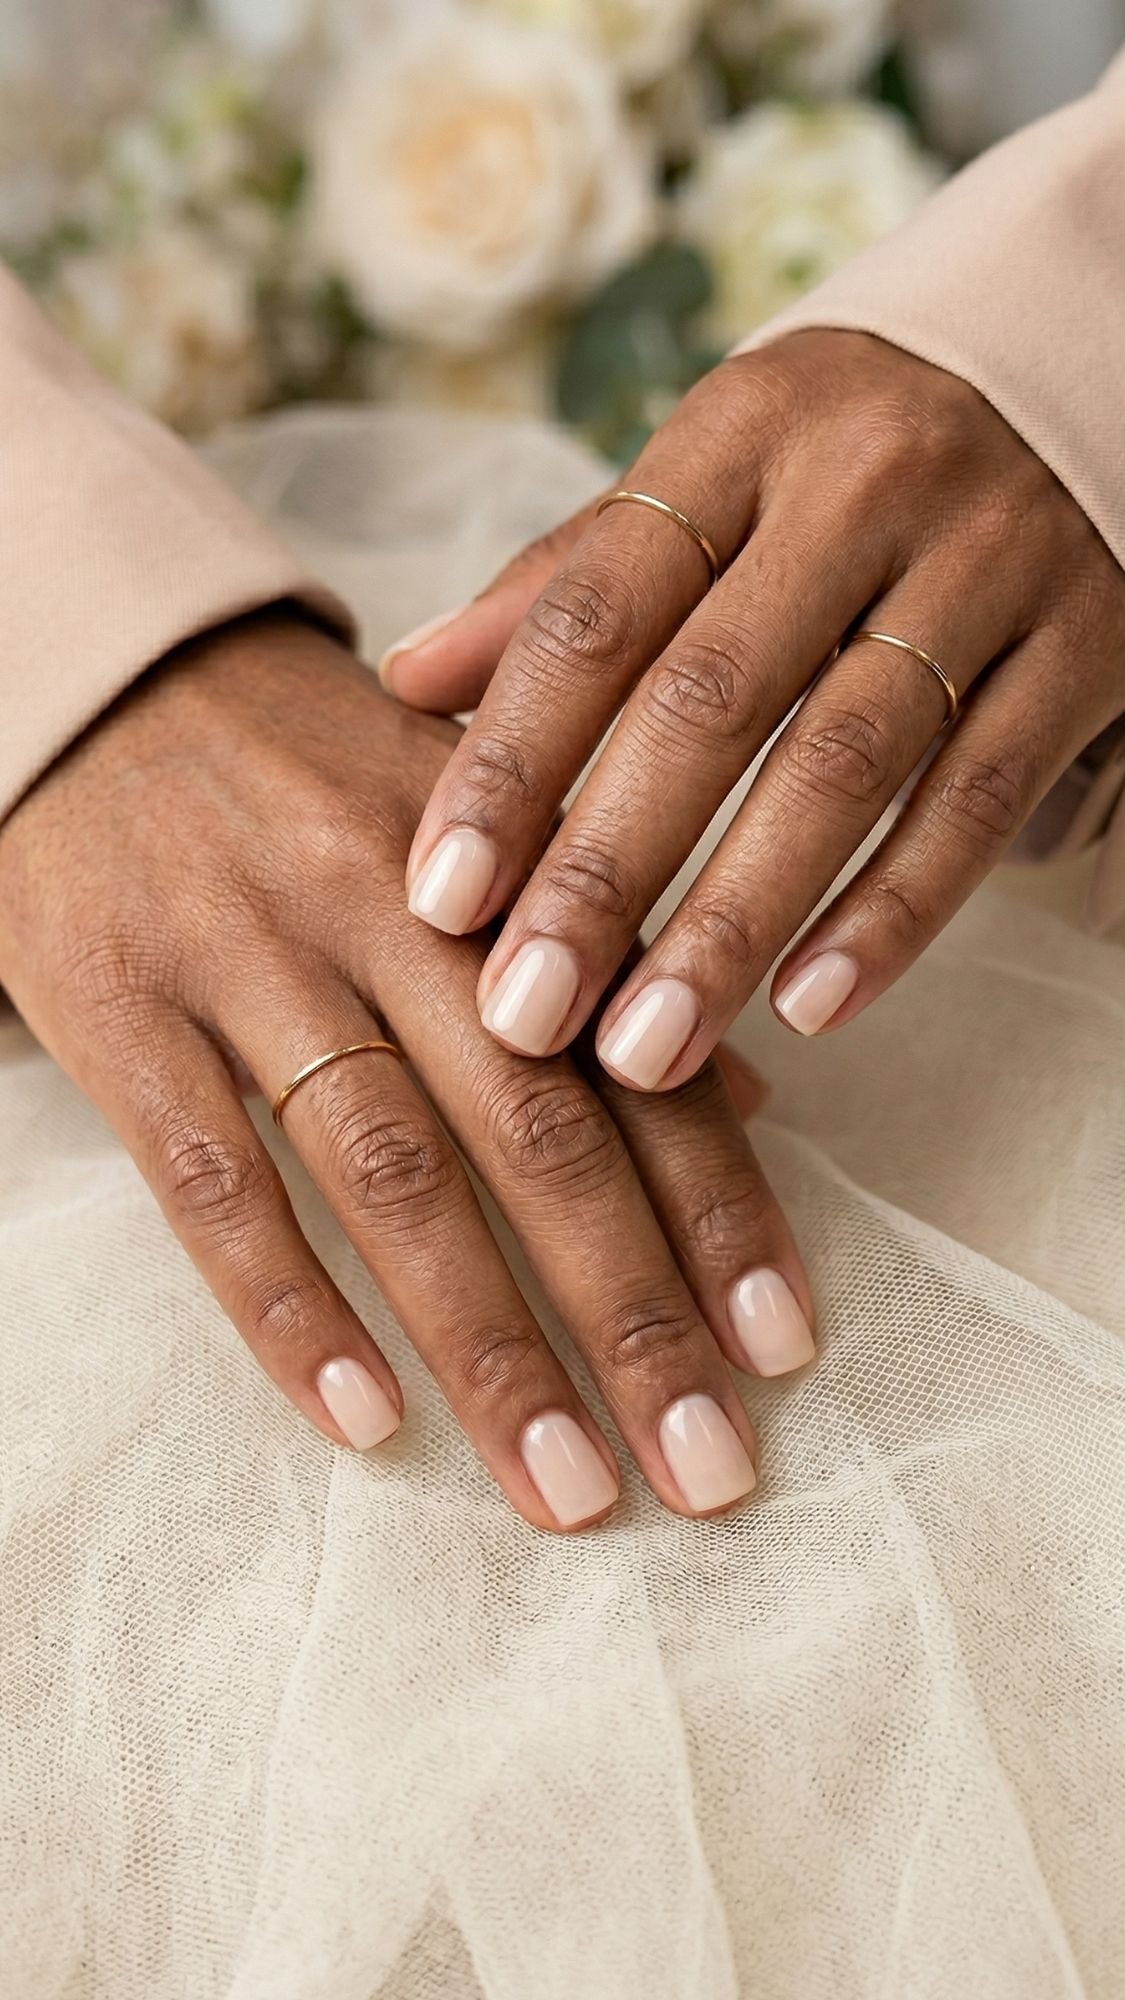
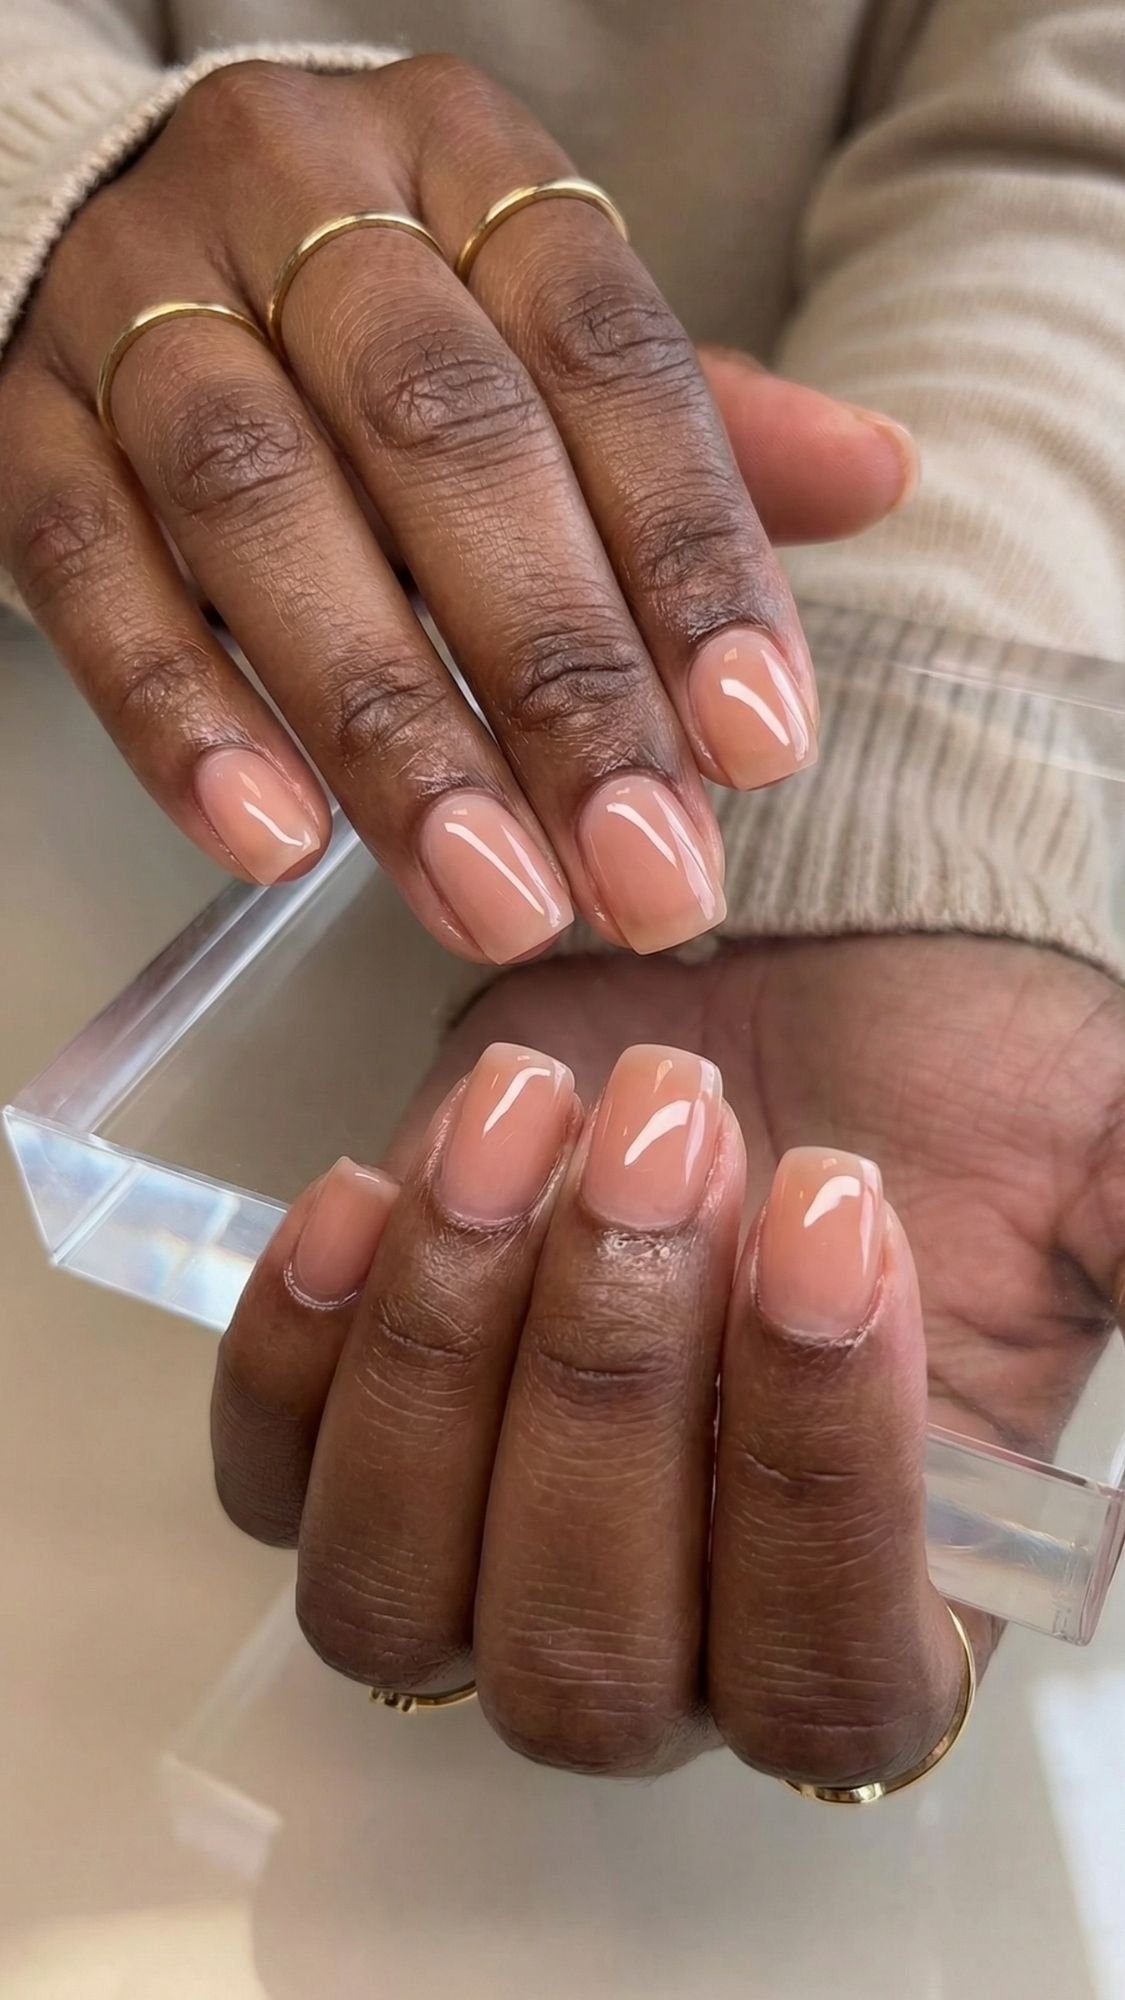
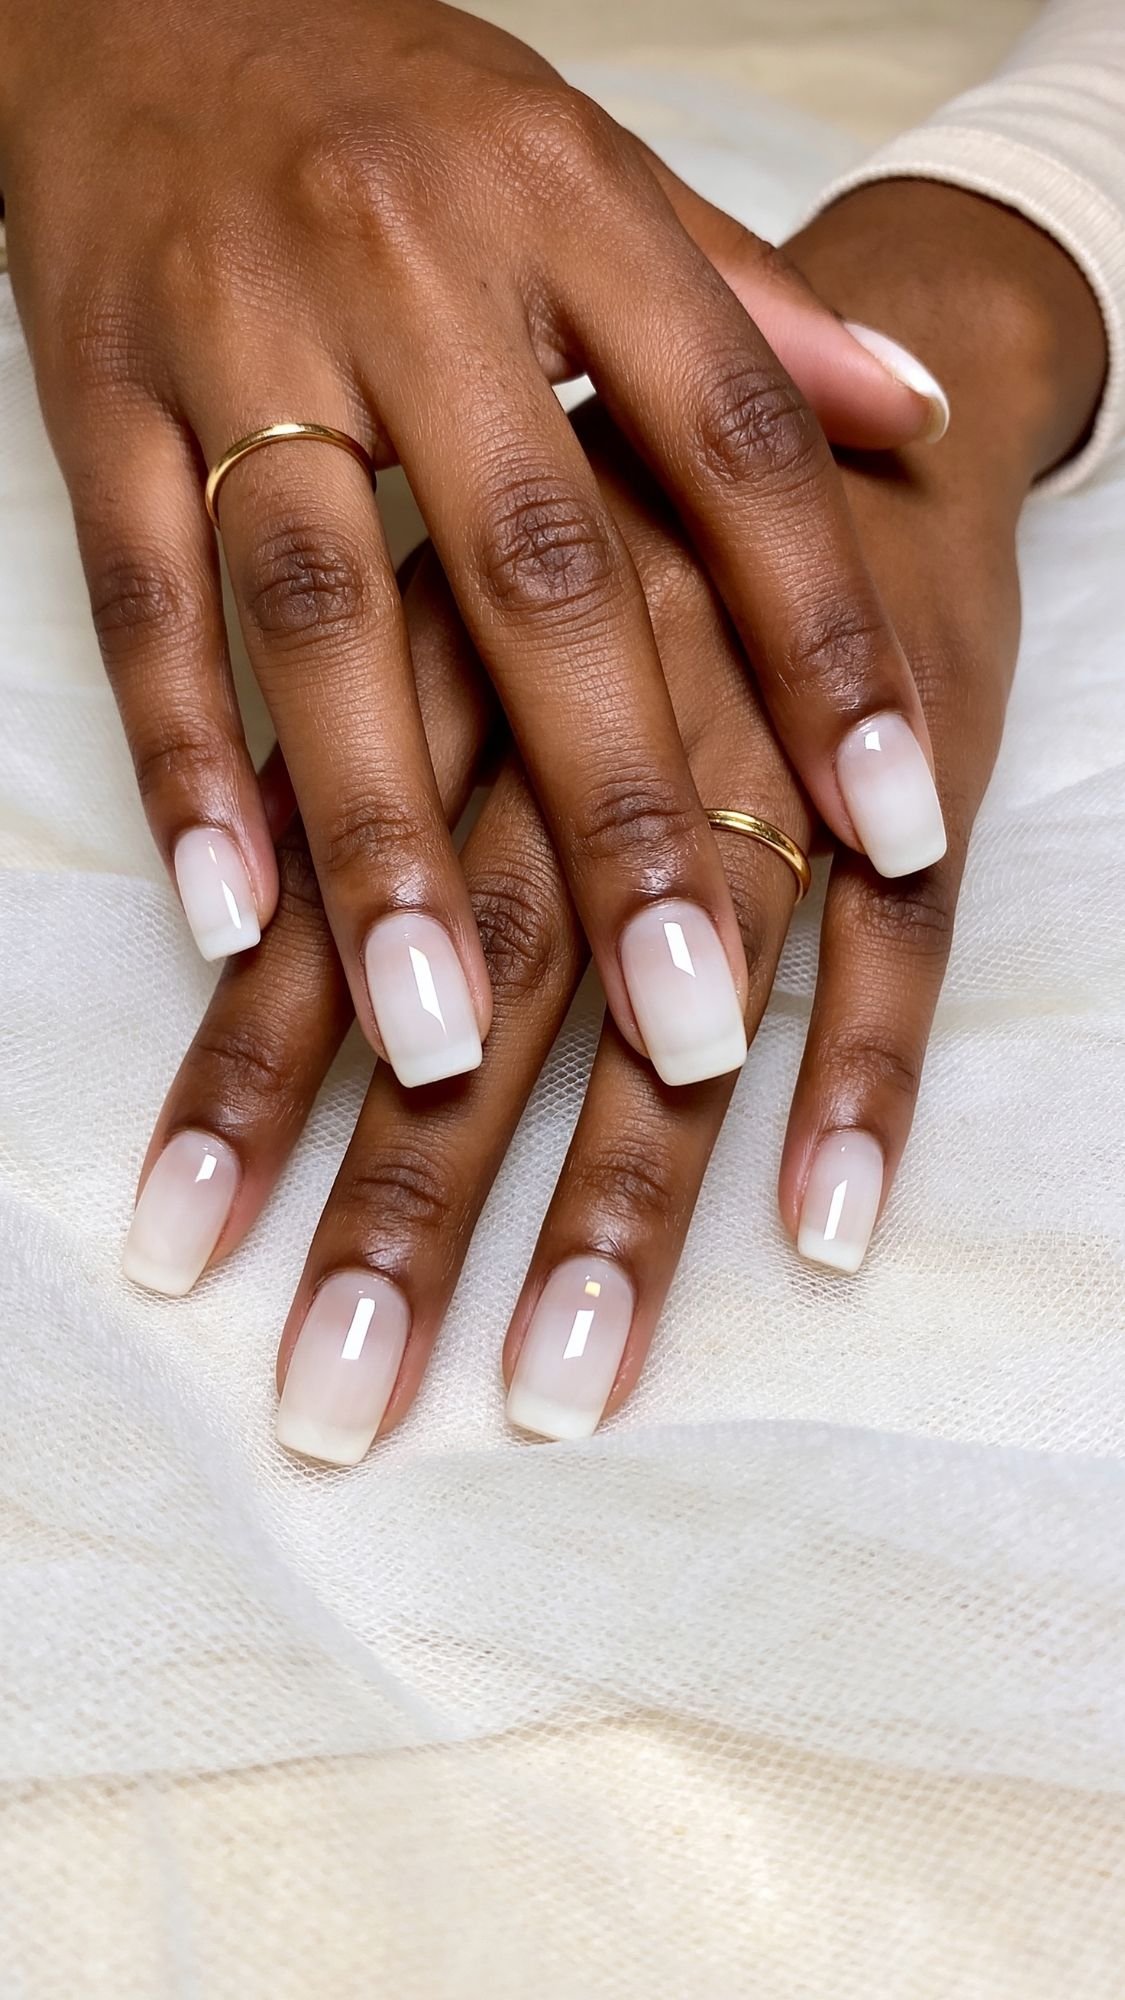
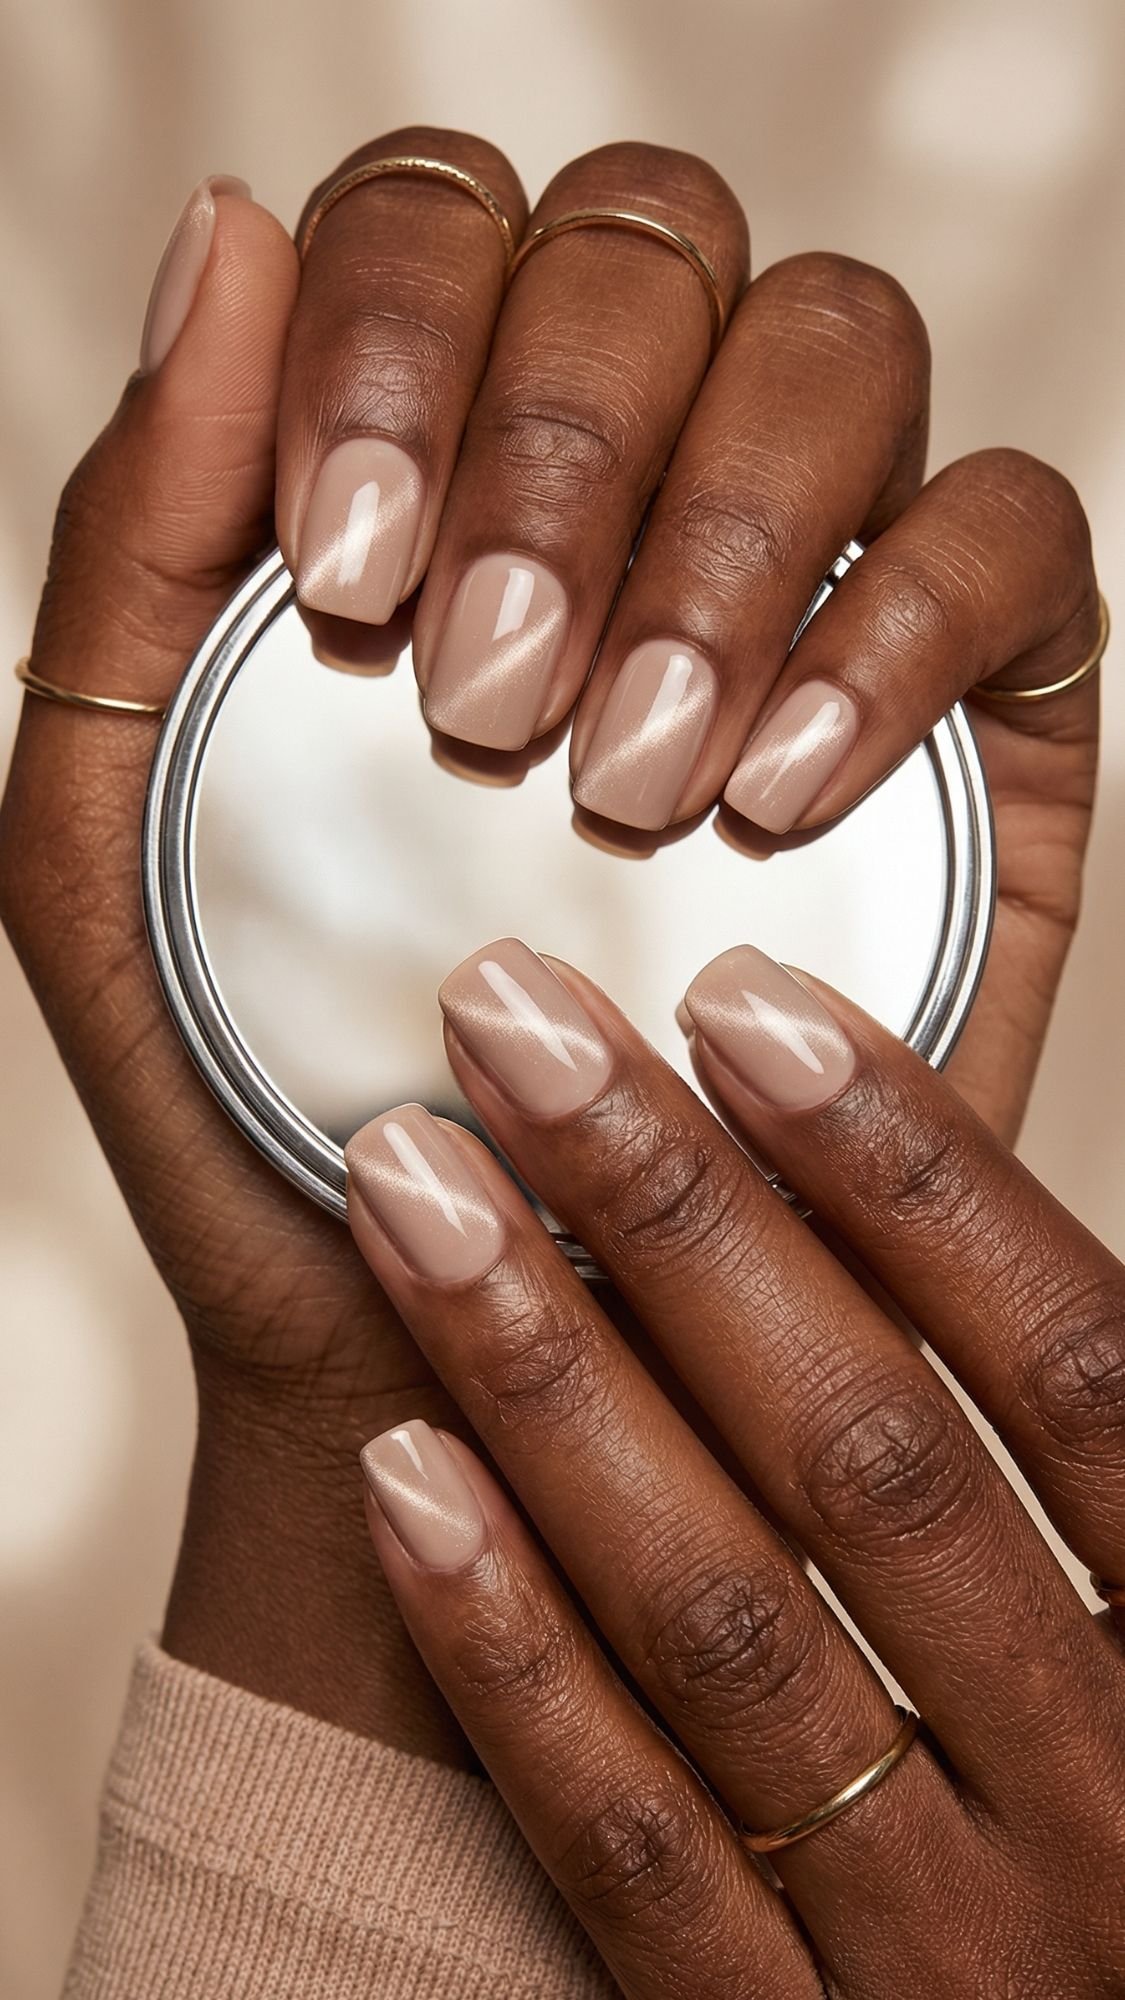
3) Milky Nude Nails, Soft-Focus And Photo-Friendly
Milky nude nails give you that “I have my life together” look, even if you absolutely do not. I love this style for weddings because it reads polished from far away, but it also holds up in close-ups when someone posts a ring-shot style photo of their drink and your hand sneaks into frame. Over the years, I’ve noticed milky nudes outperform flat beige nudes because the milkiness blurs imperfections. It acts like a soft-focus filter for your nail plate, especially if you have ridges or uneven tone. You also get a neutral base that works with any dress color, prints included.
Why It Matches Any Dress
- The milky finish sits in the neutral zone, not too pink, not too brown
- It pairs with warm, cool, and neutral outfits without clashing
- It looks expensive in photos because it reads creamy and intentional, not dull
Who It Flatters Most
- Anyone who wants a true neutral that still looks elevated
- Short nails and medium lengths, because milkiness keeps the look clean
- People who want a manicure that looks good with both gold and silver jewelry
How To Ask For It At The Salon
Say: “I want a milky nude manicure, creamy not chalky, with a high-gloss finish. Keep it buildable and even.”
If you want it more flattering, add: “Match it to my undertone so it won’t look ashy in photos.”
DIY Mini Steps (How To Get Milky Without Streaks)
- Start with a smoothing base coat, milky shades show texture fast.
- Apply one thin coat of milky nude, do not try to make it opaque immediately.
- Wait 2 to 4 minutes, then apply a second thin coat.
- If it still looks uneven, add a third very thin coat, but only if you keep it thin.
- Finish with a glossy top coat, cap the free edge. Pro tip: if the formula feels thick and drags, roll the bottle between your palms. Do not shake it, shaking adds bubbles, and bubbles ruin the smooth milky look.
Common Mistake + Easy Fix
- Mistake: You choose a milky nude that looks too pale and turns ashy on deeper skin tones.
- Fix: Choose a milky nude with a slightly warmer or slightly pink-beige base, so it stays creamy instead of gray.
Key Takeaways
- Milky nude nails give the most “photo filter” effect for wedding guest nails.
- Thin, buildable coats keep it smooth and expensive-looking.
- Choose creamy over chalky, always.
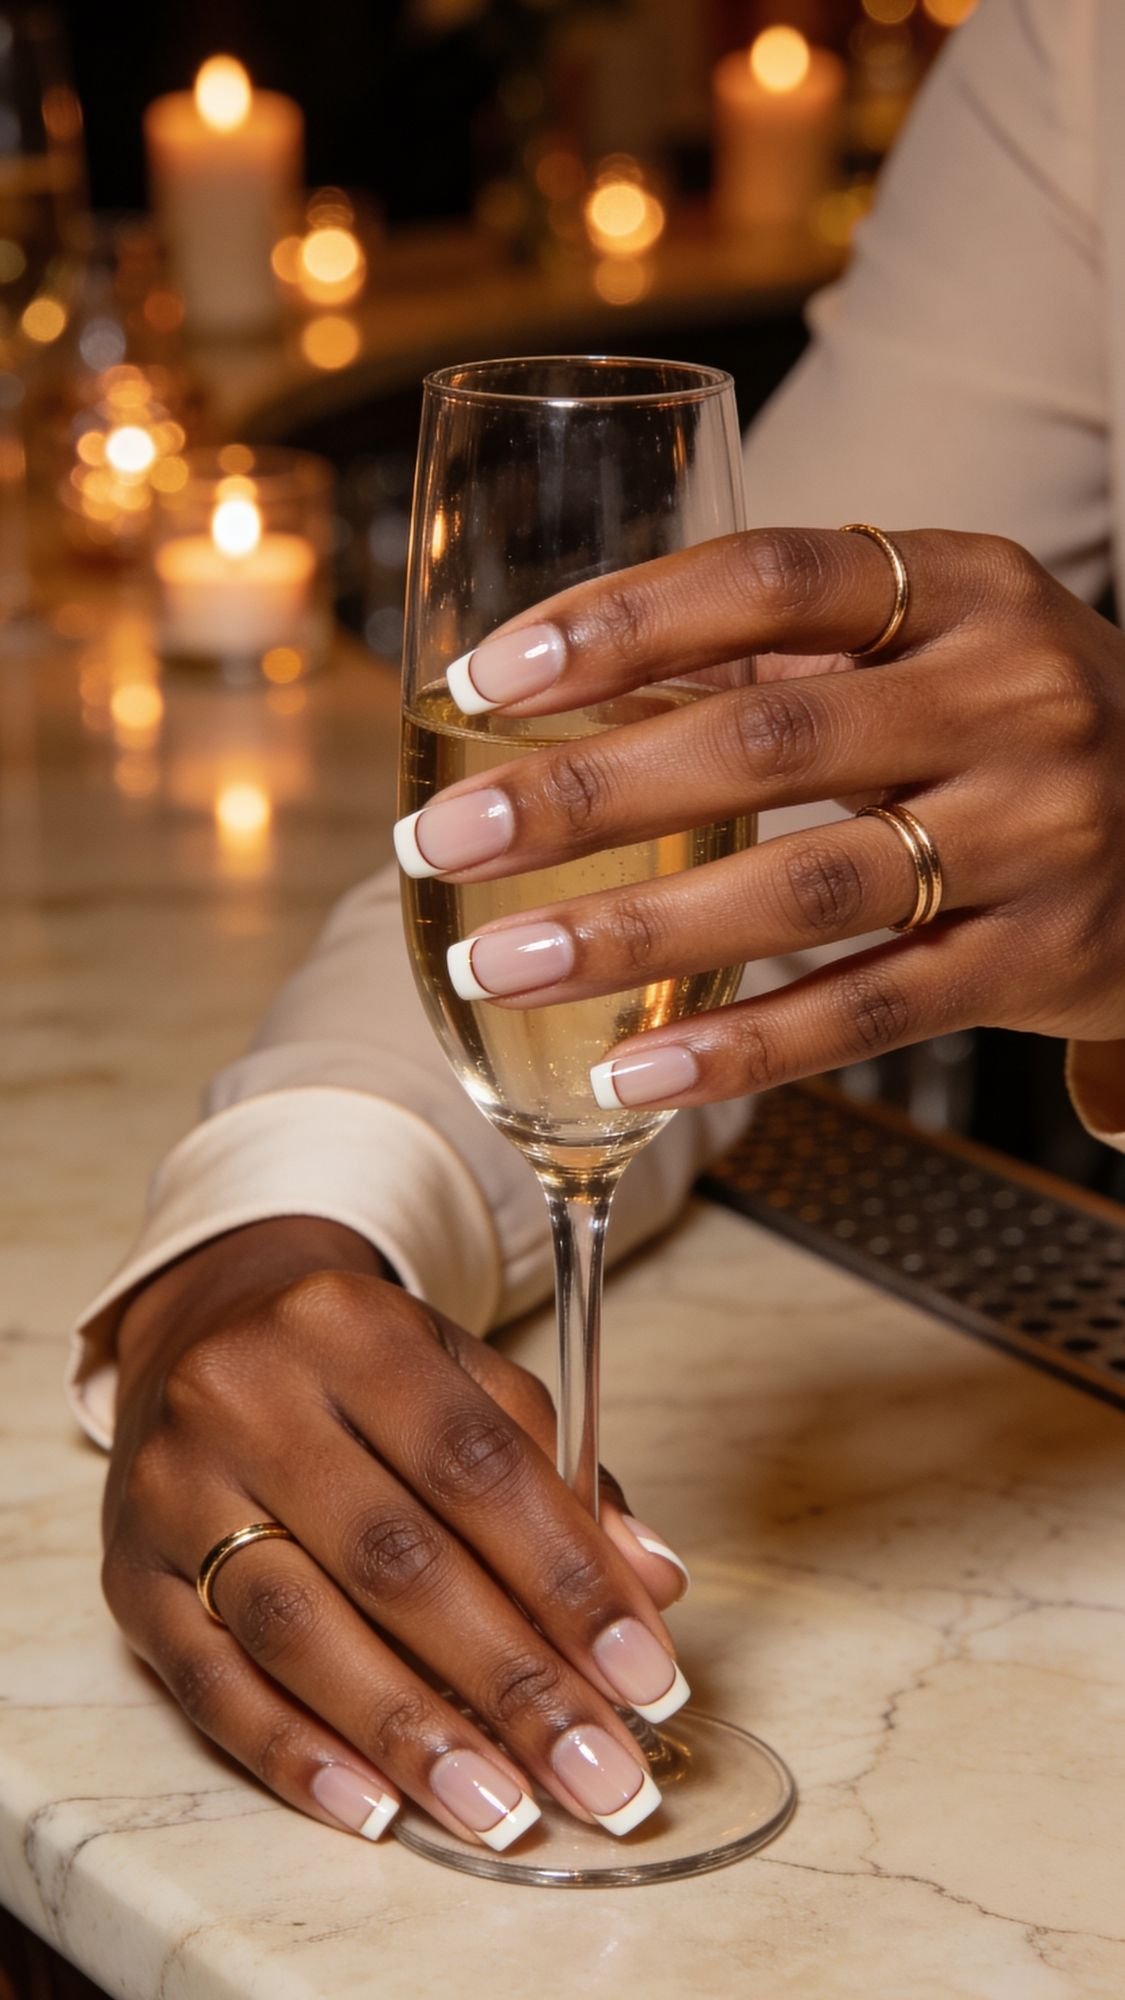
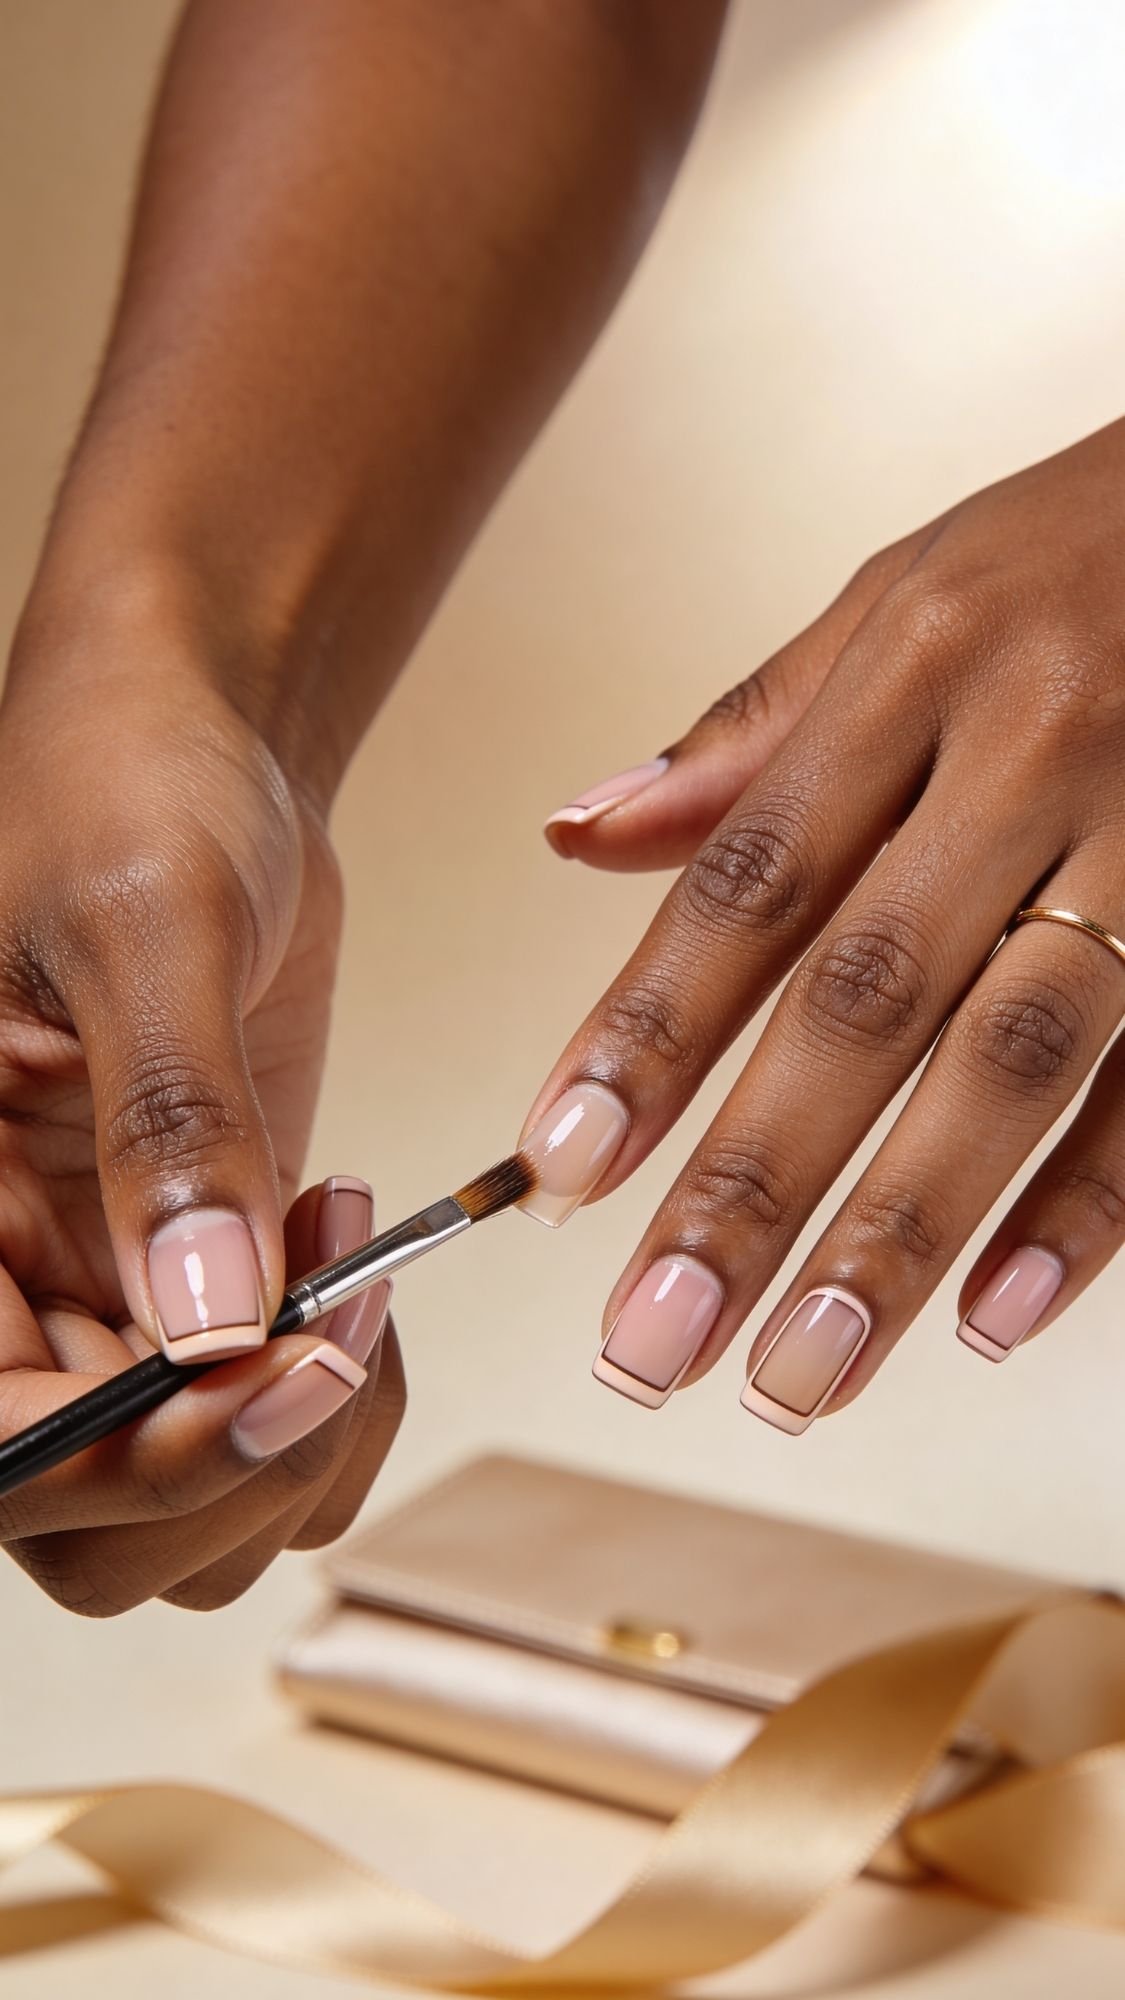
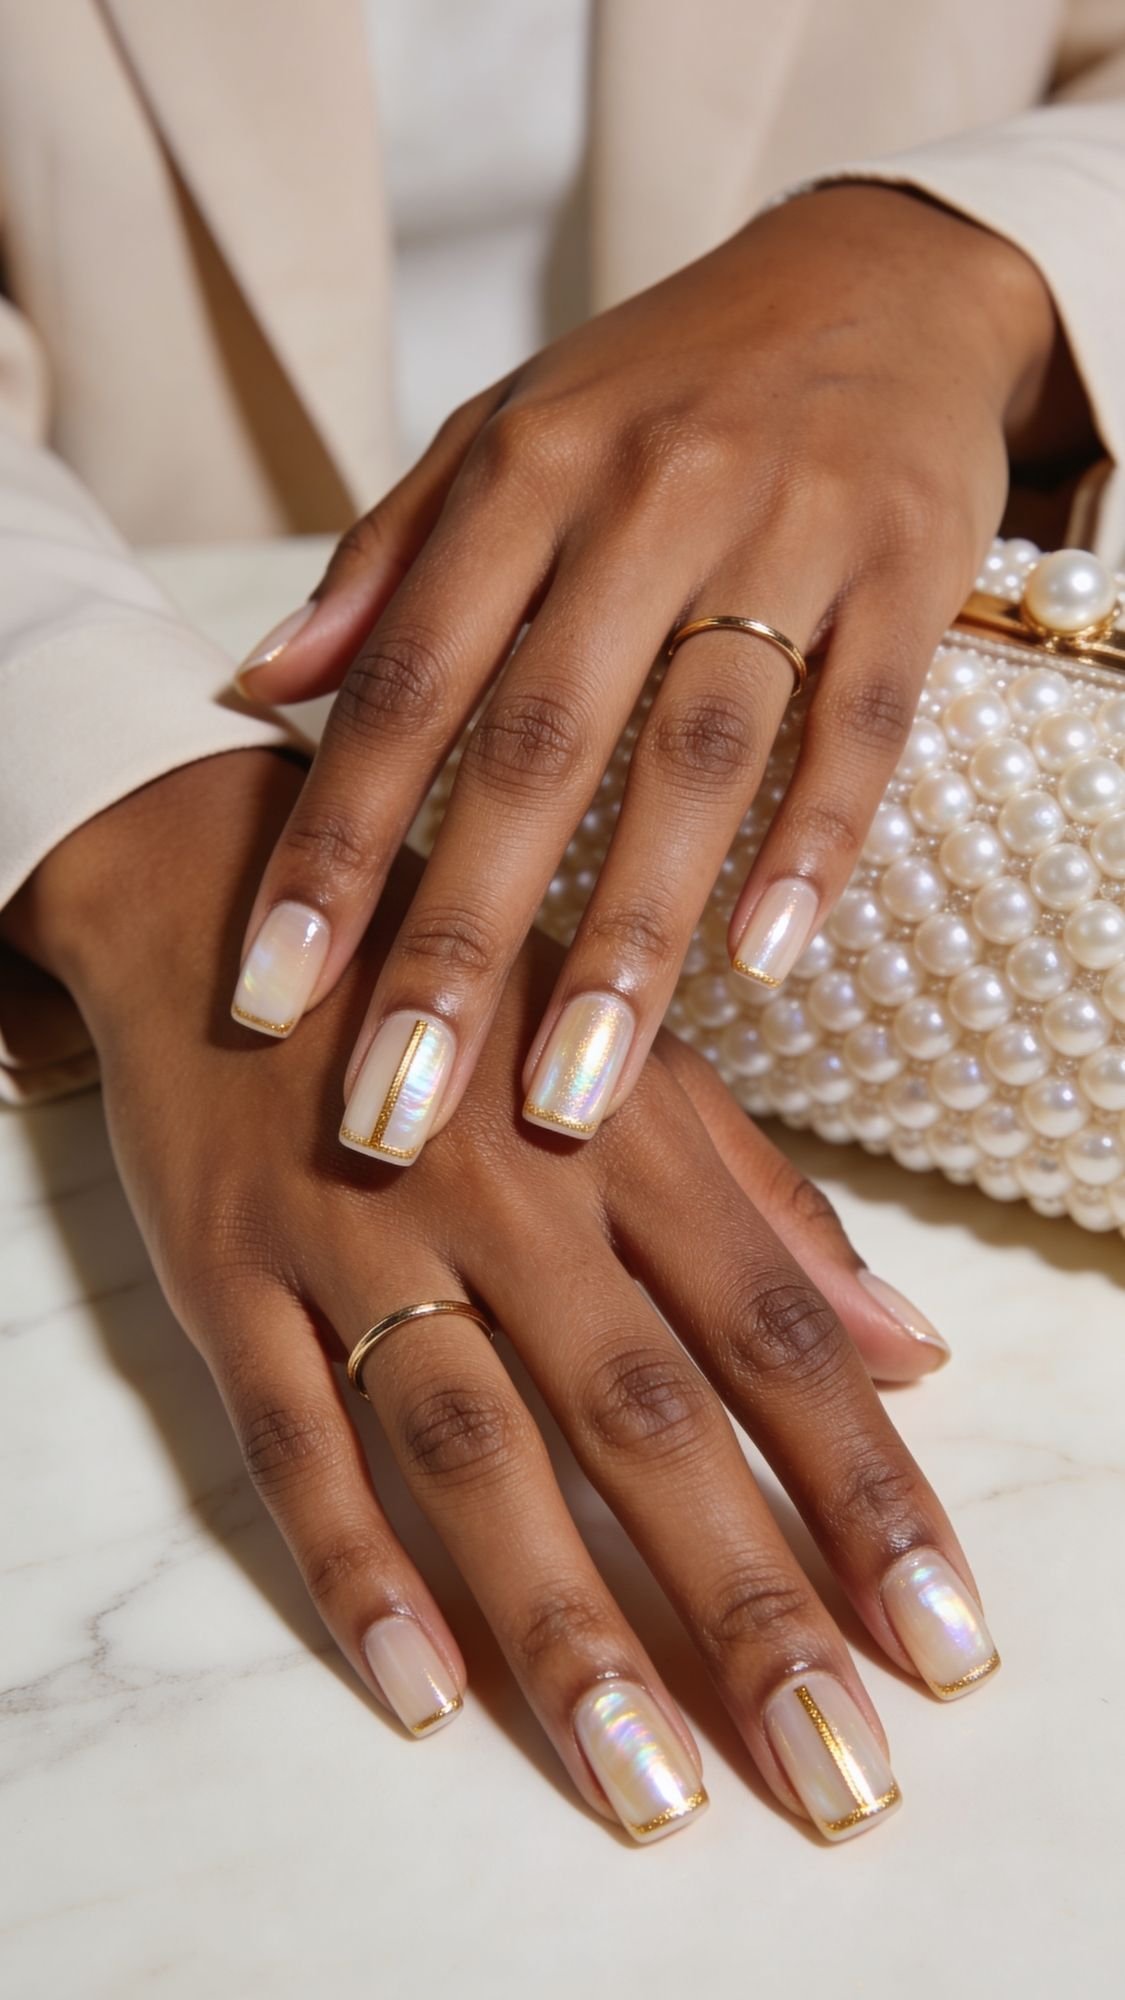
4) French Gloss Nails, The Shiny Minimalist Upgrade
French gloss nails are for the person who wants the structure of a French manicure, but refuses to look like they time-traveled from 2006. This style looks clean, modern, and ridiculously wearable. A classic French can read harsh in photos if the tip looks too white or the line looks too sharp. French gloss fixes that by keeping everything low-contrast and letting the shine do the talking. You get that polished, intentional edge, but it still matches any dress color, any print, any vibe.
Why It Matches Any Dress
- The tip stays soft and subtle, so it never competes with your outfit
- It looks appropriate for every dress code, from casual to black tie
- The glassy finish makes hands look fresh and expensive in photos
Who It Flatters Most
- Anyone who loves clean, minimalist nails but wants a little structure
- Short to medium nails, because the soft tip elongates without looking obvious
- People who wear a lot of jewelry, because this look plays nicely with everything
How To Ask For It At The Salon
Say: “I want a soft French, low-contrast tip, finished with a glassy, lip-gloss shine top coat.”
If you want it extra flattering, add: “Keep the tip thin and slightly blended, no bright white stripe.”
DIY Mini Steps (A Clean French Without The Stress)
- Apply a sheer nude or sheer pink base, two thin coats.
- Use a thin brush or French guide, and create a soft tip line.
- Keep the tip narrow, especially on short nails.
- Apply a glossy top coat and cap the free edge. Pro tip: If your tip line looks wobbly, do not panic and repaint everything. Dip a small clean-up brush in remover and sharpen the edge before you top coat.
Common Mistake + Easy Fix
- Mistake: You make the tip too thick, then nails look shorter and the French looks heavy.
- Fix: Keep the tip line thin, and curve it slightly higher at the center to elongate the nail.
Key Takeaways
- French gloss nails give you French structure without harsh contrast.
- Thin, blended tips look the most modern and photo-friendly.
- Shine makes this look instantly more expensive.
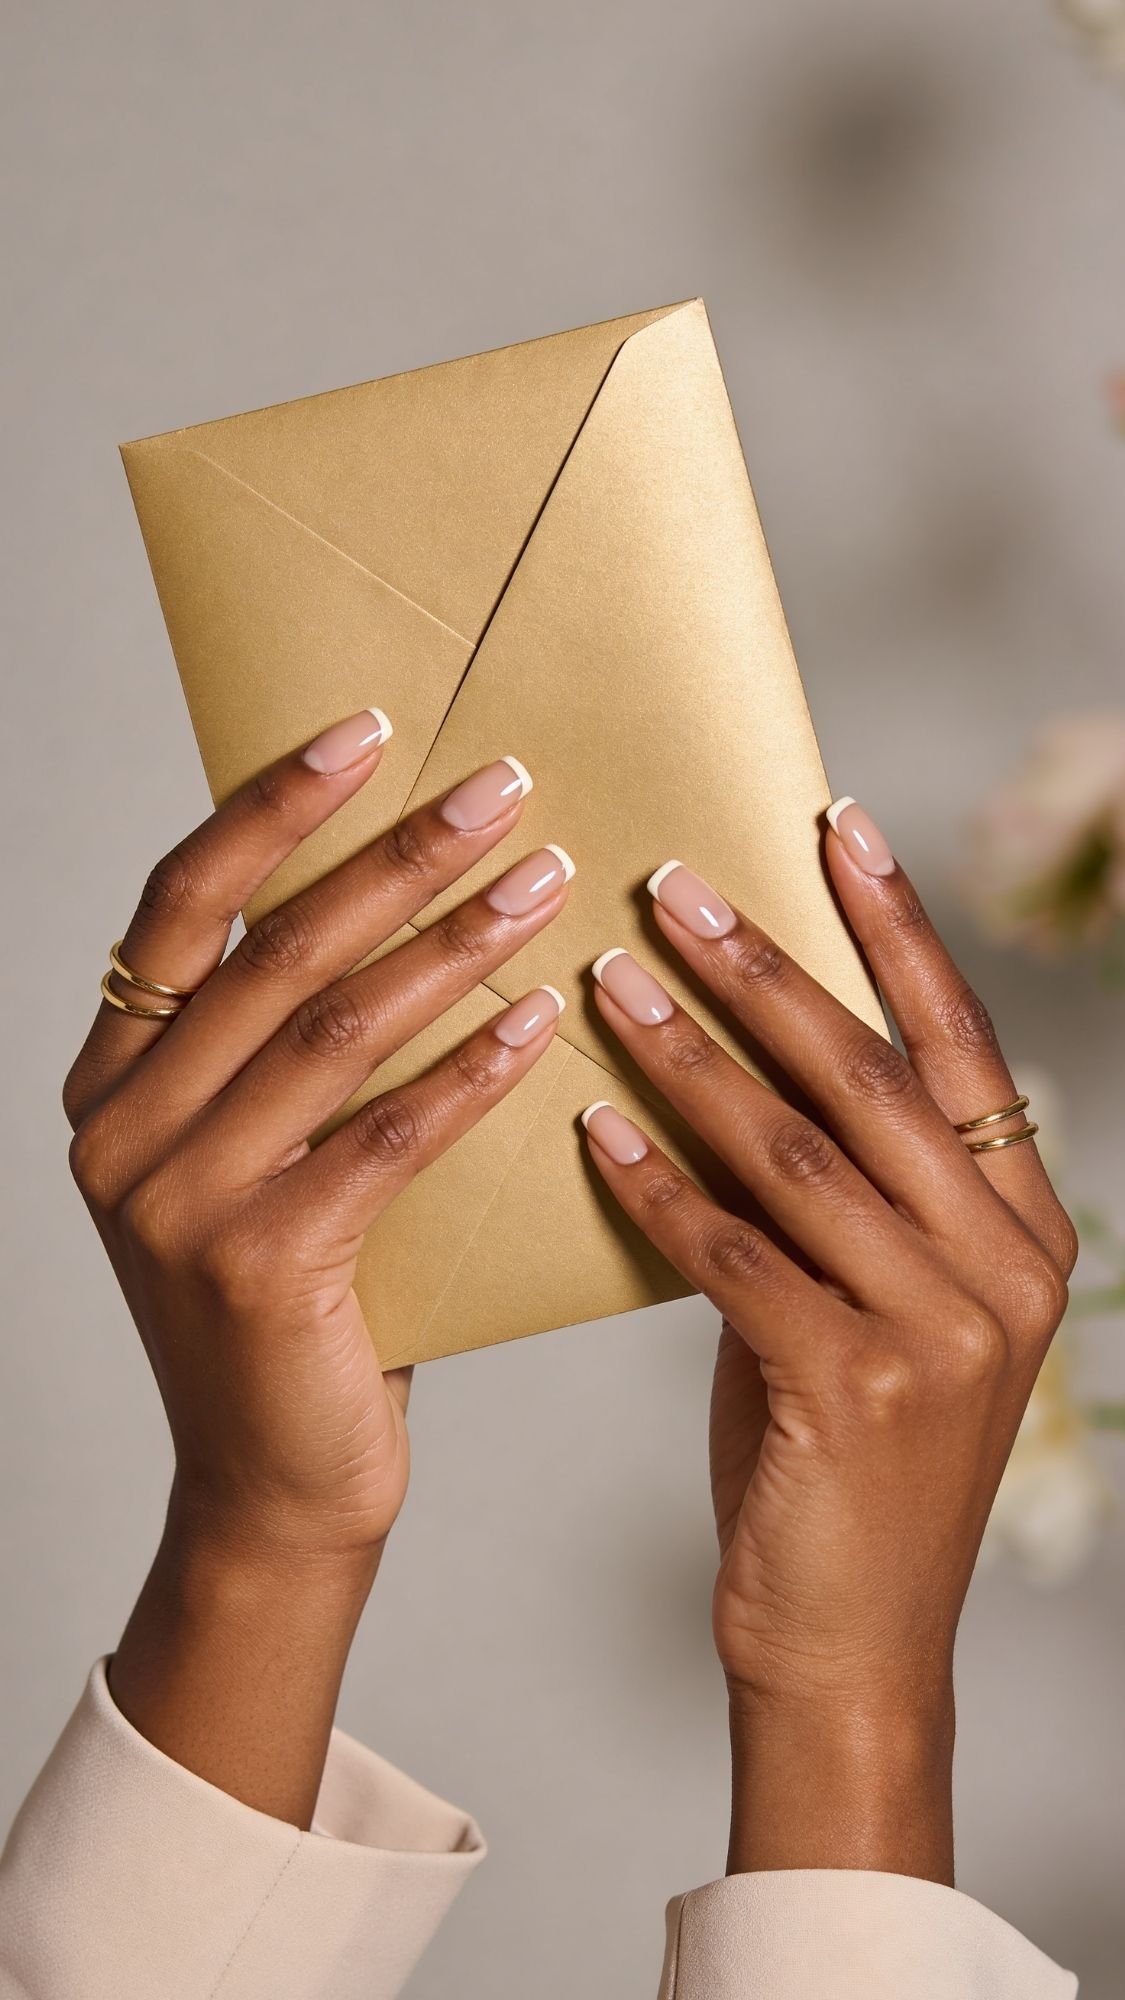
5) Micro French Manicure, Tiny Tip, Huge Payoff
Micro French nails give you that clean French vibe, but in a way that feels modern and effortless. I love this for wedding guests because it looks polished without pulling attention away from your outfit. The micro French works especially well when you want nails that match any dress, but you still want a little detail so it doesn’t feel too plain. The tiny tip creates structure, and structure always reads expensive in photos. Plus, it grows out gracefully, which matters if you do your nails a few days before the wedding.
Why It Matches Any Dress
- The tip stays minimal, so it never clashes with bold colors or prints
- It looks classy for any dress code, garden, cocktail, formal, black tie
- The design reads clean from far away and crisp up close
Who It Flatters Most
- Short nails, because the micro tip elongates without making nails look stubby
- Wide nail beds, because a thin tip line looks slimmer and neater
- Anyone who wants a “neutral but not boring” manicure
How To Ask For It At The Salon
Say: “I want a micro French, super thin tip, low-contrast, with a glossy finish.”
If you want the most versatile version, add: “Use an off-white or soft ivory tip, not bright white.”
DIY Mini Steps (Micro French Without The Rage)
- Apply a sheer nude or sheer pink base, two thin coats.
- Use a striping brush or a fine liner brush, and load it lightly.
- Draw a thin smile line across the tip, keep it narrow.
- Clean up the edge with a small brush and remover before it dries.
- Top coat, cap the free edge. Pro tip: Rest your painting hand on the table and anchor your pinky. That tiny stabilization move instantly makes your lines cleaner.
Common Mistake + Easy Fix
- Mistake: You make the tip too thick, then it stops being micro and starts looking heavy.
- Fix: Make the first line thinner than you think. You can always add a touch more, but you cannot un-thicken a tip without redoing it.
Key Takeaways
- Micro French nails look polished and modern, and they match everything.
- Soft ivory tips feel more versatile than bright white.
- A thin line makes nails look longer and cleaner.
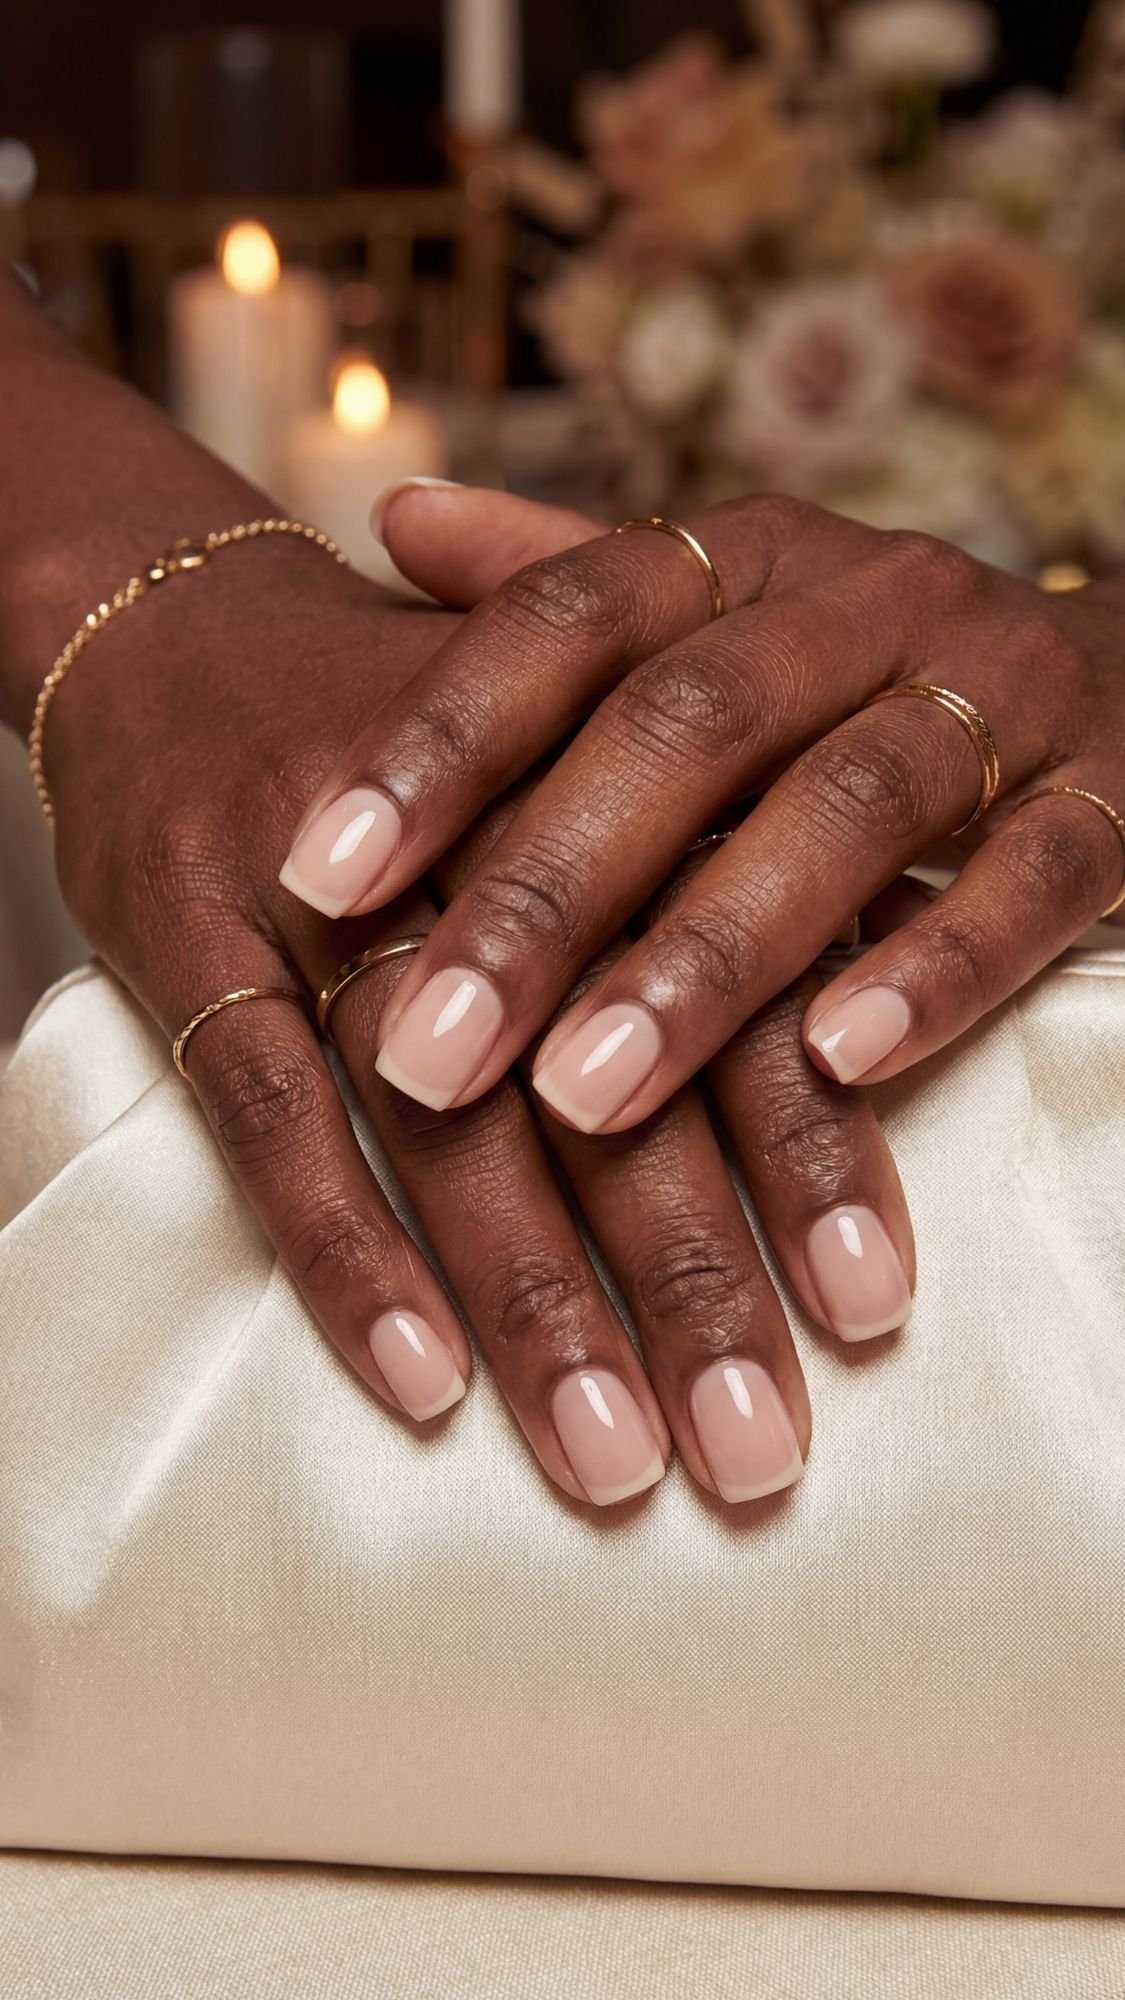
6) Barely-There French Tips, The Wedding Classic That Never Argues With Your Outfit
When someone tells me they want nails that match any dress, but they still want that “wedding appropriate” polish, I point them here. Barely-there French tips look timeless, but they feel softer and more flattering than a stark white French. Bright white tips can look harsh in flash photography, especially when the base looks too pink or too beige. This version fixes that by using a low-contrast base and a tip that looks more like a natural brightening than a stripe. You get clean, elegant nails that work with any dress color and any jewelry metal, and you never have to explain your choice.
Why It Matches Any Dress
- The design stays neutral and balanced, so it pairs with prints, bright colors, and black
- The low-contrast tip reads refined, not loud
- It fits every dress code, from garden weddings to black tie
Who It Flatters Most
- Short to medium nails, because a soft tip elongates without looking obvious
- Anyone who wants a manicure that looks “done” even at a distance
- People who want an easy grow-out, because the transition looks seamless
How To Ask For It At The Salon
Say: “I want a barely-there French with a low-contrast tip, keep it soft and blended, and finish it with a high-gloss top coat.”
If you want the most flattering option, add: “Use an ivory tip, not bright white, and match the base to my undertone.”
DIY Mini Steps (The Clean, Realistic Version)
- Apply a sheer nude base in two thin coats, then let it set for a few minutes.
- Use a fine liner brush, create a very thin tip line with soft ivory.
- Soften the edge slightly with a tiny clean-up brush if the line looks too sharp.
- Top coat with a glassy finish, then cap the free edge. Pro tip: I keep the tip slightly narrower at the sides, because that makes nails look slimmer and longer in photos.
Common Mistake + Easy Fix
- Mistake: You choose a base shade that looks perfect indoors, then turns gray in daylight.
- Fix: Test the base on one nail, then look at it near a window and under warm indoor light. If it looks ashy in either place, shift warmer by a notch.
Key Takeaways
- Low-contrast French tips look softer and more modern than bright white.
- A slightly blended edge photographs better than a hard line.
- Undertone-matched base keeps this truly dress-proof.
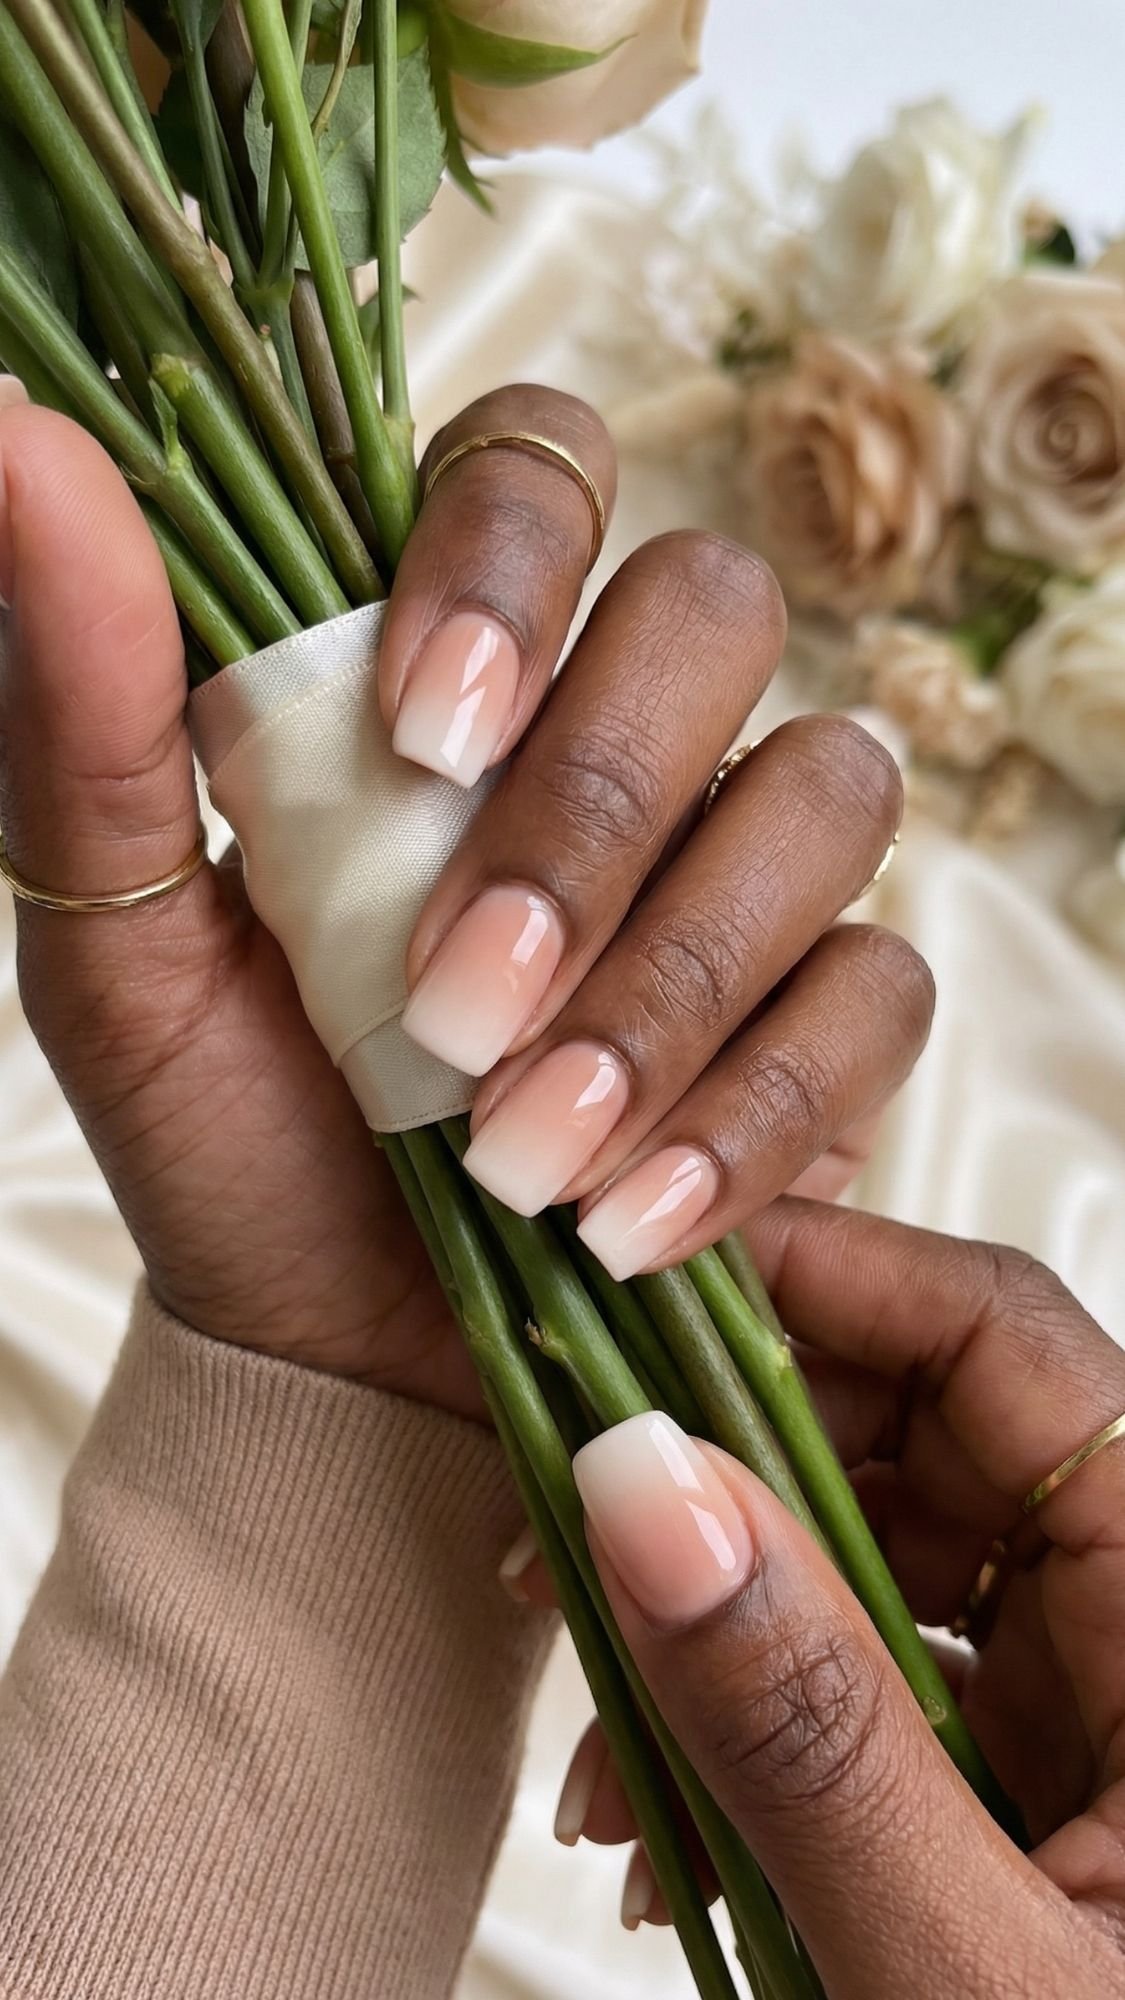
7) Nude Ombré (Baby Boomer), The Softening Filter For Your Hands
Nude ombré nails, also called the baby boomer style, give you that smooth fade from a natural base into a soft, milky tip. This look feels extra wedding-friendly because it reads elegant without shouting. This style looks especially good in photos because it blurs harsh lines, so your nails look longer and your hands look softer. It also handles outfit changes like a champ. You can wear bold colors, prints, metallics, and it still looks intentional. If you want a manicure that looks expensive from every angle, this one rarely misses.
Why It Matches Any Dress
- The gradient stays neutral, so it never clashes with dress color or pattern
- The fade looks polished in both daylight and warm reception lighting
- It pairs easily with gold or silver jewelry, no overthinking required
Who It Flatters Most
- Short to medium nails, because the fade elongates the look
- Wide nail beds, because the gradient visually narrows the nail
- Anyone who wants a romantic vibe without committing to sparkle or heavy nail art
How To Ask For It At The Salon
Say: “I want a nude ombré, baby boomer style, soft fade, not a harsh line, finished glossy.”
If you want the most flattering version, add: “Use a nude base that matches my undertone, then keep the tip milky, not bright white.”
DIY Mini Steps (The Realistic At-Home Version)
- Apply a smoothing base coat, then let it set for a minute.
- Apply one thin coat of a nude base shade.
- Use a makeup sponge to tap a milky off-white or pale nude onto the tip area.
- Tap in light layers, build slowly, do not swipe.
- Apply a glossy top coat to blend and smooth the gradient, cap the free edge. Pro tip: your sponge should feel slightly springy and damp, not wet. If it feels soaked, it dumps polish and creates a messy patch instead of a soft fade.
Common Mistake + Easy Fix
- Mistake: The fade looks like a visible stripe instead of a gradient.
- Fix: Tap lighter at the cuticle side of the fade, then concentrate product at the tip. Add more layers only after the last one looks set.
- Mistake: The tip looks too white and contrasts harshly in photos.
- Fix: Switch to a milky ivory or a pale nude tip, and keep it sheer-buildable.
Key Takeaways
- Nude ombré nails photograph like a soft-focus filter.
- Tapping beats swiping for a clean gradient.
- Milky tips look more expensive than bright white.
8) Lip Gloss Jelly Nude, Sheer And “Plump” Looking In The Best Way
Lip gloss jelly nude nails give you that juicy, translucent finish that looks fresh in every photo, and still matches any dress. This style works because it lets a little of your natural nail show through, so it adapts to whatever color you wear. Jelly finishes look especially good at weddings because they read youthful and clean, not heavy or opaque. You also get the kind of shine that makes hands look moisturized and polished, even if you forgot lotion until 10 minutes ago. The sensory detail that always gives it away, the top layer feels slightly tacky for a moment, then it turns into that smooth, slick “glass” finish once it fully sets.
Why It Matches Any Dress
- The translucency keeps it neutral, so it never clashes with bright colors or prints
- The glossy finish reads luxe in daylight and warm reception lighting
- It pairs with gold or silver jewelry without competing
Who It Flatters Most
- Anyone who wants a neutral manicure that still looks modern
- Short nails, because jelly shine makes them look extra tidy and intentional
- People who hate the look of thick polish, because this stays light and “natural”
How To Ask For It At The Salon
Say: “I want lip gloss nails, a sheer jelly nude with a high-gloss, glassy finish, keep it translucent and smooth.”
If you want it to stay truly wearable, add: “No chunky shimmer, just clean jelly shine.”
DIY Mini Steps (How To Get The Jelly Look Without Patchiness)
- Apply a smoothing base coat, then let it set for a minute.
- Apply one thin coat of your jelly nude, keep it sheer.
- Wait 2 to 3 minutes, then apply a second thin coat to even it out.
- If you want more depth, add a third ultra-thin coat, but do not go thick.
- Finish with a glossy top coat, cap the free edge. Pro tip: If the jelly shade looks uneven, do not keep brushing it back and forth. Lay it down in 3 strokes, center then sides, then leave it alone so it can self-level.
Common Mistake + Easy Fix
- Mistake: The jelly looks streaky because you overwork it.
- Fix: Use thinner coats and fewer brush strokes, then let top coat smooth it out.
- Mistake: The finish looks cloudy instead of clear and juicy.
- Fix: Skip matte or quick-dry top coats here, choose a true high-gloss top coat.
Key Takeaways
- Jelly nude nails match any dress because they stay translucent and neutral.
- Thin coats keep the finish clear, smooth, and expensive-looking.
- A glassy top coat makes the “lip gloss nails” effect believable.
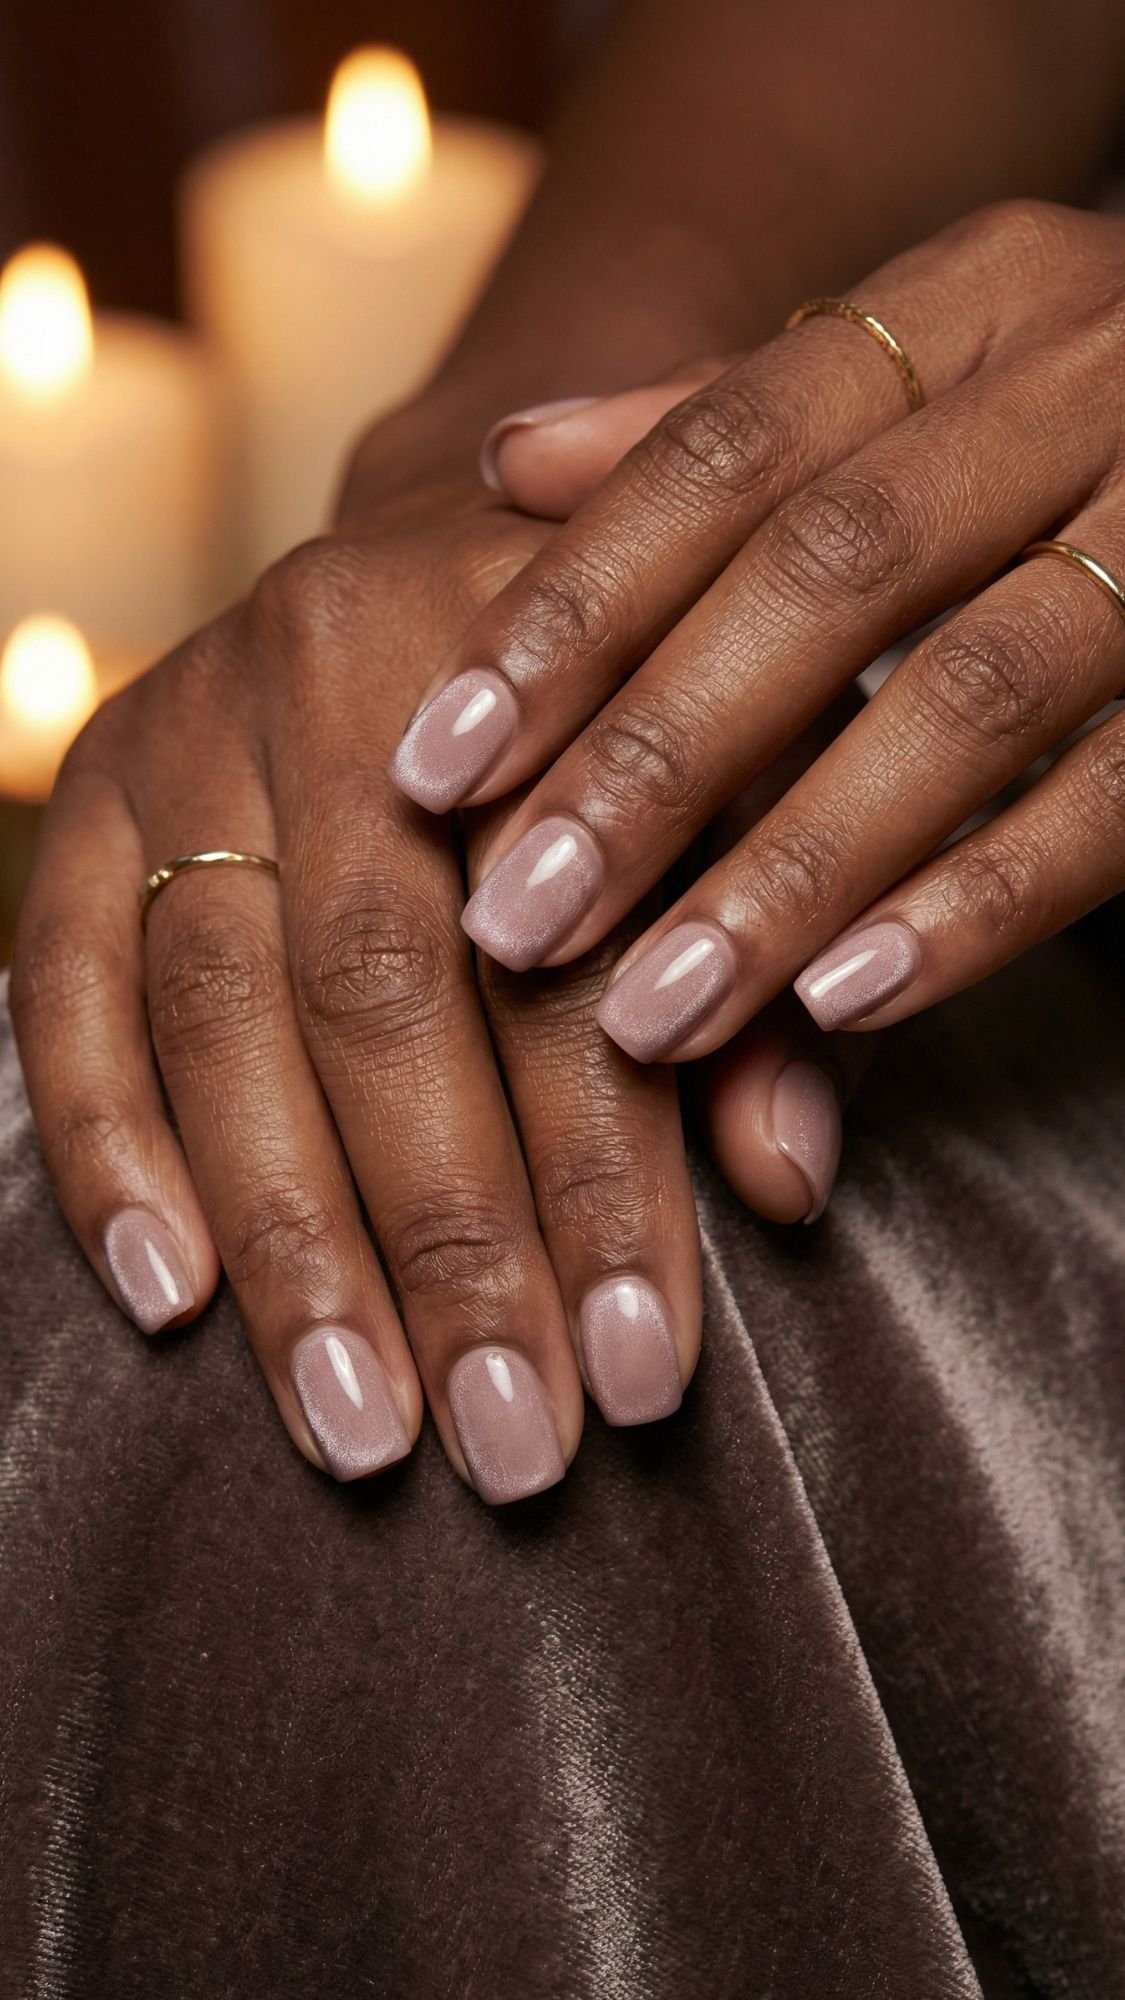
9) Glazed Donut Overlay On Nude, The Champagne-Pearl Glow
This is the look that makes people ask, “Wait, what polish is that?” because it catches light in the prettiest, most subtle way. Glazed donut nails work for weddings because they read neutral, but they still give you that soft pearl glow that looks amazing in photos and video. The most wearable version is champagne-pearl, not icy silver. Silver can look too cold or too metallic depending on lighting, but champagne pearl stays warm, soft, and dress-proof. The finish should look like a thin layer of shimmer sitting on top of a nude base, almost like a satin highlight. You want glow, not disco.
Why It Matches Any Dress
- The nude base keeps it neutral, so it pairs with any color or print
- The pearl overlay acts like jewelry, it coordinates with gold, silver, and pearls
- It looks elevated in flash photos without looking harsh
Who It Flatters Most
- Anyone who wants a neutral manicure that still feels special for a wedding
- People who love minimal outfits and want nails to add a subtle “wow”
- Short to medium nails, because the sheen makes them look clean and luxe
How To Ask For It At The Salon
Say: “I want a nude base with a champagne-pearl glazed finish, soft glow, not a mirror chrome.”
If you want it ultra wearable, add: “Keep it translucent and refined, no heavy metallic look.”
DIY Mini Steps (How To Keep It Soft, Not Harsh)
- Apply a nude base shade that matches your undertone, two thin coats.
- Add a sheer pearl topper, or use a chrome powder very lightly if you know what you’re doing.
- Apply a glossy top coat, cap the free edge. Pro tip: If you use a pearl topper, you want it to look like a veil. One thin coat usually beats two heavy coats. Heavy pearl can look streaky and chalky fast.
Common Mistake + Easy Fix
- Mistake: The glaze looks too icy and makes hands look washed out in photos.
- Fix: Switch to champagne-pearl instead of silver, and keep the overlay sheer.
- Mistake: The finish looks grainy or textured.
- Fix: Use a smoothing base and a self-leveling top coat, texture shows up more under pearlescent finishes.
Key Takeaways
- Champagne-pearl glaze reads neutral and wedding-appropriate.
- Soft glow looks more expensive than heavy chrome.
- Sheer layering keeps the look photo-friendly and versatile.
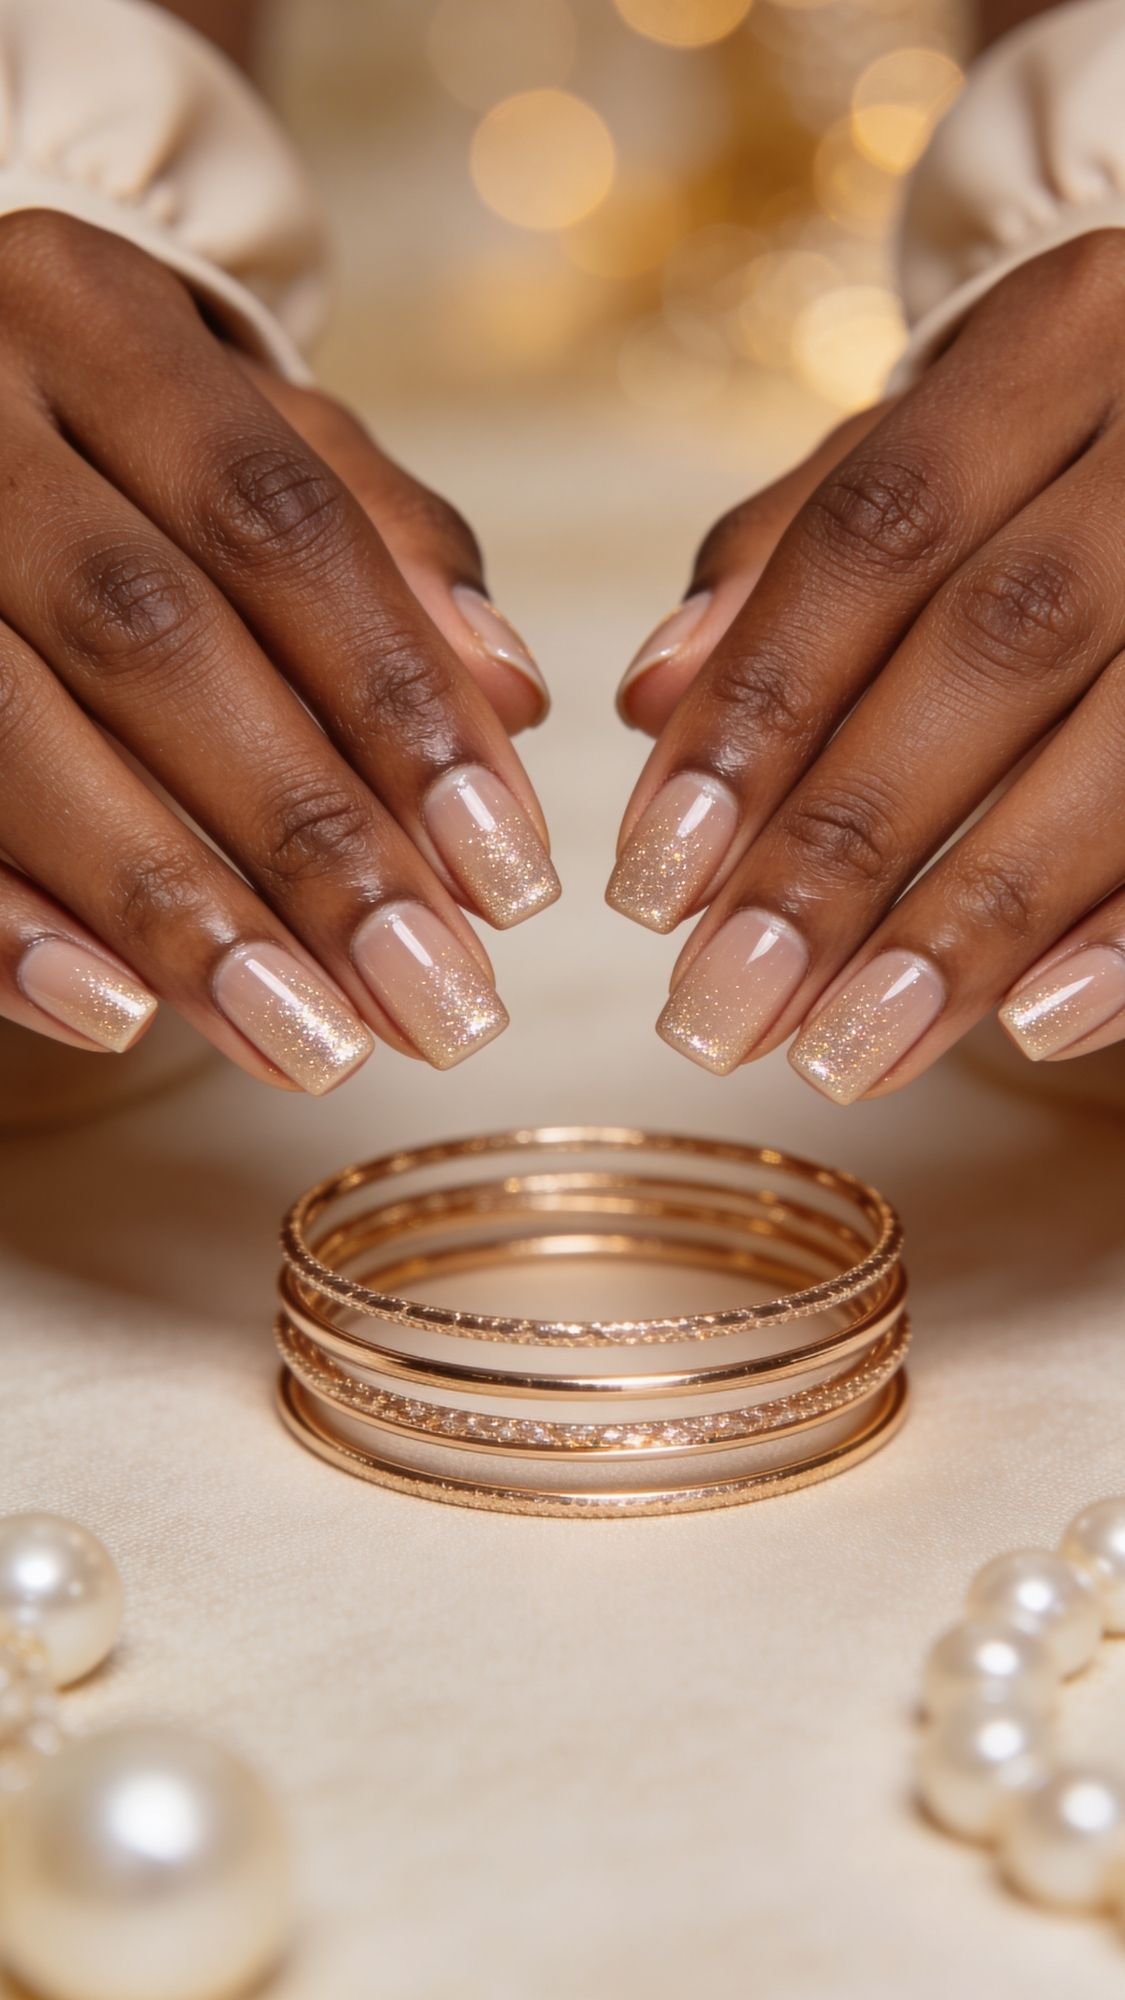
10) Champagne Shimmer Veil, Sparkle Without The Drama
If you want something a little festive but still “matches any dress,” this is the safest sparkle lane. A champagne shimmer veil looks like your nails caught candlelight, not like you glued glitter to your hands. This style consistently photographs well at weddings because shimmer reads like jewelry. It plays nicely with metallic accessories, sequins, satin, and even super minimalist outfits. The key is choosing shimmer that looks fine and smooth, not chunky. Chunky glitter can snag hair, catch on fabrics, and honestly look messy up close. This is a wedding, not a craft fair table. Kidding. Mostly.
Why It Matches Any Dress
- Champagne shimmer sits neutral, so it works with warm and cool outfit colors
- Shimmer coordinates with jewelry, shoes, and evening lighting
- The finish looks elevated in photos without overpowering your look
Who It Flatters Most
- Anyone attending an evening wedding or a venue with warm lighting
- People who love a neutral base but want a “special occasion” touch
- Short nails, because fine shimmer makes them look neat and polished
How To Ask For It At The Salon
Say: “I want a sheer nude or milky nude base with a fine champagne shimmer veil, glossy finish, no chunky glitter.”
If you want it extra refined, add: “Keep it soft and even, like candlelight on the nails.”
DIY Mini Steps (How To Layer It So It Looks Expensive)
- Apply a sheer nude or milky nude base, two thin coats.
- Apply one thin coat of fine champagne shimmer, keep it light.
- If you want more glow, add a second thin shimmer coat, but stop before it looks dense.
- Top coat with a glassy finish, cap the free edge. Pro tip: If shimmer looks uneven, do not keep brushing. Place it, then let top coat level and lock it in.
Common Mistake + Easy Fix
- Mistake: The shimmer looks too yellow or brassy in photos.
- Fix: Choose a champagne shimmer that leans neutral, not gold-gold, and keep it sheer.
- Mistake: The finish feels rough or textured.
- Fix: Use a thicker, smoothing top coat to seal the shimmer fully.
Key Takeaways
- Fine champagne shimmer reads like jewelry, it matches everything.
- Keep it sheer for a classy wedding guest finish.
- Avoid chunky glitter, it looks messy and snags easily.
11) Airy Milky White, Crisp But Soft
Airy milky white nails give you that clean, modern look without the harshness of bright white polish. I love this as a wedding guest option because it looks fresh with literally any dress color, and it feels elevated without being loud. The mistake people make is choosing a chalky white that looks flat and streaky. Chalky white can also look too stark in flash photos, especially if the formula dries down with that dry, powdery vibe. Milky white solves that by adding softness and a slightly translucent finish, so it looks creamy and intentional.
Why It Matches Any Dress
- White works with everything, but milky white keeps it wearable and soft
- It looks clean with prints, bold colors, and neutrals
- It photographs well when the finish stays creamy instead of chalky
Who It Flatters Most
- Anyone who wants a crisp neutral that still feels gentle
- Short nails, because milky white looks neat and minimal
- People who wear statement outfits, because this manicure stays classic and supportive
How To Ask For It At The Salon
Say: “I want a milky white manicure, creamy not chalky, with a glossy finish.”
If you want it extra flattering, add: “Keep it slightly sheer and buildable, not opaque in one thick coat.”
DIY Mini Steps (How To Avoid The Chalky Look)
- Apply a smoothing base coat, milky whites show texture fast.
- Apply one thin coat of milky white, do not try to make it opaque immediately.
- Wait 2 to 4 minutes, apply a second thin coat.
- If needed, add a third ultra-thin coat, but stop once it looks even.
- Top coat with a glassy finish, cap the free edge. Pro tip: If your brush strokes show, your coat is too thick or you overworked it. Use lighter pressure and fewer strokes, then let top coat smooth it out.
Common Mistake + Easy Fix
- Mistake: You pick a pure bright white that looks stark and makes hands look washed out in photos.
- Fix: Choose milky white or soft ivory instead of crisp white.
- Mistake: The polish streaks and looks uneven.
- Fix: Use thinner coats and a ridge-filling base, then rely on top coat to level.
Key Takeaways
- Milky white looks cleaner and softer than bright white for weddings.
- Thin, buildable coats keep it creamy and photo-friendly.
- Gloss prevents the chalky, flat look.
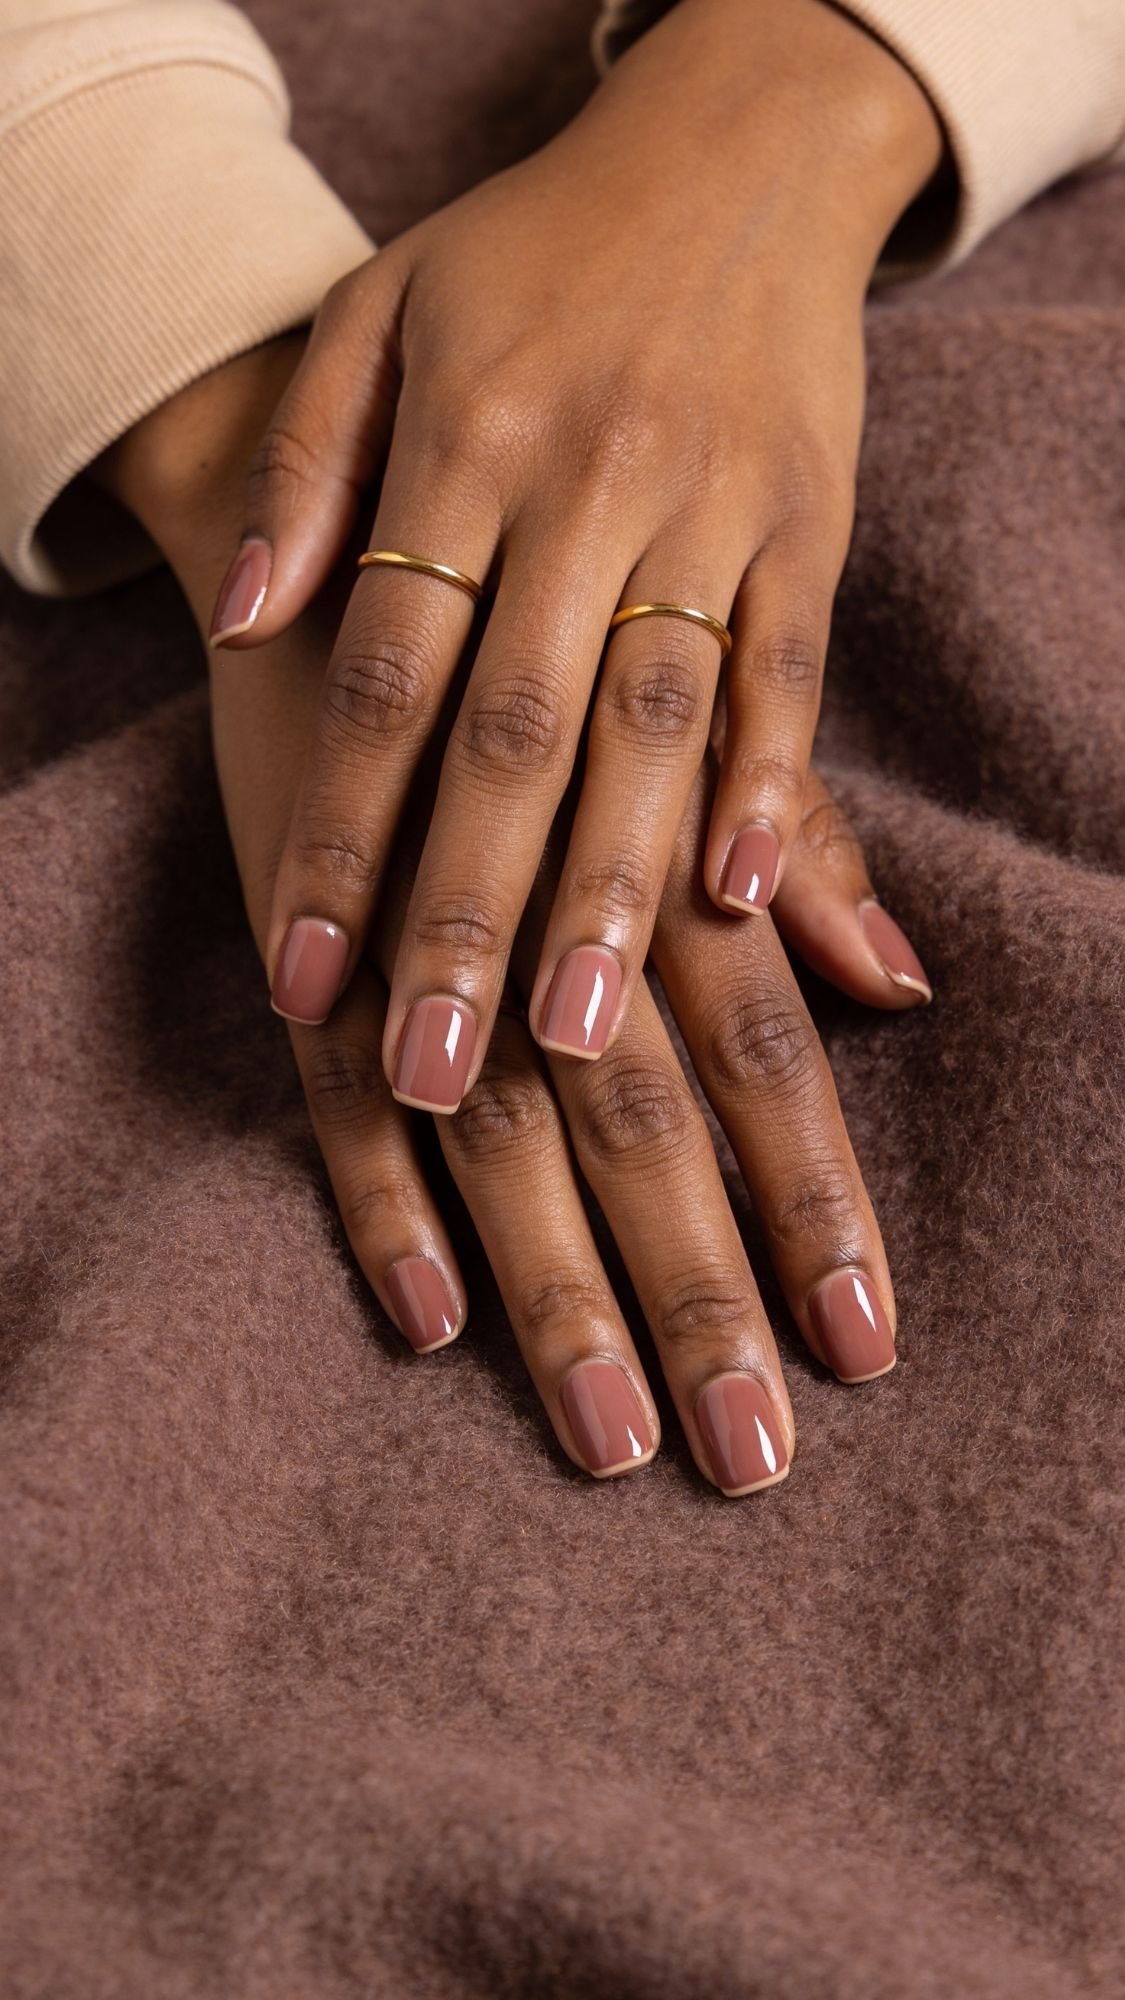
12) Soft Taupe “Cashmere” Cream, Neutral With Depth
Soft taupe nails feel like the chic friend of beige. They sit right in that sweet spot between warm and cool, so they work with almost any outfit color without looking boring. Taupe becomes the “why do your nails look so expensive?” shade when people pick the right undertone. A good taupe looks creamy, slightly muted, and smooth, like cashmere fabric. A bad taupe looks muddy or gray in photos. The difference usually comes down to how much pink, brown, or gray lives in the formula, and how glossy you keep it.
Why It Matches Any Dress
- Taupe balances warm and cool tones, so it pairs well with most color palettes
- It looks sophisticated with black, jewel tones, pastels, and prints
- It stays understated, so it never fights your outfit or accessories
Who It Flatters Most
- Anyone who wants a neutral manicure with more depth than sheer pink
- People who wear a lot of beige, brown, black, or muted tones
- Anyone who wants nails that look good with both gold and silver jewelry
Shade Guidance That Actually Helps
- If you lean warm, choose taupe with a little brown or caramel in it
- If you lean cool, choose taupe with a little mauve or rosy softness
- If you sit neutral, you can go classic taupe, just avoid anything that looks too gray in daylight Pro tip: Check the shade in daylight. Taupe shows its true personality by a window.
How To Ask For It At The Salon
Say: “I want a soft taupe cream manicure, cashmere taupe, glossy finish, not gray and not too brown.”
If you want it extra wearable, add: “Keep it creamy and smooth, no shimmer, just shine.”
DIY Mini Steps (How To Keep Taupe Looking Luxe)
- Apply base coat, cap the free edge.
- Apply one thin coat of taupe, then wait 2 to 4 minutes.
- Apply a second thin coat, float the brush and let it self-level.
- Apply glossy top coat, cap the free edge. Pro tip: Taupe shows streaks if you push the brush too hard. Use light pressure and fewer strokes, then let top coat smooth the surface.
Common Mistake + Easy Fix
- Mistake: Your taupe looks dull or muddy in photos.
- Fix: Switch to a taupe with slightly more warmth or rosy undertone, and use a high-gloss top coat.
- Mistake: Your taupe pulls gray in daylight.
- Fix: Choose a taupe labeled “mauve taupe” or “rosy taupe” instead of “cool taupe.”
Key Takeaways
- Taupe is the ultimate neutral with depth, it matches almost everything.
- Undertone choice prevents muddy or gray-looking results.
- Gloss keeps taupe looking rich and expensive.

13) Latte Beige Nails, The Ultimate “I Didn’t Overthink This” Shade
Latte beige nails always look put-together, even when you did, in fact, overthink everything. This shade works because it reads neutral, modern, and slightly warm, which plays nicely with most outfits and most lighting. Latte beige becomes the perfect wedding guest nail color when you want something more solid than sheer pink, but you still want that “matches any dress” flexibility. It feels clean with whites and pastels, sophisticated with black and jewel tones, and it even looks good next to bright florals. The trick is choosing a latte beige that looks creamy, not orange.
Why It Matches Any Dress
- Beige-brown neutrals sit in the background in the best way
- It pairs with prints and bold colors without clashing
- It looks modern and polished, especially with a glossy finish
Who It Flatters Most
- Anyone who wants a neutral nail color that still feels current
- People who wear warm neutrals, tan, cream, or black often
- Short nails, because latte beige looks tidy and flattering without looking harsh
Shade Guidance Across Skin Tones
This is where people accidentally pick a shade that pulls brassy.
- If you lean warm, pick latte beige with a soft caramel or honey warmth, not orange.
- If you lean cool, pick latte beige with a rosy beige base, not yellow-beige.
- If you sit neutral, pick a classic beige with a slightly creamy finish. Pro tip: If the shade reminds you of pumpkin spice more than latte, put it back.
How To Ask For It At The Salon
Say: “I want a creamy latte beige manicure, glossy finish, not too yellow and not too orange.”
If you want it extra flattering, add: “Match it to my undertone so it won’t pull brassy in photos.”
DIY Mini Steps (How To Keep Beige From Looking Streaky)
- Apply base coat, cap the free edge.
- Apply one thin coat of latte beige, then wait 2 to 4 minutes.
- Apply a second thin coat, float the brush, do not press hard.
- Top coat with high gloss, cap the free edge. Pro tip: If beige looks streaky, your coats are too thick or you keep re-brushing. Lay it down, then let it level.
Common Mistake + Easy Fix
- Mistake: The beige pulls orange or yellow in photos.
- Fix: Choose a shade with a slightly pink-beige or neutral beige base, and avoid anything labeled “golden beige” unless you know it suits you.
- Mistake: The finish looks dull, so the color looks flat.
- Fix: Use a glossy top coat, gloss makes beige look richer and more expensive.
Key Takeaways
- Latte beige nails match almost any outfit and look polished instantly.
- Avoid orange-leaning beige for the most photo-friendly result.
- Gloss turns beige into a luxe neutral.
14) Rose Beige Nude, Soft And Romantic Without Looking Bridal
Rose beige nude nails sit right in that sweet spot where your manicure looks intentional and pretty, but it still stays neutral enough to match anything. I love this shade for wedding guests because it gives a gentle warmth, like your nails caught a natural flush. Rose beige looks especially flattering in photos because it adds life to the hands without turning into a bold color moment. It also plays nicely with both gold and silver jewelry, and it pairs with almost every dress color, from deep jewel tones to soft pastels.
Why It Matches Any Dress
- Rose beige stays neutral, but it has enough warmth to look flattering
- It complements both warm and cool outfits, especially when you keep it soft and glossy
- It feels elegant for any dress code without looking too “bridal”
Who It Flatters Most
- Anyone who wants a neutral manicure that still feels romantic
- People who love blush tones but want them wearable
- Short to medium nails, because the soft warmth looks clean and polished
Shade Guidance Across Skin Tones
- If you lean warm, choose rose beige with a slightly peachy, rosy warmth
- If you lean cool, choose rose beige with a more rosy-mauve tint
- If you sit neutral, choose a balanced blush-beige, avoid anything too pink Pro tip: If the shade looks like bubblegum, it will not read neutral. Keep it muted.
How To Ask For It At The Salon
Say: “I want a rose beige nude manicure, muted and classy, glossy finish, not too pink.”
If you want it extra flattering, add: “Keep it soft, like a blush nude, not a bright rosy polish.”
DIY Mini Steps (How To Keep It Smooth And Even)
- Apply a smoothing base coat, especially if you have ridges.
- Apply one thin coat of rose beige nude, then wait 2 to 4 minutes.
- Apply a second thin coat, keep brush pressure light.
- Top coat with high gloss, cap the free edge. Pro tip: Rose-beige shades can streak if you overwork them. Use fewer strokes and let the polish self-level.
Common Mistake + Easy Fix
- Mistake: The shade pulls too pink and stops matching everything.
- Fix: Choose a rose beige with more beige than rose, and keep it in the muted zone.
- Mistake: The finish looks slightly patchy.
- Fix: Add a third ultra-thin coat only where needed, then top coat to smooth.
Key Takeaways
- Rose beige nude nails look flattering and still match any dress.
- Muted blush-beige tones read romantic, not too bridal.
- High gloss keeps the look polished and photo-friendly.
15) Nude Mauve Velvet Nails, The “Fabric” Effect That Looks Unreal In Motion
Velvet nails look like light moves across fabric, not like glitter sits on top. That’s why this trend works so well for weddings, you get dimension without loud color. Velvet finishes flatter almost every dress because they stay in the neutral family, but they still feel special. They also look ridiculously good in video, which matters because someone will record the table, the cake, the dance floor, and your hands will absolutely cameo.
The key is choosing a nude mauve or soft rosy-brown velvet, not a bright magnetic shade. You want the effect, not a laser beam.
Why It Matches Any Dress
- Nude mauve sits between warm and cool, so it plays nicely with most outfit tones
- The velvet shift reads like texture, it complements satin, silk, sequins, and lace
- It looks elevated in warm reception lighting, especially in evening photos
Who It Flatters Most
- Anyone going to an evening wedding or a candlelit venue
- People who want neutral nails but feel bored with plain cream finishes
- Short to medium nails, because velvet makes nails look smooth and luxe
How To Ask For It At The Salon
Say: “I want nude mauve velvet nails, soft magnetic velvet effect, not a sharp cat-eye stripe, keep it glossy.”
If you want it extra wearable, add: “Keep the shift subtle and the base neutral, no bright contrast.”
DIY Mini Steps (How To Get Velvet, Not A Harsh Stripe)
- Apply base coat, then two thin coats of magnetic nude mauve polish.
- Hold the magnet close to the nail, about 2 to 3 mm away, without touching the polish.
- Keep the magnet steady for 10 to 15 seconds per nail to set the velvet effect.
- Repeat the magnet step after the second coat and again after top coat if your formula allows it.
- Seal with a glossy top coat, cap the free edge. Pro tip: I work one nail at a time with magnetics. If you paint all ten nails first, the polish starts setting and the effect looks weaker.
Common Mistake + Easy Fix
- Mistake: You get a sharp cat-eye line instead of a soft velvet glow.
- Fix: Adjust magnet angle and distance, then use a gentle “hover” position centered over the nail to diffuse the effect.
- Mistake: The velvet looks patchy.
- Fix: Apply thinner coats, then hold the magnet steady longer. Shaky magnet hands create uneven shift.
Key Takeaways
- Velvet nails give neutral depth without clashing with your outfit.
- Nude mauve looks the most versatile across dress colors.
- Steady magnet timing makes or breaks the finish.
16) Soft Nude Cat-Eye Nails, Subtle Light-Shift That Still Reads Neutral
Cat-eye nails can look super glam or super chaotic, and the difference is how subtle you keep the effect. For wedding guest nails that match any dress, you want a soft nude cat-eye, not a neon beam across the nail. The most wearable cat-eye looks like a gentle ribbon of light that moves when you tilt your hands. It gives dimension, it looks expensive, and it still stays neutral enough to work with any outfit color. Think of it as jewelry for your nails, but quieter.
Why It Matches Any Dress
- Nude cat-eye stays neutral, so it pairs with prints, bold colors, and black
- The light-shift works with warm and cool lighting, great for photo and video
- It looks elevated without needing heavy nail art or gems
Who It Flatters Most
- Anyone who wants a neutral manicure that still feels “special occasion”
- People going to evening weddings or venues with warm lighting
- Short to medium nails, because the light stripe adds dimension without looking heavy
How To Ask For It At The Salon
Say: “I want a nude cat-eye manicure, soft and diffused, not a sharp stripe, glossy finish.”
If you want it extra wearable, add: “Keep the base nude-mauve or nude-beige, and keep the shimmer subtle.”
DIY Mini Steps (How To Make Cat-Eye Look Lux, Not Loud)
- Apply base coat, then one thin coat of your nude magnetic polish.
- Apply a second thin coat, then immediately use the magnet.
- Hold the magnet close, about 2 to 3 mm away, for 10 to 15 seconds.
- Angle the magnet slightly to create a softer, diffused stripe instead of a crisp line.
- Apply top coat, then repeat the magnet step if your formula allows it. Pro tip: I do one nail at a time. Cat-eye loses impact if you let the polish set before you magnetize it.
Common Mistake + Easy Fix
- Mistake: The stripe looks too harsh and stops reading neutral.
- Fix: Choose a polish with a nude base and a soft shimmer, then hold the magnet slightly farther away to diffuse the line.
- Mistake: The cat-eye effect disappears after top coat.
- Fix: Use a floating top coat technique, do not drag the brush hard, and magnetize again right after top coat.
Key Takeaways
- Soft nude cat-eye matches any dress because the base stays neutral.
- A diffused stripe looks more expensive than a sharp beam.
- Timing matters, magnetize while the coat is still wet.
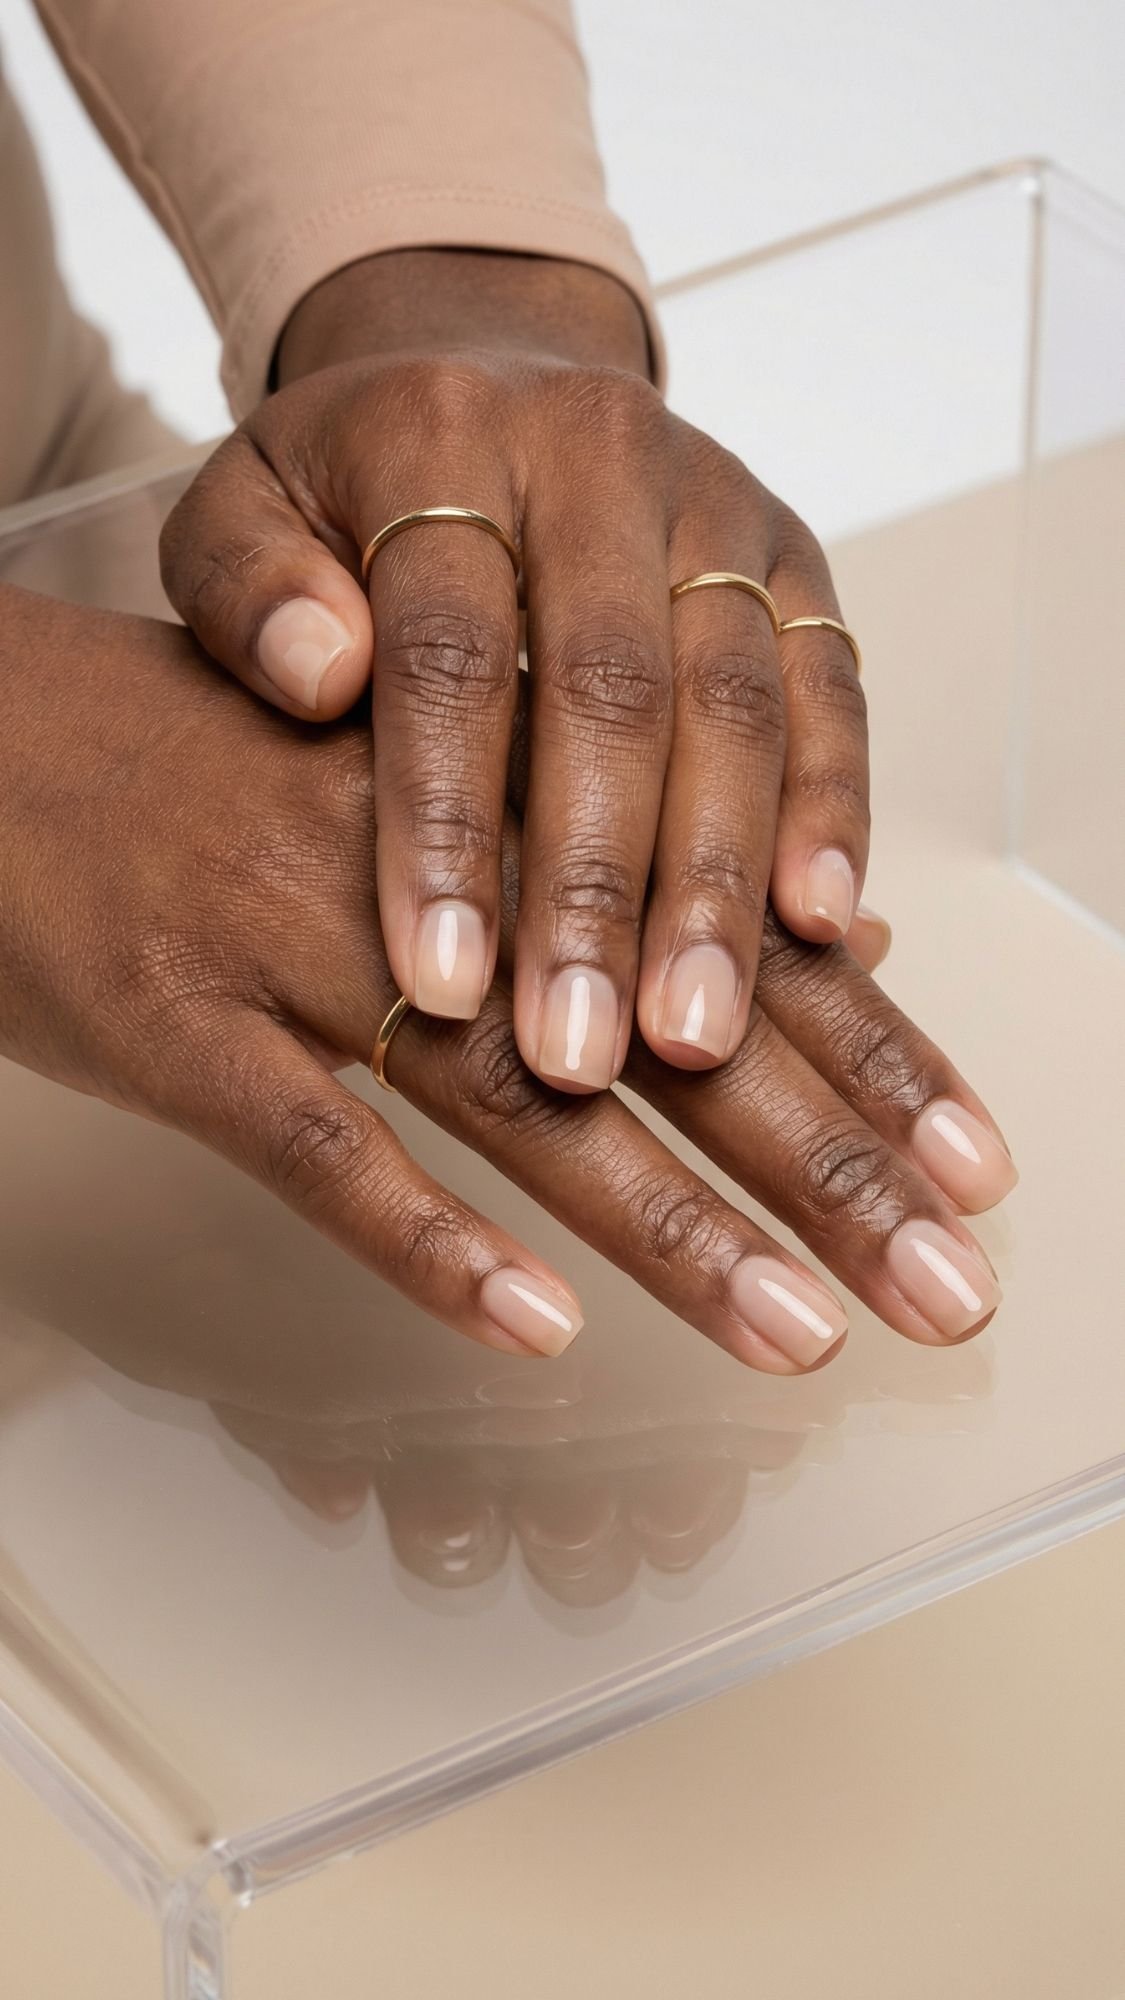
17) Glass Nails, Ultra-Gloss And Slightly Translucent
Glass nails give you that clean, editorial shine that makes your manicure look expensive even when the color is barely there. This look works for wedding guests because it reads neutral, polished, and modern, and it does not compete with your dress. Glass nails look best when they stay smooth and chip-free, because the whole point is that glossy, reflective surface. If you get a chip, it shows faster than it would on a glitter shade, so your prep and sealing have to be on point. The sensory giveaway here is that “wet glass” reflection. Your nails look like they have a glossy coating that catches light, but the color still feels airy and soft.
Why It Matches Any Dress
- The translucency keeps it neutral and adaptable
- The high gloss finish looks luxe in photos and video
- It pairs with every dress code and every accessory metal
Who It Flatters Most
- Anyone who loves minimalist nails but wants them to look elevated
- Short nails, because gloss and translucency look extra clean
- People who want a manicure that grows out invisibly
How To Ask For It At The Salon
Say: “I want glass nails, a sheer neutral base with an ultra-glossy, glass-like top coat, keep it smooth and clean.”
If you want it extra modern, add: “Keep it translucent and reflective, no heavy shimmer.”
DIY Mini Steps (How To Make It Look Like Actual Glass)
- Apply a smoothing or ridge-filling base coat.
- Apply one to two thin coats of a sheer neutral, milky nude, sheer pink, or jelly nude.
- Apply a self-leveling glossy top coat, then cap the free edge carefully.
- Let it set fully before you do anything with your hands. Pro tip: For glass nails, I avoid a thick color layer. I keep the base sheer, then I build shine with top coat. That’s what makes it look like “glass,” not like regular polish.
Common Mistake + Easy Fix
- Mistake: The shine looks dull after a day or two.
- Fix: Reapply a thin layer of top coat on day 3 or 4, and avoid harsh cleaners without gloves.
- Mistake: You get tiny chips on the tips because the finish is so glossy.
- Fix: Cap the free edge with base, color, and top coat. This tiny step saves the whole look.
Key Takeaways
- Glass nails match any dress because they stay sheer and neutral.
- The top coat is the hero, choose a high-gloss, self-leveling finish.
- Edge sealing keeps this manicure looking perfect longer.
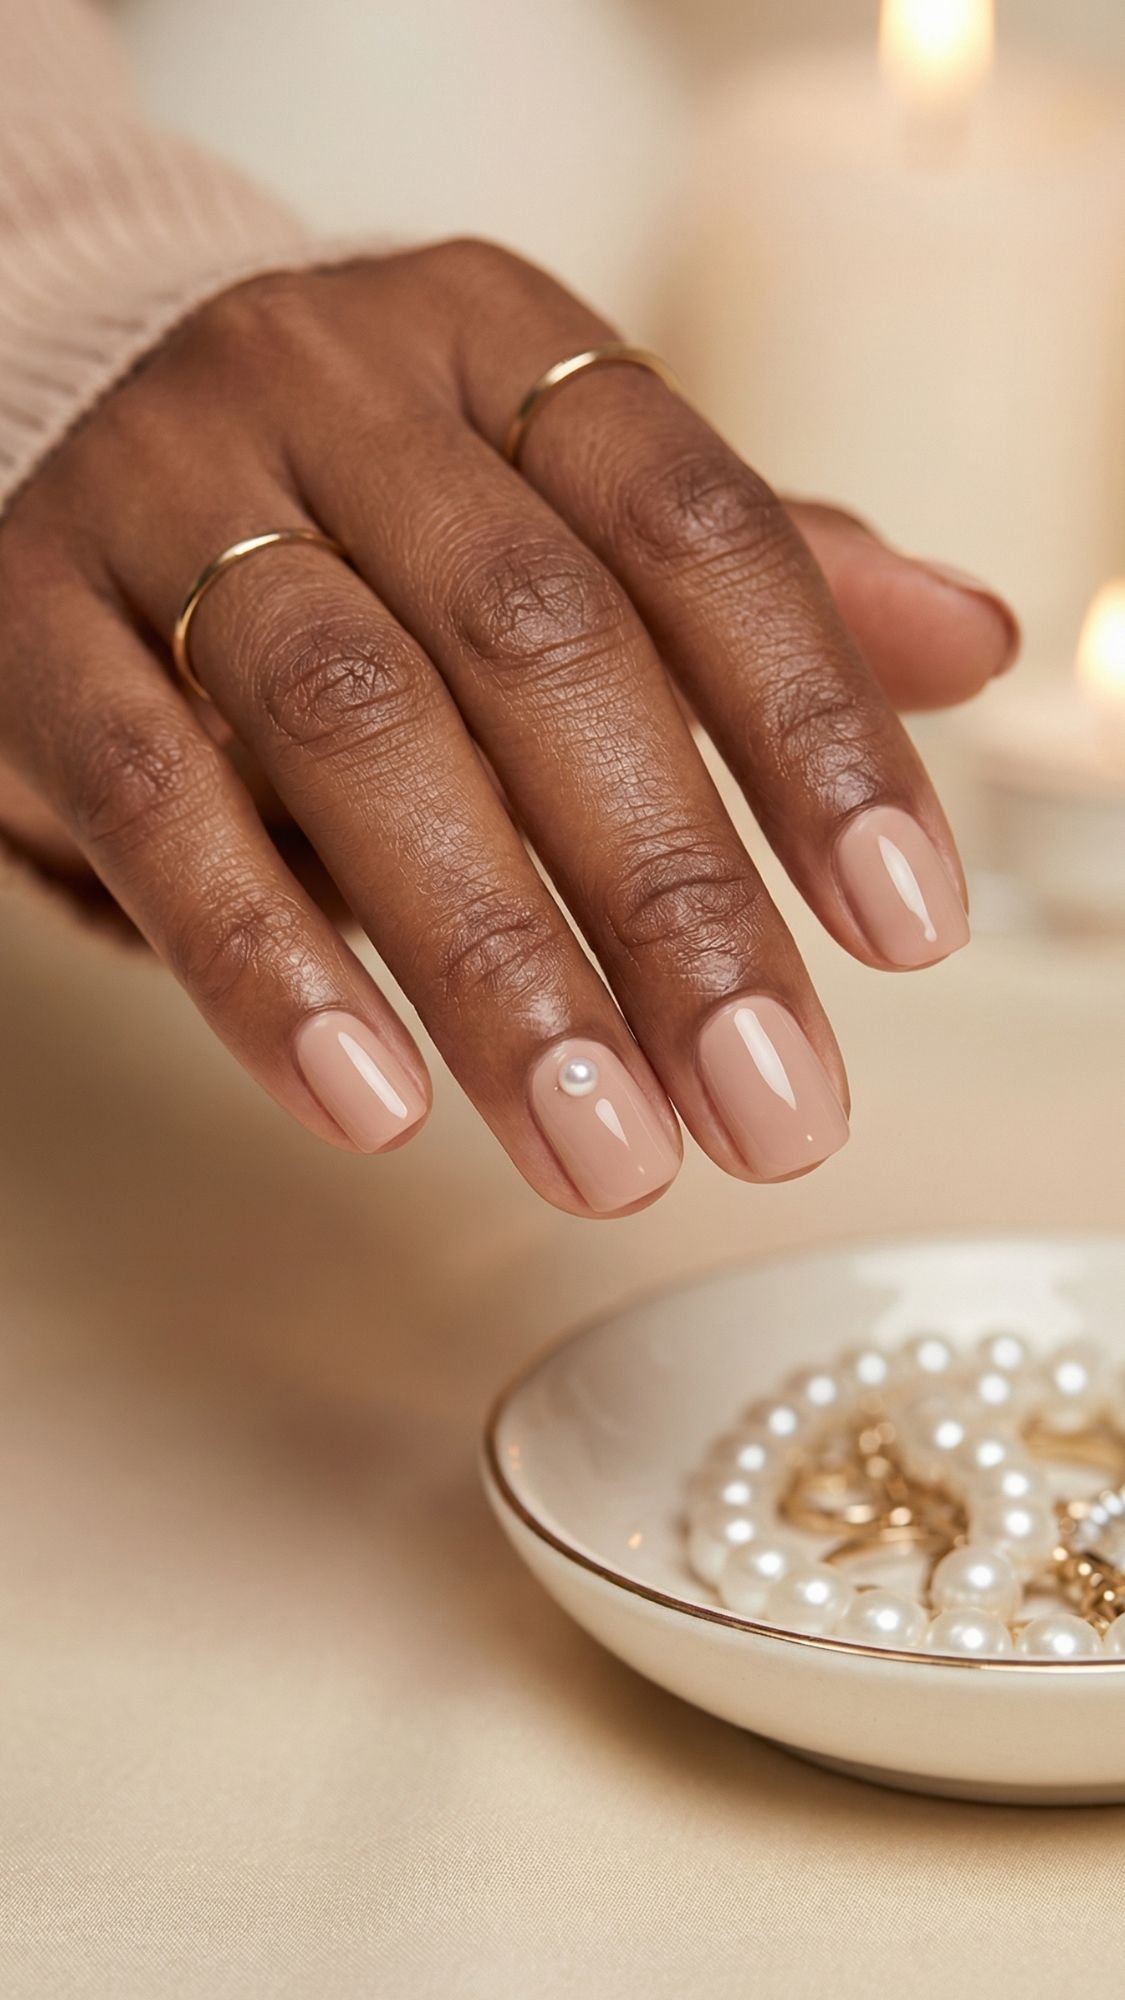
18) One-Pearl Accent, Tiny Detail, Big Wedding Guest Energy
If you want nails that match any dress but still feel a little special for the occasion, a one-pearl accent is such a smart move. It’s subtle, it’s elegant, and it reads “wedding” without looking like you tried to outshine the bride. Pearl accents work best when you keep everything else clean. Neutral base, glossy finish, and one tiny pearl placed intentionally. The moment you add five pearls and a bow and a charm, you stop matching any dress and start matching only one specific mood. You can guess which mood. Not the classy wedding guest one.
Why It Matches Any Dress
- Pearls coordinate with nearly every accessory, especially gold, silver, and pearl jewelry
- The neutral base keeps it versatile with any outfit color
- It looks elevated in photos without taking over the manicure
Who It Flatters Most
- Anyone who wants a minimal manicure with a little “event” detail
- People wearing simple dresses who want nails to add a soft touch
- Short nails, because a tiny accent looks clean and intentional
How To Ask For It At The Salon
Say: “I want a neutral glossy manicure with one tiny pearl accent on one nail, keep it minimal and secure.”
If you want it extra wearable, add: “Place the pearl closer to the cuticle so it looks intentional and won’t snag.”
DIY Mini Steps (Make It Secure, Not Snaggy)
- Finish your neutral manicure completely, base, color, top coat.
- While top coat is still slightly tacky, place the pearl with tweezers, or use a dot of nail glue if needed.
- Seal around the pearl with a thicker top coat, almost like you’re creating a tiny “dome” edge seal.
- Avoid placing it at the very tip, tip placement snags and pops off faster. Pro tip: I place the pearl slightly off-center near the cuticle area. It looks more editorial and it catches less on hair and fabric.
Common Mistake + Easy Fix
- Mistake: The pearl pops off within a day.
- Fix: Use a tiny dot of nail glue and seal the edges with top coat, do not rely on top coat alone if your pearl has a flat base.
- Mistake: The pearl snags hair and clothing.
- Fix: Choose a smaller pearl and place it closer to the cuticle, then seal around it smoothly.
Key Takeaways
- One pearl accent keeps nails wedding-appropriate and still versatile.
- Placement near the cuticle looks intentional and snags less.
- Edge sealing makes the accent last longer.

19) Classic Blue-Red Nails, The “I Want Polish” Option That Still Matches Everything
Sometimes you want neutral. Sometimes you want a real color because you feel like it. And honestly, a classic blue-based red can still match any dress in a very grown, very intentional way. Red nails work at weddings when you keep the shade classic and the finish glossy. Blue-based reds look cleaner in photos and they tend to flatter a wide range of skin tones because the undertone stays crisp instead of leaning orange. Orange reds can look brassy next to certain dresses and lighting, but a true blue-red holds its own. This is the manicure that says “I showed up,” without needing glitter or nail art.
Why It Matches Any Dress
- Classic red acts like a neutral in fashion, it pairs with black, white, jewel tones, metallics, and prints
- Blue-based red looks polished in warm lighting and in flash photos
- It feels timeless for any dress code, cocktail, formal, black tie, you name it
Who It Flatters Most
- Anyone who wants a bold manicure that still feels classy
- People wearing neutral dresses who want nails to add contrast
- Short nails, because a crisp red looks clean and intentional
How To Ask For It At The Salon
Say: “I want a classic blue-based red manicure, glossy finish, clean cuticle line, no orange undertone.”
If you want it extra photo-friendly, add: “Keep it crisp and smooth, no thick layers.”
DIY Mini Steps (How To Make Red Look Salon-Clean)
- Apply base coat, cap the free edge.
- Apply one thin coat of blue-red, keep brush pressure light.
- Apply a second thin coat, then clean up edges with a small brush and remover.
- Top coat with high gloss, cap the free edge. Pro tip: Red shows everything. I always do my clean-up before top coat, because top coat locks in mistakes. Once it’s sealed, it’s sealed.
Common Mistake + Easy Fix
- Mistake: Red floods the cuticle and looks messy fast.
- Fix: Leave a hairline gap near the cuticle, then push polish closer with the brush tip, instead of starting too close.
- Mistake: The red looks orange or brassy in photos.
- Fix: Choose a blue-based red. If it looks slightly cool in the bottle, that’s usually the right direction.
Key Takeaways
- A classic blue-red reads timeless and pairs with almost any outfit.
- Thin coats and clean edges make red look expensive.
- Glossy finish keeps it wedding-appropriate and polished.
Longevity + Maintenance Plan (Day 1 Through Day 7)
You can pick the prettiest wedding guest nails on the planet, and they’ll still betray you if you treat them like they’re invincible. Most chips happen for two reasons. People expose nails to water and heat too soon, and they never seal the tips again after day one. Nails take a beating at weddings, opening bags, snapping pics, digging for lip gloss, washing hands 45 times because you touched a railing. This plan keeps your manicure looking fresh without making you live like a fragile porcelain doll.
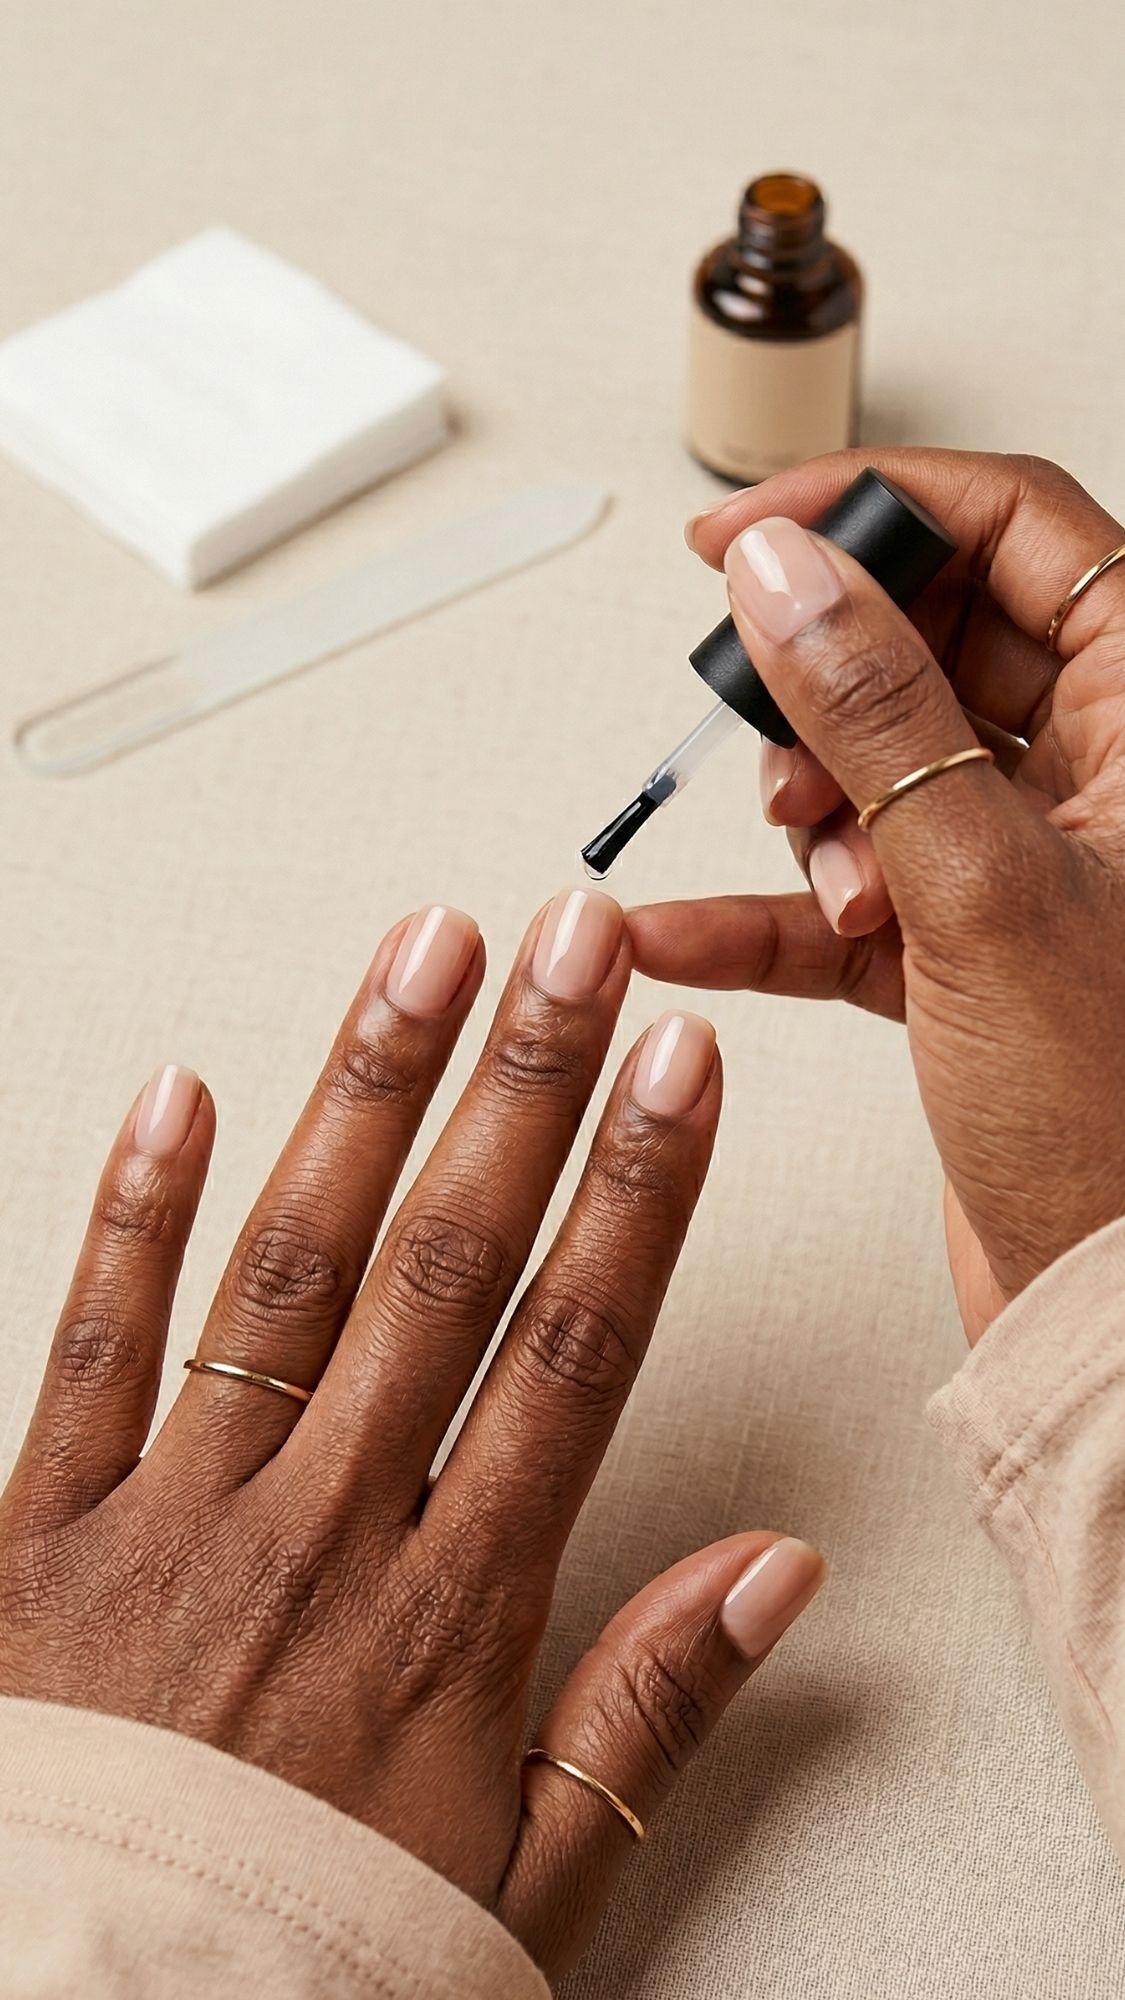
Day 1, Set The Foundation
- Avoid long hot showers for the first few hours if you can. Water plus heat softens polish.
- Use cuticle oil after the manicure feels fully set, not immediately.
- If you do press-ons, avoid water for at least 1 hour, longer if possible.
Day 2 To Day 4, Protect The Finish
- Apply cuticle oil once a day, it keeps nails flexible and reduces peeling at the edges.
- Use hand cream, but rub it in fully so it doesn’t sit oily on the nail surface.
- Wear gloves for dishes or cleaning, harsh soap and hot water kill shine.
Day 5, Refresh The Shine
- If you wear regular polish, apply a fresh thin top coat.
- Cap the free edge again. This one step prevents the “my tips look rough” problem.
- For press-ons, file any tiny snag on the edge, then seal with a little top coat if your set allows it.
Day 6 To Day 7, Quick Fix Mode
- If you get a tiny chip, file the snag smooth, then dab a little polish and top coat.
- If an edge lifts on a press-on, add a tiny dot of glue, press and hold, then clean any excess.
- If your cuticles look dry, oil them, dry cuticles make even perfect nails look less polished.
Key Takeaways
- Water and heat early on cause dents and chips.
- A day 5 top coat refresh makes nails look brand new.
- Capping the free edge saves your manicure.
Troubleshooting (Fix The Annoying Stuff Fast)
Let’s be real, the wedding is not the time for your manicure to start acting brand new. This is the section that saves you when something goes sideways. Most nail issues come from two things, too much product or not enough prep. The good news is you can fix a lot without starting over.
1) Polish Pooling Around The Cuticle
Why it happens: You overload the brush, or you paint too close to the cuticle.
Fix:
- Wipe excess polish off one side of the brush.
- Leave a hairline gap near the cuticle, then nudge polish closer with the brush tip.
- If it already pooled, use a small clean-up brush dipped in remover, trace the cuticle line before it dries.
2) Streaky Polish (Especially Sheers And Milky Shades)
Why it happens: Thick coats, too many brush strokes, or a ridged nail surface.
Fix:
- Use a ridge-filling or smoothing base coat.
- Apply thinner coats and use fewer strokes, center then sides.
- Let top coat level it out instead of brushing the color forever.
3) Bubbling
Why it happens: You shook the bottle, painted in humidity, or used thick coats.
Fix:
- Roll the bottle between your palms, do not shake it.
- Apply thinner coats and give them proper dry time.
- Avoid painting right next to a fan or in a steamy bathroom.
4) Top Coat Shrinkage (Color Pulls Back From The Edges)
Why it happens: Some quick-dry top coats shrink as they set, especially if your color coat is still too wet.
Fix:
- Wait until color looks tacky-set, not wet, before top coat.
- Cap the free edge with top coat.
- Apply top coat with a floating technique, light pressure, fewer strokes.
5) Chipping Within 24 Hours
Why it happens: Skipped dehydration step, no edge sealing, or too much water exposure early on.
Fix:
- Cleanse nails with alcohol before base coat next time.
- Cap the free edge with base, color, and top coat.
- Wear gloves for cleaning and avoid hot water right after painting.
6) Press-Ons Popping Off
Why it happens: Wrong size, oil on nails, or not enough pressure during application.
Fix:
- Size down if you’re between sizes, then file to fit.
- Cleanse nails with alcohol right before application.
- Press and hold 20 to 30 seconds per nail, then avoid water for at least an hour.
7) Glue Bubbles Under Press-Ons
Why it happens: Too much glue, or you slap the nail on too fast without pressing from cuticle to tip.
Fix:
- Use a small dot near the cuticle and a thin swipe down the center.
- Press from cuticle to tip slowly to push air out.
- If you see bubbles immediately, remove and redo that nail, bubbles cause early lifting.
8) Rough Cuticles Ruin The Whole Look
Why it happens: Dryness, harsh soaps, or over-cutting cuticles.
Fix:
- Use cuticle oil daily for 3 days leading up to the wedding.
- Stop cutting aggressively, push back gently instead.
- Apply hand cream at night, then wipe nails clean before polish.
Key Takeaways
- Thin coats prevent streaks, bubbles, and dents.
- Edge sealing stops chips.
- Press-ons need sizing and pressure, not hope.
Nail Health + Recovery (So Your Nails Don’t Hate You After)
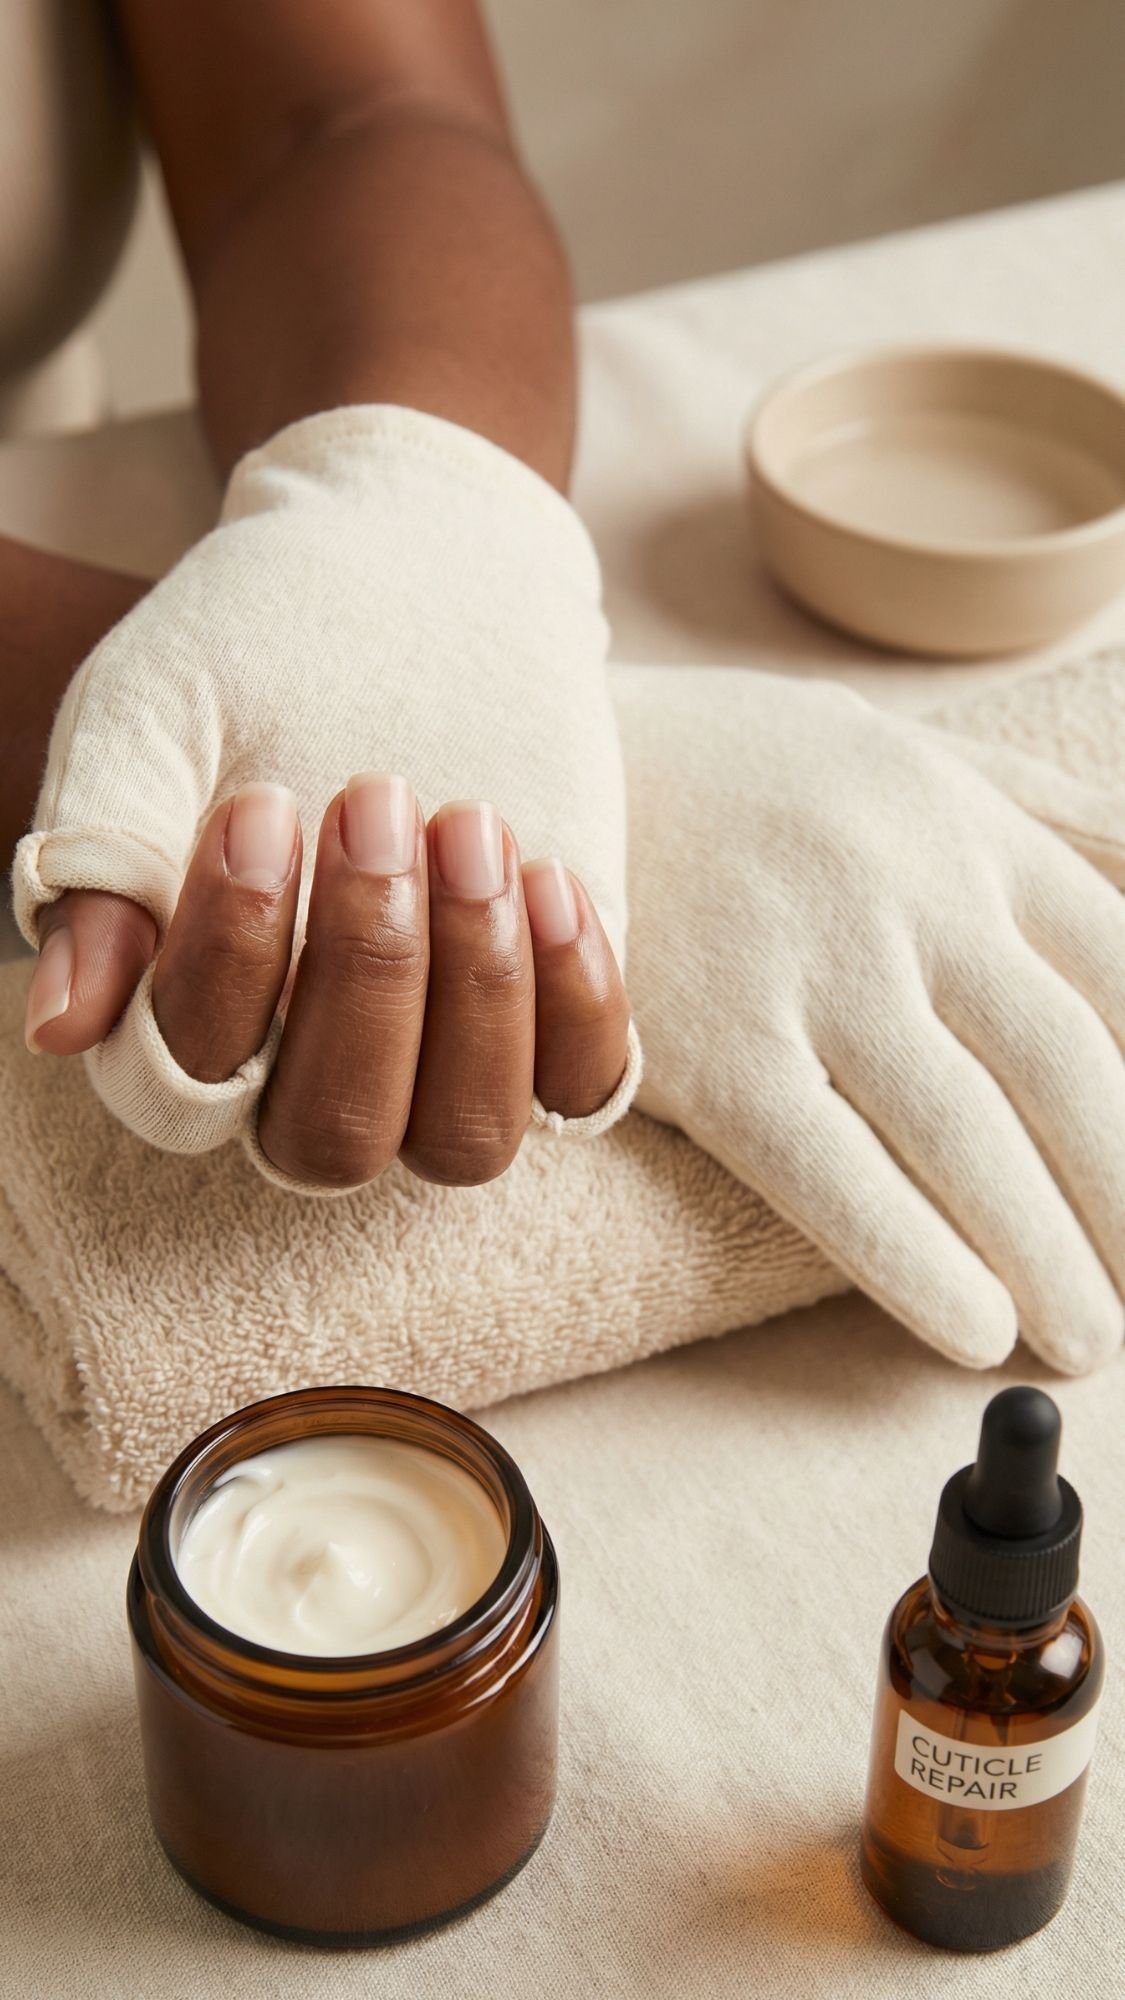
Wedding guest nails should look cute, but your natural nails still need to function after the event. Nail damage rarely comes from polish itself. It usually comes from aggressive prep, harsh removal, or ripping product off because you got impatient. If you want nails that stay strong long-term, you need a simple recovery routine that focuses on hydration and gentle handling. No, you do not need a 12-step nail detox. You need consistency.
Strength And Hydration Basics (What Actually Helps)
- Cuticle oil daily: Once in the morning or at night. Oil keeps the nail plate and surrounding skin flexible, which reduces peeling and hangnails.
- Hand cream after washing: Dry hands make nails look less polished, even with a perfect manicure.
- Gloves for chores: Hot water and cleaning chemicals dry out nails and cuticles fast.
- Gentle filing only: If you snag a nail, file it smooth. Do not pick at it.
Breaks Between Sets, What Helps Vs What’s Hype
What helps
- Taking a few days off between gels or press-ons if your nails feel thin
- Keeping nails shorter while they recover, shorter nails break less
- Using a smoothing base coat when you go back to polish, it protects the surface
What’s hype
- Over-buffing to “remove damage.” Buffing can make damage worse if you do it repeatedly.
- Hardening treatments used nonstop. Some can make nails brittle if you overuse them.
- Peeling off product “carefully.” It’s never careful, it always lifts nail layers.
Removal Rules (The Non-Negotiables)
- For polish, use remover and patience.
- For press-ons, soak in warm soapy water and oil, then lift gently.
- For gel, soak off properly, do not pry. If you remember one thing, remember this. Never rip product off your nails. That’s how you take nail layers with you.
When To See A Professional
Do not play guessing games with nail health if you notice:
- Pain, swelling, heat, or throbbing around the nail
- Green discoloration, foul smell, or lifting that spreads
- Dark streaks, bleeding, or sudden severe peeling If something looks off and it doesn’t improve, get it checked.
Key Takeaways
- Hydration keeps nails flexible and less prone to peeling.
- Removal causes most damage, not polish.
- Short nails recover faster and break less.
Shade + Shape Guidance (So It Flatters Your Hands)
This section matters more than people think. “Wedding guest nails that match any dress” fail when the nude looks off on the wearer, not when the design is wrong. The right neutral looks like it belongs on your hands. The wrong neutral looks like you borrowed someone else’s polish. And shape matters too, because shape controls how long your fingers look in photos. If you want that elegant hand moment, you need the combo, shade plus shape.
Best Shapes For Short Nails
- Short oval: Soft, flattering, and easy to maintain
- Short almond: The best “lengthening” illusion if you have enough free edge
- Squoval: Looks clean and modern, great if you prefer a slightly straight edge Pro tip: If your nails break easily, pick short oval or squoval. Almond needs a little strength to hold the shape.
Best Shapes For Wide Nail Beds
- Oval and almond slim the nail visually because the sides taper
- Avoid super wide square tips if you want a slimmer look in photos Pro tip: Ask for clean sidewall work. When the tech cleans up the sides properly, the nail instantly looks more refined.
If You Want Your Hands To Look Longer
- Choose almond or oval, keep the tip slightly tapered
- Pick sheer, milky, or ombré finishes, they extend the look of the nail
- Ask for a high-gloss finish, shine makes everything look more elongated and tidy
Color Picks That Flatter Different Skin Tones And Undertones
This is the practical part, no guessing.
- Warm undertones: Milky nudes with beige, honey, caramel, or peachy tones, champagne shimmer
- Cool undertones: Sheer rosy pinks, mauve-leaning nudes, cool beige-pinks, blue-based red
- Neutral undertones: Balanced blush nudes, classic taupe, jelly nudes, soft ivory French Pro tip: If a nude looks gray on you, it’s too cool. If it looks orange, it’s too warm. If it blends and looks clean, that’s your winner.
My Flash Photo Rule
If you’re unsure, pick a neutral that looks good in two places:
- Near a window in daylight
- Under warm indoor lighting If it looks flattering in both, it will usually look fine in photos at the wedding.
Key Takeaways
- Shape controls the “long fingers” illusion as much as color does.
- Match undertone, not outfit color, for true versatility.
- Test in multiple lighting types before you commit.
Content Creator Notes (Hands-Only Nail Photos That Look Expensive)
If you’re taking photos at a wedding, you want your nails to look glossy and clean, not blown out and blurry. Nail content flops when the lighting creates glare on top coat, or when the pose looks stiff and awkward. The goal is simple. Show shine, show clean edges, and make the hands look relaxed. You can do this without showing faces, and honestly, hands-only content converts better for nail inspo anyway.
Lighting That Makes Nails Look Glossy, Not Greasy
- Use bright, diffused light, not harsh direct sunlight.
- Stand near a window, then angle your hands slightly so the shine shows as a soft highlight, not a white glare strip.
- Avoid overhead lighting that creates hot spots on the nail surface. Pro tip: If your nails look like a flashlight reflection, move your hands, not your camera. A tiny wrist tilt fixes most glare.
Angles That Always Work For Hands-Only Nails
- Mid-forearm crop: Keeps the focus on nails while still showing styling details
- Slight diagonal angle: Makes fingers look longer and more natural
- Macro close-up: Use this for one detail shot showing cuticle cleanup and shine Pro tip: If you take only one photo, do a mid-forearm crop holding something wedding-coded, like a clutch or invite.
Props That Scream “Wedding Guest” Without Being Cheesy
- Satin clutch, champagne flute, bouquet stems, invitation card, pearl dish, delicate jewelry
- Neutral fabrics like silk, tulle, linen
- A clean marble or beige background Pro tip: One prop is enough. Too many props turns your photo into a flat-lay scavenger hunt.
Poses That Look Natural, Not Like A Hand Model Audition
- Hold a clutch with a relaxed grip, fingertips visible
- Lightly touch a ribbon or fabric edge
- Rest hands on a table with a soft curve in the fingers
- Hold a glass at the stem, keep nails angled toward the light Pro tip: Keep your fingers slightly separated and relaxed. If you splay them wide, the photo looks tense.
How To Show Clean Edges And Shine
- Take one close-up shot where you can see the cuticle line clearly.
- Wipe hands lightly with lotion, then wipe nails with a dry cloth so shine stays crisp.
- If you need extra glow, apply a tiny drop of cuticle oil, then blot. Blotting is the difference between glossy and greasy.
Key Takeaways
- Diffused light makes glossy nails look expensive.
- A relaxed grip and slight angle look more natural in photos.
- One macro shot builds trust, it shows clean edges and true shine.
Beginner Version (15 To 20 Minutes, Still Looks Put-Together)
If you want wedding guest nails that match any dress and you have exactly zero patience for a full manicure process, this is the routine. I built it for the reality where you’re getting ready, you’re doing hair, you’re doing makeup, and suddenly you remember your nails. Classic.
The fastest “expensive” result comes from two things. A clean shape and a glossy finish. You can skip fancy nail art and still look polished if you do those two steps well.
The Simplest Routine
- Shape fast: File nails into short oval or squoval. Aim for matching lengths, not perfection.
- Quick cleanse: Wipe nails with alcohol or nail cleanser, then let them air dry for 30 seconds.
- One sheer coat: Use a sheer pink, jelly nude, or milky nude in one thin layer.
- Top coat: Apply a glossy top coat, cap the free edge.
- Finish the hands: Add cuticle oil, then blot so it looks hydrated, not greasy.
If You Have An Extra 2 Minutes
- Add a second thin coat of sheer polish for a smoother, more even look.
- Clean the cuticle line with a small brush and remover, this tiny step makes it look way more salon.
Quick Fix If You Smudge A Nail
- Wait 3 minutes, then lightly smooth the smudge with a damp fingertip or a tiny bit of lotion.
- Apply top coat over it. Top coat hides a lot of sins, honestly.
Key Takeaways
- Shape + gloss = polished fast.
- Sheer shades hide small mistakes better than opaque colors.
- Capping the tips stops quick chips.
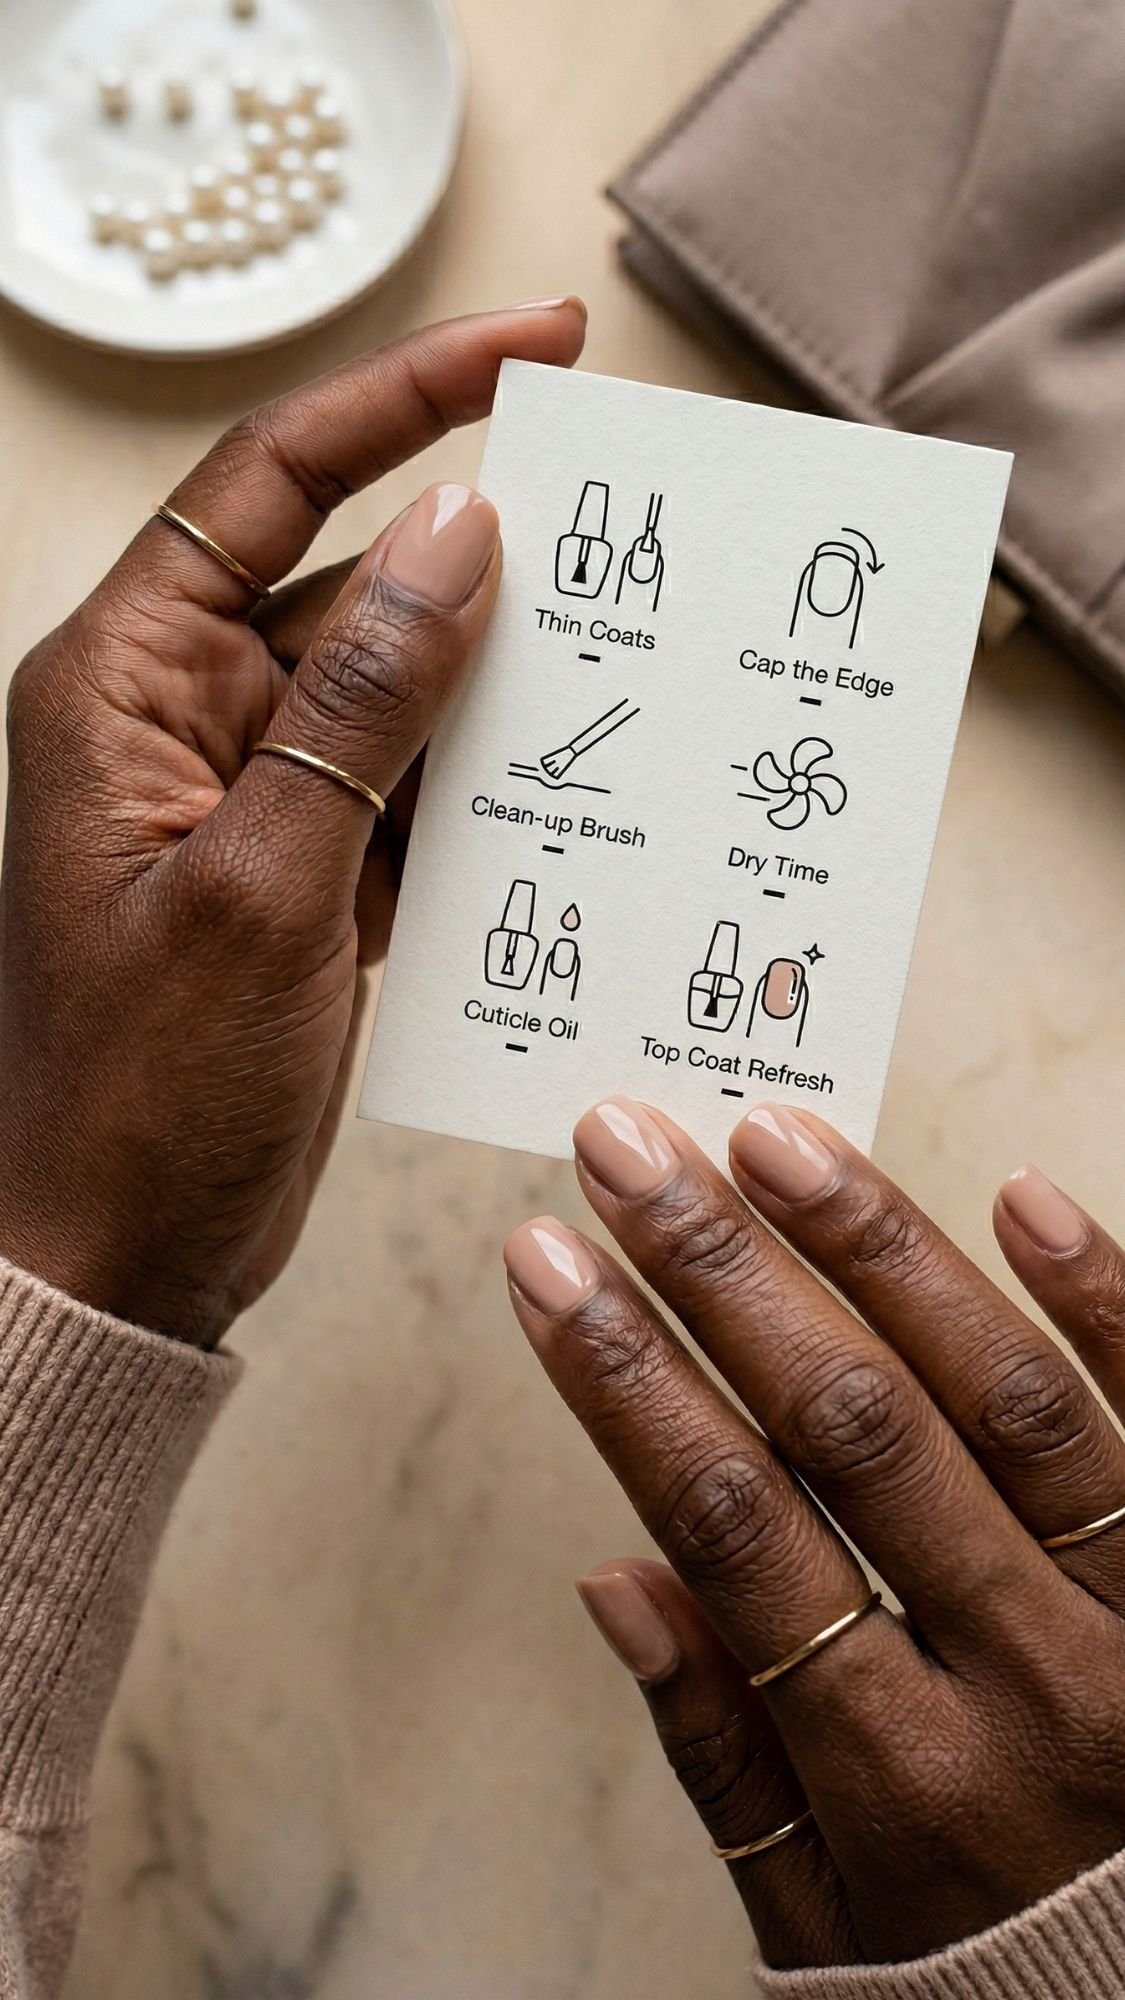
Beauty Rules Of Thumb (Quick, Practical Nail Rules)
These are the rules I wish everyone followed before they blamed their polish for chipping. Nails look expensive when the technique stays clean and consistent, not when the design gets complicated. Keep these in your back pocket and you’ll avoid 90% of nail chaos.
The Rules
- Thin coats beat thick coats, every time. Thick coats wrinkle, dent, and chip faster.
- Cap the free edge with base, color, and top coat. This step stops tip wear, especially for wedding-week handwashing.
- Match undertone, not outfit color. If your nude suits your undertone, it will suit every dress color.
- Gloss reads cleaner than sparkle in flash. Fine shimmer works, chunky glitter usually looks messy up close.
- Stop touching your nails after cleansing. Your fingers add oil back immediately.
- If you use press-ons, size down and file to fit. Too-big press-ons look obvious and lift faster.
- Do not paint in a steamy bathroom. Humidity causes bubbling and slow dry time.
- Top coat refresh on day 4 or 5 saves the manicure. It brings back shine and seals micro-wear.
- Clean cuticle lines make any nude look more expensive. This is the “pro” difference people notice.
Key Takeaways
- Technique makes neutrals look luxe.
- Edge sealing protects wear time.
- Undertone matching keeps the manicure truly dress-proof.
Technique Cheat Sheet (Fast Answers, No Guessing)
This is the part you’ll actually come back to when you’re doing your nails the night before the wedding. Most “why did my manicure fail?” problems come from mismatched products. People pick random base coats, random top coats, then wonder why their polish chips or looks streaky. Use this cheat sheet to match the technique to the goal.
Base Coat Cheat Sheet
If you want smooth, photo-friendly nails
- Choose a ridge-filling base coat.
- Best for: sheer pink, milky nude, glass nails, French gloss.
- Why it works: it blurs ridges so sheer shades don’t look streaky.
If you want the longest wear time
- Choose a grippy or adhesive base coat.
- Best for: classic polish longevity, especially if your nails chip fast.
- Why it works: it anchors color so it resists lifting at the tips.
If your nails feel weak or bendy
- Choose a strengthening base coat, but use it sensibly.
- Best for: short nails that peel.
- Why it works: it adds a bit of structure, but you still need oil to prevent brittleness.
Top Coat Cheat Sheet
If you want the most expensive-looking shine
- Choose high-gloss, self-leveling top coat.
- Best for: no-mani mani, glass nails, jelly nude, French gloss.
If you always smudge your nails
- Choose quick-dry top coat or quick-dry drops.
- Best for: last-minute manicures, beginner routine.
- Pro note: quick-dry can shrink if you rush it, so wait until color looks tacky-set.
If you want a thicker “gel-like” look without a lamp
- Choose a gel-effect top coat.
- Best for: milky nudes, taupe creams, latte beige.
- Why it works: it adds cushion and shine, which looks very salon.
French Cheat Sheet (Pick Your Vibe)
- Micro French: tiny tip, modern, best on short nails.
- Barely-there French: soft blended tip, timeless, most wedding-friendly.
- French gloss: low-contrast French plus extra shine, most “expensive” look.
Magnetic Cheat Sheet (Velvet Vs Cat-Eye)
- Velvet nails: soft fabric-like glow across the whole nail.
- Best for: evening weddings, neutral glam, video moments.
- Cat-eye nails: a ribbon of light that shifts as you move.
- Best for: a slightly more defined shimmer moment, still neutral. Pro tip: If you want it to match any dress, ask for diffused cat-eye or velvet, not a sharp stripe.
Key Takeaways
- Ridge filler makes sheer shades look smooth and expensive.
- Self-leveling gloss top coat upgrades every neutral instantly.
- Magnetic nails look best when the effect stays soft, not harsh.
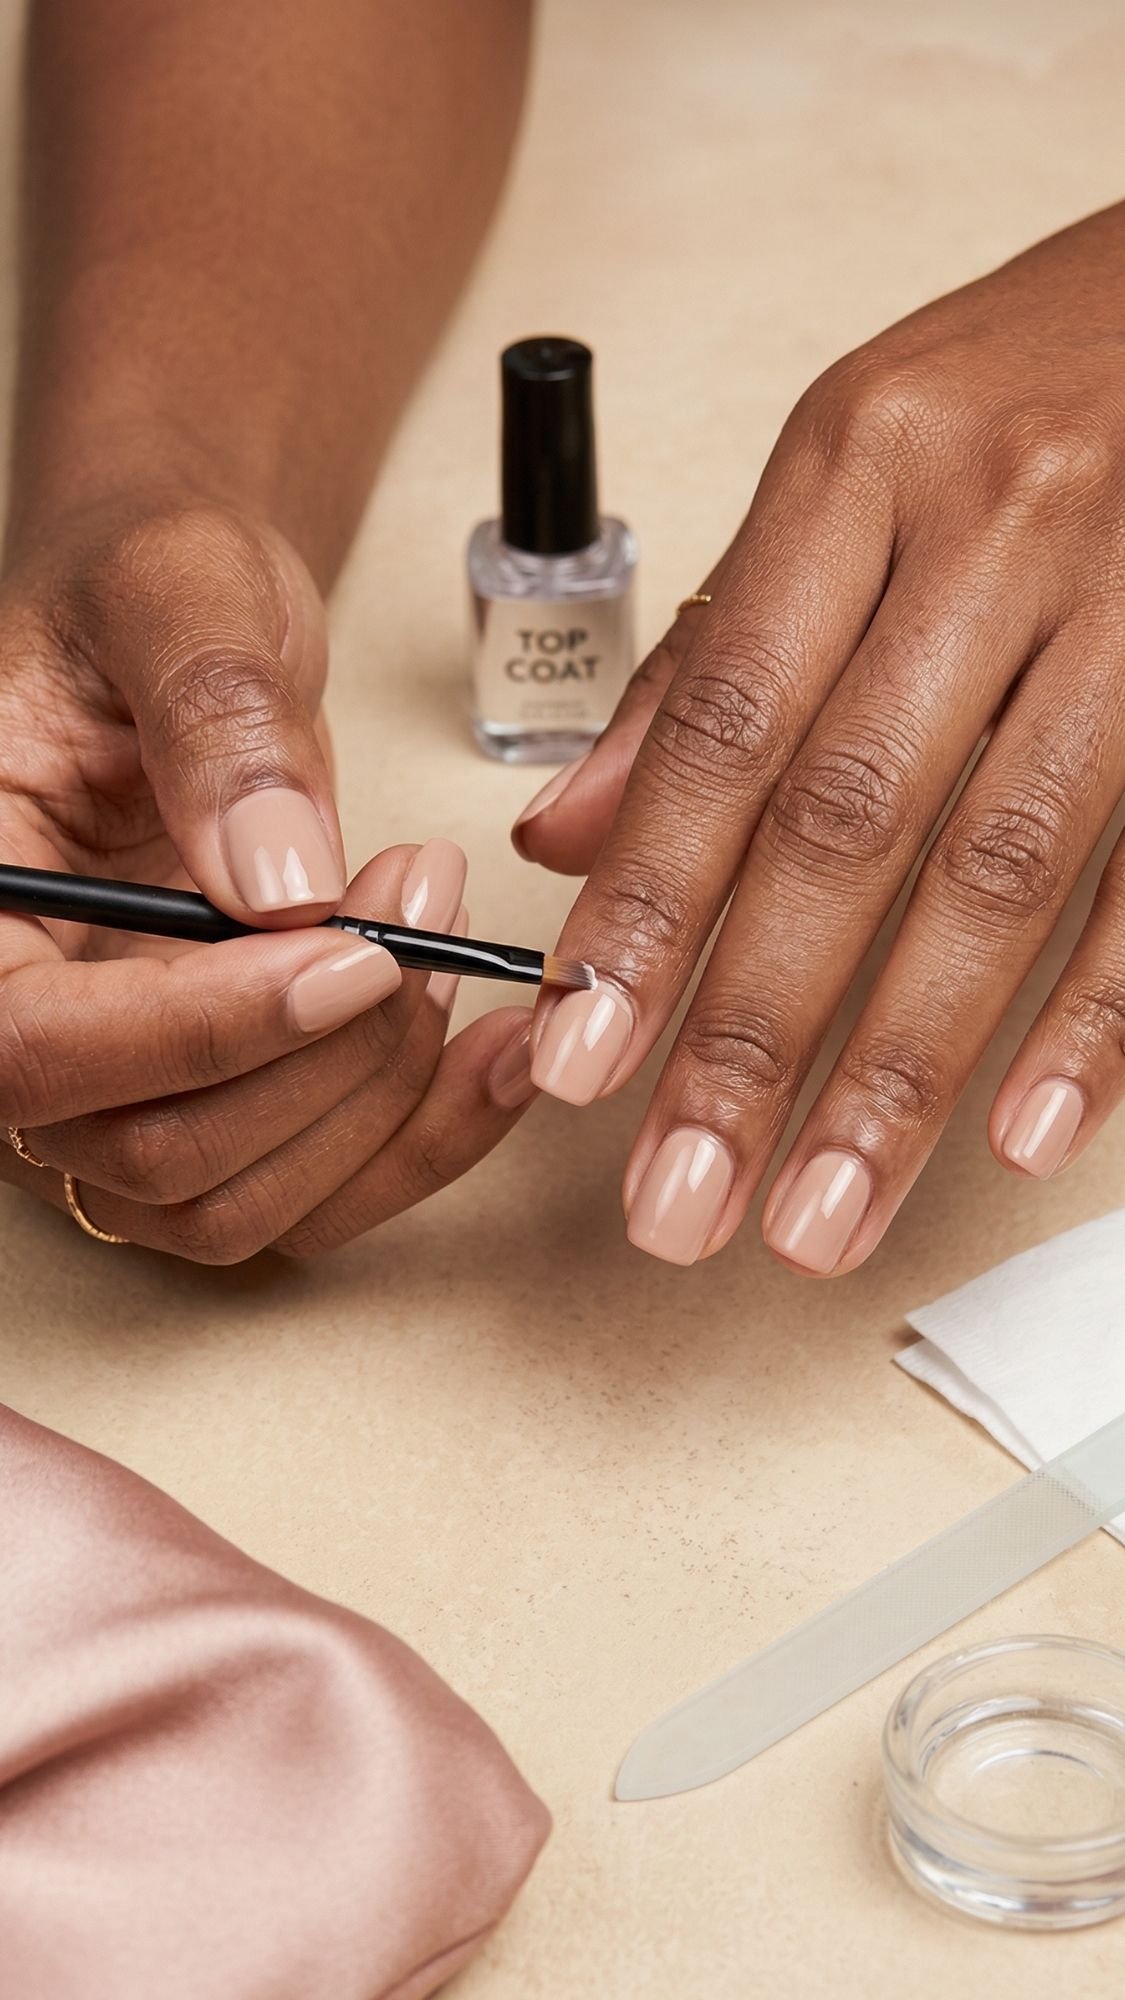
Common Mistakes And Easy Fixes (Save The Mani, Save The Mood)
This is the section that keeps your wedding guest nails looking expensive instead of “I did these in a rush and now I regret everything.” Most manicure mistakes happen because people rush prep, overload the brush, or try to fix a mistake while the polish is half-dry. That’s when you get dents, smears, and those weird drag marks that haunt your close-up photos.
Here are the most common issues, plus the fastest fixes.
1) You Skip Dehydration, Then Everything Chips
What happens: The nail plate still has oil or lotion, so base coat doesn’t grip.
Easy fix: Wipe nails with alcohol right before base coat, then do not touch the nail surface.
2) You Use Thick Coats Because You Want It Opaque Faster
What happens: Thick coats wrinkle, dent, and stay soft underneath.
Easy fix: Apply thin coats and build slowly. If the first coat looks sheer, good. That’s the point.
3) You Flood The Cuticle Line
What happens: Polish lifts faster because it sits on skin instead of nail. It also looks messy.
Easy fix: Leave a hairline gap near the cuticle. Clean the edge with a small brush dipped in remover before it dries.
4) You Paint In A Steamy Bathroom
What happens: Humidity causes bubbling and slows drying.
Easy fix: Paint in a dry room. If you already have bubbles, remove and repaint that nail. Top coat won’t fully hide bubbles.
5) You Overwork Sheer And Milky Shades
What happens: You get streaks because you keep brushing as it sets.
Easy fix: Use fewer strokes, center then sides. Let top coat smooth the surface.
6) You Shake The Bottle Like It Owes You Money
What happens: Air bubbles end up on your nails.
Easy fix: Roll the bottle between your palms instead.
7) You Forget To Cap The Free Edge
What happens: Tips chip first, especially after lots of handwashing.
Easy fix: Cap the free edge with base, color, and top coat. It takes 3 seconds and saves the whole look.
8) Press-Ons Look Obvious Because The Size Is Off
What happens: Too-wide nails lift at the sides and look bulky.
Easy fix: Size down and file to fit. A snug fit looks more natural and lasts longer.
9) You Put Too Much Glue On Press-Ons
What happens: Glue floods out, causes bubbles, and sticks to everything.
Easy fix: Use a small dot near the cuticle and a thin swipe down the center. Press from cuticle to tip slowly.
Key Takeaways
- Thin coats plus clean edges equal expensive-looking nails.
- Humidity and rushing cause most polish disasters.
- Sizing and prep decide press-on success.
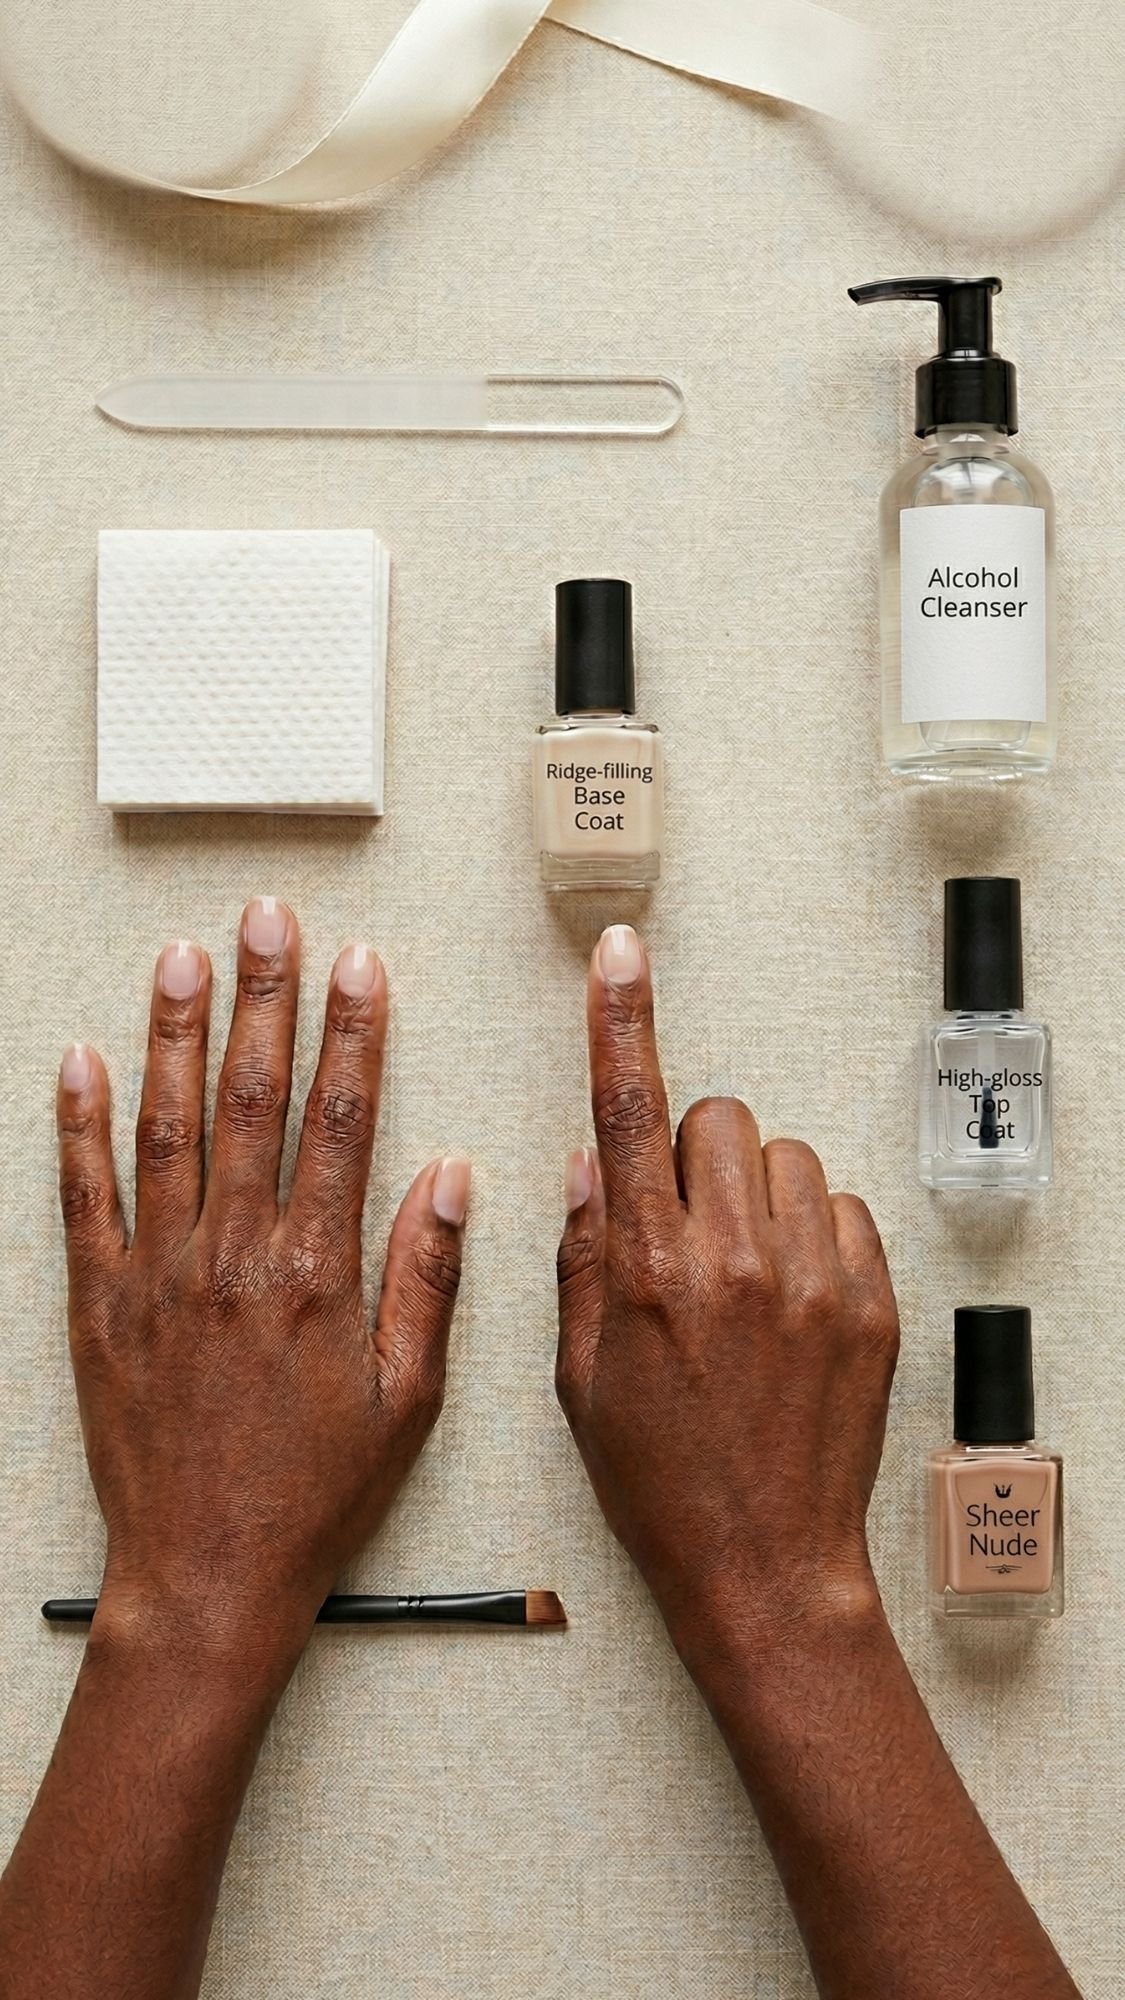
Beginner Shopping List (What To Buy First Vs What Can Wait)
If you’re building a little nail kit for wedding season, you do not need to buy everything at once. People buy a pile of trendy colors, then they don’t own a decent top coat or a clean-up brush. That’s like buying a fancy dress and forgetting shoes. Let’s keep this practical.
Buy First (This Gets You 80% Of The Result)
- Glass nail file or fine grit file for clean shaping
- Lint-free wipes so you don’t trap fuzz in polish
- Alcohol or nail cleanser for proper dehydration
- Base coat (ridge-filling if you love sheers, grippy if you chip easily)
- High-gloss top coat because shine makes neutrals look expensive
- One versatile shade:
- Sheer pink OR milky nude OR latte beige, pick the one you’ll actually wear
Buy Next (Upgrades That Make It Look More “Pro”)
- Small clean-up brush for crisp cuticle lines
- Quick-dry drops if you always dent polish
- Cuticle oil for photos and overall nail health
- Second neutral shade for variety, taupe cream or rose beige nude works well
Buy Later (Fun Extras, Not Essentials)
- Magnetic polish + magnet tool for velvet or soft cat-eye looks
- Pearl accents or tiny gems for one-nail detail
- Jelly toppers or pearl shimmer veil for glazed or gloss looks
- Press-on kit if you like quick sets:
- Nail glue, adhesive tabs, mini file, orange stick
Pro Tip To Save Money
If you’re choosing between “another nude shade” and “a better top coat,” pick the top coat. A great glossy top coat can make an average nude look premium. A bad top coat can make an expensive polish look flat.
Key Takeaways
- Top coat and prep tools matter more than having 10 shades.
- Start with one perfect neutral you’ll repeat.
- Add extras only after your basics work.
FAQ (Quick Answers People Actually Search)
1) What nail color matches any wedding guest dress?
The safest options are sheer pink, milky nude, latte beige, soft taupe, and low-contrast French styles. They blend with your natural nail tone and don’t compete with outfit colors or prints. If you want a non-neutral that still works, classic blue-based red pairs with almost everything in a timeless way.
2) How do I choose the right nude nail color for my skin tone?
Match undertone, not the bottle.
- If you lean warm, look for beige, caramel, honey, or peachy nudes.
- If you lean cool, look for rosy-pinks, mauve nudes, and cool beige-pinks.
- If you lean neutral, choose balanced blush nudes, classic taupe, or milky beige-pinks. Pro move: Test one nail, check it in daylight and warm indoor lighting. If it looks good in both, you’re safe.
3) Do press-on nails look classy for a wedding?
Yes, when you size them correctly and keep the design neutral. The classy press-on formula is:
- Short almond or short oval
- Sheer, milky, or soft neutral color
- Clean cuticle line, no lifting edges If a press-on looks too wide or thick at the cuticle, it reads fake fast.
4) How can I stop polish from chipping within 24 hours?
Focus on the basics that actually matter:
- Dehydrate the nail plate with alcohol before base coat
- Use a good base coat
- Apply thin color coats
- Cap the free edge with base, color, and top coat
- Avoid hot water for a few hours after painting These steps beat “buying a more expensive polish” most of the time.
5) Are chrome or glazed nails okay for a wedding guest?
Yes, if you keep them subtle. A champagne-pearl glaze over a nude base looks refined and wedding-appropriate. Skip harsh mirror chrome or loud metallics if you want a truly dress-proof look.
6) How long before the wedding should I do my nails?
- Regular polish: 1 to 2 days before
- Gel: 2 to 4 days before
- Press-ons: the day before or the day of This timing gives you the best chance of a fresh look without last-minute stress.
7) What nail shape makes fingers look longer?
Almond and oval elongate fingers the most, especially when you keep the tips slightly tapered. If you prefer straight edges, squoval still looks clean and slightly lengthening without being harsh.
8) How do I remove press-on nails without damaging my natural nails?
Soak, do not rip.
- Soak hands in warm soapy water for 10 to 15 minutes
- Add oil, then gently lift from the sides with an orange stick
- If it resists, soak longer Ripping them off peels nail layers and makes nails thin.
Key Takeaways
- Neutrals match any dress when they match your undertone.
- Prep and edge sealing prevent most chips and lifting.
- Glazed and chrome can be wedding-appropriate when kept soft and subtle.
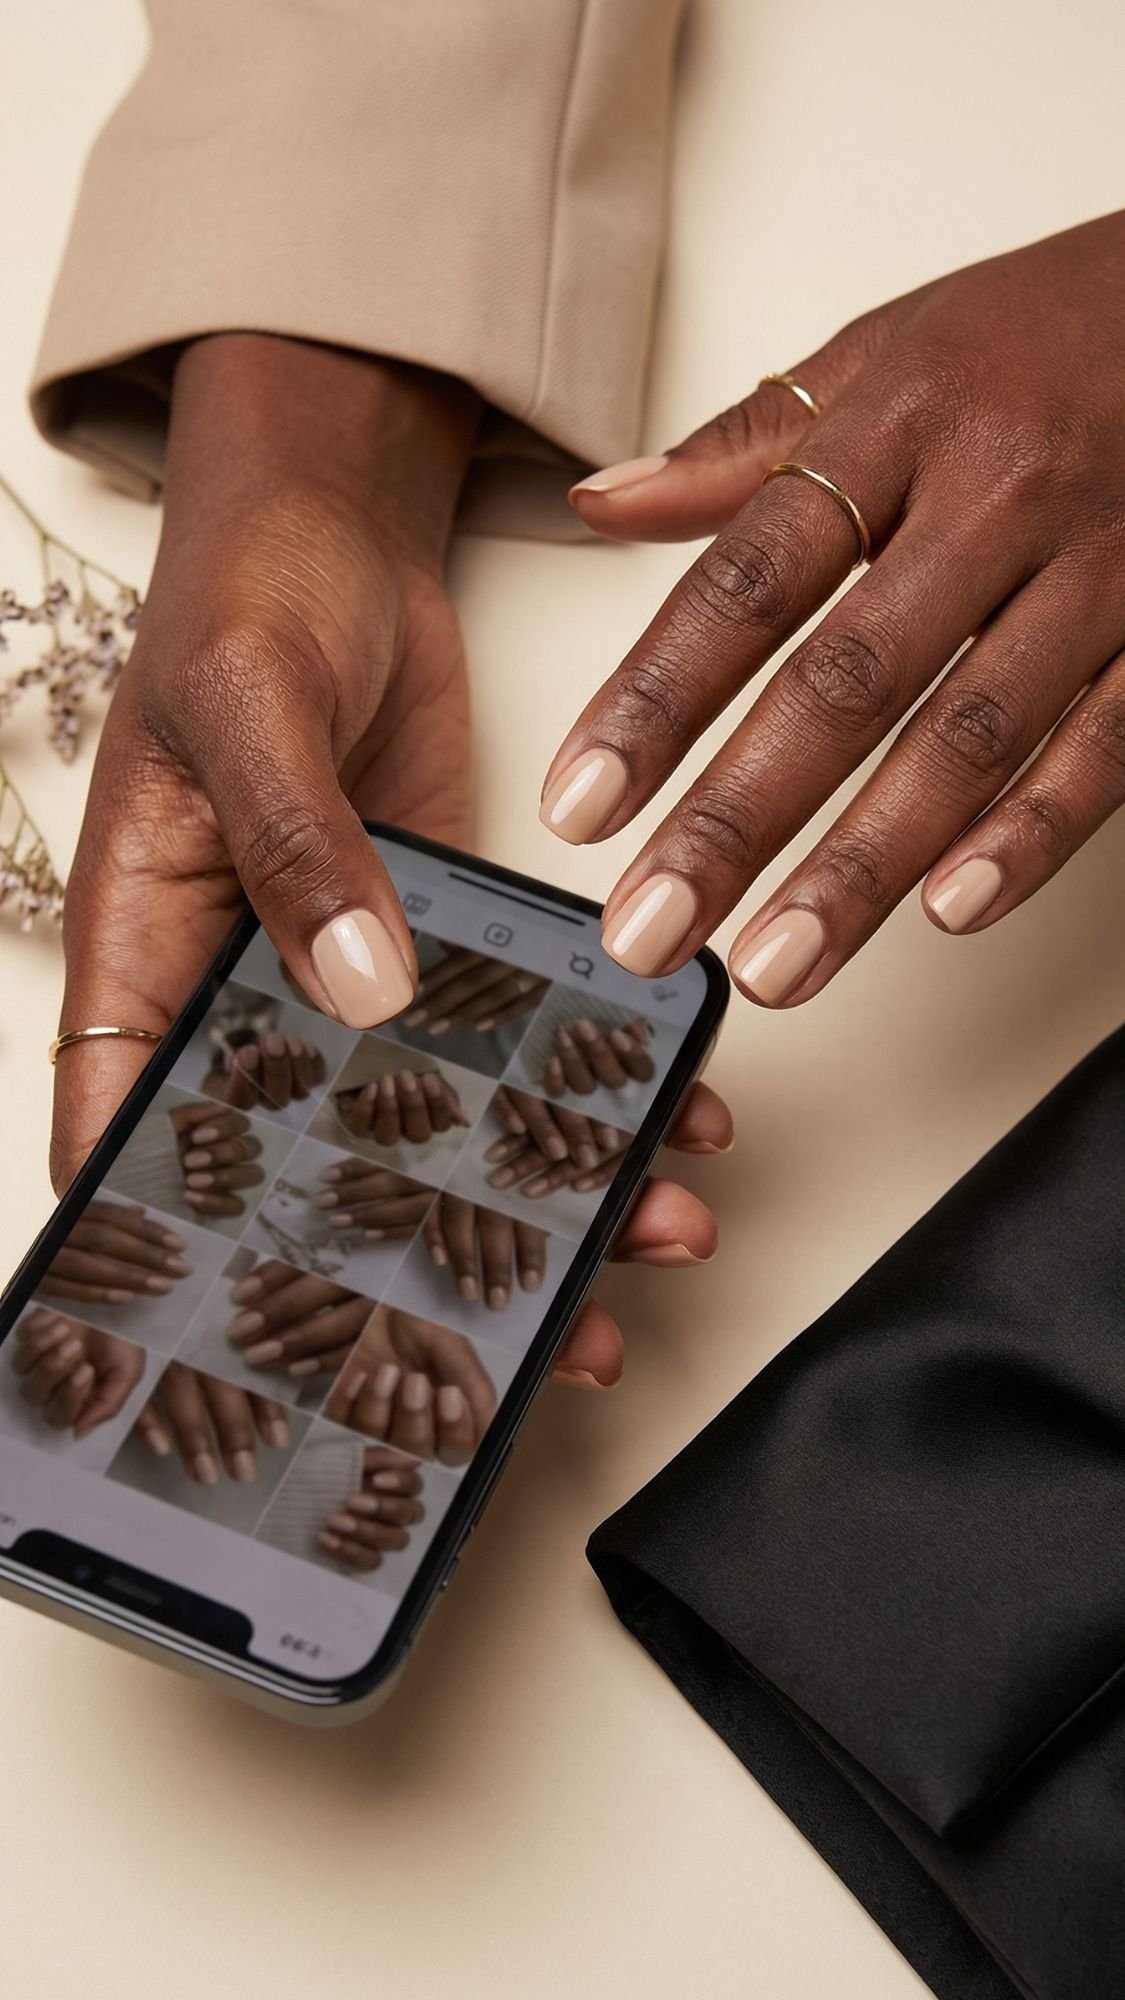
If you remember nothing else before the wedding, remember this. Prep and undertone beat trends every time. A sheer pink, milky nude, soft taupe, or low-contrast French will match any dress when the shade suits your undertone and the finish stays glossy and smooth. You don’t need a complicated design to look polished, you need clean edges, thin coats, and sealed tips.
Want the easiest “safe but stunning” combo? Pick milky nude, add a glossy top coat, and re-top on day five. Done. Your nails will look expensive, your hands will look photo-ready, and you won’t spend the entire reception hiding a chip with your clutch.