Imagine melting away makeup and daily impurities with a product that nourishes your skin while it cleanses. Oil-based skincare solutions transform from solid to silky liquid with just your fingertips – no harsh scrubbing or tightness afterward. This gentle approach works through nature’s clever logic: like attracts like.
Here’s the secret your complexion will thank you for: traditional foam cleansers often strip natural moisture, tricking oily skin into overproduction mode. But when you use quality plant oils, they dissolve grime while maintaining your skin’s balance. The result? A refreshed face that feels supple, not squeaky.
Why spend $79 on luxury brands when you can craft something better? Our method puts you in control – choose organic ingredients that align with your values and skin needs. We’ll show you how to blend pantry staples into a spa-worthy ritual that removes even waterproof mascara without irritation.
In this guide, you’ll discover:
- The science behind oil-based purification methods
- Step-by-step recipes using accessible components
- Application techniques for maximum glow
Ready to revolutionize your skincare routine? Let’s create something that makes your mirror time feel like self-care, not just maintenance.
Understanding the Benefits of a Natural Cleansing Balm
Your skincare routine deserves an upgrade that works with your body, not against it. Unlike foam-based products that leave tightness, oil-based solutions respect your skin’s natural balance. Let’s explore why this method has dermatologists and beauty enthusiasts buzzing.
Why Your Skin Craves Nature’s Touch
Traditional cleansers often contain sulfates – those bubbly agents that strip protective oils. Your face then panics, flooding with excess sebum. A quality cleansing balm avoids this cycle by dissolving impurities without stripping essential moisture. Think of it as a reset button for your pores.
Oil vs. Foam: The Great Cleanse-Off
Here’s where oil cleansing shines. Water-based formulas struggle with waterproof makeup and sunscreen residues. But plant oils? They bond with these stubborn particles like magnets. Bonus: the massaging motion boosts circulation, giving you that post-facial glow every night.
| Oil Cleansing | Traditional Cleansers | |
|---|---|---|
| Makeup Removal | Dissolves waterproof formulas | Often requires multiple washes |
| Skin Feel | Supple, balanced | Tight, dry |
| Best For | All skin types | Limited options |
Notice how your T-zone gets shiny by noon? Harsh cleansers trick oil glands into overdrive. The “like dissolves like” principle in oil cleansing helps regulate oil production naturally. Acne-prone complexions especially benefit from this harmony-focused approach.
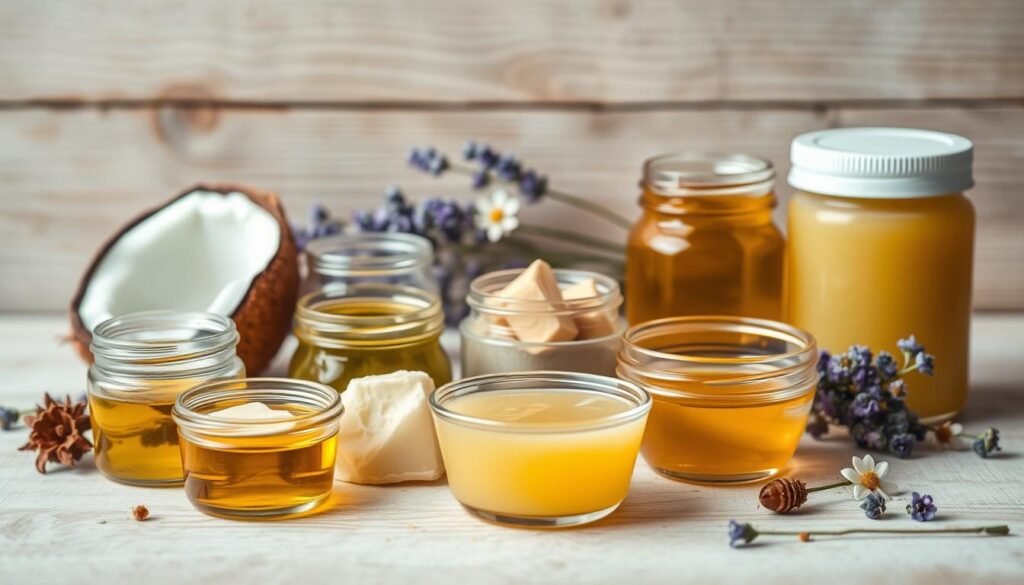
Selecting Your Ingredients and Tools

Crafting your perfect skincare companion starts with smart ingredient choices. Think of this as building a dream team where each player brings unique strengths. Let’s break down the MVP (Most Valuable Plant) components and tools that’ll make your creation shine.
Essential Ingredients for Your Balm
Shea butter takes center stage with its non-comedogenic magic – it hydrates without clogging pores. Pair it with cocoa butter, nature’s structural engineer. This firm base melts into skin-smoothing goodness while offering antioxidant protection.
Coconut oil works double duty. It dissolves stubborn mascara while delivering moisture. Choose refined versions if you prefer neutral scents. For sensitive skin, calendula oil’s soothing properties become your secret weapon.
| Ingredient | Key Benefit | Best For |
|---|---|---|
| Shea Butter | Deep hydration | All skin types |
| Frankincense EO | Anti-aging | Mature skin |
| Geranium EO | Oil balancing | Combination skin |
Tools and Equipment You’ll Need
Your kitchen becomes a skincare lab with these basics:
- A double boiler (or microwave-safe bowl)
- Precise measuring spoons
- Glass jars for storage
Glass containers prevent ingredient interactions – plastic can leach chemicals over time. Pro tip: Use amber jars to protect light-sensitive essential oils like bergamot. Add 5-10 drops of your chosen scents once the base cools slightly for maximum potency.
DIY Guide for Creating Your Homemade Cleaning Balm

Transform raw butters and oils into a silky-smooth treatment that becomes liquid gold on contact. This process feels like kitchen alchemy – watching solid textures dissolve into a nourishing blend that outperforms store-bought formulas.
Building Your Base Blend
Start with 2 tablespoons shea butter – your hydration hero. Add coconut and cocoa butters (1 tablespoon each) for structure. Microwave in 30-second bursts, stirring between intervals. Overheating destroys nutrients – stop when you see just 10% unmelted chunks. They’ll dissolve as you stir.
Elevating With Botanical Boosters
Let the mixture cool to wrist temperature (about 5 minutes). Now add 1 teaspoon calendula oil – nature’s band-aid for irritated skin. Here’s where creativity shines: blend 5 drops each of geranium (balances), frankincense (renews), and bergamot (brightens) essential oils. Sensitive skin? Swap in chamomile. Acne-prone? Try tea tree-lavender duos.
Pro tip: Stir clockwise with a bamboo stick. This old apothecary trick ensures even distribution without whipping air into your balm. Pour into amber jars while still pourable – it’ll set into scoopable perfection within two hours.
| Additive | Skin Benefit | Best Time to Use |
|---|---|---|
| Vitamin E Oil | Extends freshness | Day 1 prep |
| Rosehip Seed Oil | Fades scars | Night routine |
| Peppermint EO | Invigorates | Morning cleanse |
Notice those tiny air bubbles? Gently tap your jar on the countertop. This releases trapped oxygen, giving your diy cleansing balm that luxe, marble-smooth finish. Your masterpiece now rivals $100 designer skincare – but costs less than your latte habit.
Step-by-Step Process to Make Your Balm

Transforming raw butters into a velvety skincare treat feels like conducting a symphony – every movement matters. Let’s walk through the exact steps to craft a formula that glides across skin like silk.
Melting, Mixing, and Perfecting the Texture
Combine 2 tablespoons shea butter, 1 tablespoon coconut oil, and 4 cocoa butter discs in a microwave-safe bowl. Heat in 30-second bursts – stir vigorously between each round. This prevents scorching while creating that smooth, lump-free base your hands will adore.
Watch for visual cues: the mixture should resemble liquid gold with minimal solid flecks. Remove it once 90% melted – residual heat finishes the job. Let cool until warm (about 3 minutes), then blend in calendula oil and essential oils. Overheating destroys delicate compounds – patience rewards you with maximum potency.
Cooling Techniques and Setting the Balm
Pour your blend into jars immediately. Room temperature setting takes 2-3 hours, but the fridge accelerates this to 30 minutes. Pro tip: Tap containers gently on countertops to release air bubbles for that luxe marble finish.
Texture issues? Soft balm means more coconut oil next time. Too firm? Add jojoba oil. For visual guidance, check this detailed guide on adjusting ratios. Your creation solidifies overnight into a scoopable dream that melts upon contact – nature’s magic in action.
Using Your Cleanser Effectively

Your fingertips hold the power to transform this solid gem into a personalized spa experience. The magic lies not just in the formula, but in how you apply it. Let’s unlock the full potential of your creation with techniques tailored to your unique needs.
Mastering the Art of Oil Cleansing
Start with dry hands and a pea-sized scoop – warming it between palms creates instant silk. Press gently onto your dry face, including mascara-coated lashes. Circular motions become your new best friend here. They coax impurities to the surface while giving cheekbones a natural lift.
Reach for that steaming washcloth when fingers glide smoothly. Hold it against your skin like a warm hug – three deep breaths let heat work its pore-opening magic. Wipe upward in soft strokes, rinsing the cloth between passes. Stop when you feel that perfect balance: clean yet cushioned.
| Skin Type | Pro Tip | Follow-Up |
|---|---|---|
| Sensitive | Pat instead of rub | Cool water rinse |
| Dry | Add extra balm layer | Hydrating toner mist |
| Oily | Focus on T-zone | Blotting paper tap |
Combination complexions? Treat zones differently. Massage oilier areas longer, then lightly graze drier patches. For stubborn makeup, let the balm sit 20 seconds before massaging. Your patience gets rewarded with effortless removal – no tugging required.
Nightly use becomes ritual when you sync motions to your breath. Inhale as you sweep across forehead lines, exhale while gliding down jawline. This mindful approach turns skincare into soulcare – one luxurious cleanse at a time.
Troubleshooting and Shelf Life Considerations

Even the most carefully crafted creations need a little troubleshooting magic. Let’s tackle common hiccups and preservation strategies so your DIY cleansing masterpiece stays fresh longer.
Common Issues and How to Fix Them
Texture tantrums? Your first batch might resemble lip gloss while the second feels like concrete. Climate plays chef here. Too soft? Add cocoa butter flakes next time. Too crumbly? Blend in more sunflower oil until it scoops smoothly.
Breakouts during the first week? Don’t panic—this is your skin’s reset button. Like switching to bamboo toothbrushes, your face needs 3-5 days to shed old product residues. Stick with it, and you’ll see clearer skin emerge.
Maximizing Your Balm’s Longevity
Store your jar away from steamy showers and sunlight. Those cute bathroom shelves? Not ideal. Instead, tuck it in your bedroom drawer. Always use dry fingers or a mini spatula—water introduces bacteria that shorten your product’s lifespan.
| Fresh Balm | Spoiled Balm |
|---|---|
| Subtle nutty aroma | Sour or rancid smell |
| Smooth texture | Grainy separation |
| Golden hue | Yellowish discoloration |
Boost staying power with ¼ teaspoon vitamin E oil per batch. For dry sensitive skin, make smaller portions monthly. Remember: fresh batches mean maximum potency for your nightly ritual.
Conclusion
Your journey to glowing skin starts with a simple jar and nature’s finest ingredients. This DIY cleansing approach lets you skip harsh foaming cleansers while keeping your routine sustainable. Whether you battle stubborn makeup or seek gentler care for sensitive skin, custom blends adapt to your needs.
Remember – great beauty rituals don’t require complex formulas. Three drops of frankincense oil can transform your nightly routine into an anti-aging powerhouse. A warm cloth becomes your secret weapon for unclogging pores without stripping moisture.
Your creation outshines store-bought options because you control the quality. Adjust textures for summer humidity or winter dryness. Swap oils based on your skin’s changing needs – that’s the magic of personalized care.
Ready to feel the difference? Scoop a dime-sized cleansing balm tonight. Massage it into hands first, then let it melt away the day. Your mirror will soon reflect what nature knew all along: simple solutions often deliver the most radiant results.