Gifts that actually survive sun, soil, and Mom standards 😅
If your mom loves her garden, she does not want another “cute” gift that melts, peels, or warps the second it meets a hose. She wants something pretty, useful, and built to last past the first watering. In my DIY era, I’ve found that the difference between “aww” and “WOW, you made this?” comes down to two things, smart materials and finishing like you mean it.
I’ve made a lot of garden-y gifts over the past few years, and I’ve also ruined a few, which is how I learned what not to do. Ever spent an hour painting a pot, then watched it bubble like a science experiment after watering? Same. This list gives you projects that feel fresh and lovely, plus the pro moves that keep them from falling apart outside.
Quick pick guide, so you choose the right project fast
- If she loves flowers: pressed botanical resin, seed bombs, plantable tags
- If she loves herbs: self-watering herb planter, herb drying hanger, garden journal
- If she loves organization: tool basket organizer, stamped metal markers, apron with pockets
- If she loves houseplants too: propagation station, monogram plant mister
Before you start, grab these basics
- Rubbing alcohol for prep (vinyl and glass hate fingerprints)
- Sandpaper (120 and 220 grit covers most DIY sins)
- A tack cloth or lint-free rag
- A notebook page for measurements, spacing, and label spelling, because “BASLI” hurts forever
Pro secret I will use later in the list
When you make plantable paper, blend paper and water only, then fold seeds in by hand at the end. That move protects germination and keeps seeds intact.
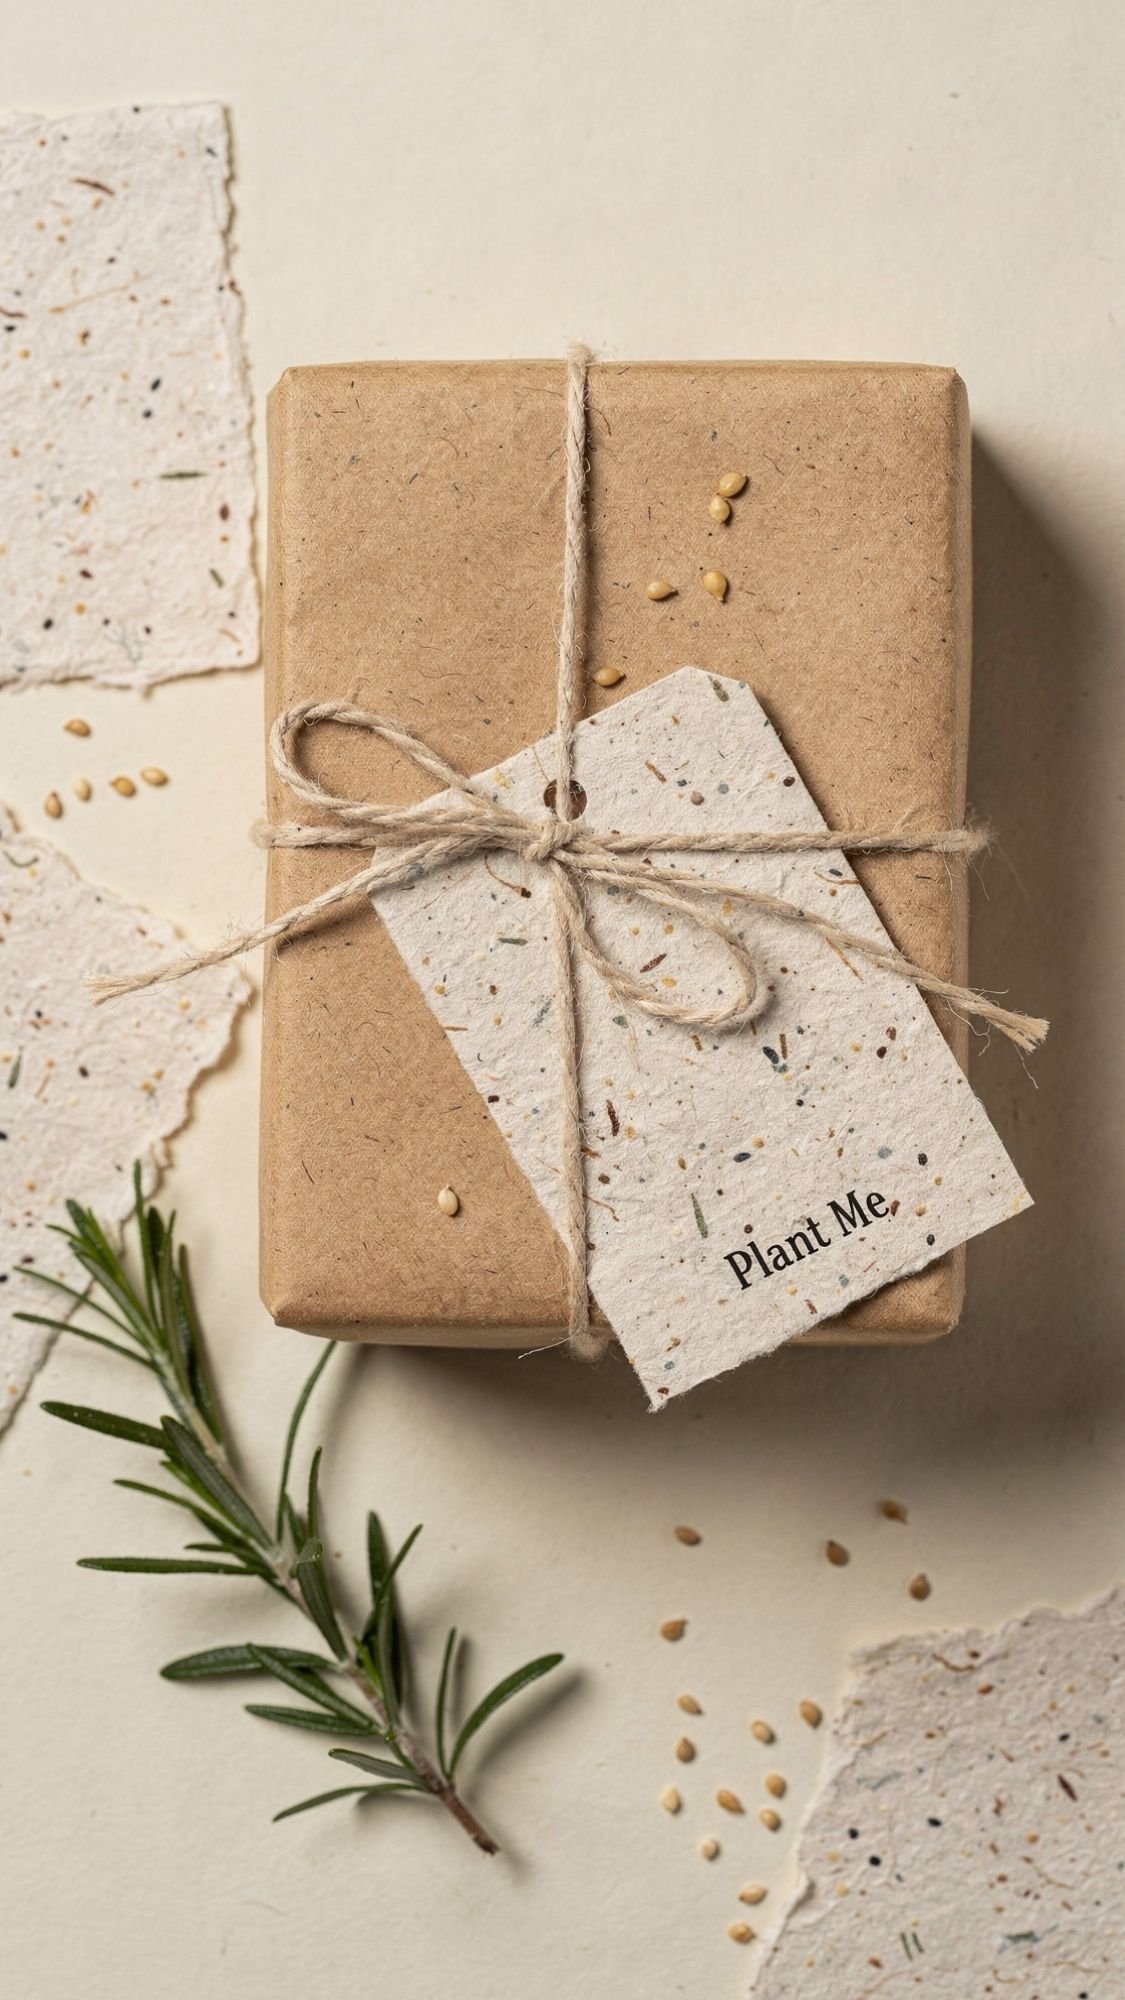
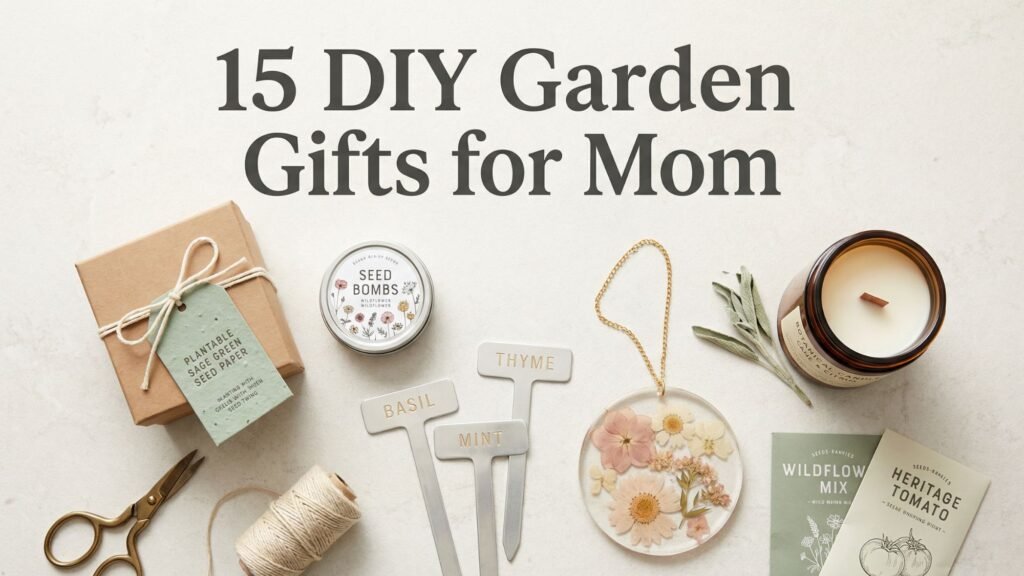
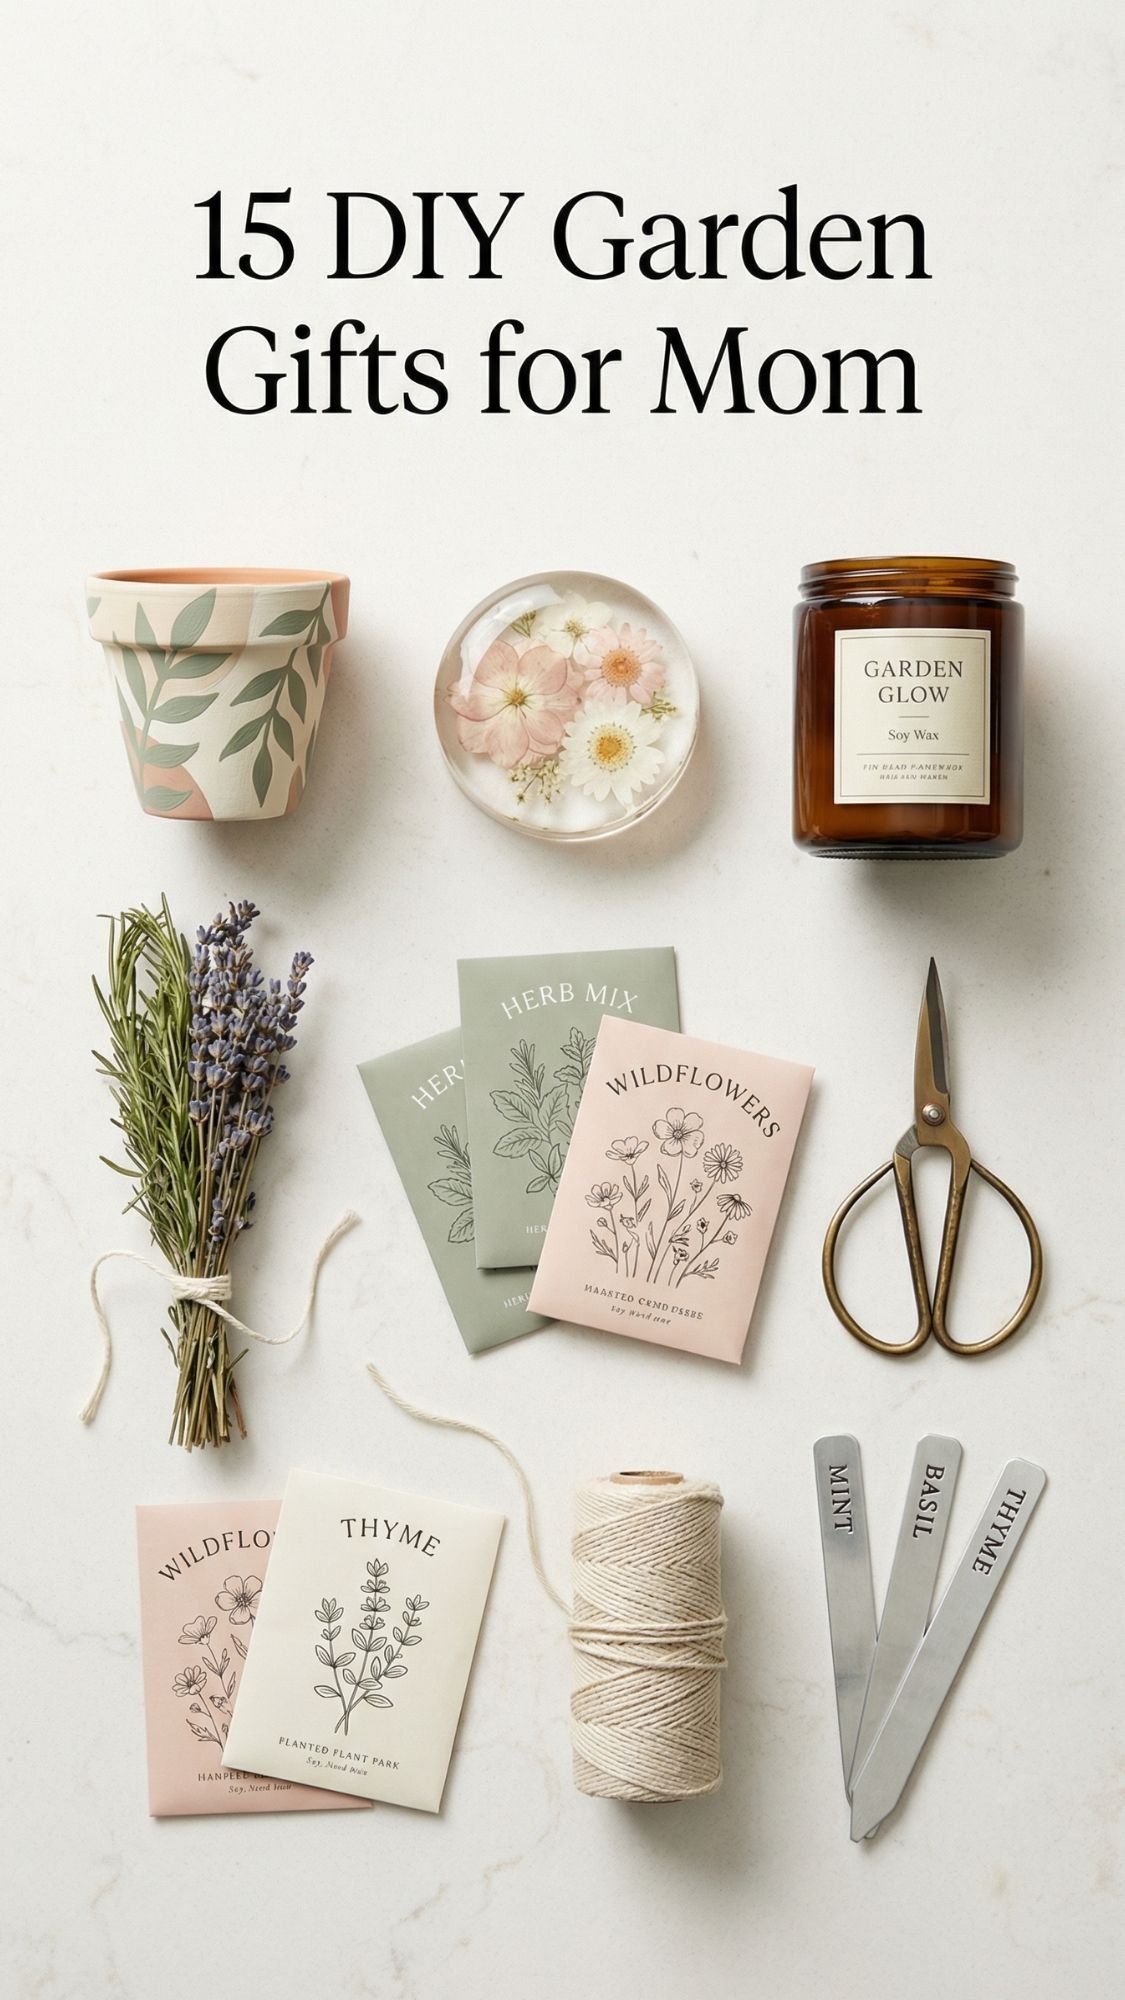
1) Plantable Seed Paper Gift Tags: the gift that literally grows
These are my go-to when I want something that looks boutique but still feels heartfelt. Garden moms love anything that turns into flowers later, and these tags do exactly that. Plus, they solve the “pretty gift wrap that becomes trash” problem, which feels extra good if your mom is the type who reuses twist ties like they are gold. Ever wondered why some seed paper works and some just… doesn’t? It usually comes down to thickness, drying speed, and how you treat the seeds.
Why she’ll love it
- She plants the tag and gets blooms, that’s basically magic in mom language.
- It looks expensive when you tie it on with linen twine.
- You can match the seeds to her garden vibe, herbs, wildflowers, pollinator mix, whatever fits.
Time, Cost, Skill
- Time: 45 to 90 minutes hands-on, plus drying
- Cost: Low
- Skill level: Beginner, messy in a fun way
Materials (keep it simple, but intentional)
- Recycled paper (egg cartons, printer paper, brown bags)
- Warm water
- Small seeds (wildflower, chamomile, basil, thyme, poppy)
- Optional natural tint: beet powder, turmeric, spirulina
- Linen twine or ribbon for tying
Tools
- Blender or food processor
- Mesh screen or a window screen piece, you can also use an embroidery hoop with mesh
- Rolling pin or flat bottle
- Parchment paper or felt sheets for drying
- Cookie cutters or scissors
- Hole punch
Steps (tight, but you can’t skip the “why” parts)
- Rip the paper small and soak it. Smaller pieces blend smoother, which gives you tags that look clean instead of lumpy.
- Blend paper and water into pulp. Blend until it looks like oatmeal. If it looks like confetti soup, keep going.
- Press out extra water. Too wet means slow drying, and slow drying invites musty smells and mold.
- Pro secret, fold the seeds in by hand. Do not blend the seeds. Blenders can damage them, and then you get a tag that looks cute but grows nothing. Nobody wants that awkward moment.
- Spread pulp thin on your screen. Aim for thin and even. Thick seed paper dries forever and loves to get moldy.
- Press and roll to flatten. Rolling makes it smoother and helps the fibers bond, so the tag holds together.
- Dry completely. Flip it partway through if it feels damp underneath. Full dry means it snaps a little when you bend it, not floppy.
- Cut tags and punch holes. Use cookie cutters for cute shapes, or keep it modern with rectangles.
Pro-Tips (do this and you’ll look like a pro)
- Keep it thin. Thin paper dries faster, stays cleaner, and plants better.
- Use small seeds only. Big seeds create weak spots and make tags crumble.
- Dry with airflow. A rack or a fan on low helps prevent that “wet paper towel” smell.
- Test one tag first. If it sprouts, you know your batch works. If it doesn’t, you can adjust before gifting.
Common mistakes and quick fixes
- Tag feels crumbly: You spread it too thin or did not press it enough. Add a little more pulp and roll again.
- Tag smells musty: It dried too slowly. Re-pulp, spread thinner, dry with airflow.
- Seeds fall out: You added seeds before pressing. Fold in gently, then press lightly, do not mash.
Finishing + gifting (so it looks premium)
- Tie tags with linen twine and add a mini note that says how to plant it.
- Store finished tags in a paper envelope until gifting, paper breathes better than plastic.
Little care card text you can copy-paste
- “Soak tag in water for 10 minutes, place under a thin layer of soil, keep moist until sprouts appear.”
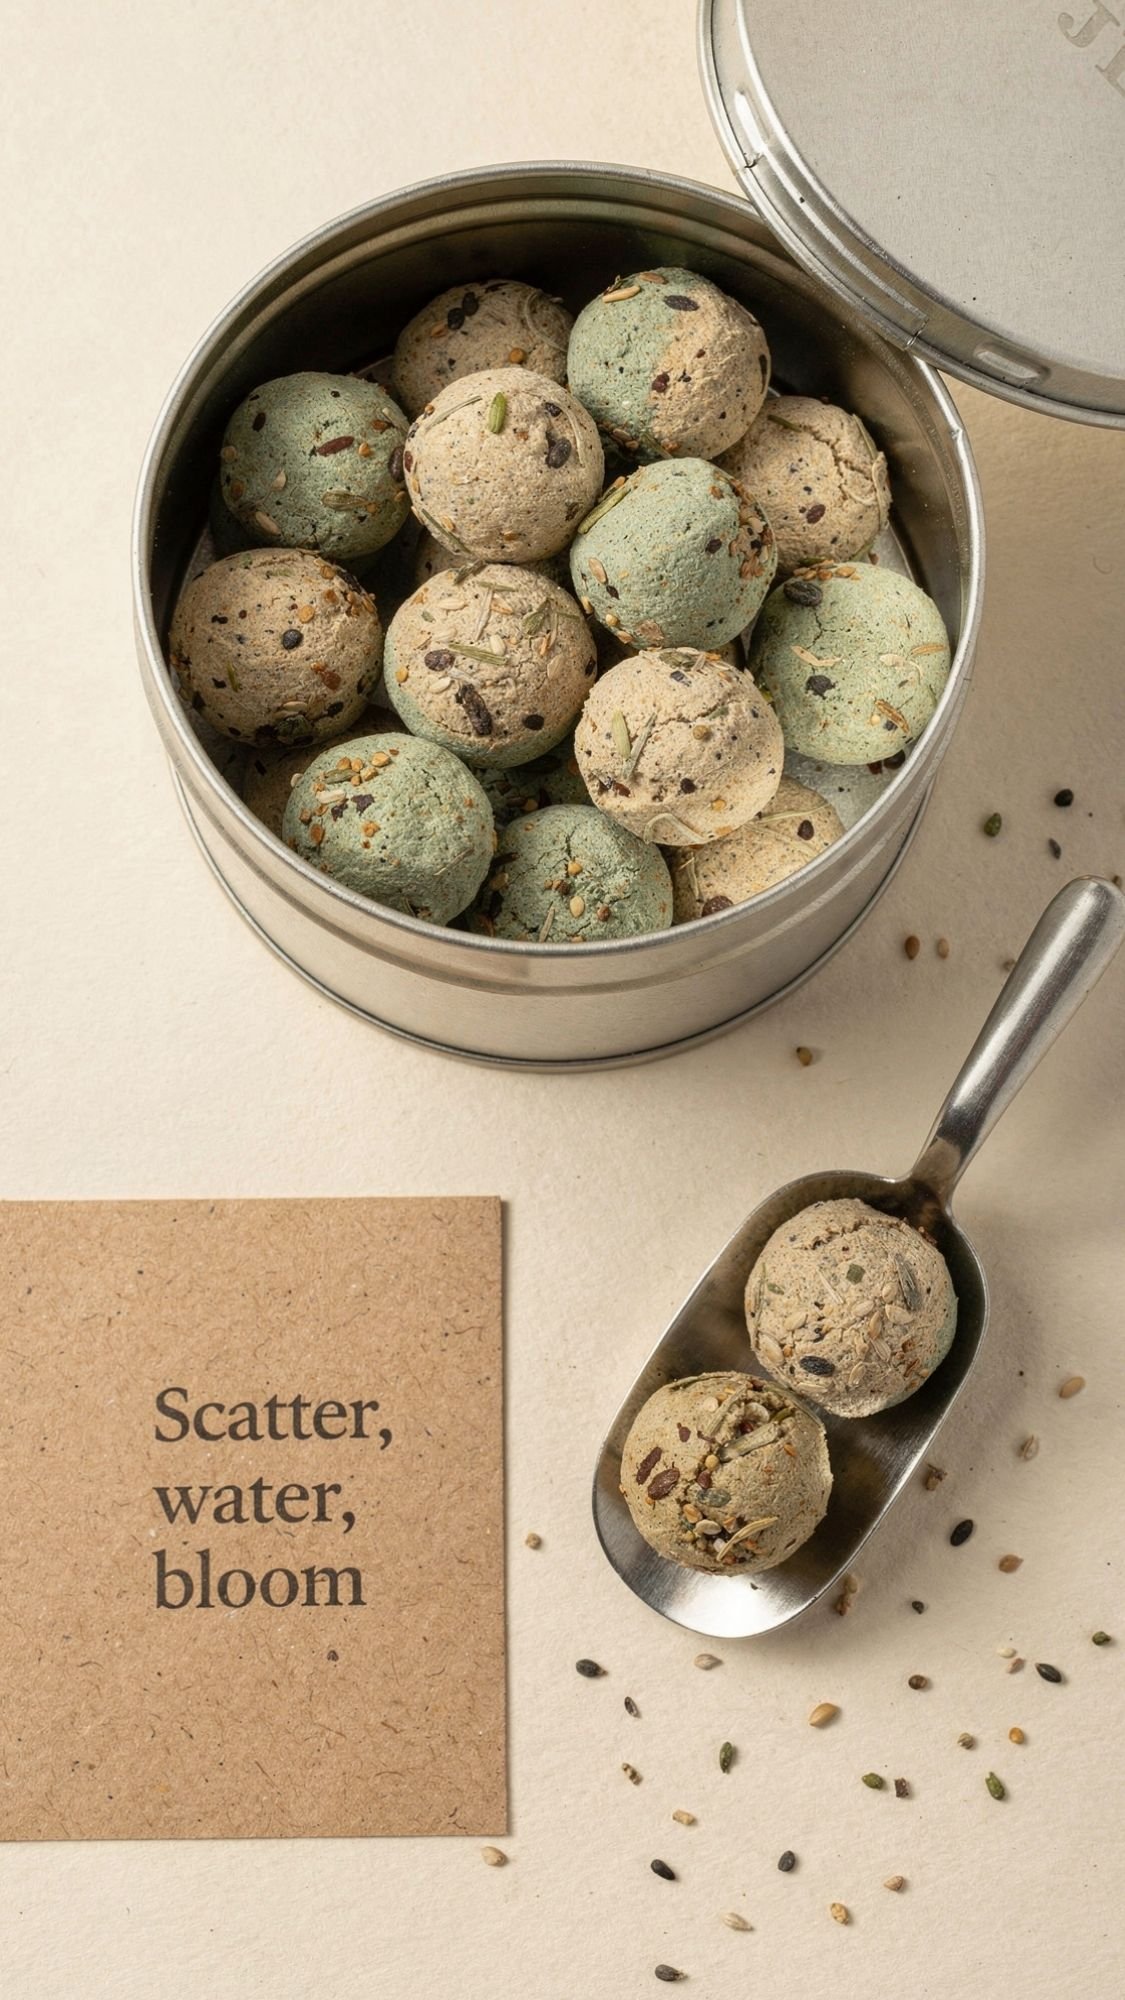
2) Seed Bomb “Tea Tin” Gift Set: tiny bloom grenades, but cute
This one always gets a real reaction because it feels like a fancy sampler gift, not a craft. You hand her a little tin of “future flowers” and she instantly knows what to do with it. Also, you get to say “seed bomb” with a straight face, which always makes me laugh. Who does not want a gift that turns into a mini wildflower moment?
Why she’ll love it
- She can scatter them in planters, bare spots, or a “meh” corner of the yard.
- It feels thoughtful and practical, not clutter-y.
- You can customize the seed mix to match her garden style.
Time, Cost, Skill
- Time: 30 to 60 minutes hands-on, plus drying
- Cost: Low
- Skill level: Beginner
Materials
- Air-dry clay powder or natural clay soil (fine, not chunky)
- Potting soil or compost (dry and sifted)
- Small seeds (wildflower mix, herbs, or native mix)
- Water in a spray bottle
- Mini tea tin or small glass jar
- Optional: silica packets for storage
Tools
- Bowl
- Spoon or gloved hands
- Sifter or fine mesh strainer
- Measuring cups or a kitchen scale
- Parchment paper or drying rack
The mix ratio I actually trust (because consistency matters)
In my workshop, I’ve found that this ratio rolls easily and dries strong:
- 5 parts clay
- 3 parts soil
- 1 part seeds
If you want extra-strong seed bombs for gifting, bump clay up a little. If you want faster breakdown in soil, keep clay at the lower end.
Steps (simple, but do them in this order)
- Sift your soil and clay. Sifting gives you smooth bombs that do not crack like a dry cookie.
- Mix clay + soil first. You want even distribution before seeds go in.
- Fold in seeds gently. Do not crush them. You want whole seeds, not seed powder.
- Mist water slowly and mix. Add water like you add salt to soup. You can always add more, but you cannot un-sog it.
- Squeeze test the texture. It should hold together when you squeeze it, and it should not stick to your fingers like dough.
- Roll into small balls. Aim for 1 inch. Small bombs absorb water better and sprout more evenly.
- Dry slowly. Let them dry 24 to 48 hours in a dry spot with airflow. Flip them halfway through.
Pro-Tips (this is what makes them gift-worthy)
- Keep them small. Big seed bombs crack, and water struggles to penetrate the center.
- Use dry ingredients. Moist soil can trigger early sprouting in storage, which ruins the gift.
- Choose the right seeds for the spot. Shade mix for shade areas, sun mix for sunny areas. If she gardens in containers, herb seeds work beautifully.
- Go native when you can. Native mixes usually perform better, and they support local pollinators.
Common mistakes and quick fixes
- They crack while drying: You added too much water or dried them too fast. Mist your hands, re-roll, then dry in a cooler spot with gentle airflow.
- They crumble: You did not add enough clay binder. Mix a little more clay into the batch and roll again.
- They feel sticky: You added too much water. Add a pinch more clay and soil, then re-roll.
Finish + gifting (the “this looks expensive” part)
Make it a set
- Put 10 to 15 bombs in a mini tea tin with tissue paper or shredded kraft filler.
- Add a tiny instruction card so she does not have to guess.
Copy-paste instruction card
- “Toss on bare soil, press lightly, water well. Keep moist until sprouts appear. Best in spring or fall.”
Storage note
- Store finished bombs in a dry tin or jar. Add a silica packet if your home runs humid.
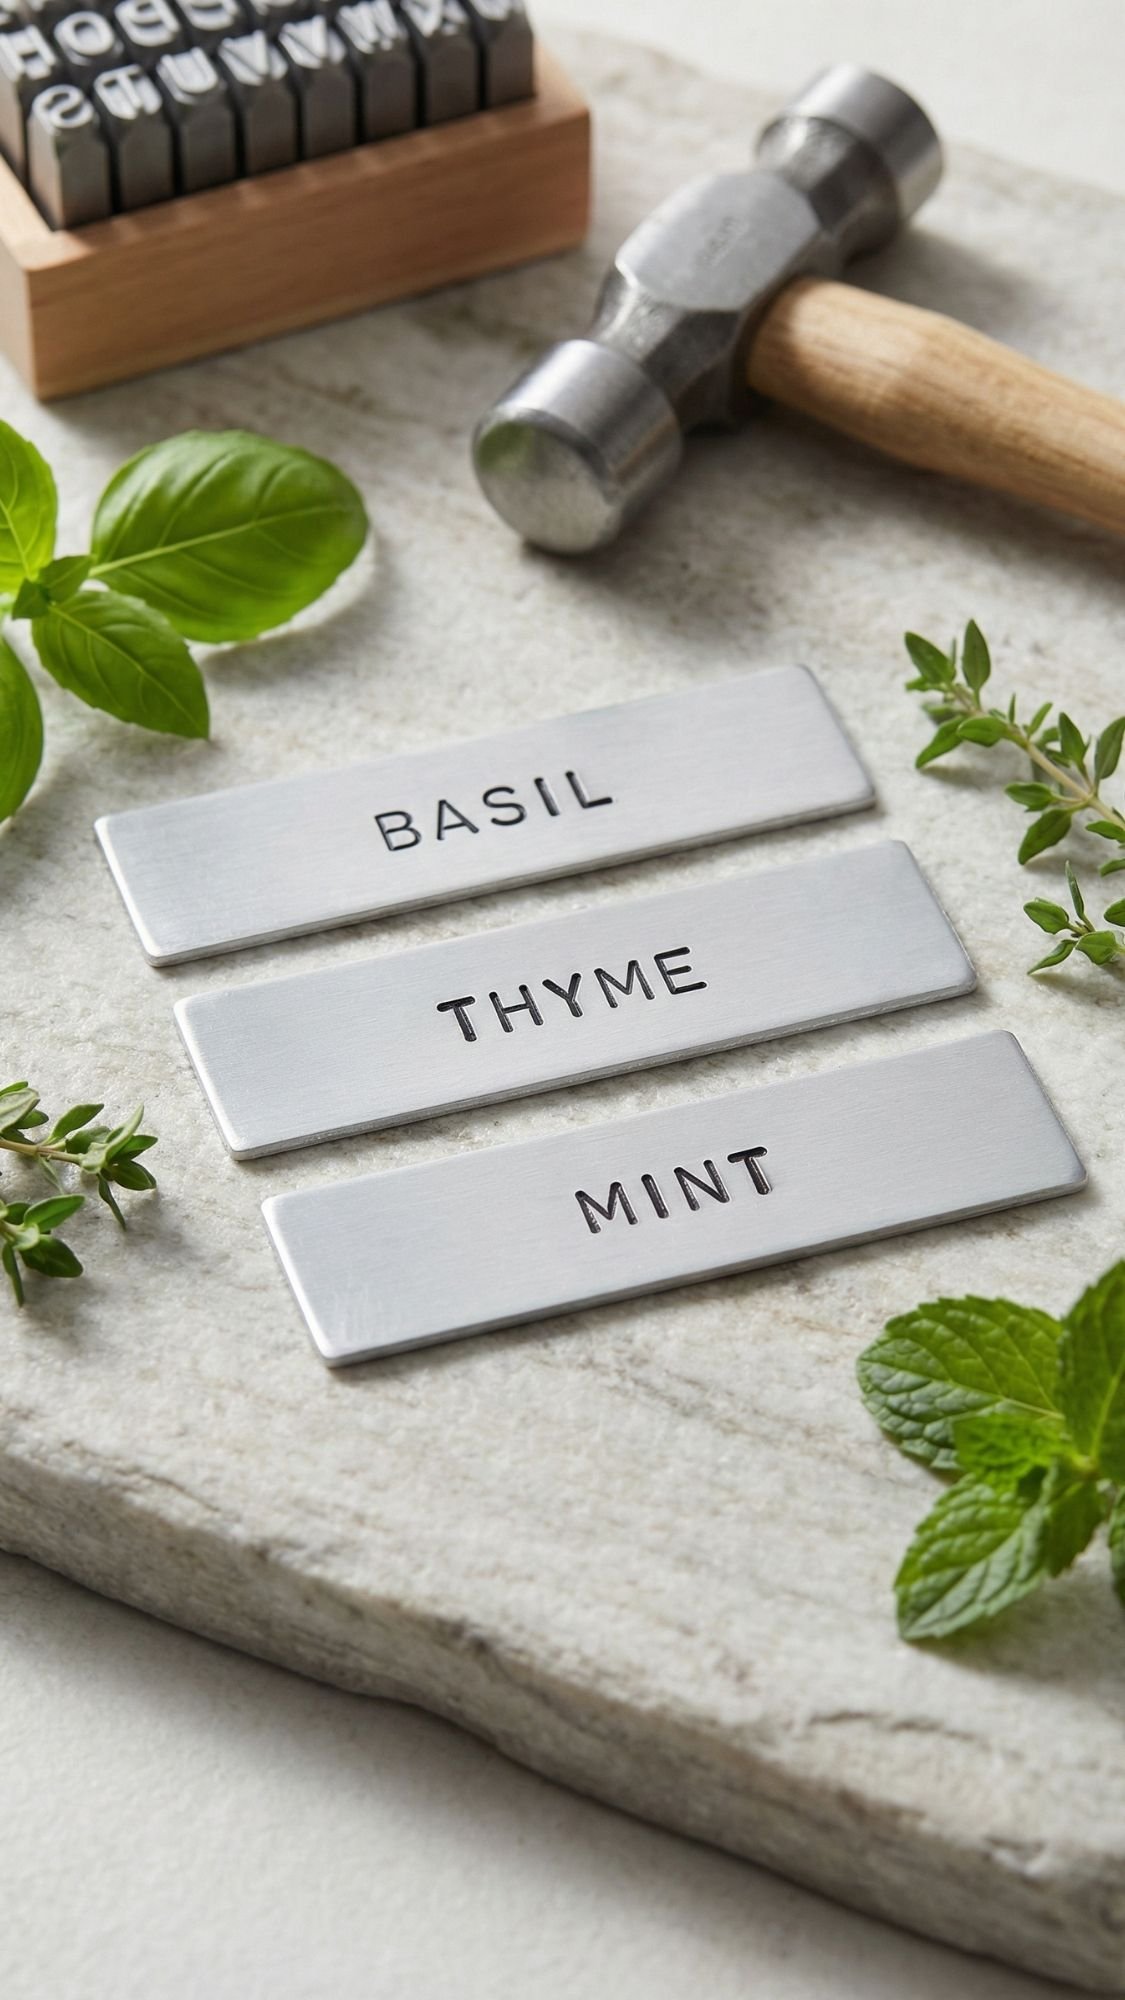
3) Stamped Metal Plant Markers: because “mystery herb” is not a vibe
These feel so polished for how simple they are. You get that clean, minimal look that garden moms love, and they actually survive weather way better than painted sticks. IMO, this is one of the most “she’ll keep this forever” gifts on the list, especially if your mom labels everything like a tiny plant librarian. Ever tried to read a marker after one rainstorm and it looks like a sad blur? Metal fixes that.
Why she’ll love it
- They look sleek, not crafty in a messy way.
- The words stay readable all season.
- You can personalize them with herb names, nicknames, or “Mom’s Tomatoes” if you want to be cute.
Time, Cost, Skill
- Time: 45 to 90 minutes
- Cost: Low to medium, stamps are the main investment
- Skill level: Beginner, you just need patience
Materials
- Aluminum stamping blanks or soft metal strips (aluminum is easiest)
- Letter stamp set
- Optional: black enamel paint or wax for color fill
- Rubbing alcohol for prep
Tools
- Hammer
- Steel bench block or a sturdy anvil-like surface
- Painter’s tape
- Fine-tip marker for a guide
- Fine sandpaper or a metal file for edges
- Soft cloth for buffing
Steps (this is where most people get crooked)
- Prep the blank. Wipe with rubbing alcohol. Oils can make fills look patchy later.
- Create a baseline. Put a strip of painter’s tape across the blank where you want the letters to sit. This is your “don’t stamp chaos” guide.
- Plan spacing before you stamp. Lightly mark where each letter goes, especially for words like “ROSEMARY” that love to run out of room.
- Stamp on a solid surface. Put the blank on the bench block. If your surface has bounce, your letters will look faint and sad.
- Strike once, firmly. In my workshop, I’ve found that two weak taps make uglier letters than one confident strike. Commit.
- Check alignment as you go. Keep the stamp straight. Rotate the blank, not your wrist, if that helps.
- Optional: color fill for readability. Rub black enamel or wax into the letters, then wipe the surface clean so pigment stays only in the indent.
- Smooth edges. File or lightly sand sharp corners so they do not snag hands or gloves.
Pro-Tips (these save you from stamping regret)
- Use tape as a straight guide. Your eyes lie when you get excited. Tape does not.
- Practice on scrap metal first. One test word prevents a whole batch of “well… that’s abstract.”
- Stamp from the center outward for long words, it helps spacing.
- If you mess up a letter, lean in. Add a small leaf stamp, a dot, or a line and call it “design.” Nobody needs to know.
Common mistakes and quick fixes
- Crooked letters
- Likely cause: No baseline or you shifted the stamp
- Fix: Start a new blank and use tape, do not fight it
- Prevention next time: Mark spacing and stamp on a bench block
- Faint letters
- Likely cause: Soft surface under your blank or weak strikes
- Fix: Move to a solid block and stamp with one firm hit
- Prevention next time: Use a bench block or anvil surface
- Metal bends
- Likely cause: Stamping without support
- Fix: Flatten gently on the block, or use thicker blanks
- Prevention next time: Always stamp on a solid block
Finish + care (so they last outdoors)
- Aluminum holds up well, but if you add color fill, let it dry fully before wiping clean.
- If your mom gardens in heavy sun, you can add a light clear coat, but keep it thin so it does not obscure the stamping.
Gift upgrade idea
- Bundle markers with a small herb plant or a seed packet set, it looks intentional and complete.
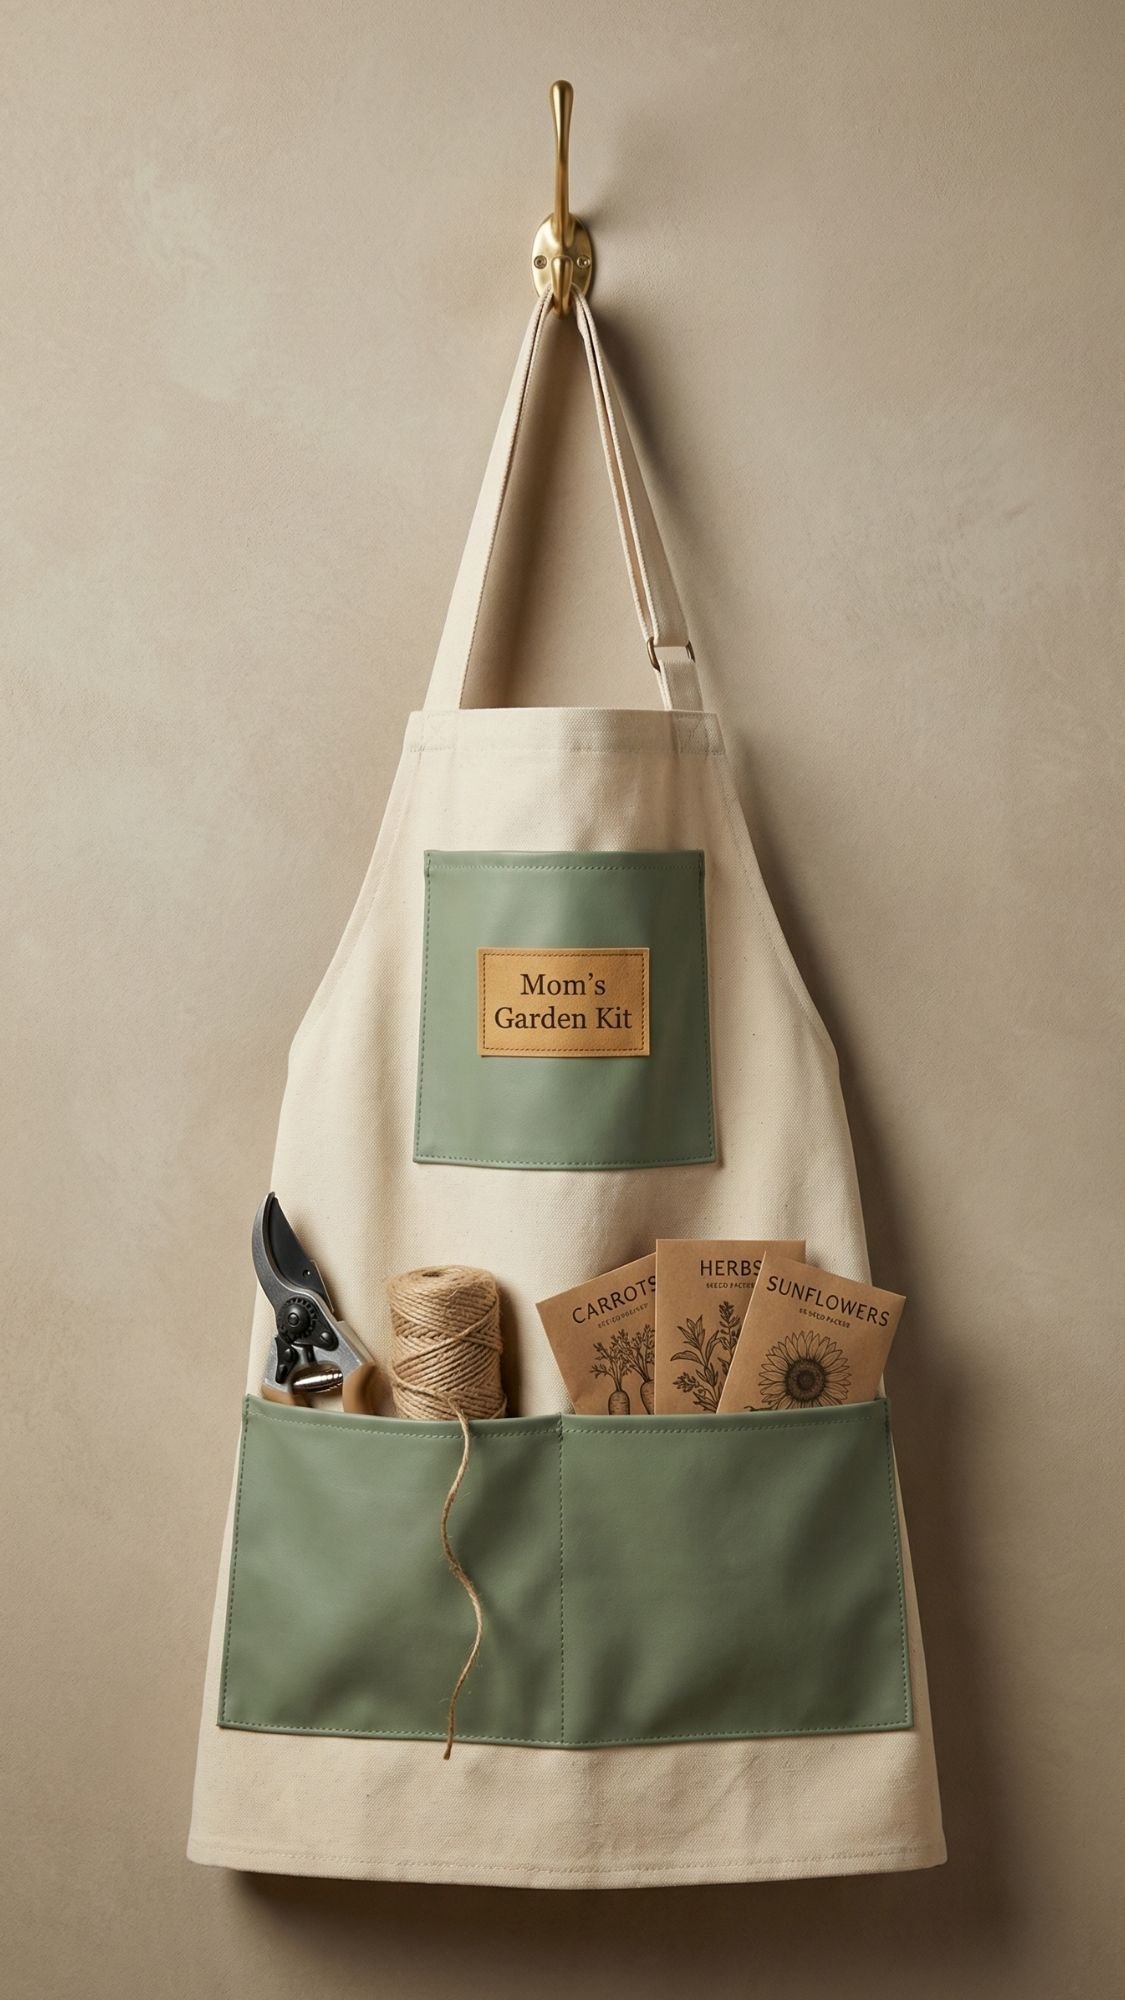
4) Handmade Garden Apron With a Wipe-Clean Pocket: because pockets are everything
This gift feels extra thoughtful because it is practical and personal at the same time. A good garden apron saves knees, saves clothes, and saves time because your mom stops walking back and forth looking for pruners like they grew legs. In my workshop, I’ve found that the pocket design matters more than the cute fabric. If the pocket holds dirt and stays damp, it turns gross fast. If it wipes clean, it stays nice.
Why she’ll love it
- It keeps tools, gloves, and seed packets in one spot.
- It feels custom, especially if you add her name or a little stitched label.
- The wipe-clean pocket makes it usable, not just pretty.
Time, Cost, Skill
- Time: 1 to 2 hours
- Cost: Medium
- Skill level: Beginner sewing, or no-sew with fabric adhesive
Materials
- Heavy cotton canvas, denim, or duck cloth, 1 to 1.5 yards
- Cotton webbing or twill tape for ties
- Clear matte vinyl or oilcloth for the wipe-clean pocket lining
- Thread that matches or contrasts
- Optional personalization:
- Iron-on vinyl name
- Embroidered patch
- Simple fabric label
Tools
- Sewing machine and scissors, or rotary cutter + mat
- Pins or sewing clips
- Measuring tape
- Iron
- Optional no-sew route: strong fabric adhesive tape or fabric glue
Pattern notes (so it fits real humans)
You do not need a fancy pattern. Keep it adjustable.
- Apron body: about 27 to 30 inches tall, 22 to 26 inches wide
- Waist ties: 30 to 36 inches each
- Neck strap: adjustable if you can, or use a simple D-ring slider
A common mistake beginners make is cutting ties too short. Give her extra length. Nobody wants an apron that feels like a belt from middle school.
Steps (sewing version, clean and sturdy)
- Cut your apron body. Round the bottom corners for a polished look.
- Hem the edges. Press, fold, and stitch. This prevents fraying and makes it look store-bought.
- Make the pocket panel. Cut a large pocket piece, then cut a vinyl lining piece the same size.
- Attach the vinyl lining. Stitch the vinyl to the pocket panel at the top edge, then flip it so the vinyl sits inside like a lining.
- Create pocket sections. Stitch vertical lines to make tool slots, one wide pocket for gloves, one narrow pocket for pruners, and one flat pocket for seed packets.
- Attach the pocket panel to the apron body. Stitch around the sides and bottom, backstitching at stress points.
- Add ties. Stitch waist ties and the neck strap securely, reinforce with an X-box stitch if you can.
- Optional personalization. Add a name patch or a simple label. Keep it clean and minimal.
No-sew option (still strong if you do it right)
If you do not sew, use heavy-duty fabric adhesive tape and stitch by hand at stress points.
- Press hems with iron first.
- Tape, press, then add a few hand stitches at corners.
- For the pocket, tape can work, but you really want hand stitches where tools pull.
Pro-Tips (this is how you make it feel premium)
- Use canvas or denim. Thin cotton looks cute but fails fast.
- Reinforce stress points. Every pocket corner needs extra stitching.
- Wipe-clean pocket lining is the secret sauce. Dirt wipes out, moisture does not soak in.
- Test the pocket depth. Put pruners in it before stitching sections, adjust now, not later.
Common mistakes and quick fixes
- Pocket sags
- Likely cause: Fabric too thin or pocket too wide with no sections
- Fix: Add vertical stitch lines to create sections, or add a second layer of fabric
- Prevention next time: Use heavier fabric and section the pocket
- Vinyl stitches look wavy
- Likely cause: You pulled the vinyl while sewing
- Fix: Slow down, use clips not pins, lengthen stitch slightly
- Prevention next time: Let the feed dogs move the vinyl, do not tug
- Ties rip out
- Likely cause: Weak seam reinforcement
- Fix: Re-stitch with an X-box reinforcement
- Prevention next time: Backstitch and reinforce stress points
Finish + care
- Wash on gentle if it is all fabric.
- If you use vinyl lining, spot clean and air dry.
- Add a small care card: “Wipe pocket lining with a damp cloth, air dry after muddy days.”
Gift styling idea
Roll the apron like a fancy towel, tie with twine, and tuck in a small pair of pruning snips or seed packets.
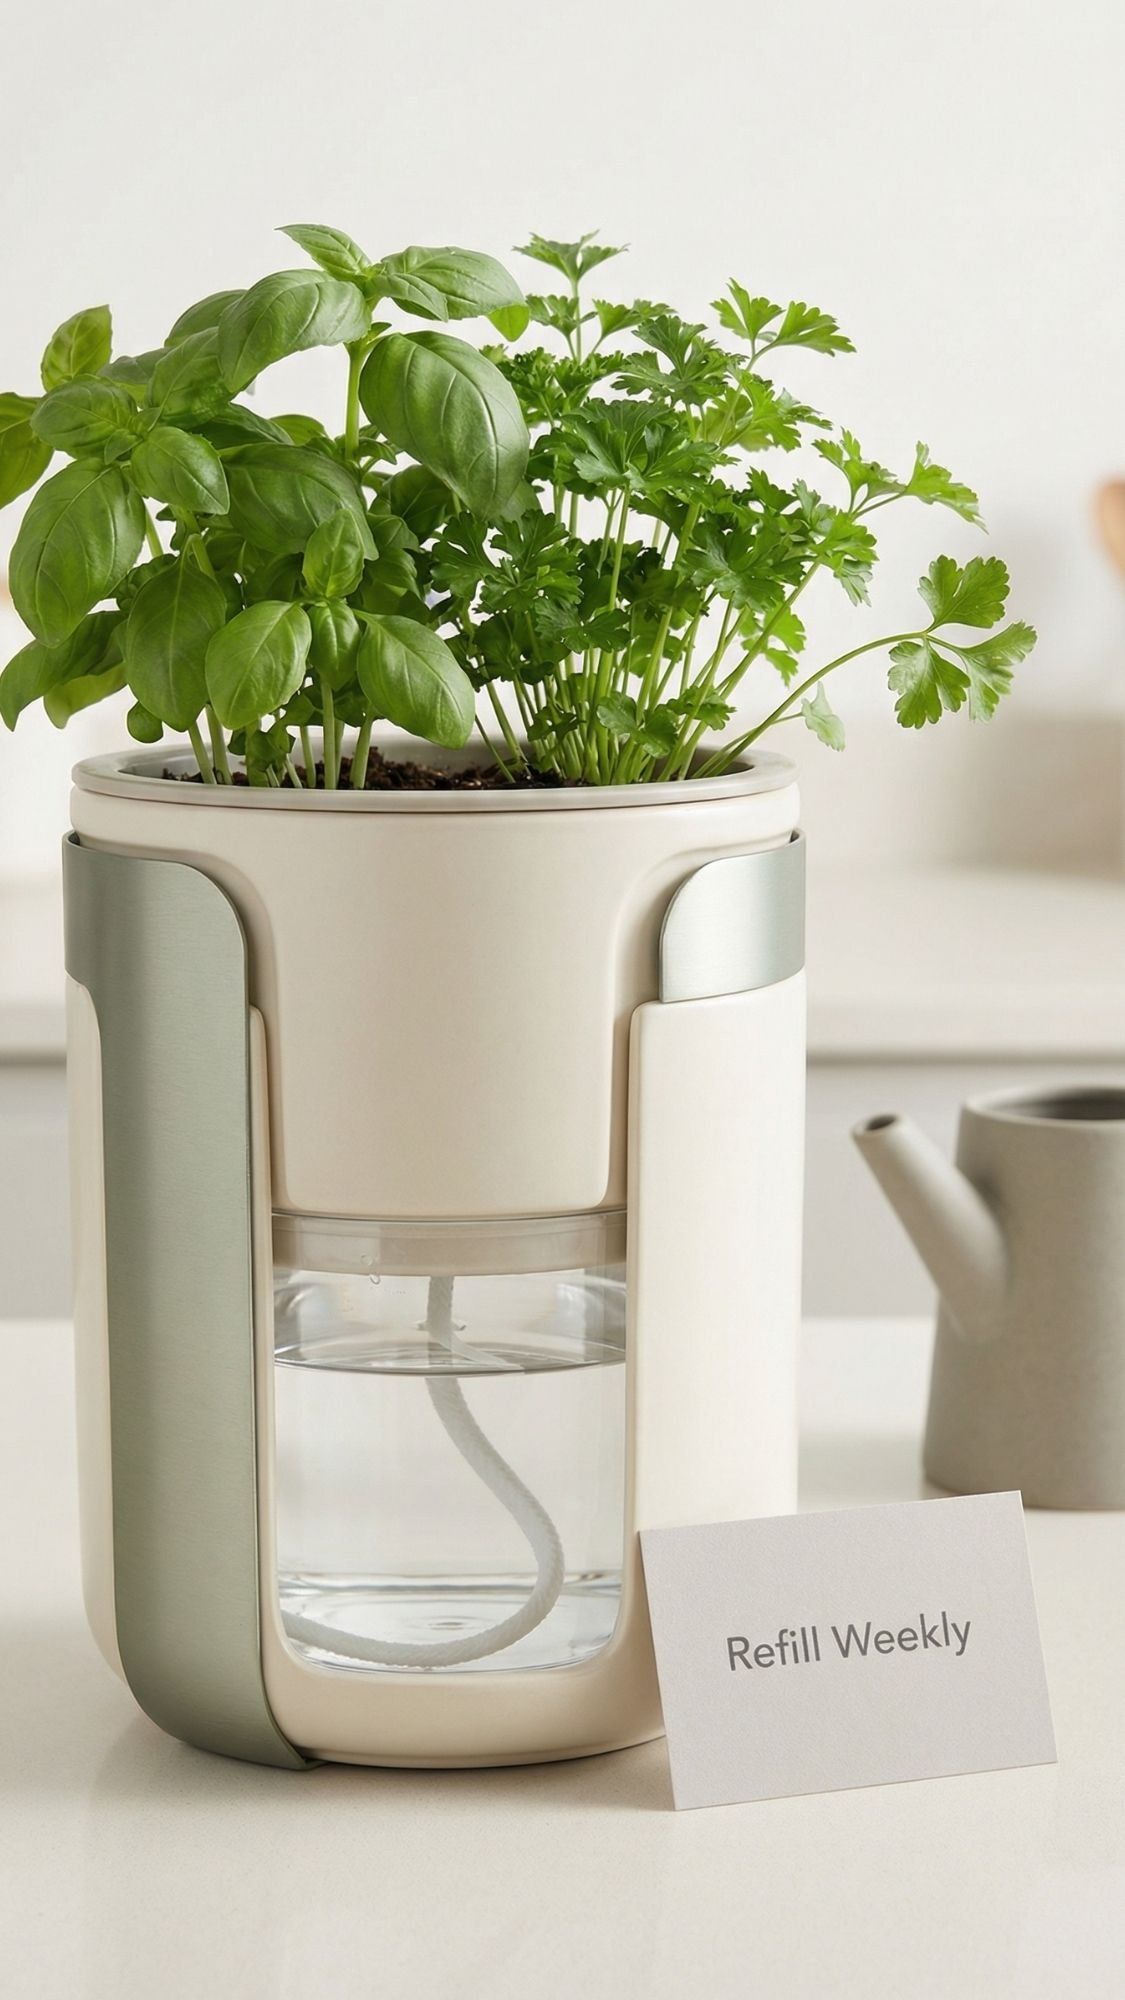
5) Self-Watering Herb Planter: busy-mom proof, honestly
If your mom grows herbs, she already knows the heartbreak of crispy basil. One missed watering and the plant throws a tantrum. A self-watering planter fixes that by feeding moisture from below, so the roots drink what they need instead of getting blasted, dried out, blasted again, and judging you the whole time. Ever wondered why herbs taste bitter or look stressed even when you water “enough”? Uneven moisture usually causes it.
In my workshop, I’ve found this gift lands best when it looks clean and intentional, not like a science project with a random bottle stuck in a pot. So we’re going for sleek, functional, and easy to refill.
Why she’ll love it
- It keeps herbs happier with steadier moisture.
- It saves time, especially in summer or sunny windows.
- It looks like something you bought, but you made it.
Time, Cost, Skill
- Time: 60 to 90 minutes
- Cost: Low to medium
- Skill level: Beginner-friendly, you just need careful measuring
Materials
- 1 outer pot or container (this holds the water reservoir)
- 1 inner pot that fits inside the outer pot (this holds the soil and plant)
- Wicking material, choose one:
- Cotton cord (thicker works better)
- Felt strip
- Microfiber strip
- Potting mix (use potting mix, not heavy garden soil)
- Herb plant or starter plugs (basil, mint, parsley, thyme)
- Optional upgrades:
- Small clear window cutout to check water level
- Decorative stones for a clean top finish
- Label or metal marker
Tools
- Scissors
- Drill with a small bit, or a heated nail for plastic containers
- Ruler or measuring tape
- Marker
- Small funnel or watering can
The “why it works” in plain language
The wick pulls water up from the reservoir. The soil stays evenly damp instead of swinging between flood and drought. Herbs love consistency. You also avoid splashing soil onto leaves, which helps reduce weird spotting and fungus issues.
Steps (do this in order, it saves headaches)
- Choose the right container combo. The inner pot needs to sit inside the outer pot with space at the bottom for water. Aim for about 1 to 2 inches of reservoir depth.
- Add wick holes to the inner pot. If your inner pot already has drainage holes, you’re good. If not, add 3 to 5 small holes in the bottom.
- Install the wick. Thread the cord or felt through a bottom hole so 3 to 4 inches hangs below the inner pot into the reservoir. Leave enough wick inside the pot to reach into the soil.
- Set a “no-sog” barrier. Place a small spacer inside the outer pot if the inner pot sits directly in water. You want the wick to touch water, not the soil sitting in water.
- Fill the inner pot with potting mix. Potting mix lets air reach roots. Heavy soil packs tight and invites rot.
- Plant the herbs. Nestle the plant, then gently firm the soil. Do not crush it.
- Prime the system. Water from the top once to fully wet the soil and activate the wick. A common mistake beginners make is skipping this, then they blame the wick for being “broken.”
- Fill the reservoir. Pour water into the outer pot reservoir, then set the inner pot in place.
- Test over 24 hours. Touch the top inch of soil. It should feel lightly damp, not soaked. Adjust wick thickness if needed.
Pro-Tips (this is how you avoid root rot and sad basil)
- Prime the soil once from the top. The wick works better after the soil wets evenly.
- Match wick to pot size. Bigger pot, thicker wick. Tiny wick, thirsty plant.
- Do not overfill. Keep water below the inner pot base. Let the wick do the work.
- Use a light potting mix. Roots need air as much as they need water.
- Pick herbs wisely. Basil and parsley love steady moisture. Rosemary prefers drier soil, so use a thinner wick or keep the reservoir lower.
Common mistakes and quick fixes
- Soil stays soggy
- Likely cause: Wick too thick, reservoir too high, or dense soil
- Fix: Lower the water level, swap to a thinner wick, and switch to lighter potting mix if needed
- Prevention next time: Keep a 1 inch air gap between water level and pot base
- Soil stays dry
- Likely cause: Wick too thin, wick not touching water, or you never primed the soil
- Fix: Re-thread wick so it touches water, top-water once to prime, upgrade to thicker cord
- Prevention next time: Prime and test within 24 hours
- Algae smell in the reservoir
- Likely cause: Sunlight hits the water
- Fix: Use an opaque outer pot, and rinse reservoir weekly
- Prevention next time: Block light from the reservoir
- Fungus gnats show up
- Likely cause: Constantly wet top layer
- Fix: Let the top inch dry slightly, top with a thin layer of sand or small stones
- Prevention next time: Do not oversize the wick
Finish + care (so it stays lovely, not gross)
- Cleaning: Rinse the reservoir every 1 to 2 weeks, especially in warm weather.
- Refill habit: Refill when the reservoir hits low, do not let it fully dry out for long.
- How long it lasts: The planter lasts years. Replace wicks when they stiffen or get funky.
- Refresh tip: Once a season, flush the soil with plain water from the top to reduce mineral buildup.
Quick care card text you can include
- “Refill reservoir weekly, top-water once per month to flush minerals, rinse reservoir every 2 weeks.”
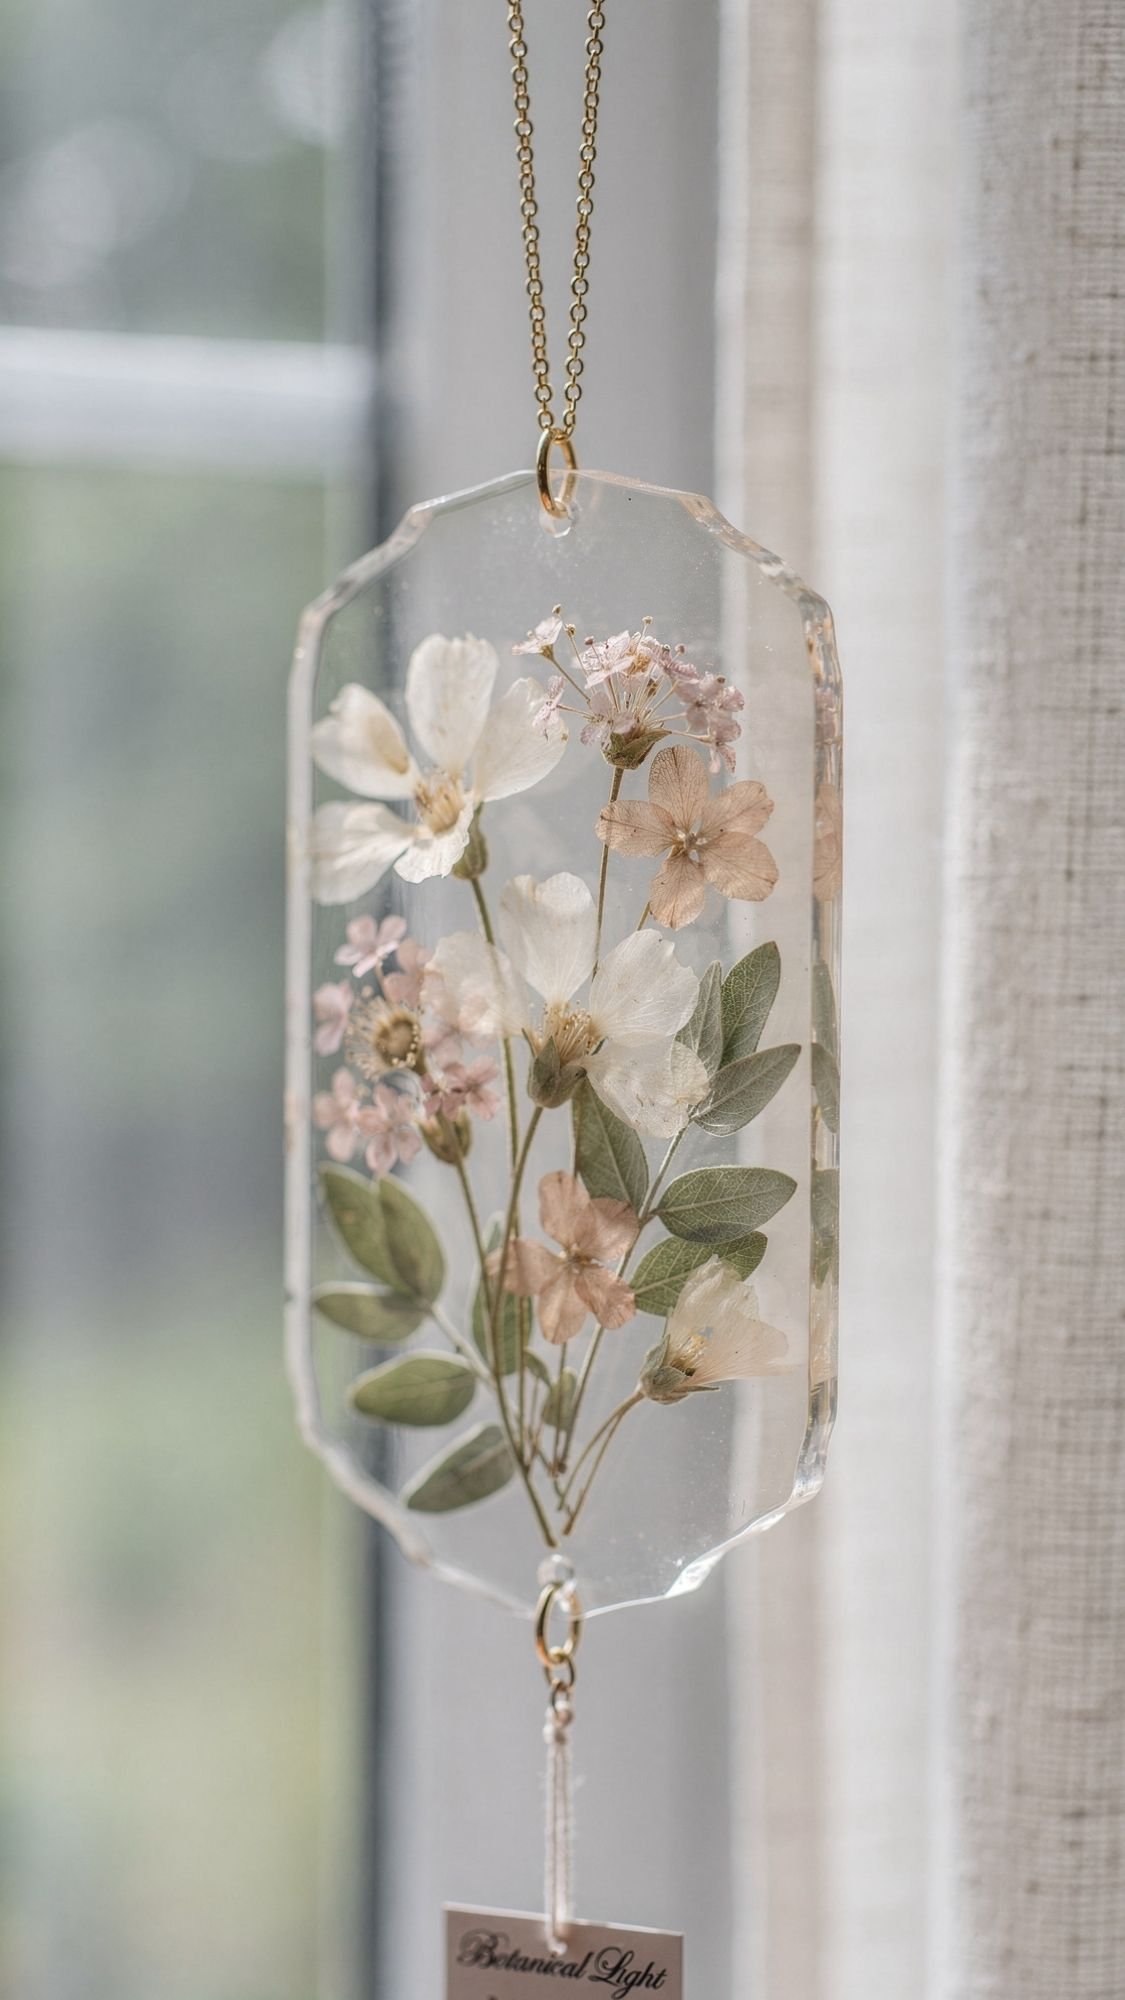
6) Pressed Flower Resin Suncatcher: botanical, modern, and honestly looks expensive
This is the project that makes people say, “Wait, you made that?” because it looks like a boutique find. The secret is not fancy resin, it’s drying your botanicals properly and keeping your pour clean. Ever seen resin that turns cloudy or flowers that brown? That usually happens because moisture sneaks in, and resin hates moisture like it pays rent.
In my workshop, I’ve found the best results come from thin pours and fully dried flowers, plus a dust-free curing spot. Simple, but not optional.
Why she’ll love it
- It catches light and looks gorgeous near a window or porch.
- You can use flowers from her garden, which makes it personal.
- It works as decor even if she already owns every garden tool known to humanity.
Time, Cost, Skill
- Time: 1 to 2 hours hands-on, plus curing time
- Cost: Medium
- Skill level: Intermediate, mostly because resin rewards patience
Materials
- Clear casting resin (follow the brand’s exact mix ratio)
- Silicone mold (circle, arch, or hex looks modern)
- Fully dried pressed flowers or leaves
- Mixing cups and stir sticks
- Gloves
- Rubbing alcohol in a fine mist spray bottle (for bubbles, if your resin allows)
- Jump ring or small screw eye + chain or clear fishing line for hanging
- Optional: gold foil flakes for a luxe touch
Tools
- Heat gun or small torch (optional, used carefully)
- Tweezers
- Level surface (seriously, use a level if you have one)
- Wax paper or silicone mat to protect your workspace
Steps (clean workflow, less chaos)
- Dry your botanicals completely. Press them until they feel papery and crisp. If they feel cool or flexible, they still hold moisture.
- Prep your mold and layout. Place flowers in the mold dry first and take a quick photo. This becomes your “map” when resin gets slippery.
- Mix resin slowly. Stir deliberately and scrape the sides. Fast stirring whips in bubbles, and bubbles ruin the glassy look.
- Pour a thin base layer. This helps flowers stay in place instead of floating like they’re trying to escape.
- Place botanicals with tweezers. Press them gently into the base layer. Do not trap air under petals.
- Pour the top layer. Pour slowly from one side so resin flows over the flowers smoothly.
- Pop bubbles carefully. Use a brief pass of heat or a light mist of alcohol if your resin instructions allow it. Too much heat can warp the mold or scorch delicate petals.
- Cover and cure. Cover with a clean container to block dust. Cure on a level surface for the full time.
- Demold and finish edges. If edges feel sharp, sand lightly, then wipe clean.
- Add hanging hardware. Attach a jump ring or drill a small hole if your mold doesn’t include one.
Pro-Tips (the difference between cloudy and crystal clear)
- Dry flowers fully. Moisture causes cloudiness and browning.
- Warm resin bottles slightly. A warm water bath can make resin flow better and reduce bubbles, but keep the cap closed and never overheat.
- Pour thin layers. Thick pours trap bubbles and shift botanicals.
- Cover while curing. Dust lands in resin like it’s magnetized, I swear.
Common mistakes and quick fixes
- Resin looks cloudy
- Likely cause: Moisture in flowers, cold resin, or high humidity
- Fix: Use fully dried botanicals, warm resin slightly, and pour thinner layers
- Prevention next time: Store pressed botanicals with silica packets before casting
- Flowers float to the top
- Likely cause: Base layer too thin or not tacky enough
- Fix: Let the base layer thicken slightly before placing flowers, or pour in two stages
- Prevention next time: Use a tacky base layer and tweezers for placement
- Bubbles around petals
- Likely cause: Air trapped underneath
- Fix: Use tweezers to press petals down gently, then do a quick bubble-release pass
- Prevention next time: Place botanicals slowly and press from the center outward
- Sticky spots after curing
- Likely cause: Incorrect resin ratio or under-mixing
- Fix: Let it cure longer if the brand allows, or do a thin flood coat on top after correct mixing
- Prevention next time: Measure precisely and stir slowly but thoroughly
Finish + sealing + care (keep it pretty long-term)
- Cure time vs dry time: It can feel dry on top but still be curing inside. Wait the full cure time before wrapping it as a gift.
- Cleaning: Wipe with a microfiber cloth. Avoid harsh cleaners.
- Longevity: Keep it out of direct blazing sun all day if you want maximum clarity over time.
- Refresh tip: If it ever dulls, buff lightly with a plastic polish and a soft cloth.
Add a tiny care card
- “Hang in bright light, wipe with microfiber, avoid harsh cleaners.”

7) Propagation Station With Test Tubes: the “new plant baby” factory
If your mom loves plants, she probably also loves making more plants. Propagation stations turn that habit into decor, which feels like a win-win. You get a clean display that sits on a windowsill, and she gets to stare at roots growing like it’s reality TV. Ever caught yourself checking roots every day like they’re going to do something dramatic overnight? Same.
In my workshop, I’ve found that propagation stations fail in two main ways: wobbly tubes and wood that warps from moisture and window heat. We’ll build it so it stays stable and looks polished.
Why she’ll love it
- It makes plant propagation feel organized and pretty.
- It works for pothos, philodendron, tradescantia, monstera nodes, herbs like mint, and more.
- It looks gift-worthy even if she already owns 47 pots.
Time, Cost, Skill
- Time: 45 to 90 minutes
- Cost: Medium
- Skill level: Beginner to intermediate
Materials
- Small wood board for the base (hardwood looks luxe, pine works too)
- 2 smaller wood pieces for sides, or one single “stand” piece depending on design
- Glass test tubes (3 to 6 tubes, depending on width)
- Wood glue
- Sandpaper (120, 180, 220 grit)
- Exterior-grade clear finish for durability, especially near windows and humidity
- Optional upgrades:
- Brass screws or brass feet
- Small engraved plaque, “Mom’s Prop Lab” (keep it tasteful)
Tools
- Drill and bit sized for your test tubes
- Clamps (very helpful)
- Measuring tape and pencil
- Level or straight edge
- Paintbrush or foam brush for finish
- Clean lint-free cloth
Design choices (so it looks modern and stays steady)
Pick one style based on your tools:
- Style A: Single solid wood block with holes drilled for tubes (clean, minimal).
- Style B: Two side supports + top bar that holds tubes (more “display stand” vibe).
- Style C: Wood base + acrylic front for an extra modern look (optional).
For most readers, Style A is the easiest and looks the most expensive.
Steps (Style A: drilled block, clean and strong)
- Measure tube diameter carefully. Use the tube itself to measure, do not guess. A common mistake beginners make is drilling too wide, then tubes wobble forever.
- Mark hole placement. Keep at least 1 inch between holes so the wood stays strong. Use a straight edge so they line up clean.
- Drill slowly and straight. Drill halfway, back out to clear dust, then drill again. This prevents burning and keeps holes cleaner.
- Test fit. Tubes should slide in snugly, not jam. If too tight, sand the inside edge lightly.
- Sand the whole piece. Work up through grits. Smooth wood is what makes it look store-bought.
- Seal all sides. In my workshop, I’ve found that sealing only the top invites warping. Moisture hits one side, the wood reacts, and then your “minimalist stand” turns into a tiny banana.
- Let finish cure fully. Dry-to-touch is not the same as cured. Let it harden before inserting tubes and filling with water.
- Insert tubes and style. Fill tubes with water, add cuttings, and do a final wipe-down.
Pro-Tips (this is what makes it last and look luxe)
- Seal every surface, including the underside. This reduces warping near windows and sinks.
- Use a finish meant for moisture and sunlight. Window ledges and plant stations get both.
- Add felt feet. It stops sliding and protects counters.
- Keep the design simple. The plants become the star, your job is to make the stand look clean.
Common mistakes and quick fixes
- Tubes wobble
- Likely cause: Holes drilled too large
- Fix: Wrap tube neck with a thin clear silicone ring, or add a neat cork collar insert
- Prevention next time: Drill a test hole in scrap first
- Wood warps over time
- Likely cause: You sealed unevenly or not at all
- Fix: Let it dry flat, lightly sand, reseal all sides evenly
- Prevention next time: Seal every side before use
- Finish looks streaky
- Likely cause: Too thick a coat or over-brushing
- Fix: Lightly sand with 220 grit and apply a thin, even coat
- Prevention next time: Use thin coats and let each dry properly
- Water rings appear
- Likely cause: Finish not fully cured or not water resistant
- Fix: Sand lightly and recoat with a more durable clear finish
- Prevention next time: Give full cure time before use
Finish + care (so Mom does not have to baby it)
- Cleaning: Wipe wood with a damp cloth, dry right away. Wash tubes separately.
- Water changes: Encourage weekly refresh to prevent funky water smells.
- Longevity: A sealed stand lasts years. Recoat the finish if it dulls or shows wear.
- Refresh tip: Lightly sand and recoat once a year if it lives in a sunny window.
Mini care card text
- “Change water weekly, wipe stand dry, keep out of standing puddles.”
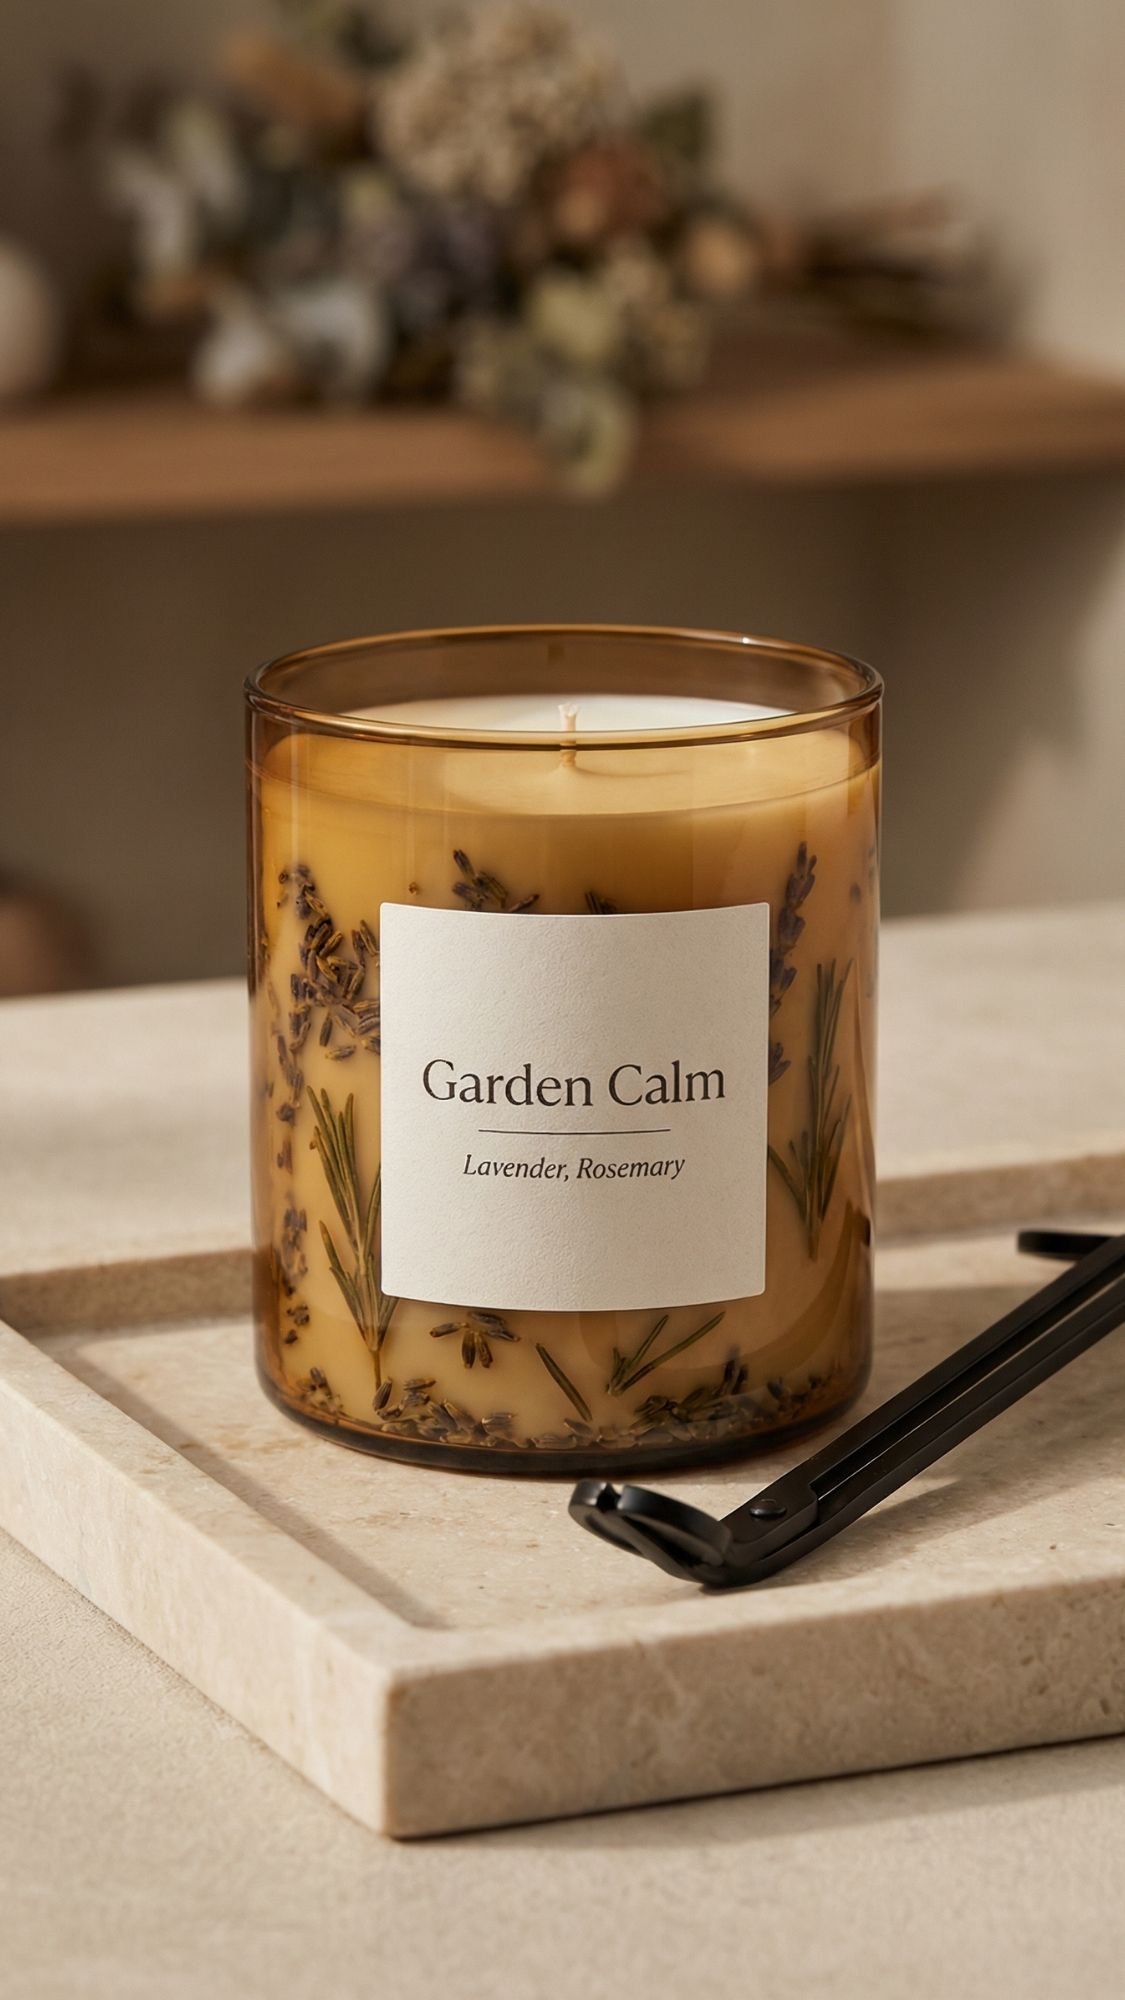
8) Botanical Soy Candle With Dried Herbs: garden vibes indoors, no mud required
This is the “she’ll light it and think of you” kind of gift. It also works when your mom can’t garden because it’s winter, raining, or her back said “not today.” The key is making it look botanical and luxe without turning it into a fire hazard. Yes, we want pretty. No, we do not want a candle that acts like a tiny bonfire.
In my workshop, I’ve found most candle issues come from two things: wrong wick size and overloading botanicals. Keep the decor near the sides, keep the burn path clean, and you’ll get a candle that looks expensive and burns like it should.
Why she’ll love it
- It brings the garden inside with a cozy scent.
- It looks high-end when you use an amber jar and a clean label.
- You can customize the scent to match her garden style.
Time, Cost, Skill
- Time: 60 to 90 minutes, plus set time
- Cost: Medium
- Skill level: Beginner, if you measure and stay focused
Materials
- Soy wax flakes
- Candle-safe fragrance oil or essential oil blend (check usage rates)
- Amber glass jar or ceramic vessel (8 to 12 oz is ideal for gifting)
- Wick (cotton or wood wick), sized for your jar diameter
- Wick sticker or hot glue dot
- Wick centering tool (or chopsticks)
- Dried botanicals, keep it simple:
- Lavender buds
- Rosemary sprigs
- Rose petals
- Optional luxe add-ons:
- Minimal label
- Kraft dust cover
- Wax seal on the lid
Tools
- Double boiler or wax melting pitcher
- Thermometer (helps a lot)
- Scale for measuring wax and fragrance
- Heat-safe spoon
- Paper towels
Steps (clean, safe, and actually works)
- Prep your jar. Clean it, then stick your wick dead center. Center matters, because off-center wicks tunnel and burn unevenly.
- Measure wax by weight. Weighing prevents “why is my jar half full” moments.
- Melt wax slowly. Use a double boiler setup. Slow heat reduces scorching and helps smoother tops.
- Add fragrance at the right temp. Stir gently but thoroughly. Too hot can flash off scent, too cool can bind poorly.
- Pour wax into the jar. Pour slowly to minimize bubbles. Keep the wick centered.
- Add botanicals only near the edges. Do not sprinkle botanicals around the wick. Keep the burn path clean. This is the pro move that keeps it safe.
- Let it set undisturbed. No moving it around. No poking it. Let it cool slowly for a smooth top.
- Trim wick and finish. Trim to about 1/4 inch for cotton wicks. Add label and care card.
Pro-Tips (so it burns clean and looks boutique)
- Match wick size to jar diameter. If the wick is too small, you get tunneling. Too big, it burns too hot.
- Keep botanicals away from flame. Place them along the glass sides for that botanical look without risk.
- Pour at a steady pace. It helps avoid frosting and rough tops.
- Label it like a brand. Simple name, scent notes, and a burn guide.
Common mistakes and quick fixes
- Candle tunnels
- Likely cause: Wick too small or first burn too short
- Fix: Do a foil wrap “chimney” to help the melt pool reach edges, then reassess wick size
- Prevention next time: Choose correct wick, and do a longer first burn
- Top looks rough or bumpy
- Likely cause: Poured too cool or cooled too fast
- Fix: Quick heat gun pass on top to smooth it
- Prevention next time: Cool slowly, avoid drafts
- Sooty flame
- Likely cause: Wick too large or wick not trimmed
- Fix: Extinguish, trim, relight
- Prevention next time: Trim before every burn
- Weak scent
- Likely cause: Not enough fragrance, or added at wrong temp
- Fix: Adjust fragrance load next batch within safe limits
- Prevention next time: Add fragrance at recommended temp and weigh everything
Finish + care (this makes it feel high-end)
Cure vs dry, plain language
- It can look set in a few hours, but the scent throws better after it cures. Let it sit 24 to 48 hours before gifting if you can.
Care card text you can copy-paste
- “Trim wick to 1/4 inch. Burn until the top melts edge-to-edge on the first burn. Keep botanicals away from the flame.”
How long it lasts
- An 8 oz soy candle typically gives many hours of burn time, but wick size and burn habits matter.
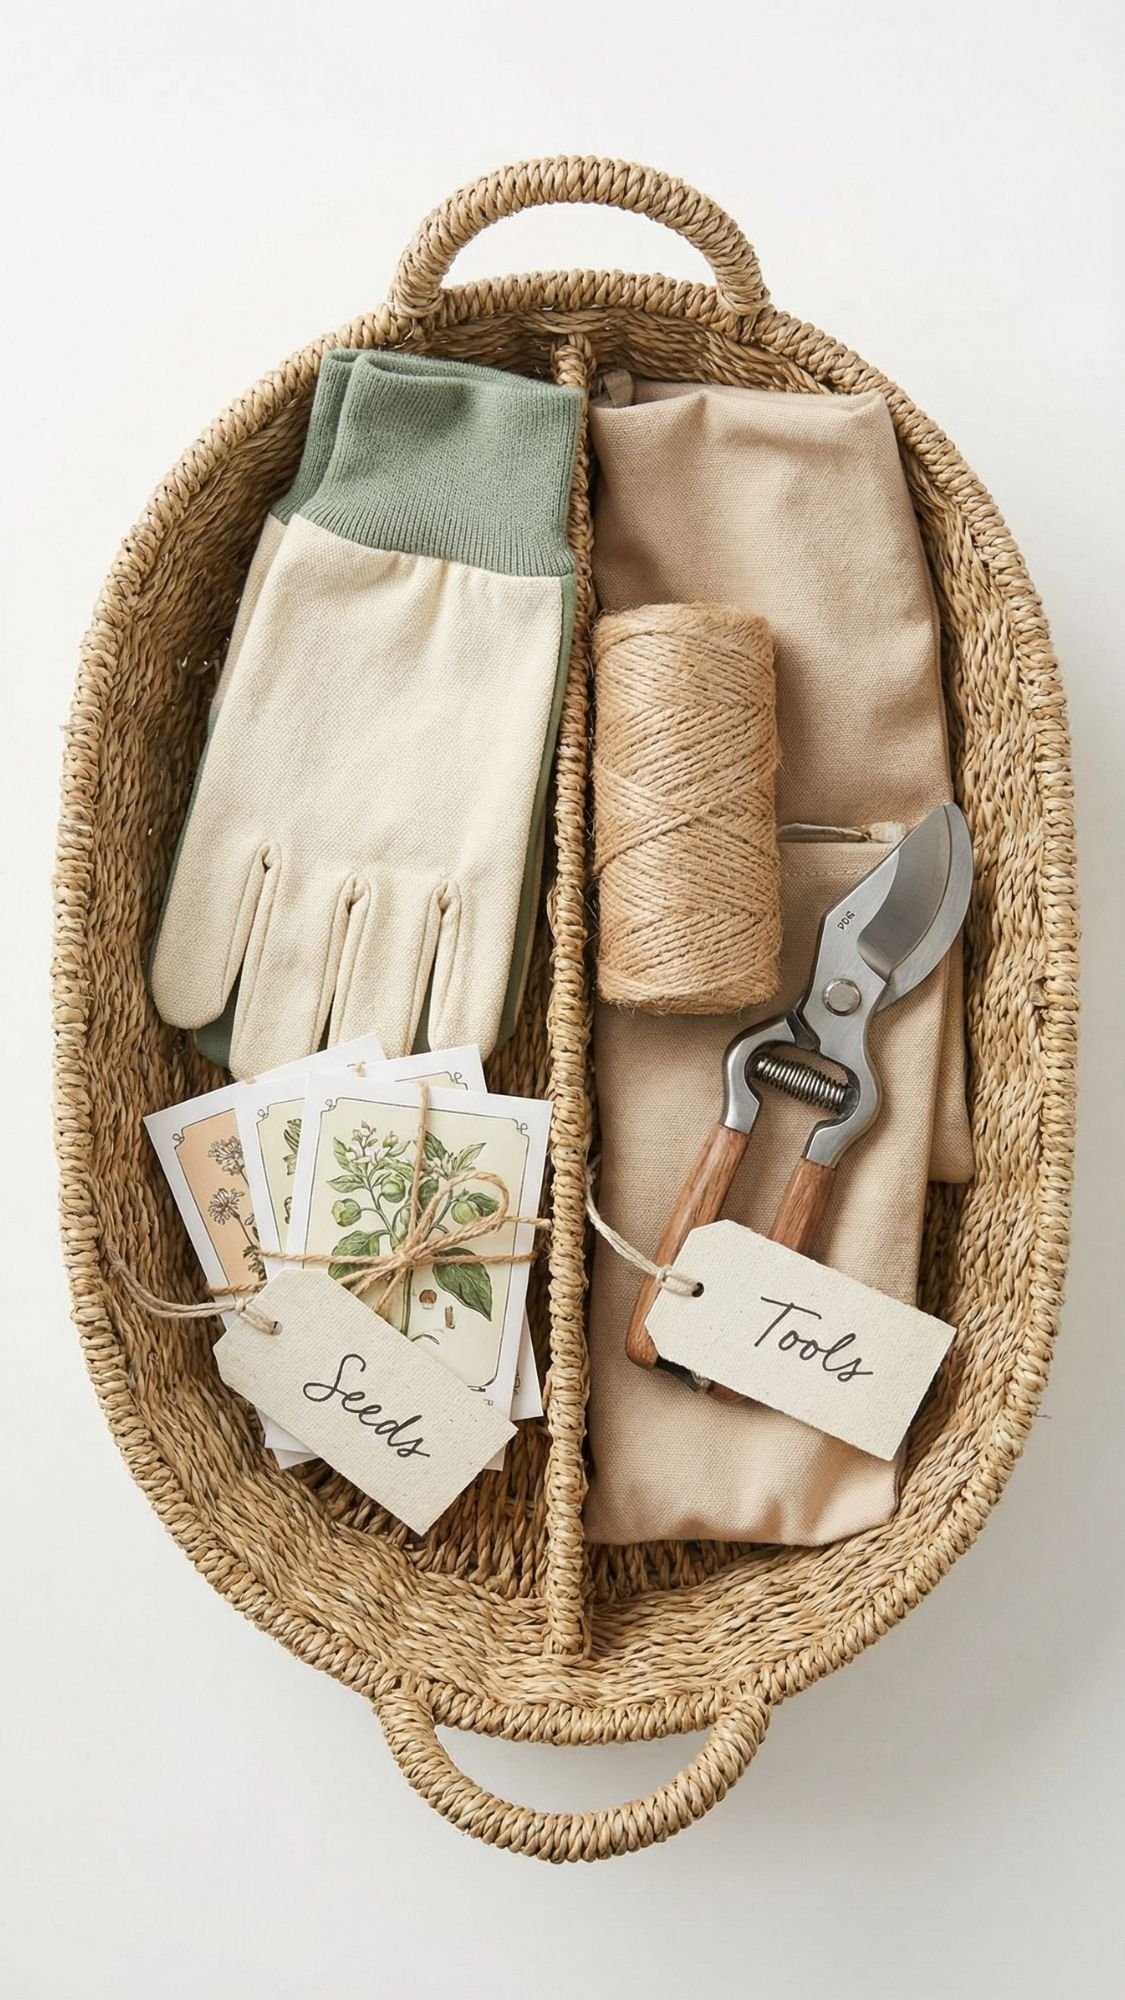
9) “Garden Basket” Tool Organizer: pretty, practical, and stops the tool chaos
This gift is for the mom who always has garden stuff scattered in three different places. Gloves on the porch. Pruners in the kitchen drawer. Seed packets in a mystery pile. The organizer basket fixes that without feeling like you gifted her a chore. It also looks adorable sitting by the back door, which matters because garden moms love function, but they also love cute.
In my workshop, I’ve found the biggest mistake with organizer gifts is making them too “open.” If everything sits in one big bin, it turns into a junk basket in a week. The secret is simple sections so each item has a home.
Why she’ll love it
- She grabs one basket and has everything she needs.
- It keeps small items from disappearing into the void.
- You can style it to match her garden vibe, modern, farmhouse, boho, you name it.
Time, Cost, Skill
- Time: 30 to 60 minutes
- Cost: Low to medium
- Skill level: Beginner
Materials
- Sturdy basket or caddy (wood, woven, or metal)
- Small fabric pouches or canvas zipper bags
- Cardstock or faux leather for labels
- Linen twine or small clips
- Optional upgrades:
- Mini spray bottle
- Hand cream
- Plant ties
- Seed packet set
Tools
- Scissors
- Hot glue gun or fabric glue
- Hole punch
- Marker or label maker
- Optional: rivets or grommet kit for a luxe label look
Steps (fast but not sloppy)
- Choose a basket that can handle dirt. Look for sturdy, wipeable, and not too delicate. If it collapses when you lift it, it is not the one.
- Plan sections before you attach anything.
- Decide on 3 zones:
- Tools: pruners, trowel, snips
- Soft stuff: gloves, kneeler pad
- Tiny stuff: plant ties, tags, seed packets
3. Add pouches for small items. Attach 2 to 3 pouches inside the basket with glue or clips. Seed packets need their own lane or they will vanish.
4. Make labels that do not look homemade in a bad way. Cut clean rectangles, punch holes, tie with twine. Keep the font simple if you print them.
5. Build the “bonus bundle.”
- Add a small gift moment inside:
- A seed packet set
- A tiny pair of snips
- Hand balm
- A roll of jute twine
6. Do a carry test. Pick it up like a real person. Shake it gently. If pouches flop around, secure them more.
Pro-Tips (how you stop it from becoming a junk basket)
- Make zones. One big bucket becomes chaos fast.
- Use one “tiny stuff” pouch with a zipper. Plant ties and tags love to escape.
- Add a wipeable liner. A scrap of oilcloth or vinyl inside makes it easy to clean.
- Keep it lightweight. If it gets too heavy, she will not use it.
Common mistakes and quick fixes
- Basket feels cluttered immediately
- Likely cause: Too many items, no sections
- Fix: Remove extras, add pouches and zones
- Prevention next time: Start with essentials only
- Pouches fall off
- Likely cause: Weak glue or dusty surface
- Fix: Clean surface, use stronger adhesive, add a few stitches if fabric allows
- Prevention next time: Rough up slick surfaces slightly before gluing
- Labels curl or bend
- Likely cause: Thin paper
- Fix: Use thicker cardstock or faux leather tags
- Prevention next time: Punch holes cleanly and store away from moisture
Finish + care (so it stays cute)
- Wipe basket down after muddy days.
- Empty and shake out once a month, that keeps it from becoming a soil storage unit.
- Replace labels as needed, or upgrade to stamped metal tags if you want them permanent.
Care card text you can include
- “Keep by the door. Refill seed pouch as needed. Wipe liner clean after muddy projects.”
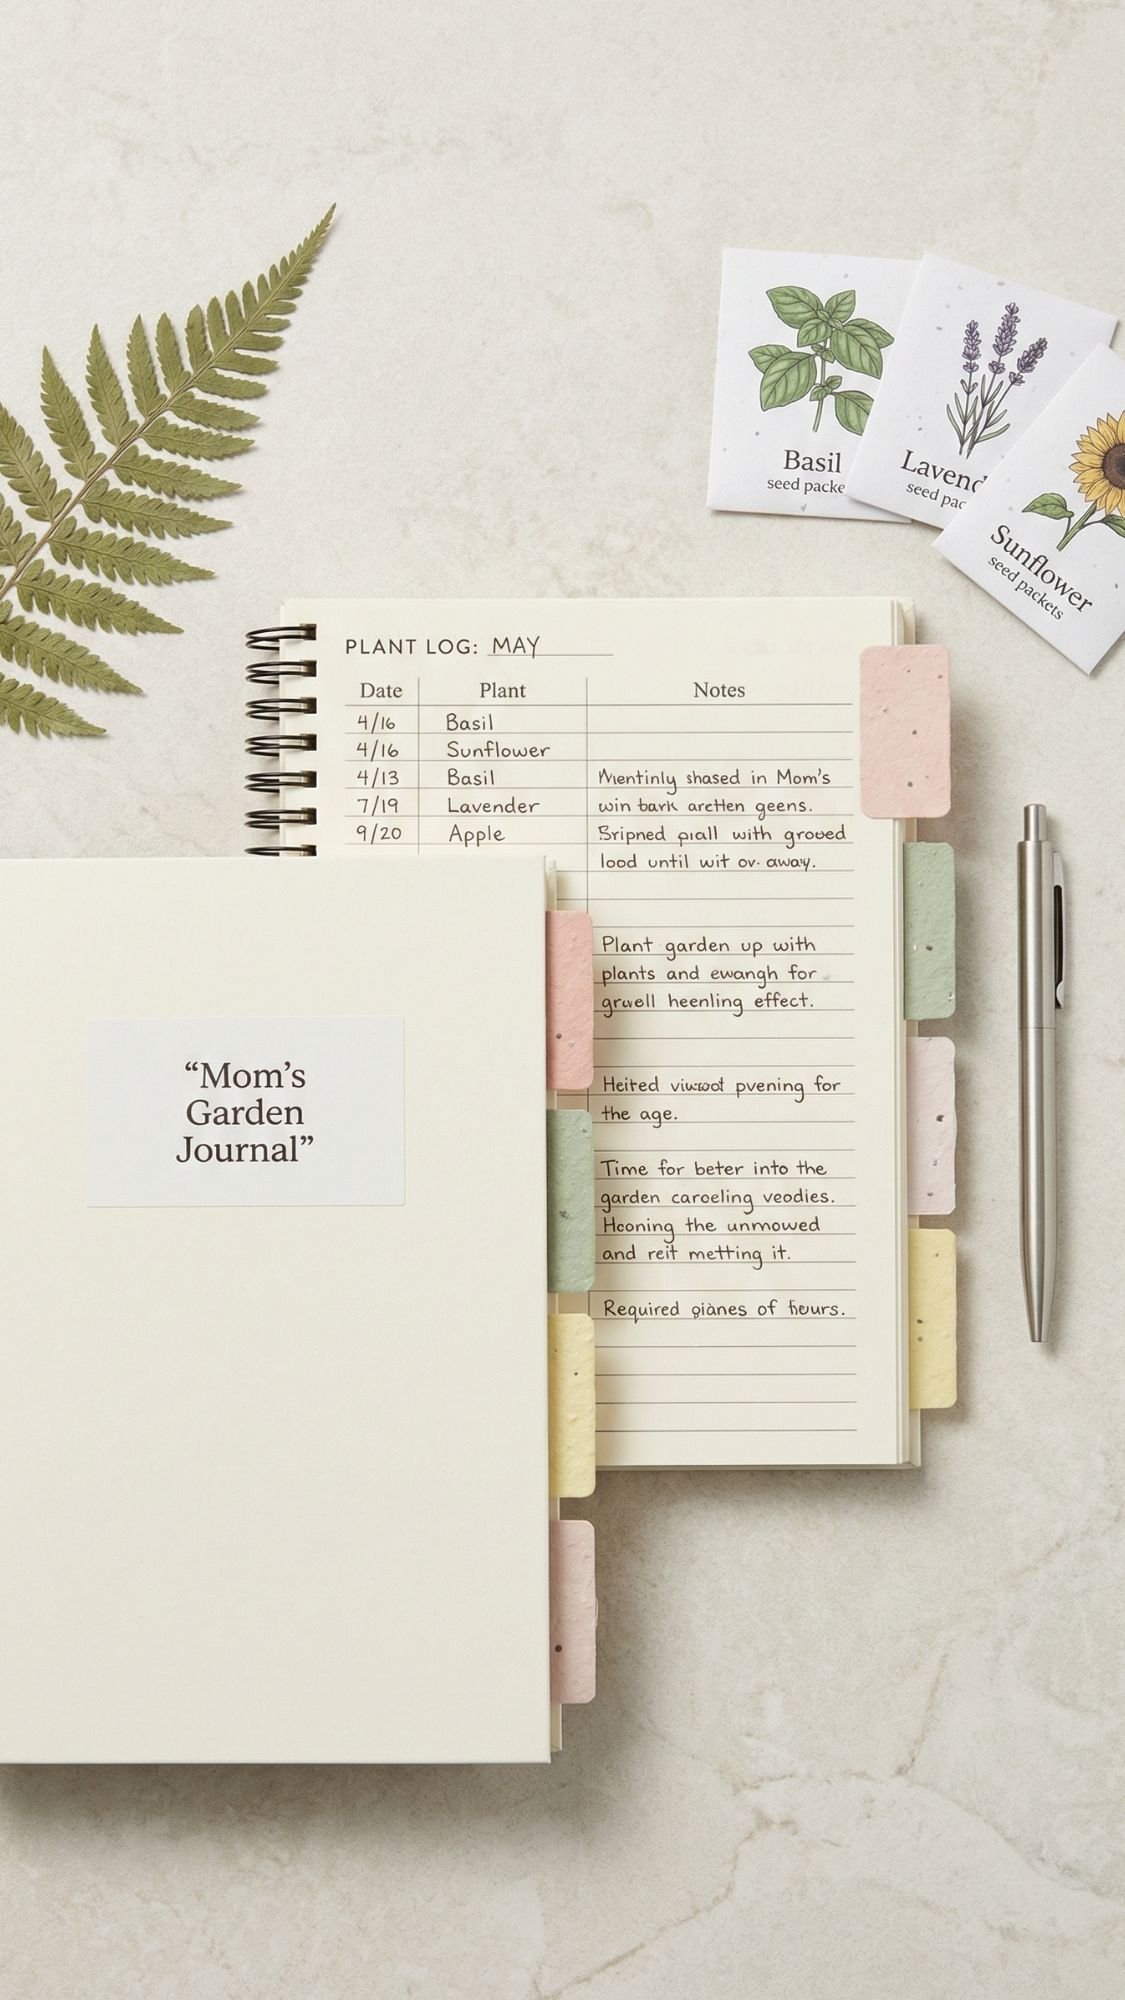
10) Custom Garden Journal With Plantable Page Tabs: memory keeping, but make it useful
Garden moms love tracking things, even if they pretend they don’t. When did she start the tomatoes? Which bed got hit by aphids? Why did the basil thrive in one pot but sulk in the other? A garden journal turns all those “hmm” moments into a system. The plantable tabs make it extra fun, because the journal still lasts, but the little extras grow later. Ever wished you could time travel to last spring and remember what actually worked? This is that, minus the sci-fi.
In my workshop, I’ve found journals stay used when they feel easy and pretty. If it looks like homework, it gets abandoned.
Why she’ll love it
- She tracks planting dates, frost notes, pest issues, and wins.
- It helps her garden better each season, not just guess.
- The plantable tabs feel thoughtful and special without being wasteful.
Time, Cost, Skill
- Time: 45 to 90 minutes
- Cost: Low to medium
- Skill level: Beginner
Materials
- Blank notebook or binder (A5 or 8.5×11, whatever she’ll actually use)
- Plantable seed paper (store-bought or your DIY batch from Gift #1)
- Cardstock divider pages (optional, makes it feel premium)
- Clear pockets or envelopes (for seed packets and plant tags)
- Washi tape or linen tape
- Label stickers or printable labels
- Optional upgrades:
- Elastic band closure
- Corner protectors
- A pen loop
Tools
- Scissors or paper trimmer
- Hole punch (if using a binder)
- Glue stick or double-sided tape
- Ruler
- Marker or printer
What to include inside (so it’s actually helpful)
Keep it structured but simple. Here’s the layout I recommend because it stays usable:
- Garden Overview page
- Zones, sun patterns, what grows where
- Plant Log pages
- Plant, variety, date started, date transplanted, notes
- Watering and feeding notes
- What you used, how often, what worked
- Pest and problem tracker
- Symptom, what you tried, result
- Harvest notes
- What you picked, when, and how it tasted
A common mistake beginners make is adding too many sections. She needs easy pages she will fill out, not a binder that looks like a business plan.
Steps (simple build, luxe results)
- Choose your notebook format. If she loves lists, use a bound notebook. If she likes flexibility, use a binder.
- Add divider tabs.
- Cut sturdy cardstock dividers and label them:
- “Plans”
- “Plant Log”
- “Problems”
- “Harvest”
- “Notes”
3. Make plantable page tabs. Cut small strips of seed paper and attach them to divider edges with double-sided tape. Keep them small so the journal stays durable.
4. Add pockets for practical stuff. Stick an envelope or clear pocket inside the cover for seed packets, tags, or receipts.
5. Create a one-page quick reference.
- Add a front page that lists:
- Last frost date range
- Sun patterns
- Watering reminders
- Favorite seed sources
6. Personalize the cover. Add a clean label like “Mom’s Garden Journal” and the year.
Pro-Tips (this is what makes it feel expensive)
- Use plantable paper for tabs, not the whole notebook. The journal should last, the tabs are the fun bonus.
- Use a consistent label style. One font, one color palette, clean spacing.
- Add a pen loop. Tiny upgrade, huge usability.
- Slip in one care card. A simple “how to use this journal” page makes it feel complete.
Common mistakes and quick fixes
- Tabs rip off
- Likely cause: Weak adhesive or tabs too large
- Fix: Use stronger double-sided tape and trim tabs smaller
- Prevention next time: Reinforce with a strip of linen tape over the tab edge
- Journal feels bulky
- Likely cause: Too many dividers and inserts
- Fix: Remove extras and keep only the sections she’ll use weekly
- Prevention next time: Start minimal, she can add pages later
- Seed paper tabs curl
- Likely cause: Humidity or thin paper
- Fix: Press tabs flat under a book overnight, add linen tape reinforcement
- Prevention next time: Store seed paper dry and attach with a reinforced edge
Finish + care
- Store it indoors, away from damp potting areas.
- Replace plantable tabs each season if she plants them.
- If pages get dirty, wipe cover with a damp cloth and let air dry.
Mini “how to use” card text
- “Fill the Plant Log once a week. Use the Problems page anytime something looks off. Harvest notes help you repeat what worked.”
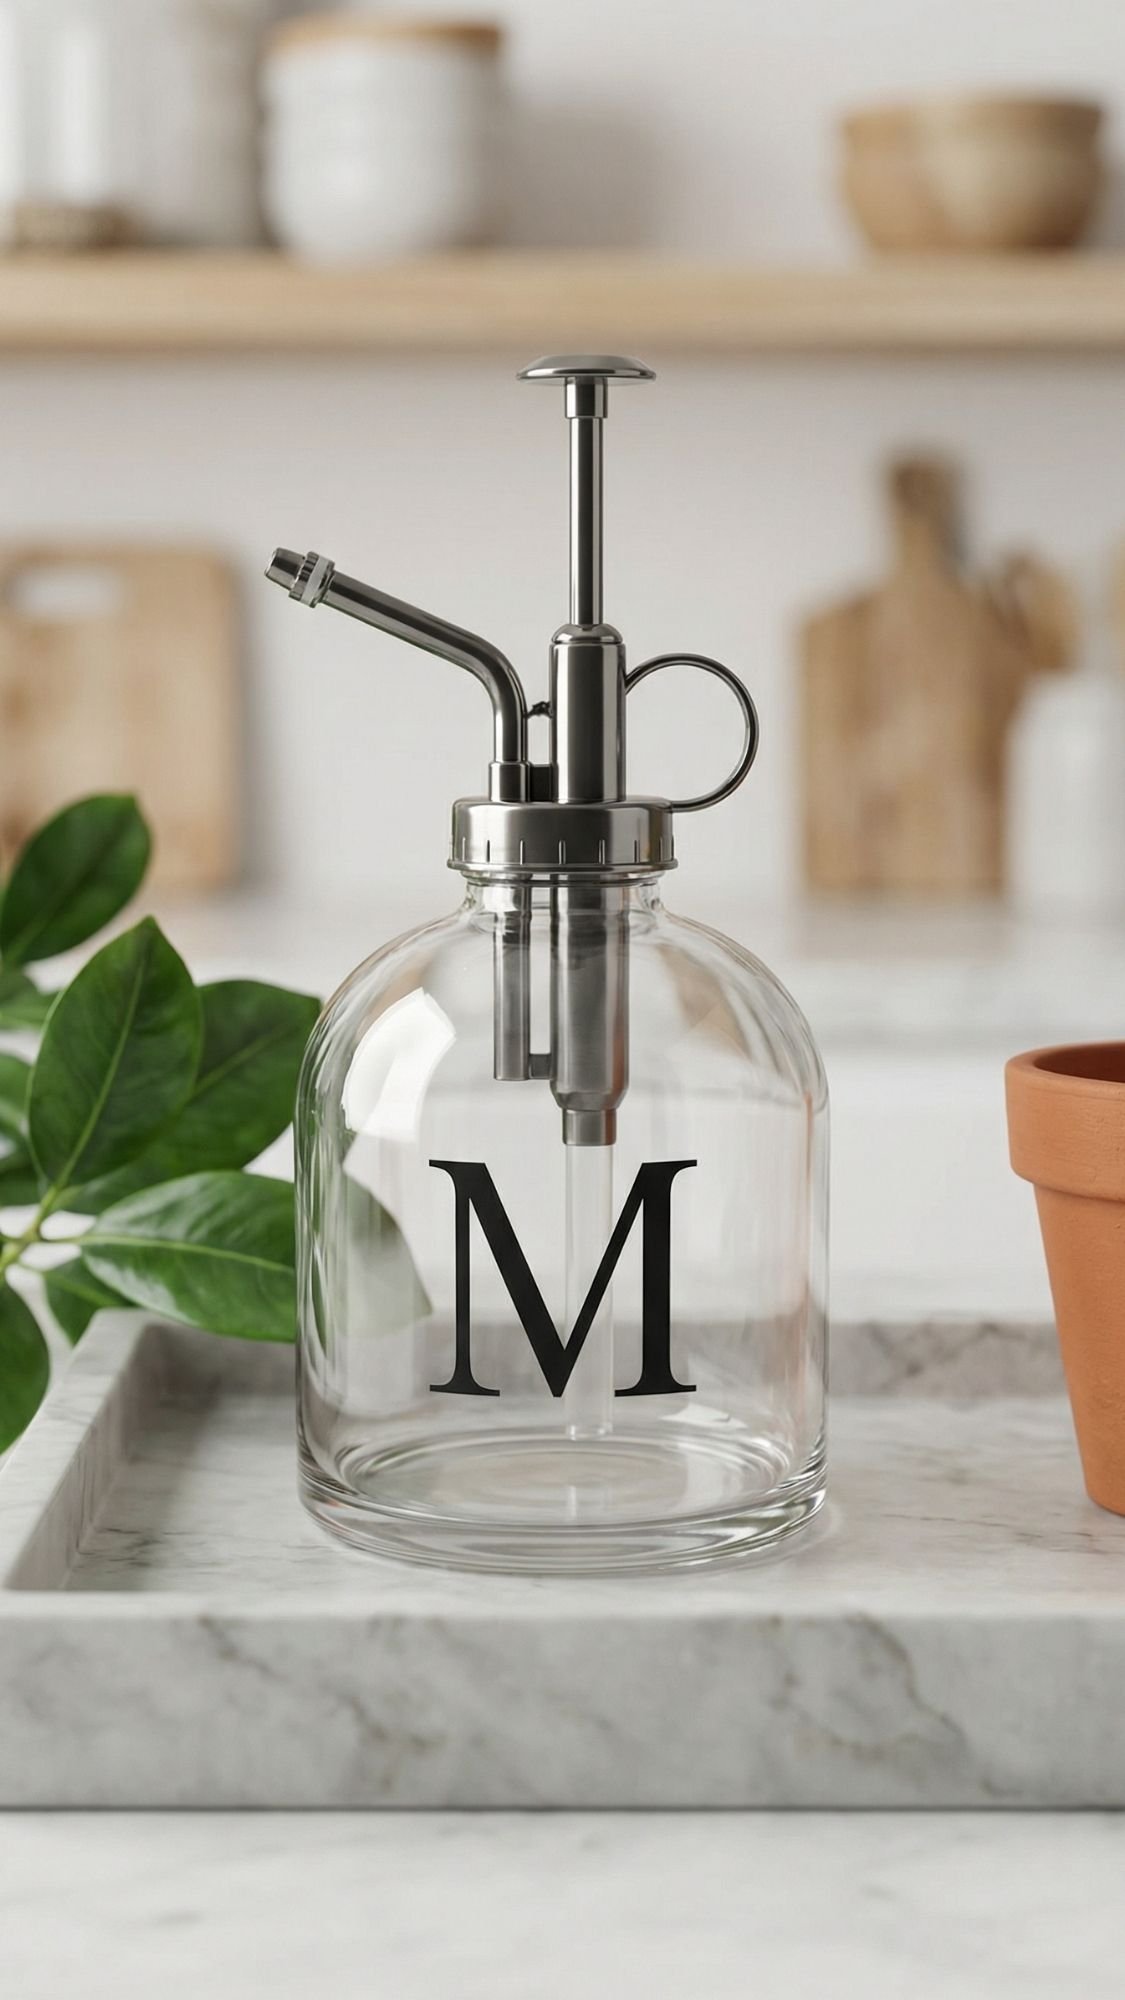
11) Monogrammed Plant Mister Bottle: small gift, big delight
This is the kind of gift that feels simple but looks so polished sitting on a windowsill. A good mister makes plant care feel a little fancy, and the monogram turns it into something she’ll keep out instead of shoving in a cabinet. Ever noticed how the “tiny” gifts can be the ones she uses every single day? This is one of those.
In my workshop, I’ve found the only thing that ruins this project is sloppy prep. Vinyl and paint do not stick to fingerprints. They just don’t. Clean the surface like you mean it and you’ll get that crisp, boutique finish.
Why she’ll love it
- It’s cute, functional, and easy to grab for houseplants or seedlings.
- The monogram feels personal without being cheesy.
- It works as a last-minute gift that still looks intentional.
Time, Cost, Skill
- Time: 20 to 40 minutes
- Cost: Low
- Skill level: Beginner
Materials
- Glass plant mister bottle (clear or tinted)
- Permanent vinyl or glass paint pen (choose one)
- Transfer tape (if using vinyl)
- Rubbing alcohol
- Optional upgrades:
- Minimal label with scent, like “Rose Water Mist” (if she uses it)
- Small leather or faux leather tag tied at the neck
- Gold or black trigger top for a luxe look
Tools
- Scissors or craft knife
- Squeegee card or an old gift card
- Tweezers (helpful for small letters)
- Microfiber cloth
- Optional: hair dryer for gentle warming during application
Steps (vinyl method, cleanest result)
- Clean the bottle thoroughly. Wipe with rubbing alcohol and a microfiber cloth. Let it dry fully.
- Decide placement before you commit. Hold the bottle at arm’s length and mark a tiny guide dot with a dry-erase marker where the center should be.
- Apply the vinyl. Use transfer tape to place the monogram, then smooth from the center outward.
- Burnish edges. Press firmly around edges so water exposure doesn’t lift it later.
- Remove transfer tape slowly. Pull back at a low angle. If vinyl lifts, press it back down and burnish again.
- Optional seal step. If the bottle will get heavy handling or frequent wiping, add a light clear sealant that’s safe for glass surfaces, or skip sealing and rely on good vinyl.
Paint pen method (if you want a hand-done look)
- Clean glass with alcohol.
- Practice the letter on paper first.
- Draw the monogram in one confident motion.
- Let it cure fully before touching or washing.
A common mistake beginners make is trying to “fix” paint pen lines while wet. That’s how you make it worse. Let it dry, then correct gently.
Pro-Tips (so it stays stuck and looks crisp)
- Clean with alcohol first. Always. No shortcuts.
- Warm the glass slightly. A little warmth helps vinyl conform smoothly, especially on curved bottles.
- Choose simple fonts. Thin swirly scripts can lift faster and look messy if you’re not perfect.
- Let it rest. Give vinyl 24 hours before heavy handling so adhesive fully bonds.
Common mistakes and quick fixes
- Vinyl won’t stick
- Likely cause: Oils or residue on the glass
- Fix: Remove vinyl, clean again with alcohol, reapply with fresh vinyl
- Prevention next time: Avoid touching the area after cleaning
- Bubbles under vinyl
- Likely cause: You pressed unevenly
- Fix: Use a pin to pop tiny bubbles and smooth outward
- Prevention next time: Burnish from center out slowly
- Edges lift after a few days
- Likely cause: You didn’t burnish edges or handled too soon
- Fix: Press edges down firmly, warm slightly, and burnish again
- Prevention next time: Let it cure 24 hours before use
- Paint pen smears
- Likely cause: Not cured, or wrong pen for glass
- Fix: Wipe off fully with alcohol and redo
- Prevention next time: Use glass-safe paint markers and allow full cure time
Finish + care (so it lasts)
- Hand wash only if possible, avoid soaking the label area.
- Wipe with a damp cloth, do not scrub aggressively.
- If vinyl starts lifting later, replace it easily, that’s the beauty of this gift.
Mini care card text
- “Wipe clean, avoid soaking the monogram area, refill with water as needed.”
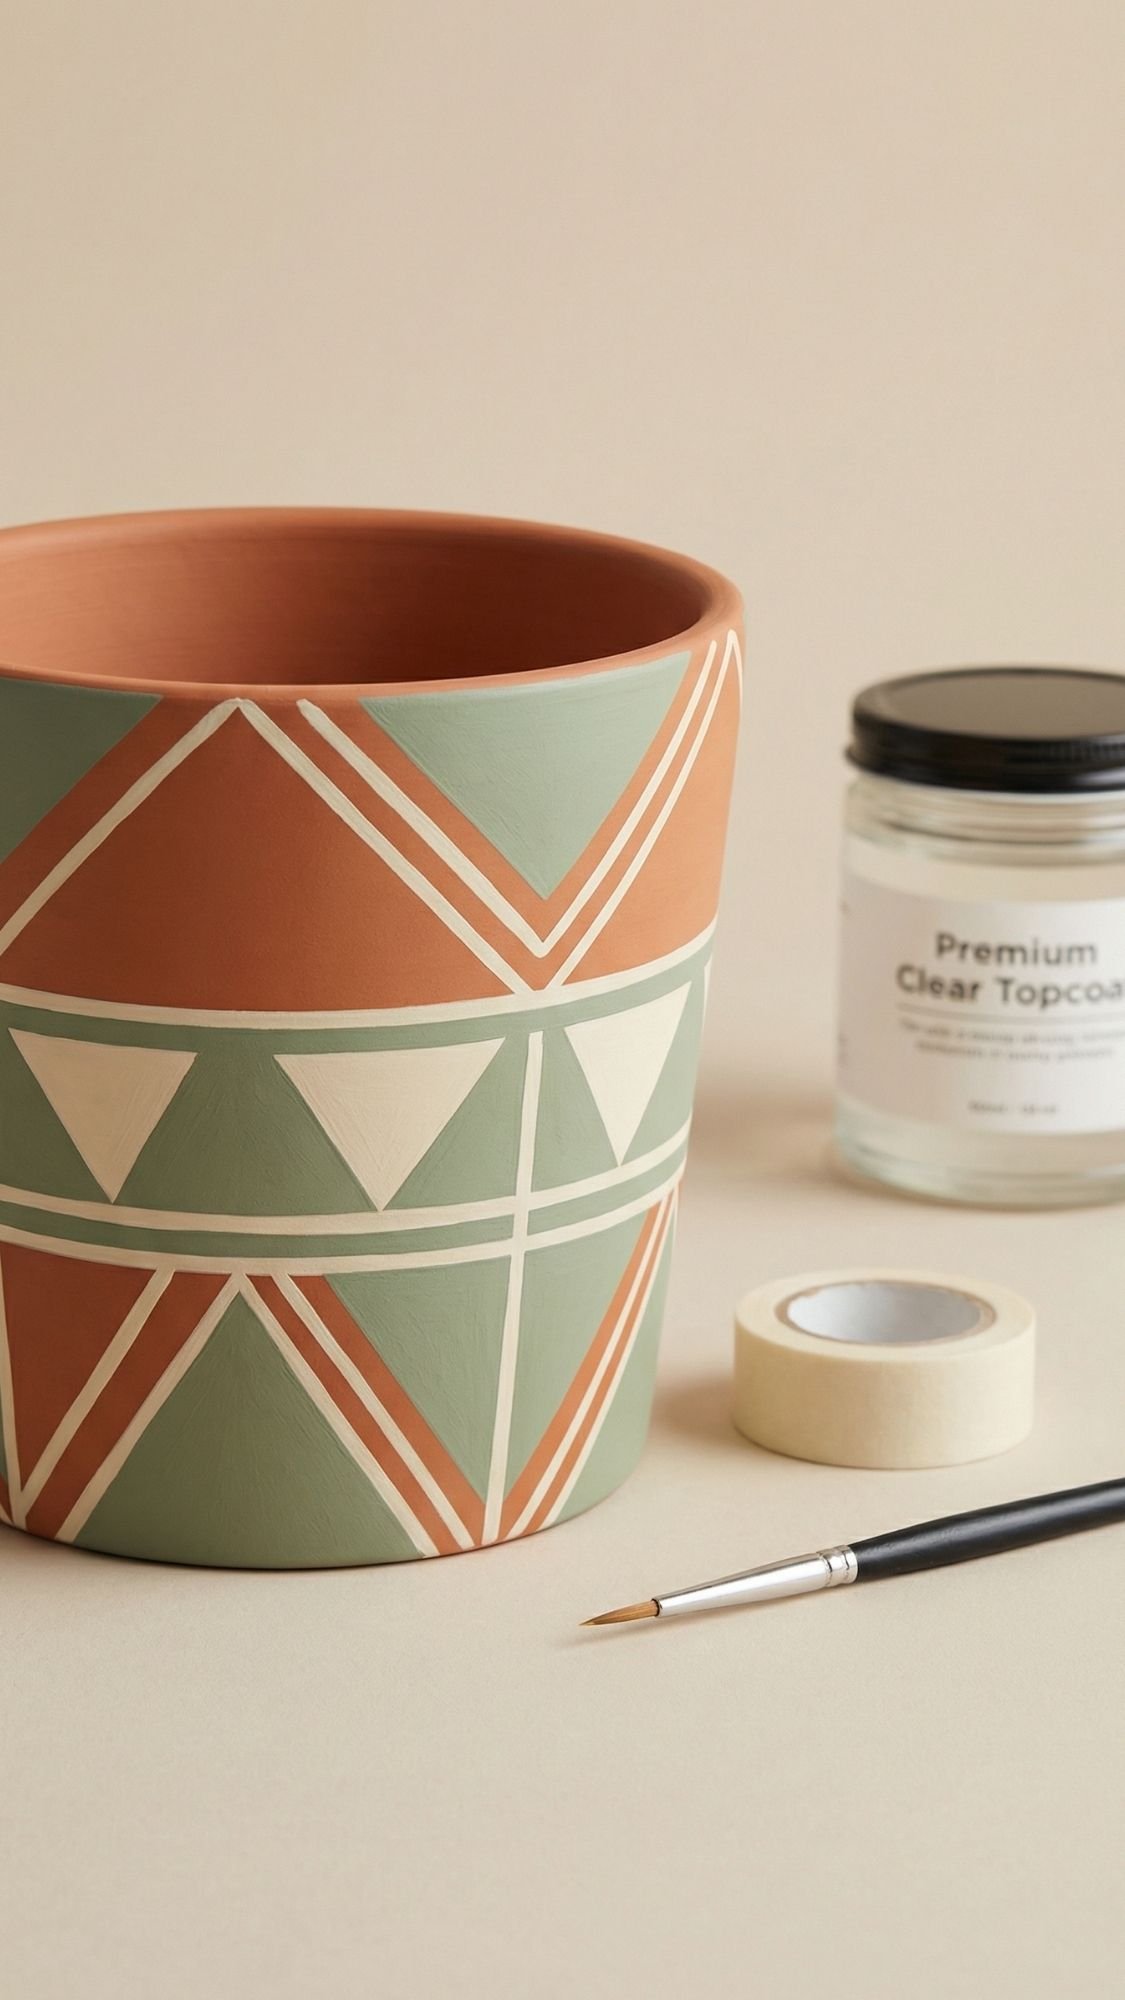
12) Outdoor-Safe Painted Terracotta Pot: done the right way, not the peeling way
Okay, this one comes with a public service announcement. Painted terracotta can look stunning, but it also loves to betray you if you rush it. Terracotta is porous, so it pulls moisture through the pot wall. If your paint and sealer can’t handle that, the finish lifts, bubbles, or peels, usually right after you gift it. Cute.
In my workshop, I’ve found the winning formula is prep + cure time + the right outdoor finish. If you treat it like a real outdoor item, it holds up. If you treat it like a cute indoor craft, it fails.
Why she’ll love it
- It’s functional and decorative, the best combo.
- You can match her garden style, modern, boho, farmhouse, glam.
- It becomes a “signature pot” she’ll reuse every season.
Time, Cost, Skill
- Time: 1 to 2 hours hands-on, plus dry and cure time
- Cost: Low
- Skill level: Beginner to intermediate
Materials
- Terracotta pot + saucer
- Mild soap and water
- Sandpaper (120 and 220 grit)
- Exterior primer (best for tricky surfaces)
- Exterior paint (acrylic works well for designs)
- Painter’s tape (for crisp lines)
- Exterior-grade clear topcoat made for sun and moisture exposure
- Optional upgrades:
- Stencil
- Gold paint pen for detail
- Cork feet to lift pot slightly for drainage airflow
Tools
- Paintbrushes (one flat, one detail)
- Foam brush for topcoat
- Tack cloth or lint-free rag
- Drop cloth
- Timer, because cure times matter
The “why” behind the process (so it doesn’t peel)
Terracotta absorbs water. When the pot gets wet, moisture tries to move outward through the clay. If your paint layer and clear coat don’t fully cure, or if you used the wrong finish, moisture lifts the coating from the clay like a sticker.
So the goal is simple: help the layers bond well, and give them enough time to harden.
Steps (this is the durable version)
- Clean the pot and let it dry fully. Wash off dust and clay residue, then dry 24 hours if possible. Painting a damp pot causes problems later.
- Lightly sand the surface. Sanding gives the primer “tooth” to grab onto. Wipe dust off completely.
- Prime with an exterior primer. Thin, even coat. Let it dry per label instructions.
- Paint your design in thin layers. Thin layers dry more evenly and resist cracking. If you use tape, press edges down firmly for crisp lines.
- Let paint dry, then let it cure. Dry-to-touch is not cure. Cure means the paint hardens and becomes more water resistant. Humidity and temperature affect this a lot, so be patient.
- Seal with an exterior clear topcoat. Use a thin coat, let it dry, then add another. Two to three thin coats protect better than one thick coat.
- Cure again before planting. This is where most people rush. Let it harden before you introduce constant moisture from soil and watering.
Pro-Tips (this is what keeps it from looking DIY in a bad way)
- Thin coats always win. Thick paint chips and cracks.
- Keep tape lines crisp. Pull tape off while paint is slightly tacky, not fully dry, for cleaner edges.
- Seal the rim and upper sides well. That area gets the most splash and sun.
- If you want it extra durable, keep the inside unpainted. The outside looks pretty, the inside stays breathable.
Common mistakes and quick fixes
- Paint peels after watering
- Likely cause: Painted on a damp pot, no primer, or sealed too soon
- Fix: Sand back to firm edges, clean dust, re-prime, repaint, reseal after proper cure
- Prevention next time: Let the pot dry fully and allow cure time
- Bubbles under the clear coat
- Likely cause: You sealed before paint cured, or applied too thick
- Fix: Let it cure longer, sand lightly, recoat thinly
- Prevention next time: Thin coats and patience
- Tape bleeds under edges
- Likely cause: Tape not burnished or paint too wet
- Fix: Touch up with a small detail brush
- Prevention next time: Burnish tape edges and use thinner paint layers
- Finish looks streaky
- Likely cause: Overbrushing or thick sealer coat
- Fix: Light sand with 220 grit, apply a thin final coat with a foam brush
- Prevention next time: Thin, even coats, minimal brushing
Finish + care (so it stays pretty outside)
- Cure time vs dry time, simple version:
- Dry means you can touch it. Cure means it’s tough enough to handle water and sun without getting weird.
- Cleaning: Wipe with a damp cloth, no harsh scrubbing.
- Longevity: Expect to refresh the clear coat seasonally if it lives in strong sun.
- Refresh tip: Lightly sand and add one thin topcoat at the start of each spring.
Mini care card text
- “Let cure before planting. Avoid soaking the pot for long periods. Refresh clear coat yearly for best durability.”
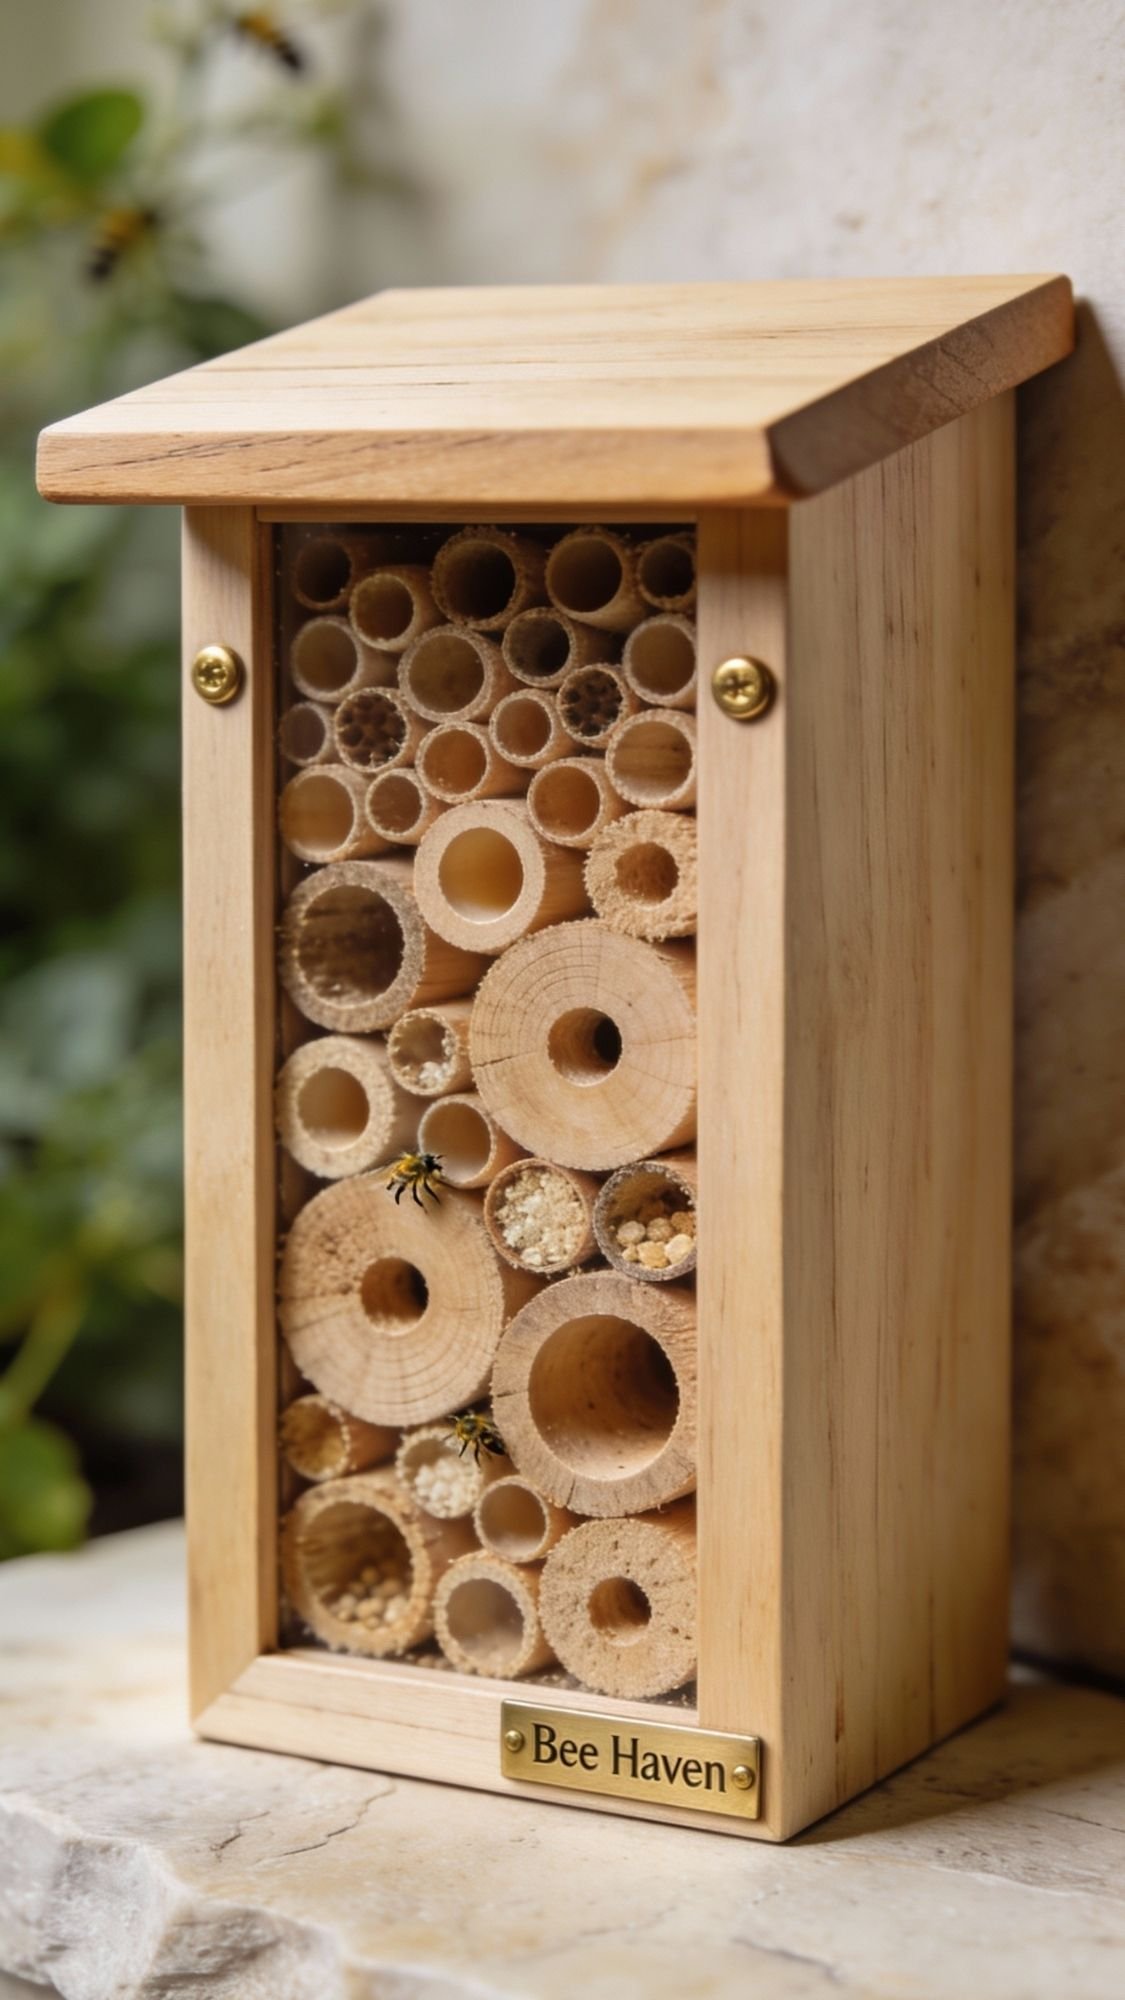
13) DIY Bee Hotel: pollinator-friendly, backyard-approved
This is the gift for the mom who cheers for bees like they’re a sports team. A well-built bee hotel gives solitary bees a safe place to nest, and it also looks adorable in the garden. But here’s the real talk, a sloppy bee hotel can attract the wrong guests or turn into a mess if you pack it with random “filler” like pinecones. In my workshop, I’ve found that the best bee hotels look simple because they follow a few very specific rules, smooth tunnels, correct sizes, and materials that stay dry.
Why she’ll love it
- She supports pollinators in a hands-on way.
- It doubles as garden decor.
- She gets to observe nesting behavior up close, which feels weirdly calming.
Time, Cost, Skill
- Time: 60 to 120 minutes
- Cost: Low to medium
- Skill level: Intermediate beginner
Materials
- Untreated wood block, at least 4 inches thick, or a small log section (avoid treated lumber)
- Bamboo, reeds, or paper tubes with one closed end (optional alternate nesting option)
- Exterior wood screws or strong wood glue
- Small roof piece (scrap wood or shingles) to keep rain off
- Sandpaper (120 and 220 grit)
- Optional upgrades:
- Removable tube inserts for easier cleaning
- A simple hanging bracket
Tools
- Drill
- Drill bits in a range of sizes
- Tape measure and pencil
- Clamp (helpful)
- Countersink bit or rolled sandpaper for smoothing entrances
The sizing that actually matters (and why)
Most cavity-nesting solitary bees prefer tunnels in a specific range. If you drill holes too big, bees ignore them. If you drill too shallow, you leave brood more exposed.
Use these proven ranges as your guide:
- Hole diameter: about 3/32 inch to 3/8 inch (roughly 2.5 mm to 10 mm)
- Hole depth: about 3 to 6 inches, and longer tunnels work better for some species
- Tube lengths: about 6 to 8 inches for cut stems, cut close to a node so one end stays closed
Also, keep tunnel edges smooth. Bees avoid rough entrances because splinters mess with their wings.
Steps (simple build, smart details)
- Choose your wood block and plan your layout. Keep holes at least 3/4 inch from edges so the wood doesn’t split.
- Mark your drill pattern and vary sizes. Mix bit sizes across the face, and stagger placements so bees can find their own tunnel more easily.
- Drill holes cleanly and straight. Drill 3 to 6 inches deep, and clear sawdust as you go so holes stay smooth.
- Smooth every entrance. Use a countersink bit or rolled sandpaper to remove splinters at the opening.
- Add a roof and keep it dry. Rain ruins nesting material and encourages mold, so give it a little overhang.
- Mount it in a smart spot. Put it in a sunny, sheltered location, ideally facing south or southeast so it warms up early in the day.
- Skip the “filler décor.” Do not stuff pinecones, moss, bark, or random fluff in there. Bees don’t use it, and it can attract unwanted pests.
Pro-Tips (the stuff most cute Pinterest versions ignore)
- Keep the hotel reasonably sized. Huge hotels can concentrate pests and parasites. Some extension resources recommend keeping total tunnels under about 100.
- Offer removable tubes if you can. Cleaning gets easier, and your hotel stays healthier long-term.
- Avoid plastic straws and PVC tubes. Plastic can trap moisture and encourage fungal problems.
- Make it easy to mount solidly. A wobbly hotel annoys bees, and it annoys moms too.
Common mistakes and quick fixes
- Bees ignore the hotel
- Likely cause: Holes too large, too shallow, or rough entrances
- Fix: Add a new drilled block with correct sizes and smooth openings
- Prevention next time: Drill within the recommended diameter and depth ranges, and sand entrances smooth
- Moldy tubes
- Likely cause: Hotel stays damp, or you used moisture-trapping materials
- Fix: Move to a more sheltered spot, swap tubes for breathable materials
- Prevention next time: Add a roof, avoid plastic tubes
- Wood splits
- Likely cause: Holes drilled too close to edges
- Fix: Replace the block, or cut down to a thicker section
- Prevention next time: Start holes at least 3/4 inch from edges
Finish + care (so it stays safe and useful)
- Seasonal check: Look for damaged tubes and replace them.
- Cleaning mindset: Removable tubes help you manage debris and reduce problems over time.
- Longevity: A solid untreated wood block lasts multiple seasons if you keep it dry and sheltered.
- Refresh tip: Swap tubes yearly if they look grimy, and keep the roof intact.
Mini care card text
- “Hang in a sunny, sheltered spot. Replace damaged tubes. Keep it dry.”

14) Herb Drying Bundle Hanger: garden-to-kitchen, but still cute
This is the gift for the mom who harvests herbs like she’s starring in a cozy cooking show. A drying hanger keeps bundles organized, improves airflow, and stops the “herbs drying on every doorknob in the house” situation. It also looks really pretty on a pantry wall or in a kitchen nook. Ever grabbed a bundle of herbs to dry, then found mold a few days later? That usually happens because bundles sit too tight with not enough airflow. We’re fixing that.
In my workshop, I’ve found the hanger works best when it’s simple, sturdy, and spaced correctly. Fancy is optional. Function is not.
Why she’ll love it
- She dries herbs neatly without cluttering counters.
- It makes harvesting feel like a ritual, not a mess.
- It doubles as decor, especially if she likes cottage vibes.
Time, Cost, Skill
- Time: 30 to 60 minutes
- Cost: Low
- Skill level: Beginner
Materials
- Wooden board or dowel (12 to 24 inches long)
- 4 to 8 hooks (brass looks luxe, black looks modern)
- Screws appropriate for your board thickness
- Sandpaper (180 and 220 grit)
- Clear finish or wood oil (choose based on indoor use)
- Linen twine for tying herb bundles
- Optional upgrades:
- Small engraved label, “Herb Drying”
- Decorative end caps for the dowel
- A small drip tray below if she dries messy herbs
Tools
- Drill and small pilot bit
- Measuring tape and pencil
- Level
- Screwdriver
- Clamps (helpful)
- Brush or rag for finishing
Spacing rules (so herbs dry, not rot)
Spacing makes or breaks this project.
- Keep hooks 2 to 3 inches apart for small bundles.
- For thicker bundles like rosemary, give 3 to 4 inches.
- Tie bundles small. If you make them too thick, the center traps moisture.
A common mistake beginners make is tying big “Instagram bundles.” They look cute, but they dry unevenly and can mold. Smaller bundles dry faster and stay cleaner.
Steps (simple, clean build)
- Sand the board or dowel. Smooth wood instantly looks more expensive.
- Mark hook placement. Use a ruler and pencil, keep spacing consistent.
- Drill pilot holes. Pilot holes prevent splitting and keep hooks straight.
- Install hooks. Tighten until secure, do not over-torque and strip the wood.
- Apply finish. One to two thin coats. Let it dry fully before mounting.
- Mount it level. Use wall anchors if needed. A tilted rack makes everything look sloppy.
- Tie herbs into small bundles. Tie snugly near the stems, leave airflow between bundles.
Pro-Tips (how to make it look like a boutique piece)
- Use brass hooks and a neutral stain for a luxe kitchen vibe.
- Add a small nameplate instead of big lettering, subtle looks expensive.
- Mount near airflow, not above the stove. Heat and steam make drying weird.
- Harvest at the right time. Morning after dew dries gives the best flavor, not late afternoon when herbs can taste more bitter.
Common mistakes and quick fixes
- Herbs mold
- Likely cause: Bundles too thick or not enough spacing
- Fix: Re-bundle smaller and increase spacing
- Prevention next time: Tie smaller bundles and leave airflow gaps
- Rack pulls away from wall
- Likely cause: Weak anchors or heavy bundles
- Fix: Use proper anchors, mount into studs if possible
- Prevention next time: Reinforce mounting points
- Hooks feel crooked
- Likely cause: No pilot holes or uneven drilling
- Fix: Remove and reinstall with pilot holes
- Prevention next time: Measure twice, drill once
Finish + care
- Dust occasionally, wipe with a slightly damp cloth, dry immediately.
- Replace twine as it gets grimy.
- Herbs usually dry in 1 to 2 weeks depending on humidity, so remind her to store them once they crumble easily.
Mini care card text
- “Tie bundles small, keep airflow between them, store dried herbs in airtight jars.”
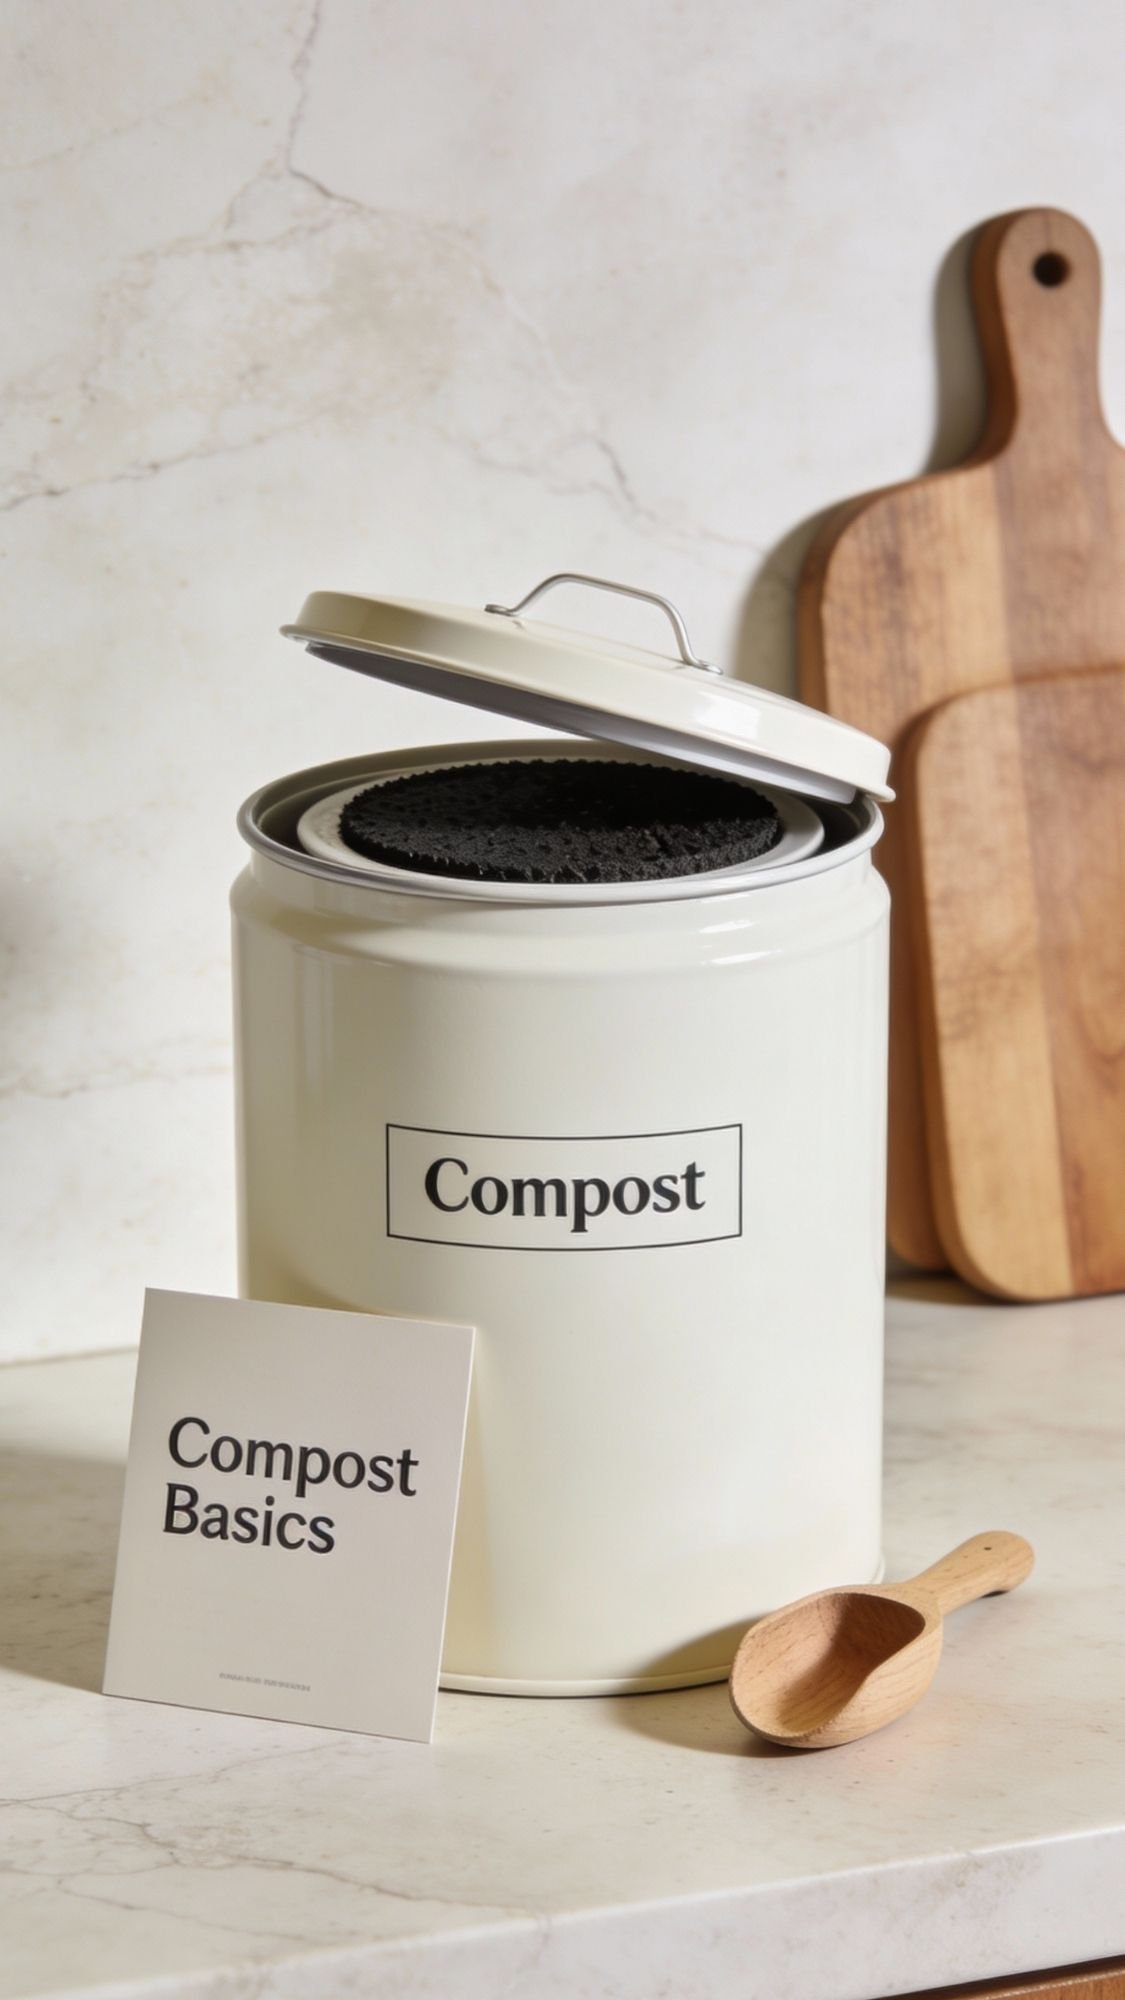
15) Countertop Compost Jar “Starter Kit”: cute, not stinky, and actually usable
This gift is for the mom who loves the garden-to-kitchen loop. Compost turns scraps into soil gold, but most people quit because their first setup smells funky or attracts fruit flies. So we’re building a starter kit that looks clean on the counter and works in real life. Ever opened a compost container and regretted your choices immediately? Same. The fix is airflow plus odor control, and a simple routine.
In my workshop, I’ve found the difference between “I love this” and “this lives outside now” is the lid setup. You want a container that seals well, but also has an odor solution like a charcoal filter.
Why she’ll love it
- It supports her garden habits without feeling messy.
- It looks sleek on the counter, not like a trash can.
- You can gift it with a little “kit” vibe, which feels thoughtful.
Time, Cost, Skill
- Time: 20 to 40 minutes
- Cost: Low to medium
- Skill level: Beginner
Materials
- Countertop compost container or jar with lid (stainless, ceramic, or glass)
- Charcoal filter disk or activated charcoal pouch
- Small scoop or wooden spoon
- Compostable liner bags (optional)
- Label (vinyl, chalk label, or engraved tag)
- Optional upgrades:
- Mini “what can compost” guide card
- Citrus peels or dried lavender sachet for the gift basket vibe
- Silicone base ring to prevent sliding
Tools
- Scissors
- Rubbing alcohol (for label prep)
- Vinyl tools or paint pen (if labeling)
- Hole punch (if you add a hanging tag)
Steps (quick, but keep it polished)
- Choose a container that fits her habits. Small households do well with 1 to 1.5 gallons. Bigger families need larger or more frequent emptying.
- Add odor control. Place a charcoal filter in the lid or under it. This is the main “not stinky” move.
- Label it cleanly. Clean the surface with rubbing alcohol, then apply a simple label: “Compost.”
- Add your scoop. It sounds silly, but a scoop makes it feel like a system, not a random jar.
- Build the starter kit insert.
- Add a card that shows:
- What to compost
- What to skip
- How often to empty
- How to avoid smell
6. Gift-ready styling. Tie a linen ribbon around the jar neck and tuck the guide card underneath.
Pro-Tips (so she actually uses it)
- Empty often. Small compost bins work best when they don’t sit full for days.
- Add “brown” material. If it gets wet, add shredded paper or dry leaves to balance moisture.
- Rinse weekly. Quick rinse prevents buildup and smell.
- Keep it dry-ish. Too wet invites odor and fruit flies.
Common mistakes and quick fixes
- It smells sour
- Likely cause: Too wet, not enough airflow, or it sits too long
- Fix: Empty, rinse, add dry “browns,” replace charcoal filter
- Prevention next time: Empty more often and add dry material
- Fruit flies show up
- Likely cause: Food exposed, lid not tight, or sweet scraps sitting too long
- Fix: Empty and rinse, freeze fruit scraps until compost day, keep lid sealed
- Prevention next time: Empty often and wipe rim clean
- Charcoal filter stops working
- Likely cause: It’s saturated or old
- Fix: Replace it, most filters are meant to be swapped regularly
- Prevention next time: Set a monthly reminder to check it
Finish + care (longevity matters)
- Cleaning: Wash with soap weekly, wipe rim daily if needed.
- Odor control: Replace charcoal filters on schedule.
- How long it lasts: Years, if she cleans it and keeps moisture balanced.
- Refresh tip: If it ever smells even after washing, soak the container in warm soapy water, dry fully, and restart with a fresh filter.
Mini care card text
- “Empty often, add dry browns if wet, rinse weekly, replace filter monthly.”
Finishing + Sealing + Care: the part that keeps your DIY gifts from failing outdoors
If you take one thing from my 10+ years of making DIY gifts, take this, most “Pinterest fails” happen at the finish stage. Paint looks dry, people seal it, wrap it, gift it, and then water and sun show up and humble everyone. Finishing is not glamorous, but it’s what makes your gifts look professional and last.
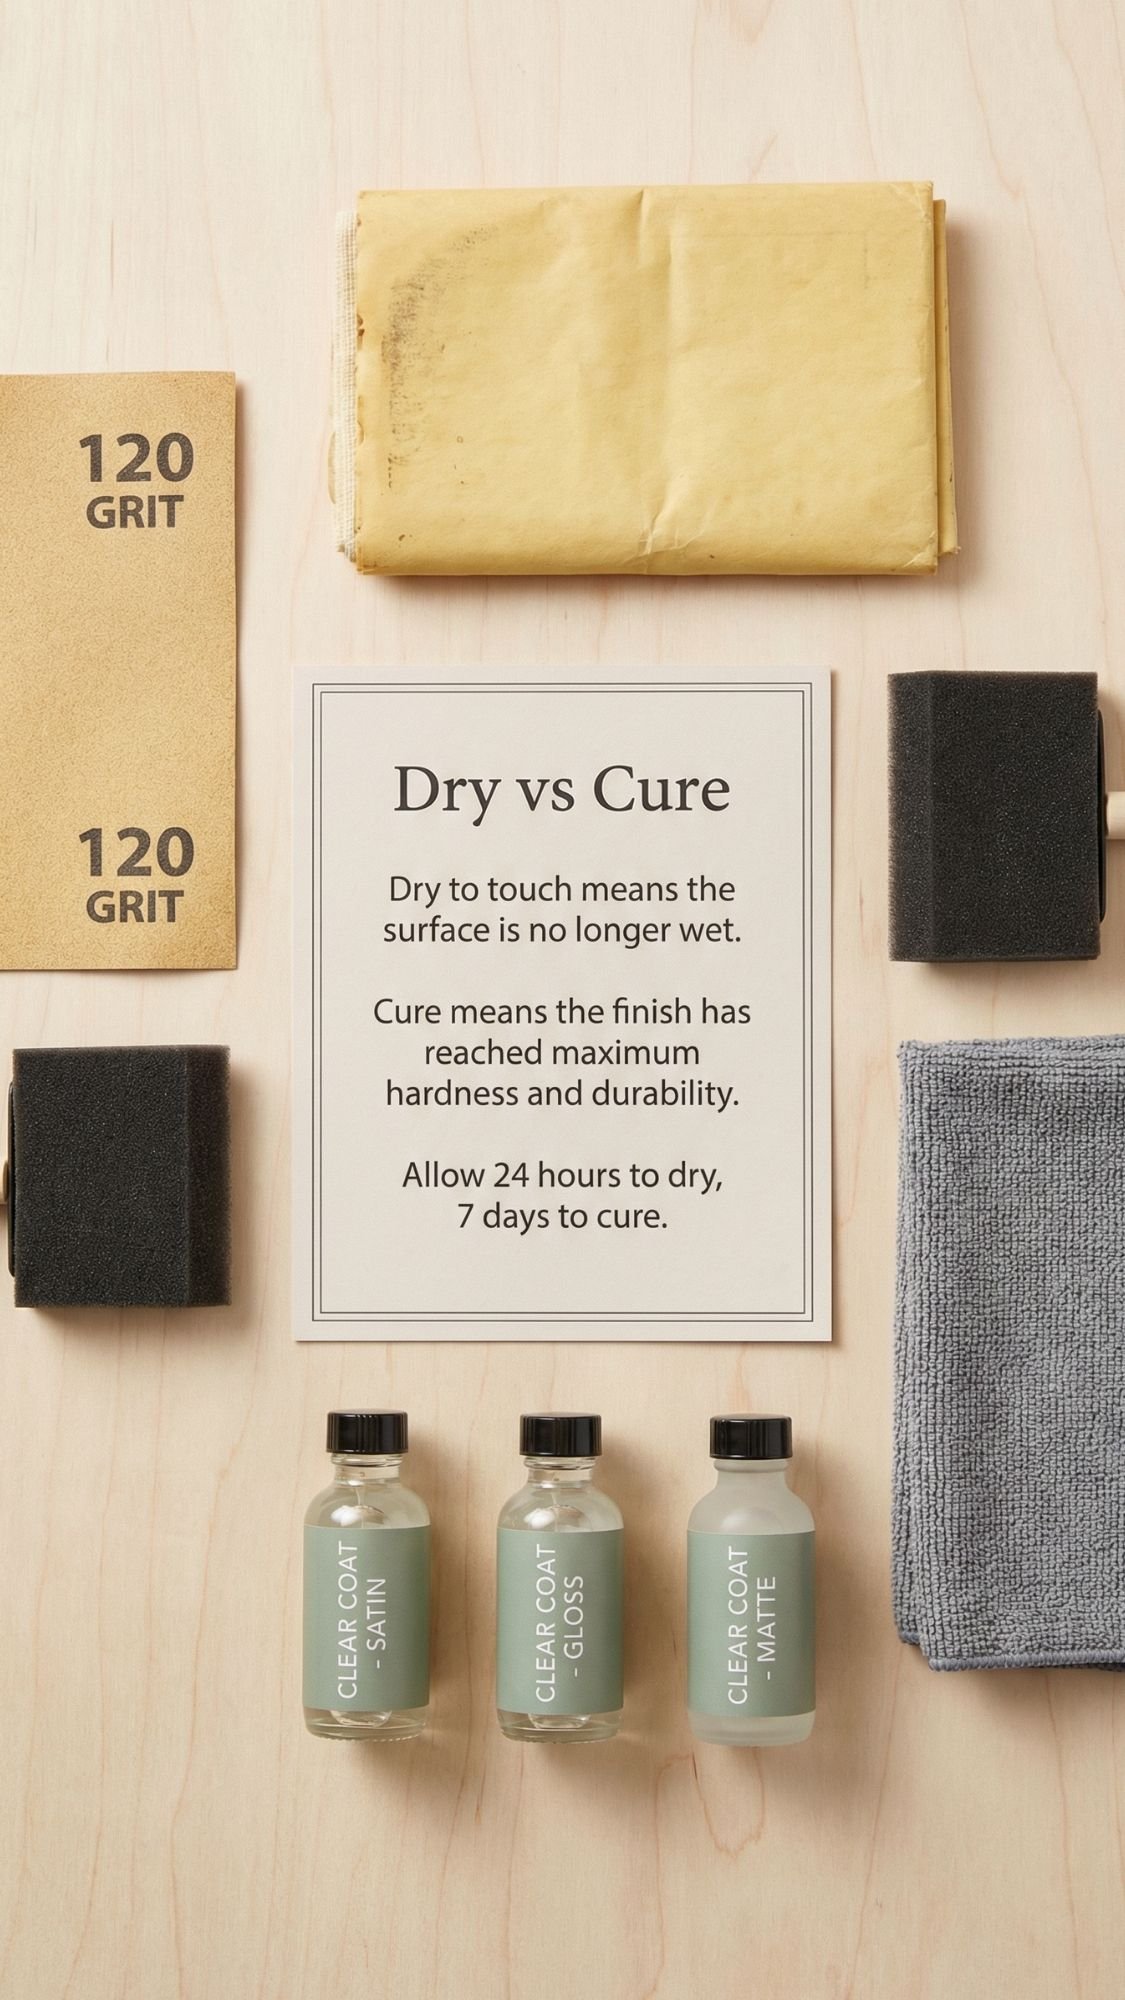
Ever touched a project that felt dry, then left a fingerprint anyway? That’s the difference between dry and cured.
Dry time vs cure time (plain language, no chemistry lecture)
- Dry: The surface stops feeling wet. You can usually touch it lightly.
- Cure: The material fully hardens. It reaches real durability, better water resistance, better scratch resistance.
Humidity, temperature, and airflow change both. If your workspace is cold or humid, curing takes longer. If your project sits in direct sun while “drying,” it can skin over on top while staying soft underneath, which leads to wrinkling later.
What to seal, what not to seal
Seal it when:
- It will live outdoors or get splashed often, like pots, markers with paint fill, wood stands near sinks, or anything you expect Mom to rinse.
- It gets handled constantly, like misters, jars, and tool organizers with labels.
Skip sealing when:
- The finish already provides durability, like plain stamped metal markers with no paint fill.
- Sealing would trap moisture where it shouldn’t, like painting the inside of terracotta where soil stays wet.
Finishing cheat sheet (use this as a scannable box in the post)
Wood projects (propagation stand, herb rack, bee hotel roof)
- Sand to 180–220 grit for a smooth feel.
- Remove dust completely, dust ruins finishes.
- Apply thin coats of clear finish or oil.
- Seal all sides, including underside, to reduce warping.
Terracotta pots
- Let the pot dry completely before painting.
- Prime if you want real durability.
- Paint in thin coats.
- Seal after paint cures.
- Let the final clear coat cure before planting.
Vinyl labels (mister, compost jar, journal cover)
- Clean surface with rubbing alcohol.
- Apply vinyl, then burnish edges.
- Wait about 24 hours before heavy wiping or washing.
Resin pieces
- Cure on a level surface.
- Keep dust off with a clean cover.
- Avoid harsh cleaners, microfiber only.
Candles
- Let them set fully before moving.
- Let them cure longer for best scent throw.
- Keep botanicals away from the wick path for safety.
Cure time reminders (so you don’t gift a soft finish)
These are general ranges, always follow product labels, but this keeps readers from rushing:
- Paint may dry in hours but can take days to fully harden.
- Clear coats can feel dry fast but often need at least 24–72 hours to toughen up.
- Resin can demold in a day but still needs extra time to reach max hardness.
A common mistake beginners make is wrapping a project too soon. Tissue paper sticks to soft finishes, and then you get that awful texture forever.
Care instructions you can attach to gifts (copy-paste card ideas)
Outdoor pot care
- “Let cure before planting. Wipe clean. Refresh clear coat yearly if it lives in strong sun.”
Propagation stand care
- “Change water weekly. Wipe wood dry. Keep out of standing puddles.”
Seed gifts care
- “Store dry until planting. Plant under a thin layer of soil. Keep moist until sprouts appear.”
Compost jar care
- “Empty often. Rinse weekly. Replace filter monthly.”
How long it lasts, realistically
- Seed paper and seed bombs: best used within a season for strongest germination.
- Wood items with good finish: years, with occasional touch-up.
- Painted pots: multiple seasons, plan to refresh the topcoat.
- Vinyl labels: long-lasting indoors, may need replacement if scrubbed often.
- Resin: long-lasting, keep out of all-day harsh sun for best clarity.
Troubleshooting: because stuff goes wrong, and we still win
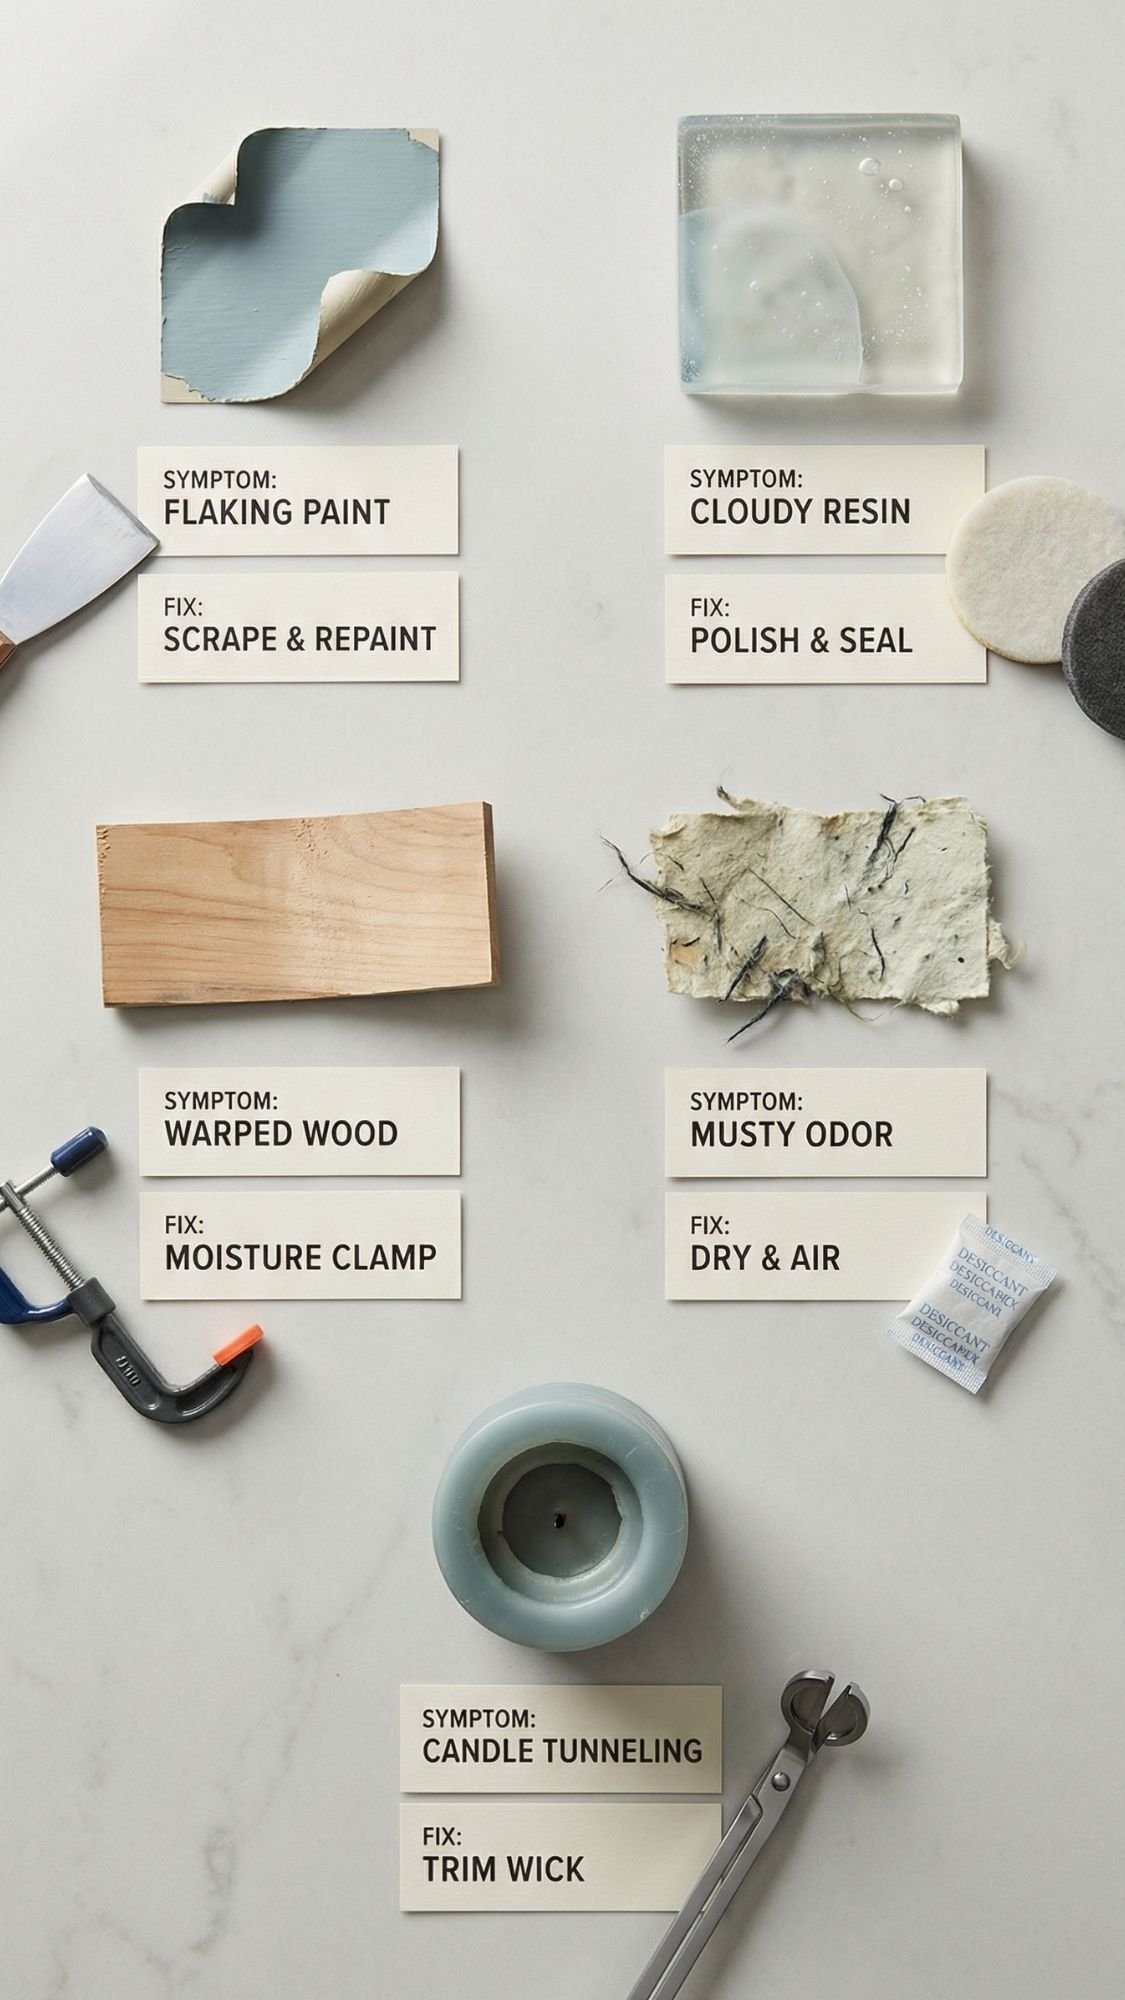
I love a pretty DIY, but I love a DIY that survives real life more. Here are the most common problems I see with garden gift projects, plus the fixes that actually work. Bookmark this section, it saves projects.
1) Paint peels off terracotta
- Symptom: Paint flakes or lifts after watering or rain.
- Likely cause: You painted on a damp pot, skipped primer, sealed too soon, or used an indoor-only finish.
- Fix: Sand back to solid edges, wipe dust, prime, repaint in thin coats, then reseal after proper cure time.
- Prevention next time: Let terracotta dry fully before painting, use primer, and wait for cure before sealing.
2) Clear coat bubbles or looks cloudy over paint
- Symptom: Tiny bubbles, haze, or a milky topcoat.
- Likely cause: You sealed before paint cured, applied too thick, or humidity was high.
- Fix: Let it cure longer, then sand lightly with 220 grit and recoat in a thin layer.
- Prevention next time: Seal in thin coats, and avoid sealing in humid conditions.
3) Vinyl will not stick to glass or metal
- Symptom: Vinyl lifts immediately or peels at the edges.
- Likely cause: Oils, dust, soap residue, or a textured surface.
- Fix: Remove vinyl, clean with rubbing alcohol, let dry, reapply with fresh vinyl, burnish edges firmly.
- Prevention next time: Do not touch the cleaned area, burnish from center outward, and let it rest 24 hours.
4) Bubbles trapped in resin around petals
- Symptom: Tiny bubbles clinging to flowers or edges.
- Likely cause: You stirred too fast, poured too thick, or trapped air under botanicals.
- Fix: Use tweezers to lift and re-seat petals, then gently pop bubbles with a brief heat pass if your resin allows it.
- Prevention next time: Mix slowly, pour in thin layers, and press botanicals down carefully.
5) Resin cures cloudy or flowers turn brown
- Symptom: Resin looks foggy, flowers lose color, or look “wet” inside.
- Likely cause: Moisture in botanicals, cold resin, or high humidity during curing.
- Fix: Stop using moist flowers, fully dry botanicals, warm resin bottles slightly, and repour in thinner layers.
- Prevention next time: Store pressed flowers with a silica packet, and cure in a dry, warm room.
6) Seed paper gets musty or moldy while drying
- Symptom: Paper smells funky, dark specks appear, texture stays soft.
- Likely cause: You spread it too thick, dried too slowly, or trapped moisture underneath.
- Fix: Re-pulp, spread thinner, dry on a rack with airflow, flip halfway through.
- Prevention next time: Keep sheets thin and dry with gentle airflow, especially in humid weather.
7) Seed bombs crack while drying
- Symptom: Cracks form, or bombs split apart.
- Likely cause: Too much water, dried too fast, or not enough binder.
- Fix: Mist hands and re-roll, then dry slowly in a cooler spot. If crumbly, mix in more clay binder and re-roll.
- Prevention next time: Add water slowly, keep bombs small, and dry gradually.
8) Seed bombs crumble when handled
- Symptom: They fall apart in the tin or break when you pick them up.
- Likely cause: Not enough clay binder, or ingredients were too dry and never bonded.
- Fix: Re-mix with more clay and a tiny mist of water, then re-roll and dry.
- Prevention next time: Use a consistent ratio and do the squeeze test before rolling.
9) Candle tunnels down the center
- Symptom: Wax melts only around the wick, leaving tall wax walls.
- Likely cause: Wick too small or first burn too short.
- Fix: Use a foil wrap to encourage an edge-to-edge melt pool, then switch to a larger wick next batch.
- Prevention next time: Choose the correct wick size and do a full first burn until the top melts to the edges.
10) Propagation stand wood warps or gets water rings
- Symptom: Stand cups, twists, or shows water stains.
- Likely cause: You sealed only one side, or finish wasn’t cured or water-resistant enough.
- Fix: Let it dry flat, sand lightly, seal all sides evenly, let cure fully.
- Prevention next time: Seal every surface, let it cure, and wipe drips immediately.
11) Bee hotel wood splits when drilling
- Symptom: Cracks form around drilled holes.
- Likely cause: Holes too close to edges, wood too dry or thin, no pilot technique.
- Fix: Replace with a thicker block, drill farther from edges, drill slowly and clear sawdust.
- Prevention next time: Keep margin around holes and use steady drilling pressure.
12) Herbs mold while drying on the hanger
- Symptom: Dark spots, fuzzy growth, or off smell on bundles.
- Likely cause: Bundles too thick, spacing too tight, or room too humid.
- Fix: Re-bundle smaller, increase spacing, move to a drier area with airflow.
- Prevention next time: Tie smaller bundles and prioritize airflow over aesthetics.
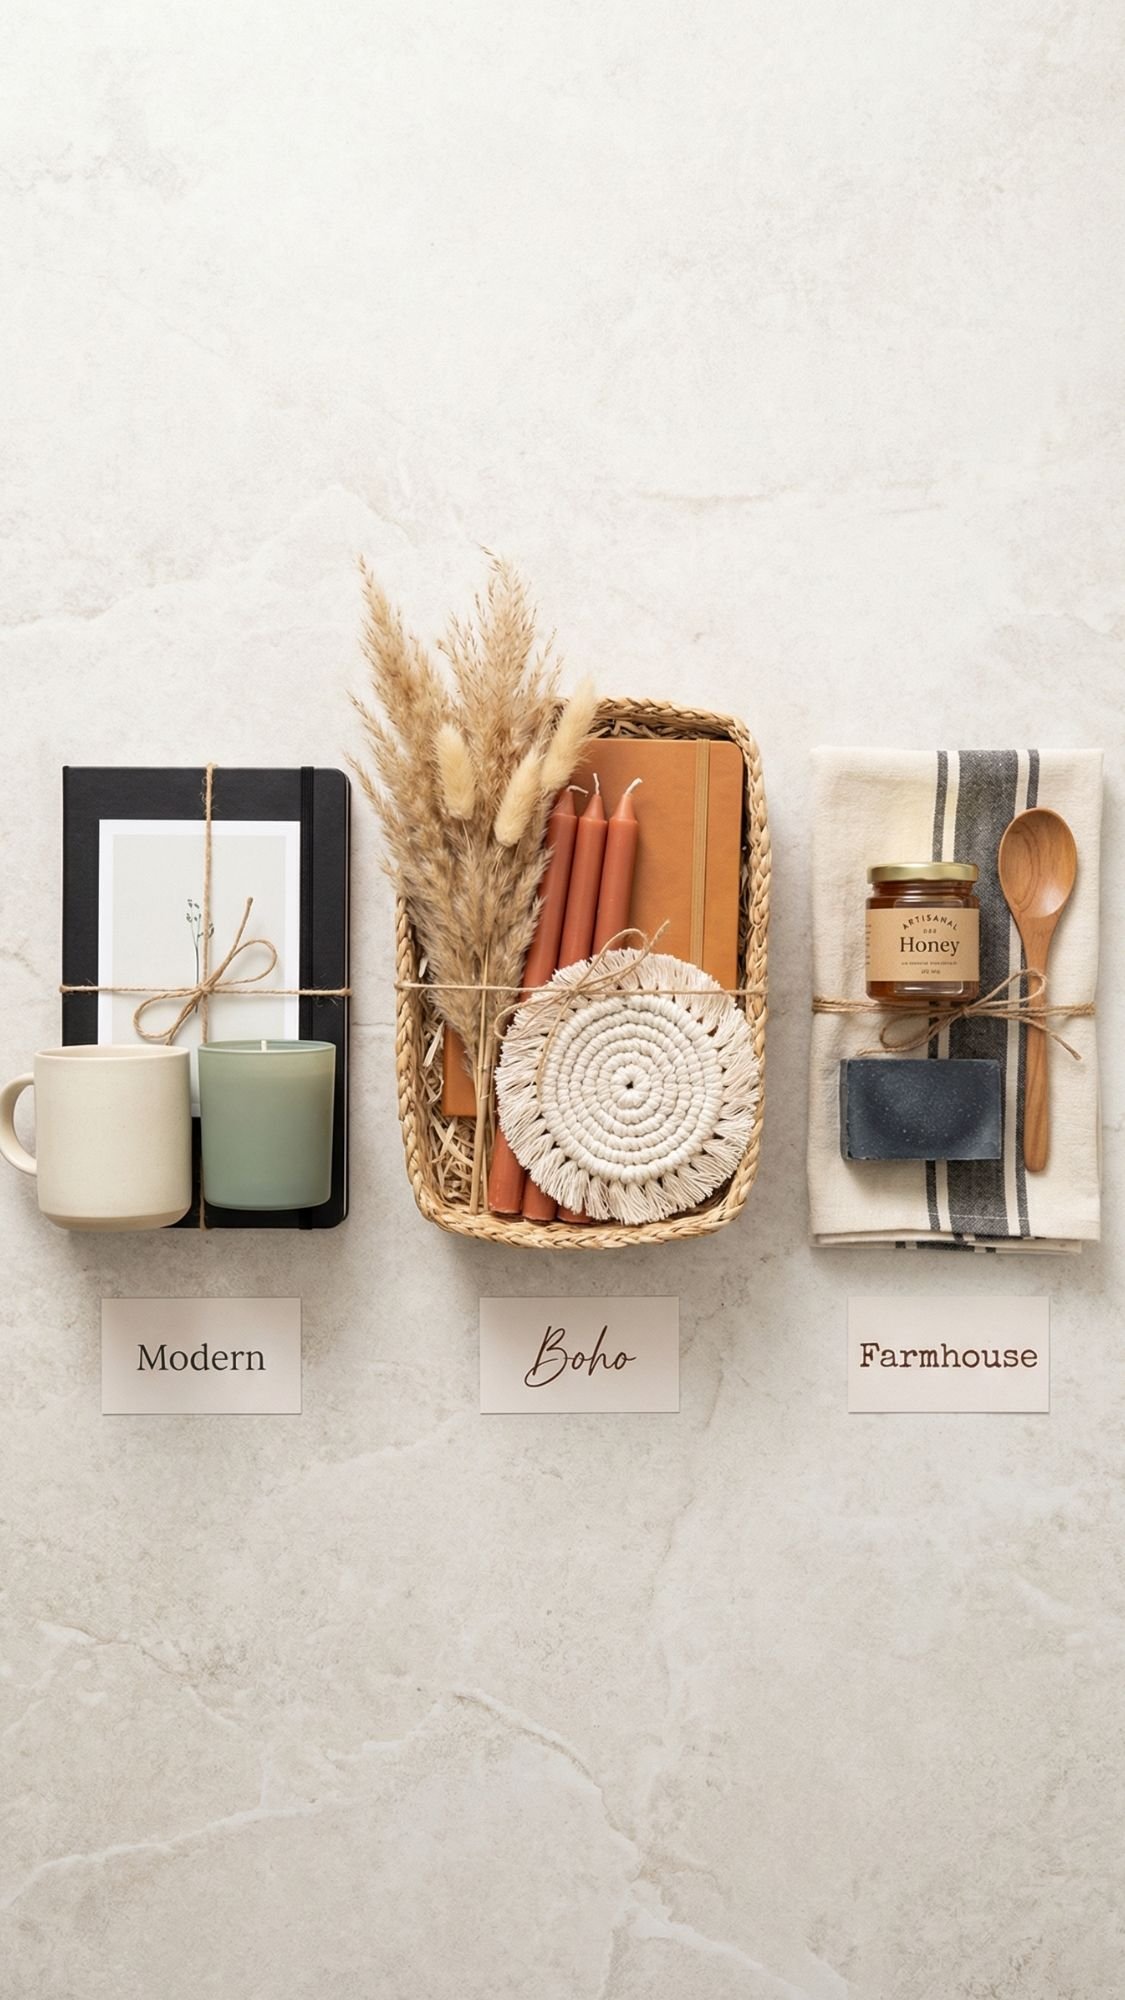
Customization Ideas: 3 easy variations that make every gift feel personal
This is the section that makes your projects feel intentional instead of “I made a thing.” Same DIY, totally different vibe. Pick one style and carry it through the whole gift set, labels, twine, colors, everything. That’s how you get the boutique look without spending boutique money.
Variation 1: Modern Minimalist
Style swaps
- Clean shapes, simple labels, lots of negative space
- Geometric patterns on pots, no busy florals
- Clear glass, brushed metal, pale wood
Color palette ideas
- Cream, white, black, sage
- Warm gray, sand, muted olive
- Clear glass + brushed aluminum accents
Personalization options
- Single initial monogram on the mister
- Herb markers in all caps: “BASIL,” “MINT,” “THYME”
- A tiny label that says “Mom’s Garden Kit” in a simple font
Material upgrades
- Brass or matte black hooks on the herb drying rack
- Aluminum stamping blanks for markers
- Linen ribbon and a minimal printed care card
Variation 2: Boho Garden
Style swaps
- Natural textures, soft curves, botanical details
- Macramé accent, rattan basket, dried flower touches
- Warm wood and amber glass
Color palette ideas
- Terracotta, cream, olive, muted mustard
- Blush clay, sage, warm tan
- Dusty lavender, oat, soft green
Personalization options
- Hand-lettered tags with a tiny botanical doodle
- Seed bomb tin labeled “Wildflower Mix”
- Pressed flower resin piece made from flowers she grows
Material upgrades
- Amber jars for candles and compost starter kit
- Leather or faux leather tag tied to the basket handle
- Gold foil accents in resin, used lightly
Variation 3: Farmhouse Classic
Style swaps
- Ticking stripe fabric, kraft paper labels, simple icons
- Galvanized metal, enamelware, natural twine
- Practical, sturdy finishes
Color palette ideas
- Cream, charcoal, eucalyptus green
- Soft white, navy, warm wood
- Beige, black, muted green
Personalization options
- “Mom’s Garden Journal” with the year on the cover
- Pot label: “Kitchen Herbs”
- Tool basket tags: “Seeds,” “Snips,” “Gloves”
Material upgrades
- Galvanized caddy instead of a woven basket
- Canvas apron with reinforced corners
- Wood propagation stand finished in a warm matte clear coat
Quick personalization ideas that work for any style
- Add a plant theme: “Herb Garden,” “Cut Flower Garden,” “Pollinator Patch”
- Use a name or nickname: “Mom,” “Nana,” “Grandma Rose”
- Tie everything together with matching care cards and one consistent label style
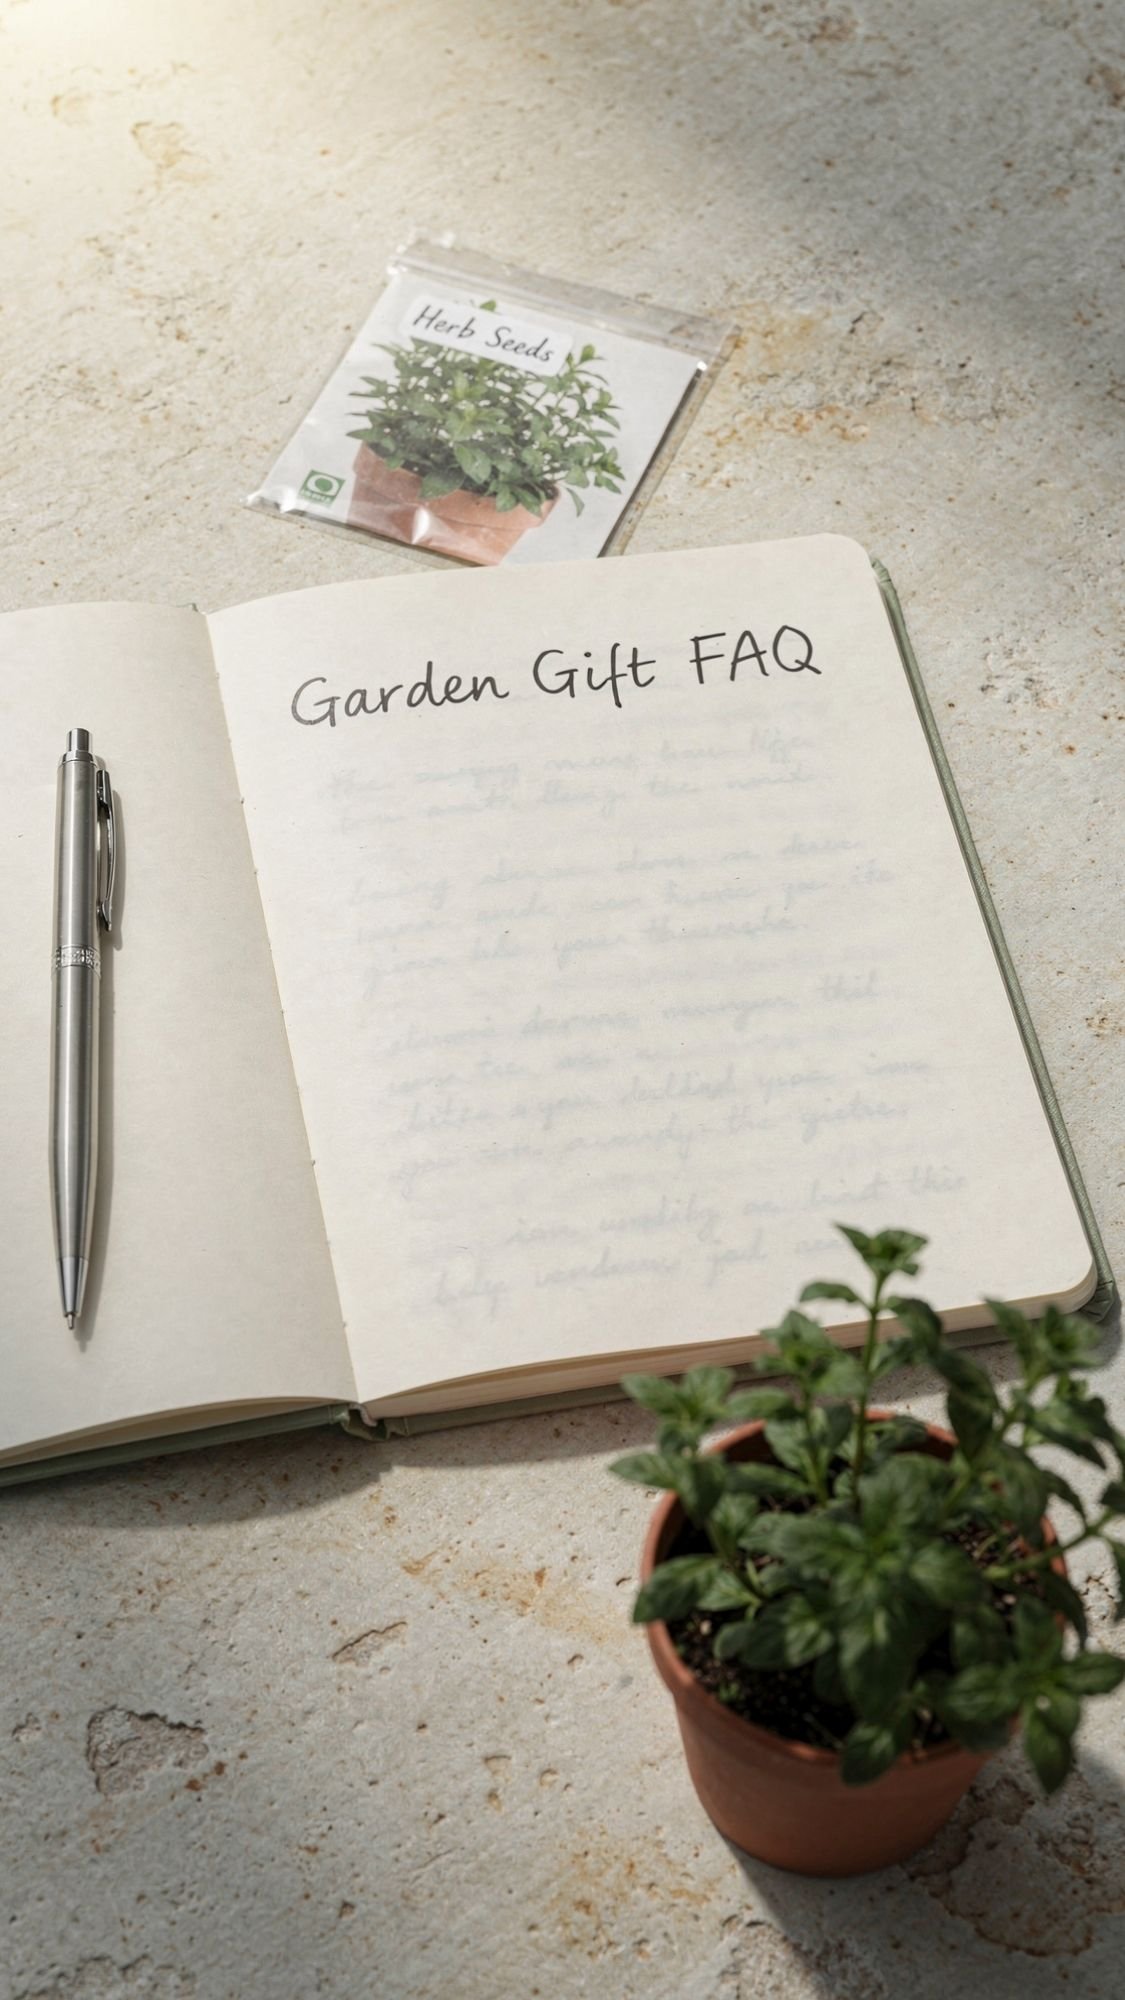
FAQ: quick answers, no fluff
1) What are the best DIY garden gifts for moms who already have everything?
Go for gifts she uses weekly, not one-time decor. Plantable seed tags, stamped metal markers, a propagation stand, and a self-watering herb planter all get real use and feel thoughtful.
2) How do I make DIY garden gifts look professional, not “crafty”?
Keep a tight color palette, measure spacing, and finish like you mean it. Thin coats, clean edges, and a simple label style make everything look high-end.
3) What seeds work best for plantable seed paper?
Use small seeds that spread evenly in paper, like wildflowers, chamomile, basil, thyme, or poppy. Avoid big seeds because they create weak spots and fall out.
4) Why did my plantable seed paper get moldy while drying?
You spread it too thick or dried it too slowly. Re-pulp it, spread thinner, and dry with airflow. Humidity makes this worse, so a fan on low helps.
5) How do I stop paint from peeling off terracotta pots?
Start with a clean, fully dry pot, prime it, paint thin layers, and wait for cure time before sealing. Rushing the seal step causes peeling more than anything else.
6) Can I use Mod Podge to seal outdoor garden gifts?
You can use it for indoor pieces, but outdoor sun and moisture usually break down craft sealers faster. If the gift lives outside, use an exterior-grade finish designed for outdoor exposure.
7) How do I keep resin gifts crystal clear?
Dry botanicals fully, mix resin slowly, pour in thin layers, and cure in a low-dust area on a level surface. Moisture and rushing cause cloudiness and bubbles.
8) What’s the easiest last-minute DIY garden gift on this list?
The monogrammed plant mister, the seed bomb tin, or plantable gift tags. They look finished fast and still feel personal.
9) How long should I wait before wrapping painted or sealed projects?
Wait until the finish cures, not just dries. If tissue paper sticks or leaves texture, it’s too soon. When in doubt, give it another day.
10) What’s a good DIY garden gift for a mom who loves herbs?
A self-watering herb planter, herb drying hanger, and a garden journal make a perfect themed set. Add stamped markers for the final touch.
11) How do I avoid fruit flies with a countertop compost jar?
Empty it often, keep the lid sealed, rinse weekly, and replace charcoal filters on schedule. Freezing fruit scraps until compost day also helps.
12) What if I’m nervous about “messing it up” on my first try?
Start with the seed paper tags or tool basket organizer. They’re forgiving, low-cost, and you can redo them fast without wasting expensive supplies.
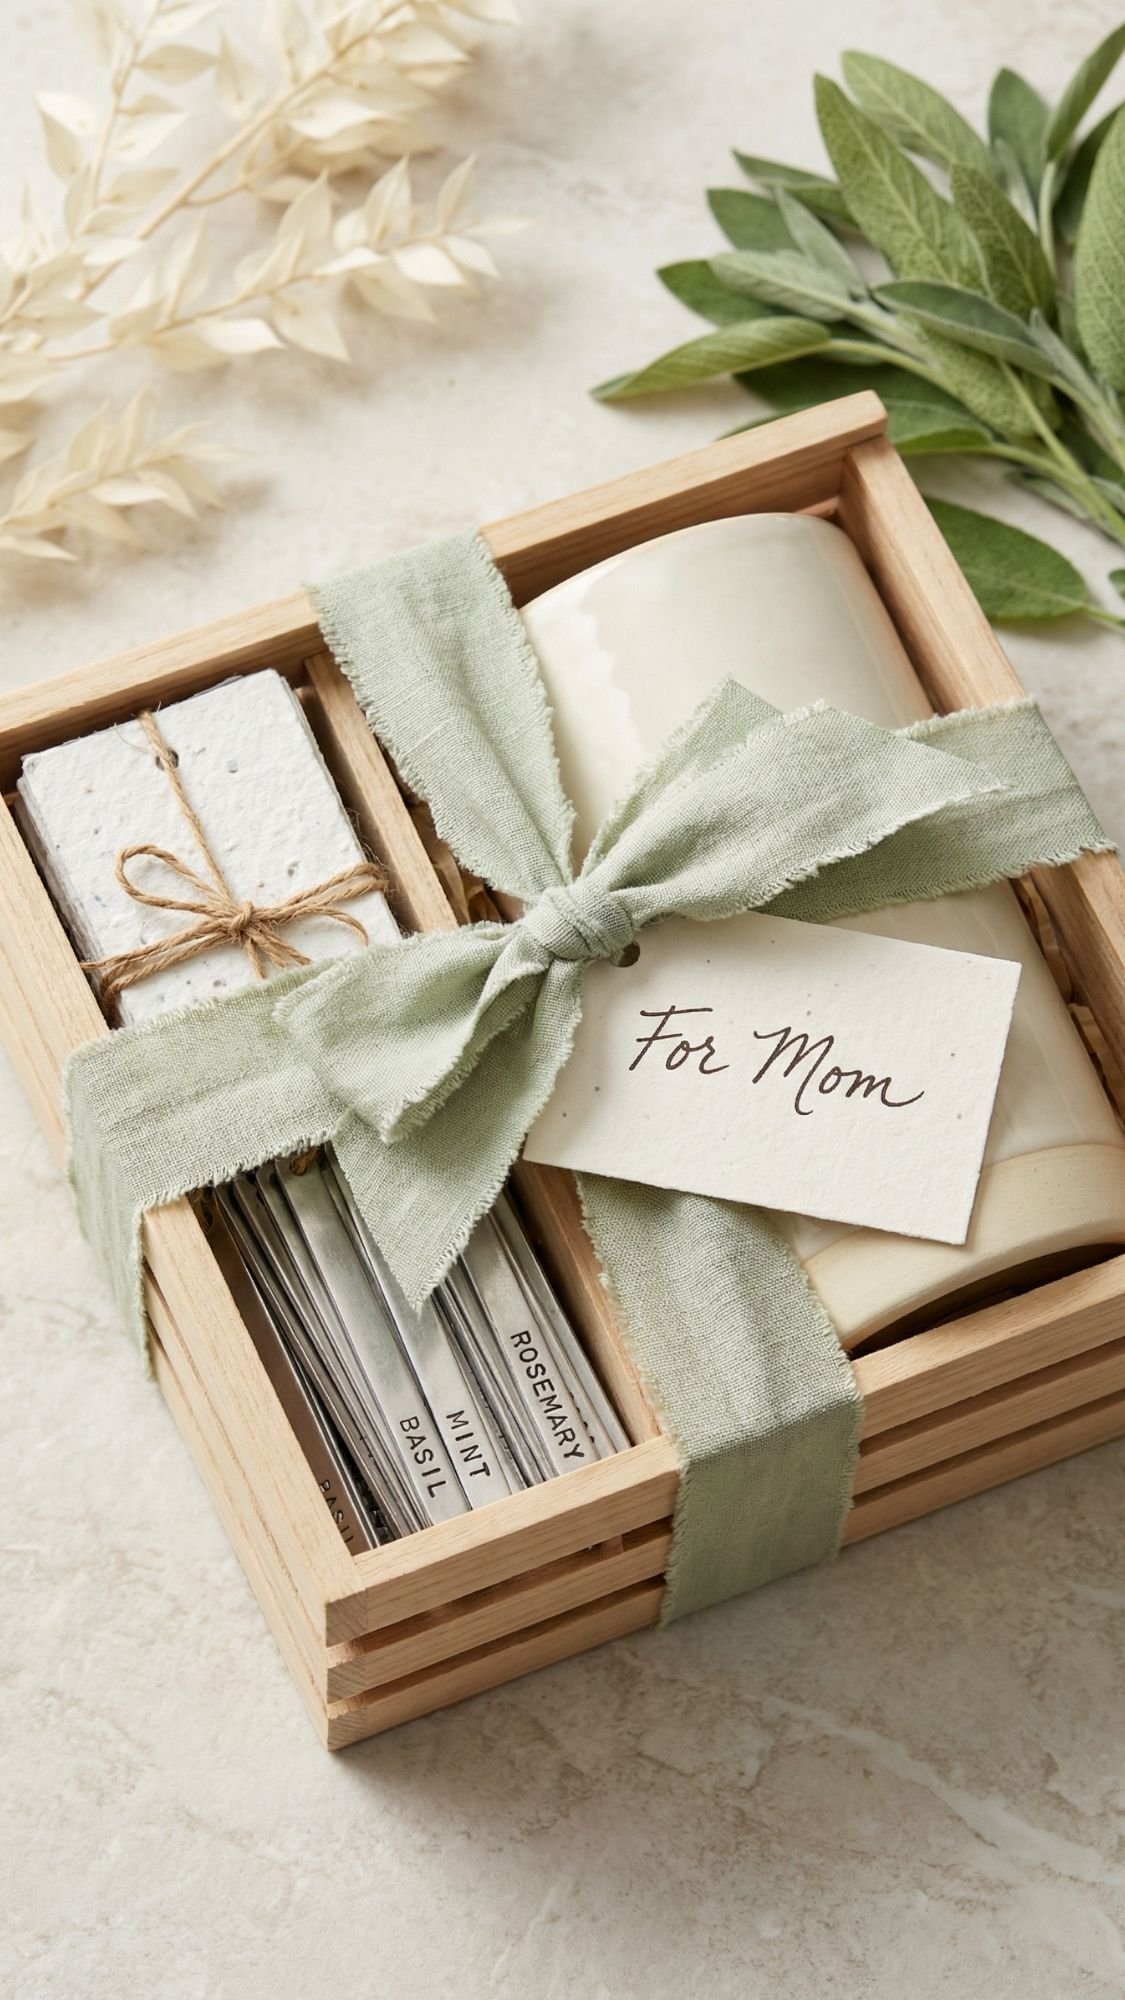
If you’re stuck choosing, here’s the move, pick one “daily use” gift and one “pretty wow” gift and bundle them like a set. For example:
- Daily use: stamped metal markers, tool basket organizer, self-watering herb planter
- Pretty wow: resin suncatcher, plantable tags, seed bomb tin
Then add one tiny thing that makes it feel finished, a simple label, linen twine, and a care card. That’s the difference between “cute craft” and “gift she brags about.”
And FYI, if you only make one project from this list, make the plantable seed tags. They’re easy, they’re personal, and watching something bloom from a gift is kind of unbeatable.

