“As an Amazon Associate, I earn from qualifying purchases. If you click a link and make a purchase, I may receive a small commission at no extra cost to you. This helps keep my design guides free and honest—thank you for the support!”
Chrome Nails That Catch The Light In Every Selfie
If you have ever taken a cute selfie, glanced down, and thought, why do my nails look… flat, this one’s for you. Chrome nails look unreal in real life, but they only look camera-ready when you nail the reflection. Chrome needs a clean highlight stripe, not random glare, and that tiny difference decides whether your nails look like expensive jewelry or like you accidentally rubbed metallic eyeshadow on top and hoped for the best. :/
What I’ve noticed after years of doing chrome on myself and watching how it behaves in different lighting is this, chrome loves intention. You have to build it like you plan to photograph it. That means clean prep, thin layers, and choosing chrome finishes that actually throw light back at the camera instead of just looking shiny in person.
Here’s what we’re doing today. I’m giving you 16 chrome nail ideas that catch the light from every angle, plus the prep, application, maintenance, and troubleshooting that makes them last. Because yes, we can have nails that look like a filter, and we can also keep our natural nails healthy while we’re at it.
Key Takeaways
- Chrome pops best when you create a clean reflection stripe, not overhead glare.
- Prep matters more with chrome than almost any other finish, because chrome shows everything.
- Thin layers and clean edges make chrome look expensive and photographable.
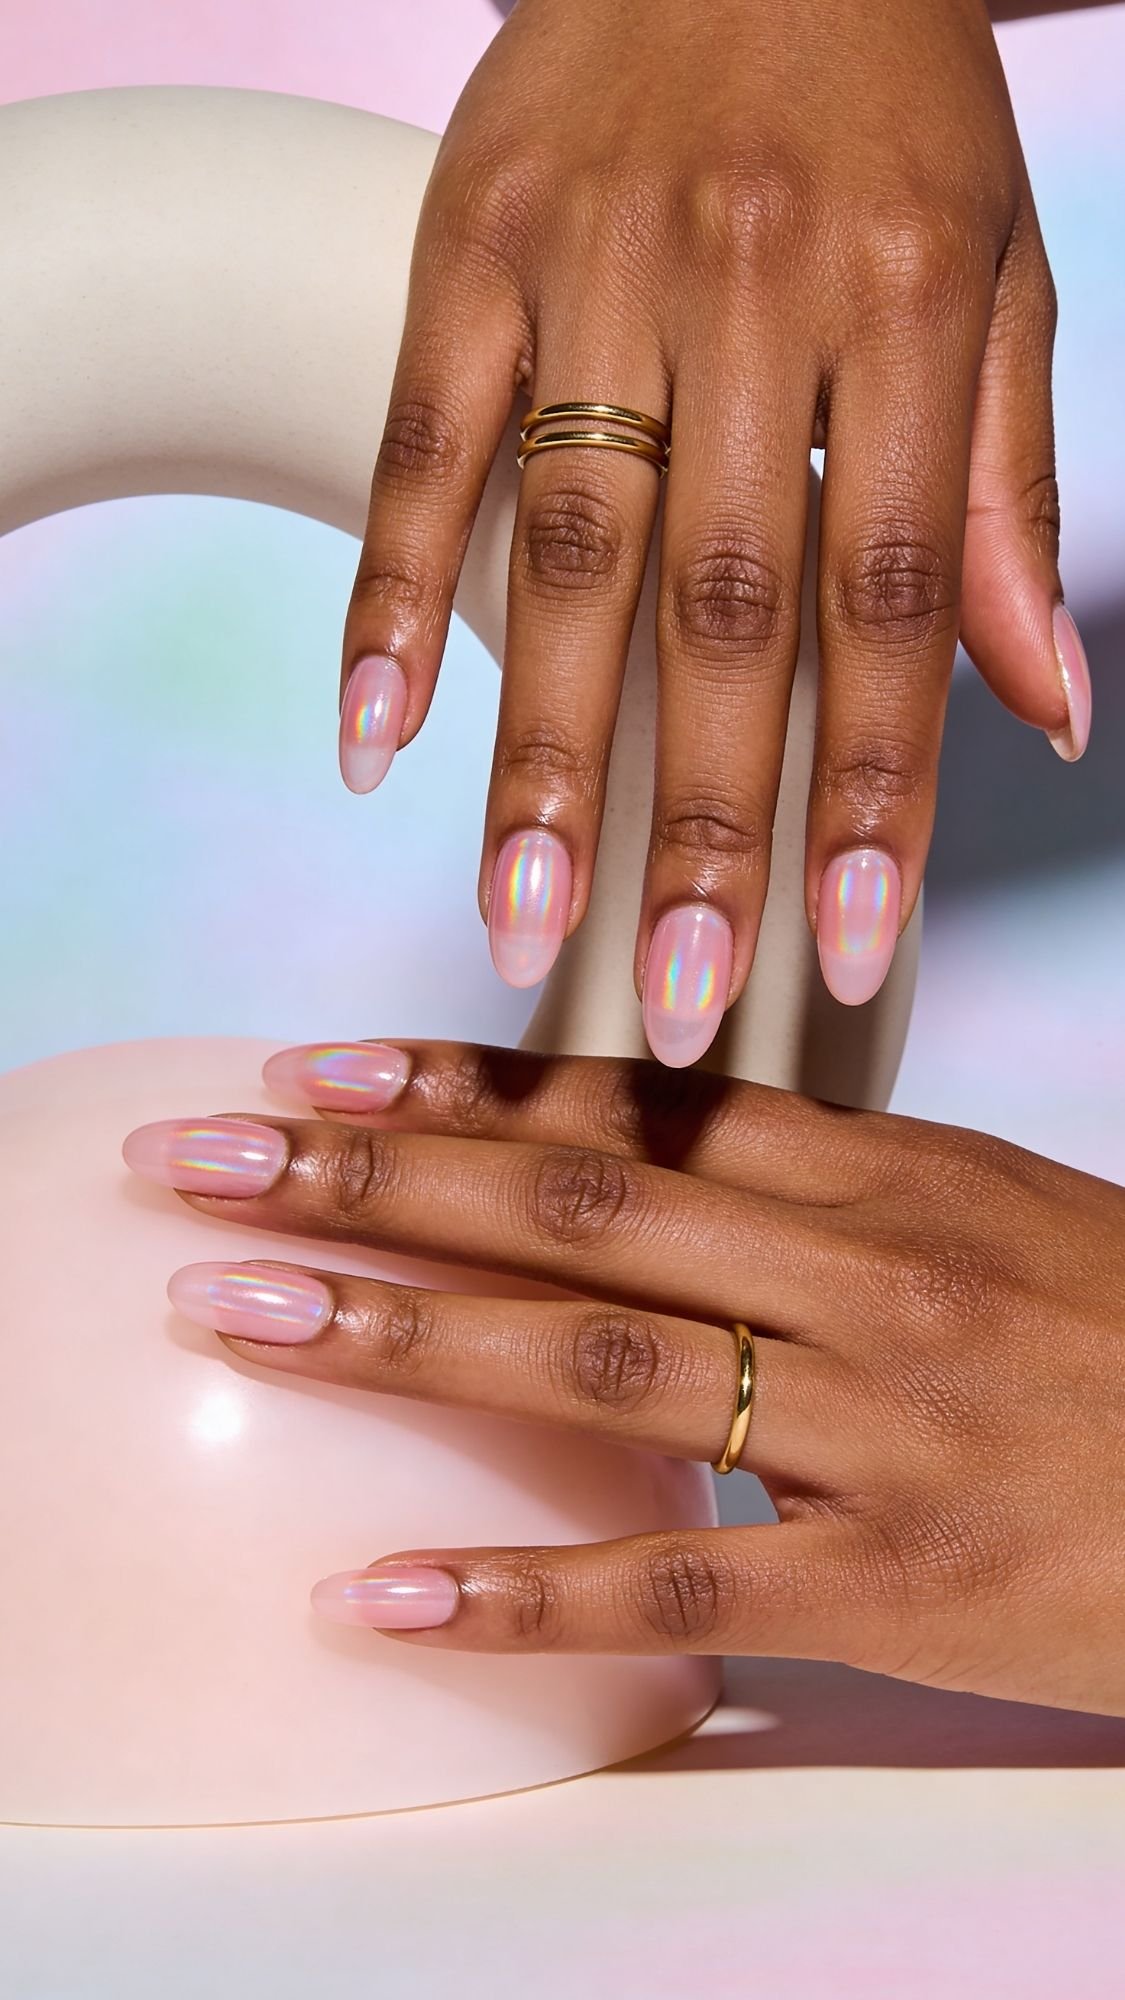
- Your chrome finish choice matters, pearl chrome glows, mirror chrome reflects, aurora chrome shifts.
Quick Results Snapshot
You want chrome nails that actually show up in photos, not just in your bathroom lighting at 11 pm. This is the quick cheat sheet so you know exactly what you’re signing up for before you pick a design. Ever wondered why chrome looks unreal in one selfie and dull in the next? Lighting plus prep, that’s the whole plot.
- What this look solves: chrome that looks flat on camera, selfies where your nails disappear, shine that only works in one angle
- Best for: short nails that need dimension, medium to long sets that want maximum reflection, beginners who want a high-impact look
- Time required:
- Press-ons, 15 to 20 minutes
- Regular polish chrome topper, 45 to 75 minutes
- Gel chrome, 60 to 90 minutes
- Budget range: $10 to $60 DIY, depending on whether you use press-ons, a chrome topper, or chrome powder plus gel system
- Expected timeline: instant, the payoff shows the second you hit top coat and lighting
- Biggest mistakes people make:
- Skipping true nail dehydration, then the chrome lifts at the tips
- Using thick coats, then the surface ripples and the reflection looks wobbly in photos
- Letting gel touch skin, which can trigger irritation and allergies over time
Key Takeaways
- Chrome = reflection, so clean edges and smooth surfaces matter more than usual.
- Thin layers beat thick layers, always.
- Your lighting plan matters, flash and a ring light will not show the same finish the same way.
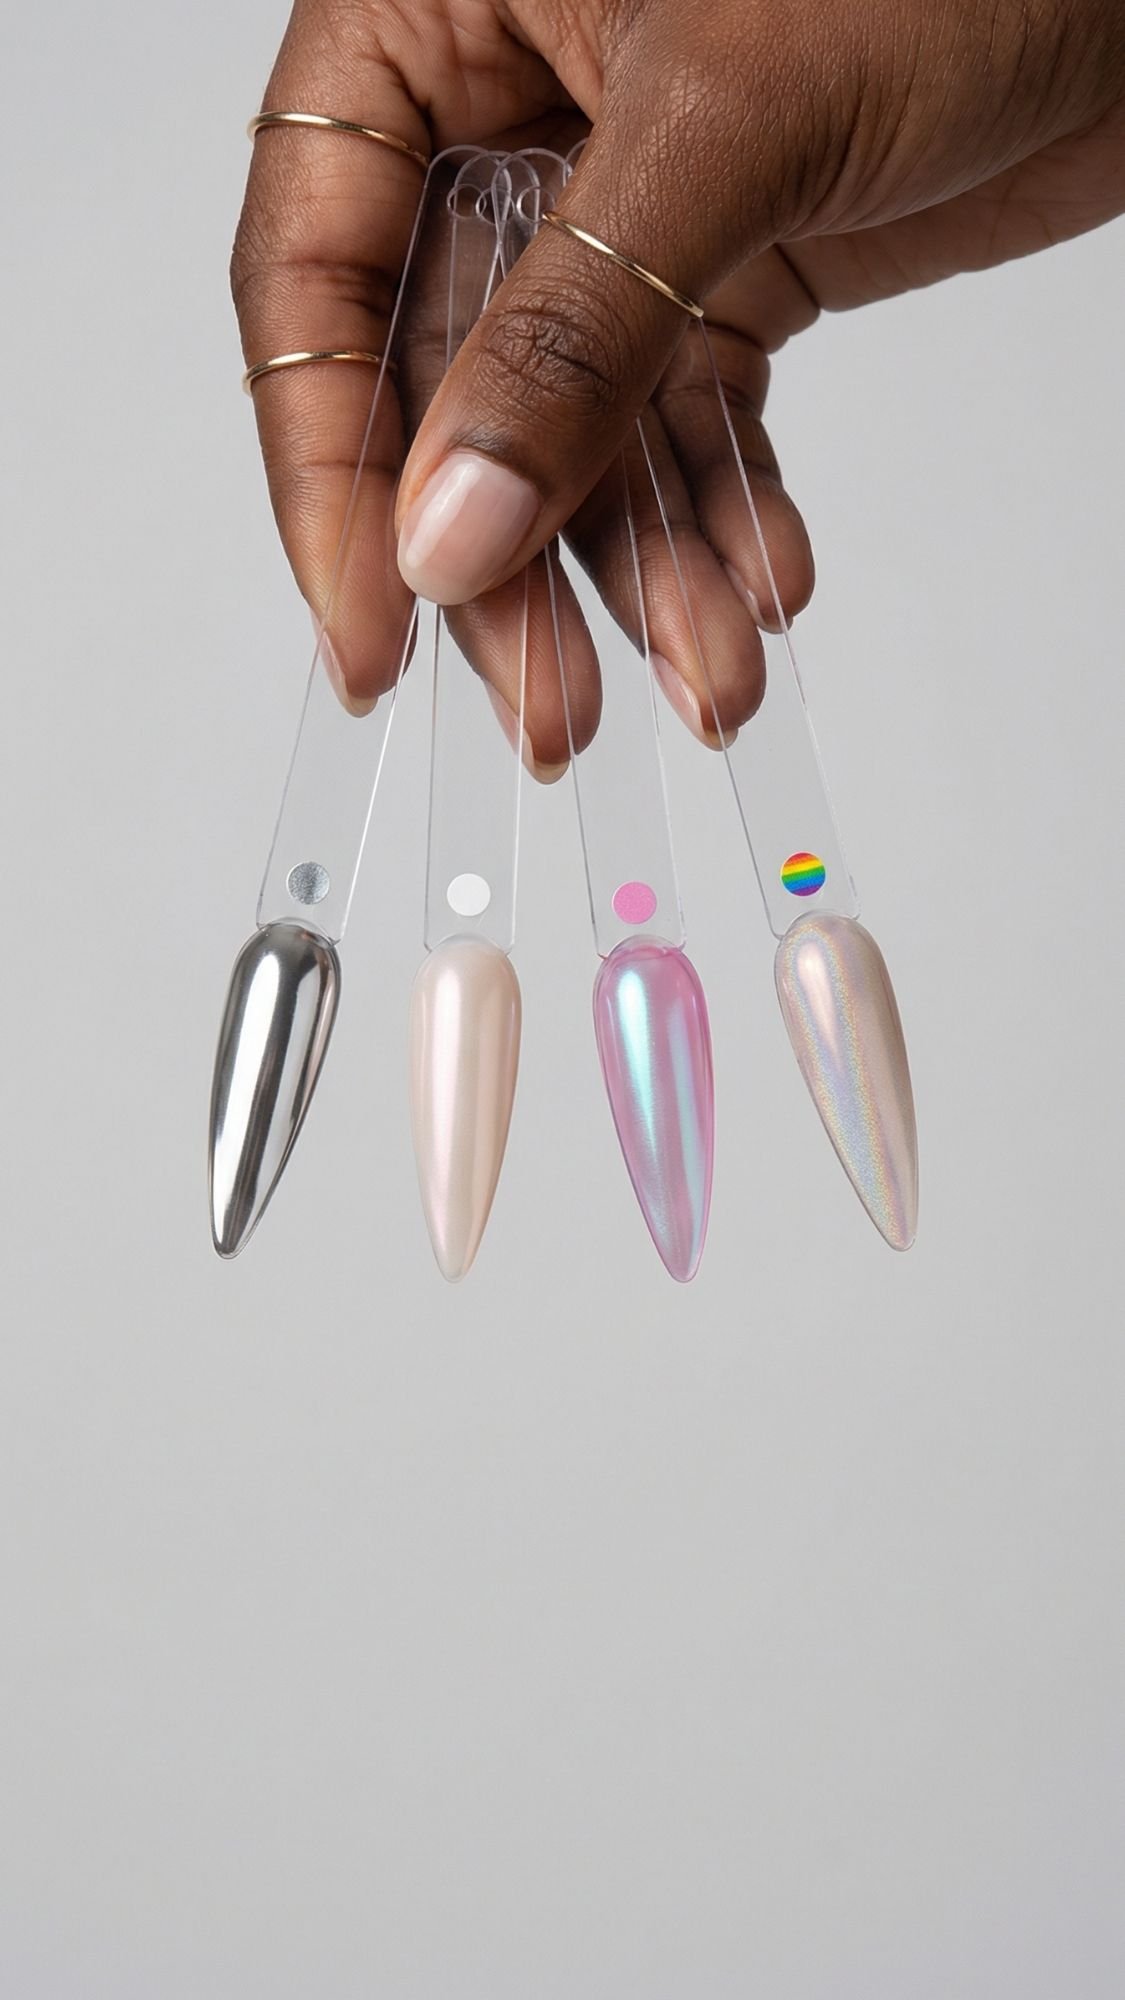
The Finishes That Actually Catch Light
Chrome nails don’t all photograph the same, and that’s the part nobody explains until you’ve already bought three powders and a top coat that betrays you. What I’ve noticed over the years is this, camera-ready chrome depends on the type of reflection you want. Some chromes “mirror,” some “glow,” and some “shift,” and each one needs a slightly different base and sealing strategy to look smooth in selfies.
Mirror Chrome
This is the classic, super-reflective, “I can see my phone screen in my nails” finish. Mirror chrome catches light in a sharp stripe, which looks insane on camera when the surface stays perfectly smooth.
- Best base colors: black for max reflect, deep brown for warm reflect, navy for cooler reflect
- Best for: bold looks, night photos, flash selfies
- Pro note: mirror chrome shows every bump, so your prep and thin coats matter more than your feelings
Pearl, Glazed, Or “Donut” Chrome
This one gives a soft glow instead of a hard mirror. It diffuses light like a glassy sheen, which flatters literally everyone and looks expensive even on short nails.
- Best base colors: milky pinks, sheer nudes, soft beige, milky white
- Best for: daylight selfies, clean-girl sets, “low effort but polished” vibes
- Pro note: over-burnishing can turn this streaky, you want a gentle buff, not a workout
Aurora Chrome
Aurora chrome shifts colors when you tilt your hand, think iridescent, “oil spill but pretty.” It reads magical on camera, but only when you keep the base smooth and not too opaque.
- Best base colors: sheer pink, milky lavender, soft nude, jelly tones
- Best for: golden hour, video clips, movement shots
- Pro note: uneven base color makes aurora look patchy fast, so you need consistency
Holographic, Multichrome, And “Extra” Chromes
These finishes throw multiple colors and sparkle, so they can look unreal or chaotic depending on your lighting and background.
- Best base colors: simple neutrals for holo, deeper bases for multichrome shifts
- Best for: party nails, flash photos, high-contrast content
- Pro note: busy chrome plus busy nail art can fight for attention, pick one star of the show

| 
| 
|
Our Rating:
4.6 | Our Rating:
4.6 | Our Rating:
4.4 |
$9.98
| $5.99
| $7.99
|
Safety Notes, Quick And Real
Chrome itself isn’t the problem most of the time, the system you use can be. If you use gel, avoid skin contact and cure properly. Under-cured gel and gel on skin can increase your risk of irritation or allergy over time. If you notice itching, swelling, burning, or persistent redness, stop and see a professional.
Key Takeaways
- Mirror chrome reflects, pearl chrome glows, aurora chrome shifts.
- Base shade controls the final chrome tone, more than people expect.
- Smoothness equals shine, every ridge shows up under flash.

Nail Prep, This Is The Difference Maker
If chrome looks dull, streaky, or starts chipping at the tips in two days, I almost never blame the powder first. I blame prep. The mistake most people make with chrome is treating it like regular polish, because chrome acts like a spotlight. It highlights every ridge, every bit of leftover cuticle, and every tiny oil slick you left on the nail plate. Fun, right?
Here’s the prep routine I stick to when I want chrome to look smooth and reflective in photos, and actually stay put.
Step 1, Remove Old Product Completely
- What to do: Remove all polish, gel residue, and base coat. If you leave a little edge behind, chrome will catch that line and show it in selfies.
- Why it matters: Chrome reflects texture, so leftover product makes the finish look uneven.
- Pro tip: Run a lint-free wipe over the nail after removal. If you see color transfer, you’re not done yet.
- Common mistake + fix:
- Mistake: leaving base coat around the sidewalls.
- Fix: use a small bit of remover on a detail brush and clean the edges.
Step 2, Shape First, Always
- What to do: File to shape before you touch cuticles. Pick your shape, then refine the sidewalls so both hands match.
- Why it matters: If you shape after, you risk lifting product later and roughing up your seal.
- Pro tip: When you want hands to look longer on camera, go for soft almond or oval. Square can look wider fast, especially in close-up shots.
- Common mistake + fix:
- Mistake: sawing back and forth with the file.
- Fix: file in one direction per side to reduce splitting.
Step 3, Cuticle Work, Gentle But Precise
- What to do: Soften with warm water for a minute or use cuticle remover, then push back gently. Clip only true hangnails, not live skin.
- Why it matters: Chrome makes messy cuticle lines look ten times worse in photos.
- Pro tip: I prefer a glass pusher because it cleans without shredding the nail plate.
- Common mistake + fix:
- Mistake: cutting too much and getting redness.
- Fix: stop, rinse, apply a soothing balm, and wait until the skin calms down before you paint.
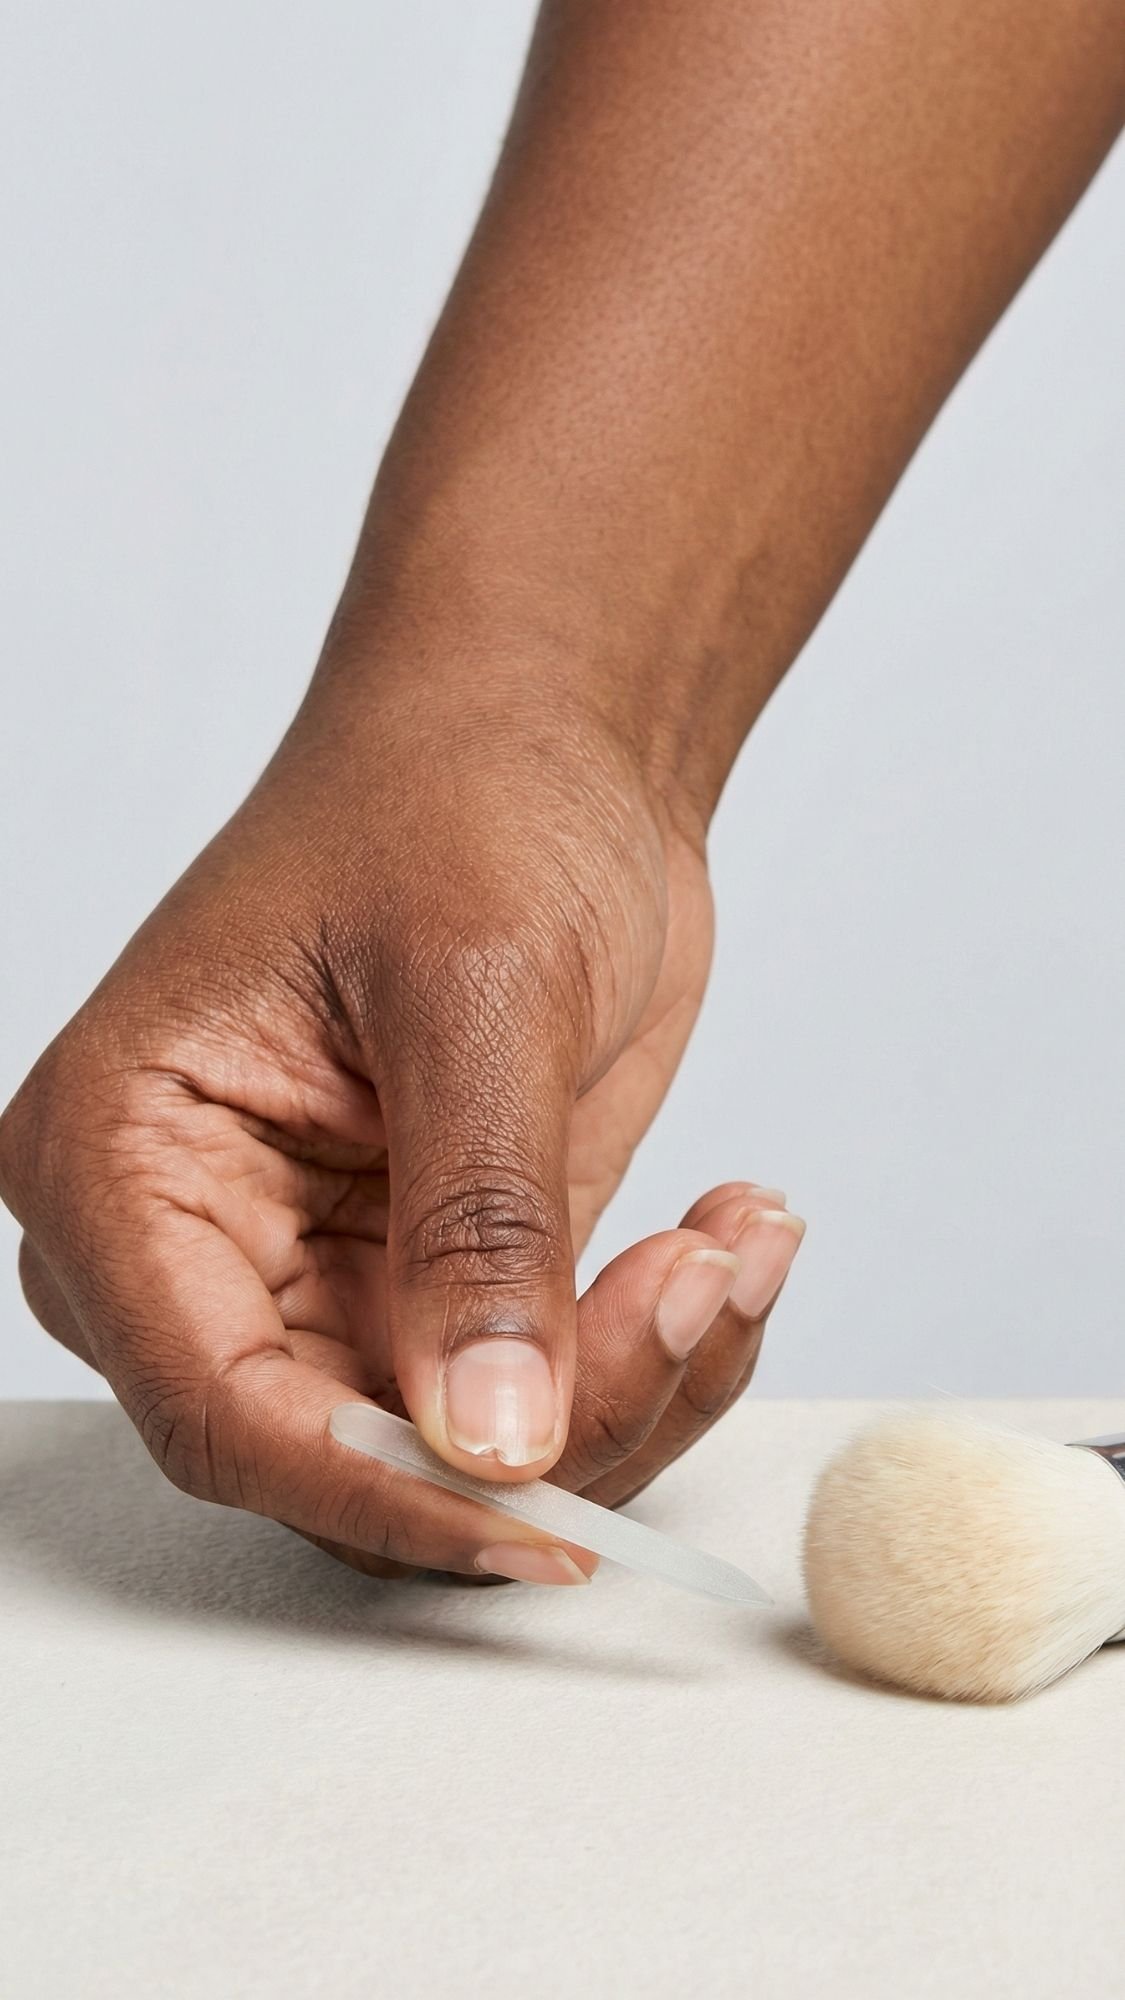
Step 4, Light Buff, Only If You Need It
- What to do: Buff just enough to remove shine. Use a fine grit buffer, not a sanding block.
- Why it matters: A slightly matte nail plate grips product better, and chrome needs a smooth base.
- Pro tip: If your nails already look smooth, skip heavy buffing. Over-buffing thins nails and makes them peel.
- Common mistake + fix:
- Mistake: buffing until the nail feels “soft.”
- Fix: stop at “shine is gone,” not “nail is thin.”
Step 5, Cleanse And Dehydrate Like You Mean It
- What to do: Wipe nails with alcohol or nail cleanser, then apply dehydrator if you have it.
- Why it matters: Oil causes lifting, and chrome tends to fail at the tips first if you skip this.
- Pro tip: Don’t touch your nails after dehydration. Your fingertips re-oil them immediately, and chrome will punish you for it.
- Common mistake + fix:
- Mistake: using cotton pads that shed fuzz.
- Fix: use lint-free wipes only.


Step 6, Base Coat Choice Matters
- What to do: Choose the base coat that fits your nail reality.
- Ridge-filling base if you have ridges and want a smoother reflection
- Sticky base if you struggle with chipping
- Strengthening base if your nails bend easily
- Why it matters: The base coat creates the foundation, and chrome is only as smooth as what’s underneath it.
- Common mistake + fix:
- Mistake: using thick base coat “for strength.”
- Fix: use two thin coats instead of one thick coat.
Key Takeaways
- Chrome needs a smooth, oil-free surface, or it looks streaky and lifts.
- Shape before cuticles, it keeps edges cleaner and helps longevity.
- Dehydration is non-negotiable, especially if your nails chip fast.
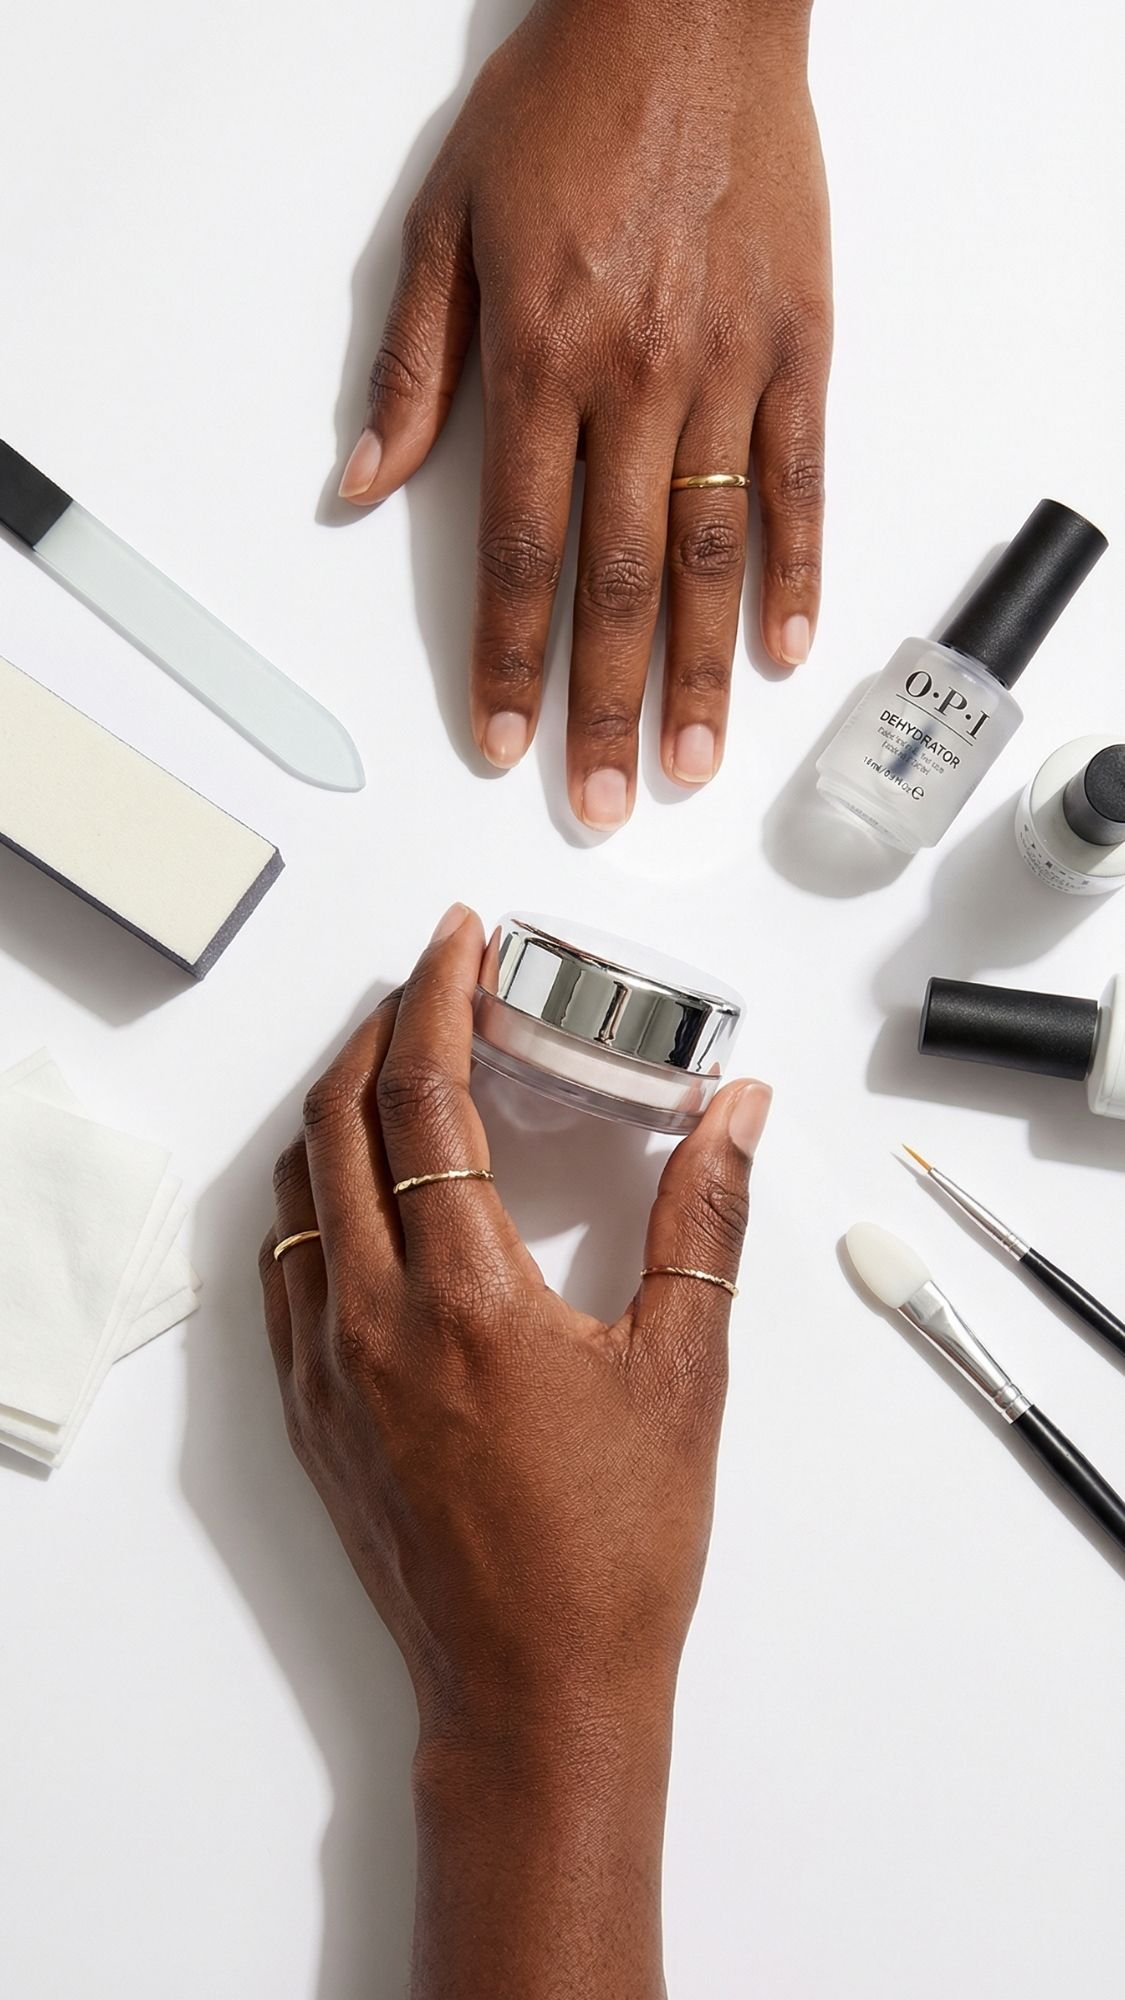
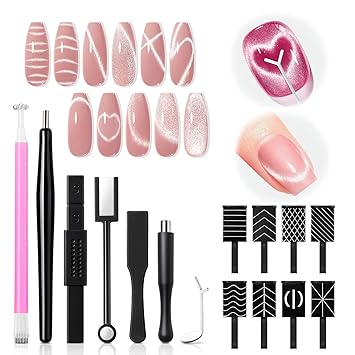
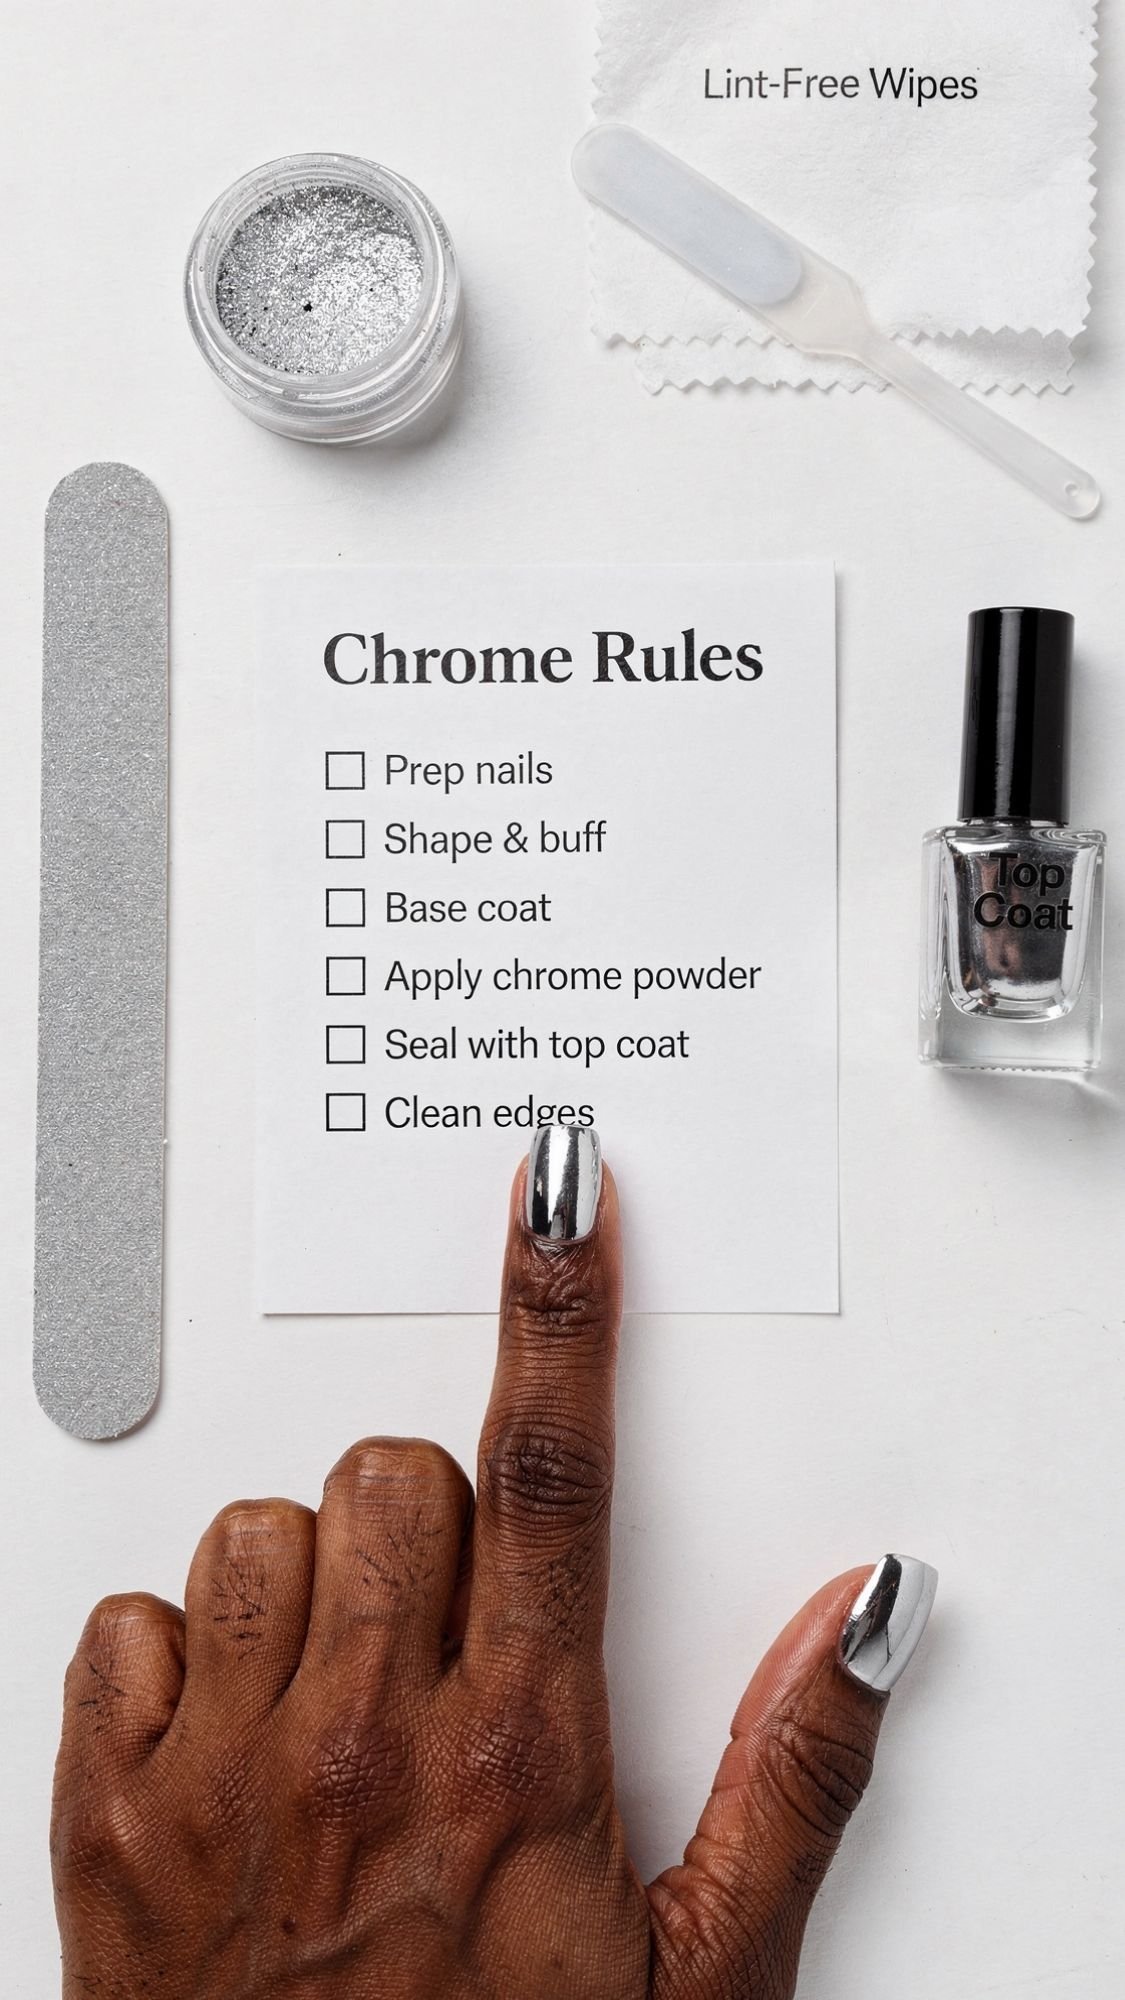
Tools + Products Needed
Let’s keep this realistic. You do not need a salon drawer the size of a dishwasher to get chrome nails that look expensive in selfies. You just need the right basics, and you need to stop buying random top coats that shrink and ruin your reflection at the tips. That betrayal hurts.
Must-Haves, The Non-Negotiables
- Nail file + buffer
- What to look for: a medium grit file for shaping, a fine grit buffer for removing shine
- Why it matters: smooth shape plus smooth surface equals a cleaner chrome reflection
- Cuticle pusher + small nipper
- What to look for: a glass or stainless pusher, nipper only for true hangnails
- Why it matters: chrome highlights messy edges fast
- Lint-free wipes
- What to look for: no fuzz, no fibers
- Why it matters: chrome shows lint like it’s a neon sign
- Alcohol or nail cleanser, plus dehydrator if you have it
- What to look for: 70%+ isopropyl alcohol works in a pinch
- Why it matters: oil causes lifting, and chrome punishes oily nails
- Base coat
- What to look for: ridge-filling if you want smooth reflection, sticky base if you chip easily
- Color polish
- What to look for: opaque, even formula that levels nicely
- Why it matters: chrome amplifies whatever base you pick
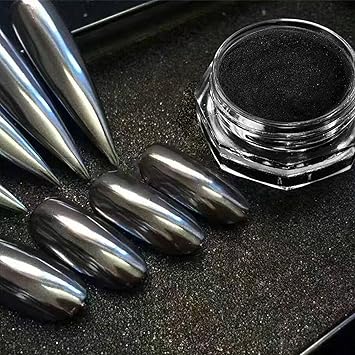
- Chrome product
- Options:
- Chrome powder for the most reflective finish
- Chrome topper polish for an easier regular-polish route
- Options:
- Top coat
- What to look for: glossy, non-shrinking, compatible with your method
- Why it matters: the top coat decides whether your chrome looks like glass or like it’s wearing a wrinkly raincoat


Nice-To-Haves, But Honestly Very Helpful
- Silicone applicator
- Why: it burnishes chrome powder evenly and avoids patchiness
- Detail cleanup brush
- Why: clean edges look more professional and photograph better
- Dust brush
- Why: removes powder without smearing it into the nail
- Striping brush or liner brush
- Why: makes micro-French tips and chrome swirls way easier
- Nitrile gloves
- Why: keeps oils off during prep and helps if you do a lot of sets
Budget Alternatives That Actually Work
- Makeup sponge tip instead of a silicone applicator
- Works best for pearl and glazed chrome effects
- Old eyeshadow brush for aura blending
- Great for chrome aura nails and soft gradients
- Drugstore quick-dry top coat for regular polish method
- Only if it does not shrink, test it on one nail first
- Press-ons instead of powder
- If you want fast results and consistent shine for content days
What To Look For, So You Don’t Waste Money
- Chrome powder texture: fine and silky, not chunky
- Top coat behavior: glossy, smooth, and does not pull back from the edges as it dries or cures
- Base coat choice: ridge-filling if you have texture, sticky base if you struggle with chips
- Press-on thickness: thin enough to look natural, thick ones can look bulky and catch weird reflections
Key Takeaways
- Top coat quality makes or breaks chrome, especially at the tips.
- Lint-free wipes matter more than people think, chrome shows everything.
- You can do this on a budget, as long as you pick the right essentials.
The 3 Best Ways To Get “Selfie Chrome”
Alright, here’s where chrome either looks like smooth liquid metal or like you fought with glitter and lost. The biggest difference comes from method choice. I’ll walk you through three routes, gel chrome for max mirror, regular polish for low-commitment, and press-ons for the fastest “I need these nails now” moment.
Method A, Gel Chrome With A Lamp (Sharpest Mirror Payoff)
If you want that crisp reflection stripe that looks like jewelry in selfies, gel chrome wins. You need control, thin layers, and clean edges. You also need to keep gel off your skin. Gel allergies are real, and they usually start when people get messy around the cuticles.


1) Base Coat
- What you’re trying to achieve: a grippy foundation that prevents lifting at the tips
- How to apply: use a thin coat, cap the free edge, cure fully
- Why it matters: the base coat anchors everything, chrome will fail fastest at the tips without it
- Common mistake + fix:
- Mistake: flooding the cuticle.
- Fix: paint with a small gap, then push product toward the edge with a detail brush.
- Sensitive-skin alternative: if you react to gel, switch to press-ons or regular polish chrome topper, and avoid skin contact either way
2) Color Coat
- What you’re trying to achieve: an even, smooth base that levels without ridges
- How to apply: 1 to 2 thin coats, cure each coat, keep them smooth
- Why it matters: chrome magnifies bumps and streaks
- Common mistake + fix:
- Mistake: thick color coat “to make it faster.”
- Fix: do two thin coats, thick layers wrinkle and look wavy under flash.
3) No-Wipe Top Coat, The Chrome Grip Layer
- What you’re trying to achieve: the perfect surface for powder to stick and buff smoothly
- How to apply: thin and even, cap the free edge, cure fully
- Why it matters: chrome powder needs the right tack level, too slick and it won’t stick, too sticky and it goes patchy
- Common mistake + fix:
- Mistake: under-curing.
- Fix: cure for the full recommended time, under-curing can cause lifting and can increase irritation risk.
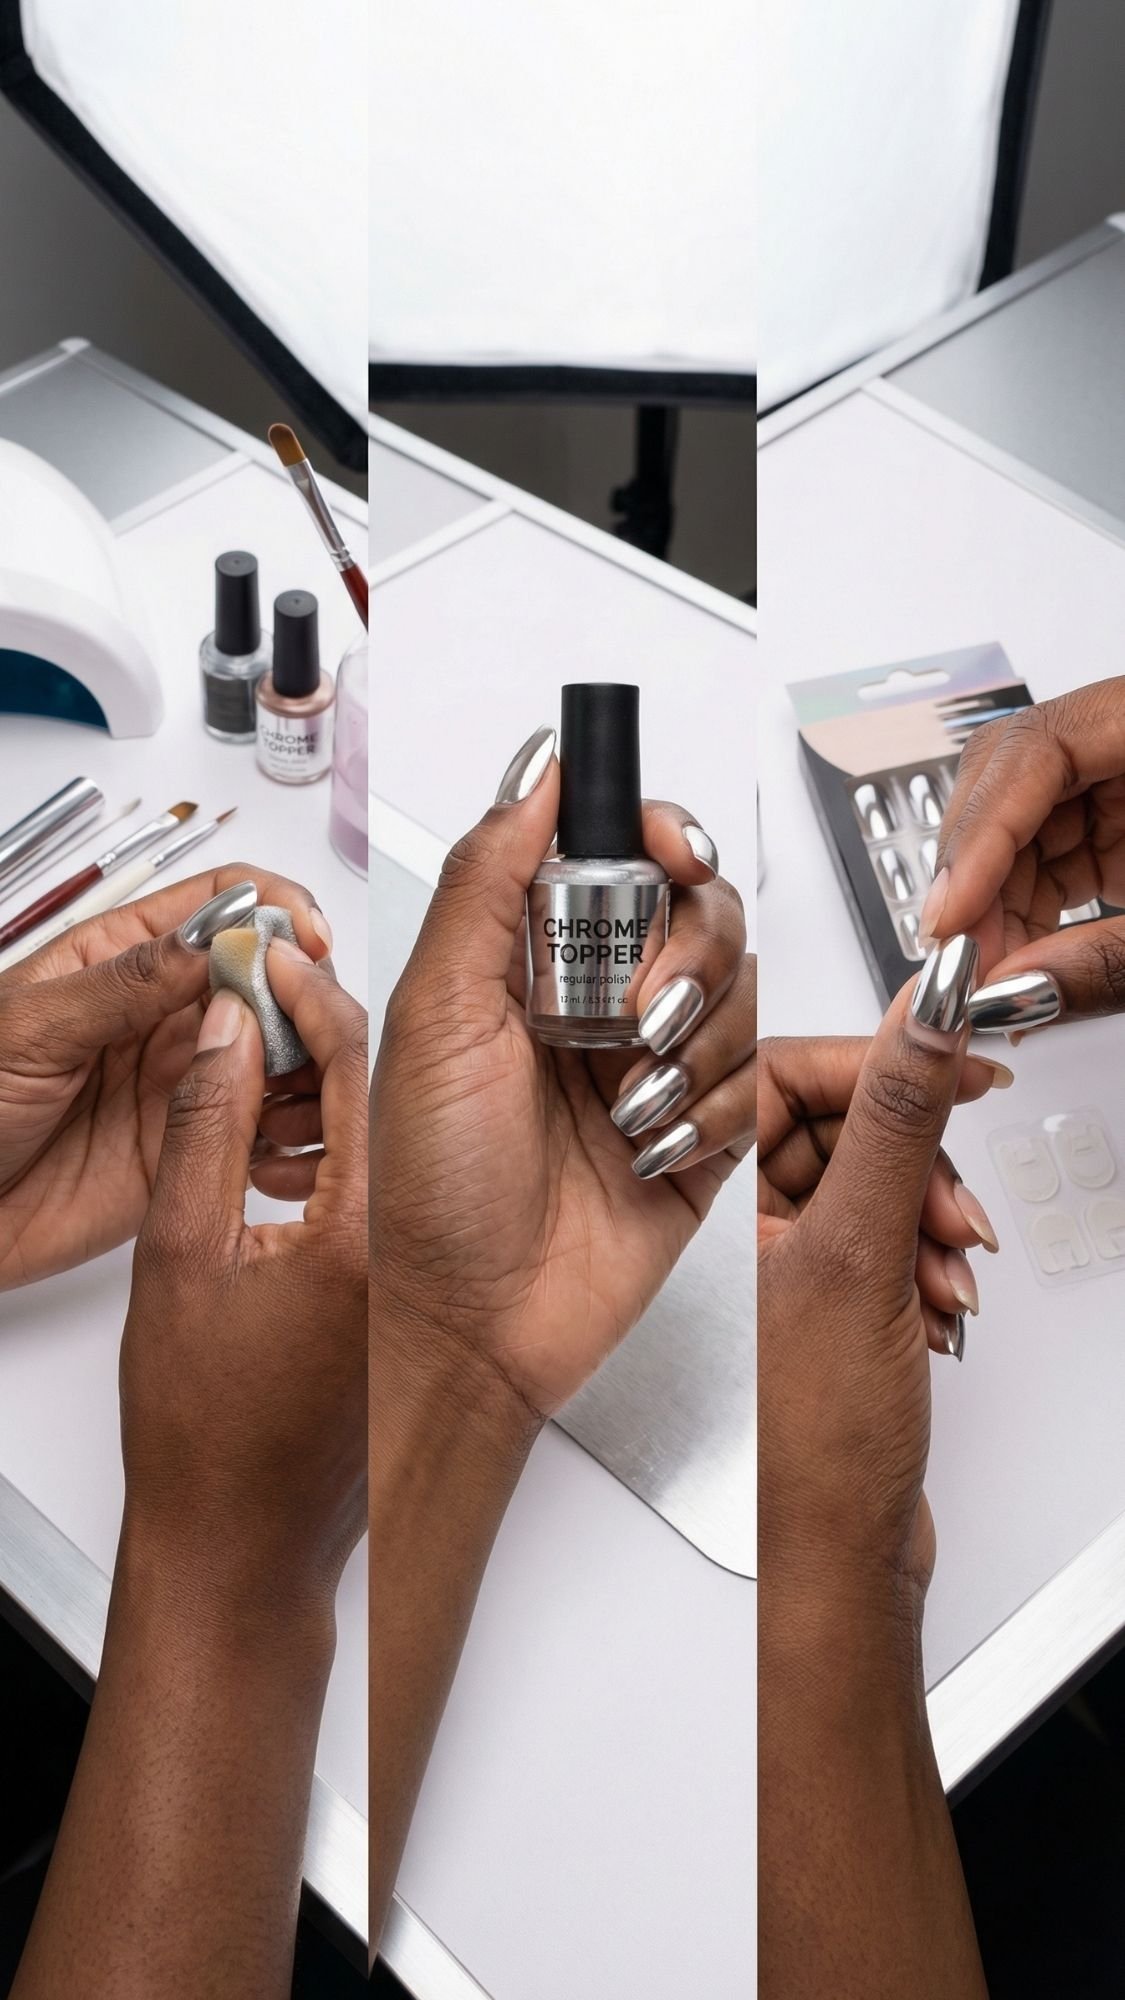
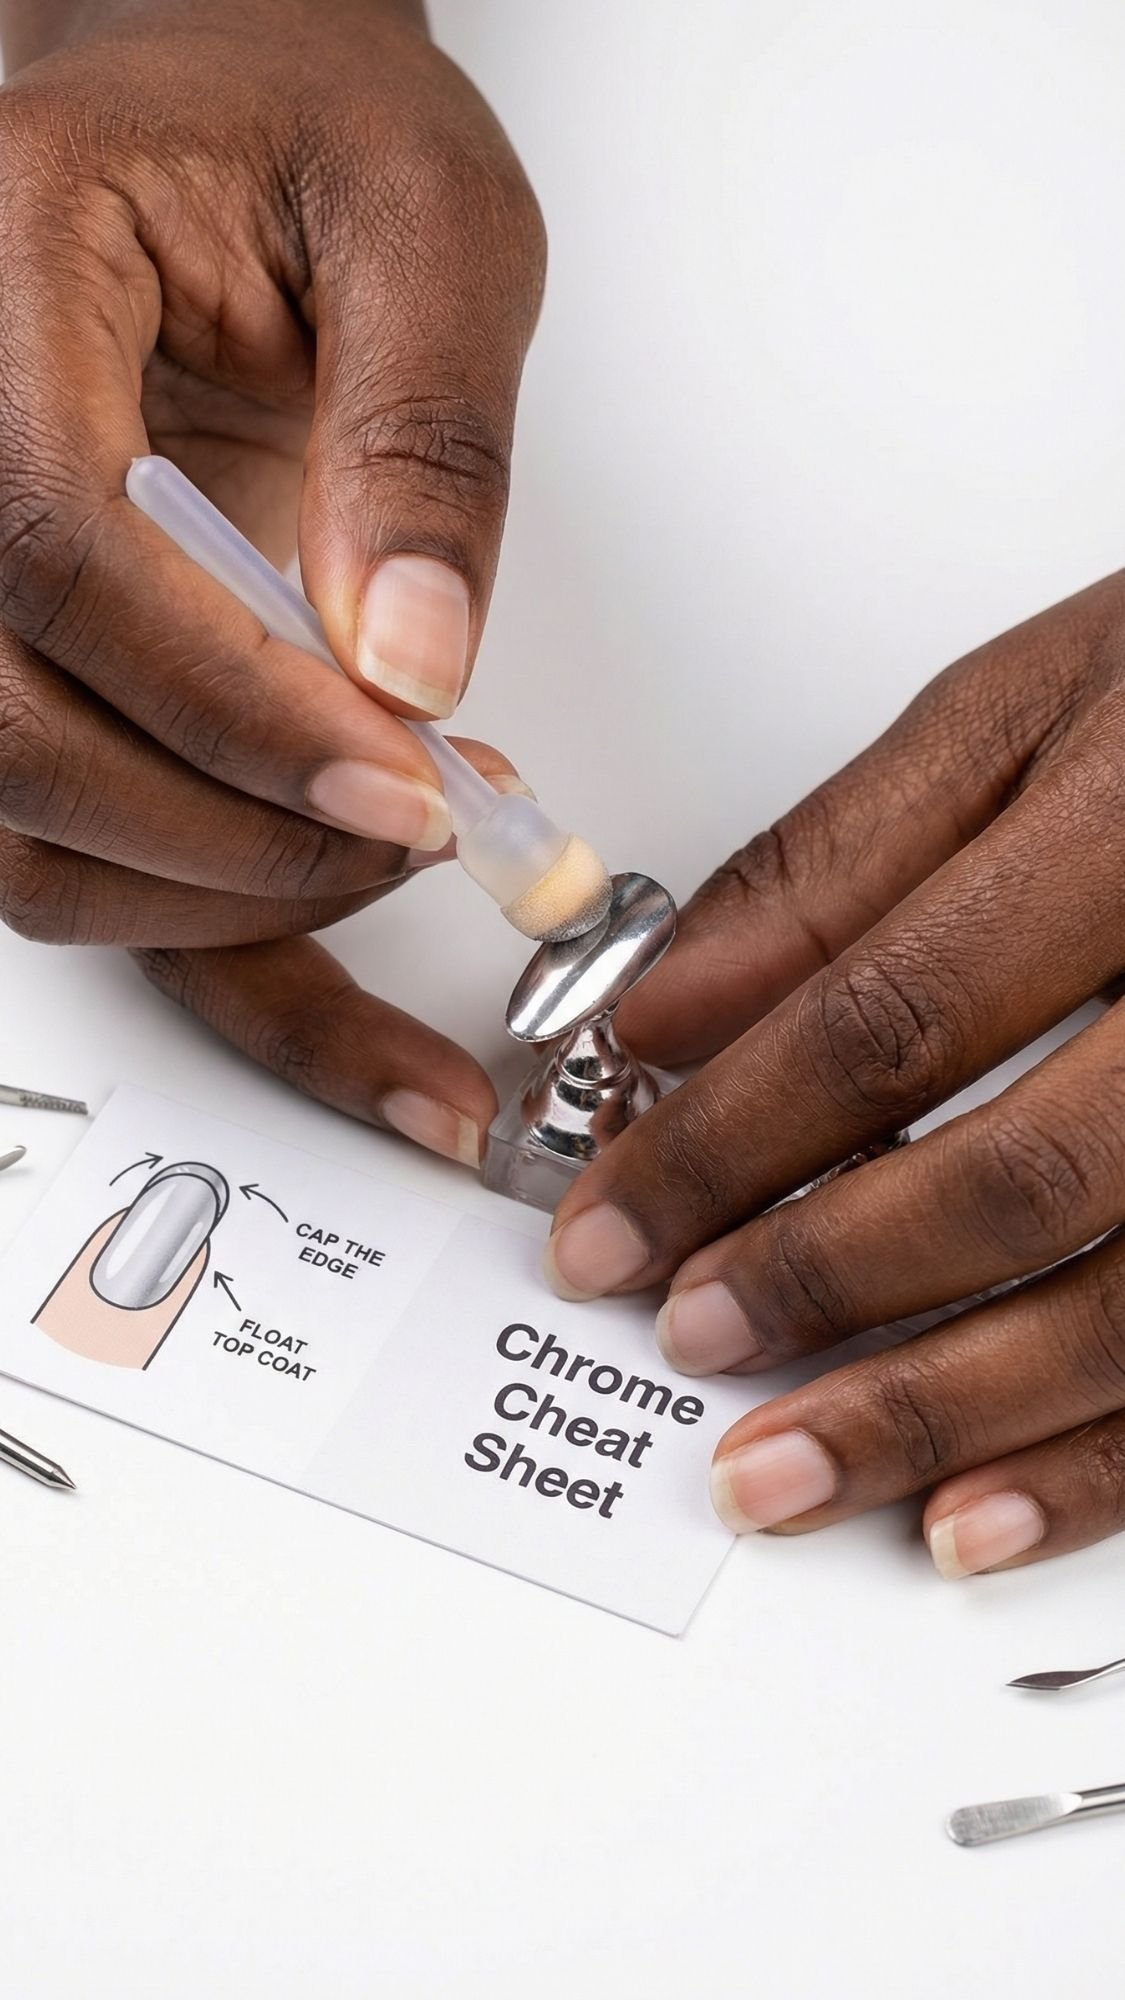
4) Burnish Chrome Powder
- What you’re trying to achieve: a smooth, even mirror layer with no bald spots
- How to apply: use a silicone tool or sponge tip and rub in small circles, then finish with longer strokes
- What it should feel like: it goes from slightly draggy to buttery-smooth, like satin on glass
- Why it matters: burnishing compresses the powder into a reflective layer that photographs cleanly
- Common mistake + fix:
- Mistake: rubbing too lightly and leaving speckly areas.
- Fix: apply more pressure, but keep it controlled so you don’t disturb the layer.
5) Seal It, Carefully
- What you’re trying to achieve: shine plus durability without dulling the chrome
- How to apply: apply top coat with a light touch, float the brush, cap the edge, cure fully
- Why it matters: a dragging brush can streak chrome, and uncapped edges chip fast
- Common mistake + fix:
- Mistake: brushing hard like you’re scrubbing a pan.
- Fix: float the top coat, then cap the free edge like you’re wrapping it.
Safety Note
- Avoid gel on skin, clean up before curing, cure fully, stop if you notice burning, itching, swelling, or persistent redness.
Method B, Regular Polish Chrome (Easiest Entry Level)
This route gives more “chrome glow” than full mirror, but it still looks great in selfies, especially for glazed and pearl finishes. It’s also easier to remove, which makes it perfect if you change your mind every week. Respect.

1) Base Coat
- Choose ridge-filling if you have texture, sticky base if you chip.
- Apply thin, let it dry.
2) Color
- Use smooth, even coats, let each coat dry longer than you think.
- Pro tip, touch the side of the nail. If it feels cool, it’s still drying.
3) Chrome Topper Or Pigment Made For Air-Dry
- Apply a thin layer, let it set.
- What I’ve noticed is that some toppers look streaky until top coat, so don’t panic too early.
4) Top Coat
- Use a glossy top coat, apply with a light hand, cap the free edge.
- Dry time strategy: give it at least 20 minutes before you do anything chaotic with your hands.
Common mistake + fix
- Mistake: rushing dry time.
- Fix: do thin coats and wait, thick coats dent and ruin the shine.
Method C, Press-On Chrome (Fastest Content-Friendly Option)
Press-ons can look shockingly real now, and honestly, they film beautifully because they come with a smooth finish baked in. If you want chrome nails for a trip, a shoot, or a weekend event, press-ons save your life.


1) Size Like A Pro
- If you’re between sizes, go slightly smaller and file the sides to fit.
- A too-big press-on lifts faster.
2) Pick Adhesion, Tabs vs Glue
- Tabs: best for 1 to 3 days, easier removal
- Glue: best for 5 to 10 days, stronger hold
- Reality check, your prep still matters either way.
3) Glue Placement Technique
- Apply a small dot of glue near the center of your natural nail and a thin swipe on the press-on.
- Press from cuticle area downward to push out air.
- Hold for 20 to 30 seconds per nail.
4) Edge Sealing So Hair Doesn’t Catch
- File the base edge lightly if needed, then press down again.
- Pro tip, use a tiny bit of top coat around the seam if your press-ons allow it.
Removal That Protects Natural Nails
- Soak in warm soapy water and oil, gently lift, never rip.
- If you rip them off, your nails will peel, and then chrome will look rough next time.
Key Takeaways
- Gel chrome gives the crispest mirror reflection, but requires careful skin avoidance and full curing.
- Regular polish chrome works best for pearl and glazed effects, and needs patience with dry time.
- Press-ons give the fastest, most consistent shine, but sizing and prep still decide longevity.
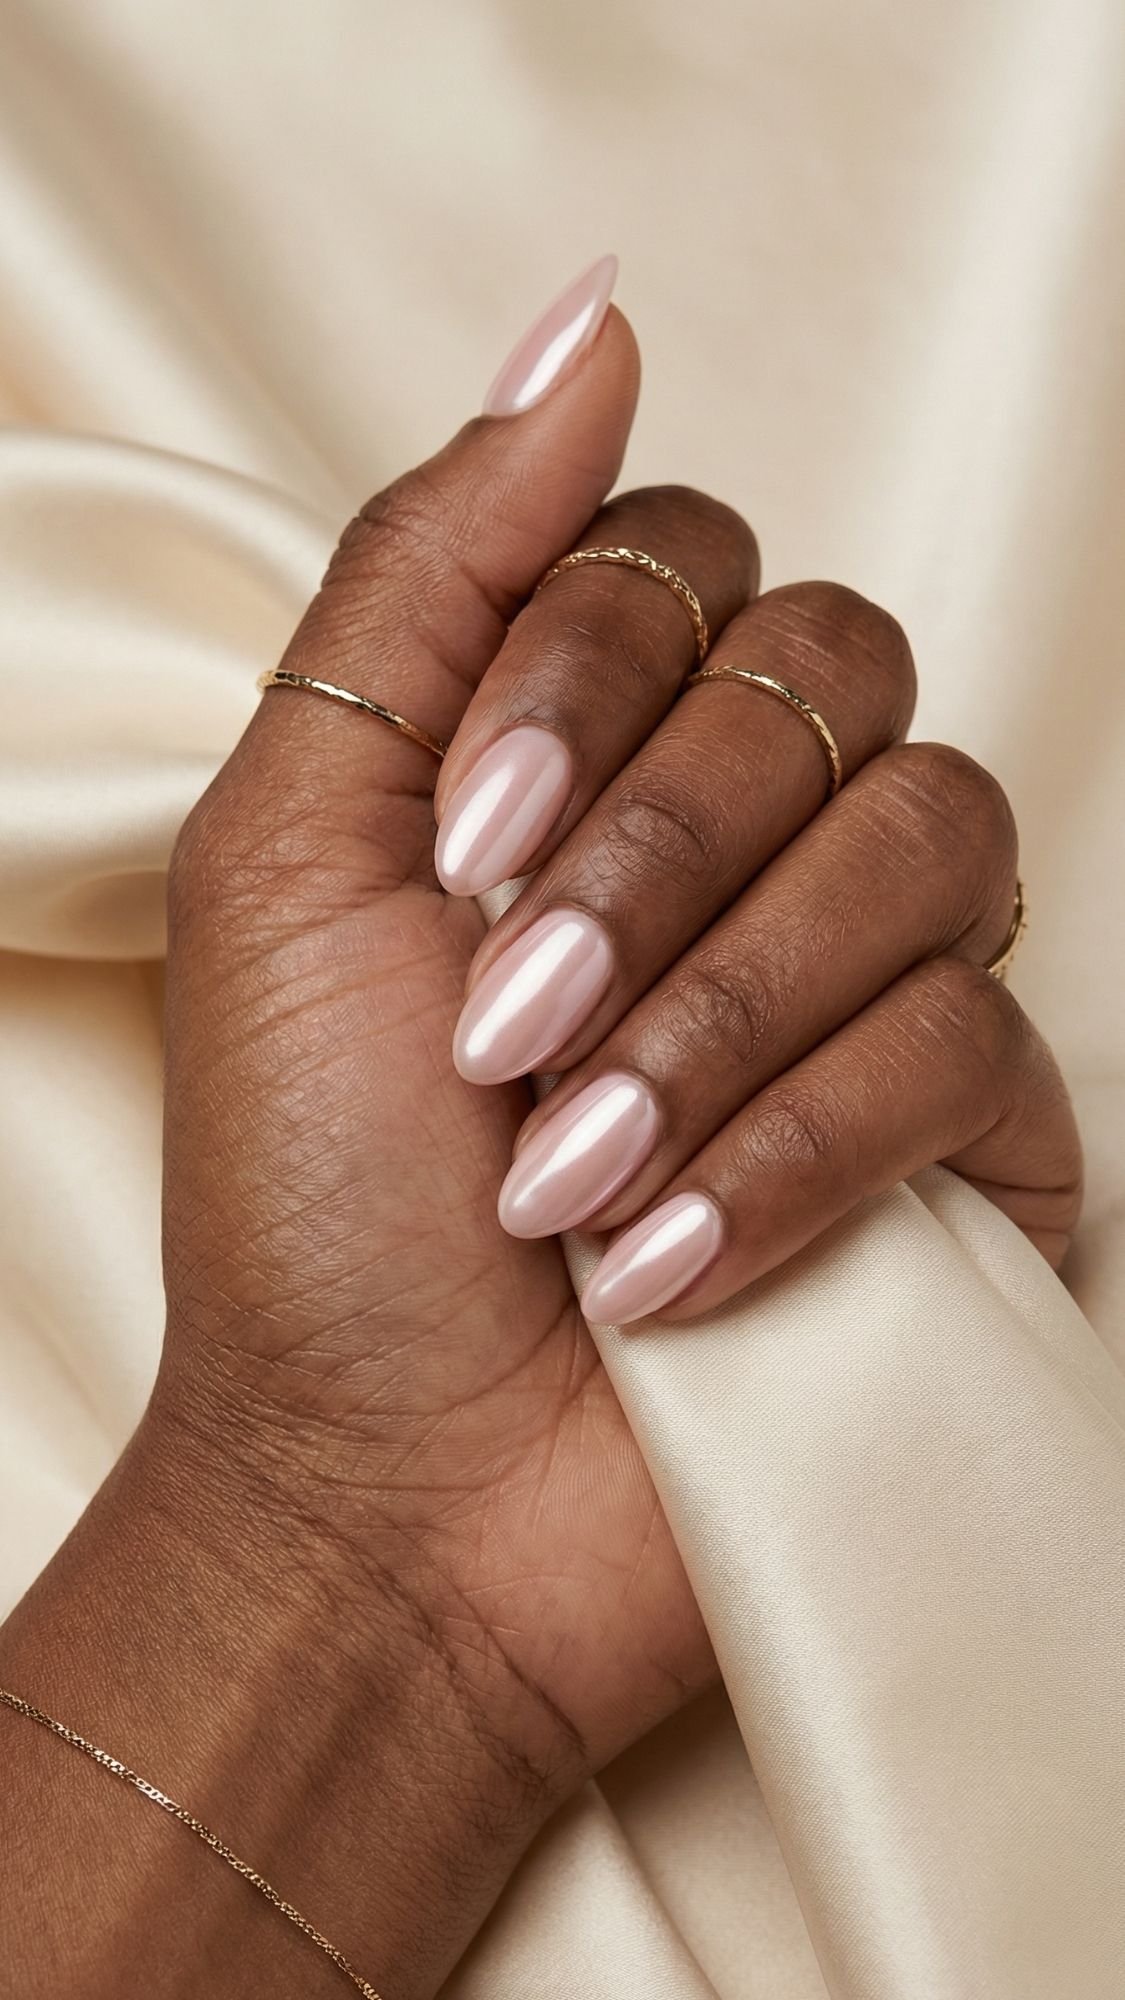
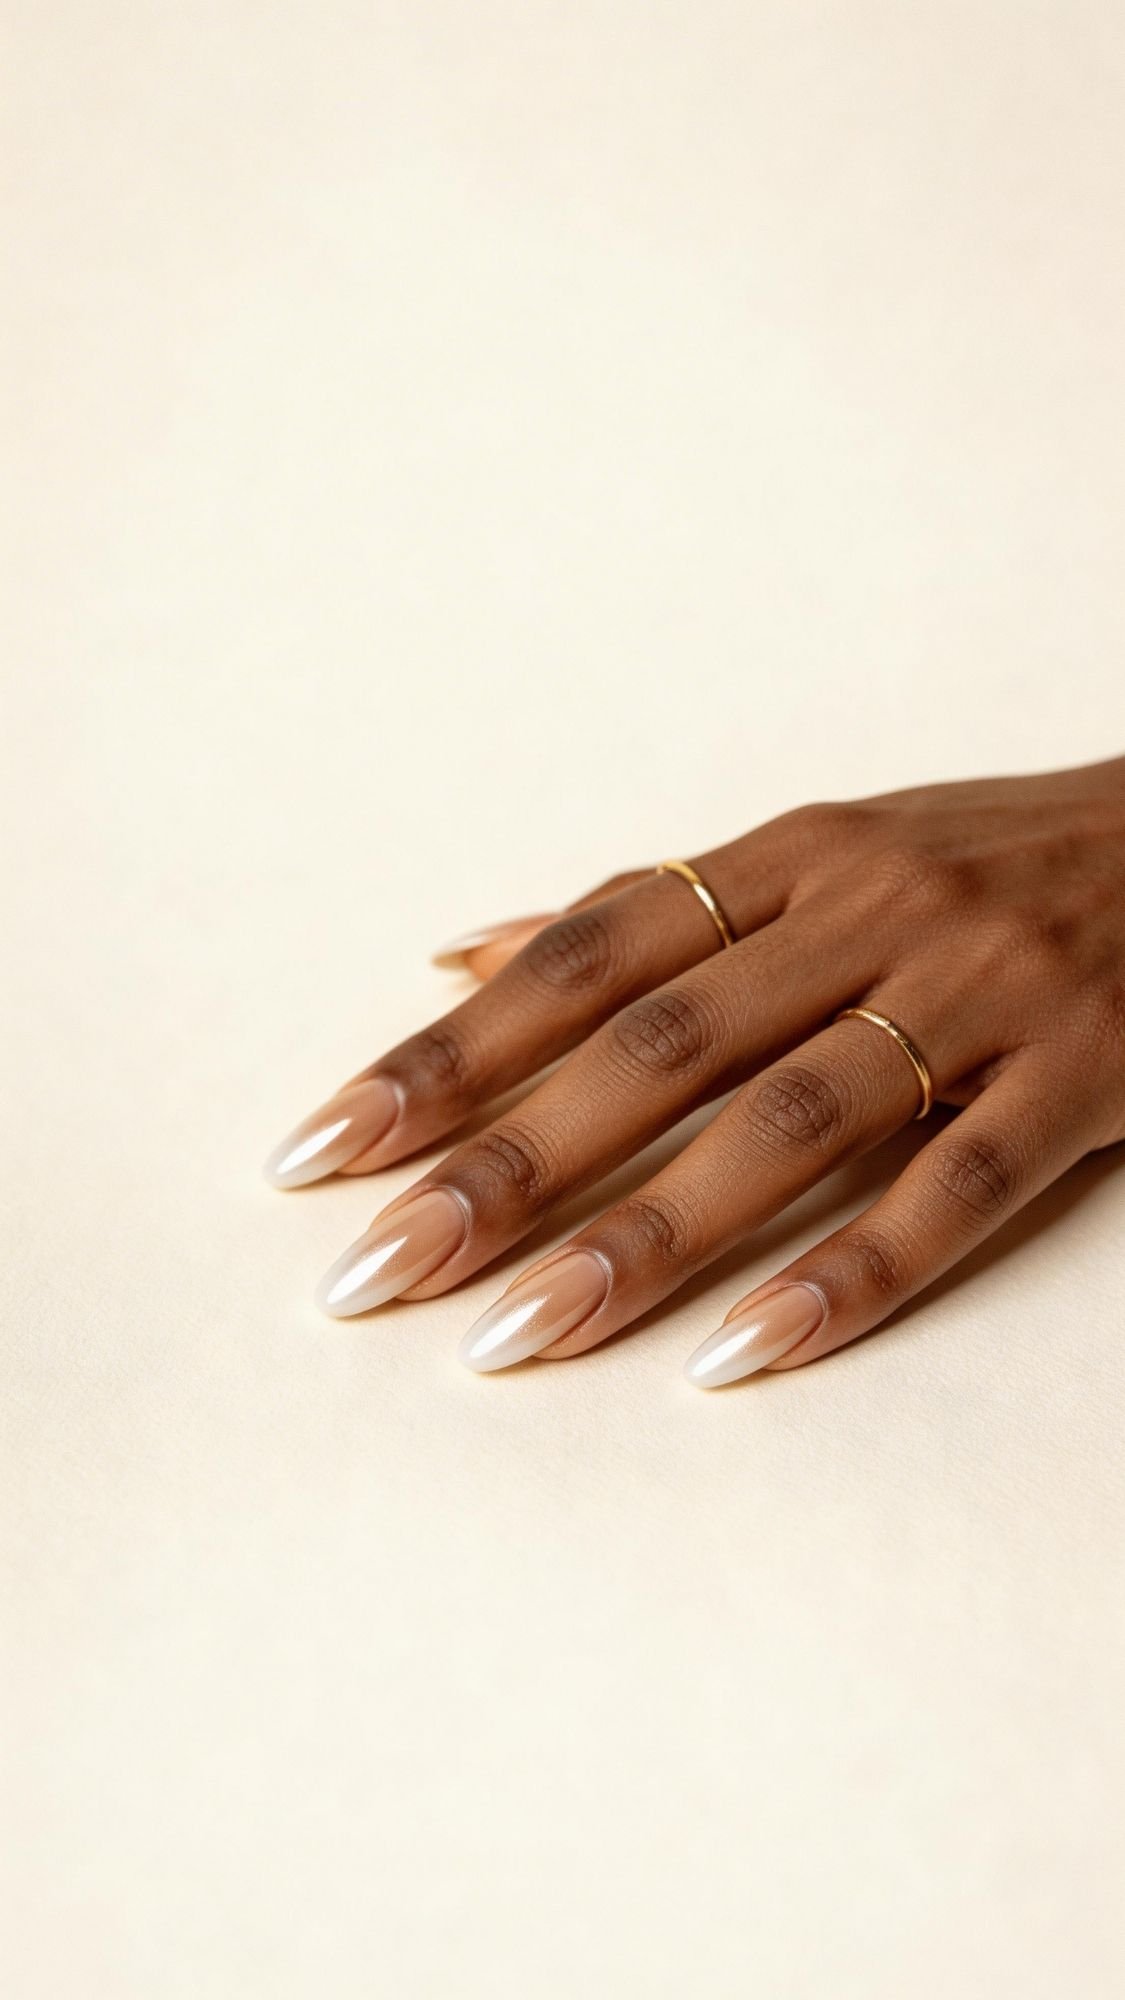
1) Glazed Donut Pearl Chrome Nails
If you want chrome that looks expensive in every selfie without screaming for attention, start here. Glazed pearl chrome gives that smooth, glossy “lit from within” shine that reads clean in daylight and still pops under flash. IMO, it’s the easiest chrome to wear every day, and it flatters short nails like it was designed for them.
The Goal
You’re going for a soft pearl glaze, not a harsh mirror. Think: polished, creamy, and reflective enough to catch a highlight stripe when you tilt your hand, but still natural-looking.
Best For
- Short nails that need dimension
- Beginner-friendly chrome that won’t show every tiny mistake
- Anyone who wants clean, minimal, “put together” nails without doing the most
Color Pairings That Make It Look Next-Level
- Milky pink base for a soft romantic glow
- Sheer nude base for a barely-there glazed look
- Milky white base for a brighter, “glass nail” effect
If you want your hands to look longer in photos, pick a base that blends close to your natural nail tone, then add the pearl chrome on top. The blend makes the reflection look smoother and your nail shape look more elongated.
Pro Application Notes
What I’ve noticed over the years is that people over-burnish pearl chrome like it’s mirror chrome. That’s when it starts looking streaky or dull in patches. Pearl chrome wants a gentler touch.
- Gel method: Apply chrome over a cured no-wipe top coat, then burnish lightly until it looks even and glossy.
- Regular polish method: Use a pearl chrome topper, then seal with a glossy top coat using a light hand.
Sensory detail that matters: When you burnish pearl chrome correctly, the nail surface feels silky-smooth, almost like satin. If it feels gritty or draggy, you need another pass with the applicator.
 Check Pricing
This package contains 2 PCS pearl nail mirror pigment powders. It needs to be used with gel nail polish and no wipe top coat. 1 PCS for white pearl powder, 1 PCS for red pearl powder. They can make many different designs for your gel nail polish.
I earn from qualifying purchases. If you click a link and make a purchase, I may receive a commission at no extra cost to you — Thank You for the support!
-
Check Pricing
Durable & Long-Lasting: The chrome finish is sealed with a protective gel layer to maintain fake acrylic nails press on's intense shine. Resistant to chipping and fading, each chrome milky white press on nails stiletto stays flawless for up to two weeks when applied correctly
I earn from qualifying purchases. If you click a link and make a purchase, I may receive a commission at no extra cost to you — Thank You for the support!

Common Mistake + Fix
- Mistake: The chrome looks patchy near the cuticle. Fix: Keep your base coats thinner and smoother, then burnish chrome from the center outward in small circles. Patchiness usually comes from uneven tack or uneven pressure.
- Mistake: The top coat dulls the glaze. Fix: Float the top coat. Don’t press the brush down, and cap the free edge to lock in shine.
Wear And Maintenance Tips
- Apply cuticle oil after everything fully sets, not before. Oil smears can make pearl chrome look cloudy.
- Re-top with a glossy top coat on day 3 or 4 if you want that “fresh set” shine for photos.
Key Takeaways
- Pearl chrome glows, it doesn’t mirror, so keep it soft and even.
- Thin, smooth base layers make the glaze look more expensive.
- Gentle burnishing prevents streaks.
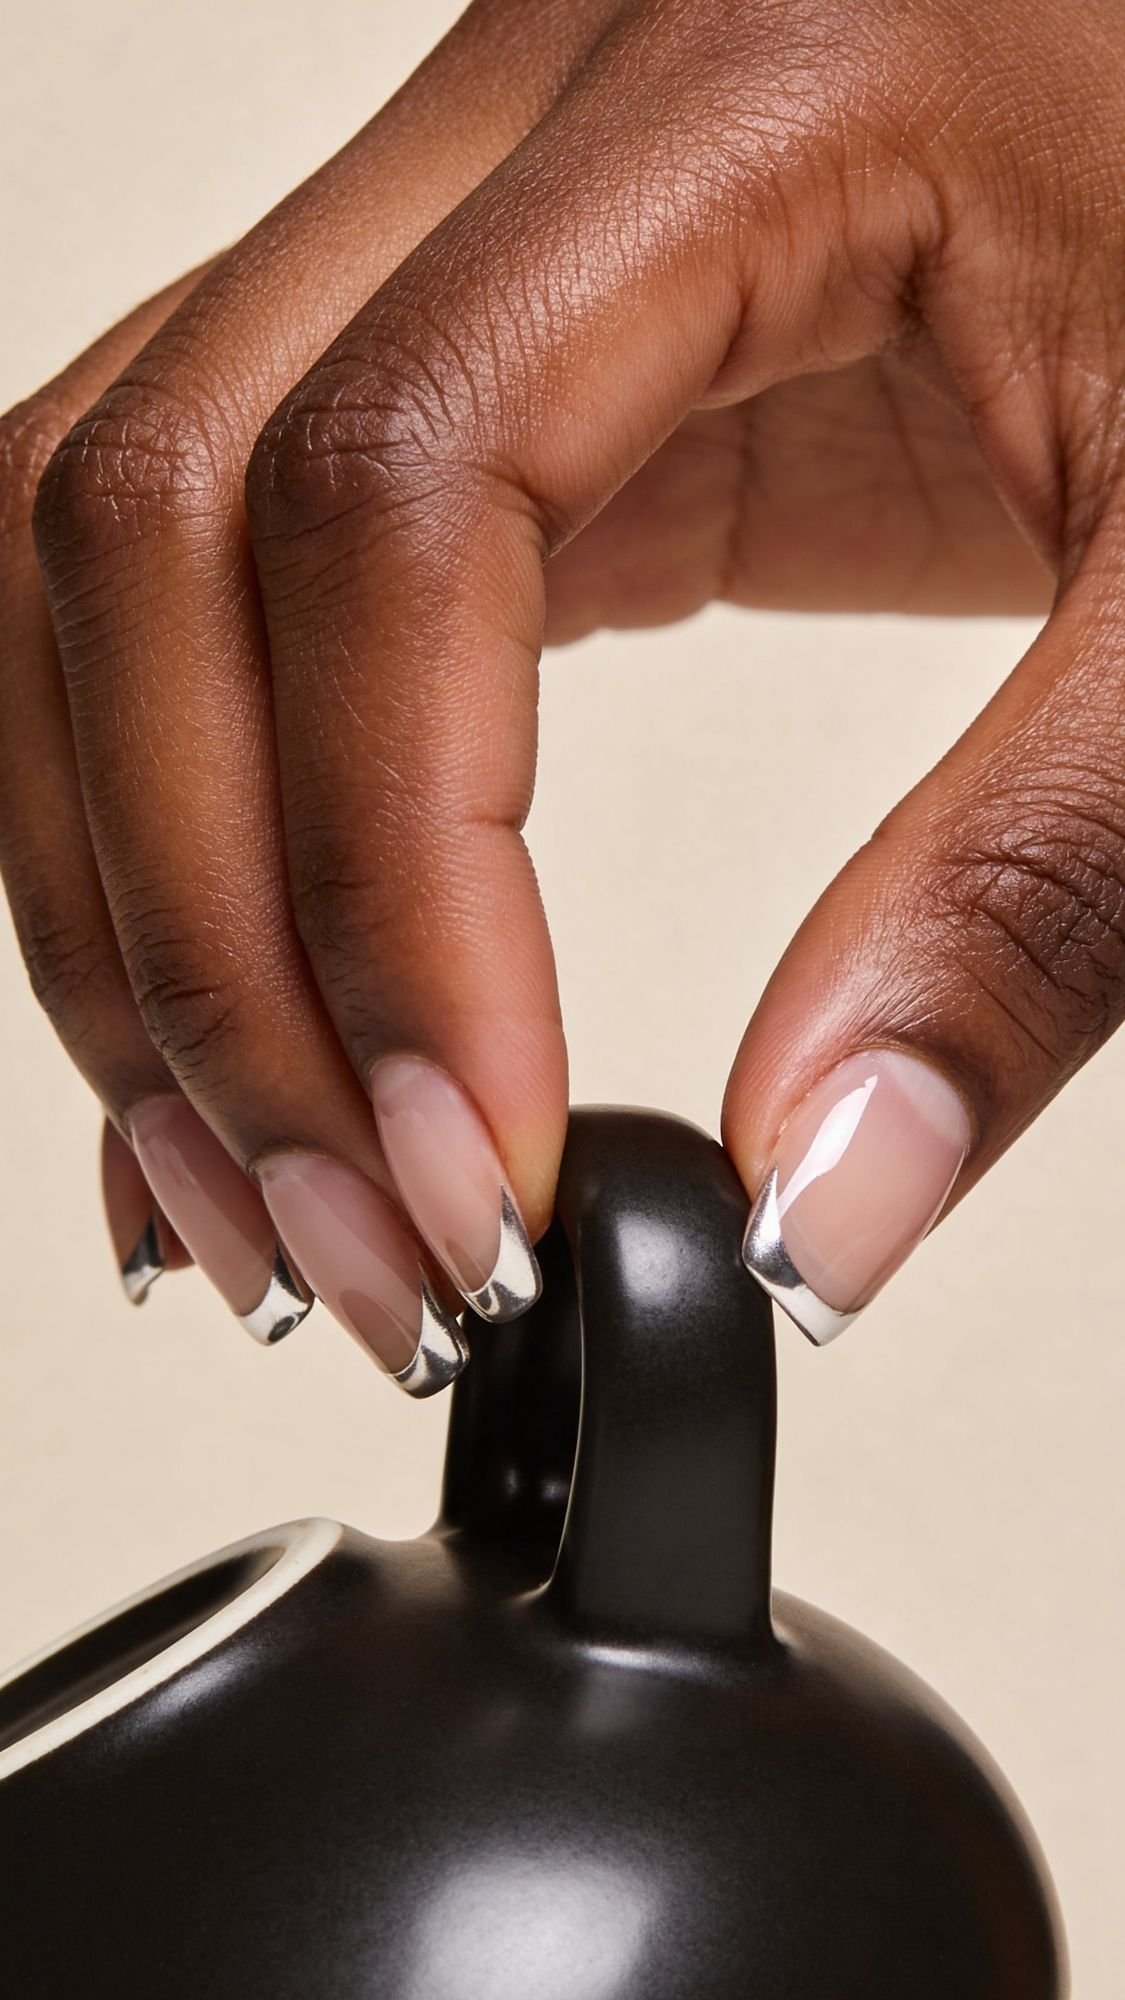
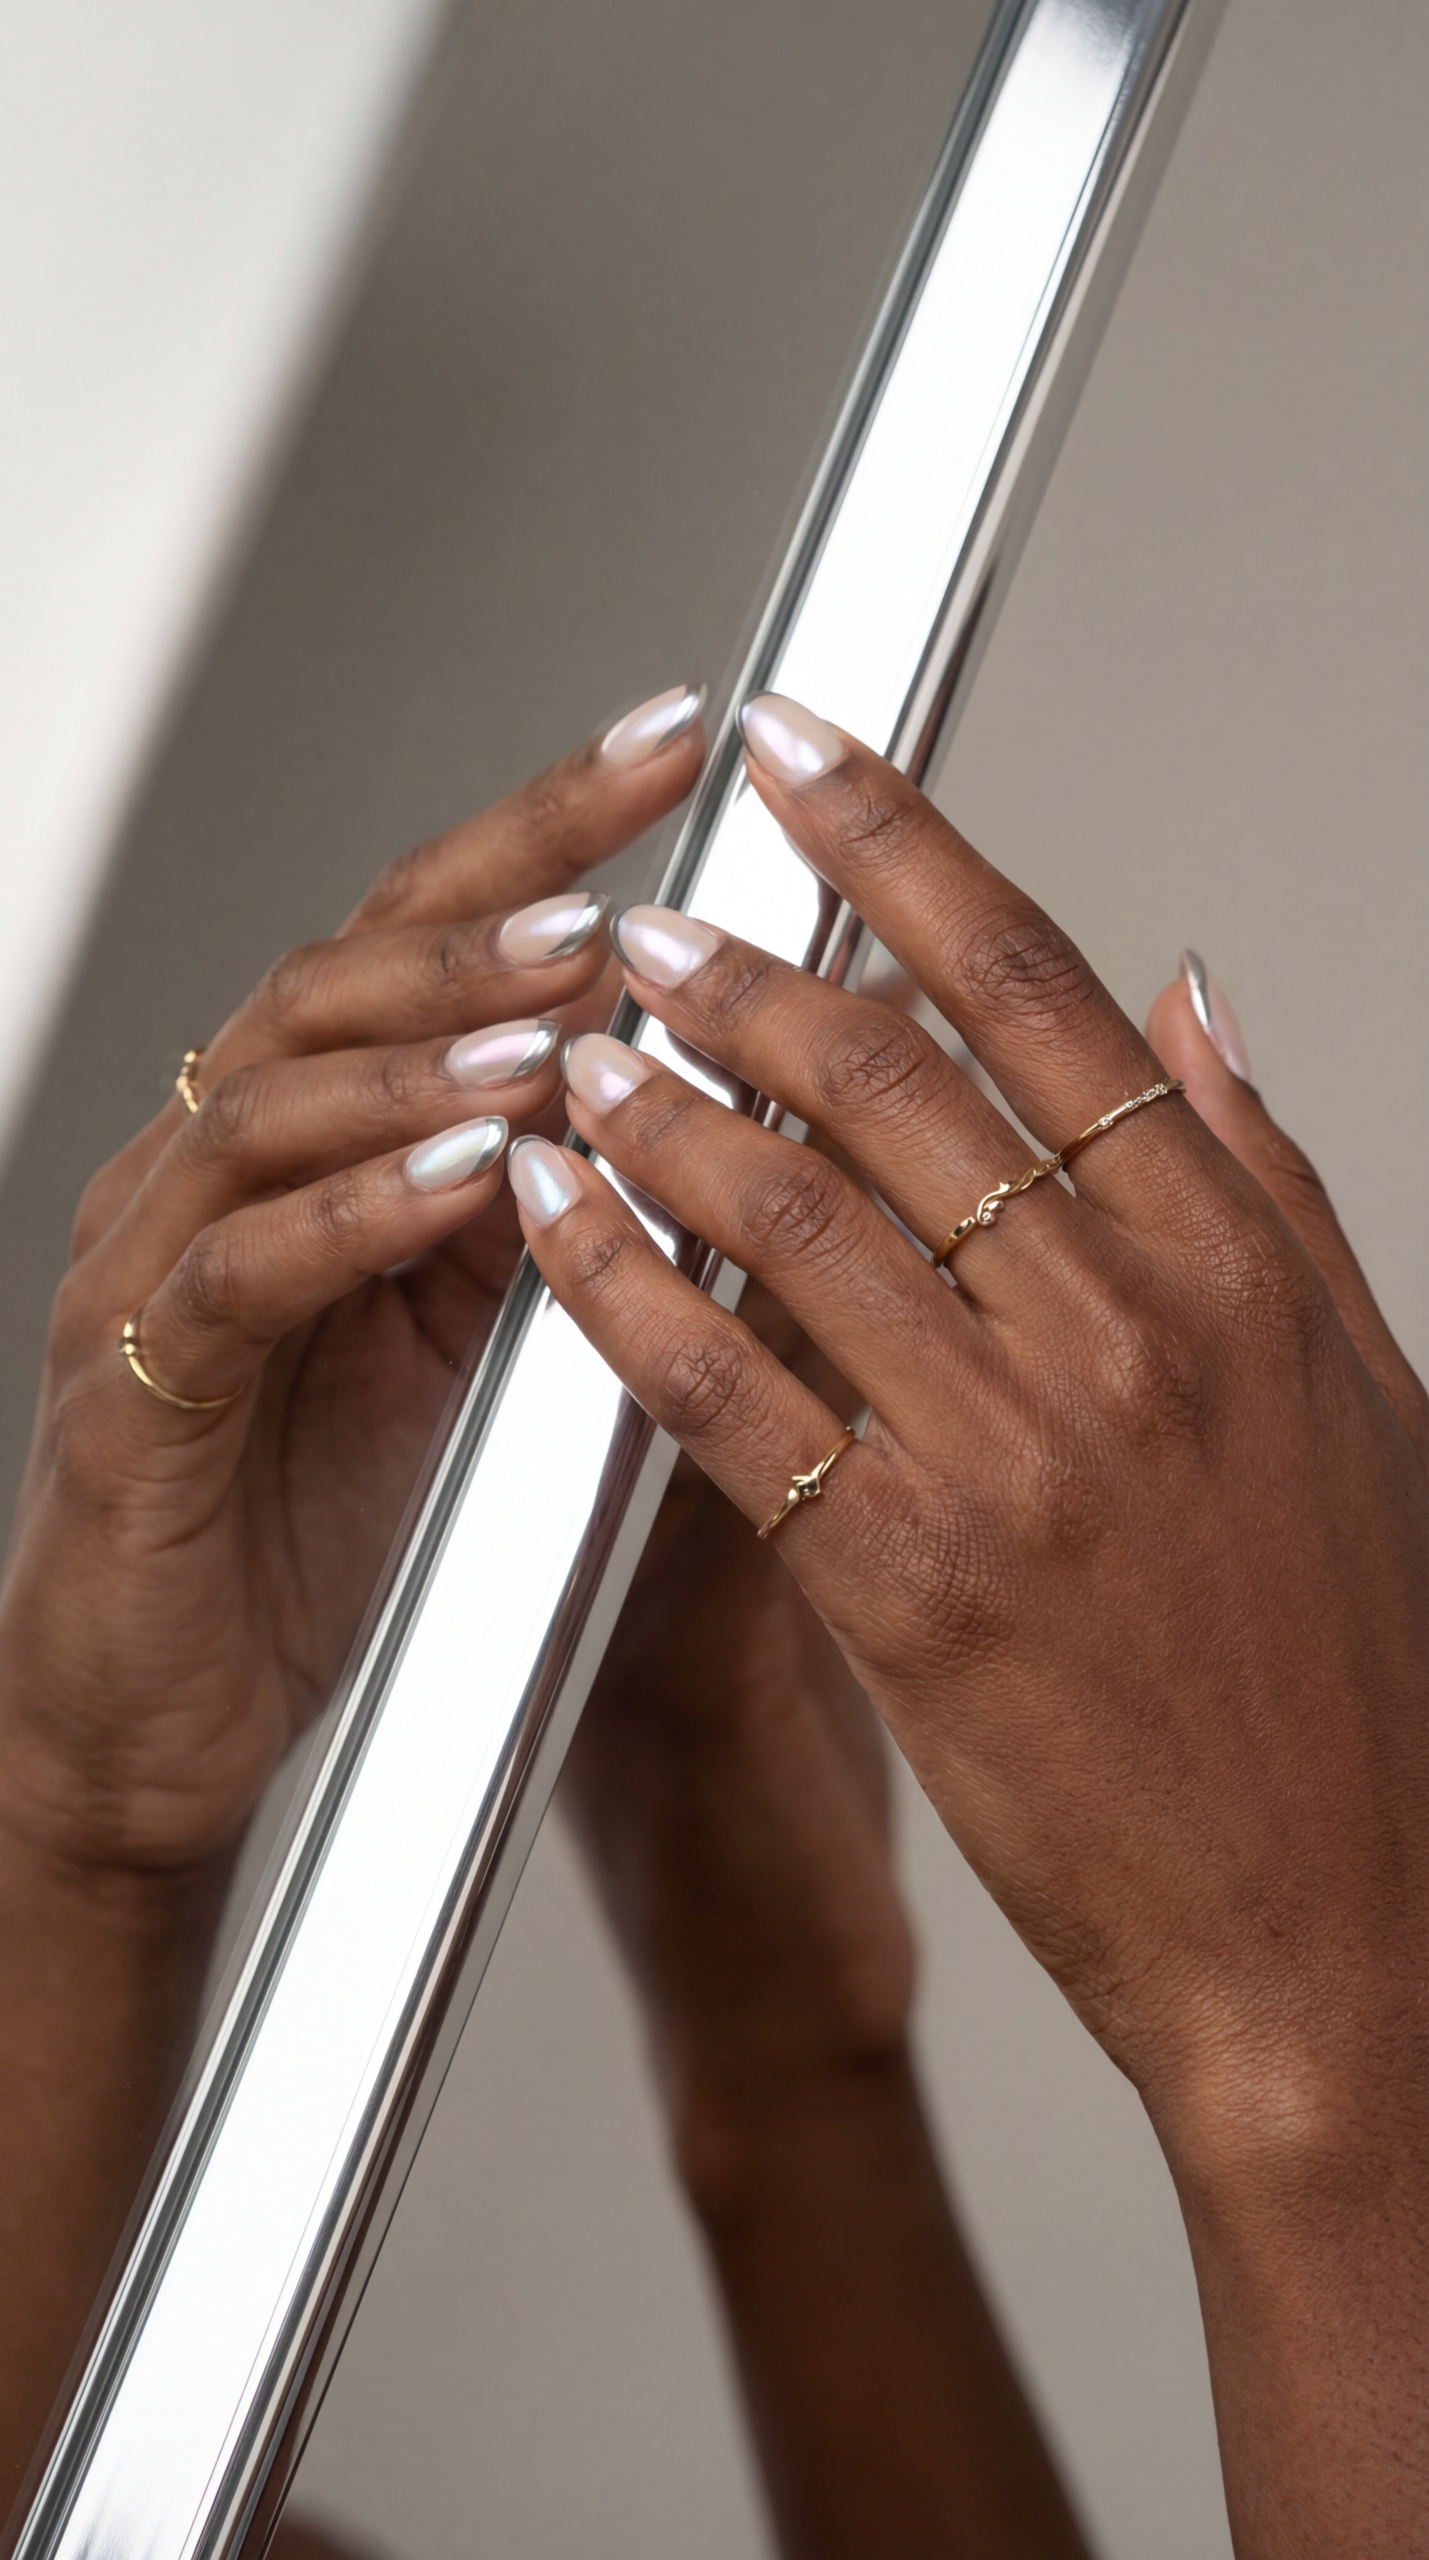
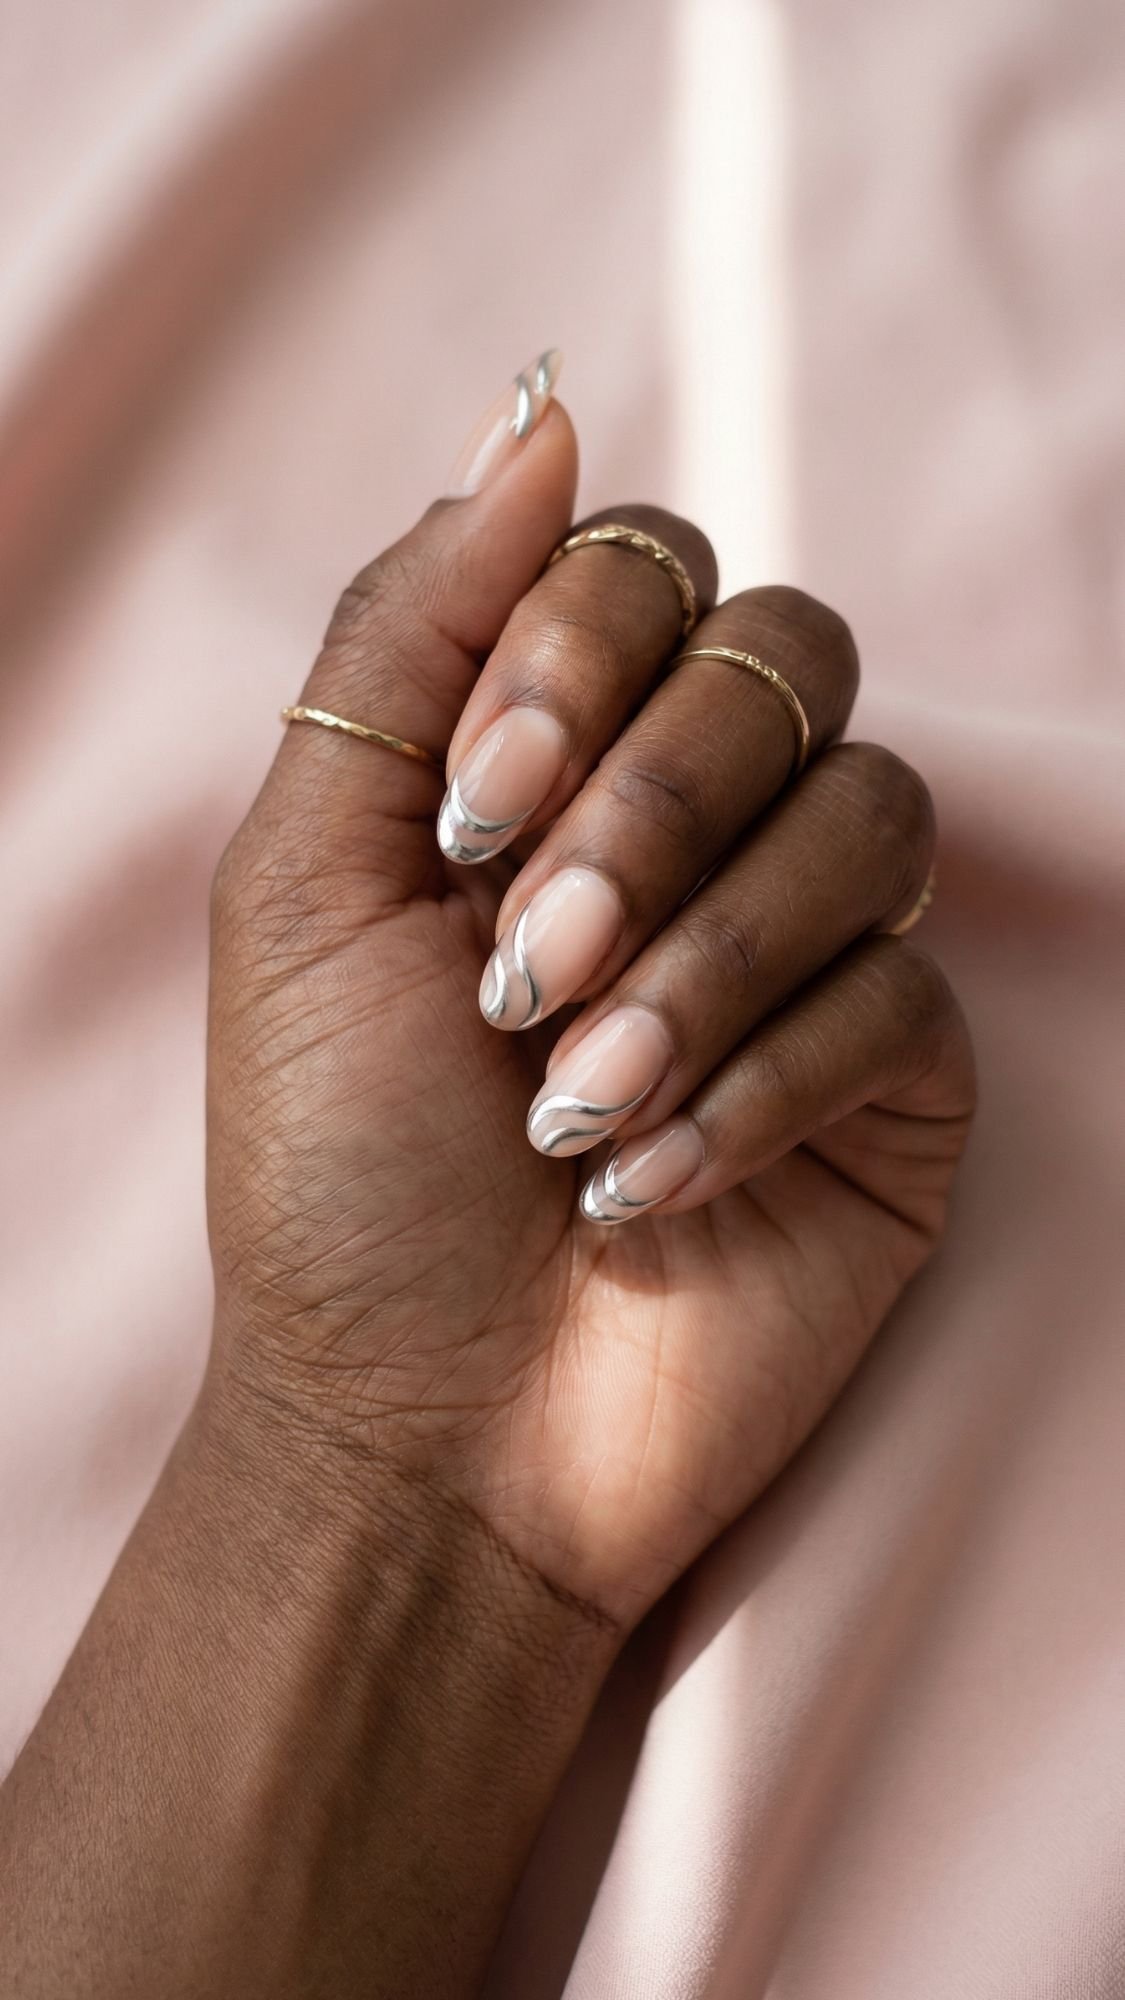
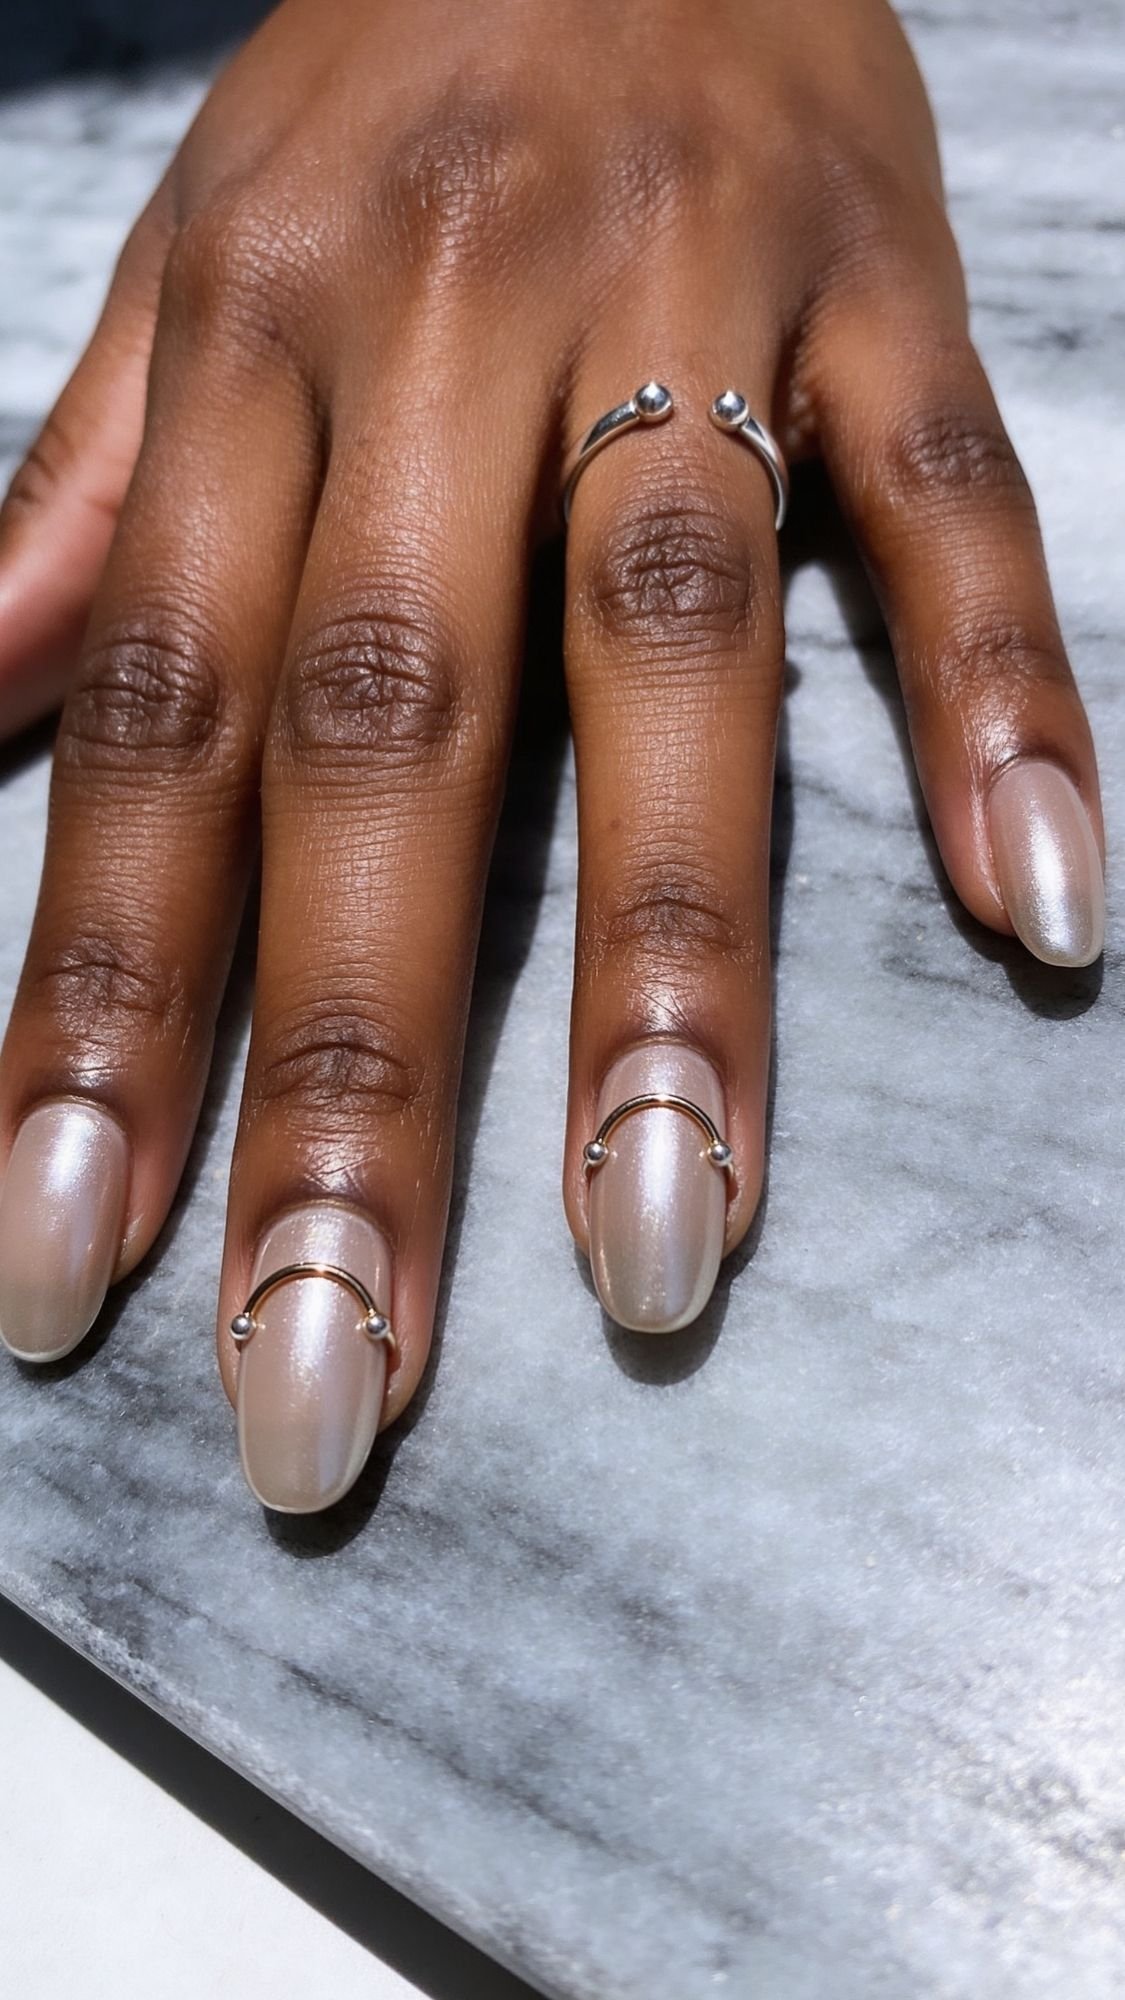
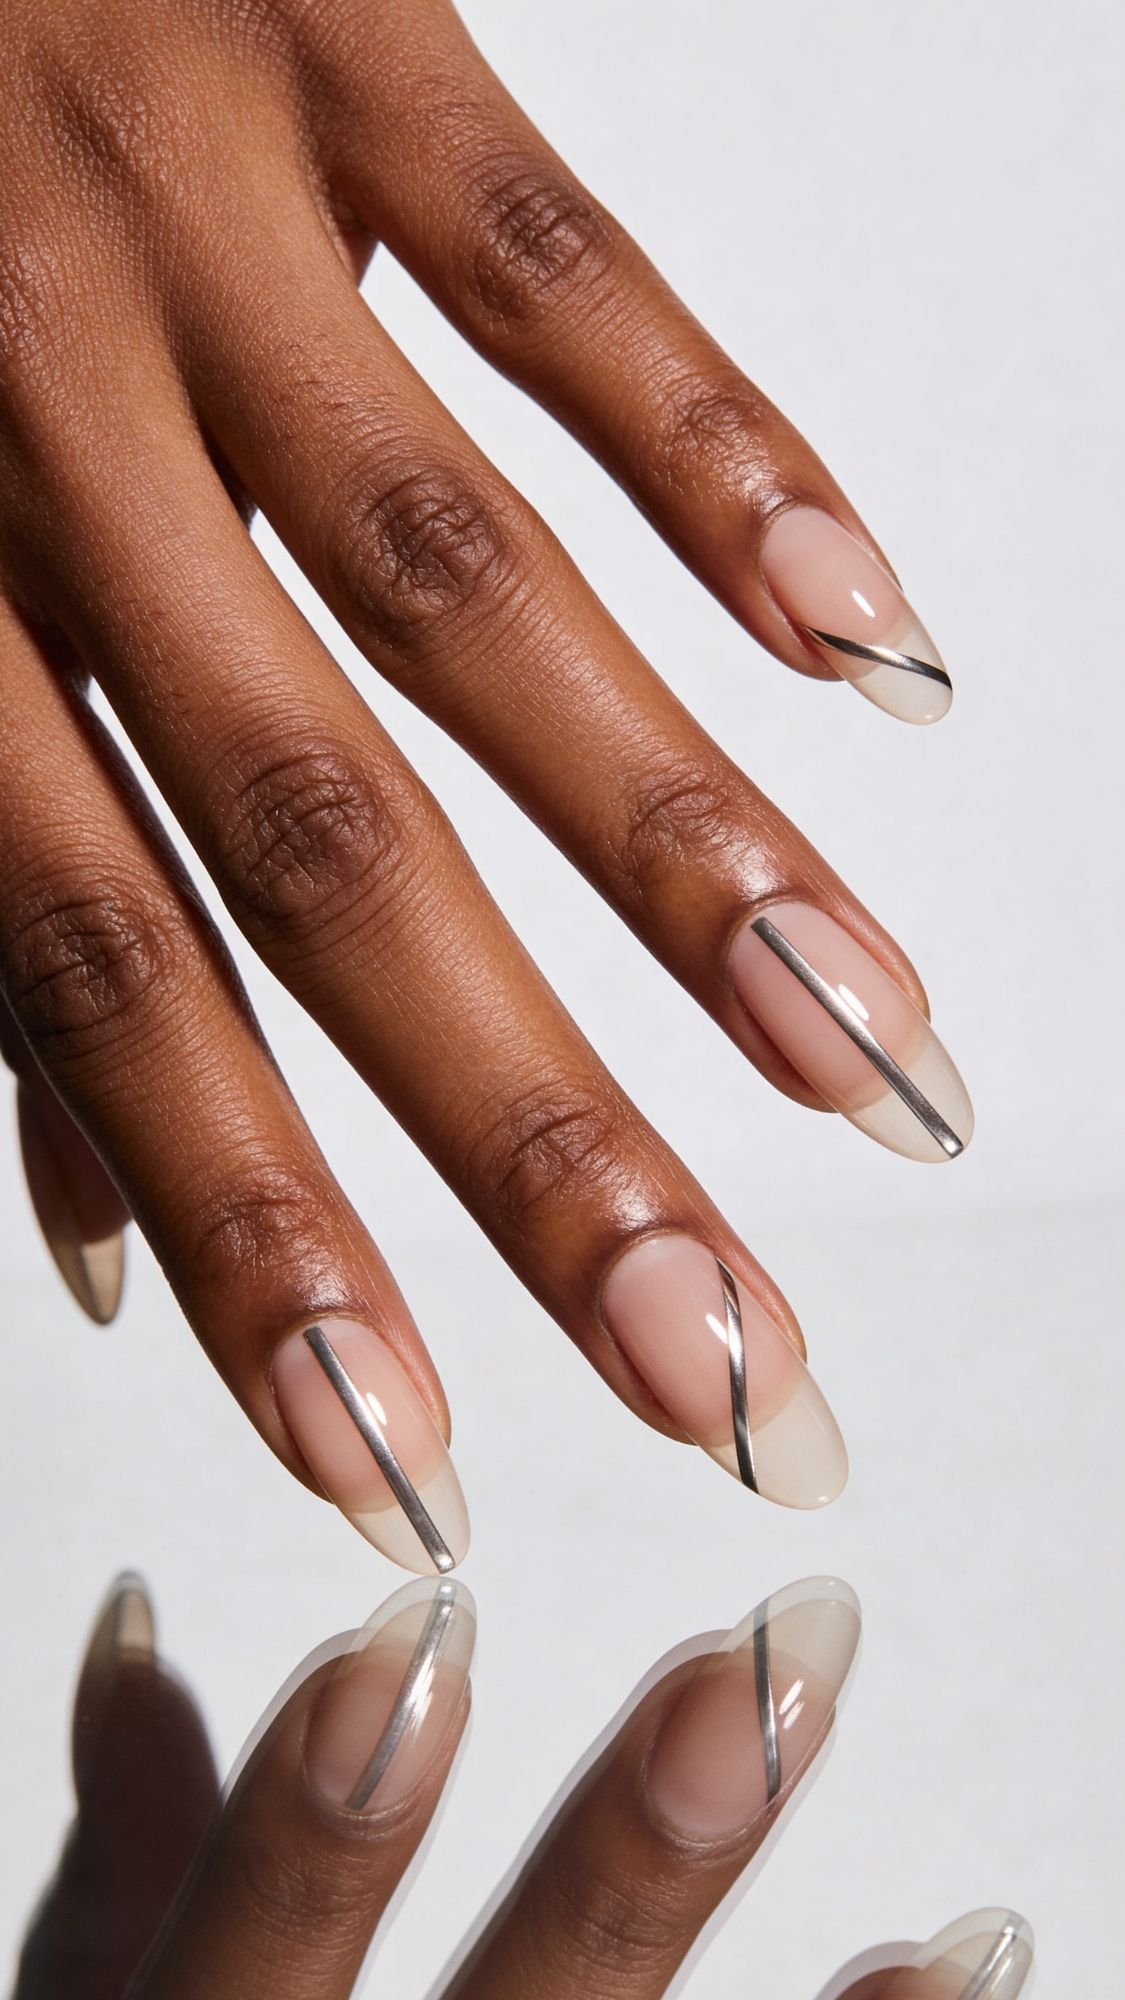
2) Liquid Silver Micro French Tips
This set looks clean, expensive, and slightly intimidating in the best way. Liquid silver micro French tips give you the sharp chrome reflection without covering the whole nail, so your manicure still looks wearable for everyday. Plus, the thin tip line makes your nails look longer in selfies, which feels like cheating, but I’ll allow it.
The Goal
You want a sheer or nude base with a razor-thin silver chrome tip that catches light as one crisp stripe. Micro means micro. If the tip gets thick, it stops looking “editorial” and starts looking like you tried to fix it five times. We’ve all been there.
Best For
- Short to medium nails that need an elongating effect
- Anyone who loves a minimalist look but still wants max shine
- Wide nail beds, because a micro tip visually narrows the nail
Base Shades That Make Silver Look Like Liquid Metal
- Sheer nude close to your skin tone for the most natural elongation
- Milky pink for a softer, fresher vibe
- Neutral beige if you want the silver to read extra crisp
If you have deeper skin tones, I love a slightly warmer nude base under silver. A cool, pale nude can look ashy on camera, and silver chrome makes that more obvious.
Pro Application Notes
The mistake most people make with French chrome is trying to paint the tip in one confident swoop, like a nail tech on fast-forward. I do it in controlled steps, because chrome shows wobbles immediately.
Option A, Gel Method (sharpest line)
- Apply base color and cure.
- Apply a thin no-wipe top coat and cure.
- Burnish silver chrome over the whole nail or just the tip area, depending on your method.
- Use a liner brush with a tiny amount of base color to clean up the smile line if needed.
- Seal with top coat, float it, cap the edge, cure.
Option B, Regular Polish Method (easier at home)
- Apply base color and let it dry fully.
- Use a silver chrome liner polish or a fine brush with a metallic polish to draw the micro tip.
- Let it set, then top coat with a light hand.
Tiny technique detail that changes everything: I angle the finger slightly downward while painting the tip. That angle lets me see the edge line clearly, and I keep the micro tip consistent across nails.

Common Mistakes + Fixes
- Mistake: The French line looks uneven across nails. Fix: Use a visual guide. Match the tip thickness to the width of your brush tip or the thickness of a credit card edge in your mind, and keep it consistent.
- Mistake: The chrome tip chips first. Fix: Cap the free edge carefully, and add a second thin top coat just on the tip area.
Wear And Maintenance Tips
- Avoid very hot water in the first few hours. Heat can soften product before it fully sets.
- Re-top the tips mid-week if you want them to stay sharp for photos.
Key Takeaways
- Micro tips elongate the nail, and they photograph like a dream.
- Consistency beats perfection, keep each tip the same thickness.
- Cap the edge, always, tips chip first.
3) Aurora Chrome Over Jelly Pink
This one gives “soft girl” in the front and “alien shimmer” in the best way when you tilt your hand. Aurora chrome over a jelly pink base looks subtle in normal lighting, then it flashes that color-shift payoff on camera like it has secrets. If you film short clips, this design eats, because the shift shows up the moment you move.
The Goal
You want a translucent jelly pink base with a sheer aurora chrome glaze on top. Jelly makes the nail look juicy and dimensional, and aurora adds that iridescent flip without looking chunky.
Best For
- Anyone who wants chrome but hates harsh mirror finishes
- Short to medium nails that need depth without heavy color
- Selfies in daylight and golden hour, aurora loves softer light
Base Shades That Make Aurora Look Smooth, Not Patchy
- Jelly pink for a fresh, brightening look
- Jelly nude if you want the most natural result
- Milky lavender if you want a cooler, fairy-shift vibe
What I’ve noticed is that aurora looks patchy when the base looks streaky. Jelly needs even coverage. You can still keep it sheer, but you need it smooth.
Pro Application Notes
Aurora chrome loves thin layers and a clean seal. The biggest upgrade you can make is keeping the base color even and not overloading chrome powder.
Gel method
- Apply base coat, cure.
- Apply 1 to 2 thin coats of jelly pink gel, cure each coat.
- Apply a no-wipe top coat, cure fully.
- Burnish aurora chrome lightly, build until you see the shift.
- Seal with top coat, float it, cap the free edge, cure.
Regular polish method
- Apply base coat, then 2 thin coats of jelly pink polish.
- Let it dry fully. Jelly dents easily if you rush.
- Apply an aurora topper or a sheer iridescent chrome-like top coat.
- Seal with a glossy top coat, cap the edge.
Sensory detail that helps you know you did it right: Jelly polish feels slightly tacky for a bit longer than you expect, even when it looks dry. If you press too soon, you’ll leave a dent that aurora chrome will highlight like a spotlight.
Common Mistakes + Fixes
- Mistake: The aurora looks cloudy instead of shifty. Fix: Keep the base sheer and even. Too many color coats can make aurora look muted.
- Mistake: Patchy chrome near the sidewalls. Fix: Burnish from the center outward using small circles, then smooth with longer strokes.
- Mistake: Tips wear quickly. Fix: Cap the free edge, then add a second thin layer of top coat just at the tip.
Wear And Maintenance Tips
- Use cuticle oil at night to keep the skin around the nails smooth. Aurora makes dry cuticles look extra obvious in closeups.
- If you want the shift to stay glossy for photos, refresh with a thin top coat mid-week.
Key Takeaways
- Even jelly base = smooth aurora shift.
- Thin layers keep the chrome bright, thick layers make it cloudy.
- Aurora shows off in motion, so it’s perfect for videos and tilt shots.
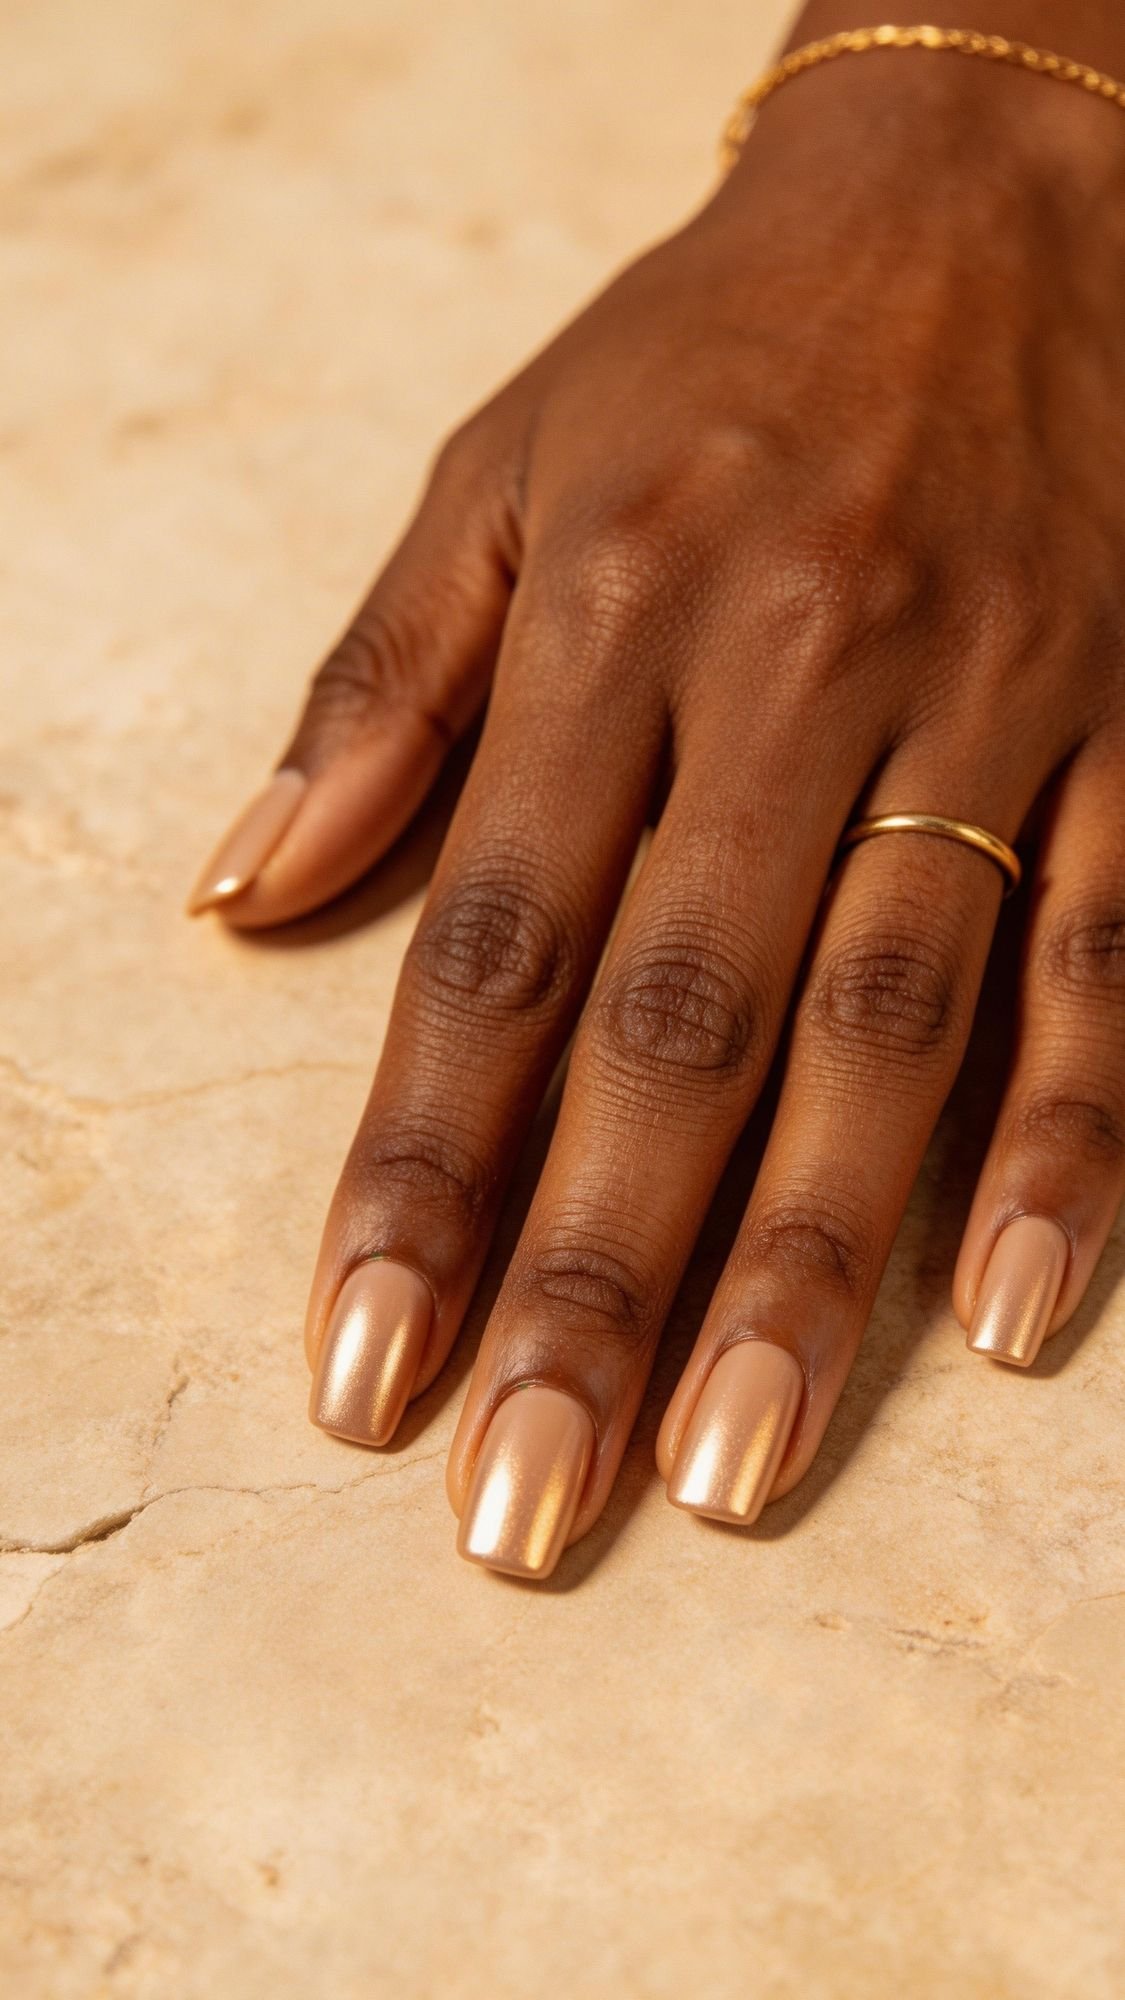
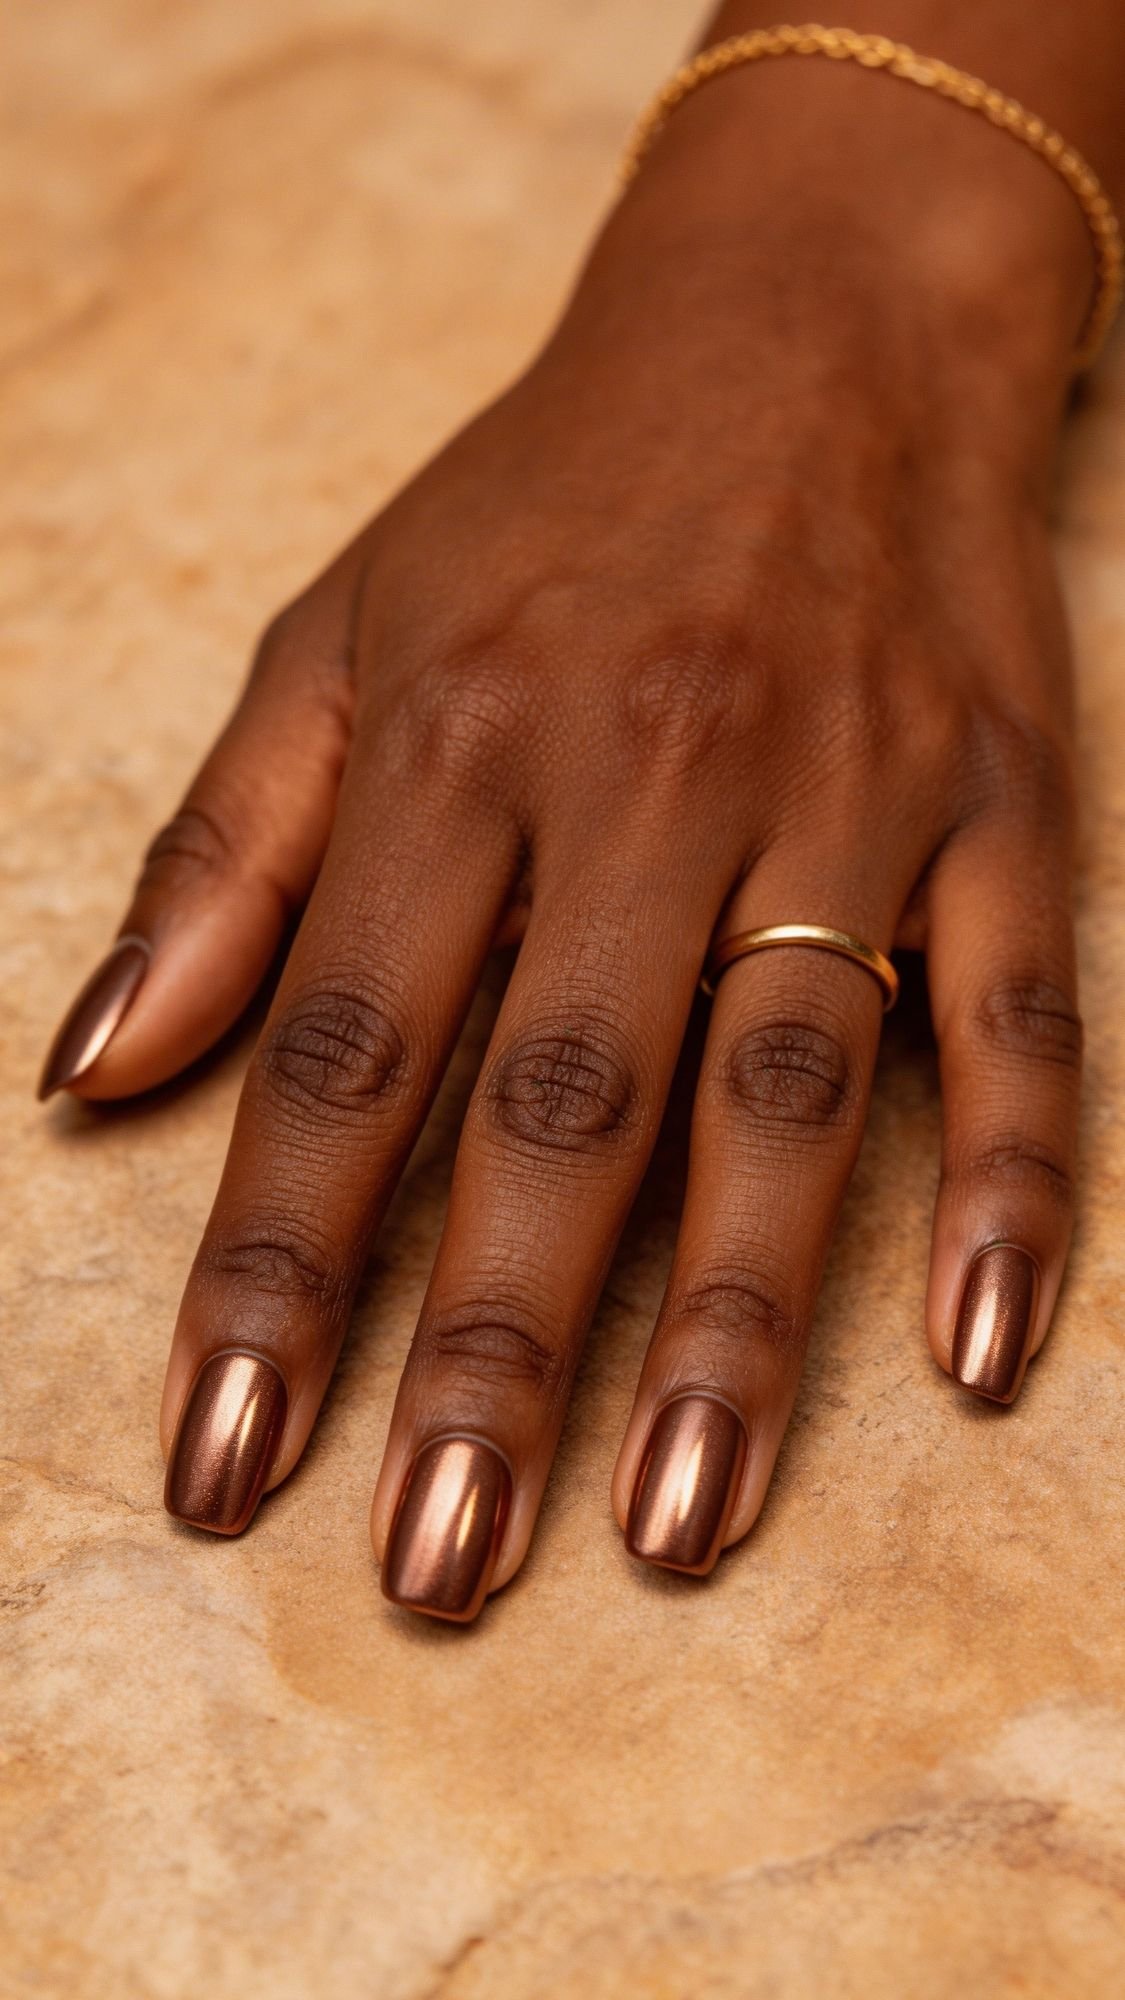
4) Champagne Chrome On Warm Nudes
This is the set I recommend when someone wants chrome, but they also want to look like they casually have their life together. Champagne chrome over warm nudes looks rich, glossy, and flattering without the icy glare that can sometimes make silver feel harsh. It also plays really well with gold jewelry, and it photographs like a “quiet luxury” manicure.
The Goal
You want a warm nude base with a champagne chrome glaze that throws soft golden highlights when you move your hand. Think reflective, not blinding.
Best For
- Anyone who loves a neutral manicure but wants more dimension
- Deeper skin tones, because champagne warmth looks especially expensive on camera
- Beginners who want chrome without the stress of a full mirror finish
Shade Guidance Across Skin Tones, Keep It Flattering
- Warm undertones: caramel nude, warm beige, honey nude
- Neutral undertones: beige nude, light mocha, rosy-beige
- Cool undertones: soft taupe nude with a champagne chrome that leans slightly pink
If you ever put on a nude and it looks gray or “off,” the base shade is wrong for your undertone. Chrome will not save it. Chrome will highlight it.
Pro Application Notes
The mistake most people make here is choosing a nude base that’s too pale. That’s when the manicure can look ashy in photos. I aim for a nude that matches the depth of the skin tone, then I let champagne chrome add the brightness.
Gel method
- Prep and dehydrate well, warm nudes lift quickly if you skip this.
- Apply base coat, cure.
- Apply 1 to 2 thin coats of warm nude, cure each coat.
- Apply no-wipe top coat, cure fully.
- Burnish champagne chrome lightly until it glows.
- Seal with glossy top coat, float it, cap the edge, cure.
Regular polish method
- Apply base coat.
- Apply 2 thin coats of warm nude, let each coat dry fully.
- Apply champagne chrome topper.
- Seal with glossy top coat.
Sensory detail: A good warm nude polish usually feels creamy and self-leveling, like it “melts” into place when you apply thin coats. If it drags or streaks, slow down and use less product.
Common Mistakes + Fixes
- Mistake: Nude looks chalky in selfies. Fix: Choose a deeper nude closer to your skin tone, or pick a nude with a touch more warmth.
- Mistake: Chrome looks uneven over nude. Fix: Smooth out the nude base first. If you can see streaks before chrome, you’ll see them after chrome.
- Mistake: The chrome dulls after top coat. Fix: Float the top coat, don’t press down, and cap the free edge.
Wear And Maintenance Tips
- Apply cuticle oil nightly. Warm nudes plus chrome make dry skin stand out.
- Re-top mid-week if you want maximum shine for photos and video.
Key Takeaways
- Warm nude base makes champagne chrome look expensive, not harsh.
- Match nude depth to your skin tone, chrome amplifies undertone mistakes.
- Smooth base first, chrome shows every streak.
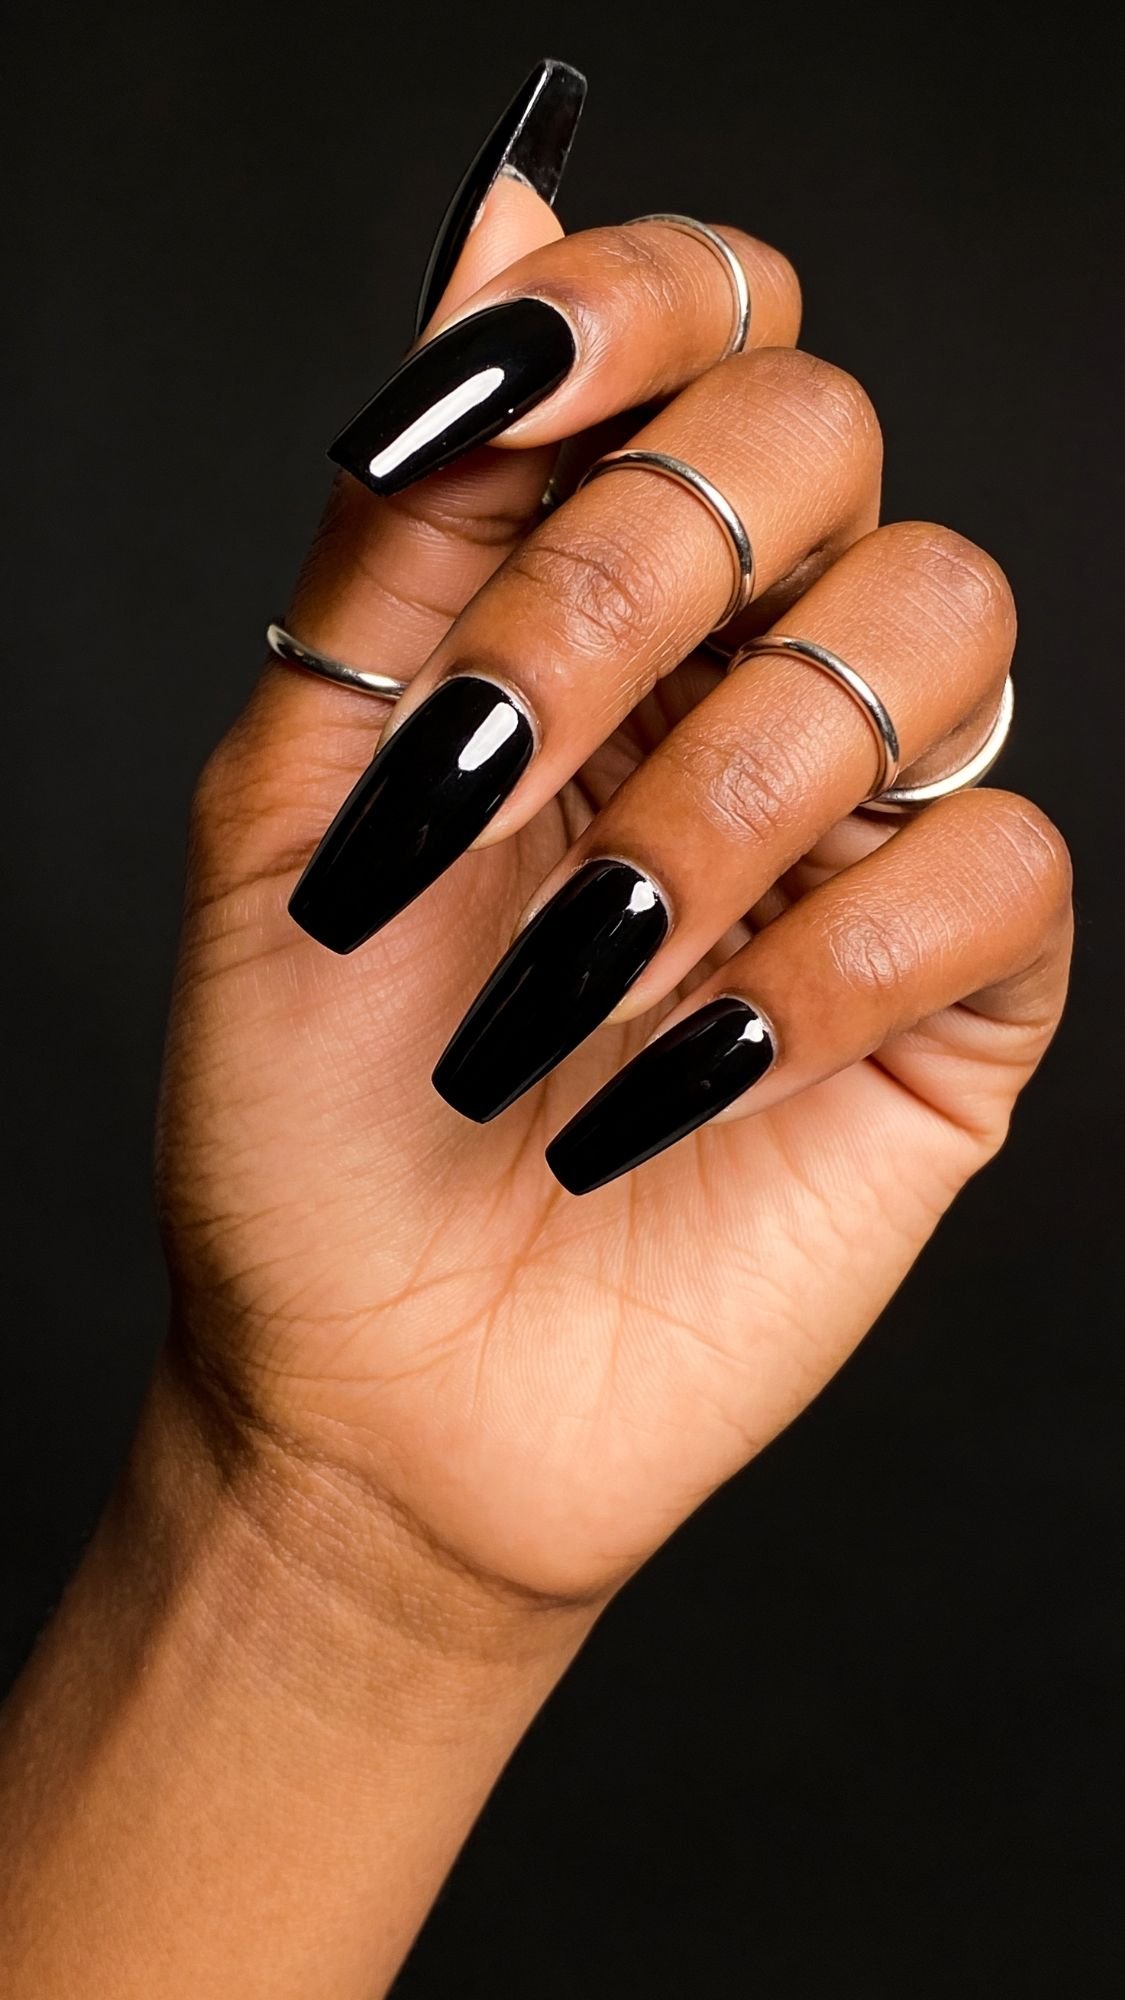
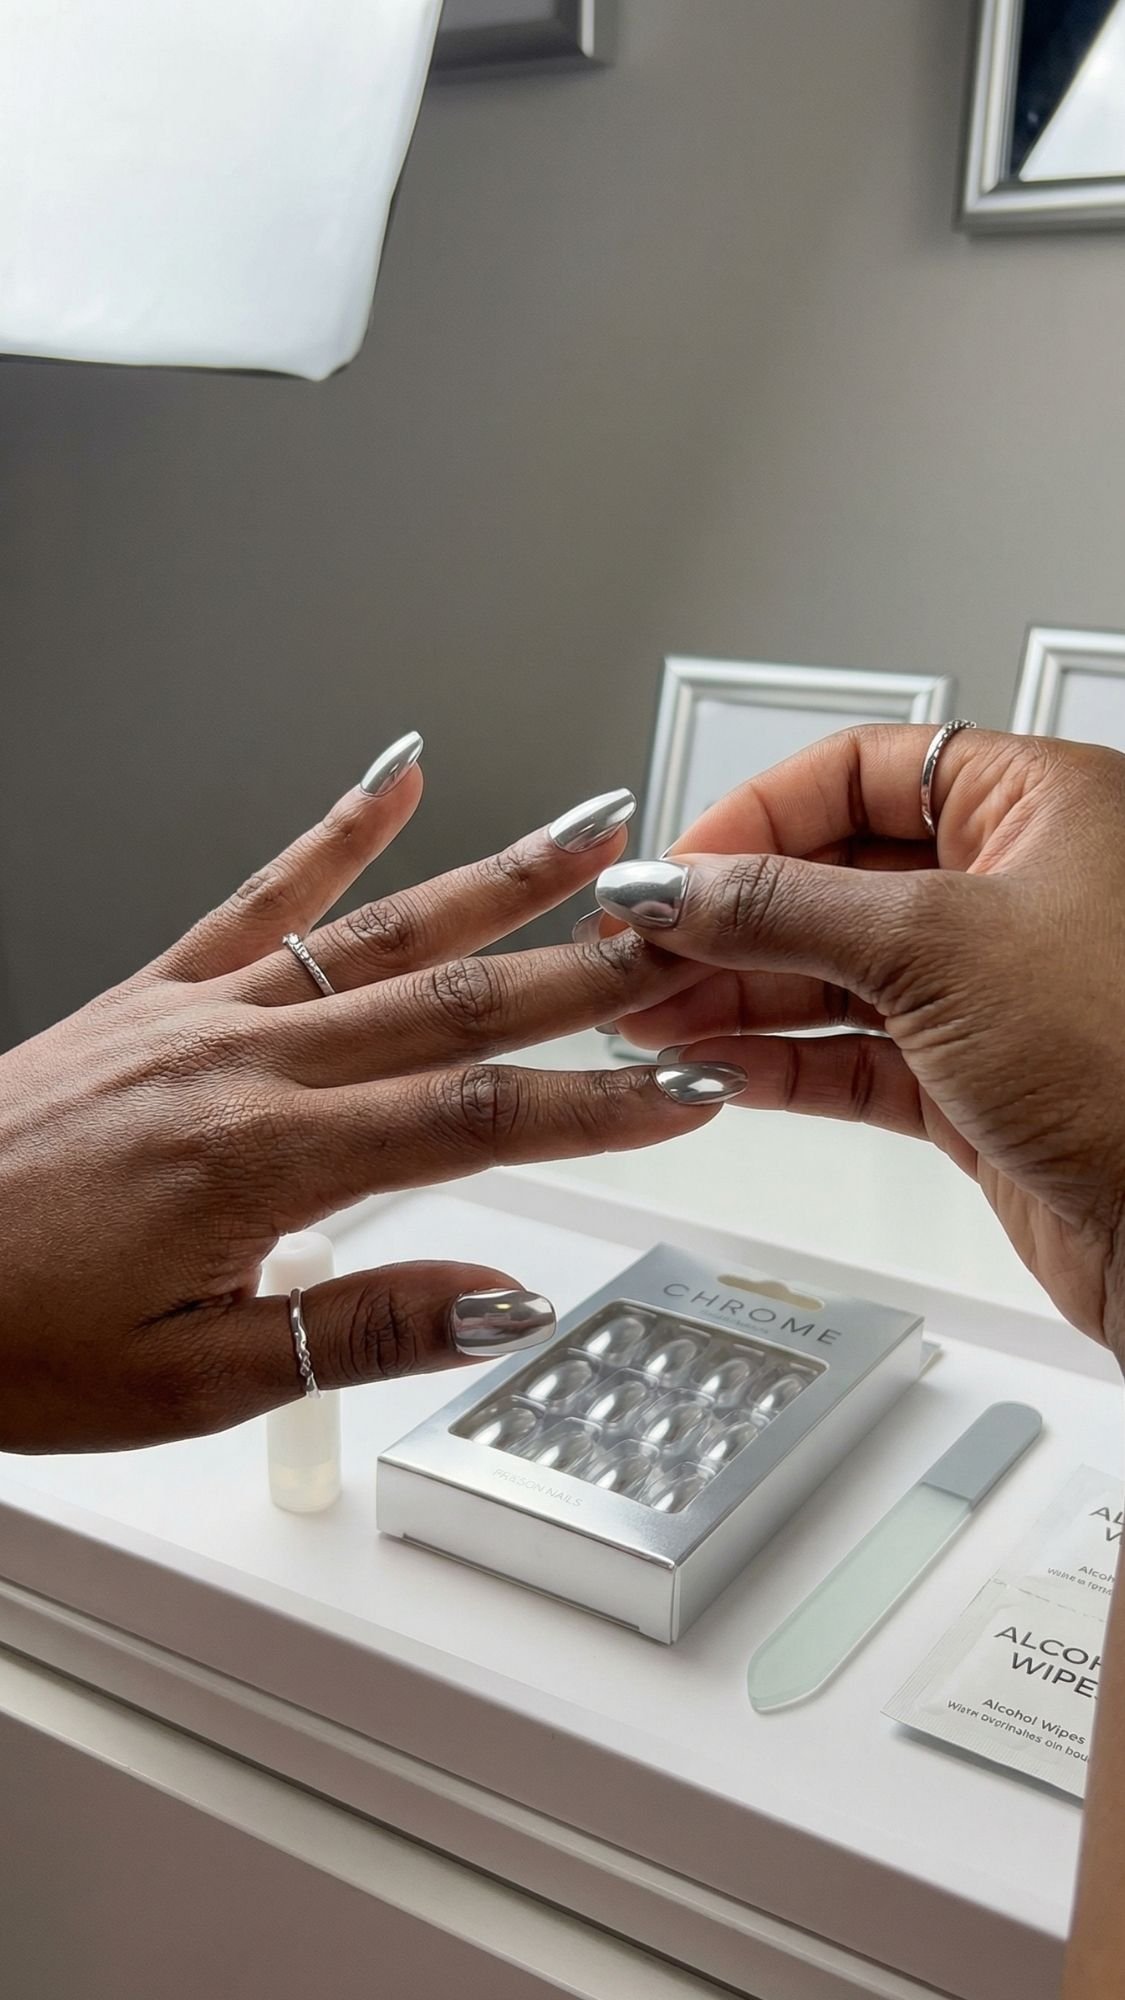
5) Black Mirror Chrome, The “Camera Loves Me” Set
If you want the most dramatic, most reflective, most “who did your nails” chrome, black mirror chrome delivers every time. High contrast makes shine look sharper on camera, and black mirror chrome basically turns your nails into tiny reflective panels. It looks unreal in flash selfies and nighttime lighting, and it makes every ring look more expensive. Convenient.
The Goal
You want a deep black base with a true mirror chrome finish that throws a crisp reflection stripe. This isn’t the soft glazed look. This is bold, glossy, and unapologetically reflective.
Best For
- Flash selfies, night photos, events, and going-out nails
- Medium to long nails, because the reflection has more space to show off
- Anyone who loves an edgy, high-fashion manicure
Pro Application Notes
Mirror chrome shows everything, and black shows everything. So yes, you need the cleanest base and the cleanest top coat technique here.
Gel method is the best option for this look
- Apply base coat, cure.
- Apply 2 thin coats of black gel, cure each coat. Black needs full cure to avoid wrinkling.
- Apply a no-wipe top coat, cure fully.
- Burnish mirror chrome firmly until the surface looks like liquid metal.
- Dust off excess powder gently.
- Seal with top coat using a floating technique, cap the edge, cure fully.
- Optional: apply a second very thin top coat just at the tips for extra durability.
Easy To Use: It's essential to apply a non-wipe top coat before applying the nail chrome powder onto your nails if you want a glossy chrome finish then cure via a UV LED lamp otherwise it is a glitter effect
Tiny technique detail that matters: I keep my top coat brush pressure super light. If I press down, I can drag the chrome and leave faint streaks. You might not see them in normal light, but flash will call you out immediately.
Sensory detail: When you burnish mirror chrome correctly, it feels almost frictionless, like you’re gliding over glass. If it feels gritty, keep burnishing, or your no-wipe layer may not have cured properly.
Common Mistakes + Fixes
- Mistake: The chrome looks streaky under flash. Fix: Cure your no-wipe layer fully, then burnish longer with firmer pressure. Streaks usually come from uneven tack or rushed burnishing.
- Mistake: Tips chip or wear first. Fix: Cap the free edge carefully, and add a second thin top coat at the tips.
- Mistake: The chrome looks dull after sealing. Fix: Use a glossy, non-shrinking top coat and float it. Shrinking top coats pull back and kill the mirror effect near the edge.
Wear And Maintenance Tips
- Avoid hot water and heavy chores for the first few hours. Let the set fully settle.
- Use cuticle oil nightly. Black chrome looks best when the skin around it looks smooth and hydrated.
- If you notice tip wear, touch up with a thin top coat on day 3 or 4.
Key Takeaways
- Black mirror chrome photographs the strongest, especially with flash.
- Full curing matters, black gel needs it.
- Float your top coat, dragging will streak the mirror finish.
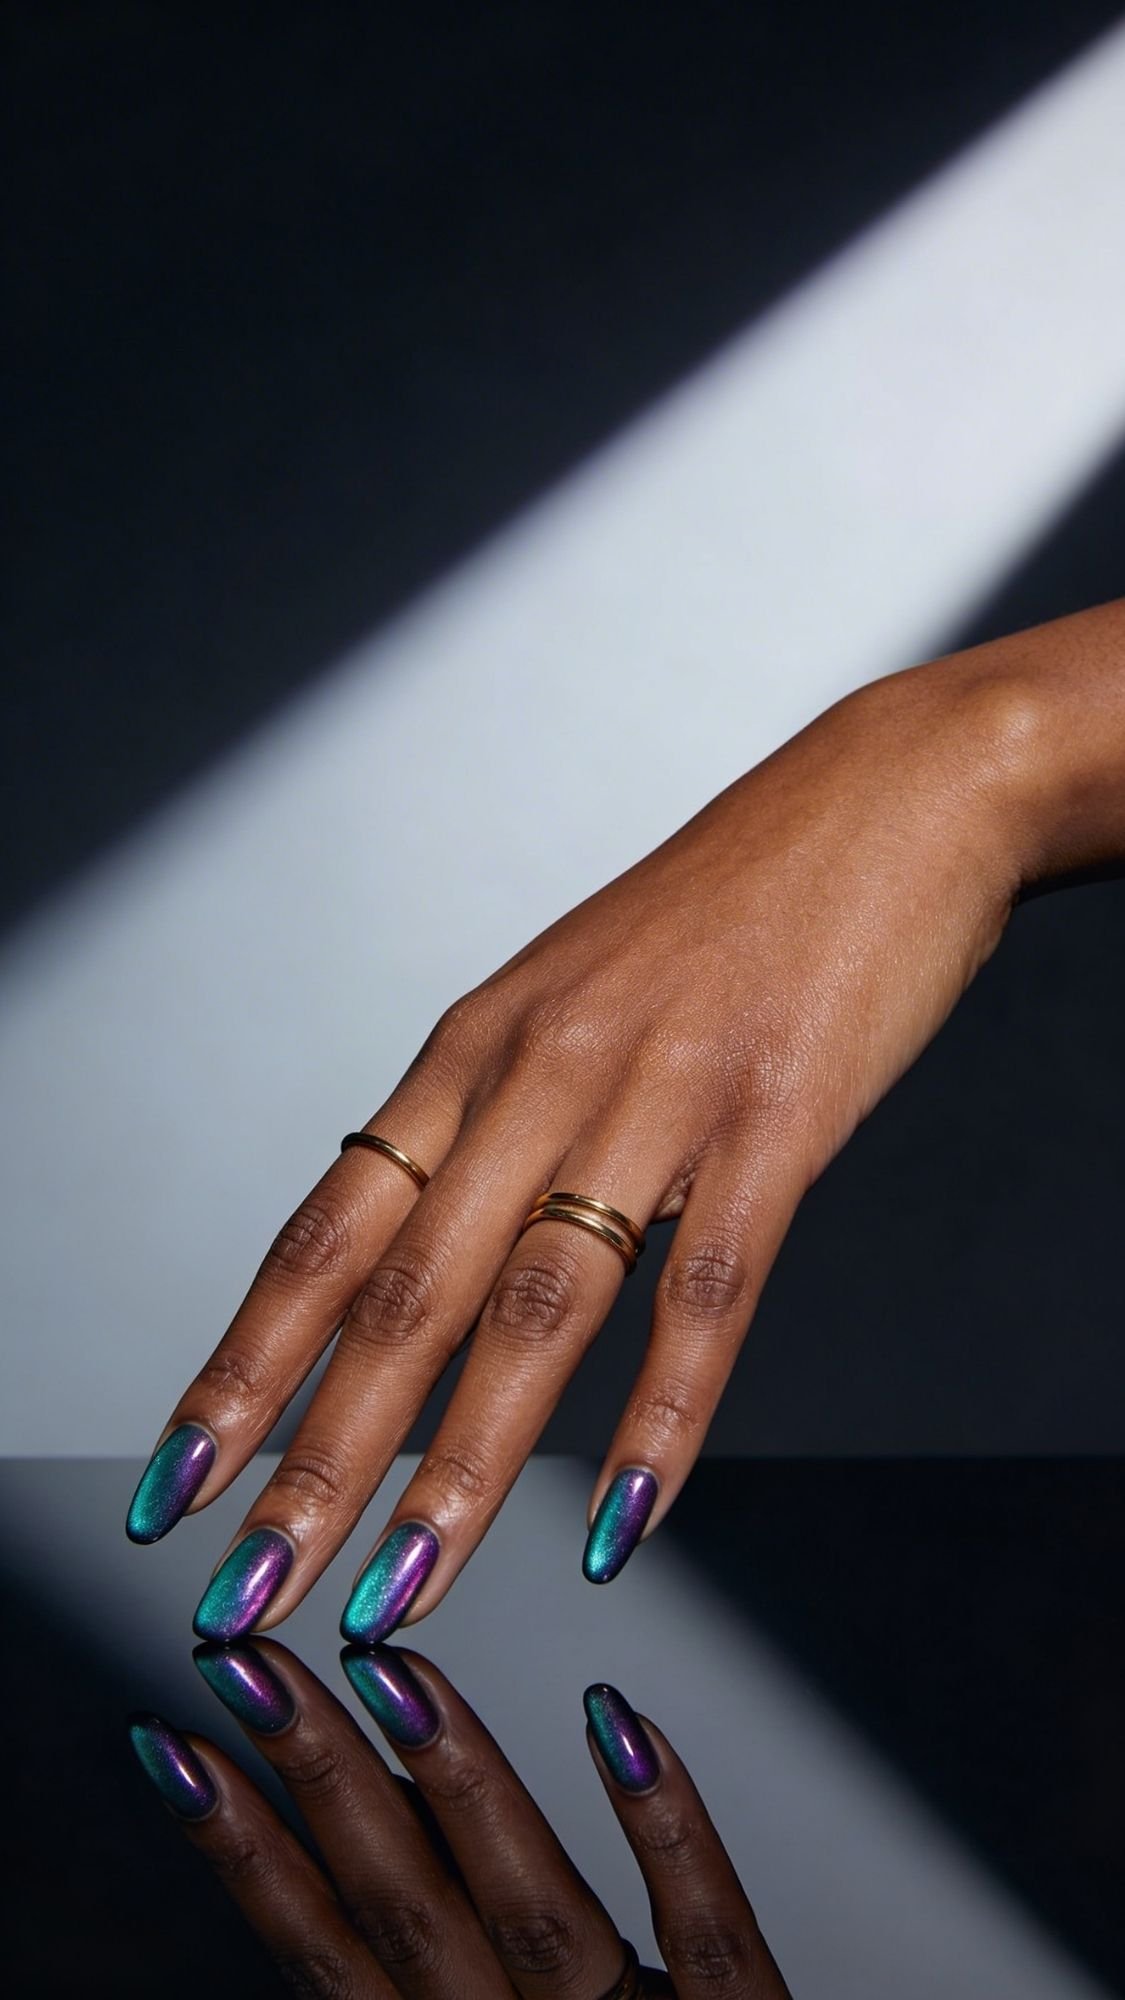
6) Oil Slick Multichrome Chrome
Oil slick chrome gives you that moody, shifting mix of teal, purple, bronze, and green that changes every time you move your hand. It looks like it should come with a sci-fi soundtrack. This finish catches light in a different way than mirror chrome. Instead of one clean reflection stripe, it gives you layered highlights plus color flip, which looks insane in videos and “tilt” selfies.
The Goal
You want a deep, smooth base with a multichrome shift that looks dimensional, not muddy. Oil slick works best when the base stays clean and the lighting shows the flip.
Best For
- Medium to long nails, so you can see the gradient shift across the nail
- Anyone who loves darker, edgy colors but still wants shine
- Content days, because the movement shows off best on camera
Base Shades That Make The Shift Pop
- Black base: the most dramatic shift, the deepest contrast
- Deep navy base: cooler, more galaxy-coded
- Deep chocolate base: warmer, richer shift that looks amazing with gold jewelry
What I’ve noticed is that oil slick looks dull when the base color looks streaky. Dark shades need thin coats and full leveling, or the chrome will highlight the unevenness.
Pro Application Notes
This look loves controlled lighting. One overhead light can flatten the shift, but two angled light sources bring it back immediately. That’s why it looks “better online” sometimes. People film it under good lighting.
Gel method
- Base coat, cure.
- 2 thin coats of black or deep base color, cure each.
- No-wipe top coat, cure fully.
- Burnish multichrome powder evenly, apply firm, consistent pressure.
- Seal with glossy top coat, float it, cap the free edge, cure.
Regular polish method
- Use a multichrome topper or multichrome polish, then top coat.
- Expect a softer shift than powder, but still very selfie-friendly.
Sensory detail: Multichrome powder feels slightly more “slippery” when it burnishes well, like it glides across the nail faster than pearl chrome. If you feel drag or grain, your base isn’t smooth enough, or you need more burnishing time.
Common Mistakes + Fixes
- Mistake: The shift looks muddy, not dimensional. Fix: Use a darker base and keep your layers thin. Too many layers can cloud the shift.
- Mistake: Chrome looks patchy near the sidewalls. Fix: Burnish from center outward, then lightly feather along the sidewalls with a smaller applicator.
- Mistake: The top coat dulls the shift. Fix: Float the top coat, don’t press, and choose a high-gloss top coat that doesn’t shrink.
Wear And Maintenance Tips
- Cap the free edge carefully. Dark chromes show tip wear faster.
- If you want the shift to look fresh for photos mid-week, apply a thin glossy top coat refresher.
Key Takeaways
- Dark base makes oil slick shift look rich, not flat.
- Two angled lights show the shift best, one overhead can flatten it.
- Thin layers keep the chrome clear, thick layers can mute the flip.
7) Chrome Aura Nails, Soft Center Glow
Aura nails give “glowy center” energy, like your nails have their own little ring light. Add chrome and you get a soft spotlight effect that looks incredible in selfies because it naturally draws the eye to the middle of the nail. This design feels artsy without being complicated, and it works on short nails and long nails equally well.
The Goal
You want a diffused glow in the center of each nail, with chrome catching light softly instead of looking like a full mirror. Think airbrushed, not stamped.
Best For
- Beginners who want nail art that looks impressive without being too hard
- Short nails that need visual dimension
- Anyone who loves soft, modern designs that still catch light
Color Combos That Always Look Good
- Nude base + pearl chrome center for subtle glow
- Jelly pink base + aurora chrome center for a dreamy shift
- Mocha base + champagne chrome center for a warm, expensive vibe
If you want your hands to look longer in photos, keep the aura centered slightly above the middle of the nail. That placement creates a subtle elongating illusion, especially on shorter nails.
Pro Application Notes
The mistake most people make is making the aura too harsh. You want a soft fade, so you need a light hand and gradual blending.
How I build a smooth aura
- Apply your base color evenly and fully dry or cure it.
- Use a small sponge, eyeshadow brush, or soft blending brush to place a tiny amount of chrome pigment in the center.
- Blend outward in small circles, keeping the edges soft.
- Add more pigment only if you need it. Build slowly.
- Seal with top coat using a floating technique.
Sensory detail: When you blend aura properly, the chrome looks like it melts into the base. If you see a hard ring edge, you used too much product at once or you pressed too hard with the sponge.
Common Mistakes + Fixes
- Mistake: The aura has a harsh circle edge. Fix: Blend with a clean brush around the edges, then add a tiny bit of base color around the perimeter to soften it.
- Mistake: The center looks blotchy. Fix: Use less pigment and build in thin layers. Blotchiness usually comes from loading the sponge too heavily.
- Mistake: Chrome smears when you top coat. Fix: Float the top coat. Don’t press down and don’t overwork the brush.
Wear And Maintenance Tips
- Keep cuticles hydrated, aura designs look cleaner when the surrounding skin looks smooth.
- If the top coat loses shine, refresh with a thin glossy coat for photo-ready glow.
Key Takeaways
- Soft edges make aura nails look expensive, harsh edges make them look accidental.
- Build slowly, chrome pigments get intense fast.
- Float top coat, smearing ruins the glow.

8) Velvet Cat Eye With Chrome Accent Stripes
This design looks like it moves even when your hand stays still. Velvet cat eye gives you that plush, magnetic “wave” effect, and chrome accent stripes add a crisp hit of light that makes the whole set look intentional and high-end. If you love nails that look better the more you tilt them, this one’s your best friend.
The Goal
You want a velvet cat eye base with thin chrome stripes that catch light like jewelry. The cat eye gives depth, the chrome gives sharp reflection. Together they look expensive, and they film ridiculously well.
Best For
- Medium to long nails, so the velvet effect has space to stretch
- Night-out nails, special events, and content clips
- Anyone who wants nail art that looks intricate but stays wearable
Color Combos That Hit Every Time
- Deep emerald velvet + silver chrome stripes
- Plum velvet + champagne chrome stripes
- Navy velvet + pearl chrome stripes
- Chocolate velvet + rose gold chrome stripes
What I’ve noticed is that velvet cat eye looks best when you keep the rest of the design clean. One to two stripes per nail is enough. If you add five different accents, the eye doesn’t know where to look, and the velvet effect loses its impact.
Easy To Use: Hold the magnet 3-5mm above the surface for 15-30s to achieve your desired effect! remember to keep the magnet side facing your nails and not to touch the nail surface, then immediately put your nails in the UV light for 2 minutes or LED light for 60 seconds, you can also apply top coat to make the nail art more stable.
Pro Application Notes
Two details decide whether cat eye looks luxurious or messy. Magnet control and layer thickness.
How to get the velvet effect to actually show
- Apply base coat, cure or dry.
- Apply cat eye polish in a thin, even coat.
- Hold the magnet close without touching the nail, and hold it still for a full 10 to 15 seconds.
- Cure or let it dry depending on your system.
- Repeat if you want more depth, but keep layers thin.
Add the chrome accent stripes
- Use a striping brush and either chrome liner polish or a thin chrome gel, depending on your method.
- Keep the lines clean and intentional. One diagonal stripe or a clean vertical stripe looks the most editorial.
- Seal carefully with top coat, float it so you don’t blur the stripes.
Sensory detail: When you get a good velvet cat eye, the finish looks like it has a soft fabric sheen. When you move your hand, the “wave” shifts smoothly instead of jumping in harsh patches.
Common Mistakes + Fixes
- Mistake: The cat eye looks weak or disappears after curing. Fix: Hold the magnet closer and longer, and make sure your cat eye layer isn’t too thick.
- Mistake: The chrome stripes look wobbly. Fix: Rest your painting hand on the table, then pull the line in one slow stroke. Speed makes it shaky.
- Mistake: Top coat smears the design. Fix: Float the top coat and use minimal brush strokes, overworking it causes blur.
Wear And Maintenance Tips
- Cap the free edge. Magnetic polish can wear at the tips faster if you skip this.
- If you notice the shine dulling, refresh with a glossy top coat mid-week.
Key Takeaways
- Velvet cat eye adds depth, chrome stripes add sharp shine.
- Magnet timing matters, hold it longer than you think.
- Keep stripes minimal, one or two lines looks the most expensive.
9) Chrome Swirl Tips, Minimal But Not Boring
Chrome swirl tips give you nail art energy without turning your nails into a full Pinterest project that takes three hours and a breakdown. You keep the base clean and sheer, then add swirly chrome lines at the tips so the light catches every curve. It looks playful, but still polished.
The Goal
You want a sheer or nude base with thin chrome swirls concentrated at the tips. The swirl placement matters, keep it higher on the nail so it elongates instead of cutting the nail off visually.
Best For
- Short to medium nails, because tip art makes them look longer
- Anyone who wants something fun but still wearable
- Beginners who want nail art without full-hand complexity
Color Combos That Photograph Like A Dream
- Sheer nude base + silver chrome swirls
- Milky pink base + champagne chrome swirls
- Jelly beige base + rose gold chrome swirls
If you wear a lot of gold jewelry, champagne or rose gold swirls look especially cohesive. Silver looks crisp and modern, but warm chromes look rich.
Pro Application Notes
The mistake most people make is doing swirls too thick. Thick lines make the design look heavy, and chrome makes thick lines look even thicker. Keep them fine and airy.
How to do chrome swirls that look clean
- Apply and fully set your base color.
- Use a striping brush, load a tiny amount of chrome liner polish or metallic gel.
- Start at one side tip, pull a loose S-curve toward the center, then finish with a second curve that overlaps slightly.
- Stop before you overdo it. One to three swirls per nail looks intentional.
- Seal with top coat using a floating technique so you don’t smear.
Sensory detail: When you draw the swirl correctly, the brush glides and the line stays continuous. If your brush drags or skips, you loaded too little product or your polish started drying mid-stroke.
Common Mistakes + Fixes
- Mistake: The swirl lines look shaky. Fix: Anchor your painting hand on the table and pull the line slowly in one motion.
- Mistake: The design looks crowded. Fix: Remove one swirl. Seriously. Negative space makes chrome look more expensive.
- Mistake: Chrome swirls smear under top coat. Fix: Float the top coat and keep brush strokes minimal. Don’t “paint” the top coat like regular polish.
Wear And Maintenance Tips
- Re-top mid-week if you want the swirls to stay sharp and glossy for photos.
- Apply cuticle oil nightly, clean cuticles make minimal designs look more high-end.
Key Takeaways
- Thin swirls look editorial, thick swirls look heavy.
- Keep the art at the tip to elongate nails in selfies.
- Negative space makes chrome pop, don’t overdecorate.

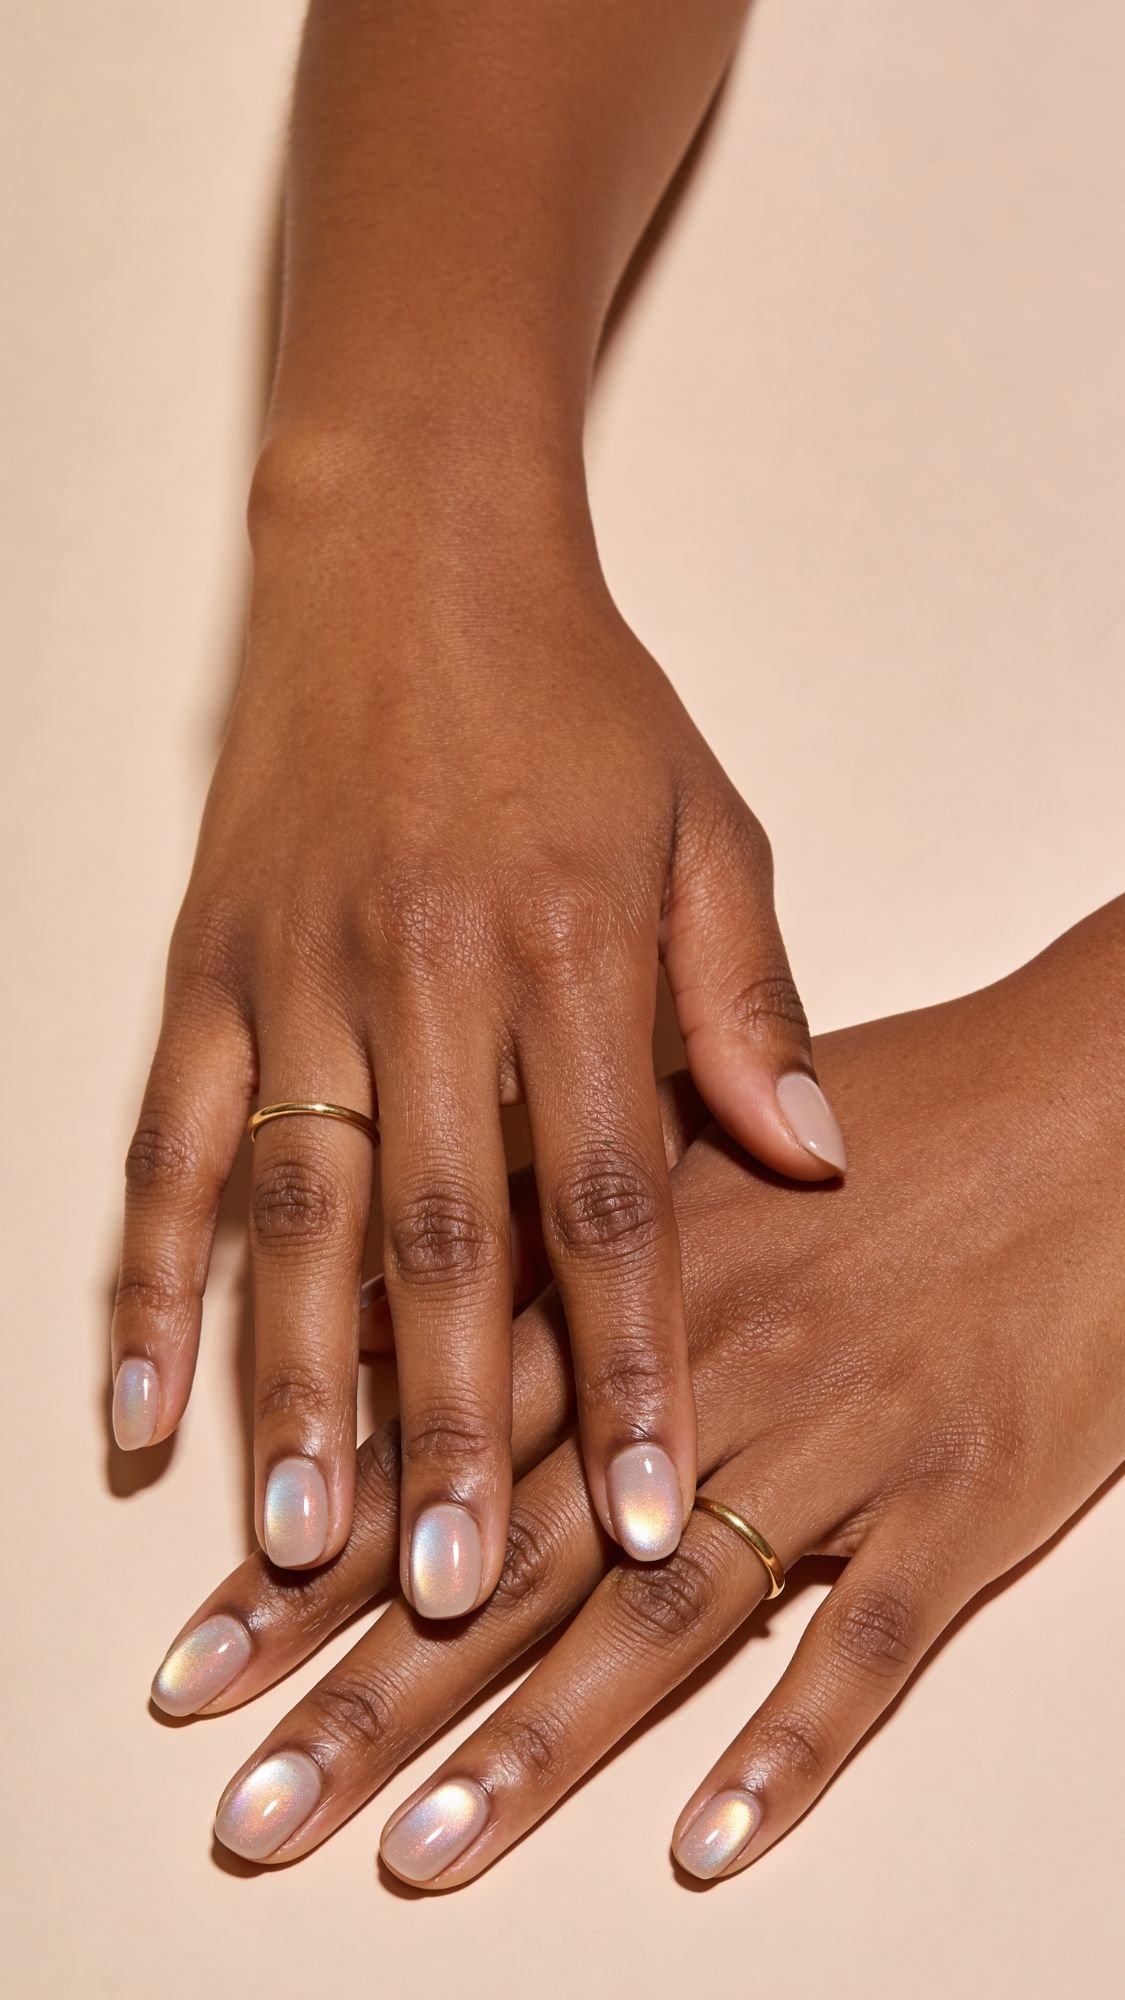
10) Chrome “Glass Nails” Over Milky White
This one looks like your nails got dipped in clear glass and then polished by a perfectionist. Milky white plus a sheer chrome glaze gives you that bright, clean reflection that reads fresh in every selfie, especially in natural light. If you like minimal nails but you still want people to notice, this is the sweet spot.
The Goal
You want a milky white base with a subtle chrome glaze that looks glossy and smooth, not frosty or streaky. The vibe stays clean, bright, and very “expensive hand model.”
Best For
- Short to medium nails, because milky white looks crisp and elongating
- Anyone who loves clean, bridal, or minimal manicures
- People who want chrome without heavy metallic color
Base Shade Notes, Because White Can Be Tricky
Milky white should look creamy, not stark. Stark white can look harsh and show brush strokes faster, and chrome will spotlight that texture.
- Choose a milky, slightly sheer white that self-levels
- If you see streaks, do two thin coats, not one thick coat
Pro Application Notes
The mistake most people make is over-layering white until it looks thick and lumpy. Thick white equals uneven chrome, and uneven chrome equals sad selfies.
Gel method
- Base coat, cure.
- Apply 1 to 2 thin coats of milky white gel, cure each.
- Apply no-wipe top coat, cure fully.
- Burnish pearl chrome lightly for a glassy glow.
- Seal with top coat, float it, cap the free edge, cure.
Regular polish method
- Base coat.
- Two thin coats of milky white, let them dry fully.
- Apply pearl chrome topper lightly.
- Seal with glossy top coat.
Sensory detail: Milky white polish can feel slightly “draggy” if you use too much. When you apply it correctly in thin coats, it feels smoother and levels itself without you needing to keep brushing. Over-brushing creates streaks and makes it look chalky.
Common Mistakes + Fixes
- Mistake: White looks streaky under chrome. Fix: Apply thinner coats and let them level, then add a second thin layer. Don’t keep brushing the same spot.
- Mistake: Chrome looks frosty instead of glassy. Fix: Use pearl chrome, not silver mirror chrome. Pearl gives glow, mirror gives harsh reflect.
- Mistake: Tips chip fast. Fix: Cap the free edge, and consider a second thin top coat just at the tips.
Wear And Maintenance Tips
- Avoid heavy staining products for the first day. White bases can pick up color if they aren’t fully set.
- Refresh with a glossy top coat mid-week if you want maximum “glass” shine.
Key Takeaways
- Milky white needs thin coats to stay smooth.
- Pearl chrome gives glass, mirror chrome can look too harsh here.
- Float your top coat, and cap the free edge for longevity.
11) Rose Gold Chrome On Deep Mocha Bases
This combo looks rich, flattering, and honestly unfair in selfies. Deep mocha makes your nails look polished and sleek, and rose gold chrome adds warmth and shine without going full copper. If you want chrome that feels glam but still wearable, this is the move.
The Goal
You want a deep mocha base with a rose gold chrome overlay that catches light in warm, glossy highlights. The base keeps it grounded, the chrome gives that reflective glow.
Best For
- Medium nails and longer nails, because the contrast shows better
- Anyone who loves warm tones and gold jewelry
- Deeper skin tones especially, rose gold over mocha looks luxe and cohesive
Shade Guidance, Keep It Rose Not Orange
Rose gold sits in that sweet spot between pink and gold. The mistake most people make is choosing a chrome that leans too copper, then it can pull orange under flash.
- Choose rose gold chrome with a pink undertone
- Pick a mocha base that looks creamy and rich, not gray
If you want your hands to look longer on camera, use almond or oval. Deep shades look even more elongating on tapered shapes.
Pro Application Notes
This design looks best when you keep the base smooth and the chrome layer even. Dark bases show texture, and chrome highlights it.
Gel method
- Base coat, cure.
- Apply 1 to 2 thin coats of deep mocha, cure each.
- Apply no-wipe top coat, cure fully.
- Burnish rose gold chrome evenly, firm pressure but controlled.
- Seal with top coat, float it, cap the free edge, cure.
Regular polish method
- Base coat.
- Two thin coats of mocha, let dry fully.
- Apply a rose gold chrome topper.
- Seal with glossy top coat.
Sensory detail: Rose gold chrome looks best when it has that smooth “metal foil” sheen. If it looks speckly, you didn’t burnish long enough, or your base layer has tiny texture that the chrome can’t hide.
Common Mistakes + Fixes
- Mistake: Chrome turns coppery or orange in photos. Fix: Choose a rose gold that leans pink, and keep the base a true mocha instead of reddish-brown.
- Mistake: The base looks streaky. Fix: Use thinner coats and let them level. If you see streaks before chrome, you’ll see them after.
- Mistake: Tips wear down quickly. Fix: Cap the free edge and add a second thin top coat just on the tips.
Wear And Maintenance Tips
- Use cuticle oil nightly. Dark bases and metallic shine look best with hydrated skin.
- Touch up shine mid-week with a thin glossy top coat if you’re filming or taking photos.
Key Takeaways
- Mocha plus rose gold reads expensive, not loud.
- Choose rose, not copper, to avoid orange flashback.
- Smooth base = smooth chrome, don’t rush the mocha layers.
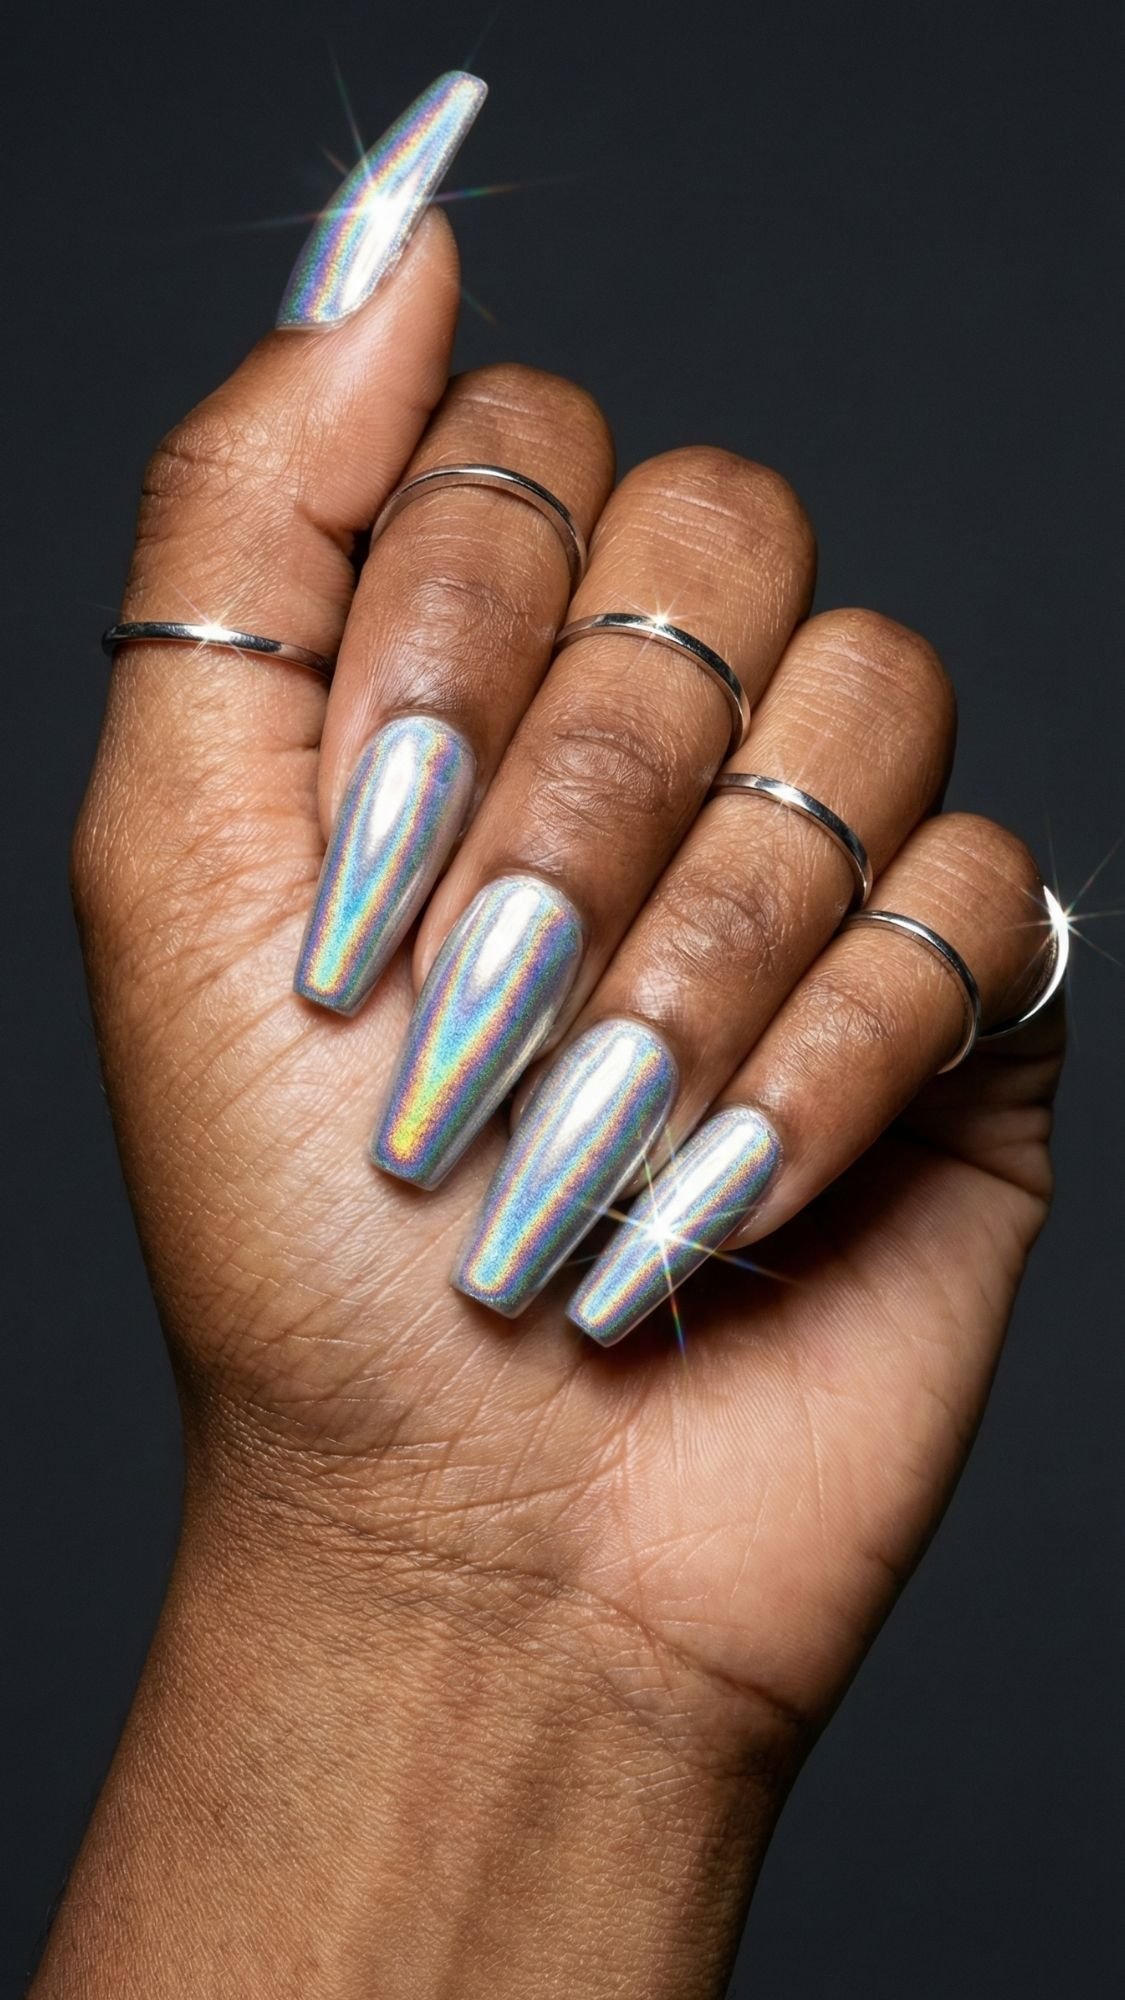
12) Holographic Chrome For Party Flash
This is the set for when you know there will be flash photos, dim lighting, and at least one moment where someone says “wait, let me see your nails again.” Holographic chrome throws rainbow reflections like tiny prisms, and it looks absolutely wild in selfies. It can look subtle in normal lighting, then explode under flash. That contrast is the whole appeal.
The Goal
You want a smooth, clean base with a holographic chrome finish that reflects rainbow highlights without looking chunky or gritty. Holo should look like a fine, glassy shimmer, not glitter.
Best For
- Parties, events, vacations, and content nights
- Medium to long nails, holo reflection shows more on bigger surfaces
- Anyone who wants “fun” nails that still look polished
Base Shades That Make Holo Look Crisp
- Milky nude or sheer pink: the most wearable rainbow payoff
- Black base: maximum contrast, maximum holo drama
- Cool gray base: modern, edgy, and still rainbow-reflective
If you want holo to look clean and not chaotic, keep the base simple. Holo already has a lot going on.
Pro Application Notes
The mistake most people make is layering holo too heavily, then it looks cloudy instead of crisp. You want an even, thin holo layer and a top coat that stays glossy.
Gel method
- Base coat, cure.
- Apply base color, cure.
- Apply no-wipe top coat, cure.
- Burnish holographic chrome powder lightly but evenly.
- Seal with glossy top coat, float it, cap the edge, cure.
Regular polish method
- Base coat.
- Apply base color, let dry fully.
- Apply a holographic topper or holo chrome polish.
- Seal with glossy top coat.
Sensory detail: Holo chrome looks best when it feels smooth to the touch after sealing. If you can feel texture, you used too much powder or you didn’t seal well enough. Texture kills the “glass” effect in flash photos.
Common Mistakes + Fixes
- Mistake: Holo looks cloudy. Fix: Use thinner layers and a simpler base shade. Too much product mutes the rainbow.
- Mistake: The rainbow doesn’t show in photos. Fix: Change lighting. Holo loves flash or a strong directional light. Soft overhead lighting can make it look flat.
- Mistake: Tips chip fast. Fix: Cap the free edge and consider a second thin top coat at the tips.
Wear And Maintenance Tips
- If you want maximum sparkle all week, refresh with a glossy top coat mid-week.
- Avoid gritty surfaces. Holo can show micro-scratches more than pearl chrome.
Key Takeaways
- Holo pops most under flash, that’s the point.
- Thin layers keep the rainbow crisp, thick layers make it cloudy.
- Smooth sealing keeps it glassy, texture ruins the effect.
13) Chrome Bangle Nails, Metallic Jewelry Energy
Chrome bangle nails give you that stacked-jewelry look, but on your nails. You add metallic arcs, cuffs, or tiny “bands” over a glossy base, and the light hits every raised edge like actual hardware. This design photographs insanely well because the dimension creates highlights even in softer lighting. Just don’t go full chandelier on every nail unless you want your manicure to snag on everything you own.
The Goal
You want a clean, glossy base with minimal 3D metallic accents that look intentional, like nail jewelry. The chrome effect should catch light, and the placement should feel balanced, not bulky.
Best For
- Medium to long nails, because the “bangle” details need space
- Event nails, birthday nails, photoshoots, weekend trips
- Anyone who wants a statement look without doing full nail art on every nail
Pro Application Notes
What I’ve noticed is that bangle nails look most expensive when you treat them like jewelry styling. You wouldn’t wear 14 necklaces at once, right? Pick one or two accent nails, keep the rest glossy chrome or a clean nude glaze, and let the details do the talking.
How to build bangle accents cleanly
- Paint your base color and fully cure or dry it.
- Add a thin chrome layer or chrome top coat if you want extra reflect under the accents.
- Place metallic strips, curved decals, or small metal charms using tweezers.
- Seal strategically. Use a thicker top coat only where needed, then smooth the edges so hair won’t catch.
- Cap the free edge, because chunky accents can make tips wear faster.
Safety note: If you use gel to attach charms, keep gel off skin and cure fully. If you notice itching or redness, stop and switch to non-gel options like adhesive strips or press-on accents.
Common Mistakes + Fixes
- Mistake: The accents snag on hair or clothes. Fix: File or press down any lifted edges, then seal with a small bead of top coat around the perimeter.
- Mistake: The nail looks bulky and wide. Fix: Place bangles closer to the center line of the nail, not the sidewalls.
- Mistake: The chrome looks dull around the embellishment. Fix: Apply chrome first, then place accents, then seal lightly. Too much top coat can cloud reflect.
Wear And Maintenance Tips
- Use gloves for chores. Raised accents hate friction.
- If a corner lifts, fix it the same day. A tiny lift turns into a full pop-off fast.
- Apply cuticle oil after the set fully hardens, and avoid oils near charm edges.
Key Takeaways
- Less detail looks more luxe, pick accent nails and keep the rest clean.
- Center placement elongates, side placement widens.
- Seal edges to prevent snags, smooth hardware always wins.
14) Chrome Ombré “Baby Boomer” Fade
If you want chrome that looks soft, flattering, and ridiculously photogenic, chrome ombré is it. The “baby boomer” fade gives you that smooth nude-to-light tip gradient, then chrome adds a glassy sheen that catches light across the whole nail. It’s subtle, but it still looks fancy. This is the manicure version of “effortless,” except we both know you put in effort.
The Goal
You want a seamless nude-to-light fade with a soft chrome glaze on top. No harsh line, no obvious sponge marks, just a smooth gradient that reflects light evenly.
Best For
- Short nails that want a lengthening illusion
- Anyone who wants a clean, bridal-adjacent manicure
- Beginners who want a “professional-looking” result without detailed nail art
Color Pairings That Always Work
- Nude base + milky white tip fade + pearl chrome glaze
- Warm nude + soft beige tip fade + champagne chrome
- Pink nude + milky pink tip fade + pearl chrome
If you want your hands to look longer in selfies, keep the fade higher on the nail so the lighter tip doesn’t visually cut the nail short.
Pro Application Notes
The biggest mistake people make is trying to do the fade in one go. Build it in light layers and you get a cleaner result.
How to do a smooth ombré fade
- Apply base coat and fully set it.
- Apply your nude base shade evenly.
- Use a makeup sponge to dab a tiny amount of the lighter shade at the tip.
- Dab lightly and repeatedly, blending downward in small taps.
- Repeat in thin layers until the fade looks smooth.
- Add chrome glaze on top, then seal.
Sensory detail: When you blend with a sponge correctly, you feel light tapping, not dragging. If you drag the sponge, you create streaks and patchy spots that chrome will highlight under flash.
Common Mistakes + Fixes
- Mistake: You see a harsh line where nude meets white. Fix: Use less product on the sponge and tap more times. More taps, less product equals softer fade.
- Mistake: Sponge texture shows through. Fix: Apply a smoothing top coat layer before chrome, then add chrome glaze. A leveling layer hides the sponge imprint.
- Mistake: The fade looks chalky. Fix: Choose milky shades, not stark white. Stark white can look powdery and streaky.
Wear And Maintenance Tips
- Re-top mid-week if you want the fade to stay glossy and selfie-ready.
- Apply cuticle oil nightly so the neutral gradient looks clean and polished.
Key Takeaways
- Build the fade slowly, thin layers create the smoothest gradient.
- Use milky shades, harsh white looks chalky.
- A smoothing layer helps, especially if sponge texture shows.
15) Chrome Negative Space, Clean Lines, Big Shine
Negative space designs look sharp, modern, and expensive because they use contrast. You leave parts of the nail bare or sheer, then add chrome in crisp lines or blocks. The chrome catches light, the negative space keeps it clean, and the whole thing photographs like editorial nail art without needing rhinestones or chaos.
The Goal
You want clean, intentional chrome placement with visible negative space that stays neat at the cuticle and sidewalls. This look lives or dies by precision.
Best For
- Short nails, because negative space keeps the nail looking longer and less bulky
- Anyone who likes minimalist nail art with a graphic edge
- People who want chrome that looks polished in close-up photos
Easy Design Options That Still Look Pro
- Single chrome stripe down the center on a sheer nude base
- Diagonal chrome corner tips with a clear gap near the cuticle
- Half-moon chrome at the base with a glossy nude nail
- Geometric chrome blocks with thin clear lines between sections
If you want your hands to look longer in selfies, go for vertical lines or diagonal tips. Horizontal blocks can visually widen the nail.
Pro Application Notes
The mistake most people make is letting the chrome creep into places it shouldn’t, like flooding the cuticle line or making crooked tape edges. The fix is prep and patience.
How to get crisp negative space
- Apply base coat and fully set it.
- Apply a sheer nude base or leave portions bare if your nails look even.
- Use striping tape or a thin brush to map your design.
- Apply chrome polish or chrome gel in thin layers where you want shine.
- Remove tape carefully while the layer is still workable, depending on your system.
- Seal with top coat, float it, cap the free edge.
Sensory detail: When you pull tape off at the right time, it lifts cleanly with a little snap and leaves sharp edges. If it drags or smears, you waited too long or used too thick a layer.
Common Mistakes + Fixes
- Mistake: Tape lines look jagged. Fix: Press tape down firmly, especially at the edges, and apply thinner product layers.
- Mistake: Chrome bleeds into negative space. Fix: Leave a tiny gap between the tape edge and where you place product, then nudge it into place with a detail brush.
- Mistake: The design looks messy near the cuticle. Fix: Use a cleanup brush and keep a small margin at the cuticle line, clean edges read more expensive.
Wear And Maintenance Tips
- Negative space designs show grow-out less, so they can look fresh longer.
- Refresh top coat mid-week if you want the chrome lines to stay glassy and sharp.
Key Takeaways
- Crisp lines make negative space look luxe, messy edges ruin it.
- Vertical and diagonal shapes elongate, horizontal shapes widen.
- Thin layers plus careful tape placement create the cleanest design.
16) Chrome Press-Ons That Look Like Gel
Sometimes you want chrome nails that look like you sat at a salon for two hours, but you also want them in the next 20 minutes. Press-ons handle that assignment, especially for chrome, because the finish comes smooth and glossy from the start. The mistake most people make with press-ons is blaming the nails when they pop off, when the real issue is sizing and prep. Press-ons don’t fail randomly, they fail predictably.
The Goal
You want chrome press-ons that sit flush, look thin and natural, and stay on long enough to survive real life and selfies. “Gel-like” means no bulky edges, no visible gaps, no hair snagging.
Best For
- Beginners who want instant results without technique stress
- Trips, events, weekends, and content days
- Anyone taking a break from gel but still wanting a high-shine look
Sizing Strategy, The Pro Way
- Lay out all nails first and match each finger before you open glue.
- If you’re between sizes, choose the slightly smaller size and file the sides to fit. A too-big nail lifts faster.
- Check the cuticle curve. If the press-on curve fights your natural nail shape, you’ll see gaps at the sides.
Adhesion Options, What To Expect
- Adhesive tabs
- Best for: 1 to 3 days, low commitment
- Feels: slightly cushioned
- Biggest issue: can loosen with heat and water
- Nail glue
- Best for: 5 to 10 days, stronger hold
- Feels: more secure, more natural
- Biggest issue: bubbles if you use too much or press unevenly
FYI, tabs can still look great for photos and short wear. If you want a set for a weekend trip, glue wins.
Glue Placement Technique, No Bubbles, No Pop-Offs
This tiny step decides everything.
- Apply dehydrator or alcohol to your natural nails, let it fully dry.
- Add a small dot of glue to the center of your natural nail.
- Add a thin swipe of glue inside the press-on, mainly near the lower third.
- Place the press-on at the cuticle edge first, then roll it down toward the tip.
- Press firmly for 20 to 30 seconds, longer if your nails are curved.
Sensory detail: When you seat a press-on properly, you feel a smooth press and a firm “lock” as the nail settles into place. If it slides around, you used too much glue or didn’t dehydrate enough.
Edge Sealing So Hair Does Not Catch
- After applying, press around the perimeter with your thumb for 5 seconds.
- If you feel a tiny lip, file the edge gently with a fine file.
- Optional: apply a thin top coat just around the seam if the press-ons allow it.
Removal That Protects Natural Nails
Press-ons should leave your nails intact. Ripping them off turns your nail plate into a flaky mess, and chrome looks rough on peeled nails.
- Soak in warm soapy water with a bit of oil for 10 to 15 minutes.
- Gently lift from the sides, never force.
- If it resists, soak longer. Patience beats peeling.
Common Mistakes + Fixes
- Mistake: Press-ons pop off within a day. Fix: Dehydrate better, size smaller, and press longer during application.
- Mistake: Visible gap near the cuticle. Fix: Choose a press-on with a better cuticle curve, and roll it down from the cuticle edge to avoid air pockets.
- Mistake: Glue bubbles show through. Fix: Use less glue and press from cuticle to tip to push air out.
Key Takeaways
- Sizing matters more than glue brand, slightly smaller fits better.
- Dehydration prevents pop-offs, oil is the enemy of adhesion.
- Roll and press method prevents bubbles, start at the cuticle edge.
Beauty Rules Of Thumb, Chrome Edition
Chrome looks simple, but it acts high-maintenance. If you follow these rules, you’ll get that crisp “selfie shine” without the streaks, chips, and weird dull patches that show up the second you turn on flash. Ever notice how chrome somehow highlights everything you thought nobody would see? Yeah, same.
My 10 Chrome Rules That Never Fail Me
- Prep like you’re filming macro shots. If you can feel a ridge with your fingertip, chrome will show it on camera.
- Dehydrate, then do not touch your nails. Your fingertips re-oil the nail plate fast, and chrome lifts faster on oily nails.
- Use thin coats, always. I aim for “see-through thin,” then I build. Thick coats wrinkle, dent, and look wavy under flash.
- Cap the free edge every single time. I swipe base, color, and top coat across the tip edge. Tip wear starts there, not in the middle.
- Float your top coat. I let the brush glide, I do not press down. Pressing drags chrome and creates faint streaks that flash exposes immediately.
- Burnish until it feels silky. Chrome should feel smooth, not gritty. If it feels gritty, I keep burnishing or I check my tack layer.
- Match chrome type to your lighting. Pearl chrome glows in daylight, mirror chrome thrives in flash, aurora looks best when you move your hand.
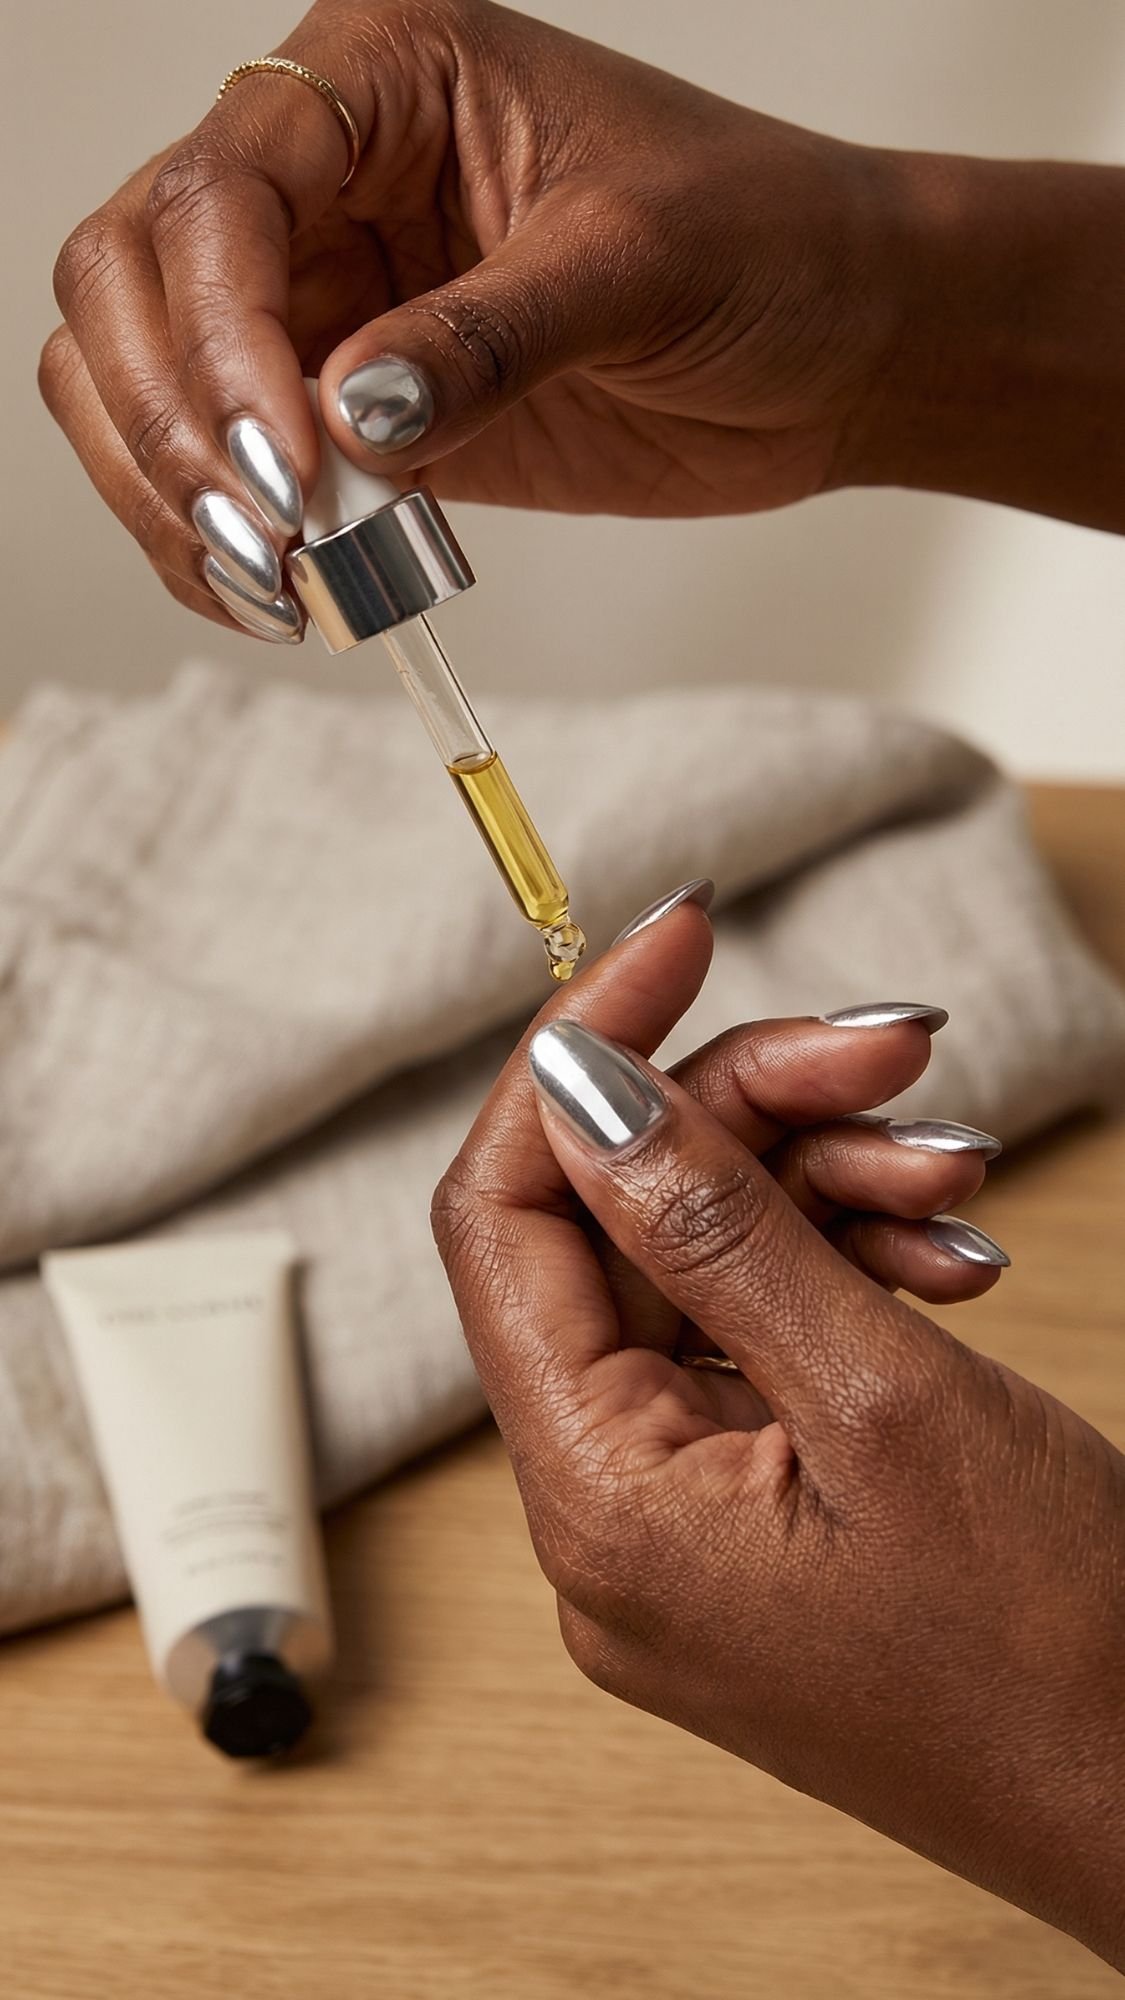
- Keep cuticle oil for the end. Oil before polish kills adhesion. Oil after finishing makes the whole set look cleaner and more expensive.
- Do not overload chrome powder. More powder does not mean more shine, it usually means patchy edges and sealing problems.
- Choose one “main character” element. If you do velvet cat eye plus chrome plus gems plus swirls, your nails look busy, not luxe.
Key Takeaways
- Chrome rewards clean technique, and it punishes shortcuts.
- Thin layers and edge sealing give you the longest wear.
- Top coat technique controls the final look, even more than the powder.
Technique Cheat Sheet: So Your Chrome Looks Smooth And Photogenic
This is the quick reference I wish everyone had before they tried chrome the first time. Because chrome doesn’t forgive chaos. It reflects it. 🙂
Chrome Finish Quick Picker
- If you want “glow” in daylight: choose pearl or glazed chrome
- If you want “mirror” under flash: choose silver mirror chrome or black mirror chrome
- If you want “shift” in motion: choose aurora or oil slick multichrome
- If you want “party sparkle” in photos: choose holographic chrome
The “Thin Coat” Rule, What Thin Actually Means
- Your coats should look slightly sheer while wet, then even out as they level.
- If product pools at the sidewalls, you used too much.
- If the nail looks thick from the side profile, you used too much.
Quick test: Turn your finger sideways. If you can see a raised “ledge” of product near the cuticle, you need thinner coats.
Burnishing Pressure Guide
- Pearl or glazed chrome: light to medium pressure, soft circles
- Mirror chrome: medium to firm pressure, circles then long strokes
- Aurora chrome: light pressure, build slowly so it stays clear
- Multichrome: firm and even pressure, consistent across the nail
How you know you’re done: the chrome feels silky, like satin on glass.
Top Coat Sealing Map, Where Chrome Fails First
Chrome usually fails at:
- Free edge tips
- Sidewalls near the tip
- Cuticle line if you flood it
So I do this every time:
- Cap the free edge with base, color, and top coat
- Seal sidewalls by running a tiny amount of top coat along the side edge
- Leave a micro-gap at the cuticle, then smooth it with a detail brush for a clean line
Dry Time Strategy, So You Don’t Dent Everything
- Regular polish: wait until nails stop feeling cool and slightly tacky
- Press-ons: press and hold longer than you think, then avoid water for an hour
- Gel: cure fully and avoid touching the sticky layer if your system leaves one
Reality check: If you rush, you’ll dent. Chrome will highlight that dent like it’s underlining it.
Common Mistakes And Easy Fixes (Quick List)
- Streaky chrome: cure fully, burnish longer, use more even pressure
- Patchy chrome near edges: apply chrome from center outward, use smaller applicator for sidewalls
- Bubbling: stop shaking polish, use thinner coats, avoid heavy pressure
- Shrinkage at tips: swap top coat, cap the free edge, avoid overly thick top coat
- Dull finish after top coat: float top coat, don’t press, use a glossy non-shrinking formula
Key Takeaways
- Chrome looks expensive when it looks smooth, texture kills it.
- Your top coat technique matters, float it, cap it, seal it.
- Burnish until silky, that feeling tells you the finish will photograph well.
Longevity + Maintenance Plan, Day 1 Through Day 7
Chrome looks best when it stays glossy and smooth, so the goal is simple. Protect the edges, keep the finish shiny, and keep the skin around the nails hydrated so your close-ups look clean. What I’ve noticed is that most “chrome failures” happen because of water and friction, not because the chrome itself is weak.
Day 1, Lock It In
- Avoid long hot showers, dishwashing, or cleaning without gloves for the first several hours.
- Treat your nails like they’re still setting, because they are.
- If you used press-ons, avoid soaking your hands in water for at least an hour.
Quick fix habit: If you feel a tiny snag at a tip, file it lightly and seal it with a thin swipe of top coat. Don’t wait.
Day 2 To Day 3, Keep The Shine
- Apply cuticle oil at night and hand cream after washing hands.
- Use gloves for chores. Chrome hates friction.
- If you have a chrome micro-French or chrome tips, check the free edge. That’s where wear starts.
Day 4, Mini Refresh If You Want “Just Done” Shine
If you’re filming, taking photos, or you just want that fresh look, do a quick refresh.
- Wipe nails with alcohol to remove oil and lotion residue.
- Apply a thin glossy top coat, float it, cap the free edge.
- Let it set fully.
This refresh step takes 10 minutes and makes nails look brand new in selfies.
CUTICLE REPAIR AND STRONGER, LONGER NAILS. A single application of the oil is certain to moisturize and hydrate the cuticles, strengthen your nails, and boost their natural shine overnight. our anti-breakage formula promotes the renewal of natural growth and thickness.

Day 5 To Day 7, Damage Control And Smart Touch-Ups
- If you see tip wear, seal just the tip with top coat.
- If a corner lifts, don’t pick. File lightly, seal, and move on.
- Keep up with oil and hand cream, because dry cuticles make any manicure look rough in close-ups.
Key Takeaways
- Water and friction cause the most wear, protect nails early.
- A mid-week top coat refresh keeps chrome selfie-ready.
- Seal snags immediately, little issues become big chips fast.
Fix The 8 Most Common Chrome Problems (Fast)
You asked for real fixes, not vibes, so here we go. If something looks off, it usually comes down to layer thickness, oil, curing, or top coat technique.
1) Polish Pooling At The Cuticle
- Why it happens: too much product on the brush, nail angled downward, flooding
- Fix: use less product, keep finger slightly angled upward, clean with a small brush before it sets
- Prevent it: leave a tiny gap near the cuticle, then nudge product closer with a detail brush
2) Streaky Chrome
- Why it happens: uneven tack layer, rushed burnishing, base layer texture
- Fix: cure the tack layer fully, burnish longer with even pressure, make sure base looks smooth before chrome
- Prevent it: apply thinner coats and use consistent burnishing strokes
3) Bubbling
- Why it happens: thick coats, shaking polish, painting over partially dry layers
- Fix: apply thinner coats, roll polish bottle instead of shaking, let layers dry longer
- Prevent it: stop overworking the brush, one to three passes per nail is enough
4) Shrinkage, Top Coat Pulls Back From The Tips
- Why it happens: shrinking top coat, too thick, not capping the free edge
- Fix: swap top coat, float it, cap the free edge, add a second thin tip-only seal
- Prevent it: thin layers, cap edges every time
5) Chipping At The Tips
- Why it happens: missed free edge seal, dehydration skipped, nails used as tools
- Fix: lightly file the chip smooth and seal with top coat, for bigger chips patch the area then top coat
- Prevent it: cap free edge with base, color, and top coat, wear gloves for chores
6) Lifting At The Cuticle Or Sidewalls
- Why it happens: oil left on nail plate, gel touching skin, under-curing
- Fix: remove lifted area safely, don’t glue it down with more product, redo prep and apply thin layers
- Prevent it: dehydrate well, keep product off skin, cure fully
7) Glue Bubbles Under Press-Ons
- Why it happens: too much glue, pressing unevenly, placing nail flat instead of rolling it down
- Fix: remove and reapply, use less glue, press from cuticle to tip to push air out
- Prevent it: small dot of glue plus thin swipe in press-on, then roll down and hold
8) Press-Ons Popping Off
- Why it happens: wrong size, no dehydration, water exposure too soon
- Fix: size slightly smaller, prep with alcohol, press longer, avoid water for an hour
- Prevent it: prep and sizing first, then glue, then press and hold
Key Takeaways
- Most chrome issues come from oil and thickness, not the chrome itself.
- Fixes work best when you catch problems early, seal snags fast.
- Top coat shrinkage causes tip issues, swap the top coat if it keeps happening.

Nail Health + Recovery: Strong Nails Make Chrome Look Better
Chrome looks the most “selfie-ready” when your nail plate looks smooth and your cuticles look hydrated. If your nails peel or your cuticles look dry, chrome reflects that texture and makes it more obvious. I don’t say that to be rude, chrome is just brutally honest.
Also, quick reality check. If you use gel systems, you need to be careful. Skin contact and under-curing can increase irritation risk over time. If you notice itching, redness, swelling, burning, or lifting that comes with discomfort, stop and see a professional.
The Daily Basics That Actually Help
Cuticle oil routine
- What to do: Apply cuticle oil nightly, then massage for 20 to 30 seconds per hand.
- Why it matters: Hydrated cuticles look smoother in close-ups, and massage boosts circulation around the nail fold.
- Pro tip: Oil first, then hand cream. Cream seals the oil in so it actually stays put.
Hand cream, especially after washing
- What to do: Keep a small tube by your sink and on your nightstand.
- Why it matters: Dry skin makes any manicure look less polished, and chrome highlights texture.
Gloves for chores
- What to do: Wear gloves for dishwashing and cleaning.
- Why it matters: Water plus detergent strips oils, weakens nails, and dulls shine.
Breaks Between Sets, What Helps Versus What’s Hype
What actually helps
- Taking 3 to 7 days between gel sets if your nails feel tender or thin
- Keeping nails shorter during recovery, shorter nails flex less and break less
- Using a ridge-filling base during recovery if you do regular polish, it smooths and protects
What I skip
- Aggressive buffing “to smooth peeling.” That thins the nail more and makes peeling worse.
- Picking at lifting gel or press-ons. That pulls layers off the nail plate.
If Your Nails Peel Or Feel Thin
- Focus on protection: Keep nails short, use a strengthening base coat if you use regular polish.
- Hydrate daily: Oil plus cream consistently makes a bigger difference than random treatments once a week.
- File gently: Use a glass file if possible, it causes less splitting at the edges.
When To See A Professional
Don’t play guessing games if you see any of this:
- Pain, throbbing, or swelling around the nail
- Green, yellow, or dark discoloration that does not grow out normally
- Pus, warmth, or signs of infection
- Persistent itching or burning after gel use
Key Takeaways
- Hydration makes chrome look cleaner, especially in close-up photos.
- Avoid ripping or peeling product off, it damages the nail plate.
- Take breaks if nails feel thin, and stop if you see irritation.
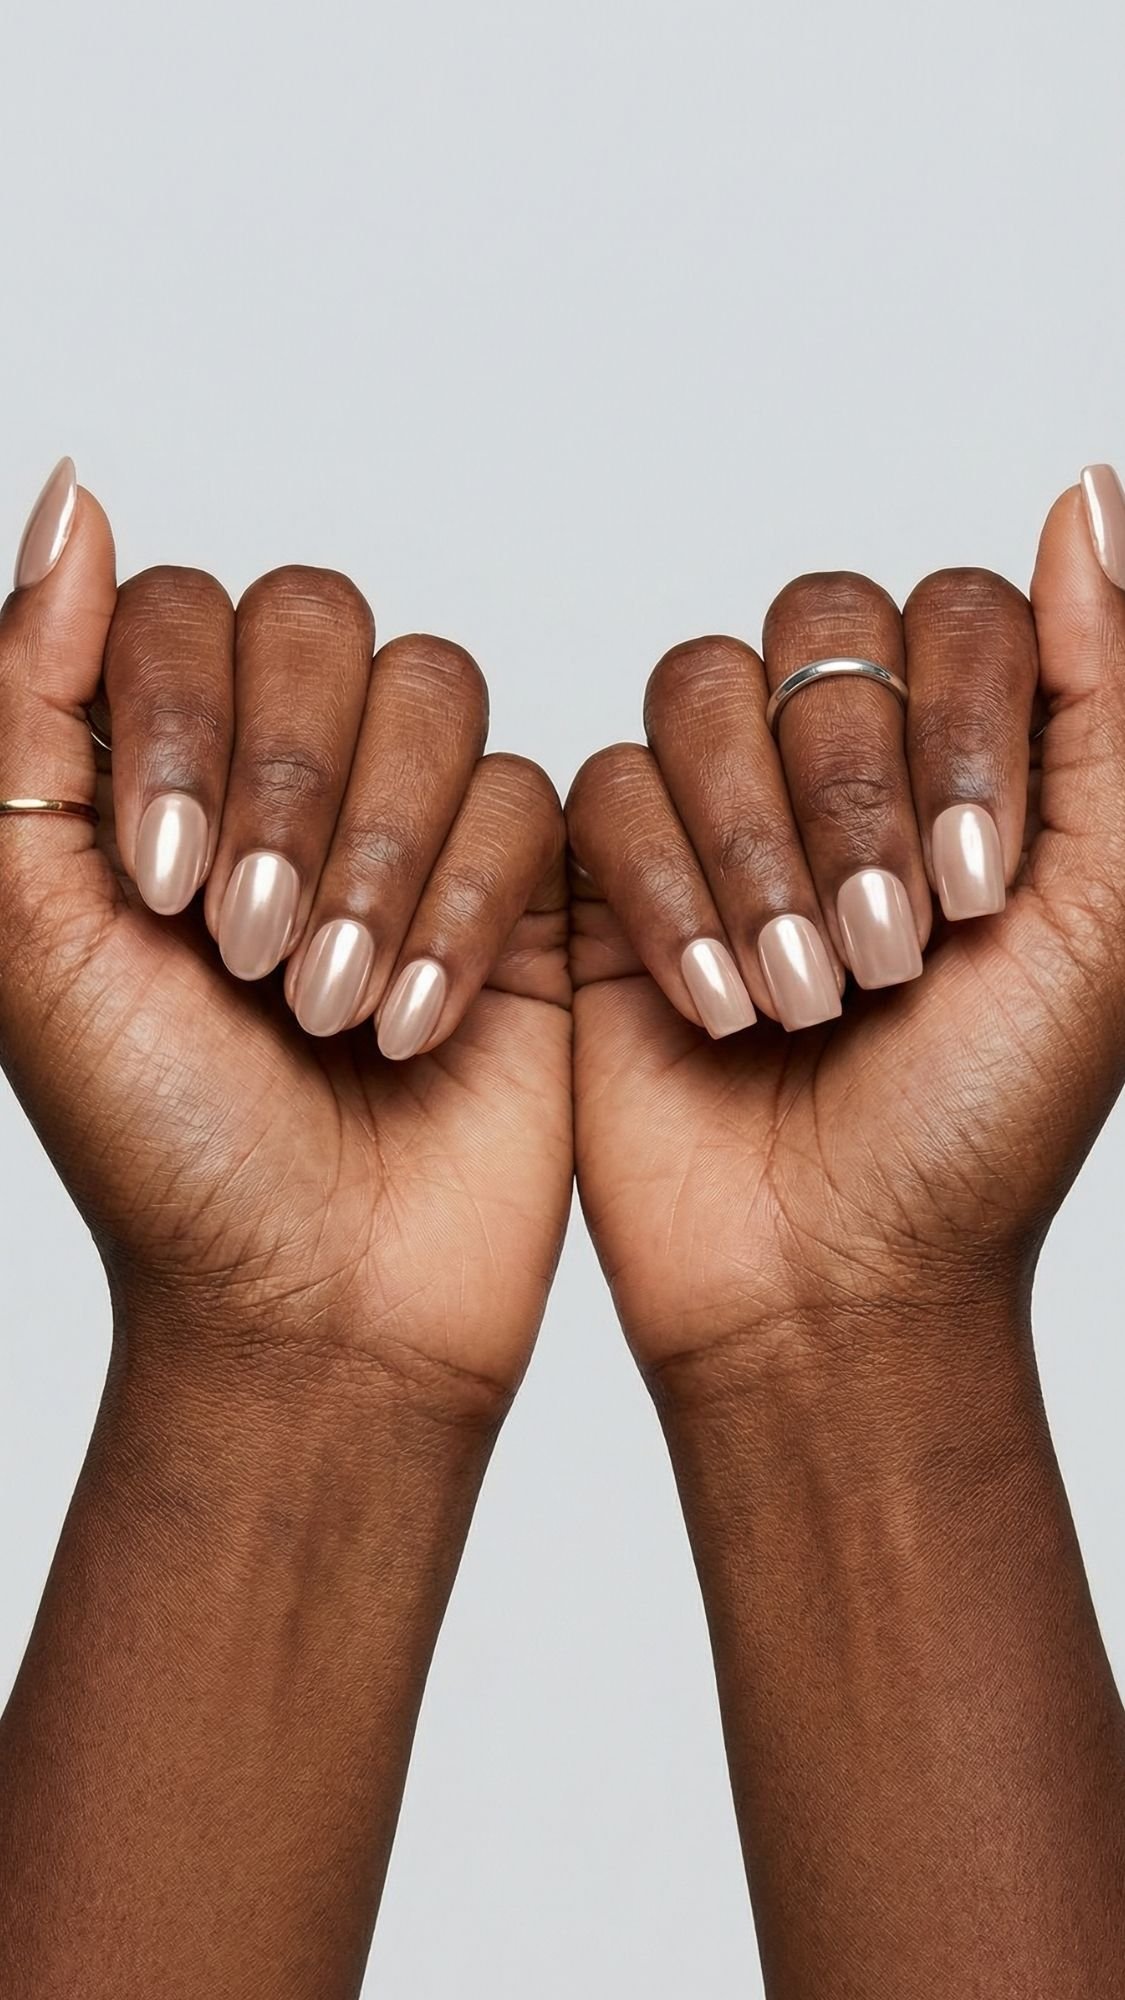
Shade + Shape Guidance: So Your Hands Look Longer In Photos
Chrome reflects light, so it can either elongate your hands beautifully or make nails look wider than you meant. A few small choices, shape, placement, and undertone, change everything in selfies. Ever taken a photo and thought, why do my nails suddenly look stubby? That usually comes down to shape and where the brightest part of the design sits.
Best Shapes For Short Nails
If you have short nails and you want them to look longer on camera, these shapes help the most:
- Oval: soft and lengthening, easiest to maintain
- Short almond: slightly tapered, very flattering
- Squoval: still neat, but less widening than a hard square
Skip if you want length: a hard square on short nails can make nail beds look wider in close-up shots.
Best Shapes For Wide Nail Beds
- Almond: visually narrows the nail plate
- Oval: elongates without looking sharp
- Coffin or tapered square: works best on medium to long nails
Pro tip: Keep sidewalls slightly tapered. That taper changes how light reflects, and it makes chrome look sleeker.
Chrome Placement Tricks That Make Hands Look Longer
- Micro French tips: elongate instantly, especially with silver or champagne chrome.
- Vertical chrome stripes: lengthen the nail visually.
- Aura placed slightly above center: creates a lift effect.
- Diagonal tips: give length without looking harsh.
Avoid if you want length: thick horizontal bands, they visually cut the nail shorter.
Shade Picks That Flatter Different Undertones
Chrome can look icy, warm, or neutral depending on your base and your undertone.
Warm undertones
- Champagne chrome, rose gold chrome, warm nude bases
- Deep mocha with warm chrome accents looks especially rich
Neutral undertones
- Pearl chrome, champagne chrome, soft beige bases
- Most chromes look balanced, lucky you
Cool undertones
- Silver chrome, icy pearl chrome, cool taupe bases
- Aurora chrome over milky lavender looks extra flattering
“If You Want Your Hands To Look Longer” Quick Tips
- Keep nails slightly longer than the fingertip, even by 1 to 2 mm
- Choose sheer or nude bases close to your skin tone
- Use thin tip lines instead of thick French
- Keep embellishments near the center, not the sidewalls
Key Takeaways
- Oval and almond shapes elongate, square shapes can widen in photos.
- Vertical and diagonal design elements lengthen, thick horizontal elements shorten.
- Undertone and base shade control the chrome vibe, choose warm, neutral, or cool on purpose.
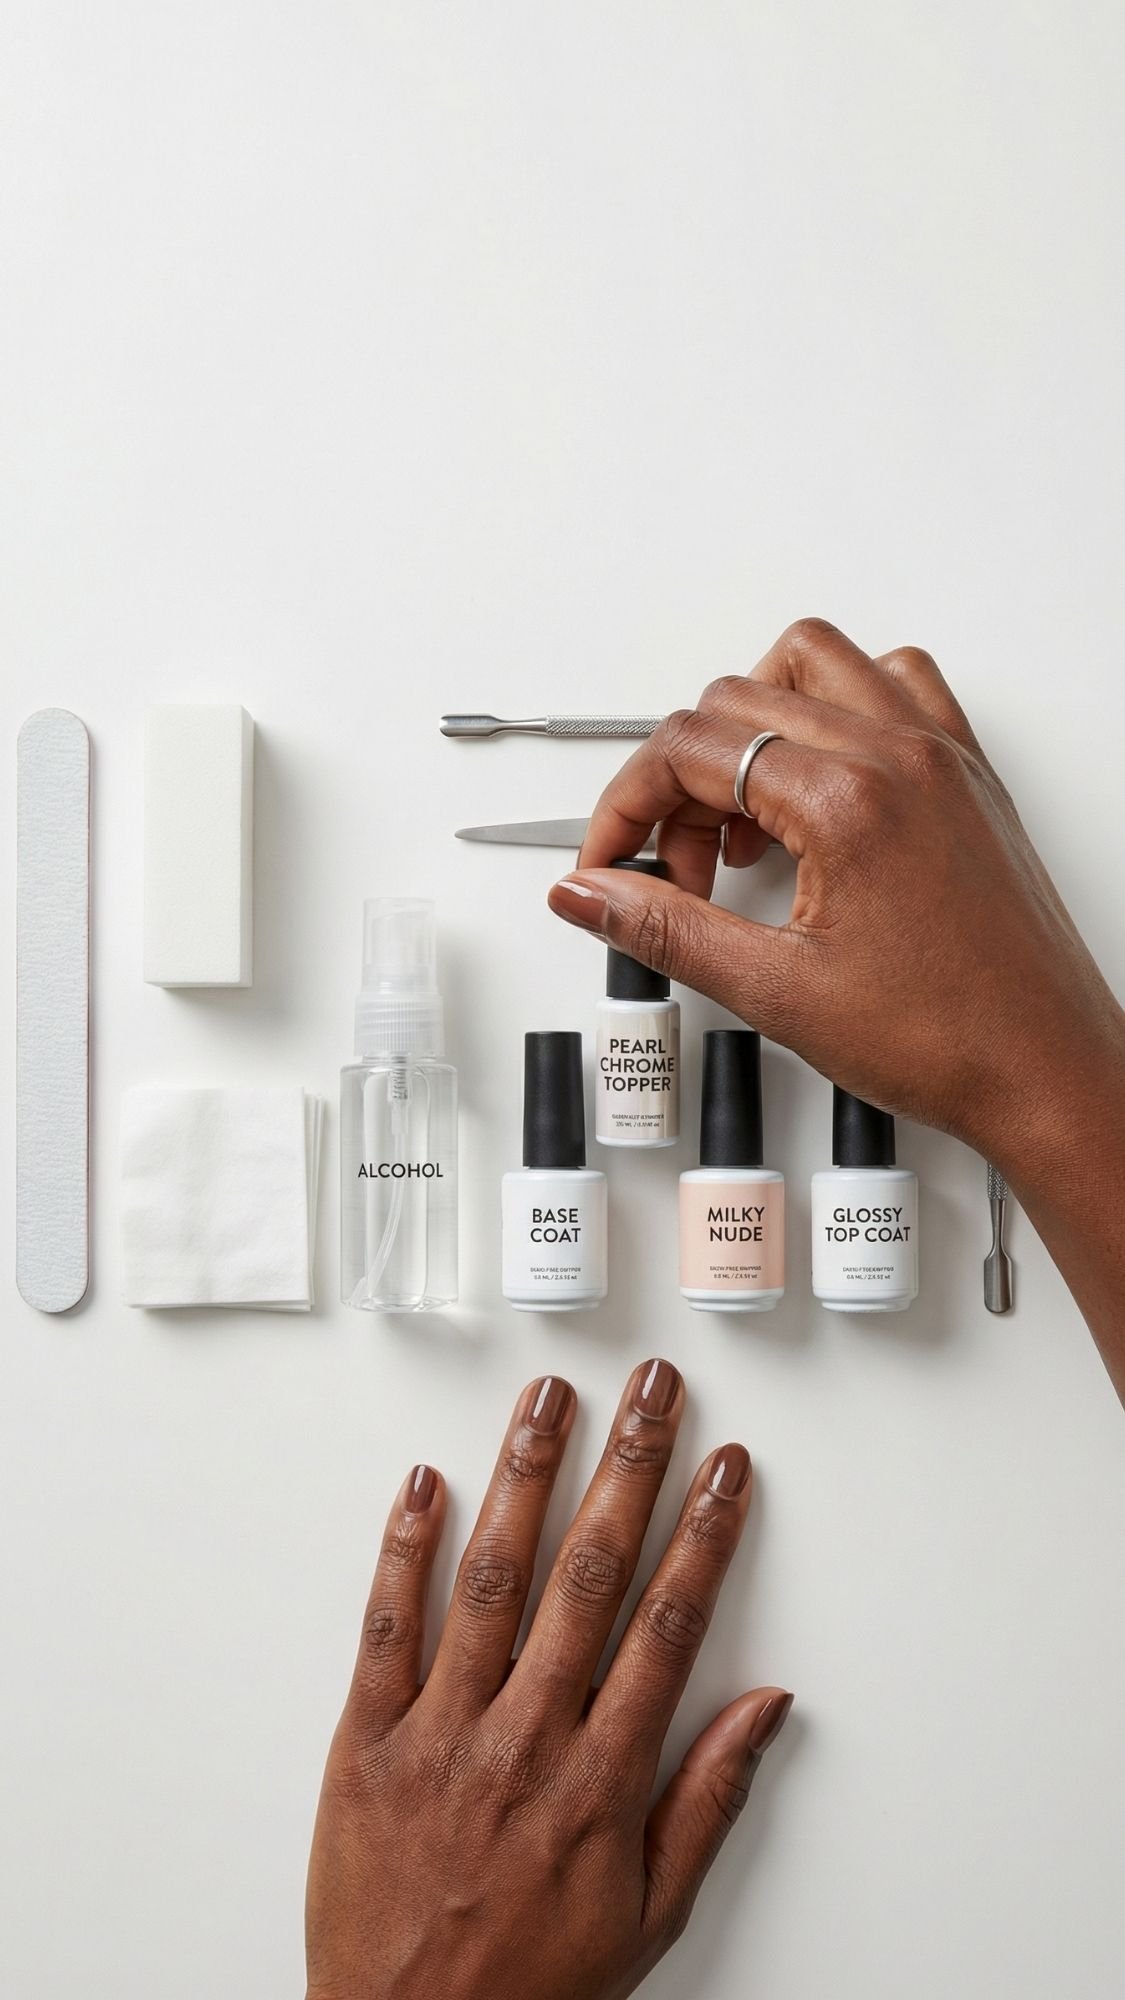
What To Buy First Versus What Can Wait, Beginner Shopping List
If you’re starting from zero, you don’t need to buy everything at once. You need a tight, smart kit that gets you chrome nails that look good in photos, and you can upgrade later. The mistake most people make is buying five chrome powders before they buy a top coat that actually seals properly.
Buy First, The Essentials
- Nail file + fine buffer
- Why: shape and smoothness decide how chrome reflects
- Lint-free wipes
- Why: fuzz shows up in chrome like it’s screaming
- Alcohol or nail cleanser
- Why: removes oils, prevents lifting and pop-offs
- Base coat
- If you have ridges: ridge-filling base
- If you chip: sticky base
- One neutral base color
- Pick: milky pink or nude, it works under almost every chrome finish
- One chrome option
- Easiest: pearl chrome topper or glazed chrome topper
- More intense: chrome powder
- One glossy top coat
- Why: top coat controls shine, smoothness, and tip wear
Acrylic Nail Kit for Beginners: The starter kit offers ultra-fine acrylic powder and EMA acrylic liquid, along with gel nail polish rich in healthy ingredients. The kit includes 180W nail lamp for quick curing and multifunctional nail drill. With complete accessories and tools, it enables home DIY nails, making it perfect for beginners to practice their nail art skills efficiently.

Buy Next, Nice Upgrades
- Silicone applicator for burnishing chrome powder evenly
- Detail cleanup brush for crisp cuticle lines
- Striping brush for micro French and swirls
- Cuticle oil for nightly hydration and cleaner close-ups
Buy Later, Only If You Love The Hobby
- Multiple chrome powders, multichrome, holo, special effects
- Magnetic cat eye system and magnet
- Nail art decals and embellishments
Key Takeaways
- Top coat and prep tools matter more than extra powders.
- One neutral base plus one chrome topper gets you a lot of looks.
- Upgrade slowly, you’ll waste less money.
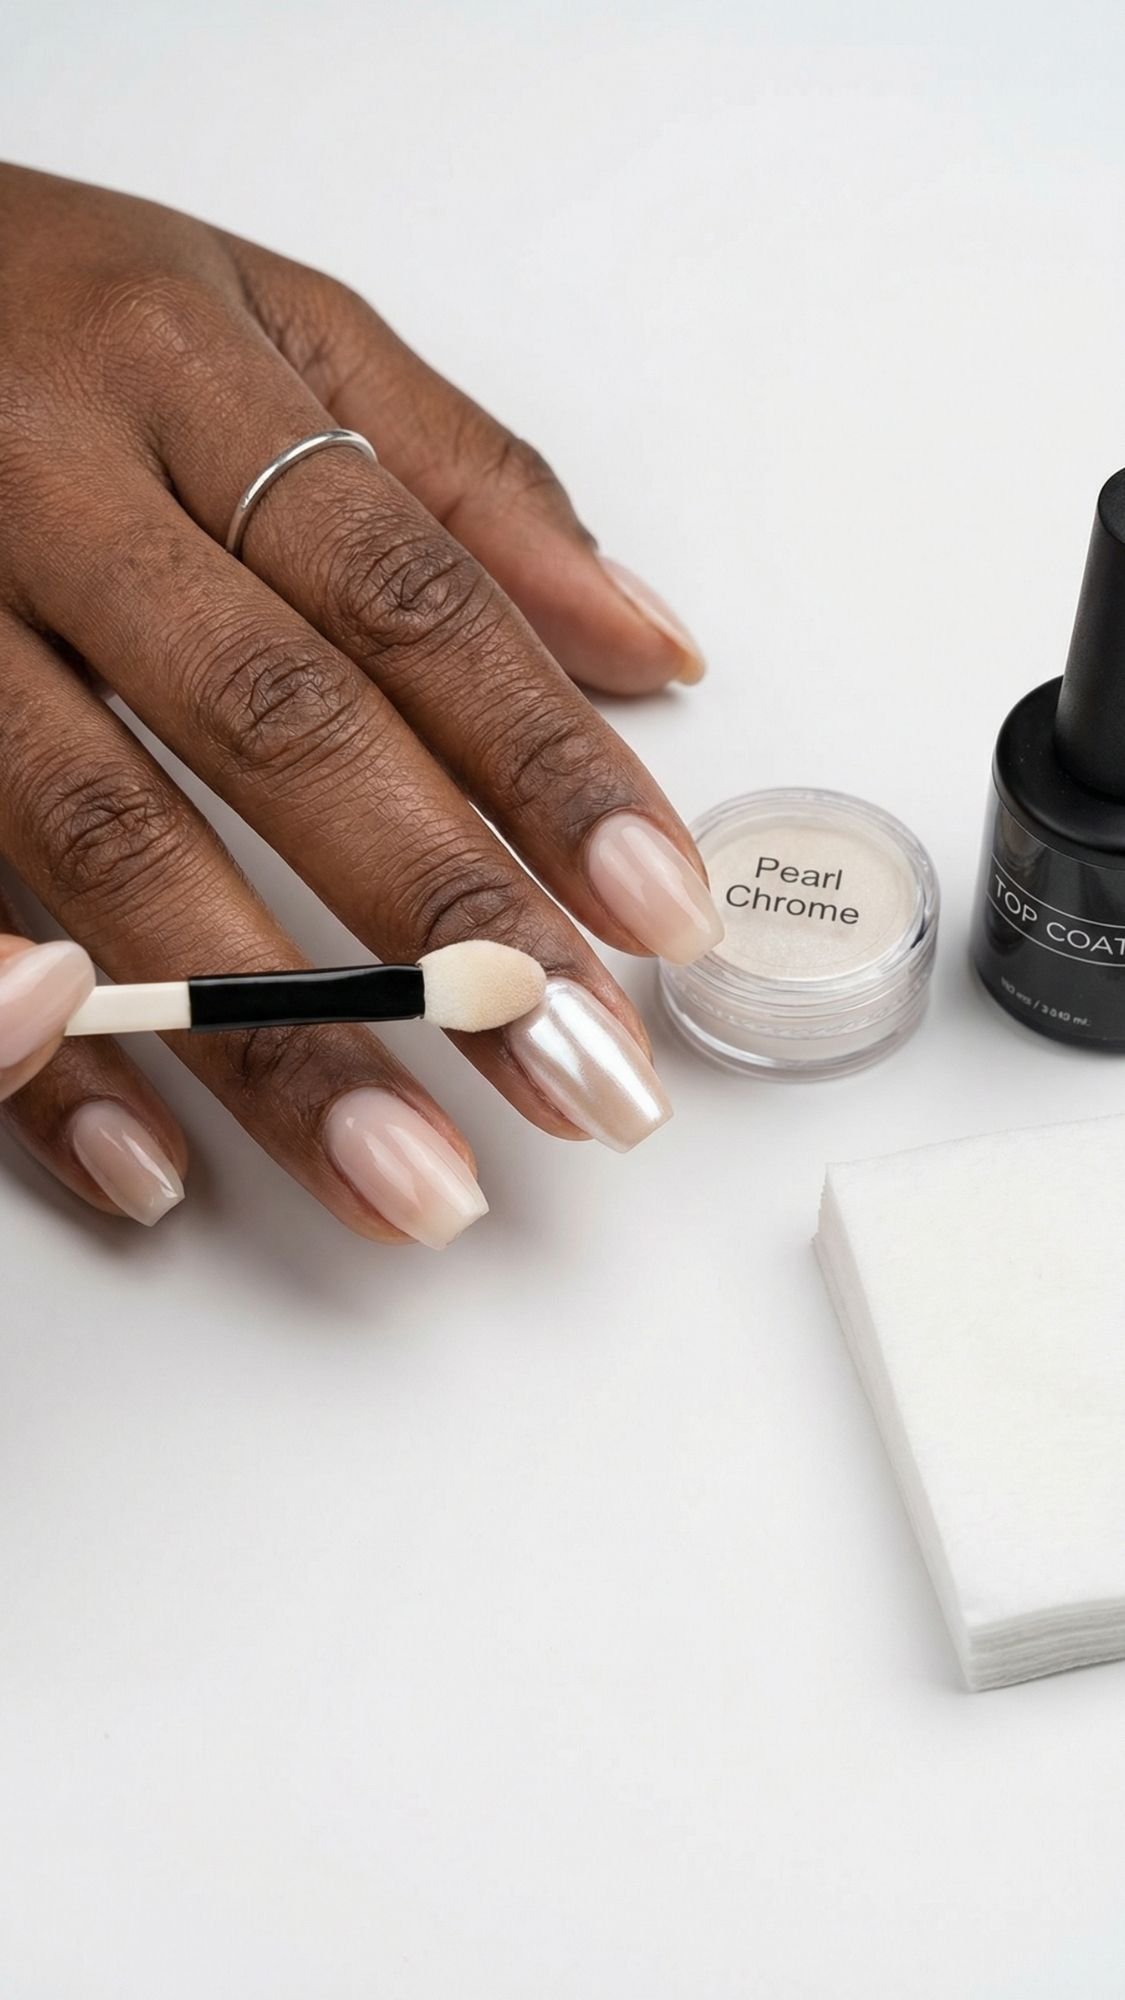
Good Chrome Nails In 15 To 20 Minutes, Beginner Version
This is the simplest route that still looks good in selfies. I’m using the regular polish topper method because it’s fast, low-stress, and you don’t need a lamp.
Step 1, Quick Prep (3 Minutes)
- Remove old product.
- File shape quickly.
- Push back cuticles gently.
- Wipe nails with alcohol.
- Do not touch nails after this.
Common mistake + fix: Touching your nails after alcohol. Fix it by wiping again right before base coat.
Step 2, Base Coat (2 Minutes)
- Apply a thin base coat.
- Cap the free edge.
Common mistake + fix: Thick base coat. Fix it with one thin layer, then wait.
Step 3, Neutral Base Color (6 to 8 Minutes)
- Apply 1 thin coat of milky pink or nude.
- If you need a second coat, keep it thin and even.
Pro tip: If you’re rushing, choose a sheer milky shade. It forgives minor streaks better than an opaque polish.
The nail powder is suitable for use on UV gel nails, acrylic nails, natural nails, and more. Our colorful nail powder is a helpful DIY tool for nail art design. Using different gel polishes can create various effects, offering a bottle of magic mirror powder to achieve a variety of styles.

Step 4, Chrome Topper (2 Minutes)
- Apply a thin layer of pearl or glazed chrome topper.
- Keep strokes minimal, don’t overbrush.
Common mistake + fix: Overbrushing. Fix it by using less product and fewer strokes.
Step 5, Glossy Top Coat (3 Minutes)
- Float the top coat.
- Cap the free edge.
- Let it set before you start doing chaotic hand activities.
Common mistake + fix: Denting nails too soon. Fix it by giving yourself 10 minutes before you grab keys, jeans, or anything that fights back.
Key Takeaways
- A neutral base plus a chrome topper gives fast, photogenic shine.
- Thin coats dry faster and look smoother.
- Edge sealing prevents tip wear, even on quick sets.
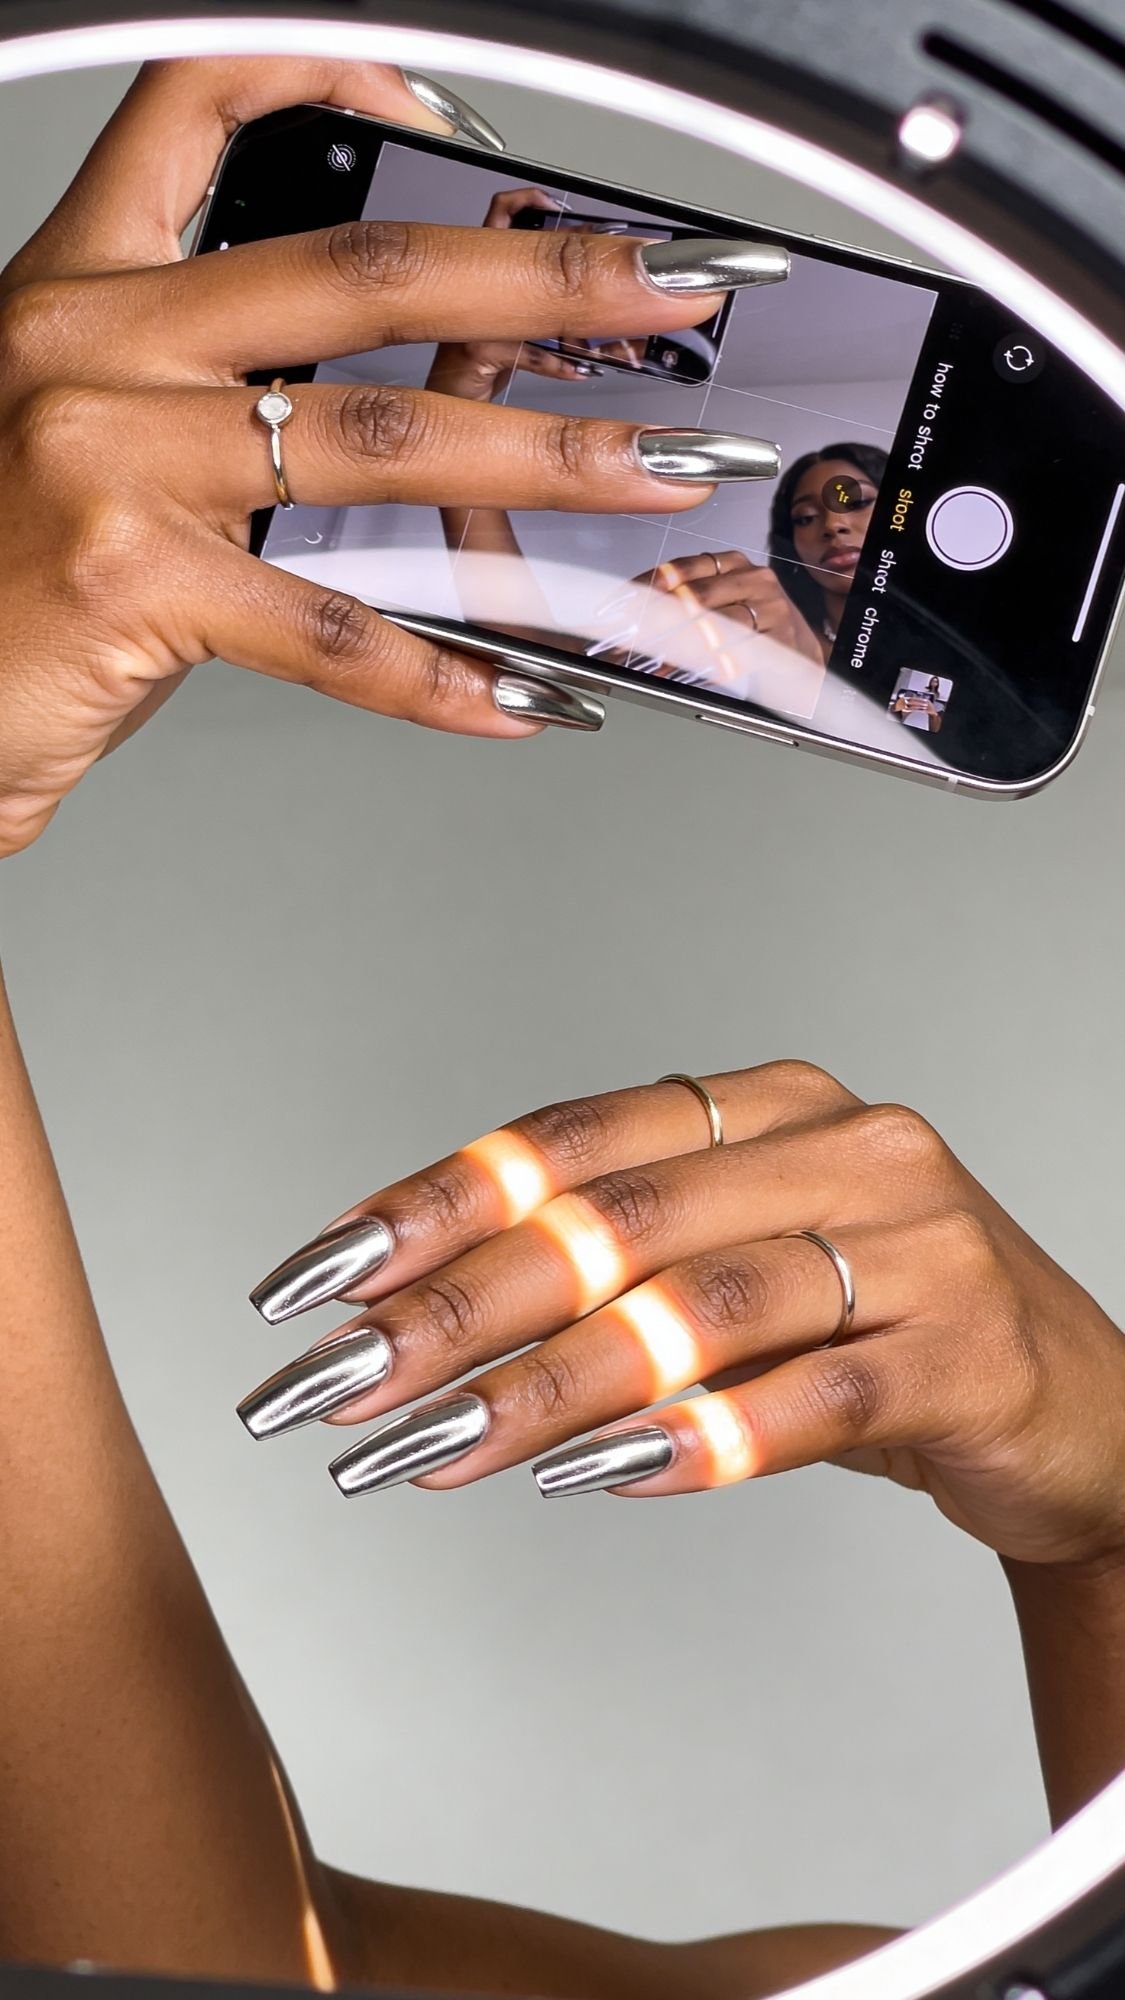
FAQ, Chrome Nails That Catch The Light In Every Selfie
1) Why do my chrome nails look amazing in person but dull in selfies?
Lighting. Chrome needs a clean highlight stripe to read as “chrome” on camera. Overhead room lighting can flatten the reflection, while flash or a ring light creates that crisp shine. Try tilting your hand slightly toward the light source so the reflection runs across the nail, instead of bouncing randomly.
2) Can I do chrome nails with regular polish, no lamp?
Yes. Use a chrome topper made for air-dry polish, or a chrome-like top coat with a pearly glaze finish. You won’t get the sharpest mirror effect like gel powder, but you can absolutely get a glossy, selfie-friendly glow.
3) Why does my chrome look streaky under flash?
You usually have one of these issues, uneven base, uneven burnishing, or a top coat that dragged the chrome. Smooth the base first, burnish with even pressure until it feels silky, then float the top coat. Flash loves to expose faint streaks that you can’t see in normal lighting.
4) What top coat works best for chrome nails?
A top coat that stays high-gloss and does not shrink back from the tips works best. Shrinkage causes tip wear and makes chrome look less mirror-like at the edges. Apply top coat with a light hand, float it, and cap the free edge.
5) How long do chrome nails last?
It depends on the method.
- Press-ons: 1 to 3 days with tabs, 5 to 10 days with glue
- Regular polish chrome topper: about 4 to 7 days, depending on your top coat and habits
- Gel chrome: often 10 to 14 days with proper prep and sealing
Your lifestyle matters too. Water, cleaning, and using nails as tools will shorten wear time fast.
6) Can chrome work on short nails?
Absolutely. Short nails actually look incredible with chrome because the reflection looks clean and modern. Micro French tips, glazed pearl chrome, and negative space chrome look especially flattering on shorter lengths.
7) How do I stop chrome from chipping at the tips?
Cap the free edge with base coat, color, and top coat. Tip wear starts at the edge, not the middle. If you still chip, apply a second thin top coat just on the tips mid-week.
8) Why do my press-on chrome nails pop off?
Usually sizing or prep. If the press-on is slightly too big, it lifts at the sides. If you don’t dehydrate the nail plate, oil breaks the bond. Size slightly smaller when you’re between sizes, wipe with alcohol, then press and hold longer during application.
9) Is chrome powder safe?
Chrome powders are generally used on top of polish or gel, but sensitivity concerns usually come from gel products, skin contact, and under-curing. Avoid getting gel on skin, cure fully, and stop if you notice itching, burning, swelling, or persistent redness. See a professional if symptoms continue.
10) How do I photograph chrome nails so they look as shiny as they do in real life?
Use one strong light source like a ring light or a window, and angle your nails so the highlight stripe runs across them. Keep your background simple and avoid busy patterns. If you use flash, hold your hand slightly away from the phone to avoid harsh glare and blown-out highlights.
Key Takeaways
- Chrome needs intentional lighting to look reflective on camera.
- Streaks come from base texture, burnishing, or top coat pressure.
- Longevity comes from edge sealing and dehydration.
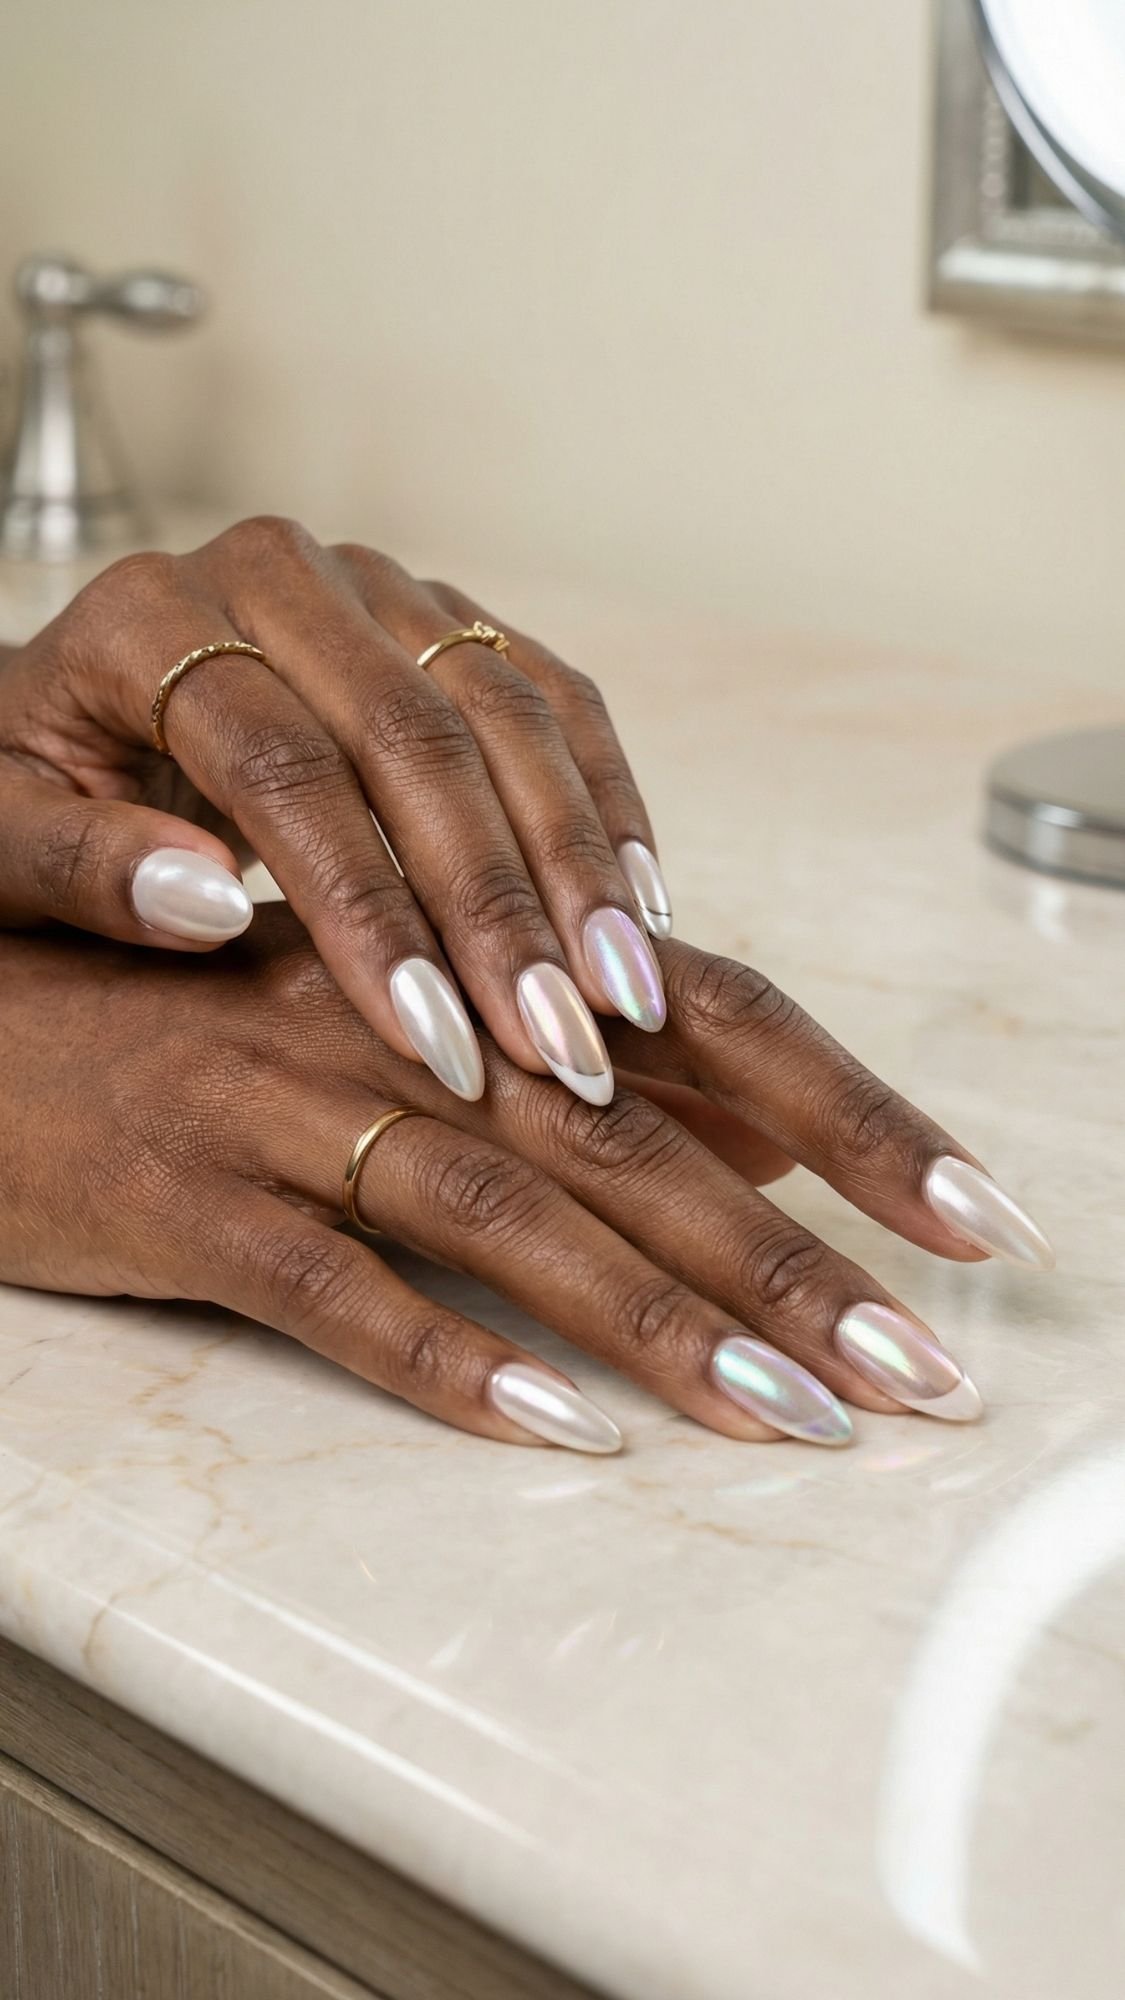
Your Nails Should Not Disappear In Photos
Chrome nails should look like they belong in your selfie, not like an afterthought that only shines in one perfect angle. If you take one thing from this post, let it be this. Chrome needs a smooth base, thin layers, and a clean highlight stripe to photograph like a mirror. You don’t need a million products, you need clean prep and a top coat technique that doesn’t drag or shrink.
If you want the easiest place to start, go with glazed pearl chrome or liquid silver micro French tips. They flatter short nails, they look expensive fast, and they don’t require you to become a full-time nail scientist. If you want drama, black mirror chrome and holographic chrome will absolutely show out under flash. If you want that “tilt your hand and watch the colors move” moment, aurora chrome and oil slick multichrome give you the payoff.
Pick one design, follow the prep, and take the mid-week top coat refresh seriously. Your future selfies will thank you.
Key Takeaways
- Smooth prep makes chrome look expensive, and it makes it last.
- Thin layers reflect better, thick layers look wavy on camera.
- Lighting and angle matter, tilt for a clean reflection stripe.
- Cap the free edge, tips wear first.