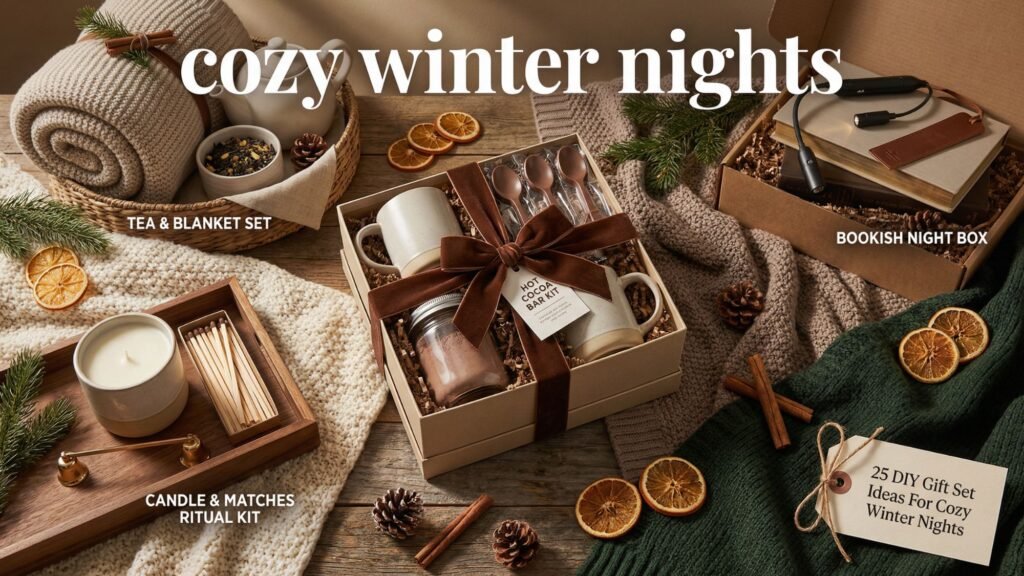
Cozy gift sets, but make them actually useful
Winter gifting gets weird fast. One minute you’re wrapping something thoughtful, the next minute you’re panic-buying a candle that smells like “vaguely festive regret.” If you want gifts that feel warm, intentional, and genuinely enjoyable to open, DIY gift sets win every time.
I’ve built a lot of these over the years, and here’s what I’ve learned. The best cozy gift sets don’t cram in random stuff. They create a whole little winter night moment. Think sip + snack + comfort + a tiny surprise. That’s the formula.
This post gives you 25 DIY gift set ideas for cozy winter nights, and I’m not leaving you hanging with vague “add cute items” advice. For each set, I’ll show you what to include, how to package it so it looks expensive, what commonly goes wrong, and how to fix it. Ever opened a gift basket where everything slides around like it’s trying to escape? Yeah, we’re not doing that.
My biggest pro secret:
If you want your gift sets to look store-bought, heat-seal cellophane bags with a hair straightener and parchment paper, and add a tiny desiccant packet to anything powdered or crunchy (cocoa, marshmallows, cookies, bath salts). It keeps textures crisp and stops clumping, especially in winter humidity swings.
Quick prep checklist (so you don’t stop mid-project):
- 1 container per set (box, basket, mug, tin)
- Crinkle paper or tissue
- Glue dots or double-sided tape
- Ribbon (velvet or satin looks luxe fast)
- Printable labels or kraft tags
- Clear bags for mini items
- Optional but amazing: small heat sealer, or the hair straightener trick
My gift set failure story, aka the moment I learned to respect humidity
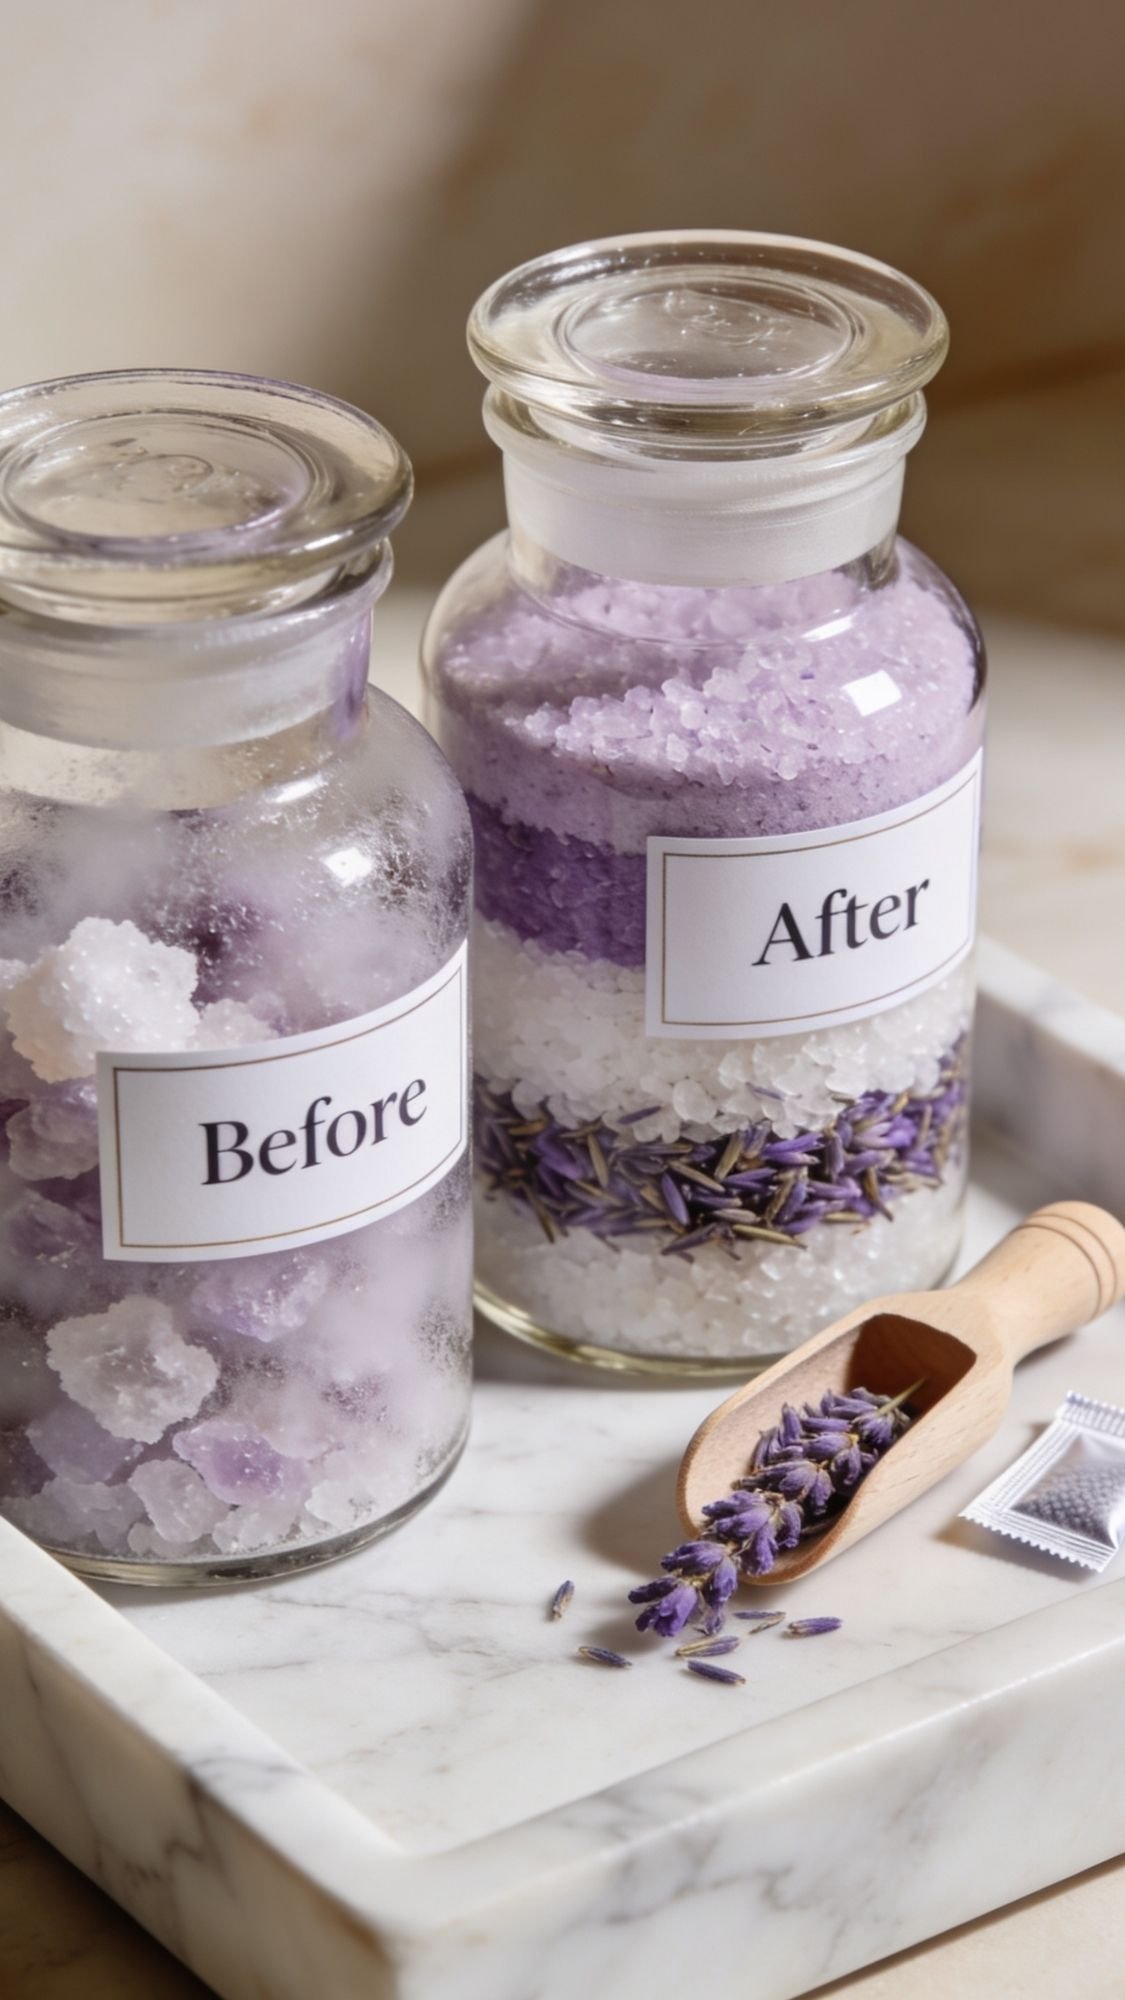
One winter I made a batch of “spa night” bath salt jars and felt extremely proud of myself. They looked gorgeous, layered salts, dried lavender, pretty labels, the whole vibe. I sealed them up, tied bows, stacked them on a shelf, and thought I was done.
A few days later I checked them and… yikes. The salts had clumped into a weird brick, the pretty layers blurred together, and the inside of the jar looked like it had fogged up. Not cute. Not giftable. Not my finest moment.
Here’s what actually happened.
What went wrong
- I added too much liquid fragrance because I wanted them to smell amazing right away.
- I sealed the jars before the mixture had fully dried out.
- The room got humid, because winter weather loves chaos, and the salts pulled moisture from the air.
How I fixed it (and saved the whole batch)
- I dumped the salts onto a parchment-lined tray and spread them out thin.
- I let them dry completely in a low-humidity space.
- I re-scented lightly, and this time I measured instead of “vibes only.”
- I repackaged them with a tiny desiccant packet tucked under the crinkle paper in the jar.
They looked brand new. More importantly, they stayed that way.
The lesson I now follow every time
Most DIY gift set fails happen because of one thing, rushing the dry time. Not lack of talent. Not bad supplies. Just sealing something up before it’s actually ready.
My rule of thumb
If it includes powder, salt, sugar, dried fruit, or anything “crunchy,” I treat moisture like the enemy.
I cool everything to room temp before sealing.
I add a desiccant packet when it makes sense.
I include a simple care tag like “Store cool and dry.”
The Gift Set Formula I Use Every Time (so it never looks like a random pile of stuff)
If you’ve ever made a gift basket and thought, “Why does this look like I shoved items into a container and hoped for the best,” this section fixes that. I use the same simple structure every time, and it makes every gift set feel intentional.
Pick a theme in one sentence
Don’t start with items, start with the moment.
Examples you can literally copy:
- “Hot cocoa and a movie night.”
- “Tea and a quiet reading hour.”
- “Spa night reset after a long week.”
- “Soup night and cozy socks.”
- “Apres ski treats, even if you never ski.”
If you can’t describe the theme in one sentence, the set will feel scattered. Ask yourself, what does the recipient do first when they open it?
Build it using my 1-2-2 structure
This is my secret weapon for “store-bought” balance.
- 1 hero item: the main thing they’re excited to use
- Example: mug, candle, blanket, book, puzzle, soup jar
- 2 supporting items: items that make the hero better
- Example: cocoa mix + marshmallows for the mug, matches + coaster for the candle
- 2 tiny wow add-ons: small things that feel fancy
- Example: mini whisk, honey sticks, chocolate spoon, ribbon-tied scoop, care card
This keeps you from overstuffing. It also keeps your budget from doing the dramatic fainting couch routine.
Choose the right container, it changes everything
Match the container to the vibe, not just the budget.
- Basket: cozy and classic, best for blankets and snacks
- Bakery box: perfect for “kits” like cookie mix, cocoa bombs, mini treats
- Magnetic close box: instant luxury, great for candle or self-care sets
- Mug as the container: adorable, and it becomes part of the gift
- Tin: perfect for small sets, like balm trio or tea kit
- Mini wooden crate: farmhouse, cabin-core, rustic winter vibes
Pro-tip: If the container feels cheap, the whole gift feels cheap. If you’re saving money, upgrade the look with better ribbon and neat packing, not more items.
My packing order, so it looks neat and stays put
Ever opened a gift and everything shifts like it went through a tiny earthquake? Anchor it.
- Base layer: crinkle paper or tissue, make a level foundation
- Place hero item first: centered or slightly off-center for styling
- Anchor hero item: glue dots or double-sided tape underneath
- Add supporting items: nestle them, don’t stack them
- Add wow add-ons last: tuck into gaps, like you planned it that way
- Top it off: a simple tag and one bow, don’t go bow-crazy
The pro tools that make it look expensive fast
I’ve tested a lot of tools over 10+ years, and these are the ones that actually matter.
- Glue dots for anchoring items without mess
- Double-sided tape for clean edges and tissue folds
- Crinkle paper for structure and gap filling
- Velvet ribbon for “luxury” in 2 seconds
- Label paper or kraft tags for cohesive branding
- Hair straightener + parchment paper to heat-seal cellophane (my favorite hack)
Pro-tip: The heat-seal trick
Put the cellophane edge between parchment paper, press with a hair straightener for 2 to 3 seconds, and you get a clean professional seal. Test on a scrap first, because every straightener runs hot in its own dramatic way.
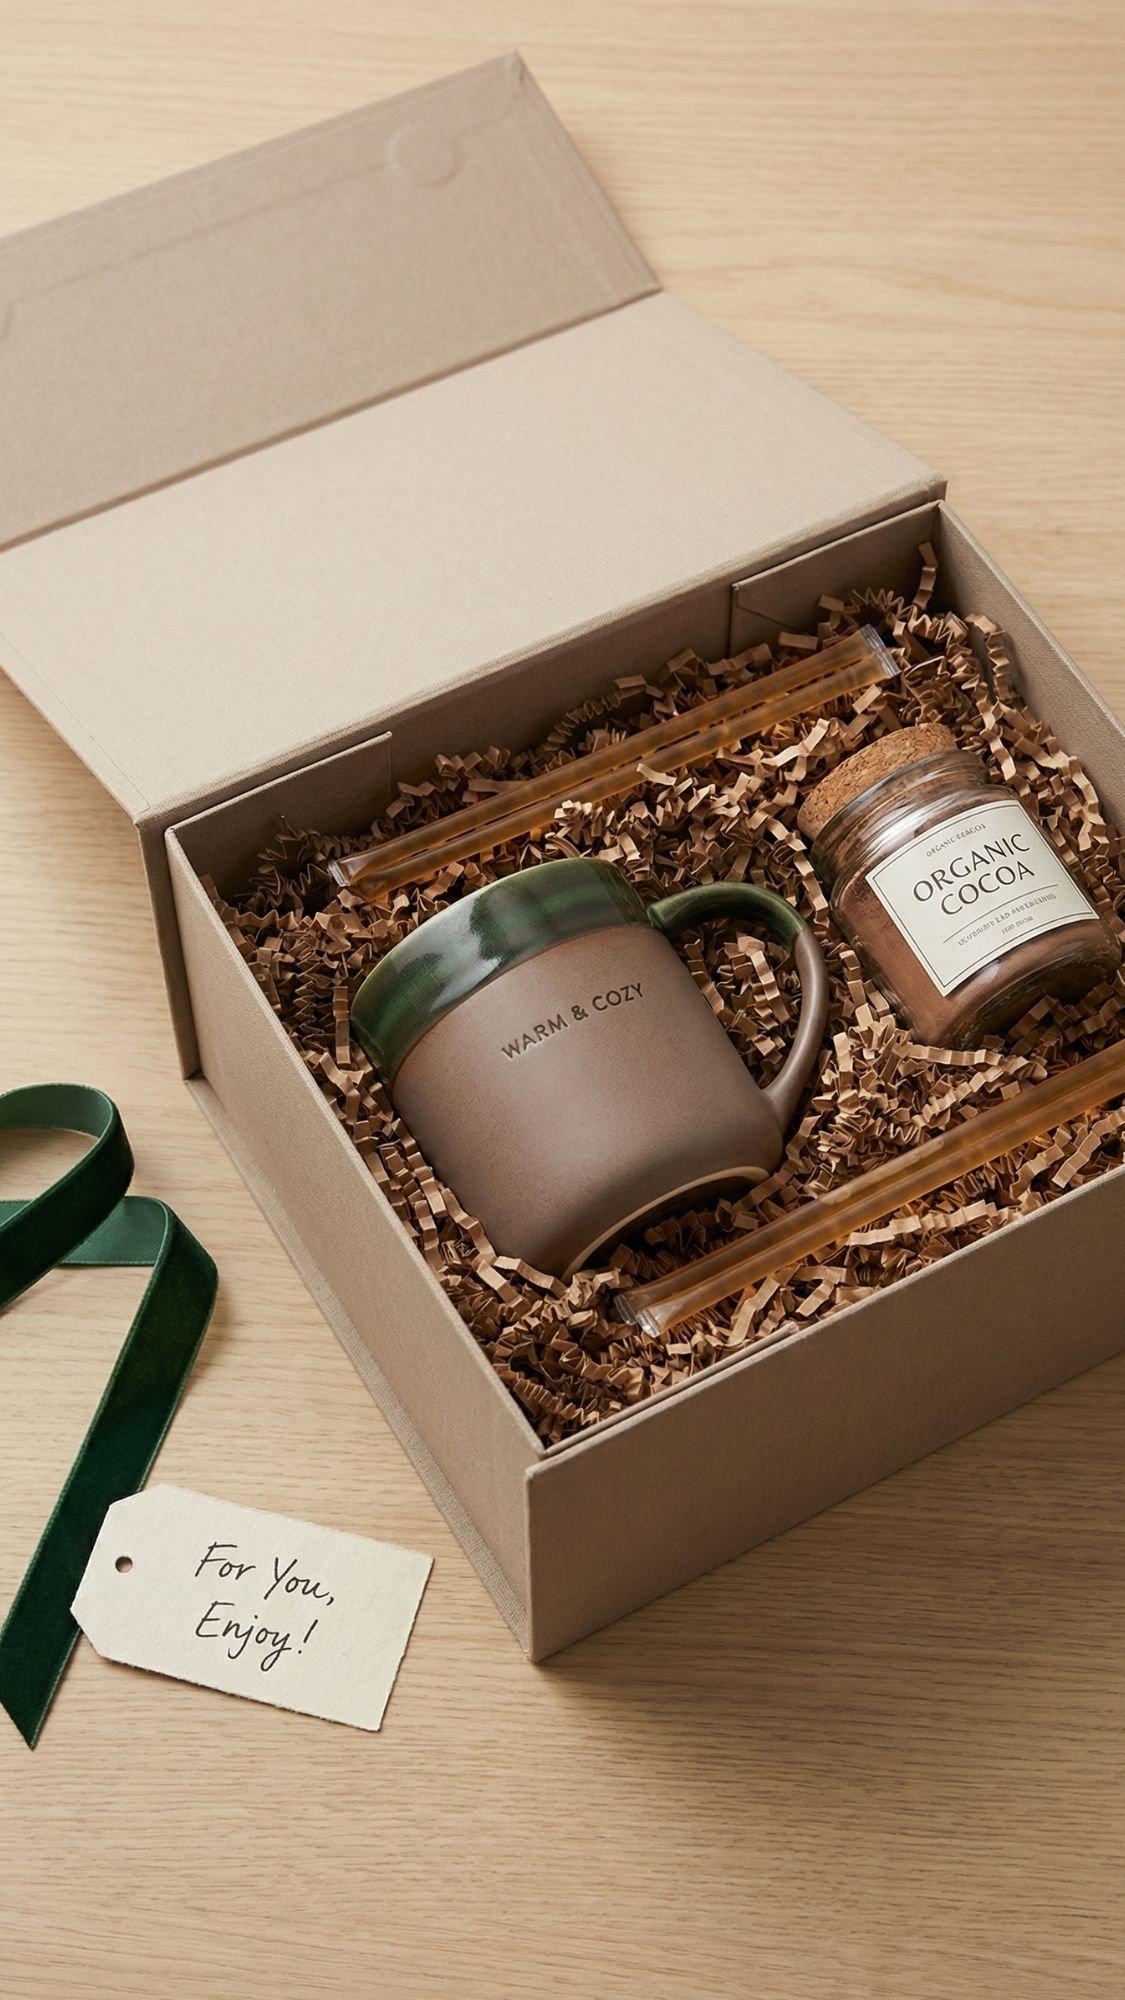
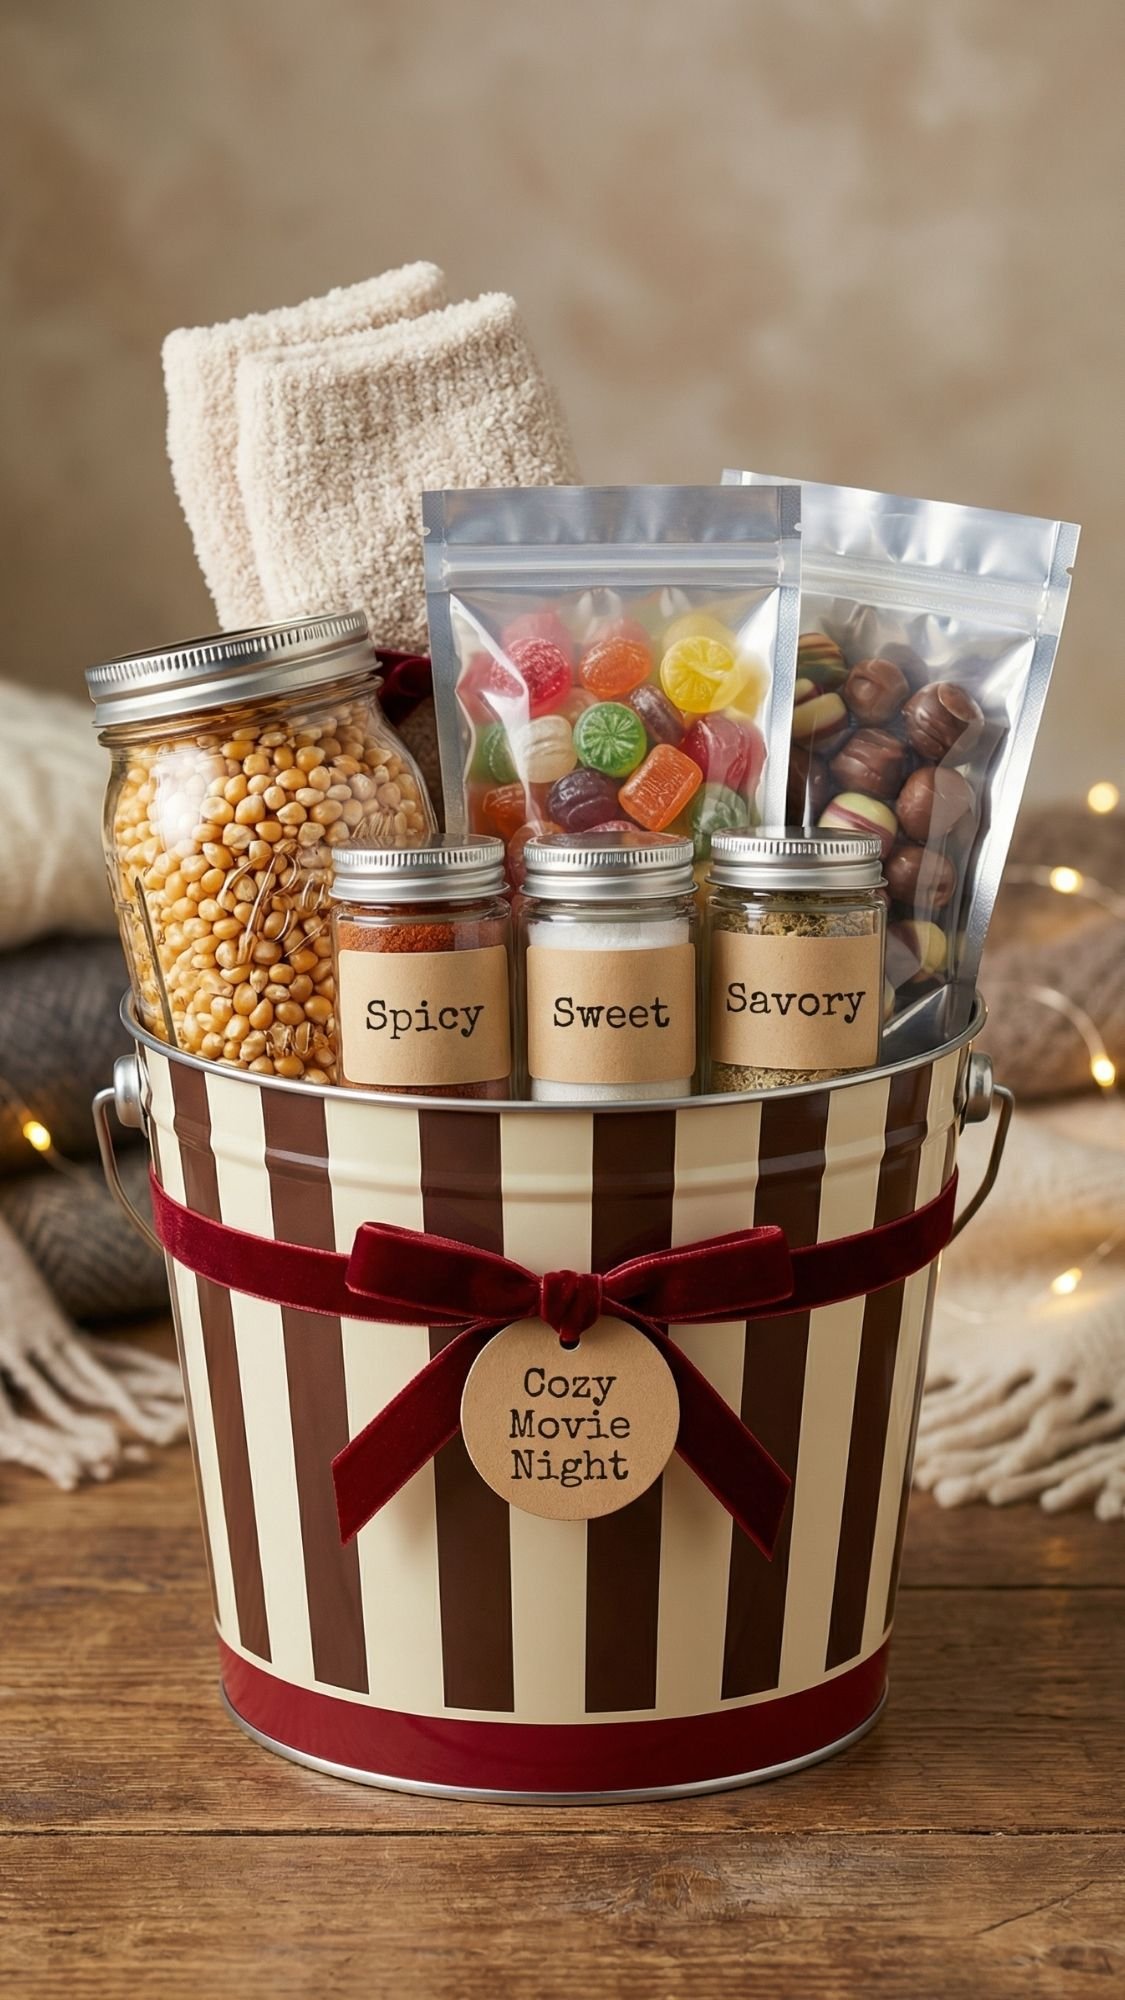
1) Hot Cocoa Bar Gift Basket (crowd-pleaser, zero awkward vibes)
This one works for pretty much everyone. You can give it to a neighbor, a teacher, a coworker, your sister-in-law you barely know, and it still feels thoughtful. It also photographs beautifully, which matters if you want Pinterest clicks and not just polite smiles.
Why it works
A cocoa bar set creates an instant winter know-how moment. They open it and immediately understand the “plan.” No guessing, no extra shopping, no “wait, what do I do with this?” energy.
What to put inside (my ideal build)
Hero item
- 1 cute mug, or a pair of stackable mugs if you’re doing a bigger basket
Supporting items
- Cocoa mix (homemade jar or a quality store packet)
- Mini marshmallows (jarred or heat-sealed pouch)
Tiny wow add-ons
- Peppermint pieces or crushed candy cane
- Chocolate stirring spoon or chocolate-dipped spoon
- Optional upgrade: tiny whisk, cinnamon stick bundle, or flavored syrup mini
Flavor trio idea: Classic, peppermint, and mocha. Three little jars look so impressive for almost no extra effort.
DIY element: My go-to homemade cocoa mix (scales well for batch gifting)
I use this because it tastes rich and dissolves better than a lot of chalky mixes.
- 1 cup powdered milk
- 1 cup cocoa powder
- 1 cup powdered sugar
- Pinch of salt
How I mix it: I sift the cocoa first, then whisk everything together in a big bowl. If you skip sifting, you’ll fight lumps later. Ask me how I know.
Label suggestion: “Add 2 to 3 tablespoons to 8 oz hot milk, stir well.”
Packaging that looks expensive without being complicated
- Line the basket with a folded kitchen towel or a mini blanket as the base.
- Add crinkle paper for structure.
- Place the mug first, slightly off center.
- Nestle jars and pouches around it.
- Add a single velvet bow on the handle and one clean tag.
Pro-tip: If you use clear bags for marshmallows or peppermint pieces, heat-seal them with the hair straightener trick. It keeps the edges neat and makes the whole set look like it came from a boutique.
Common mistake and how to fix it
Symptom: Cocoa mix clumps, or marshmallows go stale.
Likely cause: Moisture and warm storage, especially if you seal before ingredients cool.
Fix: Sift the cocoa mix, let everything cool fully, pack airtight, and tuck a tiny desiccant packet into the cocoa jar or the gift box area near powder items.
Prevention next time: Label “Store cool and dry,” and avoid storing finished sets near the stove or dishwasher.
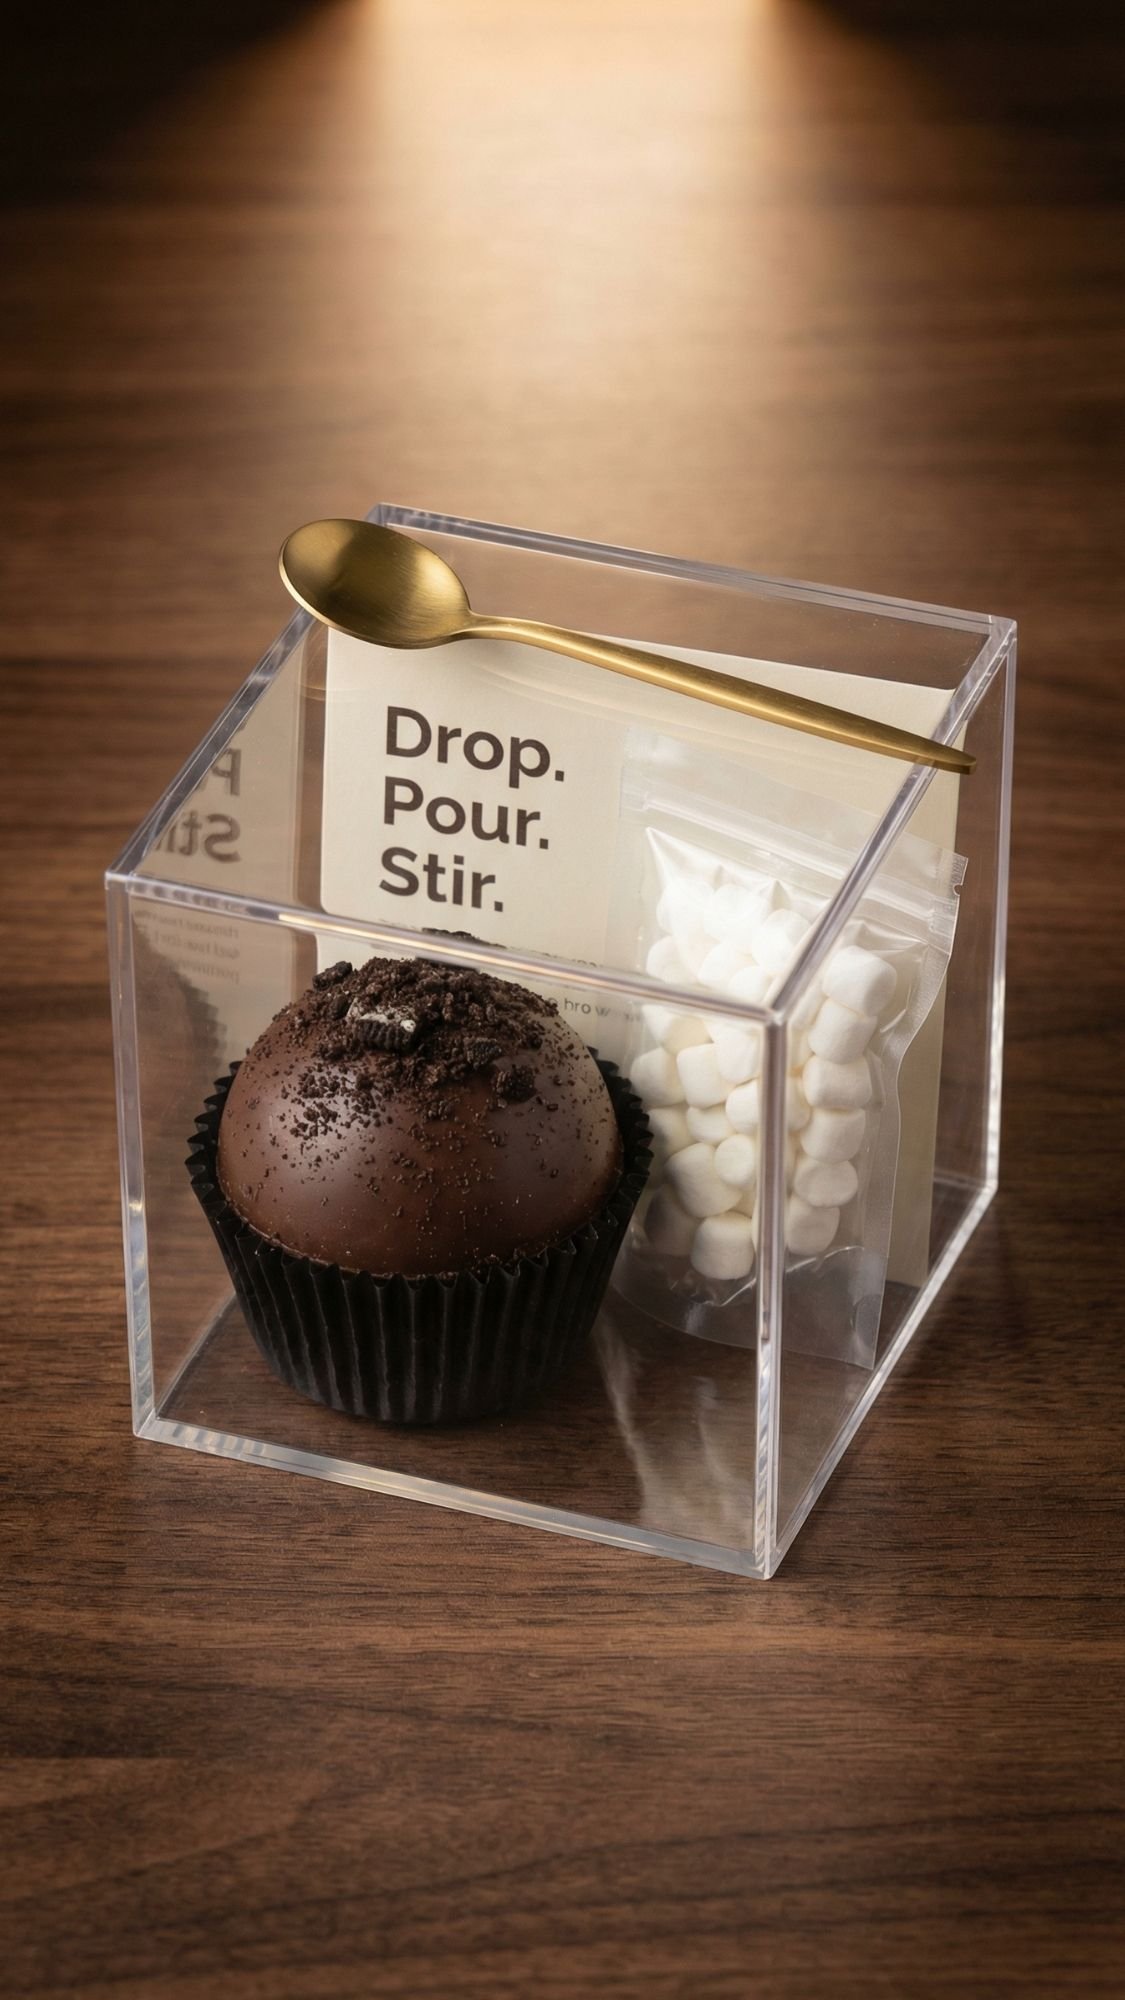
2) Oreo Hot Chocolate Bomb Mini Set (small budget, big “wow” moment)
This is the gift that looks like you tried way harder than you did. It’s tiny, it’s dramatic, and the “melt reveal” does all the heavy lifting for you. If you need neighbor gifts, teacher gifts, or “I forgot we’re exchanging gifts” gifts, this one saves the day.
Why it works
Hot chocolate bombs feel special because they turn into an experience. People love the moment where it cracks open and the marshmallows pop out like a tiny surprise party. Also, it’s compact, so you can make a bunch without your kitchen turning into a packaging tornado.
What to put inside (my favorite version)
Hero item
- 1 hot chocolate bomb (Oreo-style, classic, peppermint, or caramel)
Supporting items
- Mini marshmallows, or a marshmallow stir stick
- A cocoa topper, crushed cookies, peppermint bits, or chocolate shavings
Tiny wow add-ons
- Mini spoon (gold or black looks luxe fast)
- A tiny instruction card so they don’t guess wrong and ruin it
- Optional: a mini packet of cookies or a single wrapped chocolate square
Pro-tip: If you include crushed cookies, keep them in a separate mini jar or sealed pouch. If you toss them in loose, they’ll soften and get sad.
DIY element: The instruction card that makes it feel professional
Print it or handwrite it neatly. Keep it short and clear.
- “Place bomb in mug.”
- “Pour 8 oz hot milk over it.”
- “Wait 30 seconds.”
- “Stir and enjoy.”
Optional upgrade line: “Top with whipped cream, because obviously.”
Packaging that looks high-end
This set looks best in a small clear box or a rigid mini gift box.
- Add a tissue base, then a small crinkle paper nest.
- Place the bomb in a cupcake liner or a mini paper cup so it doesn’t roll.
- Add mini marshmallows in a sealed pouch.
- Tuck the spoon on top at an angle.
- Slide the instruction card behind everything so it stays visible.
Pro-tip: Stop the rolling
If the bomb rolls around in the box, it can crack. I anchor it with a glue dot under the cupcake liner. Invisible fix, huge difference.
Common mistake and how to fix it
Symptom: Bomb cracks or gets scuffed in the box.
Likely cause: No nesting, no anchor, too much movement in transit.
Fix: Nest it in crinkle paper, use a cupcake liner, and anchor the liner with a glue dot.
Prevention next time: Choose a snug box. Empty space creates chaos.
3) Simmer Pot Kit Gift Set (smells like winter in the best way)
This is the sneaky MVP gift set. It feels thoughtful, looks beautiful, and makes someone’s whole house smell like cozy holiday magic in about five minutes. Also, it works as a host gift, neighbor gift, or “I don’t know what they like” gift, because almost everyone likes their home to smell good.
Why it works
Scent flips a switch in the brain. A simmer pot kit gives instant cozy vibes, and it creates a little ritual. They don’t just open it, they use it that night and think of you when the whole kitchen smells amazing. That’s the goal, right?
What to put inside (balanced and pretty)
Hero item
- 1 large heat-sealed bag or jar of the simmer blend
Supporting items
- A simple instruction card
- Optional but cute: a small wooden spoon, mini ladle, or a tiny measuring scoop
Tiny wow add-ons
- A tealight candle and match bottle, so they can set the mood
- A small tea sachet or cocoa packet to make it feel like a full “cozy night” moment
My favorite winter simmer blend (it looks expensive and smells strong)
This combo reads “intentional” instead of “I threw pantry scraps in a bag.”
- 3 to 4 dried orange slices
- 2 cinnamon sticks
- 1 tablespoon whole cloves
- 2 star anise pods
- Small handful cranberries, dried works best
- 1 small rosemary sprig, dried
- Optional: a strip of lemon peel for brightness
Pro-tip: Keep it mostly dry ingredients. Fresh fruit looks cute but it molds fast if you package it wrong.
How to prep dried oranges so they don’t ruin your gift
A common mistake beginners make is thinking “I’ll just slice oranges and toss them in.” That’s how you end up with mold. Here’s the safe method.
- Slice oranges 1/8 inch thick.
- Pat them dry with a towel.
- Dry them in the oven on the lowest setting, flip halfway through.
- Let them cool fully before packaging.
If you don’t want to dry your own, you can buy dried orange slices and still call this DIY because you’re creating the blend and the presentation. Nobody needs to be a hero here.
Packaging that looks boutique
Option A, my favorite:
- Clear cellophane bag, heat-sealed, kraft label, velvet ribbon.
- Option B:
- Mason jar with a wide mouth, label on the front, twine bow.
Pro-tip: Make it look premium
Add one little bundle detail, like tying the cinnamon sticks together with twine inside the bag. It reads “handcrafted,” not “bag of stuff.”
Instruction card wording (copy-paste)
- “Add contents to a pot with 4 to 6 cups water.”
- “Simmer on low, do not boil dry.”
- “Top off water as needed.”
- “Enjoy the cozy smell for 1 to 2 hours.”
Common mistake and how to fix it
Symptom: Mold or weird soft known-off smell in the bag.
Likely cause: Citrus wasn’t fully dried, or it got sealed while warm.
Fix: Toss it, and remake it with fully dried citrus. Mold isn’t the kind of “rustic” we want.
Prevention next time: Dry citrus completely, cool everything, then seal. Store finished kits in a cool dry place.
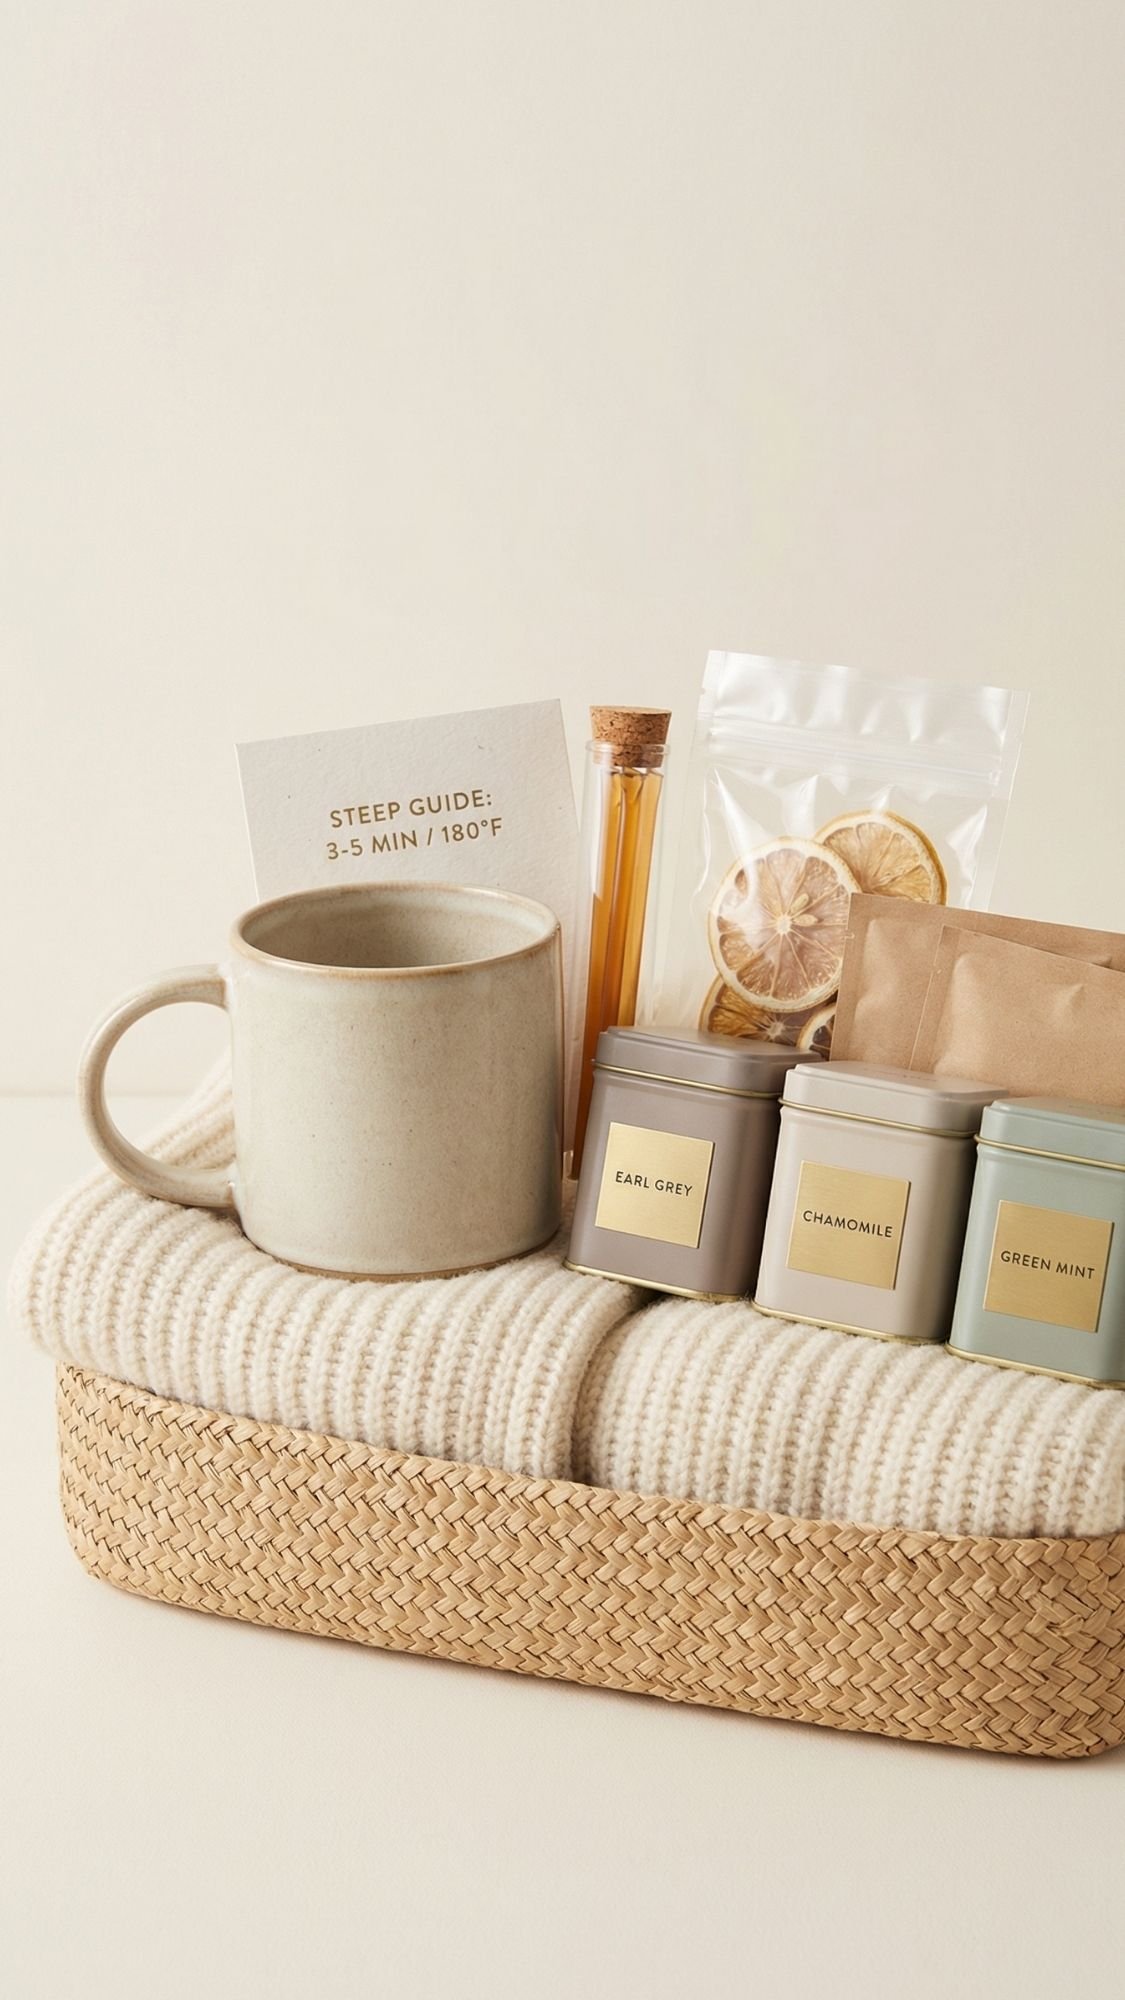
4) Tea Lover Cozy Basket (tea, honey, and a blanket base that screams “rest”)
This is the calm, steady, reliable gift set. It feels personal without being too personal. It also works for pretty much any age, and it gives that “I want you to slow down” message without being weird about it.
Why it works
Tea gifting hits that sweet spot. It feels nurturing. It encourages a cozy ritual. And when you pair it with one soft textile, like a mini blanket or a folded throw, the whole set instantly looks more expensive.
What to put inside (my ideal 1-2-2 build)
Hero item
- 1 cozy mug, or a small teacup and saucer if you want it to feel extra special
Supporting items
- Tea sampler (choose 3 to 6 flavors)
- Honey sticks or a small honey jar
Tiny wow add-ons
- Lemon slices, dried works well
- A tiny teaspoon, or a tea infuser that matches the vibe
- Optional: shortbread cookies or a single wrapped biscotti
If you want it to feel luxe fast: add one small tin of loose leaf tea. The tin elevates the whole look.
DIY element: The “steep guide” card that makes you look like a professional
People mess up tea because they guess. You fix that with a tiny card.
Example card info:
- Black tea: 3 to 5 minutes, just under boiling
- Green tea: 2 to 3 minutes, not boiling
- Herbal: 5 to 7 minutes, boiling
Keep it simple, clean, and readable. If you want to be extra helpful, add a line that says “If it tastes bitter, steep less time.”
Packaging that looks cozy and clean
- Fold the mini blanket and use it as the base and backdrop.
- Add crinkle paper in the front to keep items upright.
- Place the mug slightly off center, handle angled toward the front.
- Tuck teas and honey sticks beside it in a neat row.
- Add the steep card behind the mug so it peeks out.
Pro-tip: Make it look curated
Group items by height. Tall items in back, short in front. It’s the same styling trick magazines use, and it makes your basket look intentional.
Common mistake and how to fix it
Symptom: Tea packets slide around and the basket looks messy.
Likely cause: No anchors and too much empty space.
Fix: Use glue dots under tea tins, letting them hold position, and wedge crinkle paper behind packets.
Prevention next time: Build a snug base layer first, then nest items into it like you’re creating a little display.
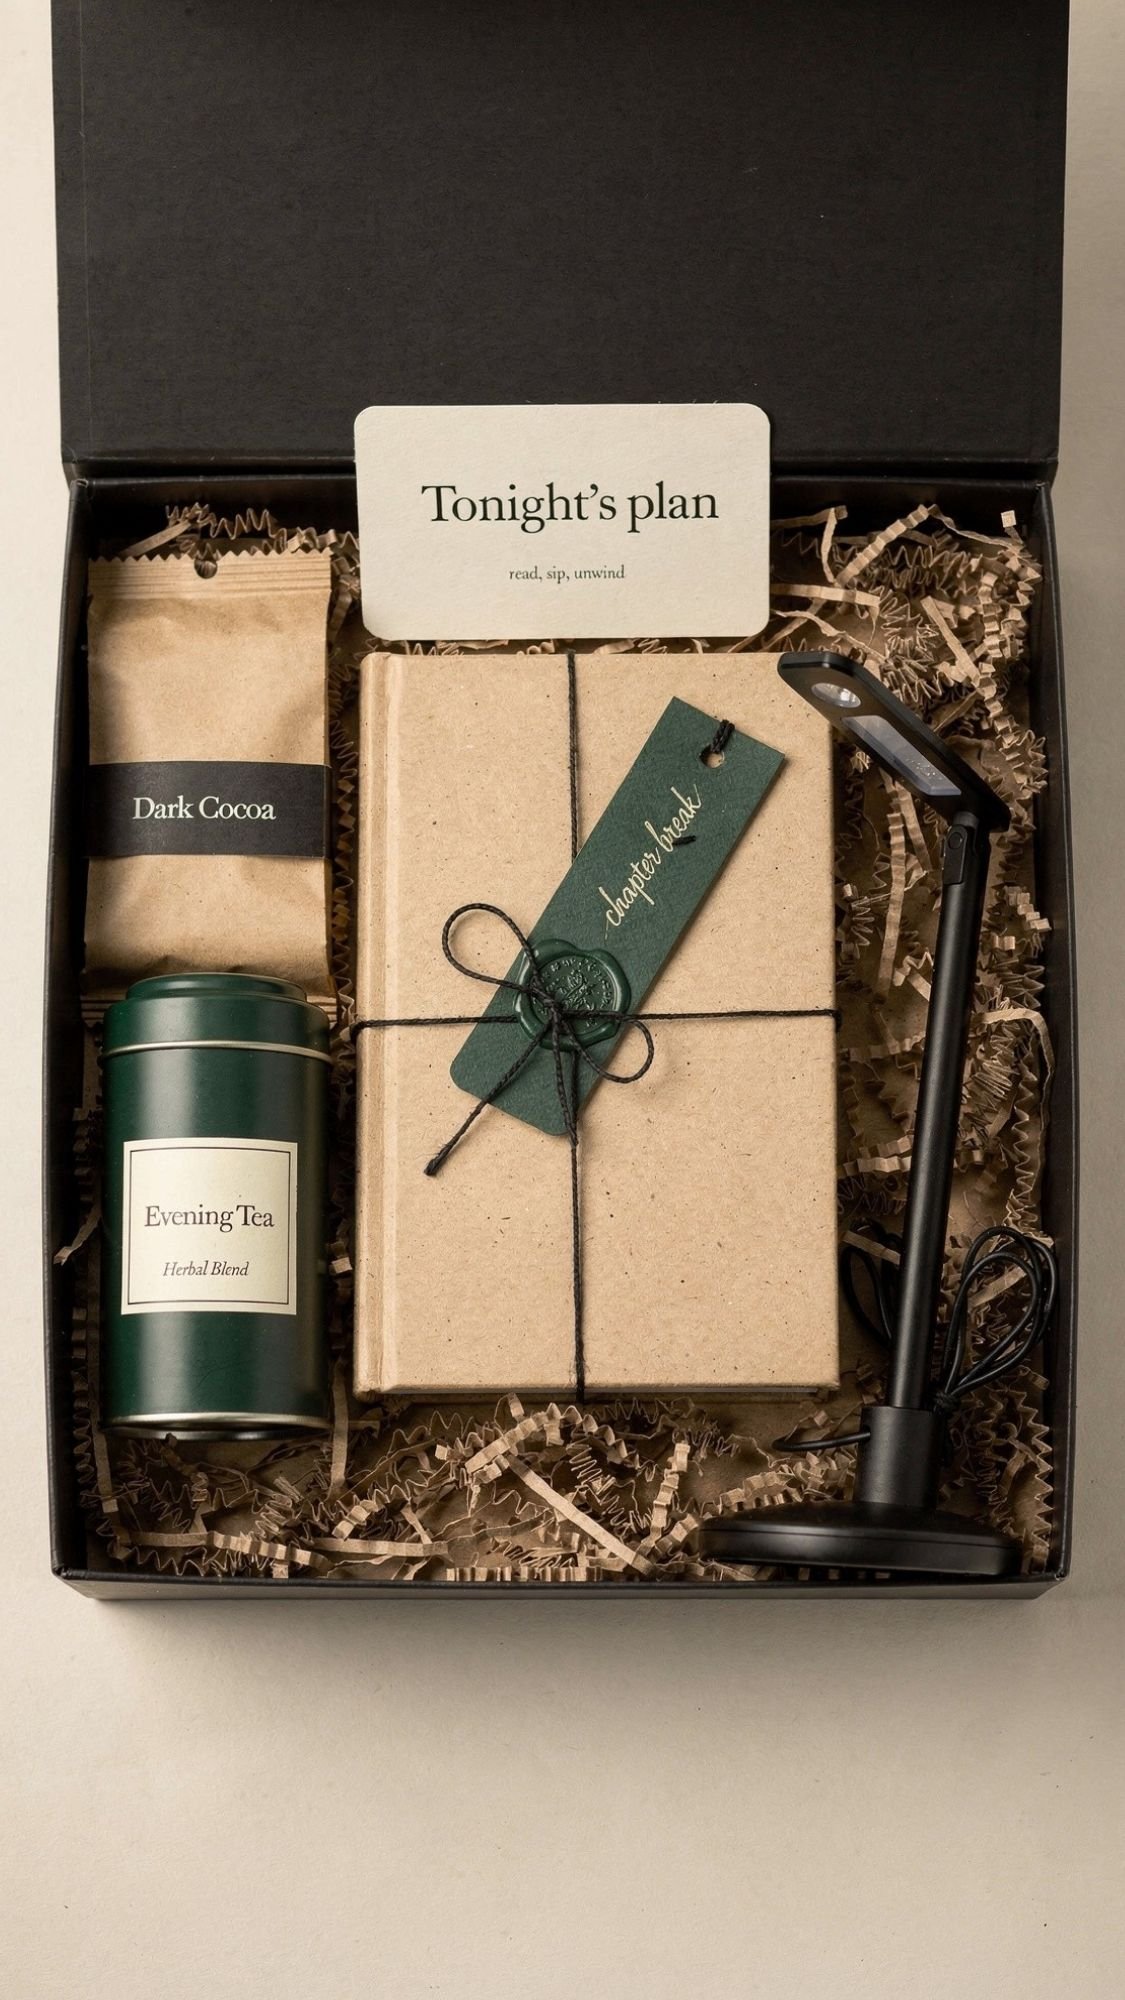
5) Bookworm Cozy Night Box (the “do not disturb” winter kit)
This one feels extremely thoughtful without requiring you to know someone’s entire personality. It’s basically a permission slip to take a quiet night for themselves, and honestly, who doesn’t need that in winter?
Why it works
A book night gift set creates a full scene. It’s not just “here’s a book.” It’s “here’s the night you’ve been needing.” Also, it’s easy to personalize without getting cheesy. You can tailor it with a genre, a color palette, or even a theme like mystery night or comfort reread night.
What to put inside (my best 1-2-2 build)
Hero item
- 1 book, new or gently new-looking
Supporting items
- A warm drink, tea sampler or cocoa packet bundle
- A reading light, or a candle if you want a cozier vibe
Tiny wow add-ons
- A handmade bookmark (this is the emotional hook)
- A snack that won’t crumb all over the pages, like chocolate, caramels, or a wrapped biscotti
- Optional: pencil and mini notepad for “quotes and thoughts”
Pro-tip: Avoid powdered snacks. Nobody wants cocoa dust inside a paperback. Keep the drink items sealed tight.
DIY element: Handmade bookmark (simple, classy, and it upgrades the whole set)
You don’t need to do anything fancy. You do need it to feel finished.
- Cut cardstock or watercolor paper into a clean rectangle
- Punch one hole at the top
- Add ribbon, twine, or a tassel
- Seal it with a clear spray sealer or laminate it so it holds up
Pro-tip: The mistake people make
A common mistake beginners make is leaving the bookmark unsealed. It warps, smudges, and looks tired fast. Seal it, even if it’s just a quick spray sealant pass.
Packaging that looks expensive
Use a rigid gift box, not a floppy one.
- Add crinkle paper base, and press it down so it forms a flat nest.
- Wrap the book in kraft paper or tissue like it’s a little present inside the present.
- Tuck the bookmark on top of the wrapped book so it’s visible right away.
- Place the drink items to one side, and anchor them with glue dots.
- Add the reading light or candle in the opposite corner for balance.
Pro-tip: Put a small card inside that says “Tonight’s plan” with three steps. It makes the set feel curated, not random.
“Tonight’s plan” mini card (copy-paste)
- Make your drink.
- Get cozy.
- Read one chapter with zero guilt.
Short, cute, and it keeps the vibe intentional.
Common mistake and how to fix it
Symptom: Everything slides around in the box and looks messy when opened.
Likely cause: No anchoring, and the box is too big for the items.
Fix: Use glue dots under tins and candles, and wedge crinkle paper around items like a snug frame.
Prevention next time: Choose a box that leaves minimal empty space. Empty space equals chaos.
6) Movie Night Gift Basket (snacks, cozy, and zero decisions)
If you want a gift set that people use immediately, this one never fails. Who doesn’t love a night where the plan is literally “sit down, press play, snack aggressively”? Exactly.
Why it works
A movie night basket removes friction. The recipient doesn’t need extra ingredients, extra errands, or extra brainpower. They open it, they pick a movie, and they snack. That’s a complete cozy winter night in one container.
What to put inside (my no-flop 1-2-2 build)
Hero item
- 1 popcorn bucket, bowl, or a cute lidded tub (this doubles as your container)
Supporting items
- Popcorn kernels in a jar, or microwave popcorn if you want it extra simple
- Seasoning shaker or seasoning trio (more on that below)
Tiny wow add-ons
- Candy, choose 1 sweet and 1 chocolate
- Cozy socks, or a mini throw if you’re going bigger
- Optional upgrade: mini hot cocoa packets or tea sachets
Pro-tip: Keep snacks in their own sealed pouches or jars. Nobody wants popcorn dust floating around like winter snow.
DIY element: Popcorn seasoning trio (looks fancy, costs little)
Make three mini jars and label them. People love options.
- Classic Butter Salt: fine salt + a tiny pinch garlic powder
- Sweet Cinnamon: cinnamon + sugar + pinch of salt
- Spicy Cheddar-ish: smoked paprika + nutritional yeast or cheddar powder + pinch cayenne
How I avoid clumping: I keep the jars small, I fill them almost to the top, and I seal them tight. If you live somewhere humid, tuck a tiny desiccant packet into the outer gift box area, not directly into the seasoning jars.
Packaging that looks clean and giftable
- Use the popcorn bucket as the base container.
- Add crinkle paper, then press it down so it holds shape.
- Place kernels and seasonings first, because they feel like the “feature.”
- Nest candy and cocoa packets around them.
- Roll socks and tuck them at the back like a backdrop.
- Tie one velvet ribbon around the bucket, add one tag.
Pro-tip: Keep it from turning into a snack avalanche
I anchor jars to the bottom with glue dots. I wedge crinkle paper between items so nothing shifts when someone carries it by the handle.
Common mistake and how to fix it
Symptom: Items slide and the bucket looks messy when they open it.
Likely cause: You used too little filler, and you didn’t anchor the heavy stuff.
Fix: Add more crinkle paper, anchor jars with glue dots, and pack items snug.
Prevention next time: Choose a container that fits the items closely. Empty space creates chaos every time.
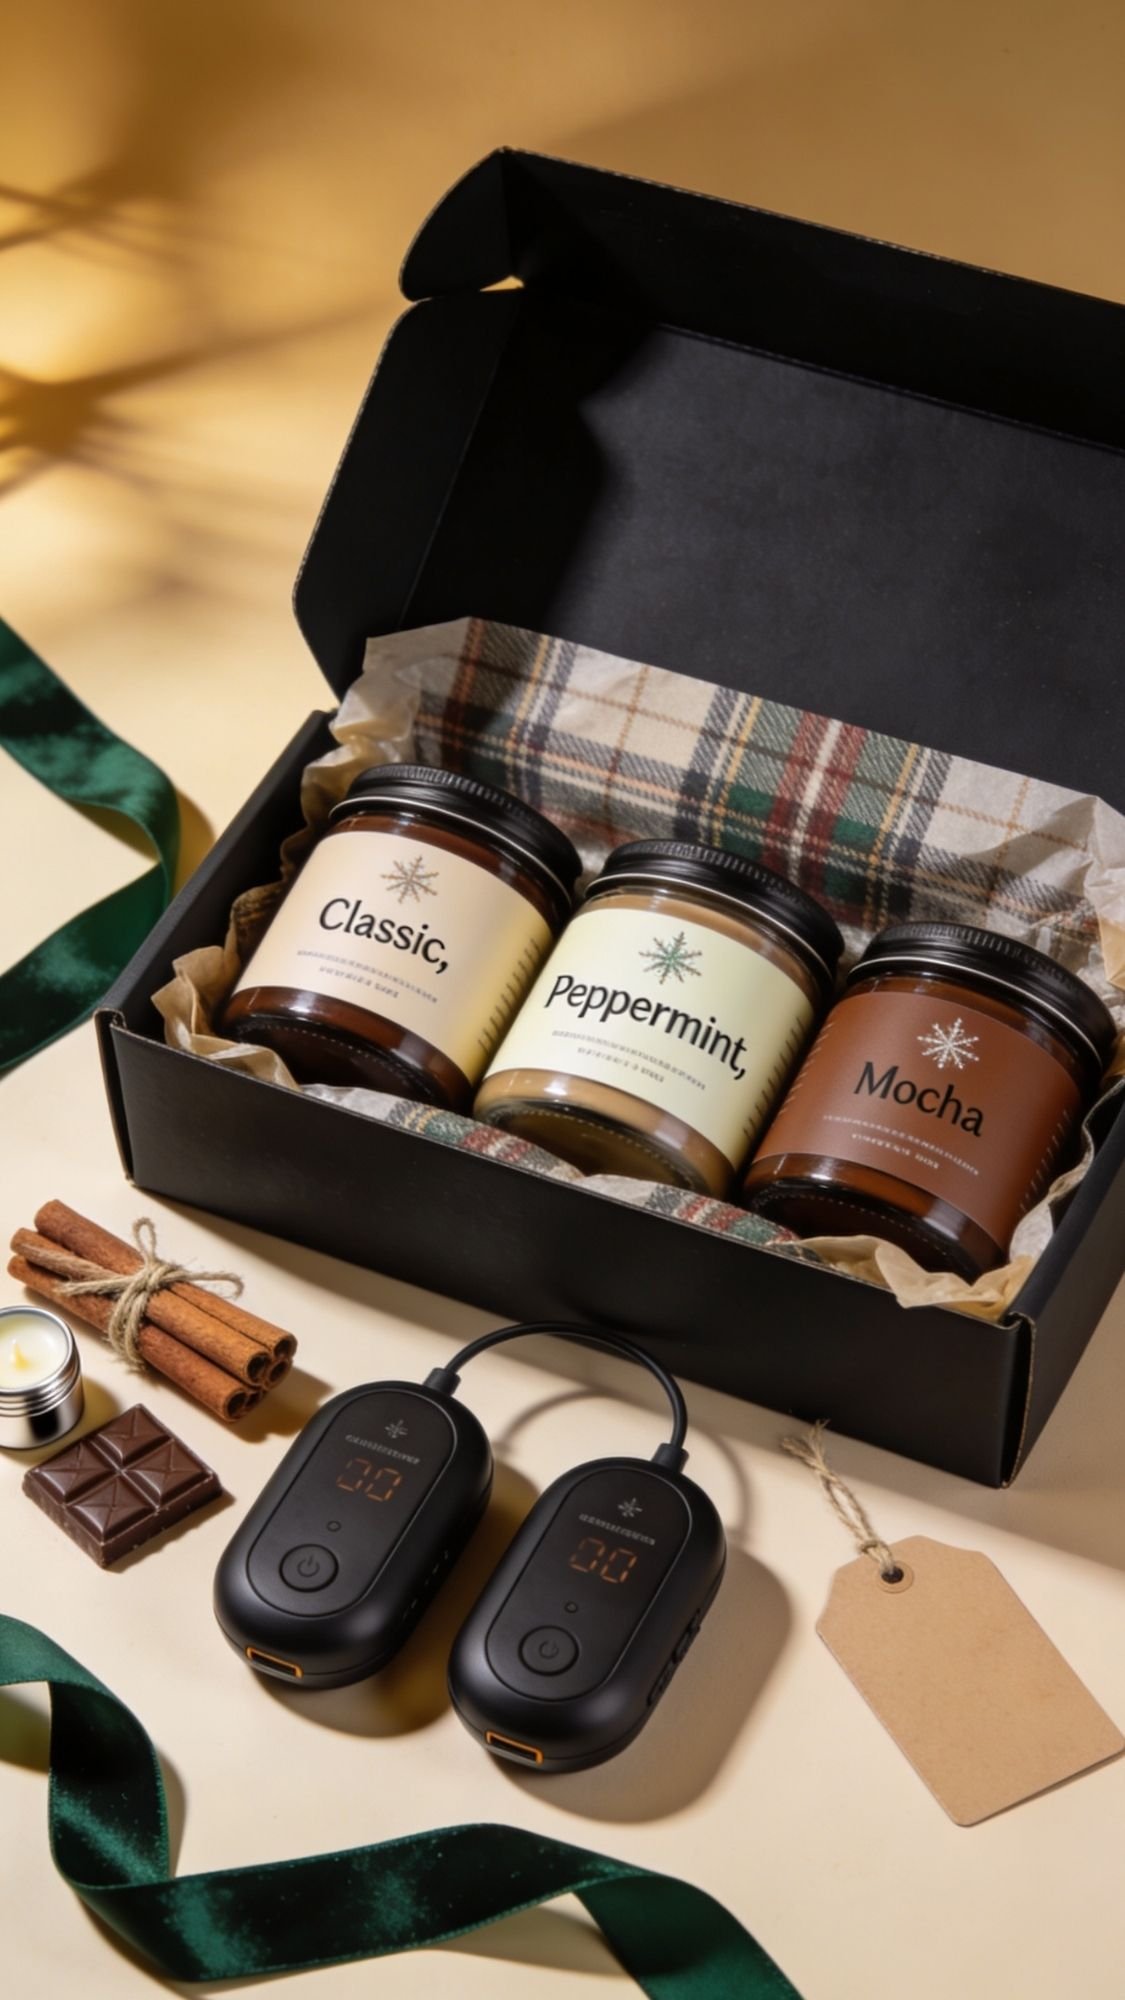
7) Apres Ski Cocoa + Hand Warmer Set (even if they never ski)
This set feels like a winter vacation in a box. It screams “get cozy and stay cozy,” and it works for anyone who complains about cold hands, which is basically everyone from November through March. Have you ever tried to enjoy a mug of cocoa while your fingers feel like ice cubes? Exactly.
Why it works
You combine comfort and function. The cocoa covers the cozy, the hand warmers cover the practical, and the whole set feels thoughtful instead of generic. People also love anything with an apres ski vibe because it feels fancy without asking them to actually do anything athletic.
What to put inside (my best 1-2-2 build)
Hero item
- 1 “cocoa flight” trio in mini jars or sealed pouches
Supporting items
- Rechargeable hand warmers, or reusable gel hand warmers
- A mug or insulated cup, optional but cute
Tiny wow add-ons
- Lip balm or mini hand cream
- Mini chocolate bar or chocolate spoon
- Optional: a cinnamon stick bundle tied with twine
Pro-tip: I pick rechargeable hand warmers when possible. They feel like a premium gift, and they don’t create trash after one use.
DIY element: Cocoa flight that looks boutique
Make three flavors and label them cleanly. People love options, and it looks high effort.
- Classic: cocoa mix + pinch salt
- Peppermint: cocoa mix + crushed peppermint (kept separate until serving)
- Mocha: cocoa mix + instant espresso powder
Pro-tip: Avoid clumps
I sift the cocoa mix, then I pack it only after it cools completely. I tuck a tiny desiccant packet into the outer gift box area near the powders. It keeps everything crisp in winter humidity swings.
Packaging that looks luxe
- Use a matte box or a small crate, both look great with apres ski styling.
- Add a crinkle paper base, then press it down so it holds items upright.
- Place the cocoa flight in the back row by height.
- Put the hand warmers front and center, because they sell the “useful” part.
- Add lip balm and chocolate last as the “found this just for you” detail.
- Finish with a velvet ribbon and a simple tag.
Common mistake and how to fix it
Symptom: Cocoa jars shift, labels wrinkle, and the set looks messy on arrival.
Likely cause: You skipped anchoring, and the box has extra space.
Fix: Anchor the cocoa jars with glue dots, wedge crinkle paper tightly around them, and keep jars upright.
Prevention next time: Choose a snug box and build a firm base layer before you add the items.

8) Soup in a Jar Comfort Meal Kit (winter hero gift, especially for busy people)
This is the gift that makes someone feel cared for in a very practical way. It says, “I want you fed and cozy,” which honestly beats most gifts. It’s also great for new parents, teachers, neighbors, anyone working long hours, or that friend who forgets dinner exists until 9 p.m.
Why it works
You’re gifting a whole warm meal moment. It’s comforting, it’s useful, and it feels homemade without being fragile. Plus, the layered jar looks pretty. People love a gift they can see is “handmade” at a glance.
What to put inside (my best 1-2-2 build)
Hero item
- 1 quart-size mason jar of layered soup mix
Supporting items
- A recipe card with exact cook times and water amounts
- A bay leaf packet or spice bundle, sealed separately
Tiny wow add-ons
- Mini wooden spoon, soup ladle, or measuring scoop
- Crackers in a heat-sealed pouch, or a small bag of croutons
- Optional: a folded linen napkin as the base inside the box
Pro-tip: If you ship this, skip anything that can crumble, and keep it all shelf-stable.
DIY element: My “cozy lentil veggie” jar (layered and reliable)
This one has a good balance, and it doesn’t turn into mush if you cook it correctly.
Jar ingredients, layered bottom to top
- 1/2 cup dried lentils
- 1/3 cup pearled barley or rice
- 2 tablespoons dried onion flakes
- 2 tablespoons dried carrots
- 1 tablespoon dried celery
- 1 tablespoon bouillon powder or bouillon granules
- 1 teaspoon garlic powder
- 1/2 teaspoon thyme
- 1/2 teaspoon smoked paprika
- 1 bay leaf, packed separately in a tiny sealed pouch
Why I separate the bay leaf: It looks nice and it keeps the leaf from breaking into sad little bits in the jar.
Recipe card wording (copy-paste, make it idiot-proof)
- Pour jar contents into a pot.
- Add 7 to 8 cups water or broth.
- Bring to a boil, then reduce to a simmer.
- Simmer 35 to 45 minutes, stir occasionally.
- Add salt and pepper to taste.
- Optional: add a splash of cream or a knob of butter at the end.
Pro-tip: Make it taste “homemade”
Tell them to finish with one of these:
lemon squeeze
grated parmesan
drizzle of olive oil
Those tiny finishing touches change everything.
Packaging that looks clean and giftable
- Place the jar upright in a snug box or basket.
- Anchor the jar with glue dots under the base.
- Fill gaps with crinkle paper so the jar can’t tip.
- Tuck the recipe card and bay leaf packet where they can see it.
- Add the spoon and crackers last.
Common mistake and how to fix it
Symptom: The soup tastes flat or stale.
Likely cause: Old spices, weak bouillon, or not enough salt at the end.
Fix: Use fresh dried herbs, quality bouillon, and tell them to salt after simmering.
Prevention next time: Date your spice jars, and refresh dried herbs regularly. Stale spices will betray you.
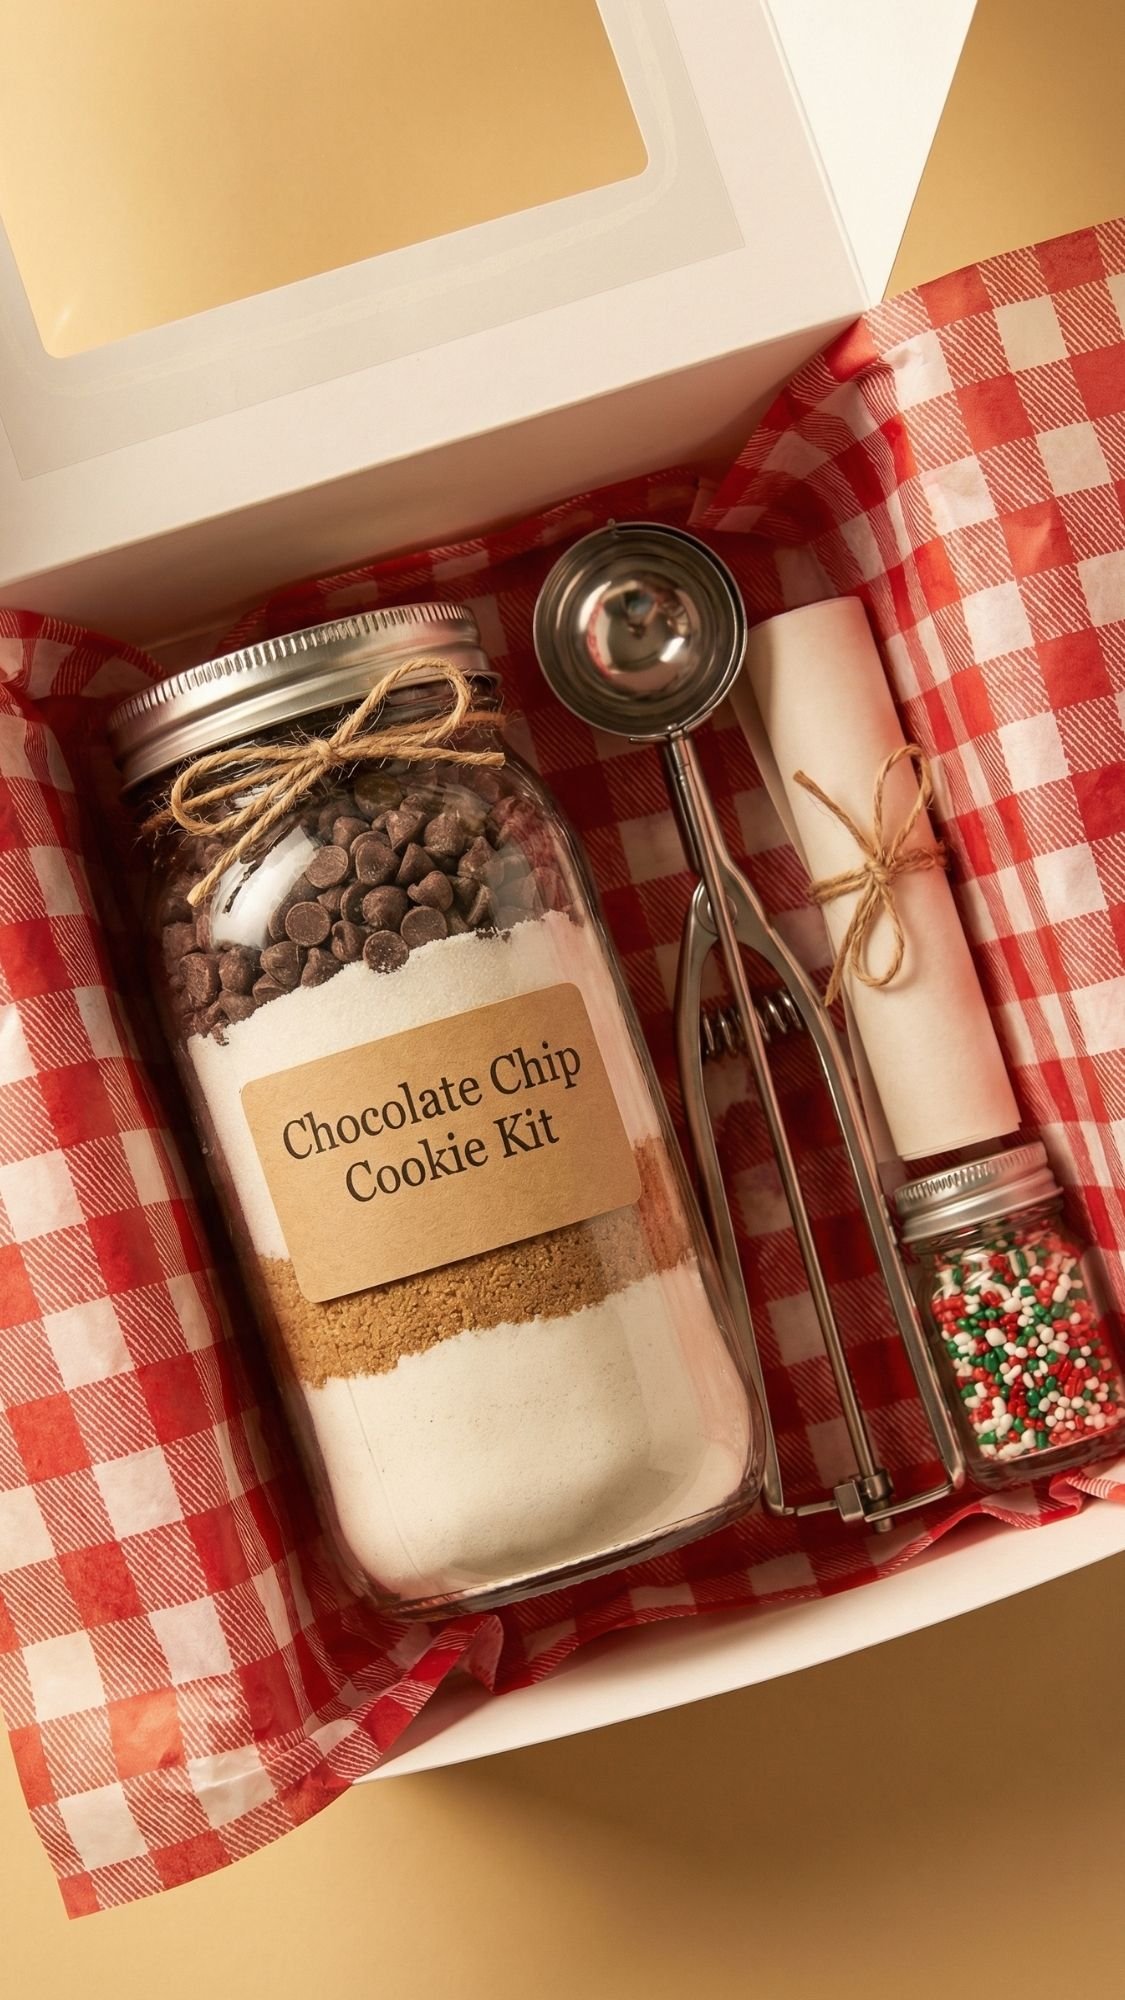
9) “Bake Me Later” Cookie Kit Box (smells like love, tastes like success)
This one hits every time because it’s interactive. They don’t just receive a gift, they get a cozy activity with a guaranteed payoff. Also, it’s one of the easiest DIY sets to batch-make, which matters if you’re doing teacher gifts or multiple family gifts.
Why it works
Cookie kits feel homemade without you having to bake anything right now. They also give people that warm “I made something” feeling, even if all they did was add butter and an egg. No shame, that’s the point.
What to put inside (my best 1-2-2 build)
Hero item
- 1 jar of layered cookie mix, or a sealed pouch mix in a rigid box
Supporting items
- Mini chocolate chips or mix-ins (sealed separately if you want the jar to look cleaner)
- A cookie scoop, because it makes every cookie look bakery-level
Tiny wow add-ons
- Parchment paper squares or a small roll of parchment
- A sprinkle jar, holiday sprinkles, cinnamon sugar, or flaky salt
- Optional: a “bake night playlist” QR card for extra cozy points
Pro-tip: That cookie scoop is the “wow, you thought of everything” item. People love it.
DIY element: My no-fail chocolate chip cookie mix (layered jar version)
This one bakes consistently and doesn’t turn into flat cookie pancakes.
Jar layering order
- 1 cup flour
- 1/2 teaspoon baking soda
- 1/2 teaspoon salt
- 1/2 cup brown sugar, packed
- 1/3 cup granulated sugar
- 3/4 cup chocolate chips
Label instructions (copy-paste)
- Add 1/2 cup softened butter and 1 egg.
- Mix until combined.
- Chill dough 30 minutes.
- Bake at 350°F for 10 to 12 minutes.
Pro-tip: The chill step is non-negotiable
A common mistake beginners make is skipping the chill time because they feel impatient. I get it. But chilling keeps cookies thick, reduces spreading, and improves texture. It also makes dough easier to scoop.
If they skip chilling and the first tray spreads too much:
Chill the remaining dough longer.
Add 1 to 2 tablespoons flour if it’s very soft.
Let the baking sheet cool before the next batch.
Packaging that looks like a boutique baking kit
- Use a bakery box or rigid gift box.
- Place the jar upright, anchor it with a glue dot.
- Add parchment and cookie scoop alongside the jar.
- Tuck sprinkles and mix-ins into gaps like you planned it.
- Add a tag that says “Bake me on a cozy night.”
Pro-tip: Add a small ribbon around the jar, then tie the spoon or scoop onto the ribbon. It’s a tiny detail that looks very intentional.
Common mistake and how to fix it
Symptom: Cookies turn out flat and greasy.
Likely cause: Butter too warm, dough not chilled, or inaccurate flour measurement.
Fix: Chill dough 30 to 60 minutes, and measure flour correctly.
Prevention next time: Tell them to soften butter, not melt it. Melted butter equals cookie puddles.
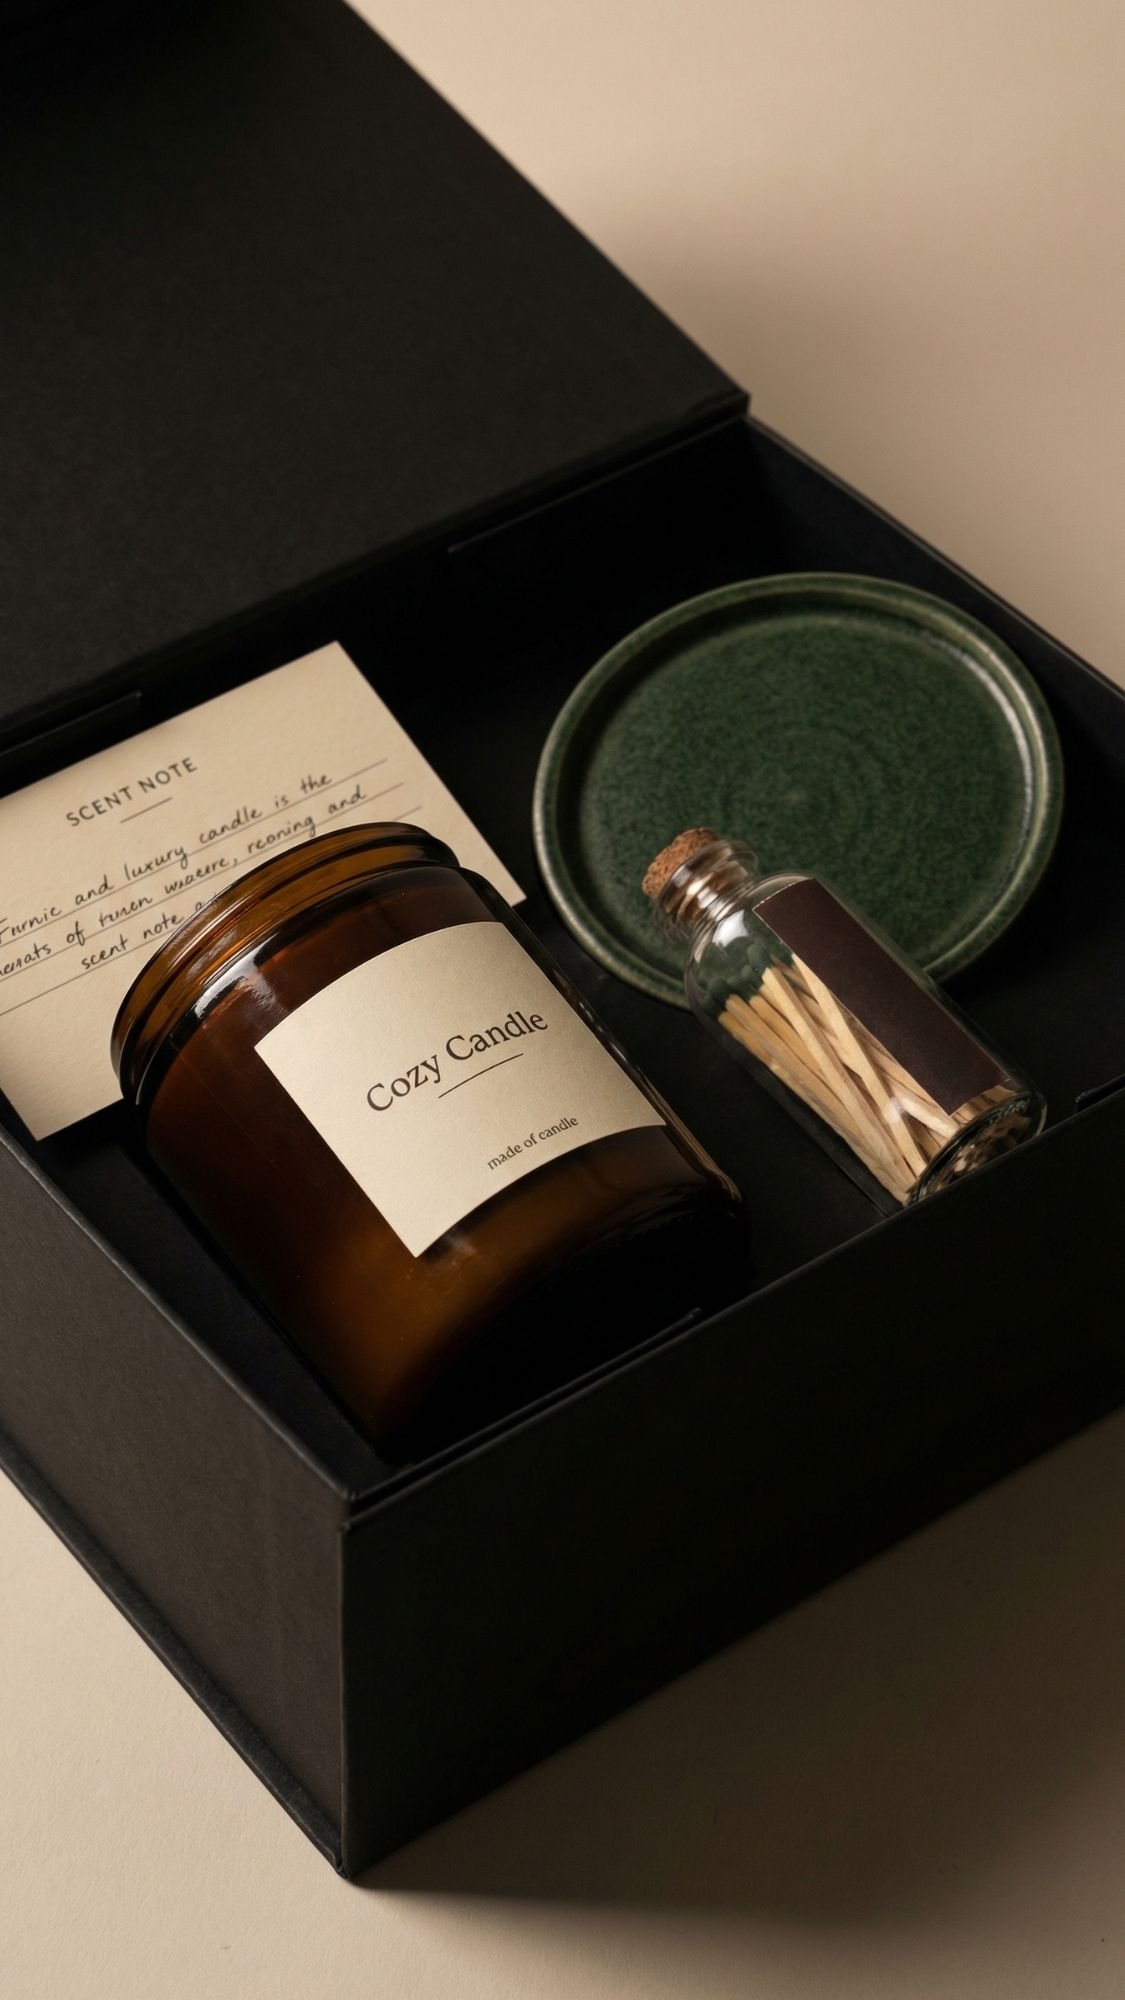
10) Candle Cozy Kit (candle + matches + a vibe card that makes it feel curated)
This set is for the person who loves a calm house. It’s simple, it’s useful, and it feels expensive when you package it right. The key is to treat it like a tiny boutique “ritual kit,” not like you tossed a candle in a box and called it a day.
Why it works
A candle gift set feels like self-care without being overly “self-care.” It also works for almost any recipient, and you can make it look premium with minimal supplies. Bonus, it’s easy to theme by scent, like vanilla for warm cozy, cedar for cabin vibes, or lavender for calm.
What to put inside (my best 1-2-2 build)
Hero item
- 1 candle in an amber jar, ceramic jar, or matte tin
Supporting items
- Match bottle with a strike strip
- Coaster, small dish, or candle tray
Tiny wow add-ons
- A scent note card, like “warm vanilla, cedar, and a hint of spice”
- Mini cocoa packet or tea sachet
- Optional: wick trimmer if you want a luxe upgrade
Pro-tip: A match bottle instantly makes the set look intentional. It’s a tiny thing that reads as fancy.
DIY element: Simple match bottle (this makes people gasp a little)
- Fill a small glass bottle with matches.
- Glue a strike strip to the side, clean and centered.
- Add a label like “Light this when you need a reset.”
Pro-tip: Keep the strike strip from peeling
Wipe the glass with rubbing alcohol first, then use strong double-sided tape or a tiny line of craft glue. Let it dry fully before you package it.
Packaging that looks high-end
- Use a rigid gift box or a small drawer box.
- Add crinkle paper and press it down to create a stable nest.
- Place the candle slightly off-center.
- Add the match bottle beside it, and anchor both with glue dots.
- Slide the scent note card behind the candle so it peeks out.
- Finish with one velvet bow and a clean tag.
If you want a luxe look: choose a matte box and velvet ribbon. That combo does a lot of work.
Candle care card (copy-paste, makes it feel pro)
- Trim wick to 1/4 inch before lighting.
- Let the wax melt to the edges on the first burn.
- Burn 2 to 3 hours max at a time.
- Keep away from drafts.
Common mistake and how to fix it
Symptom: Candle tunnels, leaving wax stuck on the sides.
Likely cause: First burn was too short or wick wasn’t trimmed correctly.
Fix: Use a foil collar once to help the wax melt evenly, then burn long enough to reach the edges.
Prevention next time: Add the care card, and make sure they know the first burn matters.
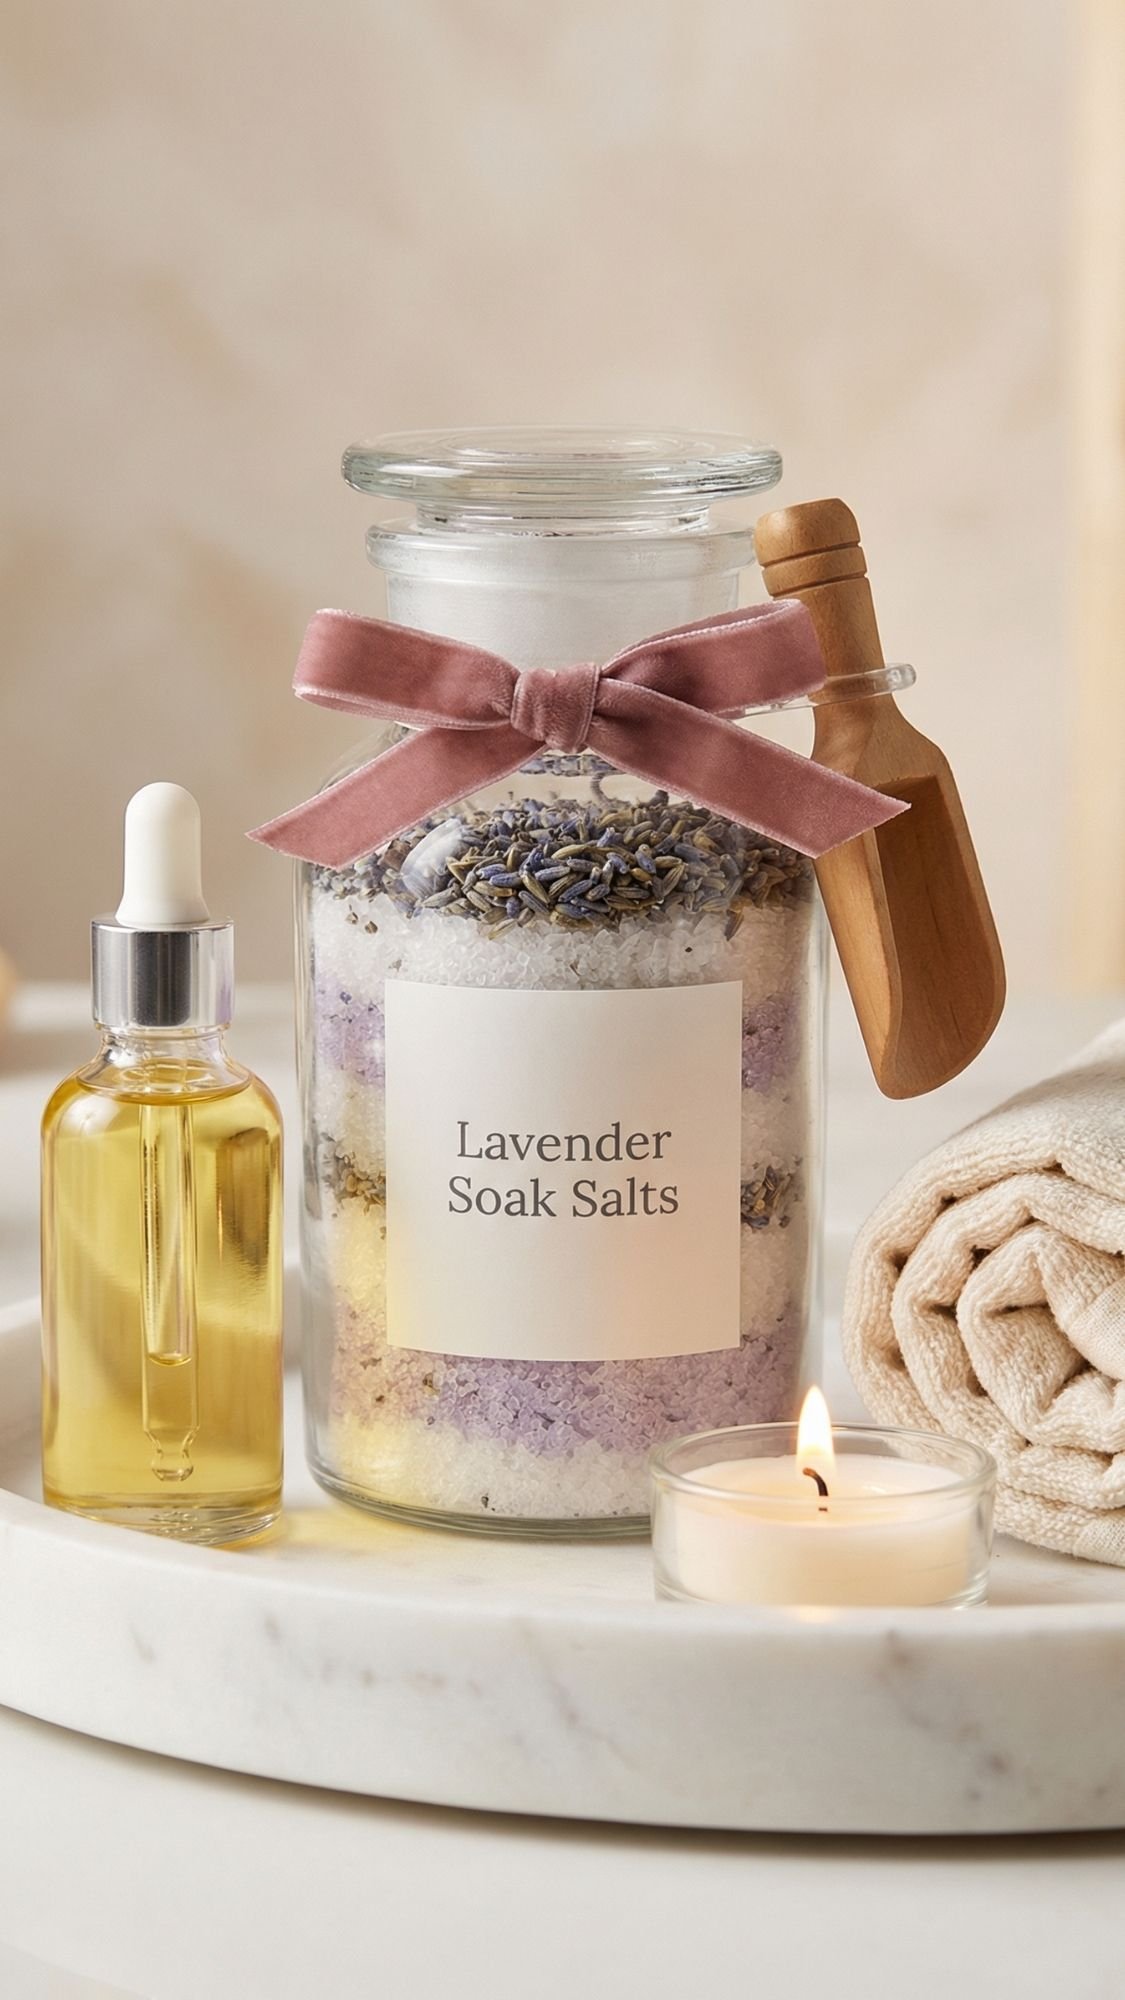
11) DIY Bath Salt Soak Set (spa night in a jar, but not the clumpy sad version)
This set feels like a deep exhale. It’s also one of the easiest “luxury-looking” gifts you can make fast, as long as you respect moisture. Ever opened bath salts that turned into a rock? Yeah, we’re avoiding that.
Why it works
Bath salts feel personal without being too personal, and they fit almost any budget. They also look gorgeous in clear jars, especially when you keep the layers clean and the label minimal. Plus, this set pairs perfectly with cozy winter nights because it gives someone a full “reset” moment.
What to put inside (my best 1-2-2 build)
Hero item
- 1 jar of DIY bath salts, 12 to 16 oz jar looks gift-worthy
Supporting items
- Mini body oil or body butter
- A soft washcloth, loofah, or mini towel
Tiny wow add-ons
- A wooden scoop, tiny spoon, or shell spoon
- Tea light candle, or a match bottle if you want to keep the vibe consistent
- Optional: a calming tea sachet tucked into the box
DIY element: My no-fail bath salt blend (smells good, dissolves well)
I keep this simple because the fancy stuff can cause problems.
Ingredients
- 1 cup Epsom salt
- 1/2 cup coarse sea salt
- 1/2 cup baking soda
- 1 tablespoon dried lavender or dried rose petals, optional
- 10 to 15 drops fragrance oil or essential oil, lavender and eucalyptus both work well
How I mix it
- I mix salts and baking soda in a big bowl first.
- I add oil slowly while stirring constantly, so it distributes evenly.
- I let it sit uncovered for at least 12 hours, longer if the air feels humid.
- I pack it only after it feels fully dry and fluffy.
Pro-tip: Keep botanicals from turning into a soggy mess
I use dried botanicals only, and I keep them light. Fresh citrus looks cute, but it discolors and clumps fast.
Packaging that looks like a boutique spa gift
- Choose a clear jar with a good lid, or an apothecary-style jar if you want it extra luxe.
- Add a clean label on the front, keep it minimal and readable.
- Tie a velvet ribbon around the neck, then tuck the scoop under the bow.
- Build the set in a small box with crinkle paper, anchor the jar with glue dots.
- Add a small care card that says “Keep sealed, store cool and dry.”
If you gift these in winter, humidity can still mess with them, especially near kitchens and bathrooms. I tuck a tiny desiccant packet into the outer gift box area near the jar, it helps a lot.
Common mistake and how to fix it
Symptom: Salts clump, sweat, or harden in the jar.
Likely cause: Too much oil, sealing too soon, or humid storage.
Fix: Spread the salts on a tray, let them dry fully, then repackage.
Prevention next time: Measure oil, let the mix dry overnight, and seal only when it feels fully dry.
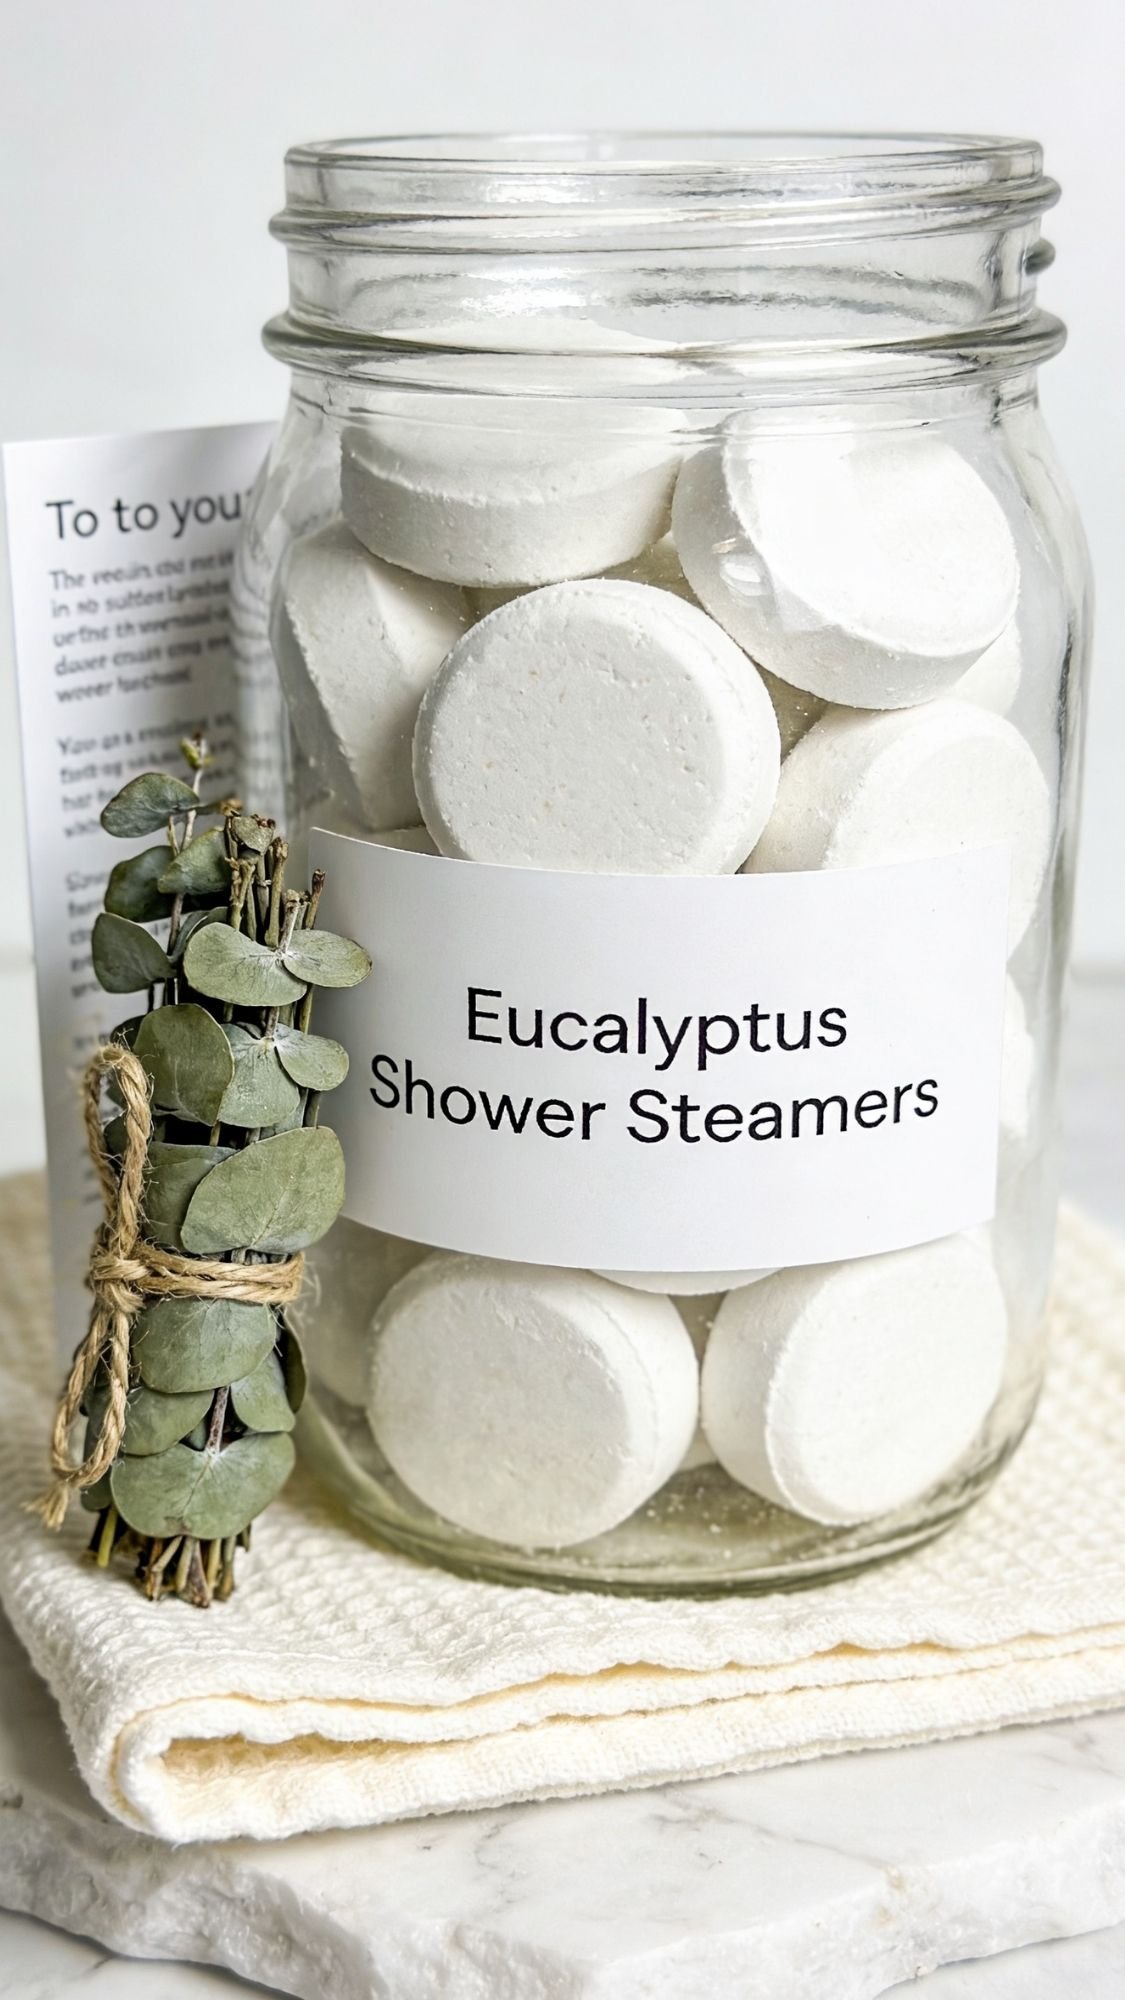
12) Shower Steamer Set (for the people who swear they “don’t take baths”)
This set is the perfect loophole gift. If someone doesn’t do baths, or they live in a place with a tiny shower, shower steamers still feel like a spa moment. It’s also a great winter gift because eucalyptus and mint vibes basically scream “breathe again.”
Why it works
Shower steamers turn a normal shower into a mini ritual. They feel fancy, but they’re simple to use, and they don’t require extra time the way a bath does. You also get strong sensory payoff, which makes the gift feel bigger than it is.
What to put inside (my best 1-2-2 build)
Hero item
- 4 to 6 shower steamers, packaged in a jar or sealed pouches
Supporting items
- Dried eucalyptus bundle, or a small shower-safe hook to hang it
- Mini “how to use” card, because people misuse steamers constantly
Tiny wow add-ons
- Mini lip balm or mini lotion
- A calming tea sachet for after the shower
- Optional: a small washcloth rolled like a spa towel
DIY element: Shower steamer basics (simple, reliable)
I’m keeping this outline-level, but here’s the high-value info that prevents fails.
Core ingredients
- Baking soda base
- Citric acid for fizz
- A tiny bit of water, sprayed, not poured
- Essential oil blend, eucalyptus and peppermint work well
Pro-tip: The mistake that ruins steamers
A common mistake beginners make is adding water too fast. It starts the fizz reaction early, and your steamers end up crumbly or half-activated. I use a spray bottle and mist slowly until the mix holds shape when squeezed.
Packaging that looks clean and premium
Option A, easiest and cutest:
- Glass jar with a wide mouth, layered steamers inside, label on front.
Option B, my favorite for gifting sets:
- Individually wrap each steamer in parchment, then heat-seal in clear pouches, and arrange them in a small box like “treats.”
Pro-tip: Add a tiny desiccant packet to the outer box area. Steamers hate humidity, and bathrooms are basically humidity headquarters.
How-to-use card (copy-paste, so they don’t waste it)
- Place steamer on the shower floor, away from direct water stream.
- Let hot water run, steam activates the scent.
- Use 1 per shower.
Common mistake and how to fix it
Symptom: Steamers crumble or fizz too early.
Likely cause: Too much water added while mixing, or high humidity during drying.
Fix: Add water by misting only, and let steamers dry longer in a low-humidity area.
Prevention next time: Dry for 24 to 48 hours, then store airtight until gifting.
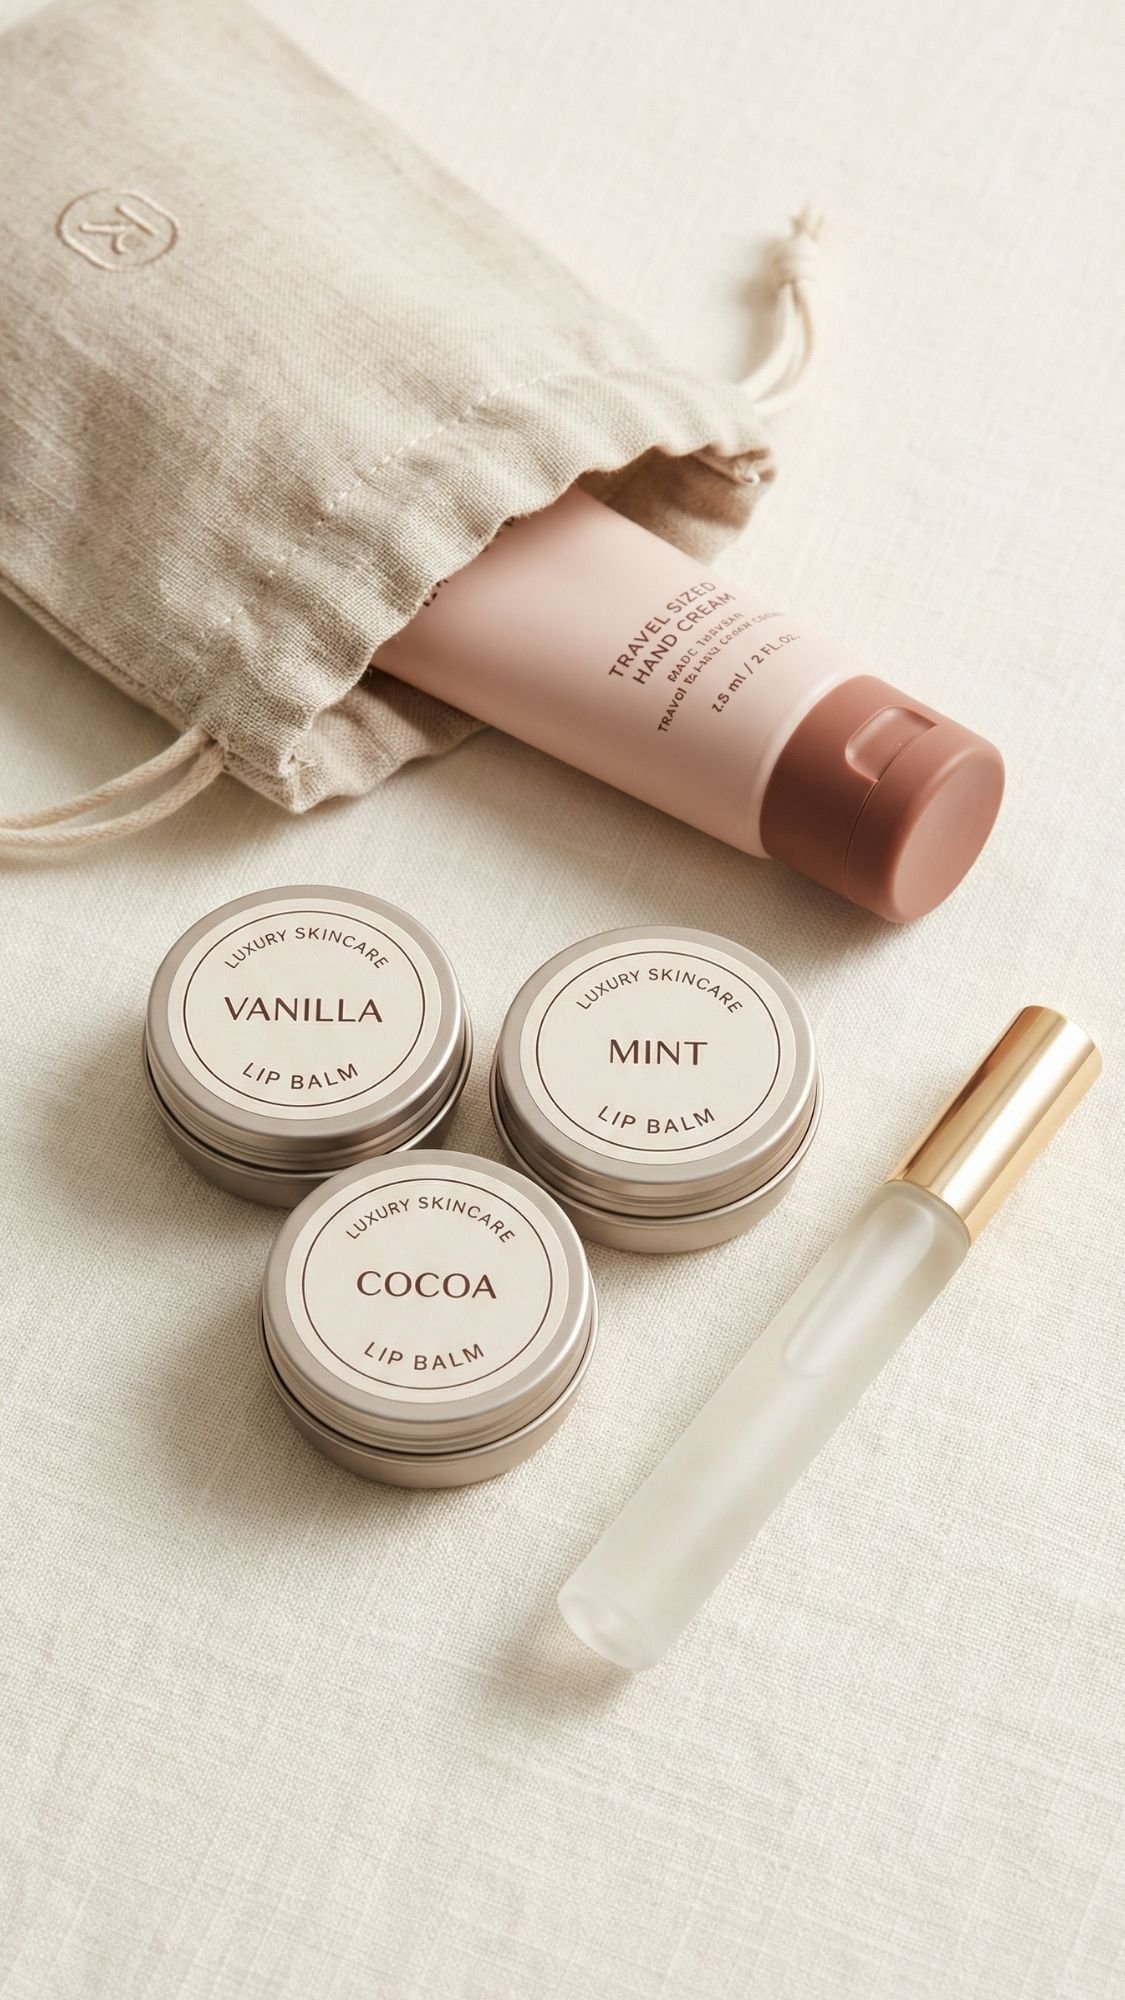
13) Lip Balm Trio + Cuticle Oil Mini Set (small gift, huge winter payoff)
This one is tiny but mighty. Winter air dries everything out, hands, lips, cuticles, even your mood sometimes. This set feels practical and pampering at the same time, which is a rare combo.
Why it works
It’s a daily-use gift. People don’t “save it for later.” They throw it in a bag, a desk drawer, a nightstand, and actually use it. That makes it feel more valuable than a bigger gift that sits untouched.
What to put inside (my best 1-2-2 build)
Hero item
- 3 lip balm tins or tubes, different scents
Supporting items
- Cuticle oil pen or mini roller bottle
- Mini hand cream, travel size
Tiny wow add-ons
- A tiny nail file or mini buffer
- A soft cloth pouch, because it instantly looks more premium
- Optional: a mini sugar scrub sample in a tiny jar
Pro-tip: The pouch changes everything. Without it, it can look like loose toiletries. With it, it feels curated.
DIY element: Balm trio that feels boutique
You can do this with tins or tubes. I prefer tins for a handmade look.
Simple, winter-friendly flavors:
- Vanilla bean
- Peppermint
- Cocoa butter
Pro-tip: Don’t accidentally irritate someone’s lips
A common mistake beginners make is overdoing essential oils. Keep peppermint light, and skip spicy oils entirely. If you sell or gift widely, label allergens clearly, especially if you use nut-derived oils.
Packaging that looks luxe and clean
- Place the pouch or small box base first.
- Arrange the three balms in a tidy row or triangle.
- Tuck the cuticle oil pen alongside them.
- Add the mini hand cream behind, so it adds height.
- Finish with a minimal label or tag like “Winter Rescue Kit.”
Pro-tip: If you use a box, add a small piece of foam or thick cardstock under the items so they don’t sink into the crinkle paper and disappear.
Common mistake and how to fix it
Symptom: Balms feel grainy or separate.
Likely cause: Overheating ingredients, or cooling too slowly.
Fix: Melt gently, avoid high heat, and cool at room temp.
Prevention next time: Use low heat, stir well, and don’t rush the pour.
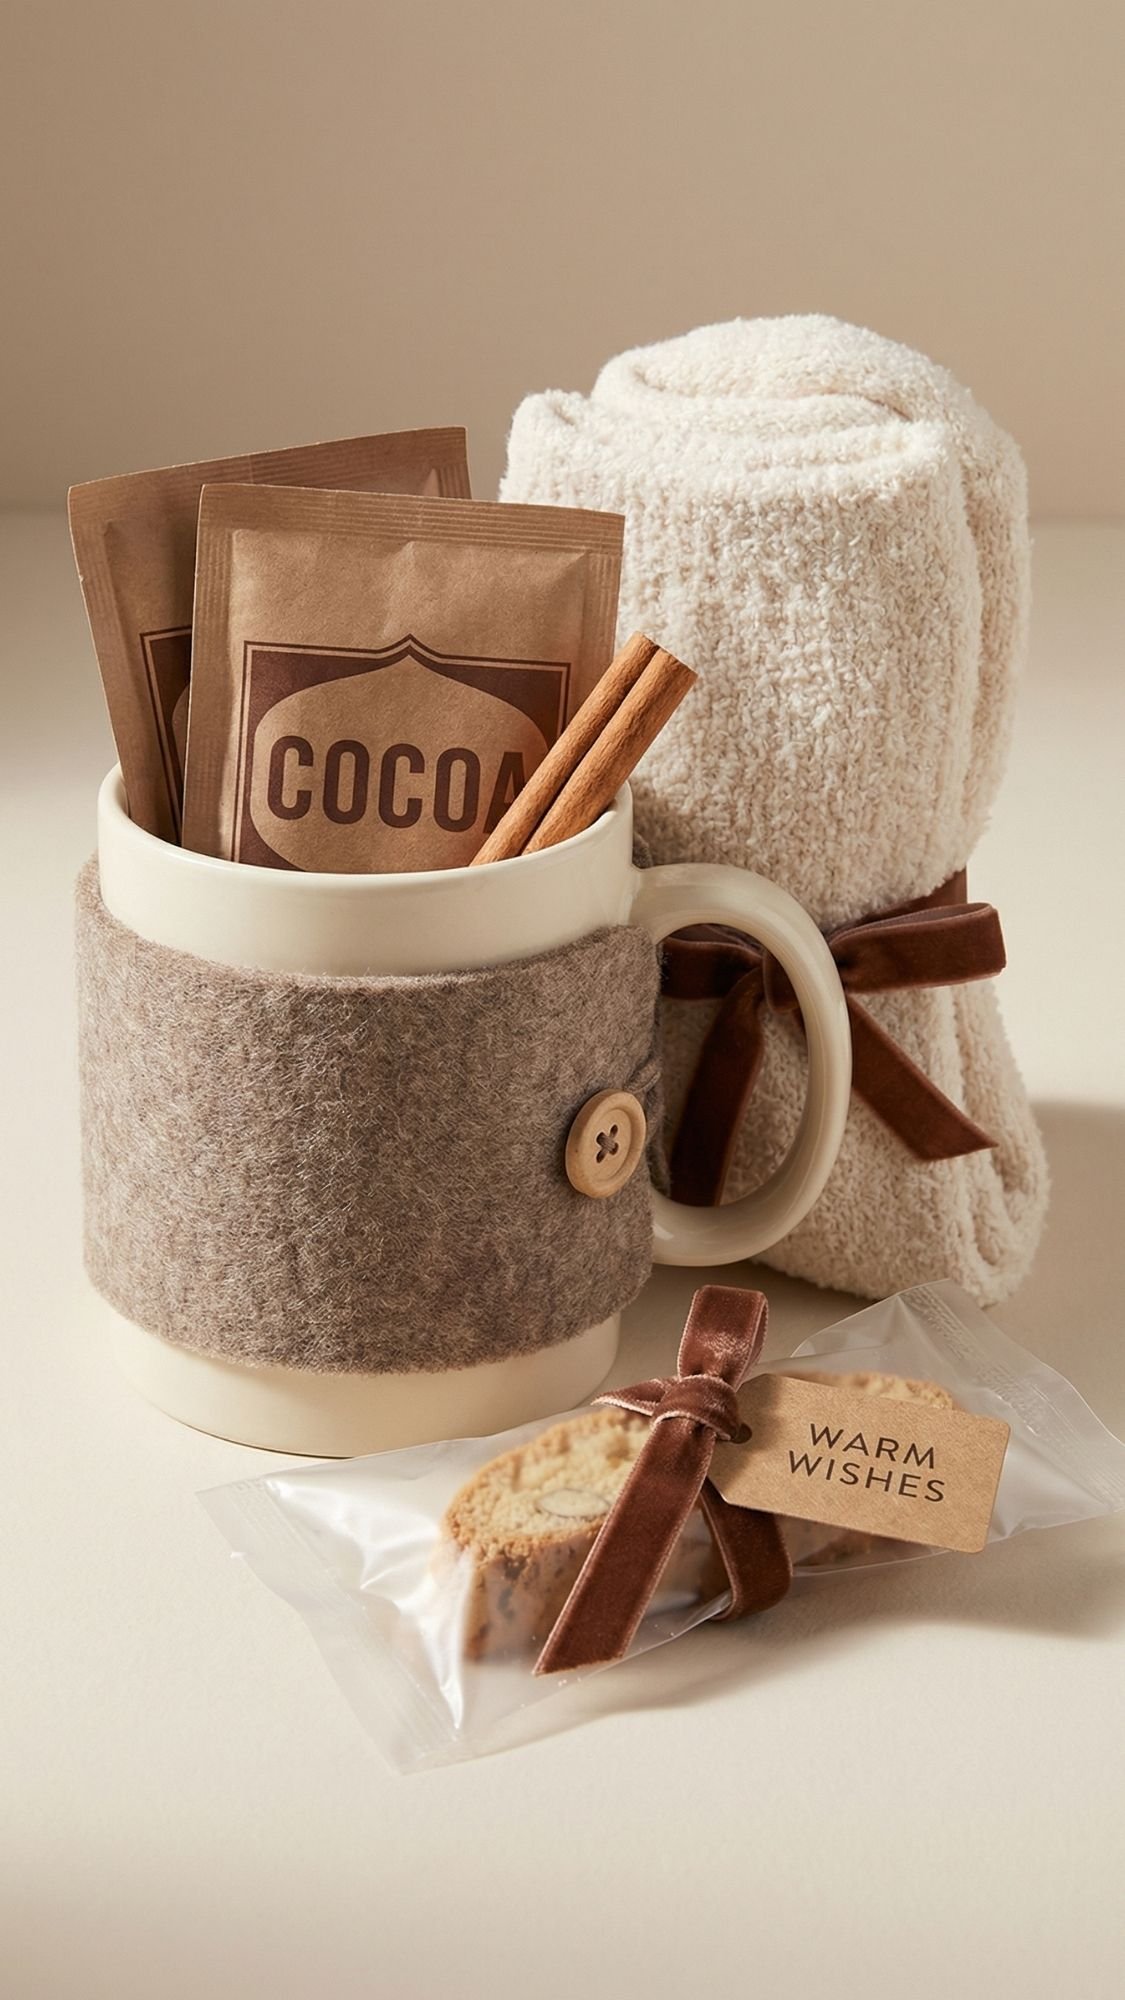
14) Cozy Socks + Mug Hug Set (easy, cute, and people actually use it)
This set is simple, but it doesn’t feel basic when you present it right. It’s the kind of gift that makes someone immediately go “oh, this is cozy,” and then they put the socks on that same night. That’s a win.
Why it works
Warm feet and a warm drink feel like instant comfort. Also, it’s low risk. You’re not guessing their skincare preferences or fragrance tolerance. You’re gifting comfort items that most people like.
What to put inside (my best 1-2-2 build)
Hero item
- 1 cozy mug, sturdy and neutral, or a cute seasonal one
Supporting items
- Fuzzy socks, preferably a thick pair
- Hot cocoa packets or a small jar of cocoa mix
Tiny wow add-ons
- Mini biscotti or shortbread, sealed
- Cinnamon stick bundle or mini chocolate bar
- Optional: a coaster or mug spoon
Pro-tip: I avoid super fuzzy socks that shed like crazy. They feel cozy, but they leave fluff everywhere. Thick knit socks usually behave better.
DIY element: Mug hug sleeve, no-sew option that looks polished
You can sew a fabric sleeve, but you don’t have to. A clean felt wrap looks cute and holds up.
- Cut felt into a rectangle that wraps the mug.
- Round the corners for a finished look.
- Add a button and elastic loop, or a simple leather cord tie.
- Optional: add a small monogram patch.
Pro-tip: Make it look intentional
Match the felt color to the ribbon or the cocoa label. That small “everything matches” moment makes the set feel curated.
Packaging that looks boutique
- Use the mug as the container.
- Fill it with cocoa packets and the mini treat.
- Roll the socks like a cinnamon roll and tuck them behind the mug as the backdrop.
- Wrap the mug hug sleeve around the mug.
- Tie a velvet ribbon around everything, and add a tag.
If you want it extra luxe, place the mug inside a small box with tissue and crinkle paper so it feels like a present inside a present.
Common mistake and how to fix it
Symptom: Socks look messy, or the set feels flat and not gift-worthy.
Likely cause: Socks aren’t styled, and the mug looks lonely.
Fix: Roll socks tightly, tuck them behind the mug for height, and add one small treat for visual interest.
Prevention next time: Always add one “tiny wow” item, even if it’s just a cinnamon stick bundle.
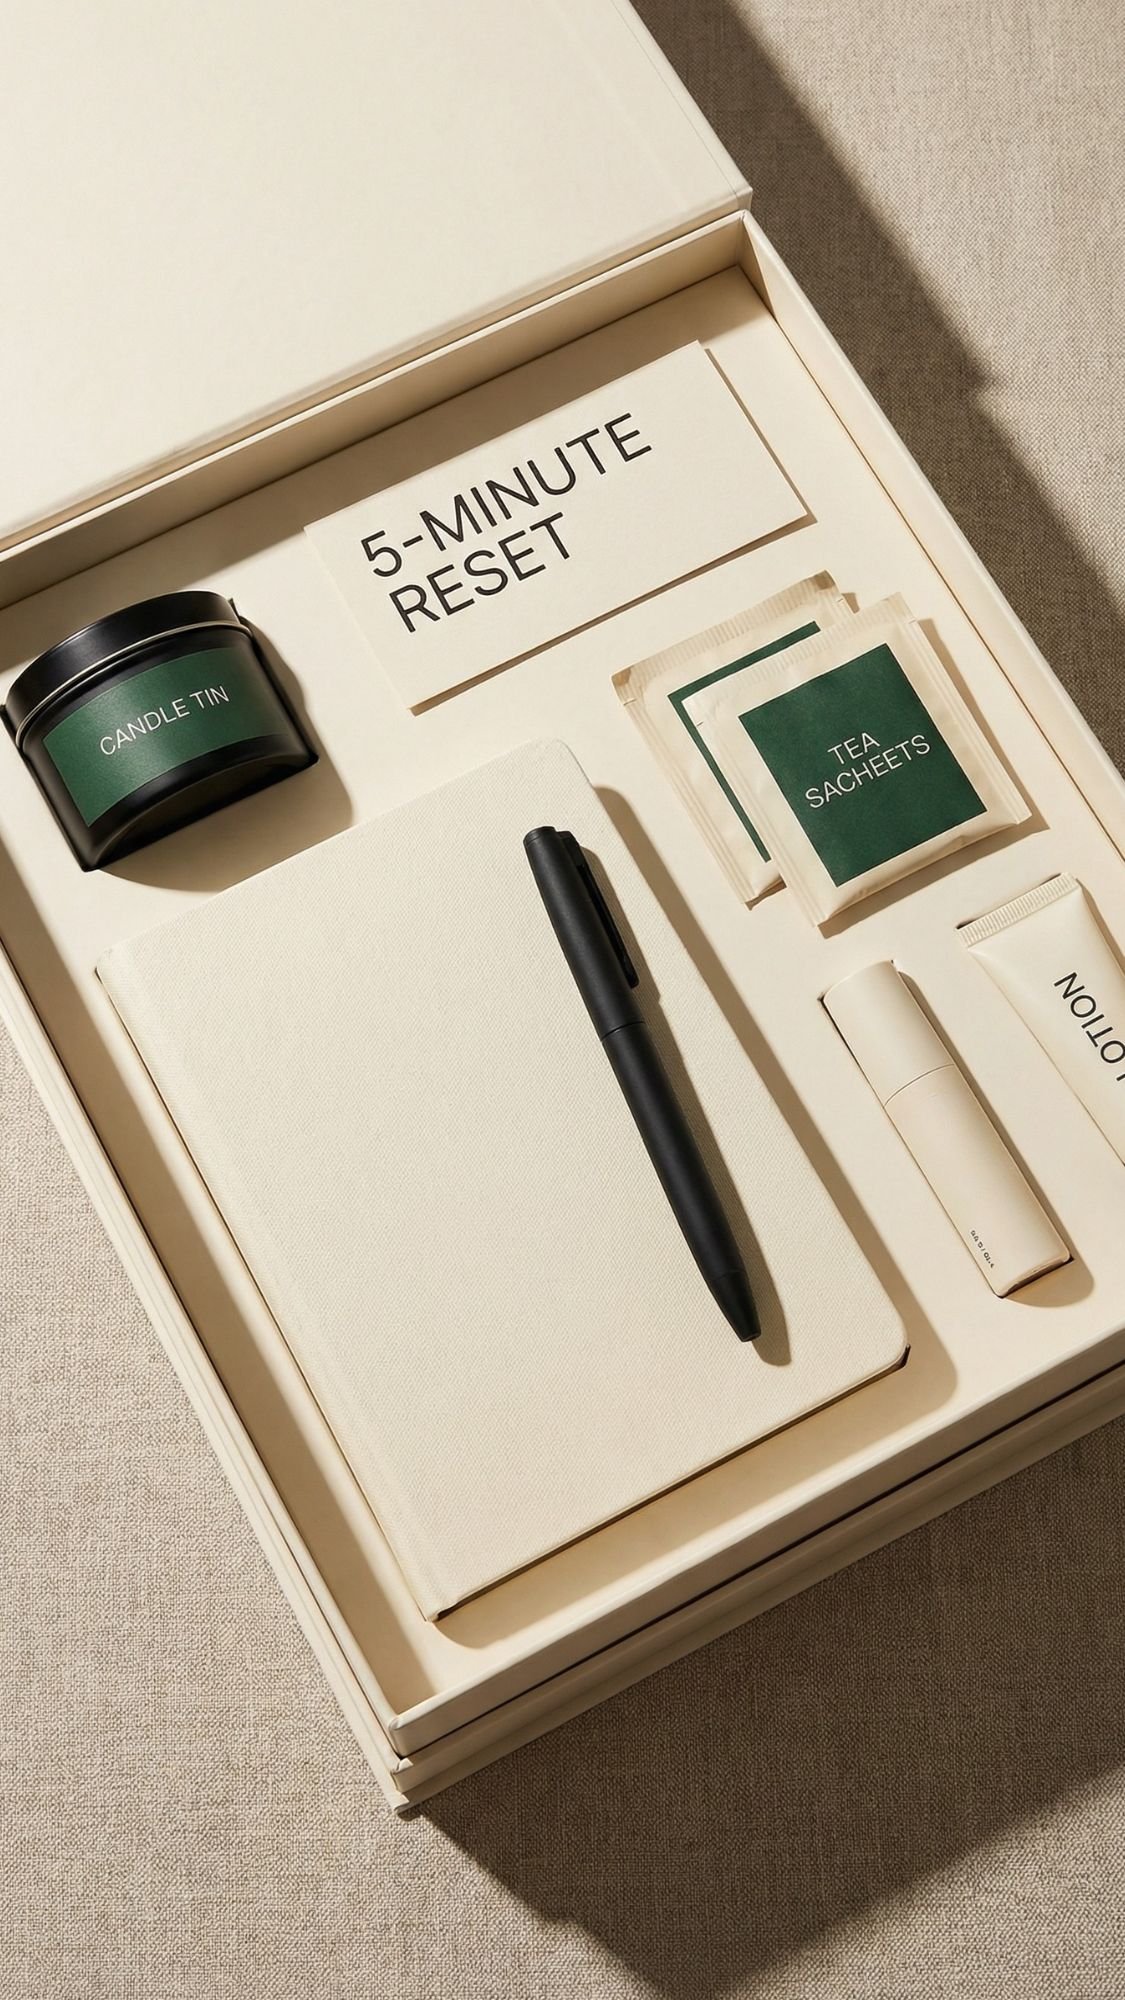
15) “Cozy Desk Reset” Kit (for the friend who basically lives at their laptop)
This one is perfect for anyone who works from home, studies, or has a desk that looks like a tiny stress museum. It gives them a mini reset ritual they can actually use in the middle of a busy winter day.
Why it works
It’s practical, it’s calming, and it doesn’t require them to “find time” for self-care. They can use it in five minutes. Also, it’s a great gift for people who already own everything. You’re not gifting more stuff, you’re gifting a better workday.
What to put inside (my best 1-2-2 build)
Hero item
- 1 small notebook or notepad, something that feels nice to write on
Supporting items
- A good pen, not the scratchy giveaway kind
- Tea sachets or a cocoa packet bundle, because warm drinks make everything better
Tiny wow add-ons
- Mini candle or desk-safe wax melt, optional but cozy
- Hand lotion or cuticle oil, winter desk essential
- Cable clip or cord keeper, because tangled cords ruin the vibe
- Optional: mini timer, 5-minute reset timer is great
Pro-tip: Keep this set clean and minimal. If you add too many items, it becomes desk clutter, which is the opposite of the goal.
DIY element: “5-minute desk reset” ritual card
This is the part that makes it feel like a curated kit instead of office supplies.
Copy-paste version:
- Make a warm drink.
- Set a 5-minute timer.
- Clear one small area.
- Write your top 3 priorities.
- Start with the easiest one.
It’s simple, and it actually works. Ever noticed how “do everything” lists make your brain freeze? This keeps it doable.
Packaging that looks sleek and premium
- Use a rigid box or a drawer-style box.
- Add a thin crinkle paper base, not too fluffy, keep it tidy.
- Place the notebook on the bottom like the foundation.
- Lay the pen diagonally across it, it looks intentional.
- Tuck tea sachets and lotion to one side, anchor them with glue dots.
- Slide the ritual card in last so it’s the first thing they see.
Pro-tip: Make it feel expensive
Match the palette. Black, cream, and one accent color, like deep green or burgundy. When everything matches, the set looks curated even if the items were budget-friendly.
Common mistake and how to fix it
Symptom: The set feels boring, like you gifted office supplies.
Likely cause: No ritual card, no cozy element, and no cohesive palette.
Fix: Add the 5-minute reset card, include a warm drink element, and keep colors consistent.
Prevention next time: Always include one “comfort” item, tea, cocoa, candle, or lotion, to make it feel cozy.
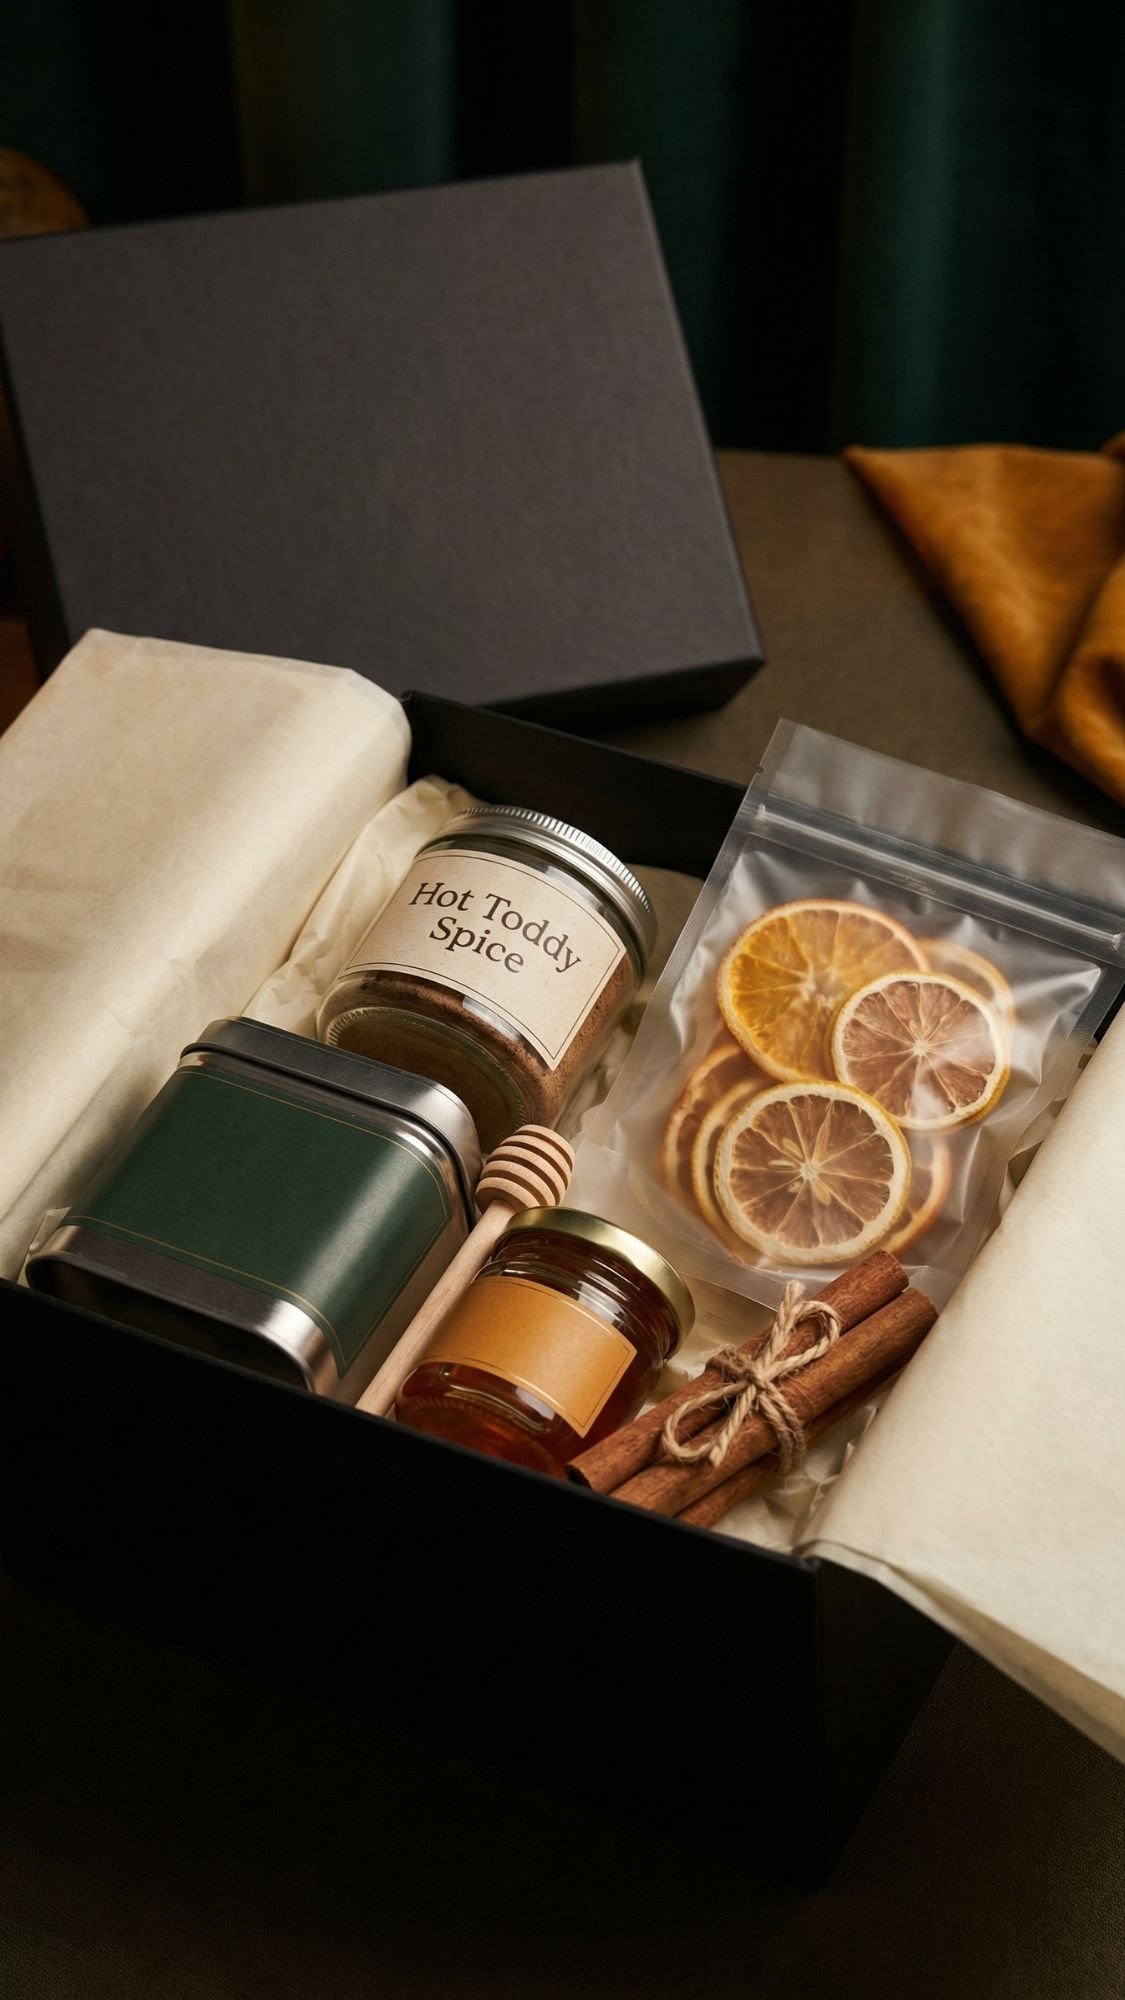
16) “Quiet Luxury” Hot Toddy Set (grown-up cozy, not cheesy)
This is the cozy winter set for people who like things a little more refined. It feels like a fancy winter drink moment, but it doesn’t have to include alcohol. You can build it as a hot toddy kit, a spicy herbal “evening tea” kit, or both, and it still feels intentional.
Why it works
It’s cozy, but it’s not juvenile. It’s also very giftable because it reads like a curated experience, not just food items. And the best part, it’s easy to keep shelf-stable, so you can prep it ahead.
What to put inside (my best 1-2-2 build)
Hero item
- 1 “toddy spice blend” jar, plus a tea tin if you want it extra luxe
Supporting items
- Honey, small jar or honey sticks
- Dried citrus slices, fully dried and sealed
Tiny wow add-ons
- Cinnamon sticks tied in a small bundle
- Mini spoon or honey dipper
- Optional: a small packet of ginger candy
Non-alcohol friendly option: Make the kit “Hot Honey Citrus Tea” and it still works. Nobody needs to know what you planned.
DIY element: Toddy spice blend (easy, smells incredible)
I keep it simple, and I make it in small batches so the spices stay strong.
- 2 teaspoons cinnamon
- 1 teaspoon ground ginger
- 1/2 teaspoon cloves
- 1/2 teaspoon allspice
- Pinch of nutmeg
Label suggestion: “Add 1/4 teaspoon to hot drink, start small, adjust to taste.”
Pro-tip: Don’t make it bitter
Cloves can overpower everything fast. Measure them. If you go heavy, the blend tastes medicinal. It’s not a vibe.
Instruction card (copy-paste, keep it clear)
Hot toddy version:
- Add honey to mug.
- Add hot water or tea.
- Add a squeeze of lemon, add spice blend.
- Optional: add whiskey or bourbon.
Tea-only version:
- Add honey and spice blend to herbal tea.
- Add dried citrus, steep 5 minutes.
- Sip and pretend you’re in a fancy cabin.
Packaging that looks truly luxe
This set shines in a matte black or deep green box.
- Line the box with tissue, fold it neatly.
- Place the tea tin or spice jar centered.
- Add honey and citrus on either side for balance.
- Tuck cinnamon bundle diagonally, it looks styled.
- Finish with a satin or velvet ribbon and a minimal tag.
Pro-tip: Keep labels minimal, like apothecary style. Too much text makes it look busy.
Common mistake and how to fix it
Symptom: Citrus gets soft or smells off in the bag.
Likely cause: Citrus wasn’t fully dried, or it got sealed warm.
Fix: Replace citrus with fully dried slices and reseal.
Prevention next time: Cool completely before packaging and store in a dry place.
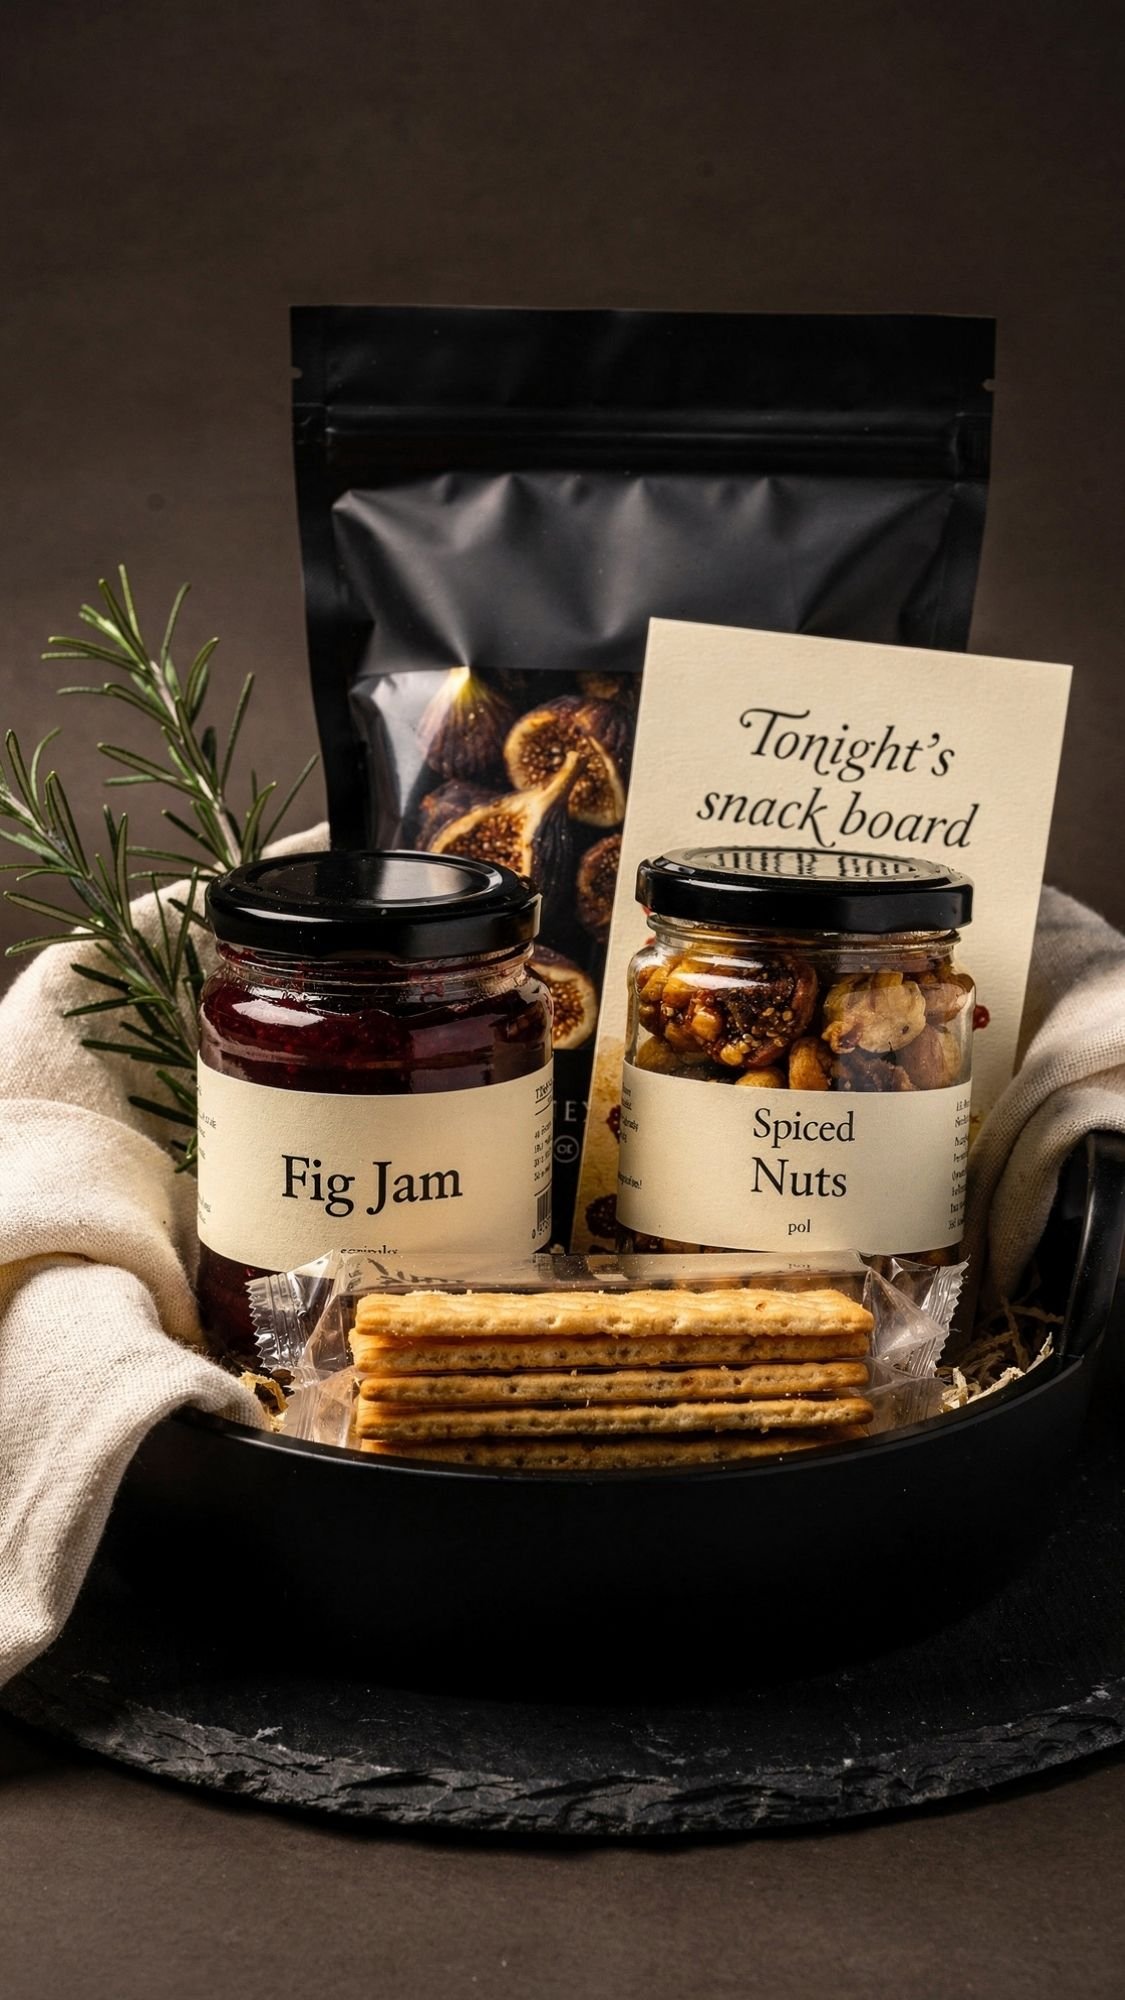
17) Charcuterie Night In Mini Kit (snack board energy, winter edition)
This set feels fancy, but it’s secretly easy. It’s a great cozy winter night gift because it turns into an immediate little event, like “we’re doing a snack board tonight.” Also, it works for couples, roommates, hosts, and anyone who loves grazing like a classy forest creature.
Why it works
Charcuterie kits feel elevated without being complicated. You’re giving a full theme, not random snacks. And if you keep it shelf-stable, it’s stress-free to prep, gift, and even ship.
What to put inside (my best 1-2-2 build)
Hero item
- Mini board, slate, or a small serving tray
Supporting items
- Jam or pepper jelly, small jar
- Crackers or crostini, sealed
Tiny wow add-ons
- Nuts, spiced or candied, in a mini jar
- Dried fruit like apricots or figs
- Optional: mini honey or mustard, or a tiny olive pouch
Pro-tip: If you include anything fragile like crackers, pack it upright and tight. Crumbs are not the “luxury” we want.
DIY element: Spiced nuts jar (the fancy upgrade everyone notices)
This is the thing that makes the kit feel handmade.
Simple winter spiced nut blend:
- Mixed nuts
- Pinch of salt
- Smoked paprika
- Brown sugar
- Tiny pinch cayenne
If you don’t want to bake them, you can still do a no-cook version using a spice mix and a cute label. If you do bake them, let them cool fully before sealing so they stay crisp.
Packaging that looks upscale
- Use a shallow box or a small basket so everything stays visible.
- Add crinkle paper base, press it down for stability.
- Place the mini board flat, it becomes your foundation.
- Group jars together, jam, nuts, honey, and anchor them with glue dots.
- Add dried fruit and crackers last, tucked in like a styled display.
- Finish with a ribbon and a “Tonight’s snack board” tag.
Pro-tip: Make it feel curated
Include a tiny “board map” card with a simple layout suggestion:
“Place crackers here, add jam here, sprinkle nuts here, done.”
It sounds silly, but it removes decision fatigue. People love that.
Common mistake and how to fix it
Symptom: The kit looks messy, and crackers break into dust.
Likely cause: Too much empty space and nothing anchored.
Fix: Choose a snug container, anchor jars, and wedge crackers upright with tissue.
Prevention next time: Keep fragile items in a separate inner box or pouch, and pack them tight.
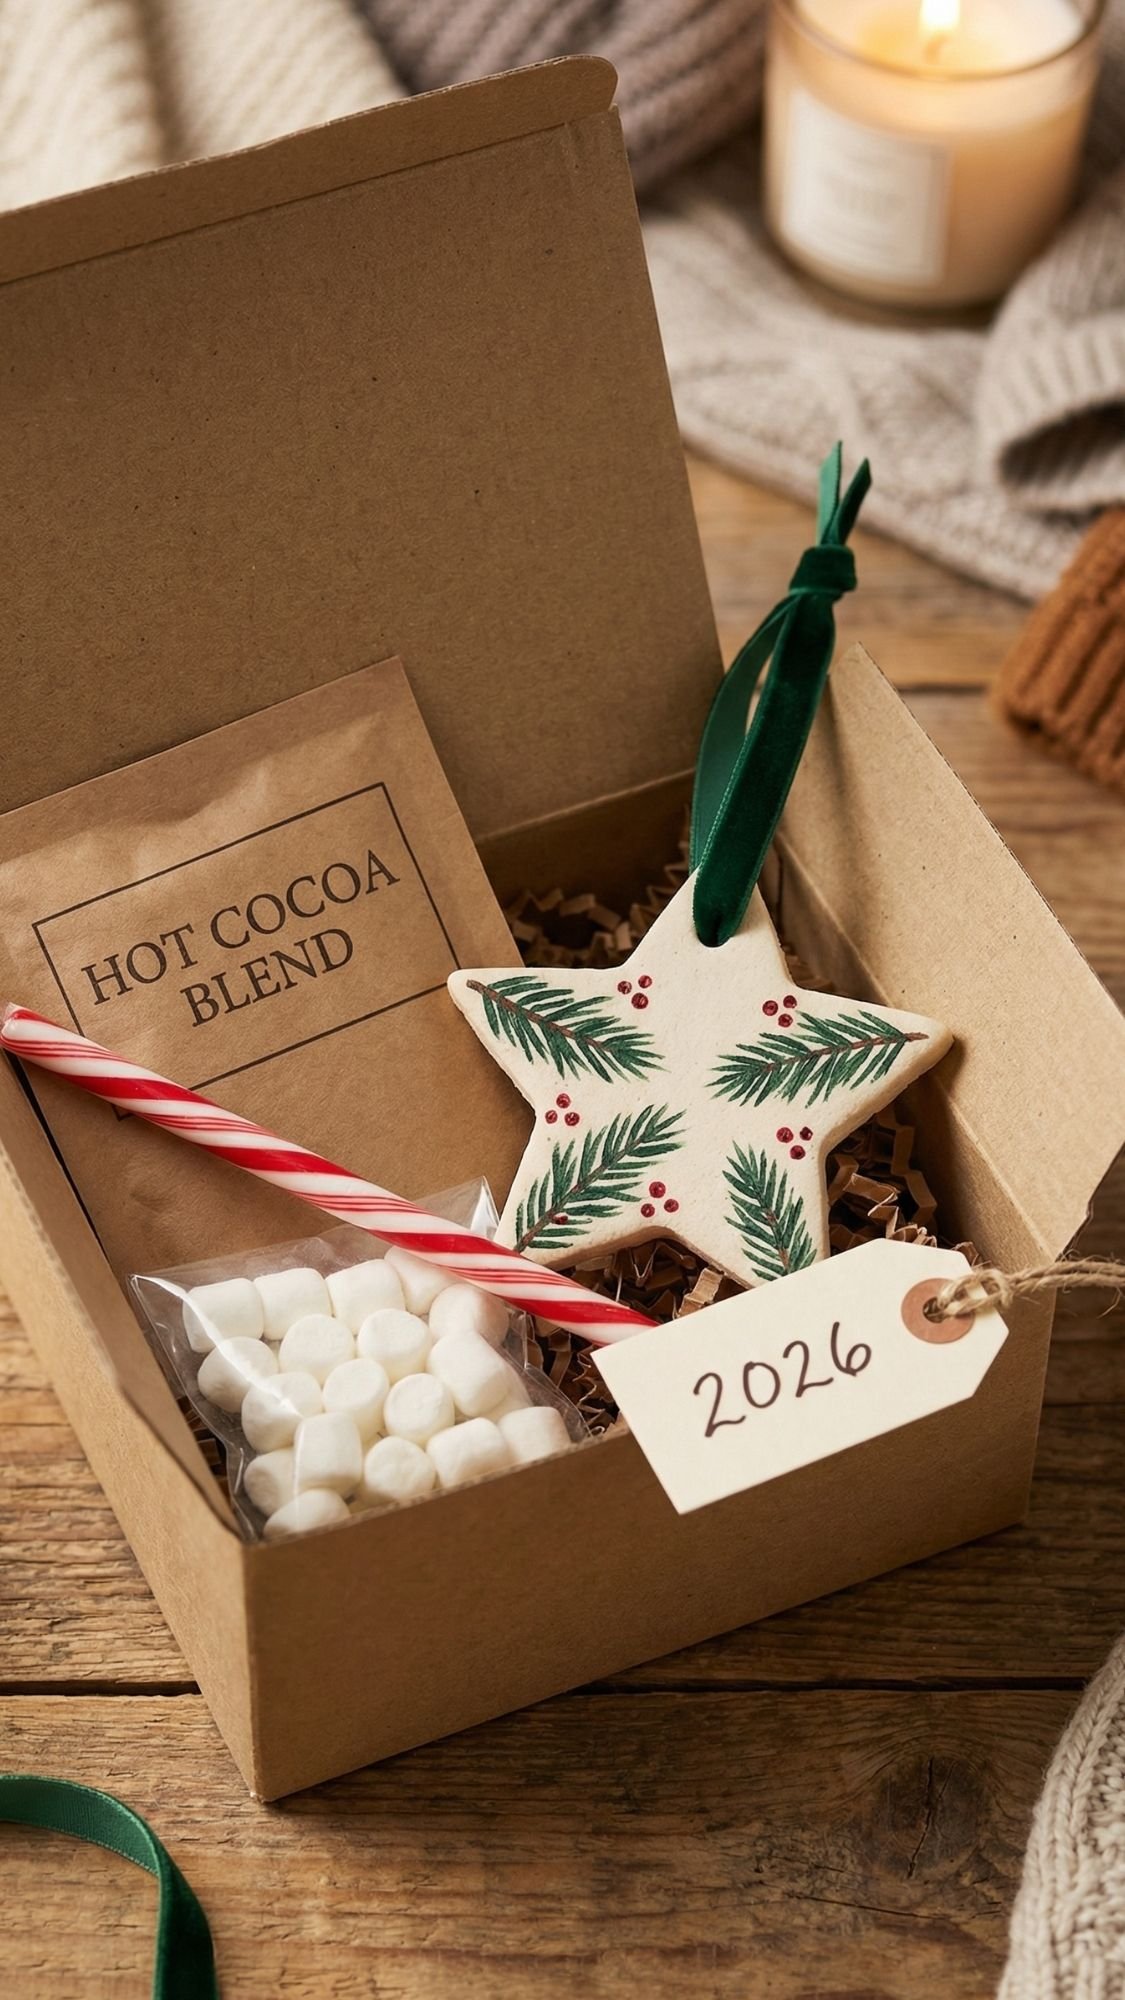
18) DIY Ornament + Cocoa Mini Set (neighbor gift that doesn’t feel cheap)
This is the perfect “small but thoughtful” winter gift. It’s light, it’s easy to batch, and it doesn’t feel like you grabbed something random on the way out the door. Also, pairing a handmade ornament with a cocoa treat feels cozy and intentional.
Why it works
People keep ornaments. Even if they don’t decorate a lot, they usually have a spot for one meaningful piece. The cocoa makes it immediately usable, so the gift feels like both a memory and a cozy night moment.
What to put inside (my best 1-2-2 build)
Hero item
- 1 handmade ornament, sealed and ready to hang
Supporting items
- Cocoa packet, or a mini cocoa jar
- Mini marshmallow pouch, optional but cute
Tiny wow add-ons
- Candy cane stirrer or chocolate spoon
- A tag with the year, so it becomes a keepsake
- Optional: a tiny ribbon bow tied directly onto the ornament hanger
DIY element: Salt dough ornament that looks polished, not kindergarten
Salt dough ornaments can look amazing, but only if you finish them properly.
Basic dough:
- Flour, salt, water, mixed into a firm dough
- Roll evenly, cut clean shapes
Pro-tip: The biggest beginner mistake
A common mistake beginners make is rolling the dough unevenly. Thin spots crack or warp. I roll to one consistent thickness and keep shapes simple.
Finish like a pro
- Let ornaments dry completely before painting.
- Paint in thin layers.
- Seal fully, front and back, so paint doesn’t scratch in storage.
If you want a more rustic look, wood slice ornaments work too. Paint a simple design, seal it, and it feels very cabin-core.
Packaging that looks gift-worthy
- Use a small kraft box or clear box.
- Place the ornament in the box first and anchor it gently with a glue dot or tissue nest.
- Add cocoa packet and marshmallow pouch beside it.
- Add the year tag on top so it’s visible immediately.
- Finish with twine or velvet ribbon.
Pro-tip: Put the cocoa in a sealed pouch or leave it in its wrapper. Loose powder and ornaments do not mix.
Common mistake and how to fix it
Symptom: Ornament paint scratches or sticks to packaging.
Likely cause: Sealer wasn’t cured, or you packed it too soon.
Fix: Let it dry longer, then reseal if needed and repackage with tissue between surfaces.
Prevention next time: Seal, then let it cure fully before boxing. Dry to the touch isn’t the same as ready to pack.
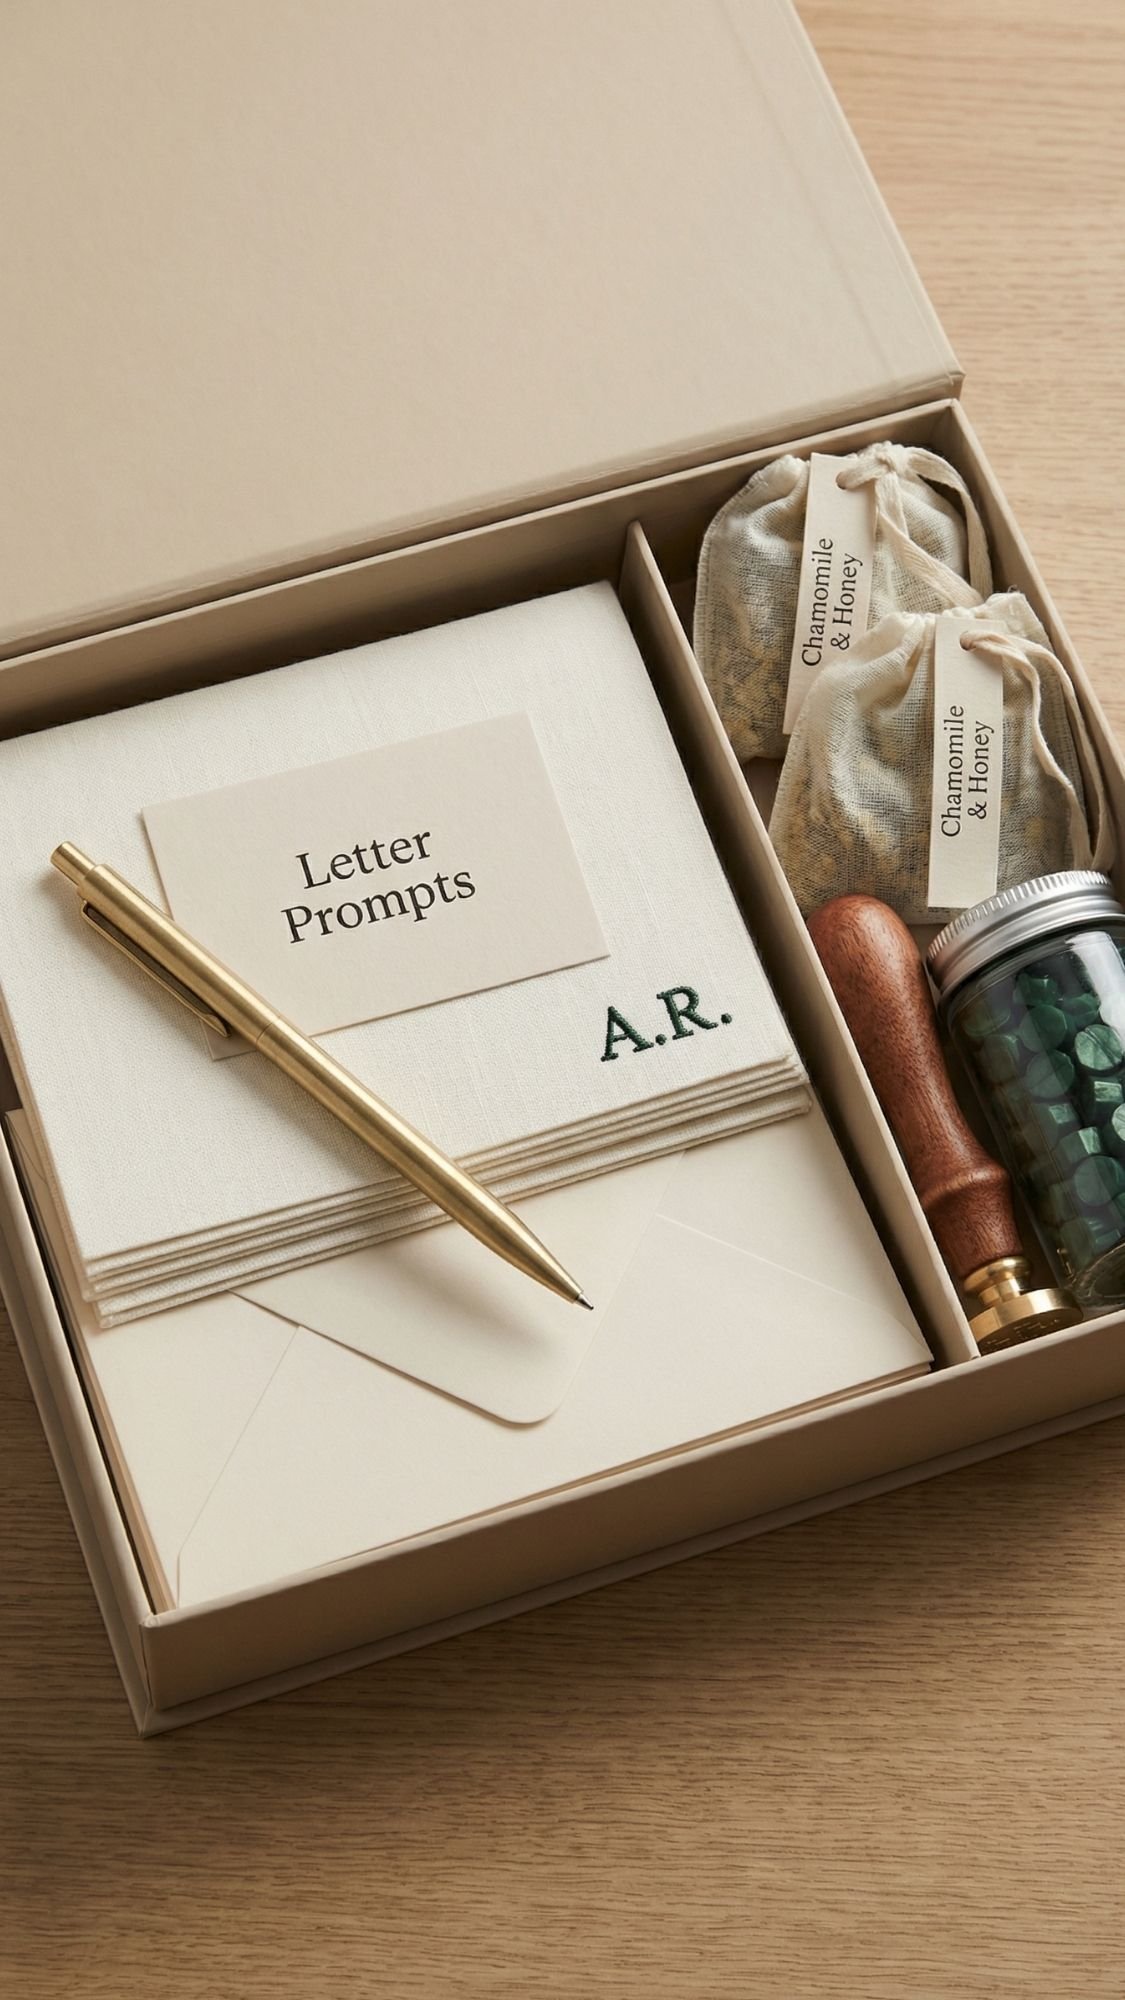
19) “Letter Writing Night” Kit (soft, nostalgic, and weirdly emotional in a good way)
This is the gift set that makes people slow down. It’s cozy, but it’s also meaningful, which is why it hits hard in winter. You’re basically gifting a quiet night where they write to someone they love, or even write to themselves. Yes, it’s a vibe.
Why it works
People crave connection and calm, especially during winter. A letter writing kit creates a simple ritual that feels thoughtful without being expensive. It also stands out because it isn’t the same candle-and-socks combo everyone does.
What to put inside (my best 1-2-2 build)
Hero item
- A small stationery set, note cards and envelopes
Supporting items
- A good pen, smooth ink, no skipping
- Tea sachets or cocoa packet bundle
Tiny wow add-ons
- Wax seal kit, sticker seals, or a roll of washi tape
- A tiny candle or match bottle
- Optional: a small packet of chocolate or peppermints
Pro-tip: If you include wax seals, add a simple “how to” card. Wax seal fails look dramatic, and not in the fun way.
DIY element: Personalized note cards (simple, classy, and actually doable)
You can make this with stamps, a printer, or even hand lettering.
Ideas:
- Monogram in one corner
- Simple winter motif, tiny pine sprig, snowflake, or star
- A clean border line that looks modern
Pro-tip: Keep it readable
A common mistake beginners make is making the design too bold or too busy. Keep it minimal so the writing area stays clean and usable.
Add prompts, because blank pages scare people
This is the part that turns it into a complete kit.
Prompt ideas to include on a small card:
- “Here’s what I appreciate about you lately.”
- “A memory I keep thinking about is…”
- “Right now I’m grateful for…”
- “One thing I want you to know is…”
Ever stared at a blank card and suddenly forgot every word you’ve ever learned? Exactly.
Packaging that looks like a boutique set
- Use a rigid box or a shallow tray box.
- Stack note cards neatly, envelopes underneath.
- Place the pen diagonally across the stack.
- Tuck seals, wax, and tea to the side.
- Slide the prompt card on top so it’s the first thing they see.
Pro-tip: Add a small ribbon around the card stack, then tuck the pen under it. It holds everything in place and looks styled.
Common mistake and how to fix it
Symptom: Cards bend, corners get dinged, or the set looks messy.
Likely cause: No support base and items shifting.
Fix: Add a firm cardstock base under the cards, and anchor the stack with a ribbon band.
Prevention next time: Use a snug box and avoid too much loose filler.

20) Puzzle + Snack Night Box (the “screen break” gift that people actually use)
This set is such a win for winter nights because it gives someone a plan that does not involve scrolling for two hours and then wondering why they feel tired. Have you ever started a puzzle “just for 20 minutes” and suddenly it’s midnight? Yep, that’s the magic.
Why it works
A puzzle night kit feels cozy and interactive, and it works for couples, families, roommates, and solo cozy nights. It also feels more thoughtful than generic snacks because you’re gifting an activity plus the treats to go with it.
What to put inside (my best 1-2-2 build)
Hero item
- 1 puzzle, 300 to 500 pieces for casual puzzlers, 750 to 1,000 for dedicated puzzle people
Supporting items
- Snack mix jar, homemade or upgraded store mix
- Cocoa packets or tea sachets, keep it simple
Tiny wow add-ons
- Mini timer, optional but fun for “puzzle sprint” nights
- Pencil and tiny notepad for “missing piece panic notes” (kidding, sort of)
- Sorting trays or a small zip pouch for pieces, optional upgrade
Pro-tip: I avoid greasy snacks in the box. Grease plus puzzle pieces equals sadness.
DIY element: Winter snack mix jar that looks fancy and stays crisp
You can make this sweet, salty, or both. I like a balanced mix so it feels intentional.
Easy winter mix idea
- Pretzels
- Roasted nuts
- Dried cranberries
- Chocolate chips or chocolate chunks
- Optional: mini marshmallows
Quick seasoning option
- Cinnamon sugar, pinch of salt for sweet mixes
- Smoked paprika, pinch of garlic powder for savory mixes
Pro-tip: Keep it crunchy
I let everything cool completely, then I pack it airtight. If you pack warm snacks, they soften fast. I also tuck a tiny desiccant packet into the outer gift box area if the air feels humid.
Packaging that keeps pieces safe and the box looking neat
- Use a rigid gift box or a shallow tray box.
- Place a thin crinkle paper base, keep it tidy, not fluffy.
- Lay the puzzle box flat as the foundation.
- Add the snack jar and drinks on top, and anchor them with glue dots.
- Tuck the tiny add-ons into gaps like a styled layout.
- Add a small “Tonight’s plan” card on top.
Tonight’s plan card (copy-paste)
- Pour a drink.
- Open the snack jar.
- Sort edge pieces first.
- Enjoy the quiet.
Common mistake and how to fix it
Symptom: Snacks crumble, and crumbs end up everywhere.
Likely cause: Snacks aren’t sealed well, or you used a box with too much movement space.
Fix: Heat-seal snack pouches, or use a tight-lid jar. Wedge crinkle paper tightly so nothing shifts.
Prevention next time: Pack snug, anchor heavy items, and keep anything crumbly double-contained.
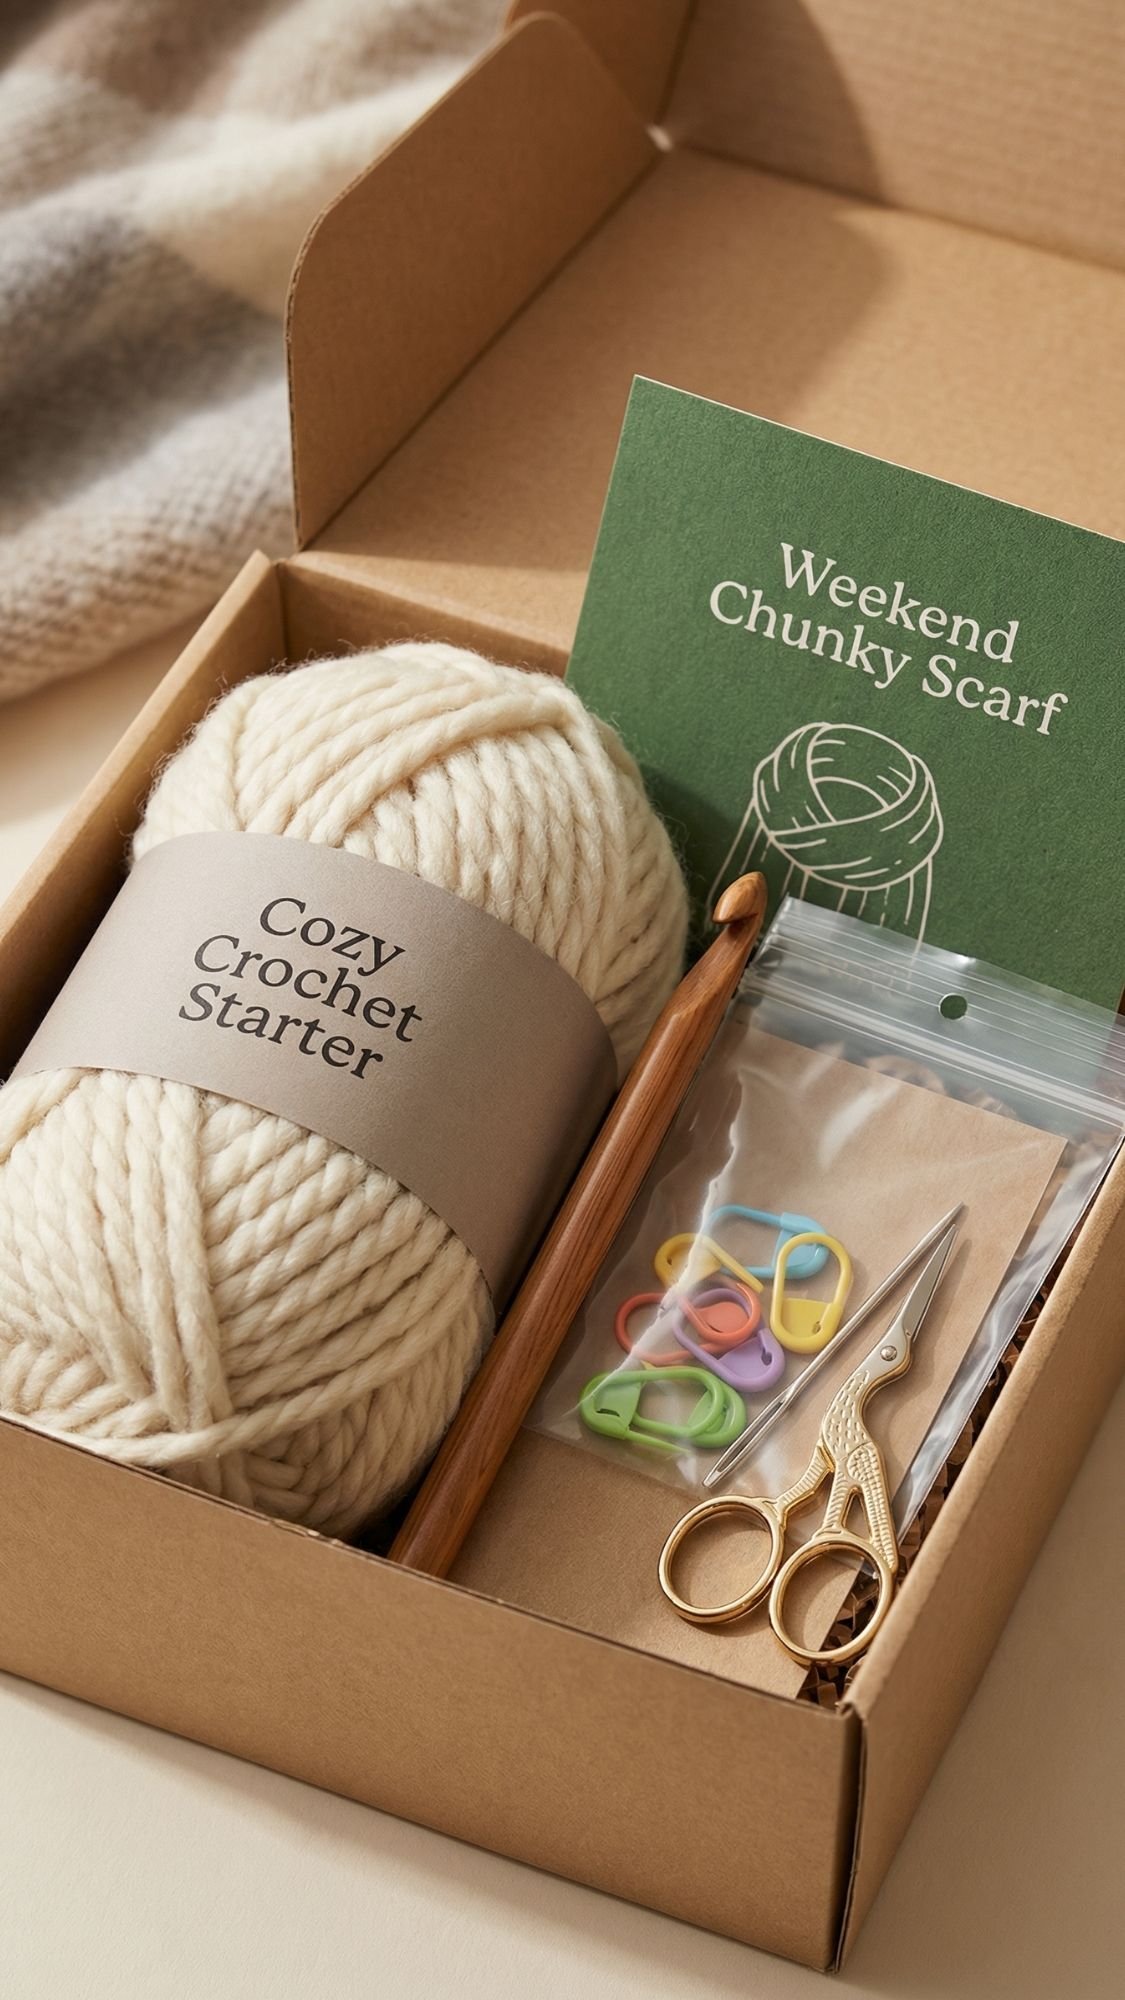
21) Crochet Starter Comfort Kit (for the “I need a cozy hobby” friend)
This kit is for the person who keeps saying they need a hobby, but they also don’t want a hobby that feels like homework. Crochet fits the cozy winter night vibe perfectly because it gives them something to do with their hands while they watch a show, sip tea, and relax. Have you ever noticed how your brain calms down when your hands stay busy?
Why it works
After 10+ years of DIY gifting, I’ve seen this happen over and over. People love gifts that invite them into a new ritual, especially when you remove the confusing parts. Crochet feels approachable when you give them the right yarn, the right hook, and a simple first project.
What to put inside (my best 1-2-2 build)
Hero item
- 1 skein of beginner-friendly yarn, chunky yarn works great for fast wins
Supporting items
- 1 crochet hook in the correct size for the yarn
- Stitch markers, a small pack
Tiny wow add-ons
- Small scissors, travel-size
- Yarn needle
- Mini tea sachets or cocoa packet, because cozy
Optional upgrade: a small project bag, even a simple zip pouch works.
DIY element: A beginner “Weekend Chunky Scarf” starter card
A common mistake beginners make is following a pattern that assumes they already know the basics. I include a card that lists only what they need for the first hour so they don’t spiral.
Your starter card can include:
- Hook size
- Yarn type
- 3 stitches they’ll use, chain, single crochet, slip stitch
- Tiny “how to hold the yarn” tip
- A QR code link to your own short demo video
Pro-tip: Set them up for an early win
Choose a light or medium yarn color. Dark yarn looks pretty, but beginners can’t see stitches well, and frustration kills momentum fast.
Packaging that looks cute and organized
- Use a small box or a fabric pouch as the container.
- Wrap the yarn with a simple belly band label, so it looks tidy.
- Lay the hook across the yarn like a display, anchor it with a tiny strip of tape underneath.
- Tuck notions, scissors, markers, needle, into a mini clear pouch so they don’t vanish.
- Place the starter card on top so it’s the first thing they see.
Common mistake and how to fix it
Symptom: Yarn splits, stitches look uneven, and they feel like they “suck at this.”
Likely cause: Yarn is too fuzzy, too thin, or too dark, and the hook size doesn’t match.
Fix: Switch to a smoother yarn, use the correct hook size, and practice with a simple swatch first.
Prevention next time: Pick beginner yarn with a smooth twist, avoid novelty fuzzy yarn, and match hook size to the yarn label.
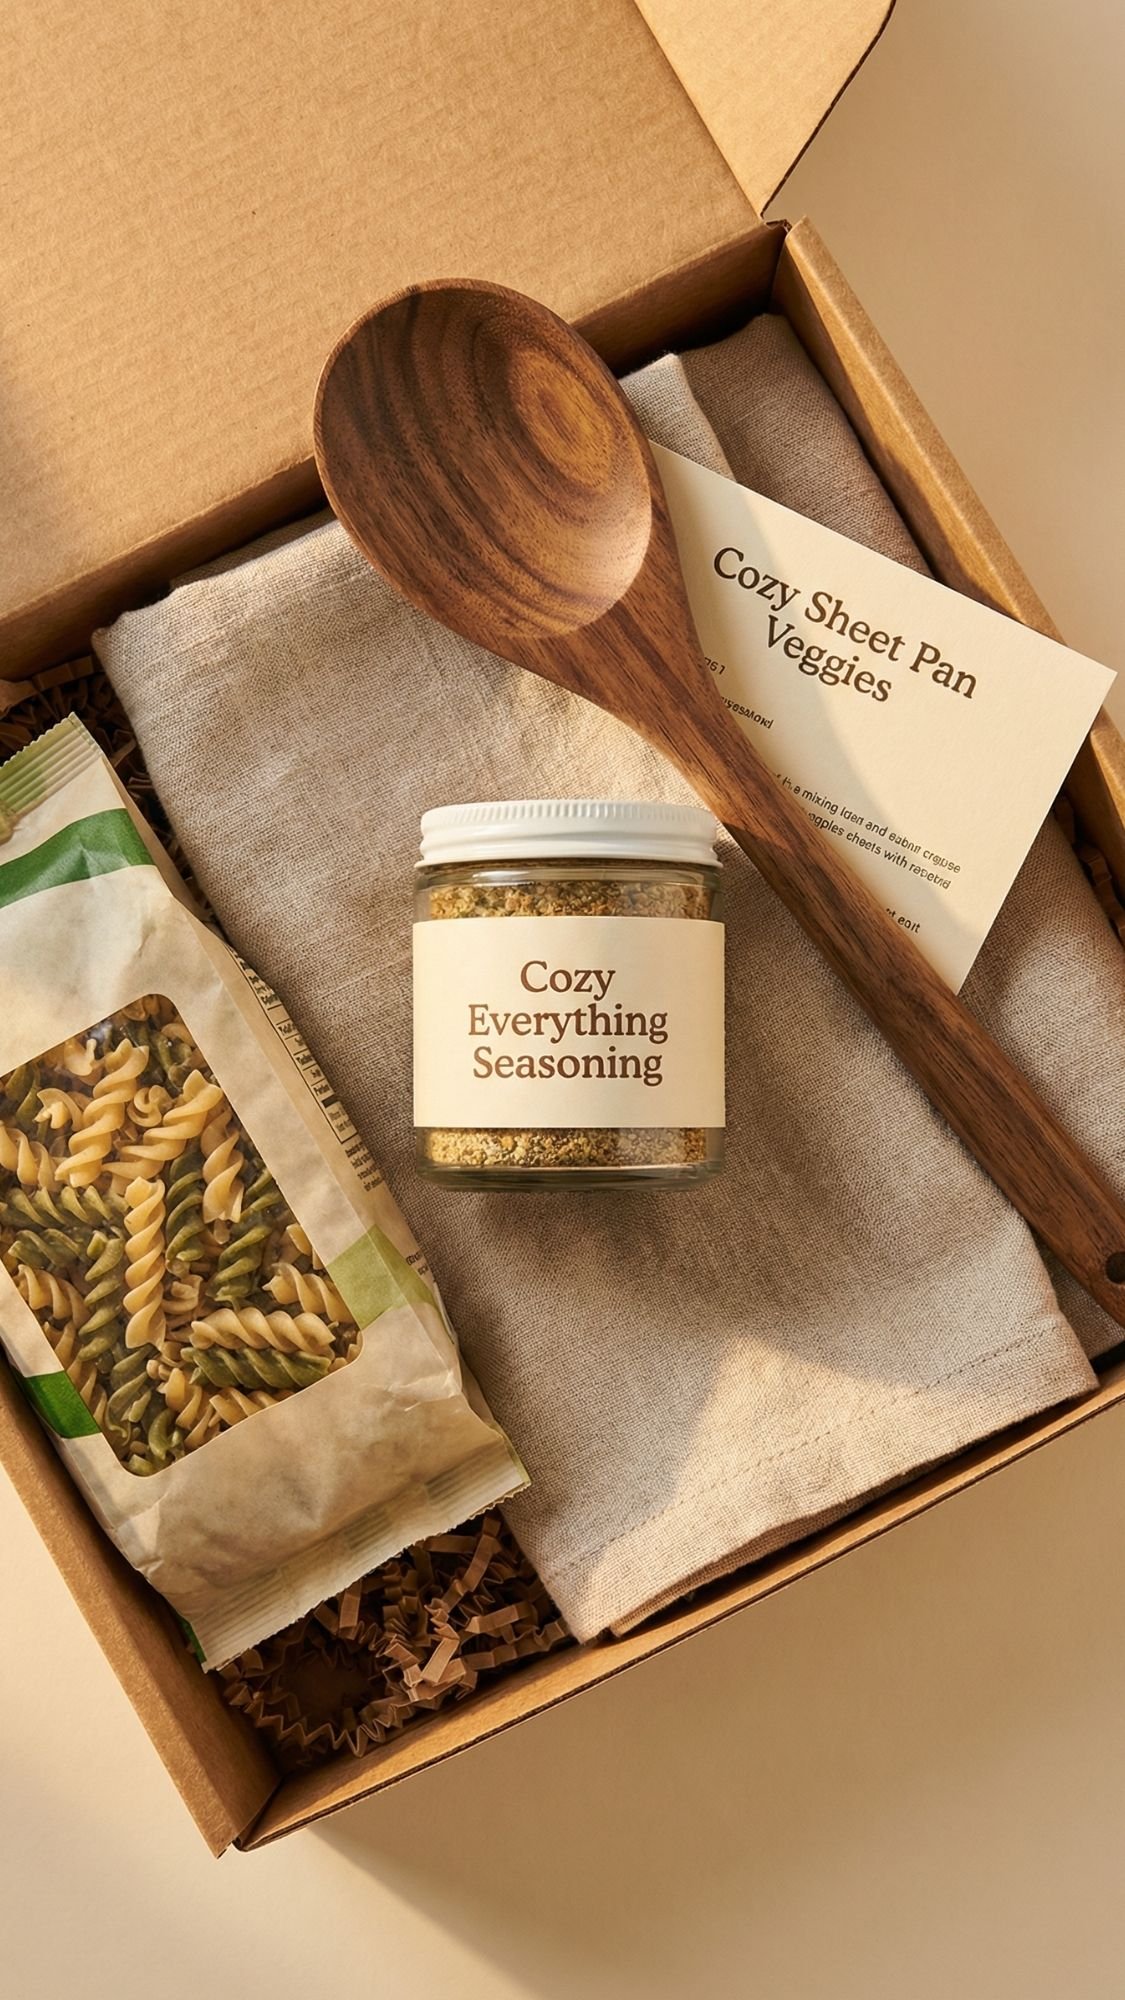
22) “Nonna Night” Kitchen Cozy Set (warm, nostalgic, food-forward)
This set feels like comfort food in gift form. It’s cozy winter nights meets “someone loves you enough to make sure dinner tastes amazing.” It also works beautifully as a host gift, a neighbor gift, or a family gift, especially if you keep it neutral and classic.
Why it works
Food-forward gifts feel personal without being risky. You’re not guessing their size or their skincare sensitivity. You’re giving them something they can use in the kitchen right away, and winter is peak season for soups, roasts, and slow dinners.
What to put inside (my best 1-2-2 build)
Hero item
- 1 signature spice blend jar, or a soup mix jar if you want it bigger
Supporting items
- Linen kitchen towel, neutral and textured looks expensive
- Wooden spoon, a good quality one that feels sturdy
Tiny wow add-ons
- Recipe card, simple and comforting, like “Sunday Sauce” or “Cozy Roasted Veg”
- Mini pasta or soup mix pouch, optional but on-theme
- Optional: a small grater, or a mini bottle of olive oil if you want to go luxe
Pro-tip: One linen towel makes everything look premium. It’s the “soft luxury” item of the kitchen world.
DIY element: Your signature “cozy everything” seasoning blend
This is the kind of blend people use constantly, and it makes them think of you every time they cook.
Simple blend idea
- 2 tablespoons garlic powder
- 2 tablespoons onion powder
- 1 tablespoon smoked paprika
- 1 tablespoon dried oregano
- 1 tablespoon dried basil
- 2 teaspoons salt
- 1 teaspoon black pepper
- Optional: pinch chili flakes
Label suggestion: “Use on veggies, chicken, potatoes, eggs, basically everything.”
Pro-tip: Keep it fresh and strong
A common mistake beginners make is using old dried herbs. They look fine but taste like nothing. I refresh herbs more often in winter gifting season, and I keep blends in smaller jars so they stay potent.
Recipe card idea that fits the set
Pick one comfort recipe and make it foolproof.
Example: “Cozy Sheet Pan Veggies”
- Toss veggies with 1 to 2 tablespoons seasoning blend and olive oil.
- Roast at 425°F for 20 to 30 minutes.
- Finish with lemon squeeze or parmesan.
Short, clear, and it makes the seasoning instantly usable.
Packaging that looks like a boutique kitchen gift
- Fold the linen towel and use it as the base.
- Place the spice jar centered, anchor it with a glue dot.
- Lay the wooden spoon diagonally across the towel, it looks styled.
- Add the recipe card and mini pasta/soup pouch tucked to one side.
- Finish with twine or velvet ribbon and a simple tag like “Nonna Night.”
Pro-tip: Keep labels minimal, apothecary style. Kitchen gifts look best when they feel classic.
Common mistake and how to fix it
Symptom: Spice blend clumps or loses aroma.
Likely cause: Moisture exposure or jar wasn’t sealed well.
Fix: Break up clumps, reseal, and store in a cool dry place.
Prevention next time: Let spices cool fully, pack airtight, and keep jars away from stovetops and dishwashers.
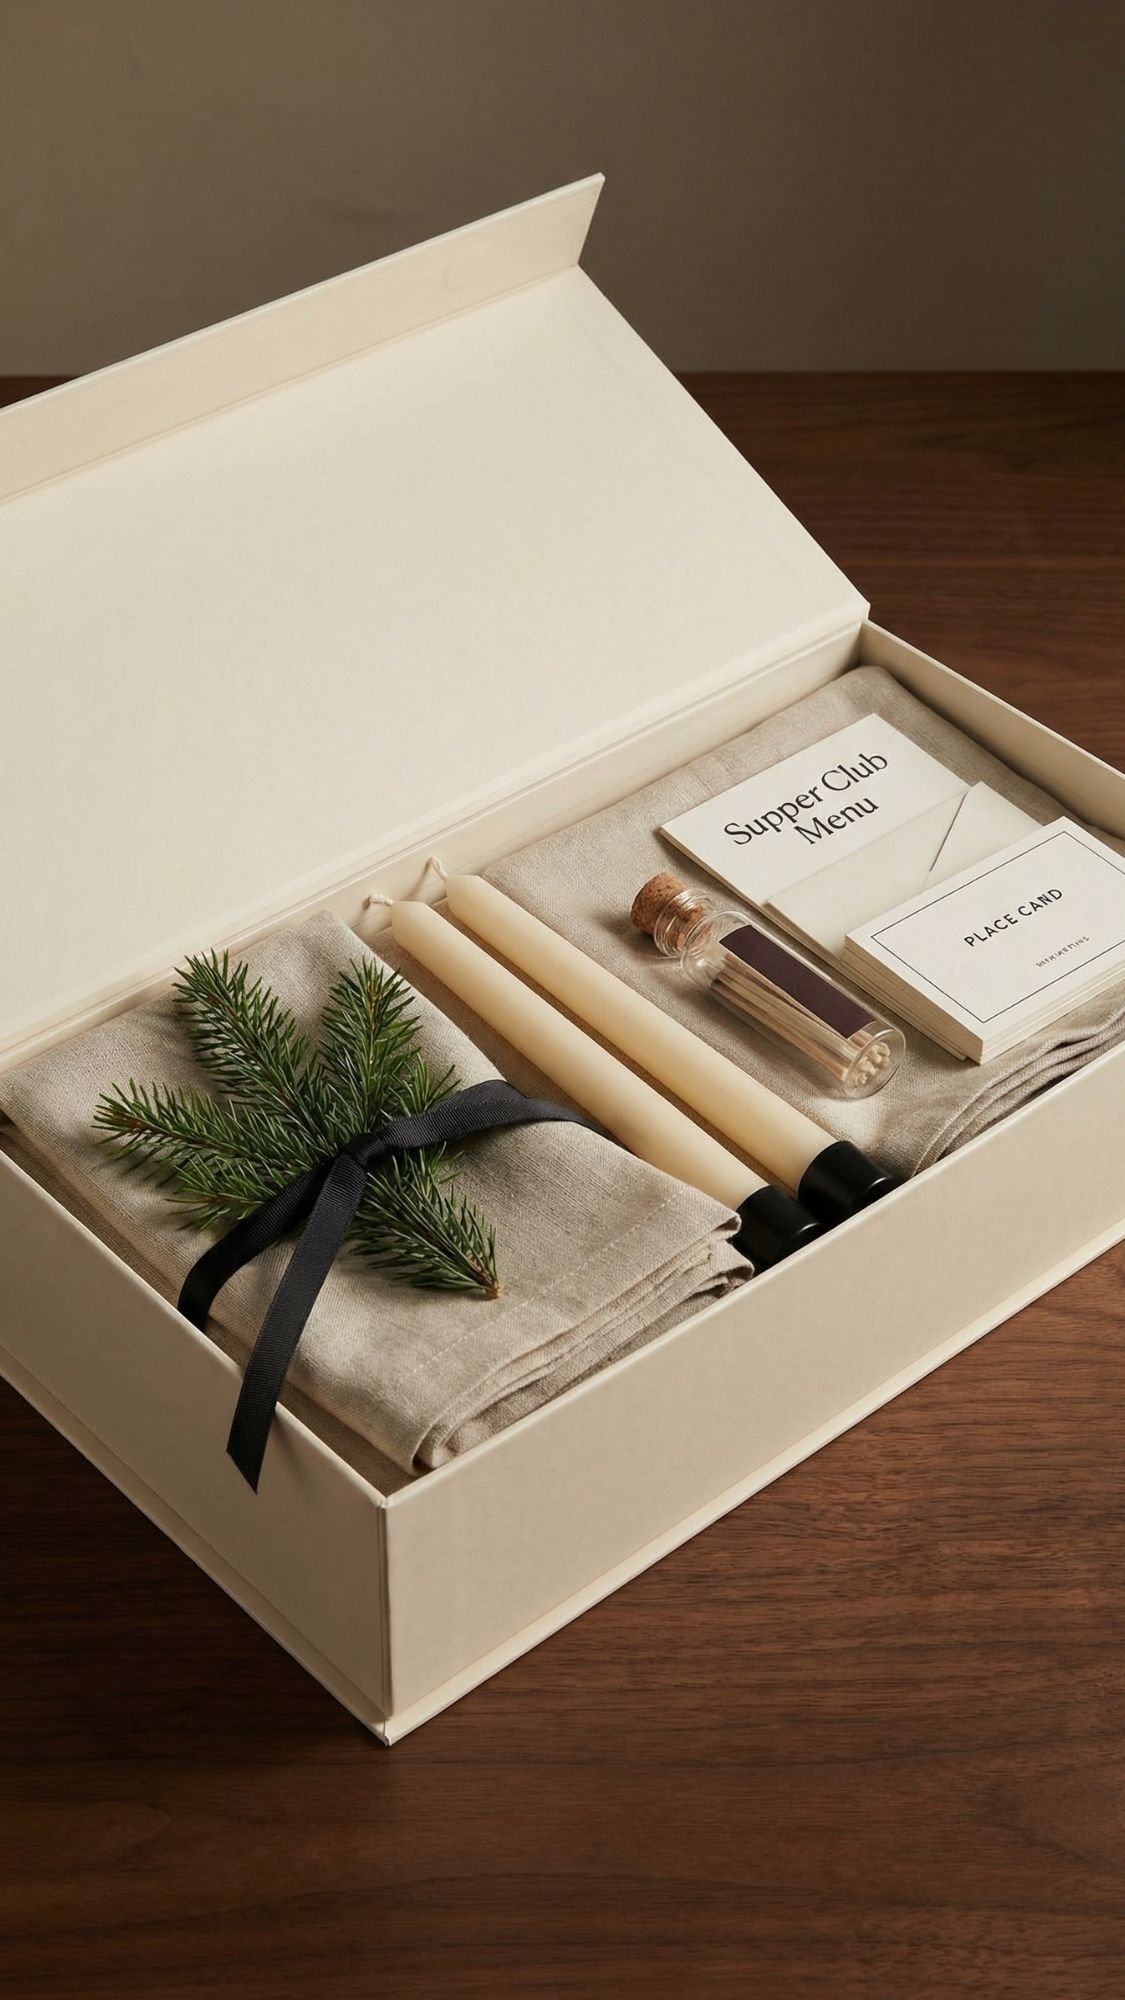
23) “Supper Club Host” Mini Set (because winter hosting is absolutely back)
This one is for the friend who loves having people over, or wants to love having people over but needs a little push. It’s a cozy winter hosting kit that feels classy, not cluttered. It also works as a hostess gift that doesn’t scream “I panicked at the store.”
Why it works
Hosting gifts feel thoughtful because they support someone’s lifestyle. You’re giving tools and details that make a table feel special. And winter is prime hosting season. People crave warm dinners, candles, and a reason to gather.
What to put inside (my best 1-2-2 build)
Hero item
- 2 to 4 cloth napkins, neutral or classic pattern
Supporting items
- Taper candles, or a small candle set
- A match bottle or lighter, styled and gift-worthy
Tiny wow add-ons
- Place cards, blank or printed
- Mini menu template, even just one example menu card
- Optional: a small bottle of fancy salt, like flaky salt, or a tiny jam for a cheese course
Pro-tip: Cloth napkins read “grown-up dinner.” They instantly signal “this will be a vibe.”
DIY element: Place cards + mini menu (makes the set feel curated)
You can keep this very simple and still make it feel high-end.
Place cards:
- Thick cardstock, cut clean rectangles
- Minimal font, black ink
- Optional: add a tiny winter motif, like a pine sprig icon
Mini menu:
- One sample menu card that shows how to set up the night
- Example:
- Starter: soup
- Main: roast chicken and veggies
- Dessert: hot cocoa or cookies
Pro-tip: Don’t make it look like a school project
A common mistake beginners make is using thin paper and busy designs. Use heavier cardstock, minimal ink, and clean cuts. Sharp corners and tidy edges read luxury.
Packaging that looks like a boutique hosting gift
- Use a rigid box, long enough for tapers.
- Fold napkins neatly and use them as the base layer.
- Place candles on top, anchor them so they don’t roll.
- Add match bottle, place cards, and menu template to one side.
- Finish with a satin ribbon and a clean tag like “Supper Club Starter Kit.”
If you want it extra pretty, tuck one faux evergreen sprig under the ribbon. It adds instant winter without making it too holiday-specific.
Common mistake and how to fix it
Symptom: Candles roll and the box looks messy when opened.
Likely cause: No anchors, and candles aren’t nested.
Fix: Use a crinkle paper cradle and anchor candles with small tape loops or glue dots underneath.
Prevention next time: Choose a box that fits the candle length closely, and pack snug.
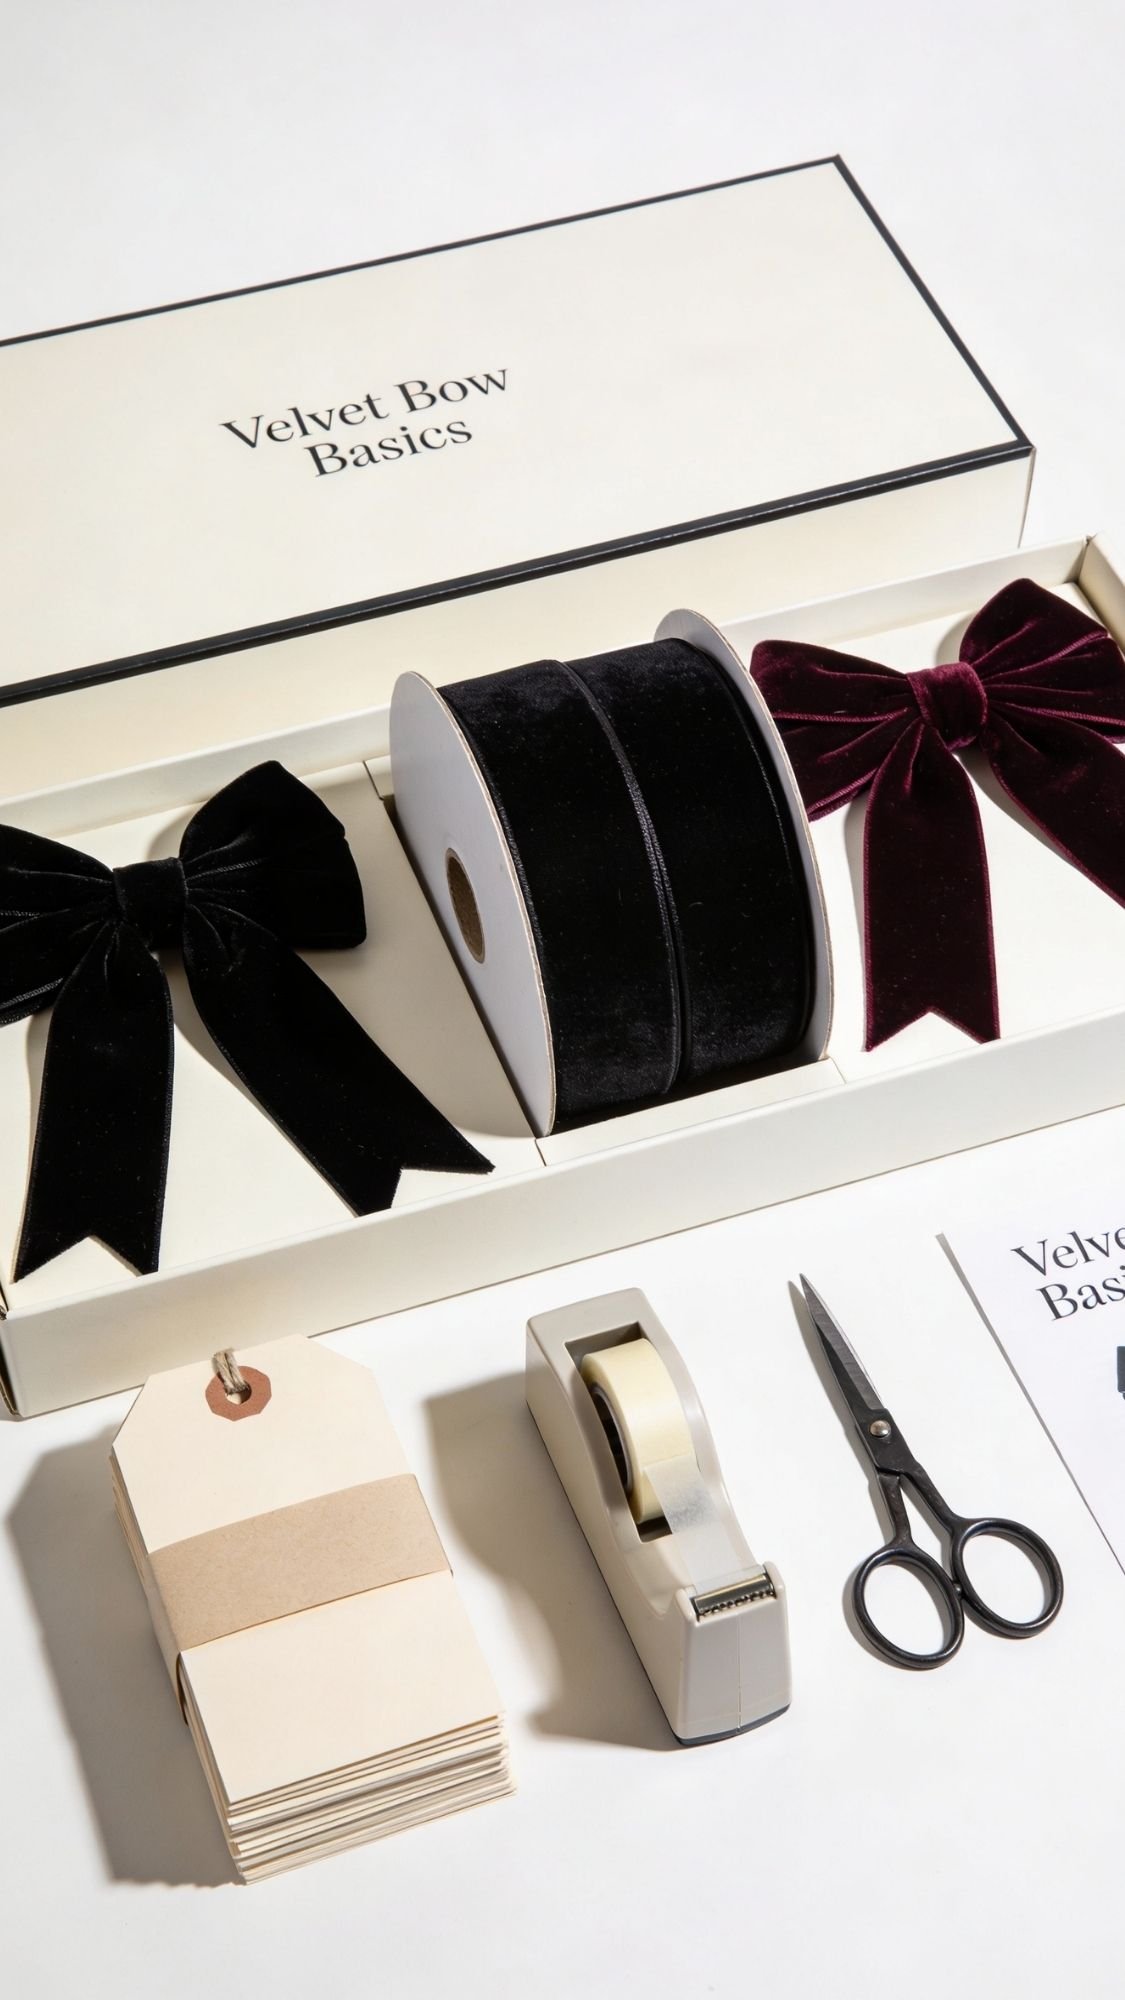
24) Velvet Bow Wrapping Upgrade Kit (the “make everything look expensive” helper gift)
This one is sneaky brilliant. It’s not a typical “cozy night” set, but it supports every cozy night gift they give all season. It’s also perfect for the friend who loves wrapping, the mom who always handles the gifts, or anyone who wants their presents to look like they came from a boutique instead of a last-minute scramble.
Why it works
Presentation matters. A wrapping kit feels thoughtful because it helps them create beautiful moments. Also, velvet bows are the fastest way to make a basic gift look expensive. No complicated craft skills required.
What to put inside (my best 1-2-2 build)
Hero item
- Velvet ribbon spool, 1 inch width looks luxe and ties well
Supporting items
- Gift tags, neutral cardstock or kraft tags
- Double-sided tape or tape runner, clean edges always win
Tiny wow add-ons
- Small sharp ribbon scissors, or mini shears
- Pre-tied velvet bows, 3 to 5, ready to go
- Optional: a small bundle of faux evergreen sprigs, for winter styling
Pro-tip: A tape runner feels like a small luxury. People love it once they use it.
DIY element: Pre-tie bows so they don’t have to “figure it out”
Pre-tied bows turn this from supplies into a real kit.
Bow tips that make them look polished:
- Cut tails at a clean angle.
- Fluff loops gently, don’t crush them.
- Keep bow size consistent, it looks professional.
Pro-tip: Stop ribbon tails from fraying
A common mistake beginners make is cutting ribbon with dull scissors. Use sharp shears, cut cleanly, and lightly seal fraying ends with clear fabric glue if needed.
Add a tiny “how to” card, copy-paste
- Wrap gift.
- Tape edges cleanly.
- Add velvet bow.
- Add tag.
- Done, look fancy.
You can also include one photo on the card showing where to place the bow. Centered or slightly off center both work, but pick one and stick with it.
Packaging that looks luxe and tidy
- Use a slim box or a tray box.
- Wind ribbon neatly, don’t toss it in loose.
- Stack tags together with a paper band.
- Place tape runner and scissors side by side.
- Add pre-tied bows on top like a display.
This kit should look clean and minimal. Too much filler makes it feel like a junk drawer, and we’re not doing that.
Common mistake and how to fix it
Symptom: Bows look floppy or messy.
Likely cause: Ribbon is too thin, or bows aren’t fluffed and shaped.
Fix: Use thicker velvet ribbon and shape loops gently before attaching.
Prevention next time: Pre-tie bows and store them flat so they hold their shape.
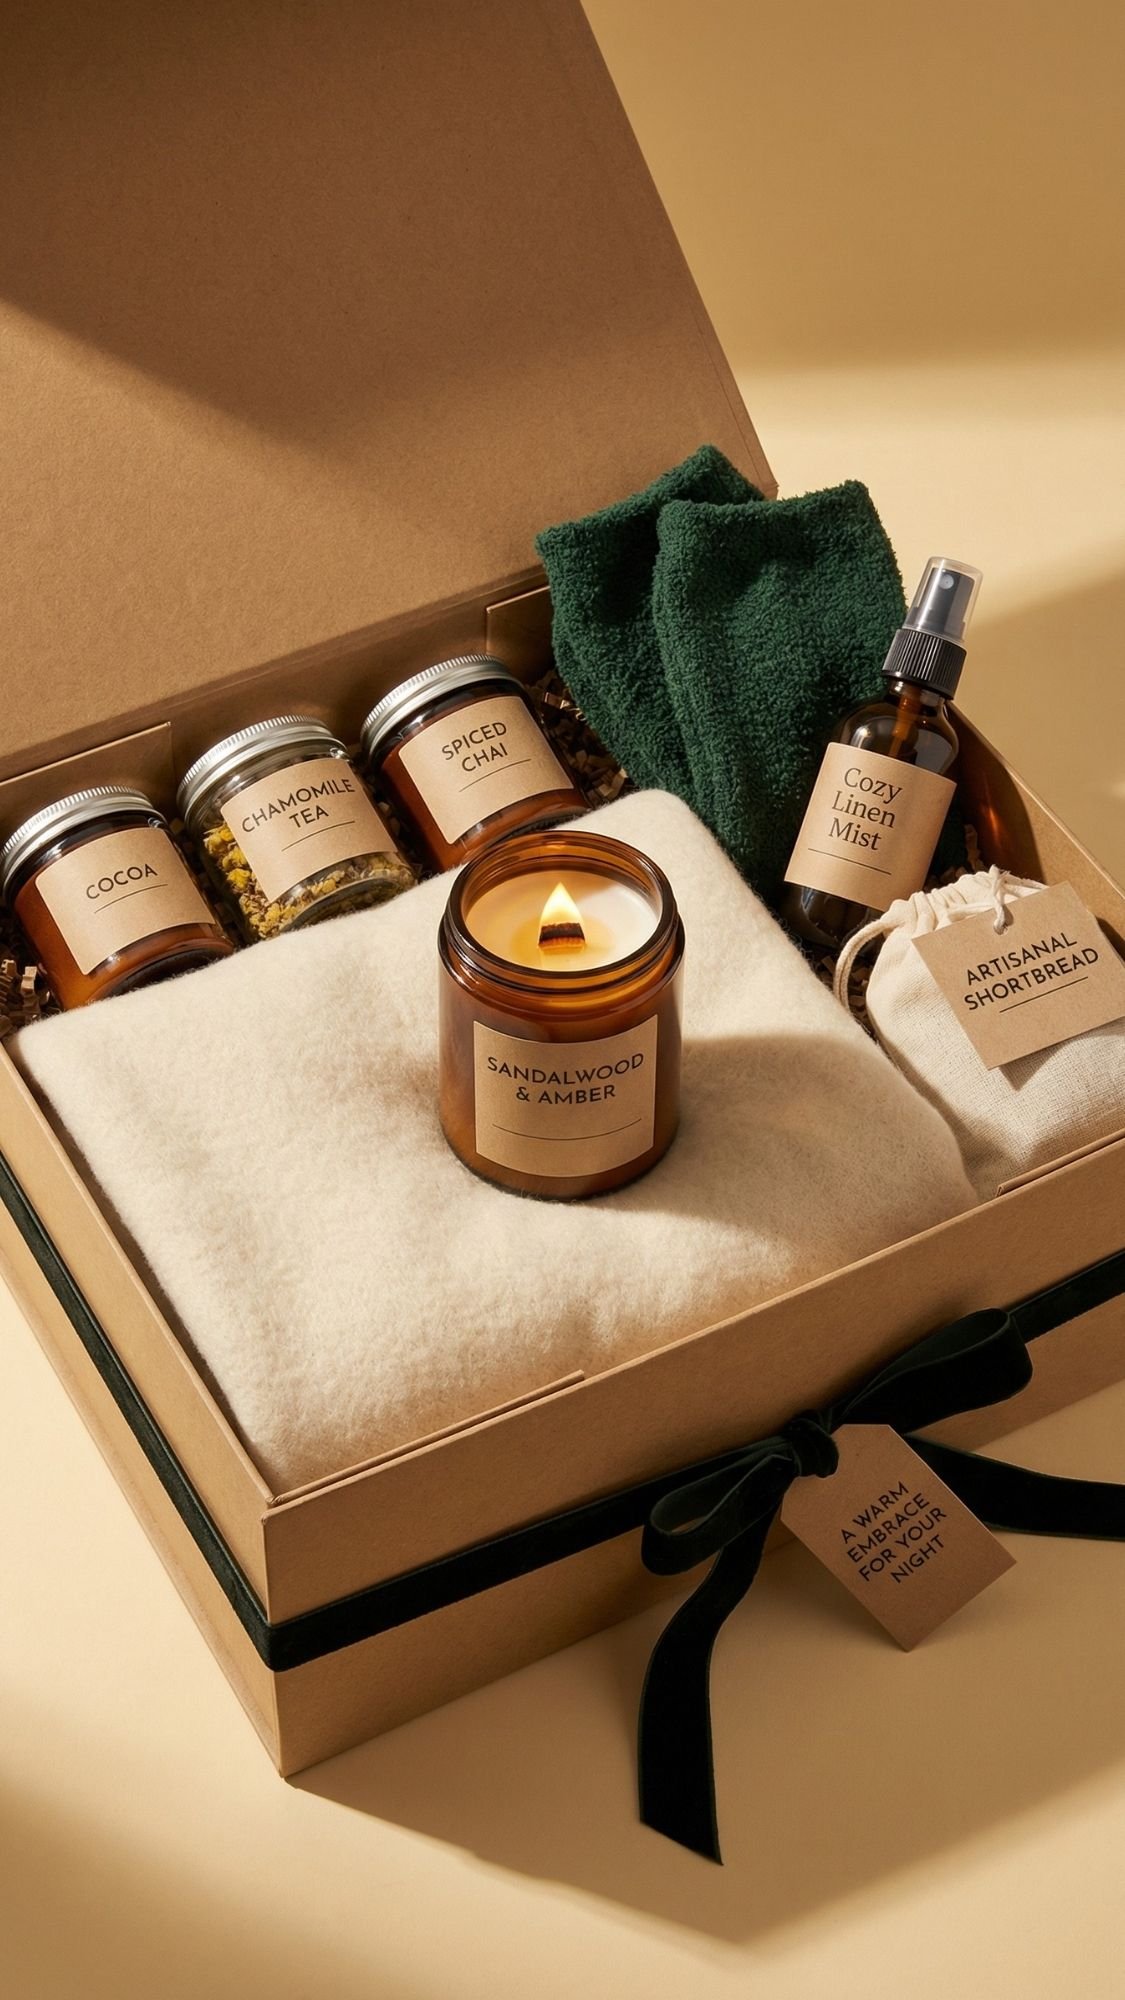
25) “Cozymaxxing” Full Sensory Night Kit (the ultimate cozy flex)
This is the big one. The all-in, cozy winter night kit that feels like a luxury stay-in experience. It’s perfect for a partner gift, best friend gift, new parent gift, or anyone who deserves a serious reset. It’s also the easiest way to make someone feel spoiled without needing to guess their exact style.
Why it works
It hits multiple senses. Soft texture, warm light, comforting scent, something to sip, something to snack on. When you build a gift set that covers the whole cozy experience, it feels expensive and intentional. It also avoids the “random pile of stuff” problem because everything points toward one goal: a perfect winter night in.
What to put inside (my best 1-2-2 build)
Hero item
- 1 soft throw blanket, scarf, or oversized wrap
Supporting items
- Candle or mini candle set, warm scent like vanilla, cedar, or cozy spice
- Hot cocoa or tea sampler, choose 3 flavors
Tiny wow add-ons
- Fuzzy socks, or a plush eye mask if you want it more spa-like
- Mini room spray or linen spray, lightly scented
- A small treat, like shortbread, chocolate, or caramel candies
- Optional: a playlist QR card, because it’s fun and it makes the kit feel curated
Pro-tip: Keep scents gentle. Strong fragrance can ruin an otherwise perfect kit. IMO, warm vanilla and soft cedar feel safe and cozy for most people.
DIY element: Linen spray that feels boutique
This is a great “I made this” touch that upgrades the kit.
- Small spray bottle
- Distilled water
- A tiny amount of fragrance or essential oil blend
- Label it cleanly, like “Cozy Linen Mist”
Pro-tip: Don’t make it too oily
A common mistake beginners make is adding too much oil. It can leave spots on fabric and smell overpowering. Keep it light, and test on a scrap cloth first.
Packaging that looks truly premium
This kit should look like a magazine spread in a box.
- Use a rigid box, or a deep basket with a structured base.
- Fold the blanket neatly as the base and backdrop.
- Add crinkle paper in front to create a stable nest.
- Place candle and drink items in the center, anchor them with glue dots.
- Tuck socks and treats into gaps like styling props.
- Finish with a velvet ribbon, a clean tag, and one simple “Tonight’s plan” card.
Tonight’s plan card (copy-paste)
- Light the candle.
- Make your drink.
- Put on the socks.
- Do absolutely nothing productive for one hour.
Yes, I’m giving them permission, and it feels amazing.
Common mistake and how to fix it
Symptom: The kit looks messy, items sink, and it loses the luxury feel.
Likely cause: Blanket base isn’t folded neatly, and items aren’t anchored.
Fix: Refold the base, press crinkle paper into a firm nest, anchor jars and candles with glue dots.
Prevention next time: Build from the base up, and pack snug. Empty space kills the premium vibe.
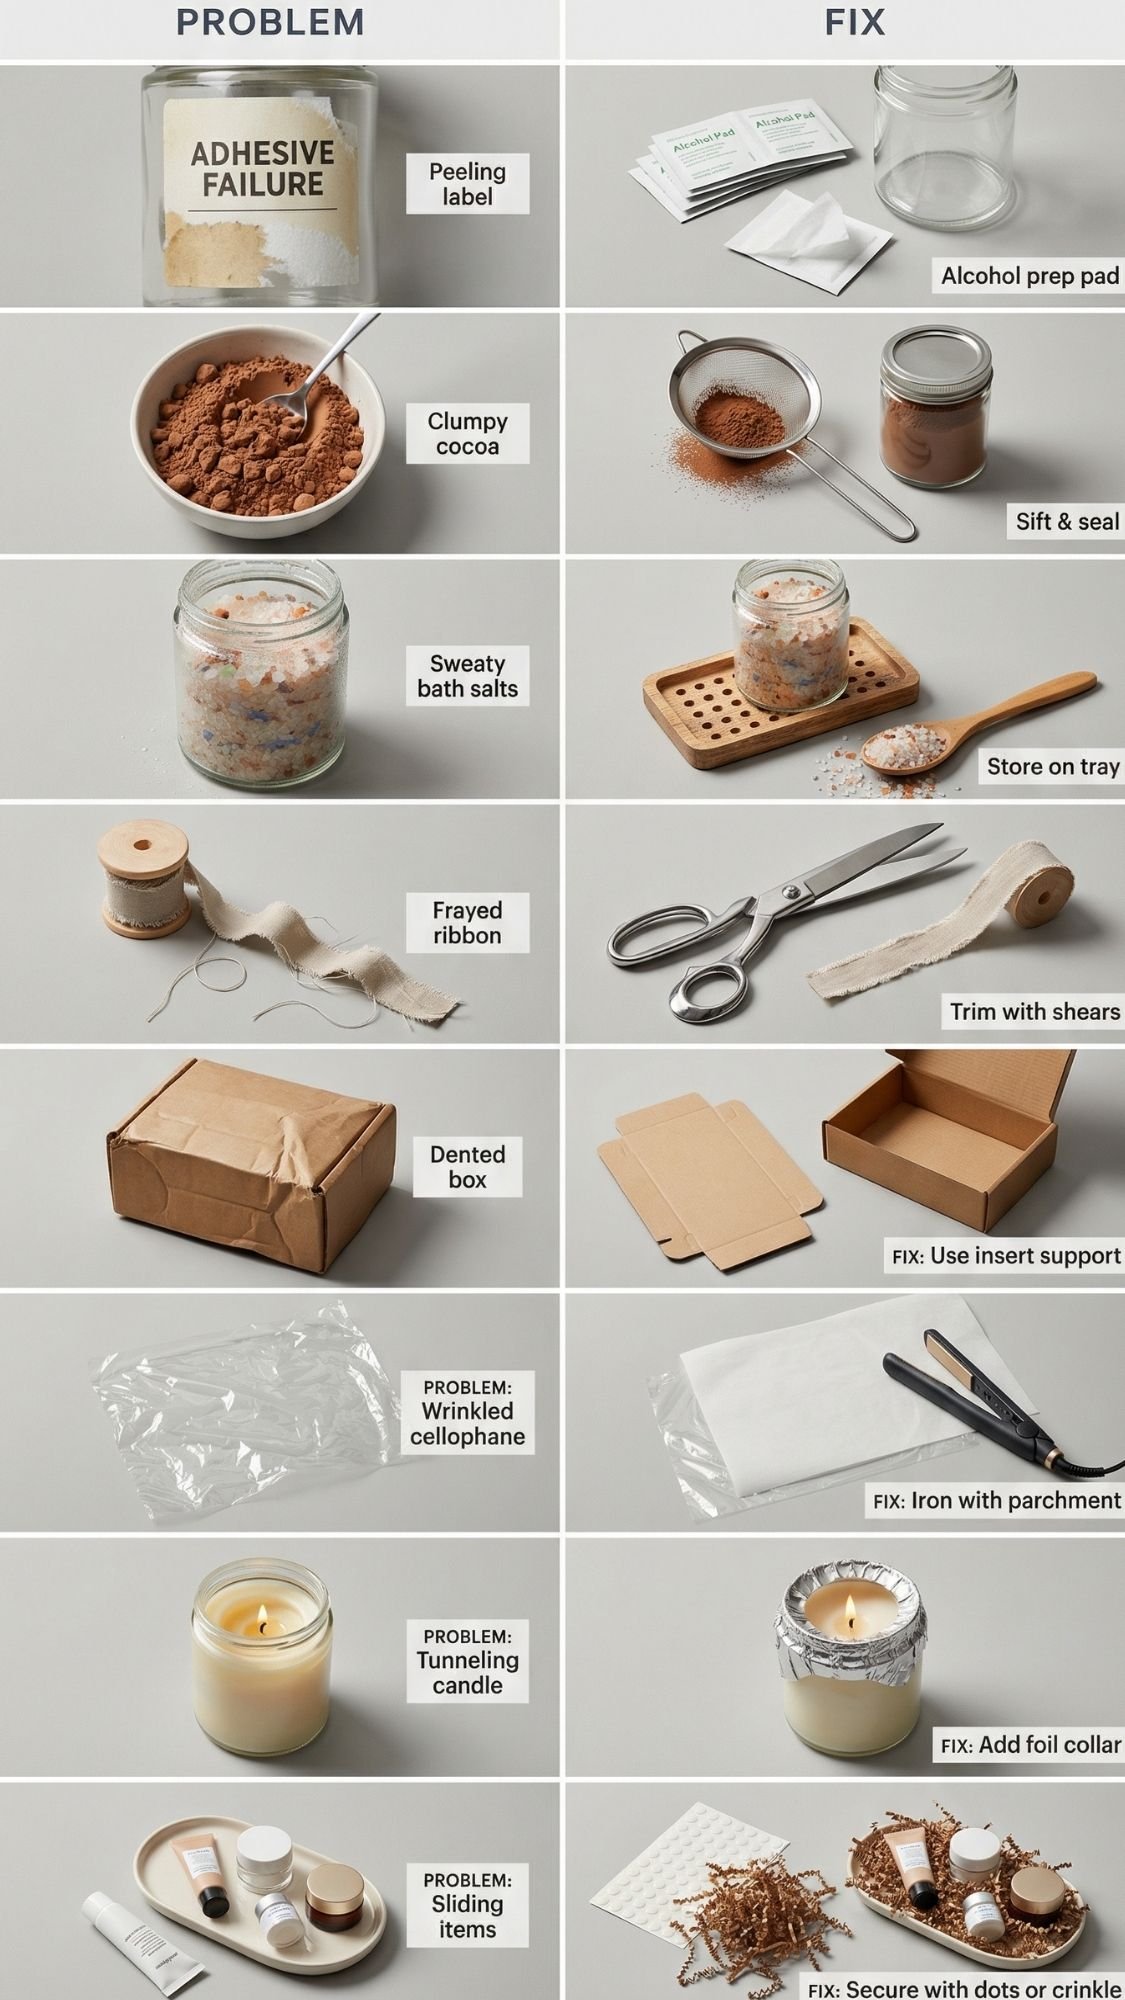
The 8 Things That Go Wrong In DIY Gift Sets, And How I Fix Them Fast
If you make gift sets long enough, you’ll meet the same problems over and over. I’d rather you learn from my mistakes than from your own pile of peeling labels and clumpy cocoa, deal? 😉
1) Labels peel off jars
- Symptom: The label curls at the edges or slides off.
- Likely cause: Oils, dust, condensation, or a label that can’t handle smooth glass.
- Fix:
- Wipe the jar with 70% isopropyl alcohol and let it dry.
- Apply the label and press hard for 20 to 30 seconds.
- Warm it slightly with a hair dryer and press again if edges lift.
- Prevention next time:
- Label after everything reaches room temp.
- Choose waterproof labels, or add a strip of clear packing tape over the label edges for insurance.
2) Cocoa mix clumps
- Symptom: Cocoa forms hard lumps, and it won’t dissolve smoothly.
- Likely cause: Moisture, warm packing, or unsifted cocoa.
- Fix:
- Sift the mix again, then repack in a fully airtight jar.
- Tuck a tiny desiccant packet into the outer gift box area near the cocoa items.
- Prevention next time:
- Let ingredients cool fully before sealing.
- Store finished sets away from the stove, dishwasher, or a steamy kitchen corner.
3) Bath salts sweat and harden
- Symptom: Salts form bricks, layers blur, jar fogs.
- Likely cause: Too much oil, humid air, or sealing too soon.
- Fix:
- Spread salts on a parchment-lined tray.
- Let them dry in a low-humidity spot until they feel fluffy again.
- Re-scent lightly if needed, then repack.
- Prevention next time:
- Measure fragrance, don’t freestyle it.
- Let salts sit uncovered overnight before you jar them.
- Use dried botanicals only.
4) Ribbon frays and looks messy
- Symptom: Ribbon tails fuzz, split, or unravel.
- Likely cause: Dull scissors or cheap ribbon.
- Fix:
- Cut tails with sharp shears at a clean angle.
- Dab a tiny bit of clear fabric glue on the cut edge if fraying keeps happening.
- Prevention next time:
- Upgrade to velvet or quality satin ribbon.
- Store ribbon spools neatly so they don’t crease.
5) Boxes cave in or feel flimsy
- Symptom: The box bows, dents, or collapses when you carry it.
- Likely cause: Heavy items sit on a weak base, or the box walls flex.
- Fix:
- Cut a piece of cardboard to fit the box bottom and lay it under the filler.
- Move heavy items low and toward the center.
- Prevention next time:
- Pick rigid boxes for anything with jars.
- Use a snug box so items support each other.
6) Cellophane looks wrinkled or cloudy
- Symptom: The bag looks crinkly, and the seal looks uneven.
- Likely cause: Uneven heat, thin film, or overheating.
- Fix:
- Use parchment paper and press the seal gently for 2 to 3 seconds.
- Let it cool before you touch it, or it warps.
- Prevention next time:
- Test your heat level on a scrap piece first.
- Buy thicker bags if you seal a lot.
7) Candles tunnel
- Symptom: Wax melts only in the center and leaves tall wax walls.
- Likely cause: Short first burn or wick that needs trimming.
- Fix:
- Wrap a loose foil collar around the candle rim for one burn.
- Let the top melt edge-to-edge, then remove the foil.
- Prevention next time:
- Add a care card that tells them to burn long enough the first time.
- Trim wick to about 1/4 inch before lighting.
8) Items slide around and the set opens messy
- Symptom: Everything shifts, the “pretty” layout disappears.
- Likely cause: Too much empty space, no anchors, not enough filler.
- Fix:
- Anchor jars and tins with glue dots.
- Pack crinkle paper like wedges around each item.
- Prevention next time:
- Build a firm base layer, then nest items in by height.
- Choose a container that fits the items closely.
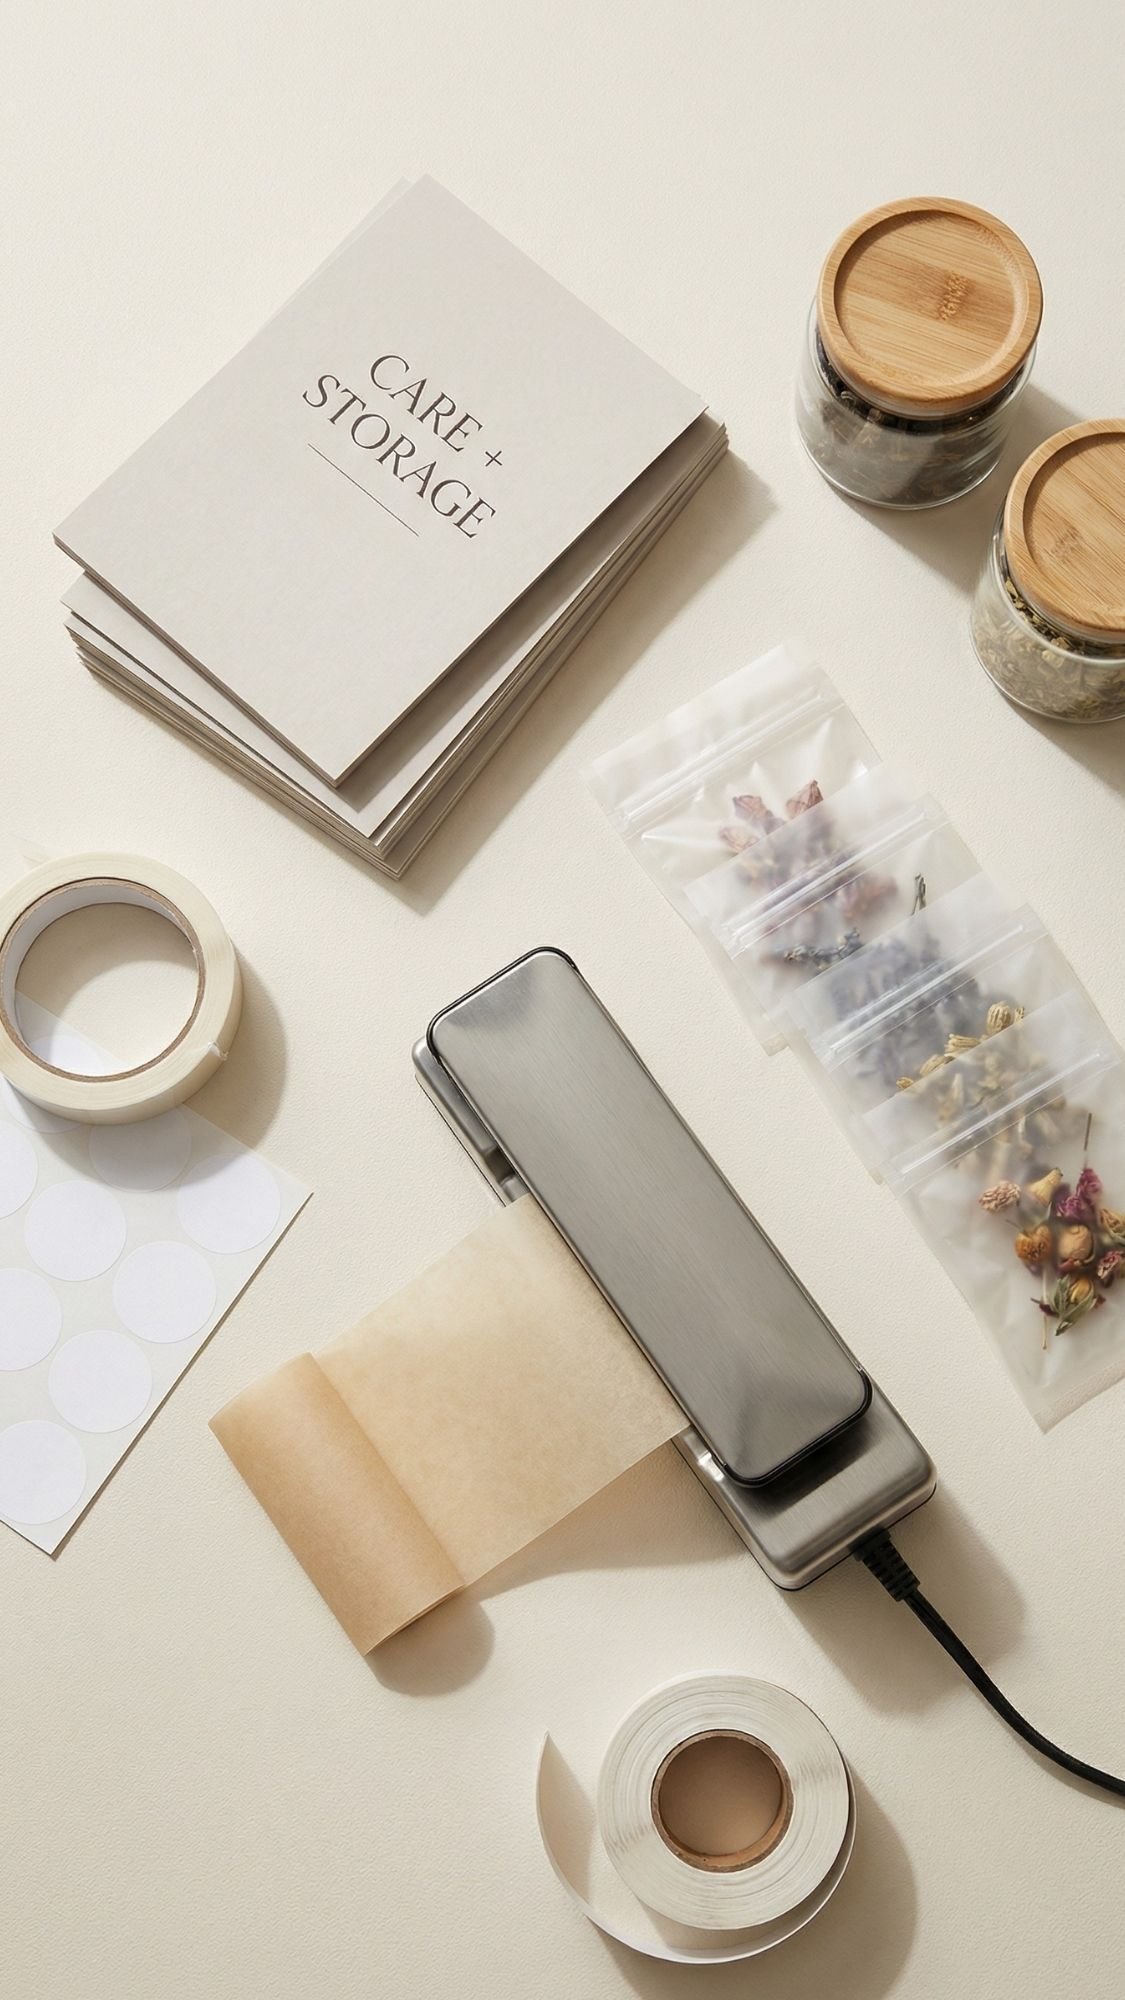
How To Make These Look Professional And Last
This section is what separates “cute DIY gift” from “wait… did you buy this at a boutique?” It’s mostly about timing, sealing, and not trapping moisture where it can ruin your work.
Dry time vs cure time (plain language, no weird science lecture)
- Dry time means it feels dry to the touch.
- Cure time means it reaches full strength and stability.
Here’s why you should care. You can touch something and think it’s ready, then you pack it, seal it, stack it, and it smudges, dents, warps, or sweats inside the container. Cure time prevents that drama.
Quick examples:
- Painted ornaments or tags: dry fast, cure slower. If you pack too soon, paint can stick to tissue or scratch.
- Candles: they set quickly, but the scent often smells better after a short cure.
- Bath salts and steamers: they can feel dry on top, but moisture can still be hiding inside.
Finishing and sealing by category (so your gift survives real life)
Food gifts (cocoa mix, snack mix, soup jars, seasoning blends)
- Use airtight containers and heat-sealed pouches for anything powdered or crunchy.
- Let anything homemade cool completely before sealing, especially roasted nuts or mix-ins.
- Add a simple tag: “Store cool and dry.”
This is the pro move: tuck a tiny desiccant packet into the outer box area near powders. It helps prevent clumps and keeps snacks crisp.
Bath and body gifts (salts, steamers, balms)
- Let mixes sit uncovered long enough to fully dry before you jar them.
- Store them away from the bathroom until gifting, bathrooms are humidity traps.
- Use clean, dry jars with tight lids.
Care tag wording you can copy
- “Keep sealed until use.”
- “Store in a cool, dry place.”
- “Use within 3 to 6 months for best scent and freshness.”
Paper goods (bookmark, stationery, recipe cards, tags)
- Sleeve them in a clear bag or wrap in tissue to protect edges.
- Avoid packing them near anything scented unless you want the paper to smell like it forever.
- Use thicker cardstock for anything you want to feel premium.
Candles and match bottles
- Add a small candle care card, it prevents tunneling and complaints.
- Make sure strike strips fully adhere and dry before boxing.
- Pack candles snugly so the glass doesn’t clink around.
“How long does it last?” and “how do you refresh it?”
People love knowing this, and it keeps your gift from feeling mysterious.
- Cocoa mix: best within 3 to 6 months, store airtight.
- Snack mixes: best within 2 to 4 weeks for crunch, longer if fully sealed and dry.
- Soup jars and seasoning blends: best within 6 months for strongest flavor.
- Bath salts: best within 6 months, keep sealed and dry.
- Steamers: best within 3 months, store airtight, avoid humidity.
- Balms: best within 6 to 12 months depending on oils used.
- Candles: shelf-stable, scent performs best after a short cure.
Refresh ideas
- Snacks: reseal, replace desiccant, keep cool.
- Bath salts: if clumpy, dry on a tray and repack.
- Candle: trim wick, first burn long enough to melt edge-to-edge.
Cleaning and care instructions (the quick version)
- Jars and bottles: wipe with a damp cloth, don’t soak labels.
- Boxes and baskets: dust lightly, keep away from moisture.
- Textiles: include a note if you pre-washed. If you didn’t, add “wash before use” to avoid lint surprises.
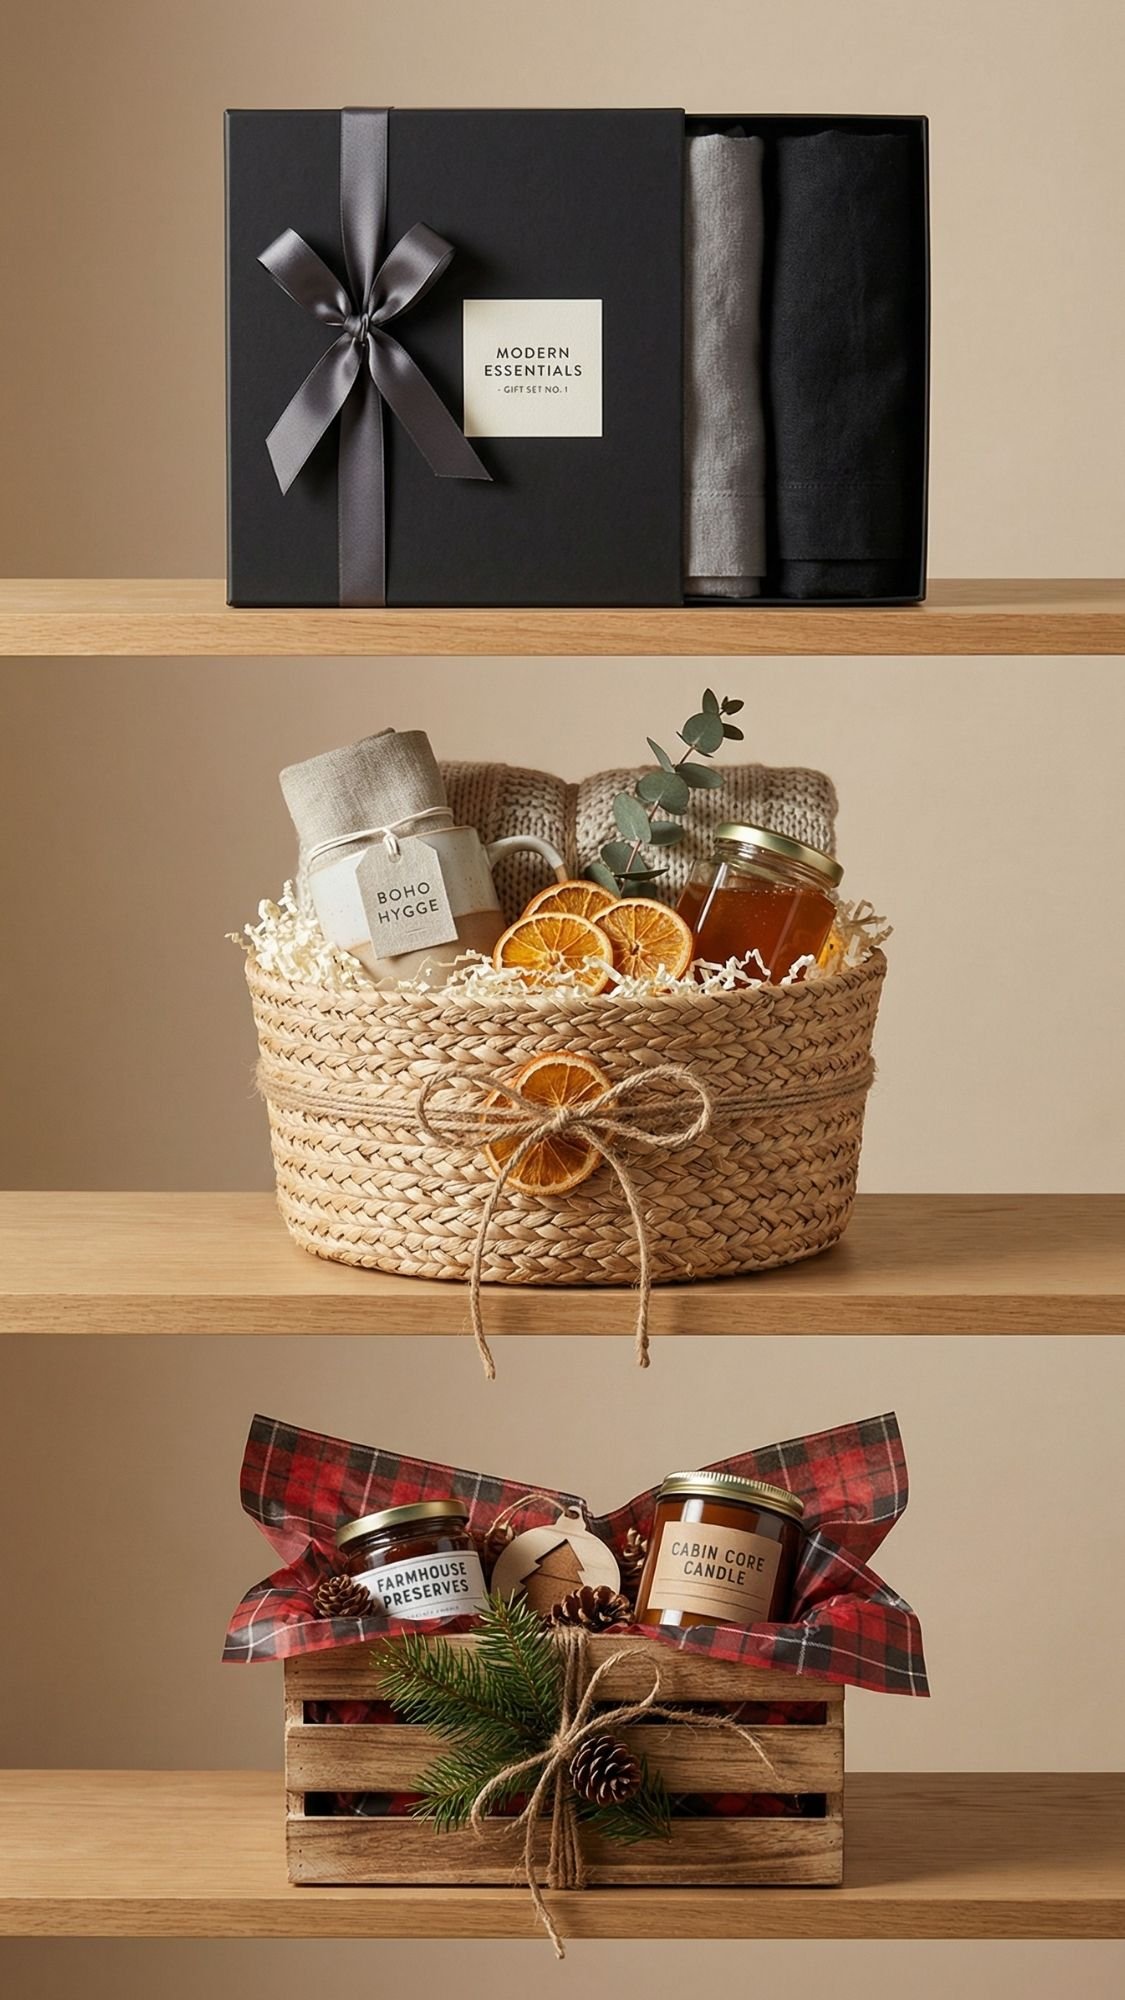
3 Vibe Swaps That Change The Whole Gift Set Look
This is where you make the same gift set ideas feel totally different without reinventing anything. You swap the palette, container, and finishing details, and suddenly it looks like a completely new gift. Sneaky, efficient, and honestly kind of fun.
Variation 1: Modern Minimal (clean, boutique, no clutter)
Style swaps
- Matte rigid boxes, black, cream, or warm taupe
- Minimal labels, one line of text, no busy graphics
- Satin ribbon instead of twine
Color palette ideas
- Cream + black + warm wood
- Taupe + white + deep forest green accent
- Soft gray + white + brass detail
Personalization options
- Simple monogram sticker on the outside corner of the box
- Name on a small tag, one clean font
- A “Tonight’s plan” card in minimalist typography
Material upgrades
- Upgrade to a ceramic mug with a clean shape
- Use an amber apothecary jar for anything you jar
- Add a match bottle with a neat strike strip
Variation 2: Boho Hygge (textured, warm, slightly rustic)
Style swaps
- Woven baskets, mini crates, kraft bakery boxes
- Twine bows, dried orange slices, and linen tags
- Natural textures, like linen towel bases and wood scoops
Color palette ideas
- Oatmeal + terracotta + sage
- Warm beige + cocoa brown + muted blush
- Cream + rust + olive
Personalization options
- Hand-lettered tag, simple and cozy
- Add a dried flower sprig tied into the ribbon
- Theme tags like “Cozy Night In” or “Warm + Slow”
Material upgrades
- Linen ribbon or cotton ribbon
- Wooden spoon and linen towel in kitchen sets
- Chunky knit socks instead of fuzzy polyester ones
Variation 3: Farmhouse Cabin-Core (winter woods, plaid, cozy classic)
Style swaps
- Mini wooden crates, enamel mugs, plaid tissue paper
- Evergreen sprigs, cinnamon stick bundles, and kraft labels
- Buffalo check ribbon or deep green velvet ribbon
Color palette ideas
- Cream + forest green + kraft brown
- Plaid red + warm wood + black accents
- Snow white + pine green + cinnamon brown
Personalization options
- Add the year to tags, especially for ornaments
- Stamped name tag on kraft cardstock
- “Cabin Night” theme card with a simple checklist
Material upgrades
- Cedar coaster, feels expensive and on-theme
- Flannel napkin base for a charcuterie kit
- Matte black box with plaid tissue inside
Quick personalization ideas that work for any set
If you want it to feel truly custom, pick one of these and repeat it across the whole gift:
- Monogram sticker
- Name tag
- Theme tag like “Tea Night,” “Movie Night,” “Soup Night”
- One signature detail like a tiny cinnamon bundle, a wax seal, or a velvet bow
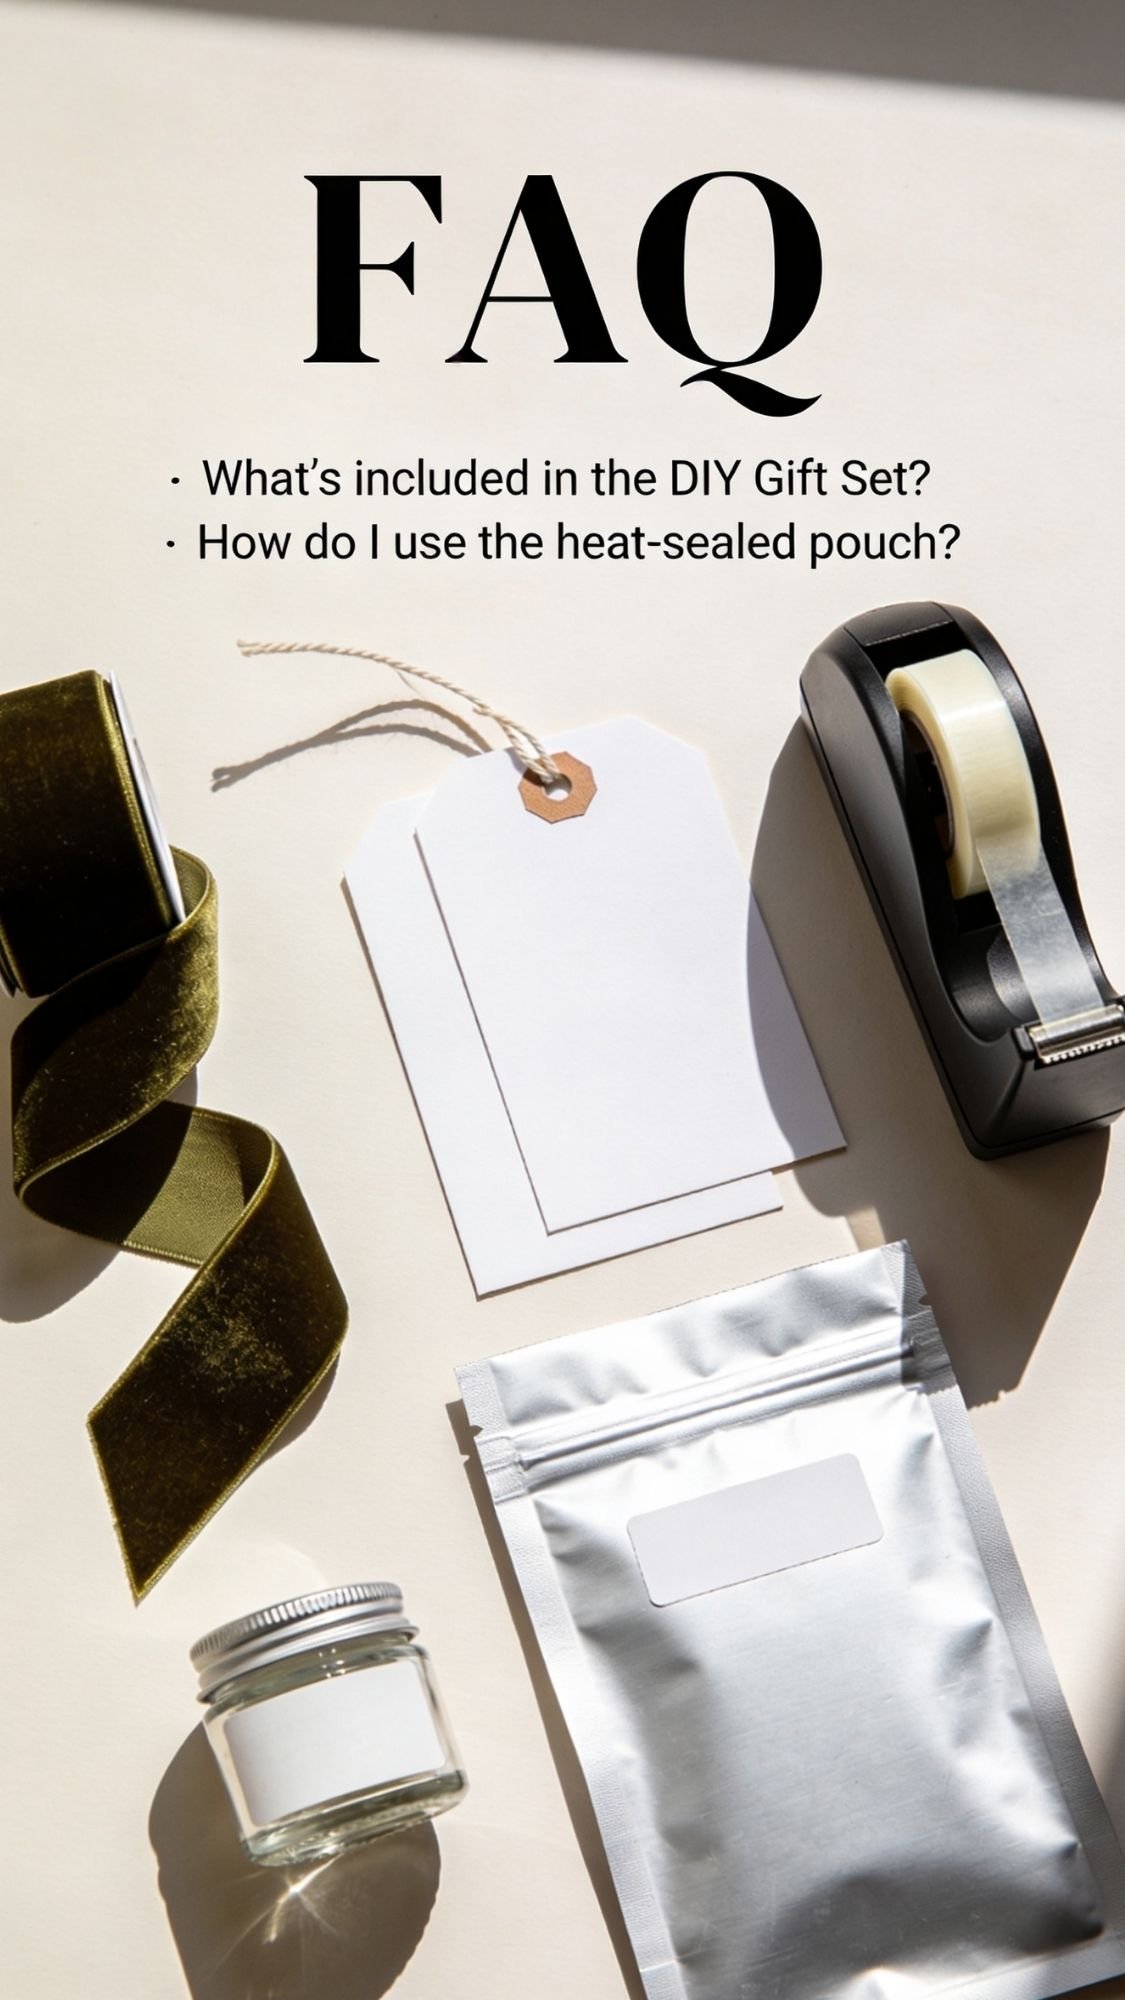
FAQ: Answers People Actually Google When They’re Building Cozy Winter Gift Sets
1) What do I put in a cozy night in gift basket?
I build it with a simple formula, 1 hero item + 2 supporting + 2 wow add-ons. A mug or blanket works as the hero, cocoa or tea supports it, then you add tiny upgrades like honey sticks, a chocolate spoon, or a mini candle. If the theme feels clear in one sentence, the gift set will feel intentional.
2) How do I make a DIY gift set look expensive?
You focus on finishing, not more stuff. Use a rigid box, velvet or satin ribbon, and clean labels. Anchor items with glue dots so nothing shifts. Also, heat-seal clear bags with parchment paper and a hair straightener for that boutique look.
3) What’s the best container if I don’t want to use baskets?
I like:
- Bakery boxes for kits like cookie mix or cocoa bombs
- Rigid magnetic boxes for luxury vibes
- Mugs as containers for small cozy sets
- Tins for compact sets like balms or tea samplers
- They look neat, stack well, and photograph better than floppy baskets.
4) How far ahead can I make these gift sets?
Most sets can be prepped 2 to 4 weeks ahead if you keep everything sealed and dry. Food items stay freshest when you package them closer to gifting, but shelf-stable mixes, spice blends, and paper goods can be done earlier with no issue.
5) How do I keep cocoa mix from clumping?
Sift the cocoa before you mix, let everything cool fully before sealing, and use airtight jars. If you live in a humid area, tuck a tiny desiccant packet into the outer gift box area near powdered items. That prevents most clumping issues.
6) How do I keep bath salts from getting hard in the jar?
Don’t rush the dry time. Let the mixture sit uncovered overnight, and measure oils instead of guessing. Seal only when the salts feel fully dry and fluffy. If your air is humid, add a desiccant packet near the jar inside the gift box.
7) What should I write on the instruction or care cards?
Keep it short and helpful. People want:
- “Store cool and dry”
- “Use within X weeks”
- “Add 2 tablespoons to hot milk”
- “Trim wick to 1/4 inch”
- “Keep sealed until use”
- A simple “Tonight’s plan” card also makes the set feel curated.
8) How do I ship a DIY gift set without it arriving messy?
Use a rigid box, anchor items with glue dots, and fill gaps tightly with crinkle paper wedges so nothing shifts. Pack fragile items like crackers in their own inner box or pouch. Shipping equals movement, so pack like the box will get tossed. Because it will.
9) What’s a good DIY gift set for neighbors or teachers?
Go for compact and universally useful:
- Cocoa bomb mini set
- Ornament + cocoa set
- Simmer pot kit
- Lip balm trio
- They’re easy to batch-make, and they don’t feel too personal.
10) How do I keep gift tags and labels from peeling?
Wipe surfaces with rubbing alcohol before applying labels. Press firmly. If you’re using glass, waterproof labels help a lot. If you want extra insurance, add a thin strip of clear tape over the label edges.
11) What do I do if I already wrapped it and something shifts?
Open it and fix it. I know, annoying. But you can usually slide in crinkle paper wedges, re-anchor items with glue dots, and reseat the bow. Five minutes of fixing saves the whole presentation.
12) How do I choose a theme so it doesn’t feel random?
Describe the gift in one sentence, like “tea and a quiet reading hour.” If the sentence sounds clear, you’re good. If it turns into a paragraph, the set will feel like a grab bag.
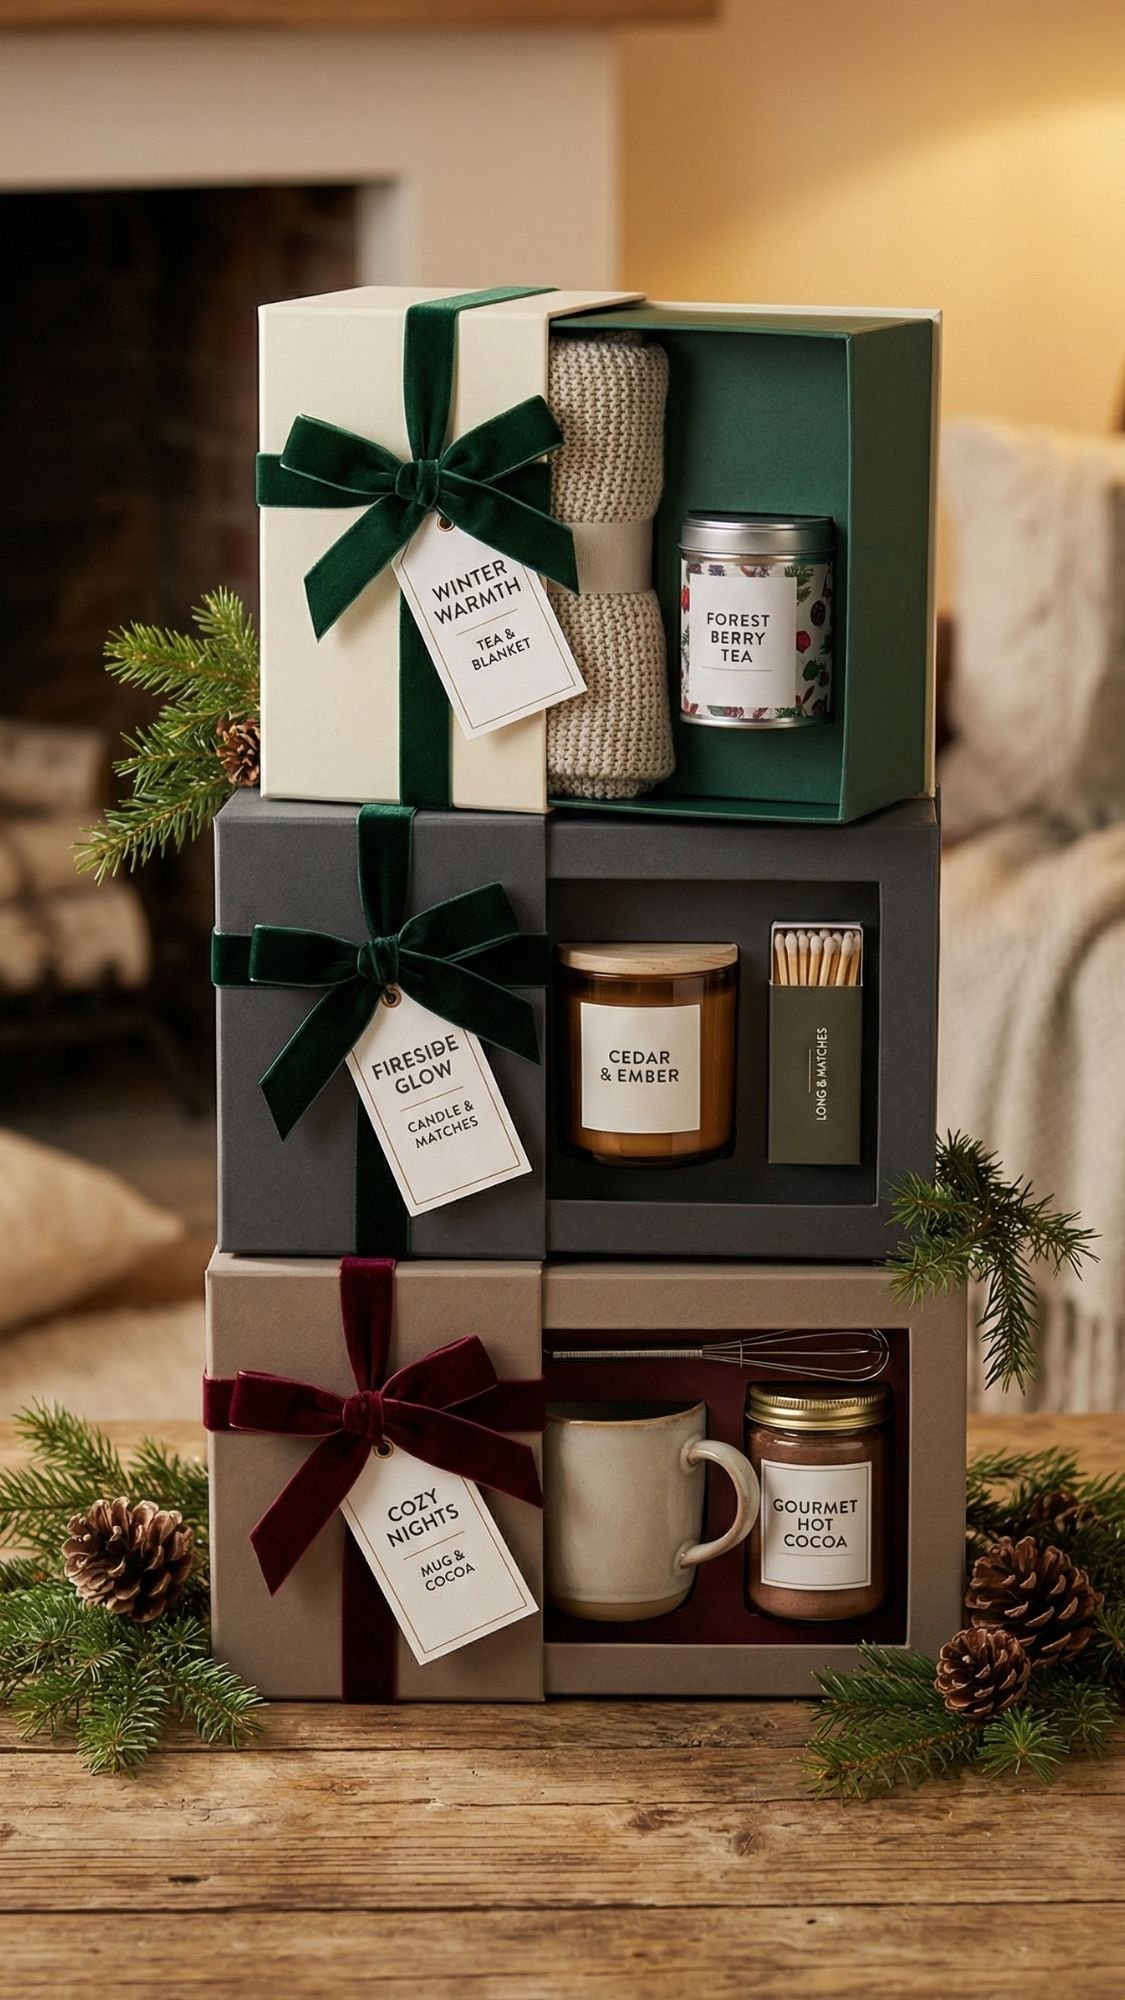
You Just Made Cozy Gifting Ridiculously Easy
If you take one thing from this post, take this. A great DIY gift set tells a story in one sentence. Cocoa and a movie. Tea and a quiet night. Soup and a soft reset. When you build around a moment, everything looks intentional.
Use the 1-2-2 formula, anchor your items so they don’t shift, and finish with one strong ribbon choice. That’s the whole secret. You don’t need more stuff, you need better structure. And when you heat-seal those little pouches and keep moisture away from powders, your sets stay crisp and gift-worthy, not clumpy and chaotic.
Pick one idea from the list, batch-make three versions, and you’ll have gifts ready for winter birthdays, hostess moments, neighbors, and “oops I need a gift tomorrow” situations. You’ve got this.

