What if your next weekend project could boost mental clarity while giving your living room a designer makeover? Modern crafting isn’t about glue sticks and popsicle sticks – it’s a science-backed path to reducing stress and enhancing cognitive function. Research shows regular creative practice lowers cortisol levels by up to 75%, making your DIY sessions as beneficial as a meditation retreat.
We’ve designed this guide for those who want statement pieces, not shelf clutter. Forget complicated patterns requiring art degrees – our methods help you achieve high-end looks using accessible techniques. That chipped side table? It’s about to become a marble-look accent piece worthy of Architectural Digest.
You’ll learn how to:
• Curate materials that match your existing decor
• Master texture-blending tricks designers use
• Create focal points that make rooms feel larger
The best part? Every project serves double duty – you’ll craft beautiful home elements while building neural pathways that combat age-related memory decline. We’ll even show you how to set up an inspiring workspace that sparks joy (without requiring a full room renovation).
Ready to turn your living area into a reflection of your personal style – and your commitment to self-care? Let’s reshape your environment one intentional creation at a time.
Introduction: Unleash Your Inner Artist
Have you ever admired a handmade piece and thought, “I could never do that”? That viral Pinterest board full of gorgeous home projects isn’t just for pros – it’s proof that artistic expression lives in all of us. You don’t need formal training to create showstopping decor, just willingness to experiment.
Those stunning geometric wall hangings and abstract-painted vases? They’re born from simple techniques anyone can master. The secret lies in viewing ordinary materials through fresh eyes – think coffee filters transformed into floral arrangements or thrift store frames reborn as modern art displays.
This isn’t about chasing perfection. It’s about the thrill of turning dollar store finds into conversation starters. We’ll guide you through easy crafts that build skills naturally – no complex tools or prior experience needed. Start with paint-dipped planters before progressing to mixed-media wall art.
Your unique perspective matters most here. Two people using identical supplies will create wildly different pieces – that’s where the magic happens. As textile artist Anni Albers noted: “Vision develops through the doing.”
Ready to silence that inner critic? Grab a glue gun and let’s prove that stunning, personalized home decor is always within reach.
The Allure of Creative DIYs for Adults

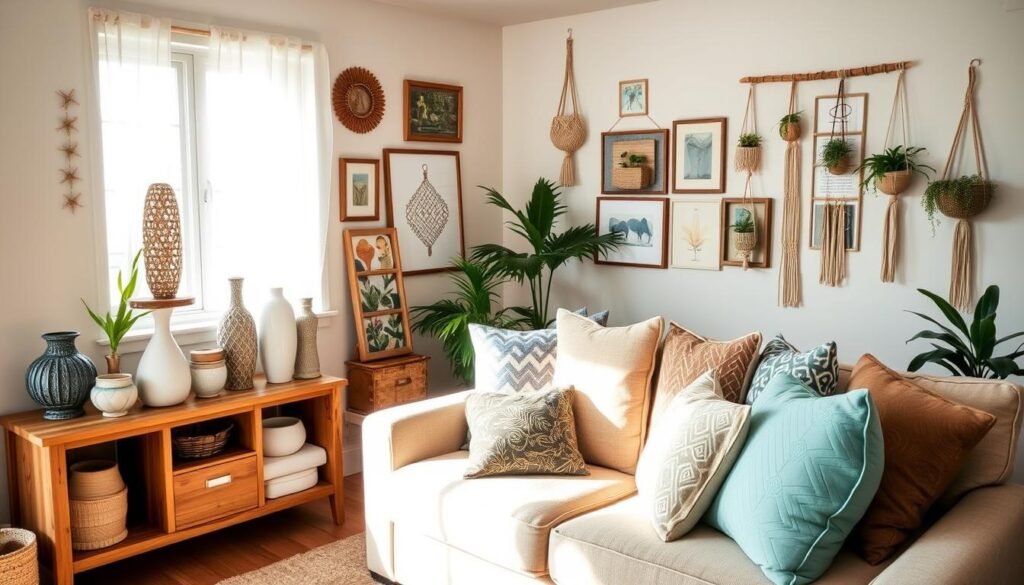
Your living room isn’t just where you binge Netflix anymore – it’s your canvas. Since remote work became permanent for many, our spaces have transformed into hybrid zones for productivity and self-expression. That blank wall behind your desk? It’s begging for a macramé installation made from leftover yarn.
You’ve likely noticed this shift yourself. Three years of reimagined routines created a hunger for environments that spark joy and function smarter. DIY projects became the perfect way to merge practicality with personality – think floating shelves that organize while showcasing your ceramic experiments.
There’s power in turning household items into art. That chipped serving tray? With some texture-blending techniques, it becomes a modern centerpiece. These transformations do more than upgrade decor – they rewire how we see our capabilities. As one maker told me: “Every finished project is a receipt proving I can learn new tricks.”
The rhythm of crafting offers something rare in our digital age: tactile satisfaction. Kneading air-dry clay or arranging dried botanicals forces your mind into the present – no notifications allowed. It’s why 68% of remote workers report DIY hobbies improve their work-from-home mindset.
This isn’t your childhood glue-and-glitter scene. Modern methods let you achieve gallery-worthy results using thrift store finds and that fabric stash gathering dust. The best part? Each creation becomes a timestamp – a reminder of how far you’ve come in mastering new skills.
Setting Up Your Craft Space for Creative Projects

Does your current workspace look like a glitter bomb exploded? Let’s fix that. Your crafting zone should feel like a launchpad for ideas – not a stress trigger. Whether you’re using a kitchen nook or repurposing an old desk, smart design turns any area into a productivity hub.
Essential Tools and Supplies
Start with the crafting trifecta: sharp scissors, multi-surface glue, and a ruler. These form 90% of project foundations. Add acrylic paints and brushes from the dollar store – their quality often rivals pricier brands. Pro tip: Buy duplicate adhesives to keep in different zones.
Organizational Tips for a Productive Workspace
Clear shoe organizers become vertical supply racks. Use drawer dividers for beads or washi tape. Designate zones using colored trays – blue for cutting, green for drying. Daylight bulbs (
Remember: Your space should invite creation, not intimidate. One maker transformed her coffee table into a mobile station using baking sheets (magnetic storage!) and a caddy. As organization expert Marie Kondo says: “Tidying is just the beginning. The real goal is to create space for joy.”
Budget-Friendly Craft Supplies and Dollar Store Finds

What if your craft supply upgrade cost less than your morning latte? Those colorful aisles hold more potential than you realize – you just need the right hunting strategy.
Finding Hidden Gems at the Dollar Store
The secret lies in seeing ordinary items through a maker’s lens. Those plastic snack containers? Perfect for organizing beads or mixing small paint batches. Wooden kitchen utensils become stamping tools when carved with simple patterns.
Focus on these dollar store staples:
| Item | Intended Use | Craft Hack |
|---|---|---|
| Bamboo spoons | Cooking utensils | Custom wood-burned wall art |
| Glass jars | Food storage | Terracotta-painted planters |
| Clothespins | Laundry accessories | Mini easels for table numbers |
Professional organizer Lisa Adams shares a pro tip: “Shop the seasonal aisles first – those specialty shapes and textures often work best for unexpected projects.” Those heart-shaped baking molds? Ideal for concrete candle holders.
While most supplies are worth the dollar price tag, invest more in:
- Acrylic paints (better pigmentation)
- Brushes for detailed work
- Adhesives for heavy materials
Remember: The goal isn’t to buy everything. Keep a running list of project needs and visit the store with purpose. Your wallet – and craft storage bins – will thank you.
Creative Crafts For Adults Diy Ideas: Your Guide to Fun and Affordable Projects

Ever stared at empty pasta sauce jars and seen potential lanterns? That’s the magic we’re unlocking here – transforming “I should toss that” moments into statement pieces. Our curated selection proves stunning decor doesn’t require specialty supplies or endless hours.
Start with instant-gratification projects like fabric-wrapped storage boxes (30 minutes, old scarves + cardboard). Progress to layered wall art using paint samples and leftover molding. We’ve organized options by commitment level:
| Project Type | Time | Skill Level |
|---|---|---|
| Dyed napkin curtains | 45 mins | Beginner |
| Floating bookshelf | 2 hours | Intermediate |
| Upcycled denim rug | 4 sessions | Advanced |
Interior designer Mariah Nielsen swears by this approach: “Master one technique – like decoupage – and suddenly old trays become botanical showpieces and dressers get new life.”
Seasonal swaps keep things fresh. Turn summer’s dried hydrangeas into fall wreaths with copper accents. Winter’s bare branches? Spray-paint them gold for instant holiday centerpieces. The key is flexibility – our methods work with whatever materials you’ve stockpiled.
True joy comes from making pieces your own. That geometric pillow pattern? Try it in neon yarn for a playful twist. These craft ideas aren’t about replication – they’re launchpads for self-expression that make your space unmistakably yours.
Step-by-Step Tutorials: Bringing Your Vision to Life

That stunning project you’ve bookmarked? It’s closer than you think – if you’ve got the right roadmap. Our tutorials act like GPS for your creativity, turning intimidating concepts into achievable checkpoints. We’ve dissected popular techniques into bite-sized actions anyone can follow.
Building Skills Through Guided Practice
Always scan the entire tutorial first – like previewing a recipe. This helps spot steps needing special tools or drying time. Our guides include “what it should look like” checkpoints so you can course-correct early. Made a wonky paper flower? Perfect – now you know how tension affects shapes.
Start with foundational projects that teach transferable skills. Mastering accordion folds in paper crafts? That same motion creates textured fabric wall hangings. As textile artist Tacha Reed advises: “Each technique is a building block – collect enough, and you’ll design original pieces without instructions.”
We include troubleshooting charts for common issues:
| Problem | Quick Fix |
|---|---|
| Paint bleeding | Use washi tape as guide |
| Glue wrinkles | Apply with silicone brush |
| Uneven edges | Sand before finishing |
Visual learners get photo examples at each milestone. Notice how the candle-dipping tutorial shows wax consistency through temperature ranges? Those details turn frustration into “Aha!” moments. Soon, you’ll modify tutorials instinctively – swapping materials or scaling designs.
Remember: Every expert was once baffled by glue guns. Our methods help you rack up small wins that compound into real confidence. Before long, you’ll be the friend saying “Here’s how I did it” with pride.
Floral and Nature-Inspired Craft Projects
Imagine your coffee table glowing with preserved wildflowers encased in glass – a living snapshot of spring that never fades. Nature crafts let you bottle seasonal magic while adding organic texture to modern spaces. The secret? Balancing delicate botanical elements with clean-lined designs that feel current, not crafty.
Pressed vs. Paper: Two Paths to Botanical Beauty
Pressed flower projects capture nature’s fleeting beauty – think ferns frozen mid-unfurl or roses preserved at peak bloom. For best results:
| Material | Prep Time | Project Lifespan |
|---|---|---|
| Fresh flowers | 2-4 weeks pressing | 5+ years sealed |
| Paper sheets | 30 minutes cutting | Indefinite |
Paper flowers offer endless customization. “The right crepe paper can mimic peony petals better than real stems sometimes,” says floral designer Lila Chen. Her pro tip? Use coffee filters for realistic hydrangea clusters.
Master accordion folding with our step-by-step tutorial to create dimensional daffodils. You’ll learn:
- Template placement for natural asymmetry
- Gradient dye techniques using tea bags
- Wire wrapping for sturdy stems
Pressed flower lanterns make stunning nightlights – simply arrange blooms between glass panels using clear glue. For gifts, try floral-stenciled totes: they combine quick execution with that “she definitely bought this” polish.
Home Decor Makeovers With DIY Touches
That thrift store find gathering dust? It’s a masterpiece waiting to happen. Strategic updates turn tired furniture into design-forward statements – like transforming a chipped side table with marble-contact paper or converting window frames into rustic pinboards. The magic lies in seeing potential where others see flaws.
Start by hunting for pieces with good bones – solid construction, interesting lines, or unique proportions. An outdated cabinet becomes an apothecary-inspired storage unit with $15 worth of paint and hardware. As designer Emily Henderson notes: “Great decor isn’t about starting over – it’s about revealing what’s already there.”
Color theory makes your projects look intentional. Try this pro trick: match existing room accents using free paint swatch apps. A bland vase gains depth with three coordinated shades applied in geometric blocks. Notice how these small changes create visual flow:
| Project | Cost | Impact Level |
|---|---|---|
| Colorblock vase | $4 | High |
| Window frame pinboard | Free (upcycled) | Medium |
| Apothecary cabinet | $15 | Transformative |
The secret? Choose updates that enhance your space’s personality rather than chasing trends. Your grandmother’s outdated hutch could become a modern bar cart with casters and matte black spray paint. These personalized touches make your home feel curated, not catalog-perfect.
Remember: Successful makeovers balance function and beauty. That cubby cabinet isn’t just pretty – it organizes craft supplies while adding vintage charm. You’ll save money and create spaces that truly reflect your journey – one intentional brushstroke at a time.
Upcycling and Repurposing Everyday Items Into Art
Your recycling bin holds more potential than you think. Those empty jars and worn-out magazines? They’re raw materials waiting to become functional art that tells your sustainability story. This approach to crafting turns “trash” into treasure while shrinking your environmental footprint – imagine saving 15 pounds of waste annually through creative reuse.
We’ll show you how to spot hidden potential in ordinary objects. A spaghetti sauce jar becomes a bohemian vase with fabric scraps and mod podge. Recycled bottle caps transform into retro-chic magnets using basic acrylic paints. The magic lies in material alchemy – combining what you have with simple techniques.
Try these starter ideas to build your upcycling skills:
- Roll magazine pages into coiled bowls (no glue needed)
- Convert pill bottles into chic brush holders with chalk paint
- Layer fabric remnants on thrift store frames for textured wall art
Seasoned makers know the best projects often need just three things: imagination, scissors, and that craft supply stash you’ve been hoarding. As zero-waste designer Emily Folk notes: “Beauty emerges when we challenge our definition of ‘useful’.”
This way of creating does more than declutter your space – it rewires how you see consumption. Those weekly ads become potential paper mosaics. Worn-out jeans morph into plant hangers. Every DIY session becomes a small act of environmental stewardship wrapped in creative joy.
Keep a “maybe box” for questionable items – that cracked teacup could be tomorrow’s succulent planter. The perfect craft materials are often already in your home, waiting for fresh perspective. Ready to make your next masterpiece from what others overlook?
Craft Projects for Gifting: Personalized Presents That Impress
Ever wanted a present that whispers “I get you” without words? Handmade gifts carry stories store-bought items can’t replicate – like coffee sleeves stitched during lunch breaks or necklaces made from hardware store finds. These creations become tangible memories, proving you invested time rather than just cash.
Start with instant-gratification projects that fit busy schedules. Five-minute tassel earrings use embroidery thread and dollar store hoops – perfect for last-minute occasions. Paper flower toppers elevate basic gifts into curated experiences. Our tutorial breaks down petal shaping into three foolproof steps.
For luxury appeal, rose petal bath salts blend Epsom salts with dried botanicals. Package them in upcycled jars with handwritten labels – instant spa vibes that feel professionally crafted. Kid-friendly options like washer necklaces let little hands participate while creating keepsakes.
| Project | Time | Impact |
|---|---|---|
| Tassel earrings | 5 mins | High |
| Bath salts | 20 mins | Luxury |
| Washer jewelry | 15 mins | Playful |
Personalization turns good gifts into cherished ones. Match colors to the recipient’s decor using paint chip samples. Add monograms with iron-on patches or stamped leather tags. As one maker noted: “The magic lives in details they’ll notice – not the price tag.”
Ready to make your next present unforgettable? Our step-by-step guides help you craft meaningful items that spark “You made this?!” reactions. Because true connection often comes wrapped in handmade charm.
DIY Home Decor for Every Season
Ever wished your home could shift its mood with the seasons like a chameleon changes colors? Seasonal updates keep spaces feeling intentional without draining your time or budget. The trick lies in creating versatile base pieces – like neutral wreath forms or modular shelves – that become blank canvases for autumn leaves or spring blossoms.
Foundations for Flexible Styling
Those lace-dipped mason jars you made for fall? Swap dried wheat stems for cherry blossoms come April. A decorative pinboard becomes winter’s cocoa recipe display or summer’s vacation photo collage. This approach cuts storage needs while letting your decor evolve with your tastes.
Focus on nature’s free supplies: acorns for autumn centerpieces, evergreen clippings for holiday mantels. Our guide to year-round style shows how to use textures like burlap and linen that transition seamlessly between seasons. You’ll learn to layer removable elements over timeless bases – think velcro-attached fabric panels for bookcases.
Fall’s rich ochres and burnt sienna work beautifully when balanced with year-round metallics. Try spray-painted pinecones in copper beside evergreen eucalyptus. These combos feel festive yet refined – no pumpkin overload required. Remember: Seasonal doesn’t mean temporary. With smart planning, your DIY projects become cherished traditions that grow with your home.

