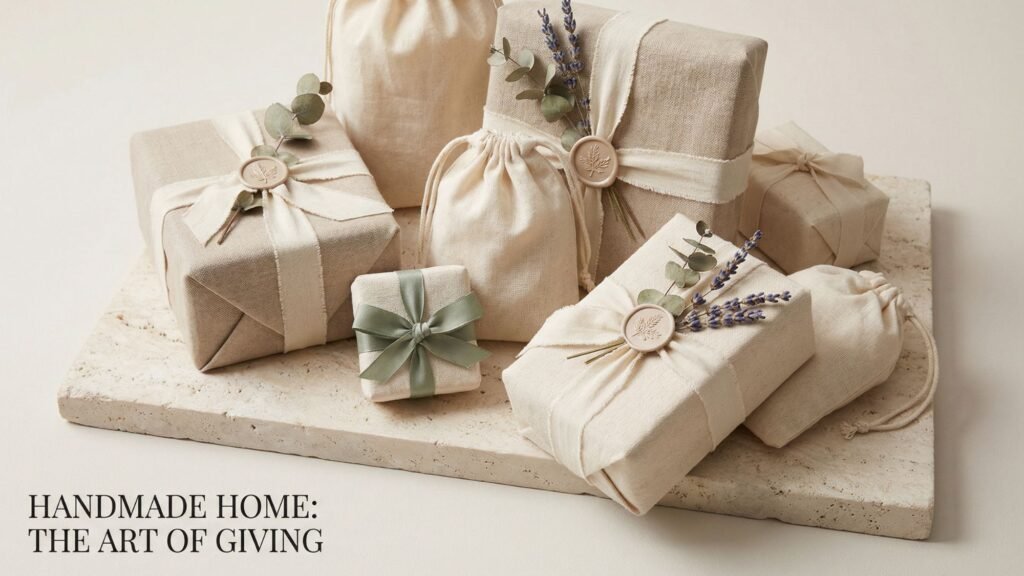
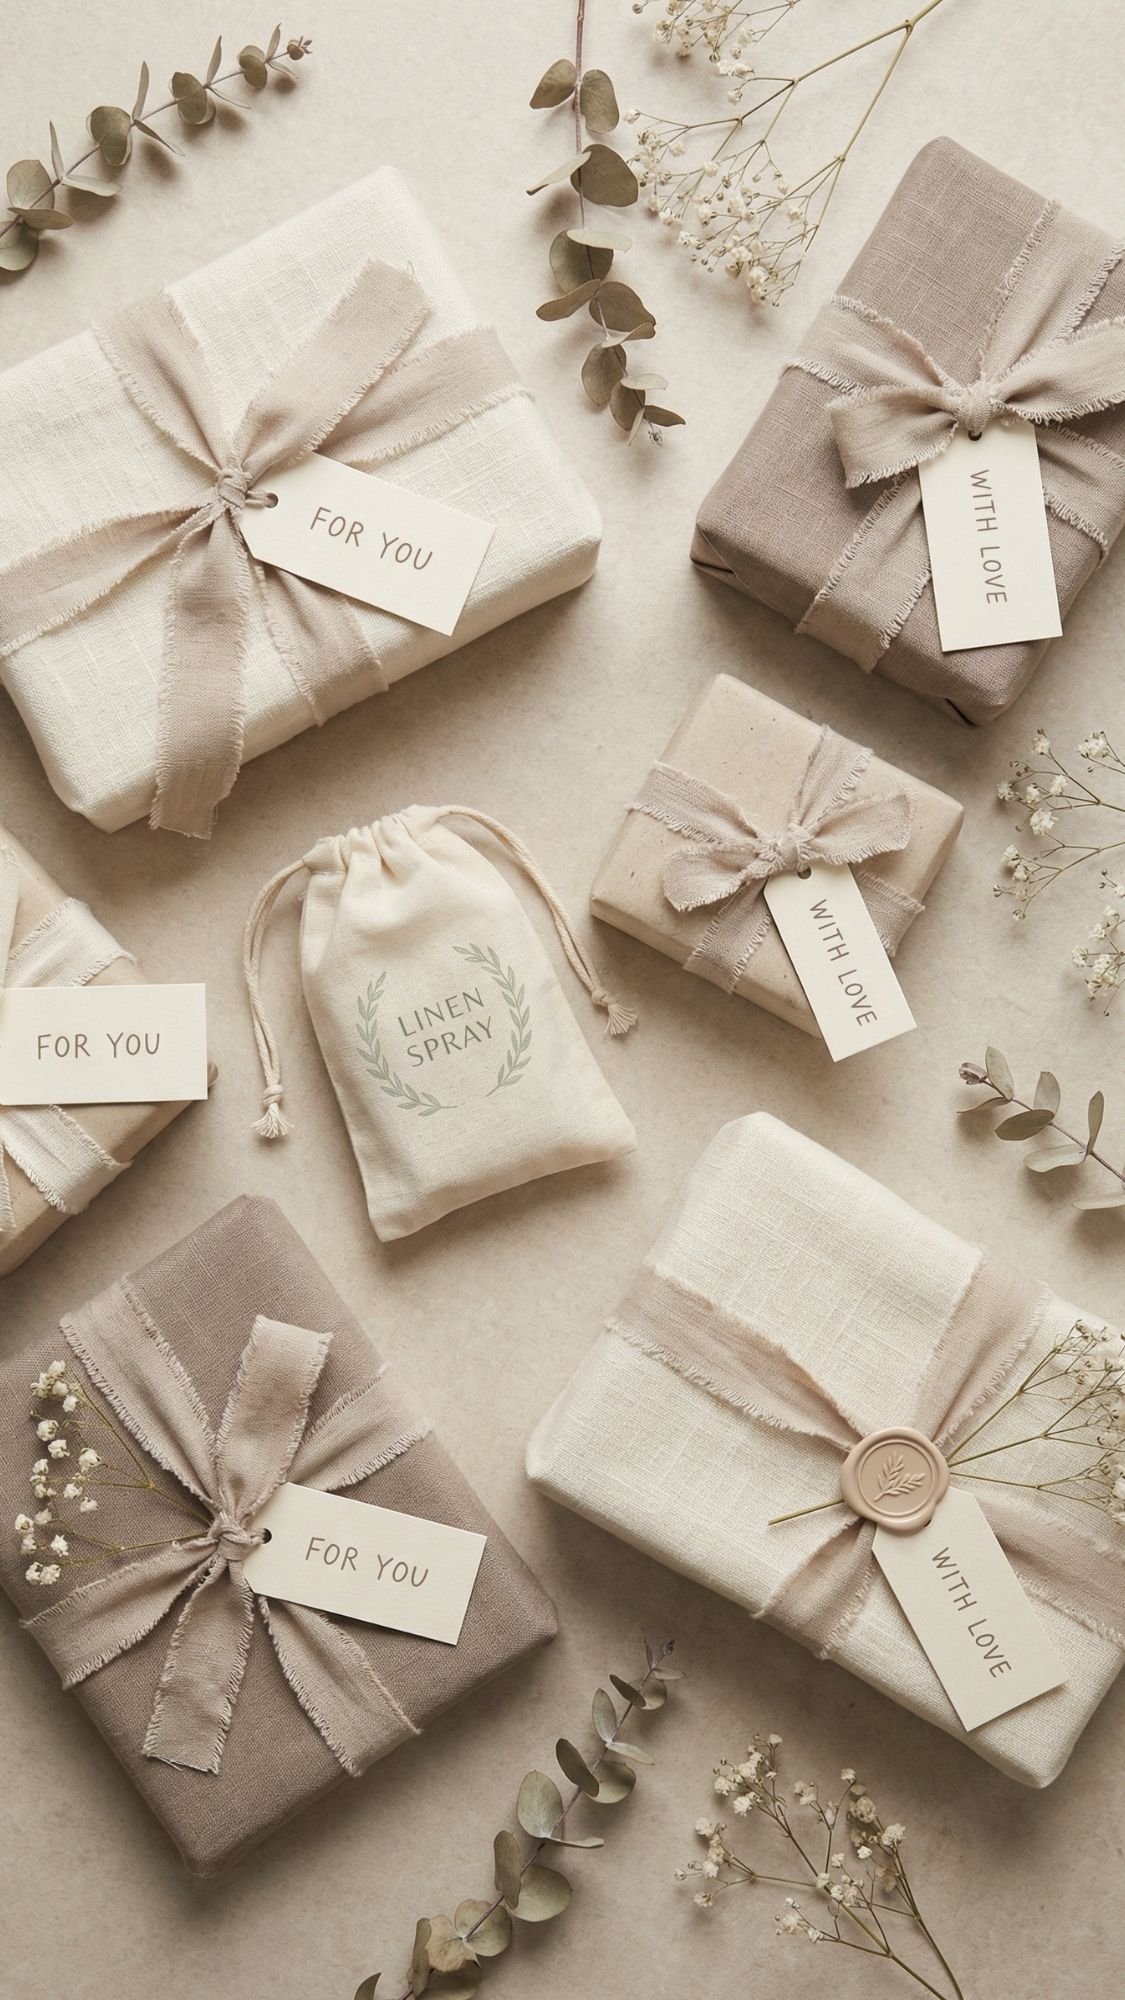
Neutral aesthetic packaging is the cheat code for making DIY gifts look like you bought them from a tiny boutique where everything smells like “linen and good decisions.” And the best part is you do not need expensive supplies to get that calm, creamy, put-together vibe. You just need a simple system, a few texture-forward materials, and the patience to make one crisp fold instead of rage-wrapping it in the car. Been there.
In my workshop, I’ve found that neutral wrapping works because it highlights the craftsmanship, not the noise. The gift feels intentional, the photos look clean, and Mom gets that “wow, you really thought about this” moment before she even opens it. So in this list, I’m giving you 17 DIY presents plus the exact neutral packaging approach that makes each one look polished, not homemade-in-a-bad-way.
We’ll keep things practical and scannable, with supplies, steps, pro tips, and troubleshooting baked in. And yes, I’m including a failure story because nothing says “real crafter” like admitting you have absolutely ruined something and survived to tell the tale.

Neutral Aesthetic Packaging 101: My 3-Layer “Looks Expensive” Formula
If you want every single gift in this post to look cohesive, expensive, and Pinterest-ready, you need a repeatable system. I’ve found that the best neutral packaging always uses three layers. Not three random layers, three layers that each do a job. This keeps your wrap from looking plain, while still staying calm and minimal.
The 3 layers (use this on every gift)
- Layer 1: The base wrap (clean + simple)
- Kraft paper, cream matte paper, an oatmeal-toned tissue wrap, a muslin bag, or a fabric wrap.
- Choose one base for the whole batch of gifts if you want that “curated set” look.
- Layer 2: The texture tie (this is where the luxury shows up)
- Linen ribbon, cotton twill, velvet ribbon, or soft satin.
- Neutral packaging looks best when the ribbon has texture, because flat + flat can look a little… office supply aisle.
- Layer 3: The focal detail (one moment, not five)
- Wax seal tag, stamped label, embroidered tag, tiny dried sprig, or a minimal charm.
- The trick is one focal point, not a scrapbook situation.
My “Pro Secret” that instantly makes it look boutique
I’ve found that one invisible seam changes everything. If you can’t see tape, the wrap reads expensive. I use double-sided tape on the underside seam only, then I burnish it with a bone folder or an old gift card so it lays perfectly flat. A common mistake beginners make is using regular tape on the outside “just this once,” and then wondering why the whole gift suddenly looks like it came from a middle school fundraiser.
Neutral wrapping supplies I actually keep on my cart
- Double-sided tape for hidden seams
- Bone folder or old gift card for crisp creases
- Small sharp scissors for ribbon tails
- Glue dots for botanicals and tags
- Wax seal kit or wax seal stickers (less messy, still fancy)
- Pre-cut cardstock tags in cream or kraft
Quick “make it cohesive” checklist
- Pick one base wrap color (kraft or cream)
- Pick one ribbon texture (linen or satin)
- Pick one focal detail style (wax seal or botanical)
- Repeat that combo on every gift for a clean, luxe set

A Real Failure Story: The Time My Wax Seal Ruined Everything
Okay, confession time. I once tried to be extra and put a wax seal directly onto textured kraft paper. It looked gorgeous for about twelve seconds. Then I tightened the ribbon and the seal popped off like it was personally offended by my confidence. If you’ve ever had a craft fail so dramatic it made you stare into space for a full minute, you get it.
Here’s what went wrong, and how I fixed it in a way that actually holds up.
What happened (and why it failed)
- Symptom: The wax seal cracked and popped off the wrap.
- Likely cause: Textured paper has tiny ridges, so the wax doesn’t bond evenly. When you pull the ribbon tight, the paper flexes and the seal loses grip.
- Also: I rushed it. The wax felt “set,” but it wasn’t fully cooled, so the stamp pull lifted it.
The fix that saved the whole gift
I’ve found the best move is this: make the wax seal on a smooth tag, not directly on the wrapping paper.
- Cut a cream or kraft cardstock tag.
- Pour the wax onto the tag.
- Let it cool fully. Like fully. Don’t get impatient.
- Attach the tag to the ribbon with a string loop or glue dot.
Now the seal stays pretty, the gift stays intact, and you don’t spiral.
The “pro” method that makes wax seals basically foolproof
- Pour wax onto parchment paper in small circles.
- Press the stamp.
- Let it cool.
- Peel it off and attach the seal using:
- a strong glue dot, or
- double-sided adhesive circles
This is especially great if you want to make a batch of seals ahead of time and feel like a crafting wizard.
My wax seal rules (learned the hard way)
- Use wax seals on smooth surfaces only.
- Tighten ribbon first, then place the seal tag last.
- Keep the seal as the focal detail, don’t bury it under bows and botanicals.

1) Rosemary Mint Sugar Scrub: The “use it tonight” gift
This is one of those gifts that feels fancy immediately, even though you’re basically mixing pantry ingredients in a bowl. It’s also great for neutral packaging because a glass jar plus a clean label looks expensive with almost zero effort. Ever notice how anything in an amber jar automatically looks like it belongs in a spa? Yeah, same.
What you’ll need
- 1 cup white sugar (or fine cane sugar)
- 1/3 cup carrier oil (sweet almond, grapeseed, or melted coconut oil)
- 1 to 2 tsp dried rosemary (or fresh, fully dried so it doesn’t mold)
- 6 to 10 drops peppermint essential oil (optional, adjust for sensitivity)
- Small glass jar with lid (4 to 8 oz)
- Spoon or spatula, small bowl
- Optional: parchment circle, label or tag, linen ribbon
Why this formula works
- Sugar exfoliates evenly and rinses clean.
- A lighter oil (like grapeseed) feels less greasy, which most moms prefer.
- Dried rosemary adds texture and that “handmade” look without turning it into a green swamp.
Steps
- Mix the sugar and oil slowly. Add oil a little at a time so you control texture. You want “wet sand,” not soup.
- Add rosemary last. If you stir it too aggressively early on, you crush it and the scrub can look muddy.
- Add essential oil, then pause and smell-test. Peppermint gets intense fast. Keep it subtle unless you want Mom’s sinuses cleared from across the house.
- Jar it and clean the rim. Wipe the rim before sealing so the lid closes tight and stays clean.
Pro Tips
- Prevent water contamination: Add a mini note that says “Use a clean spoon.” Water in the jar shortens shelf life fast.
- Keep the top clean: Press a parchment circle under the lid so oil doesn’t creep into the threads.
- Texture too runny? Add more sugar, 1 tablespoon at a time.
- Too dry and crumbly? Add a teaspoon of oil and stir again.
Shelf life: About 1 to 2 months if kept dry and clean. If you use fresh herbs, shorten that.
Neutral aesthetic packaging (simple and luxe)
- Wrap the jar with a cream paper belly band or a minimalist label.
- Tie a linen ribbon around the neck.
- Add one focal detail:
- a tiny rosemary sprig tucked under the knot, or
- a clean tag (cream cardstock) tied with twine
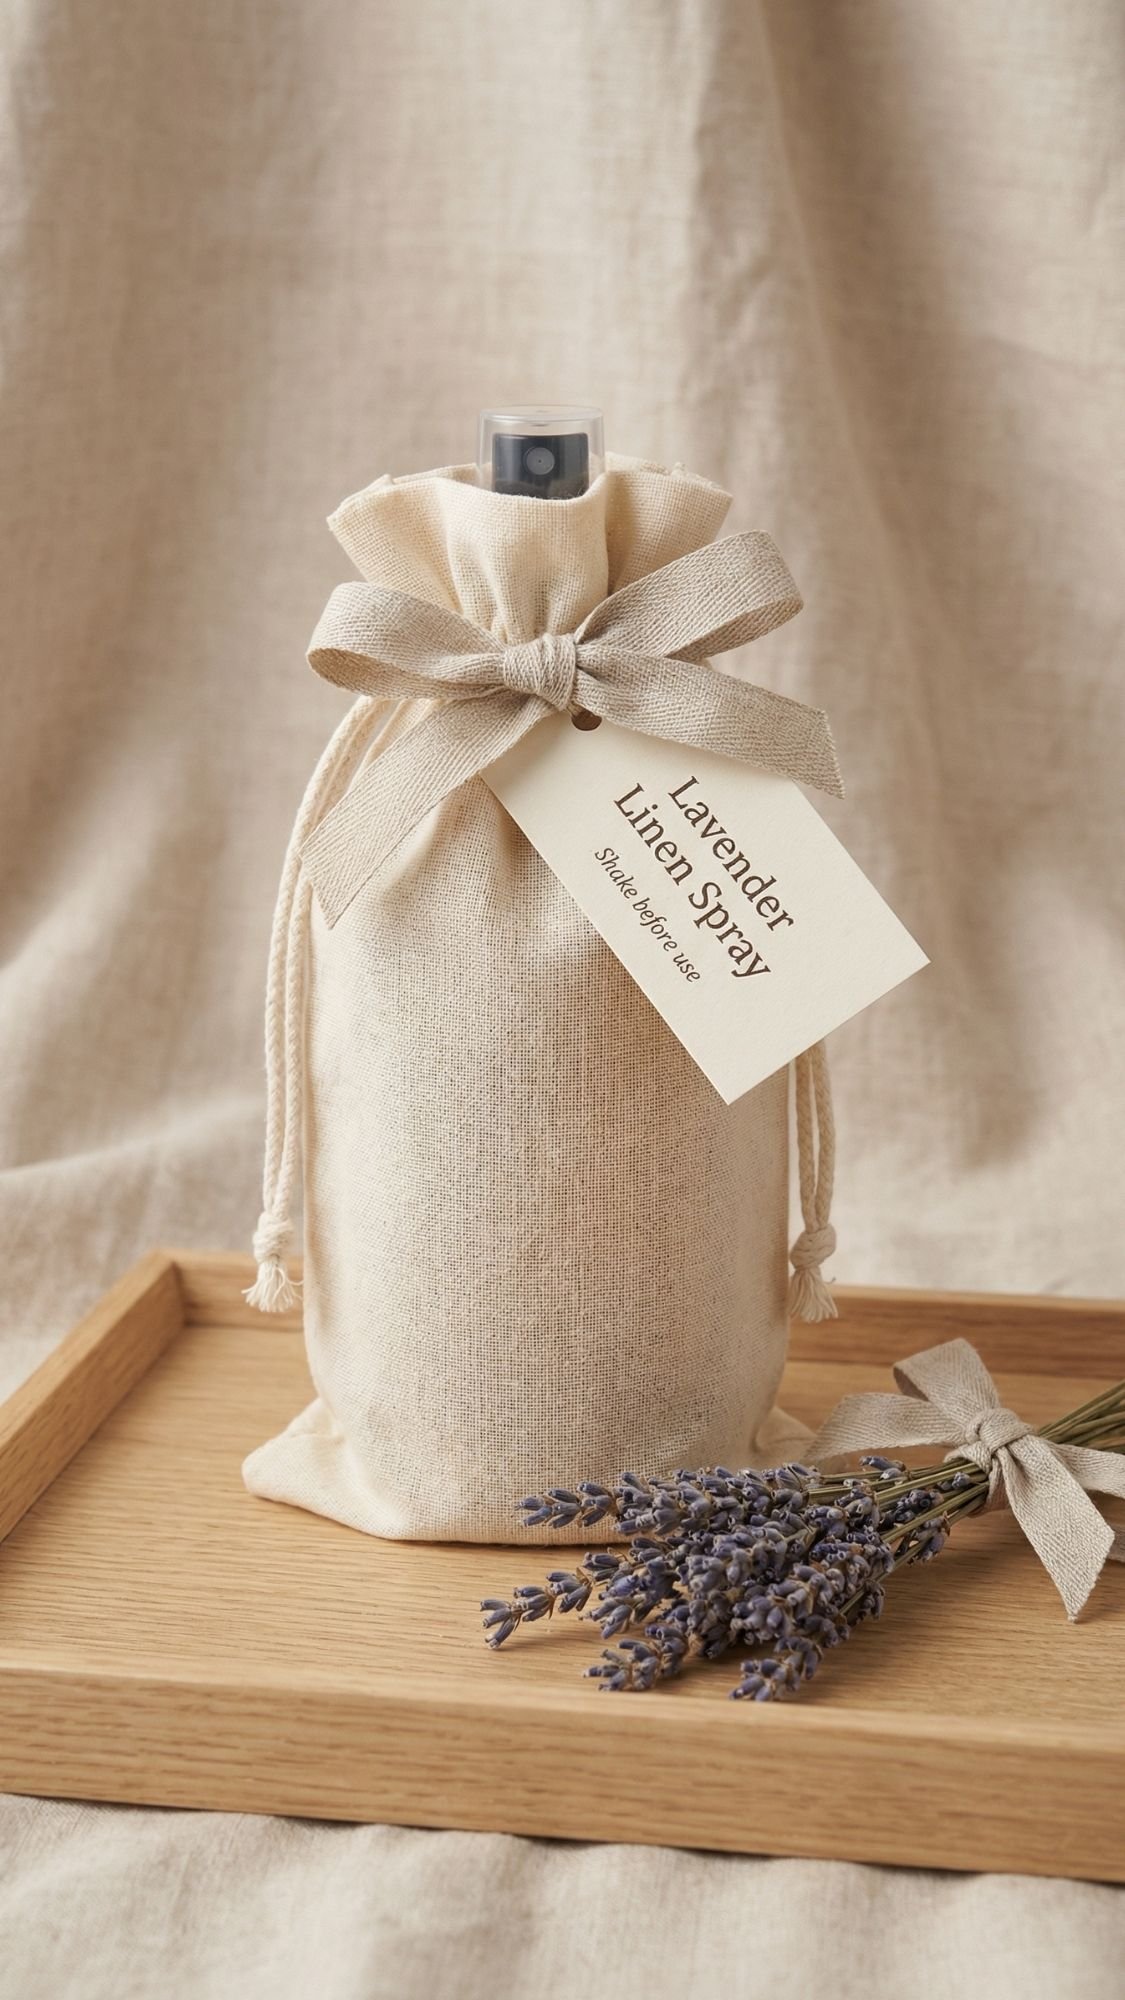
2) Lavender Linen Spray: Fresh sheets energy, zero fuss
This one is perfect if you want a gift that feels thoughtful but takes like ten minutes. It also photographs beautifully in neutral packaging because amber bottles and clean labels give instant “apothecary chic.” Plus, Mom can use it on sheets, towels, a throw blanket, even the car. Practical gifts win, period.
What you’ll need
- 2 oz witch hazel (helps the oils disperse)
- 2 oz distilled water
- 10 to 20 drops lavender essential oil (start low, build up)
- Optional: 5 drops bergamot or cedarwood for a more grown-up scent
- 4 oz amber glass spray bottle (or clear, but amber looks luxe)
- Small funnel
- Minimal label or tag
Why this recipe works
- Witch hazel acts like a “mixer” so the essential oil doesn’t just float on top forever.
- Distilled water helps prevent funky smells that can happen with tap water over time.
- A simple formula keeps it stable and easy to remake.
Steps
- Pour witch hazel into the bottle first. This helps the essential oils blend better when you add them.
- Add essential oils and swirl. Swirl, don’t shake yet, so you don’t create a million bubbles.
- Add distilled water and cap tightly.
- Shake for 10 seconds. Then you’re done. Seriously.
Pro Tips (so it behaves nicely)
- Add a tiny note that says “Shake before each use.” Oils still separate over time, that’s normal.
- If Mom has sensitive skin, keep oils lighter and label it as “linen spray, not body spray.”
- Test spray on a hidden fabric spot first, especially on silk or delicate upholstery.
Shelf life: About 1 to 2 months for best freshness. If it smells “off,” toss and remake.
Neutral aesthetic packaging (soft and boutique)
- Put the bottle inside a muslin drawstring bag.
- Tie the bag with linen ribbon or thin twine.
- Add a minimalist tag like:
- “Lavender Linen Spray”
- “Shake before use”
- “For sheets, towels, throws”
Optional upgrade: add a tiny dried lavender bundle tied into the bow.
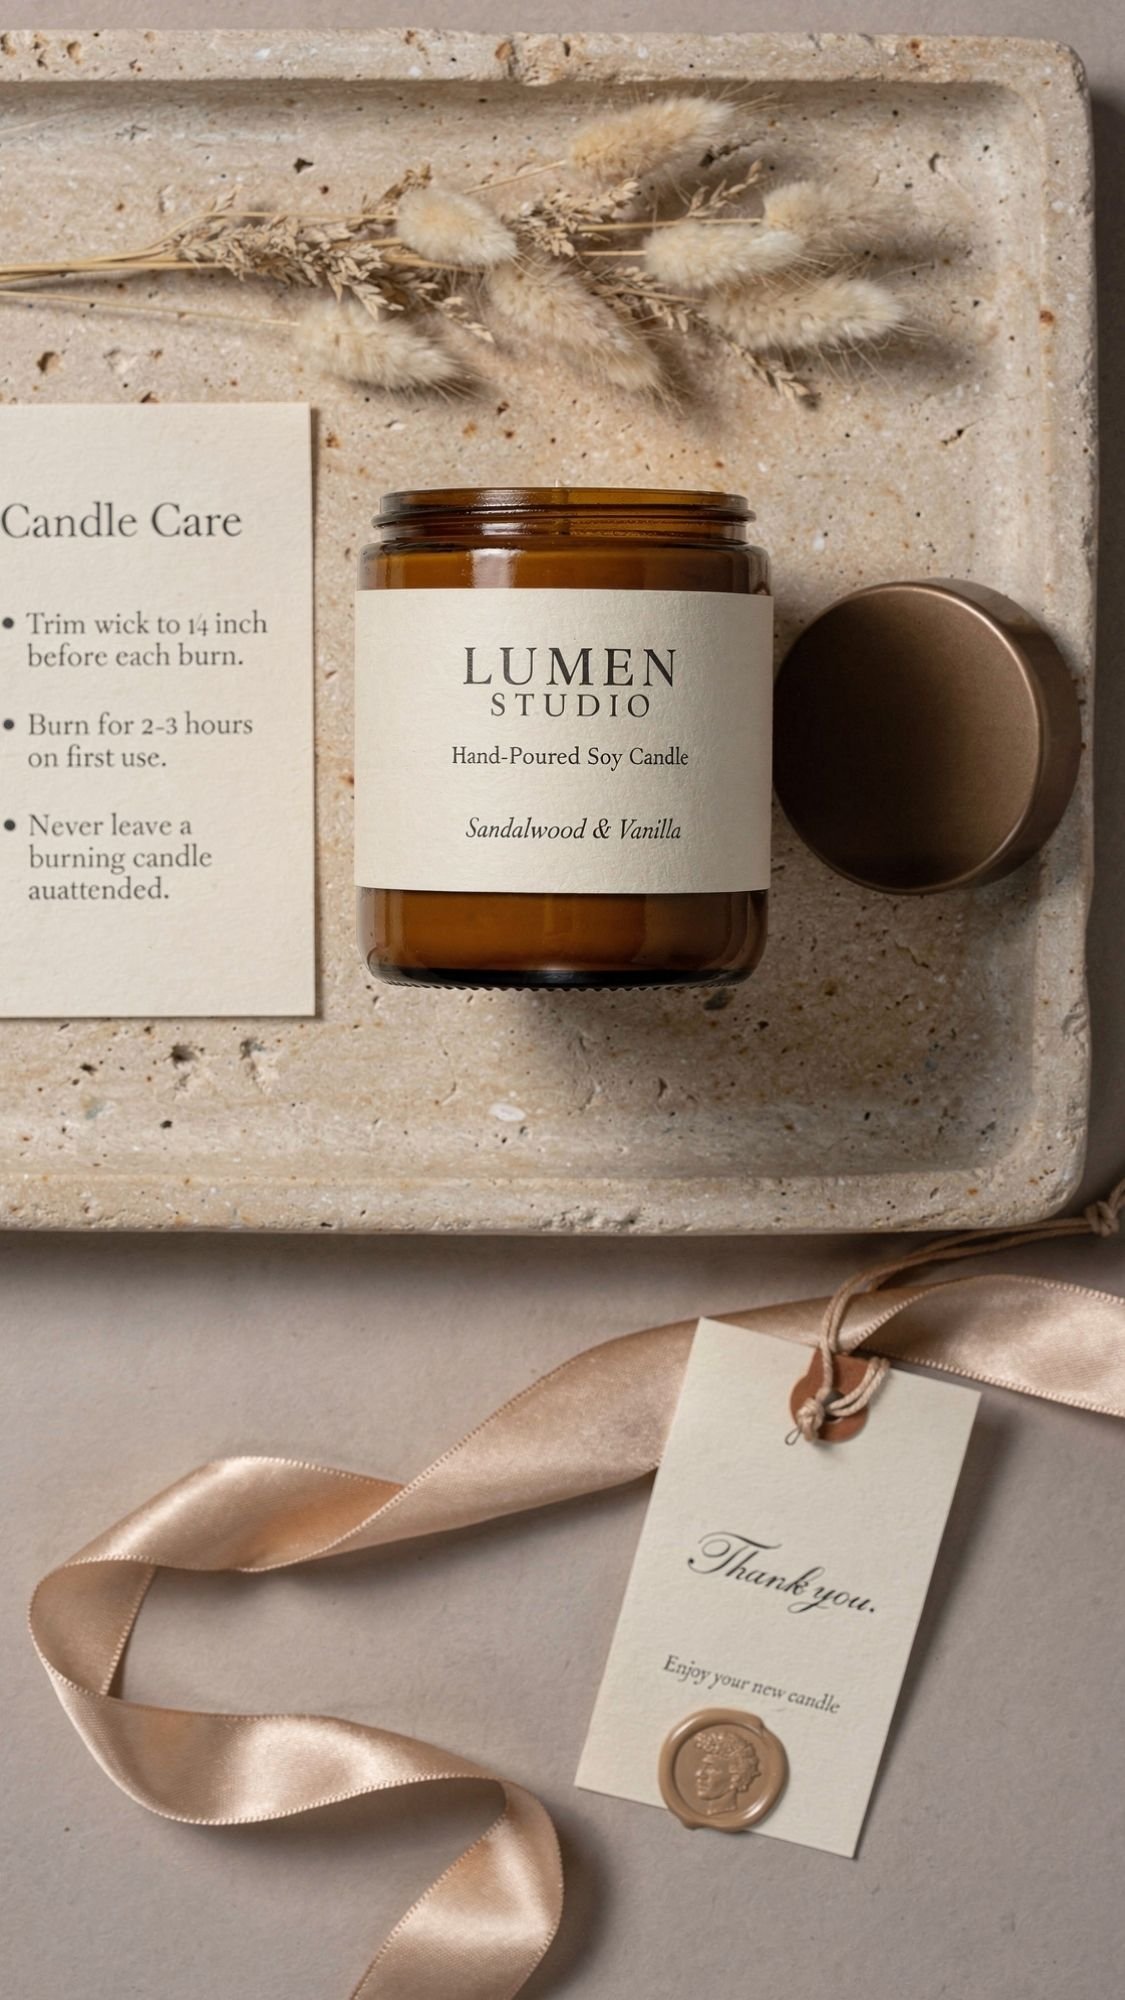
3) Hand-Poured Soy Candle in an Amber Jar: Luxury, but make it DIY
If you want one gift in this list that screams “I spent money,” it’s a candle. Even when you make it yourself, it reads premium because it feels like a full experience, scent, glow, vibe, all of it. And neutral packaging plays so well with candles because the jar and label already look like a product.
What you’ll need
- Soy wax flakes (container blend works best)
- Candle wick (size depends on jar diameter)
- Wick sticker or hot glue (to anchor wick)
- Fragrance oil (best scent throw) or essential oils (lighter scent)
- Amber glass jar with lid (or a matte neutral tin)
- Thermometer (or candy thermometer)
- Pouring pitcher or heat-safe measuring cup
- Chopstick or wick centering tool
- Optional: warning label for the bottom, care card
Why candles go wrong (and how to avoid it)
Candles look simple, but small details matter. Temperature controls adhesion, scent throw, and whether you get weird sinkholes. The good news is you don’t need perfection, you just need a few smart habits.
Steps
- Prep the jar and wick
- Stick the wick to the center of the jar using a wick sticker.
- Keep it straight with a chopstick across the top.
- Melt the wax
- Melt slowly and evenly. Overheating can cause more frosting and rough tops later.
- Cool slightly before adding fragrance
- Add fragrance when the wax cools a bit from peak heat.
- If you add it too hot, you can burn off scent and weaken throw.
- Pour and leave it alone
- Pour steadily, then let it set without moving.
- Drafts and constant “checking on it” can cause rough tops.
- Trim the wick and cure
- Trim wick to about 1/4 inch.
- Let it cure before gifting if possible, scent throw improves as it sits.
Pro Tips (the stuff that makes it look pro)
- Smooth top hack: If the top sets slightly uneven, hit it with a quick pass of a heat gun or a hair dryer on low to re-melt the surface.
- Jar adhesion: Warm the jar slightly before pouring if your room is cold, cold glass can cause wax pull-away.
- Care card = fancy: Add a tiny card that says:
- First burn: 2 to 3 hours
- Trim wick before each burn
- Stop burning with 1/2 inch wax left
Neutral aesthetic packaging (clean, calm, expensive-looking)
- Wrap the jar in cream matte paper or place it in a small kraft box.
- Tie with soft satin ribbon (this is where it gets luxe fast).
- Add one focal detail:
- a wax seal on a tag (tag method, not directly on textured wrap), or
- a simple stamped label on the box
Optional upgrade: include a tiny match vial wrapped in the same palette so it looks like a set.
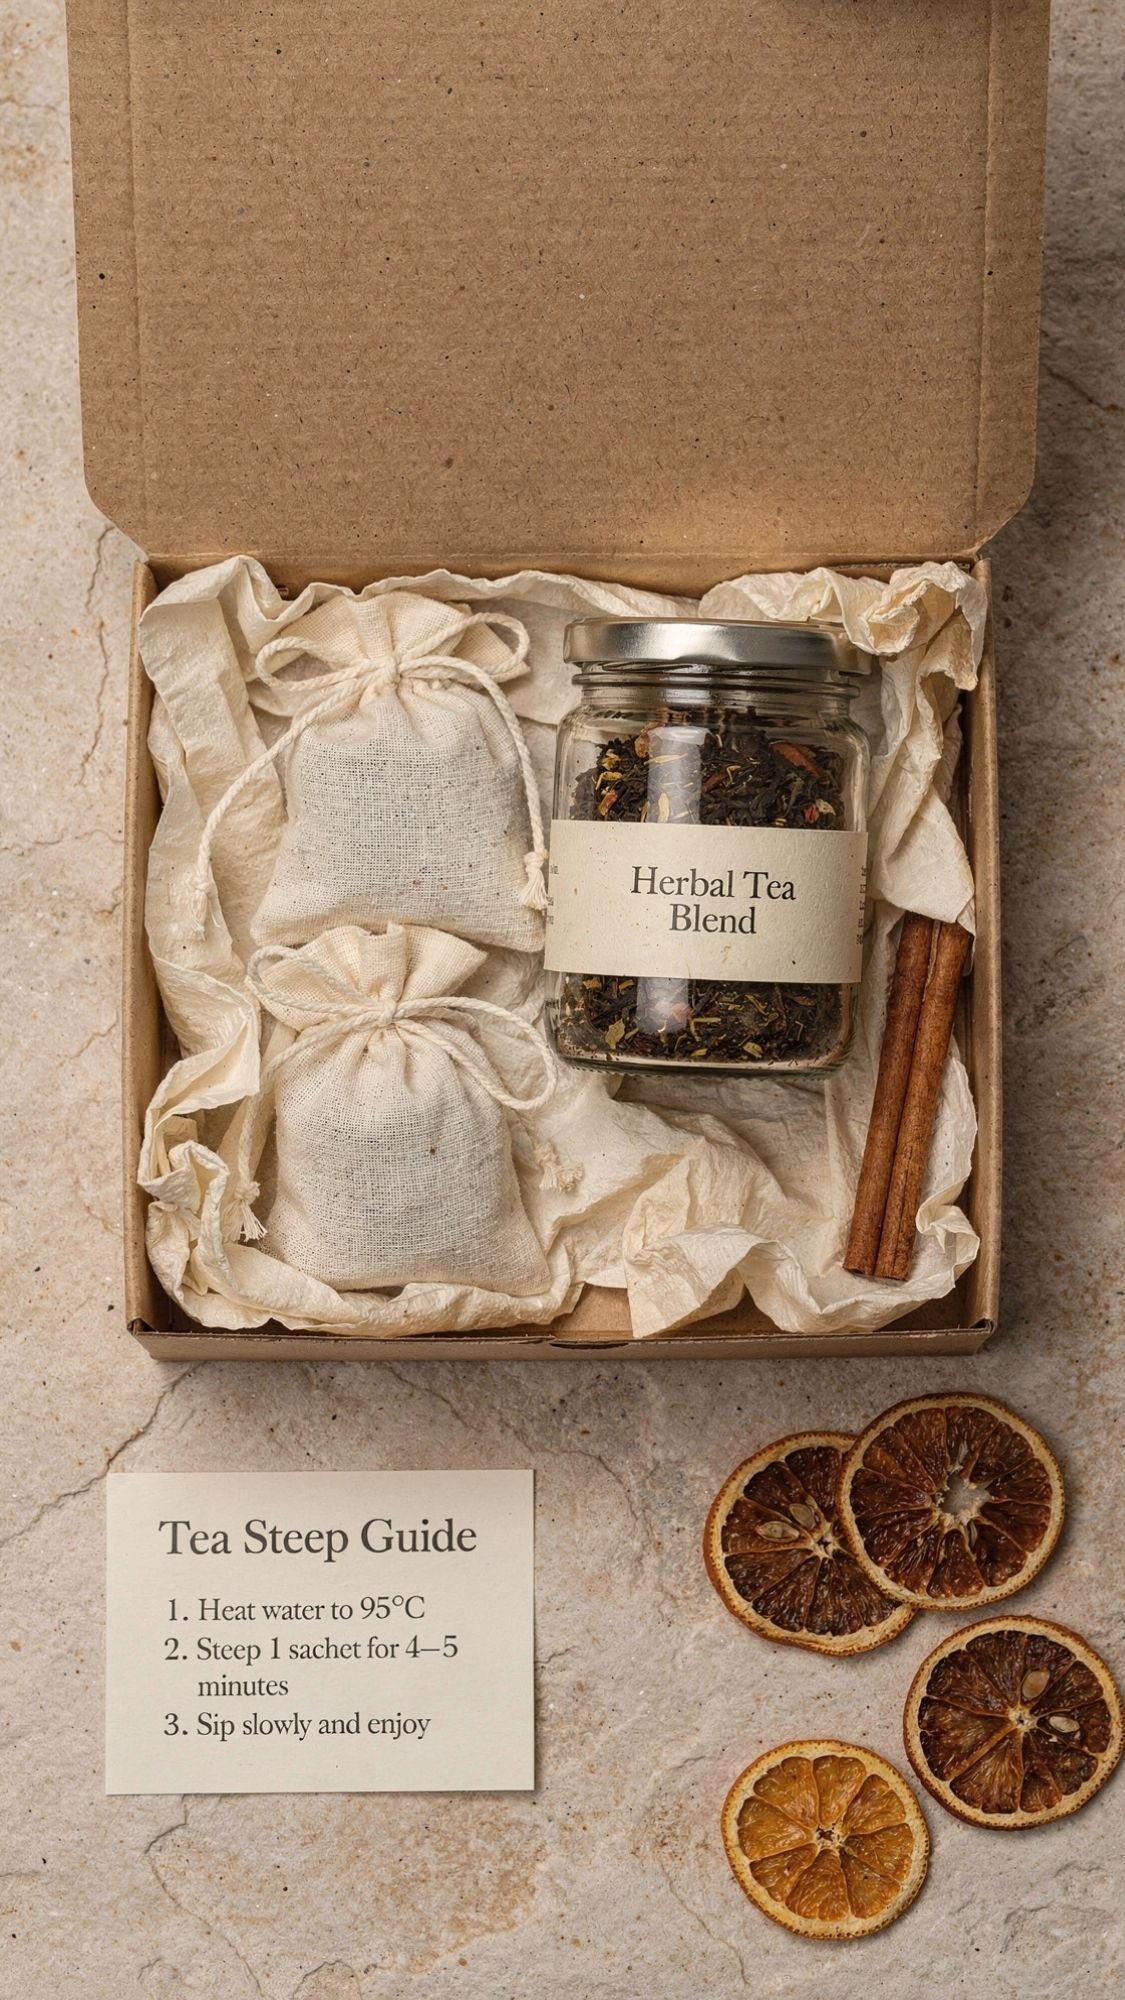
4) DIY Tea Blend + Muslin Sachets: Cute, useful, and feels thoughtful
This one works for pretty much every type of mom because it’s cozy, practical, and easy to personalize without getting cheesy. Also, tea in neutral packaging looks ridiculously good in photos. It’s basically made for kraft paper and linen ribbon.
What you’ll need
- Loose leaf tea base (black, green, rooibos, or herbal)
- Dried add-ins (pick 1 to 3):
- dried lavender buds
- dried rose petals
- dried chamomile
- dried orange peel
- cinnamon chips
- Muslin tea bags or reusable muslin sachets
- Small tin or glass jar (optional)
- Mini scoop or teaspoon
- Tag or label, kraft box or muslin bag for packaging
Easy blend formulas (so you don’t guess)
Choose one “recipe” so it tastes intentional, not like you dumped your spice rack into a bowl.
- Calm Mom Blend (caffeine-free)
- rooibos + chamomile + a pinch of lavender
- Cozy Citrus Blend
- black tea + dried orange peel + tiny pinch cinnamon
- Soft Floral Blend
- green tea + rose petals + a few lavender buds
Steps
- Mix your blend in a bowl and smell-test first. If it smells balanced, it usually tastes balanced.
- Fill sachets 2/3 full. Tea needs room to expand, packed bags brew weak and sad.
- Add a steep card. This makes it feel premium and prevents the “how long do I steep this?” text later.
Pro Tips (that make it feel like a real product)
- Keep lavender light. Too much turns “spa” into “soap aisle.”
- Add a note if the blend includes citrus peel, it can be stronger after steeping.
- If you’re including a tin, line the bottom with a circle of parchment for a clean look.
Neutral aesthetic packaging (boutique tea shop vibe)
- Put sachets in a small kraft box or muslin drawstring bag.
- Tie with linen ribbon or twine.
- Add a minimal tag with:
- Blend name
- Caffeine level
- Steep time
Optional: tuck in a small dried orange slice or a tiny eucalyptus sprig as the focal detail.

5) Vanilla Bean Simple Syrup: For coffee moms, tea moms, and “I deserve a little treat” moms
This gift feels like you bought it at a fancy café, but you can make it with two ingredients and a little patience. It also looks ridiculously good in neutral packaging because a clear bottle plus a clean label reads premium right away. Ever poured something into a glass bottle and suddenly felt like you have your life together? Same.
What you’ll need
- 1 cup granulated sugar
- 1 cup water
- 1 vanilla bean (or 1 to 2 tsp vanilla extract as backup)
- Small glass bottle with lid or swing top (8 to 12 oz)
- Small saucepan
- Spoon
- Funnel
- Optional: label, tag, linen or velvet ribbon
Why this works
- Equal parts sugar and water creates a syrup that pours easily and mixes well in drinks.
- Vanilla bean adds a deeper flavor than extract, and it looks beautiful in the bottle.
Steps
- Combine sugar and water in a saucepan. Stir over medium heat until the sugar dissolves. Don’t boil hard, you want a gentle simmer.
- Split the vanilla bean and scrape the seeds. Drop the seeds and the pod into the pan for full flavor.
- Simmer for 8 to 10 minutes. Keep it low and steady. You want the syrup slightly thickened, not candy.
- Cool completely. Syrup thickens more as it cools. Hot syrup in a bottle can create condensation.
- Bottle it with a funnel. Slide the vanilla pod into the bottle for that boutique look.
Pro Tips (so it tastes and stores like a “real” product)
- Sterilize the bottle if you want longer fridge life.
- Rinse with boiling water, then air-dry fully.
- No vanilla bean? Use extract, but add it after cooling so heat doesn’t dull the flavor.
- Want it thicker? Simmer 2 to 3 minutes longer, then cool and re-check.
Shelf life: 2 to 3 weeks in the fridge, longer if you sterilize well and keep the bottle clean.
Quick troubleshooting
- Syrup crystallized in the fridge: You boiled too hot or used too much sugar.
- Fix: warm gently and stir until smooth.
- Syrup looks cloudy: You stirred too aggressively while simmering or bottled it hot.
- Fix: let it settle, it still tastes fine. Next time cool fully before bottling.
- Flavor feels weak: You didn’t simmer long enough with the pod.
- Fix: add the pod back in and let it sit overnight in the fridge.
Neutral aesthetic packaging (simple, luxe, photogenic)
- Wrap the bottle with a cream paper belly band or a minimal label.
- Tie a velvet ribbon or linen ribbon around the neck.
- Add a small tag that says:
- “Vanilla Bean Syrup”
- “Keep Refrigerated”
- “Best within 3 weeks”
Optional upgrade: pair it with a tiny scoop of good coffee or a mini match jar for a full “morning ritual” gift.

6) Bath Salt Soak Tubes: Easy “spa moment” gift that always looks expensive
Bath salts are one of the fastest DIY gifts that still feels like a treat. And because the ingredients look pretty on their own, you don’t have to over-style anything. The packaging does the heavy lifting, glass tubes, a clean label, and one small detail and you’re done.
What you’ll need
- 2 cups Epsom salt
- 1/2 cup pink Himalayan salt (optional, adds color and texture)
- 1 tbsp baking soda (optional, softens the feel)
- 10 to 20 drops essential oil (lavender, eucalyptus, or sweet orange)
- Optional add-ins (keep it minimal):
- dried rose petals or lavender buds
- a spoonful of dried rosemary
- Glass tubes with corks, small jars, or test-tube style bottles
- Small funnel, spoon
- Labels or tags, linen ribbon or twine
Why this formula works
- Epsom salt dissolves well and feels soothing.
- A second salt adds texture so it looks elevated in a clear tube.
- Baking soda can soften the soak, but you can skip it if you want the simplest version.
Steps
- Mix salts in a bowl first. This helps you distribute texture evenly before adding scent.
- Add essential oil to the dry mix slowly. Drip, stir, then repeat. If you dump it all in, you get scent “hot spots.”
- Add dried botanicals last and lightly. Too many petals look messy and can annoy the drain.
- Fill tubes using a funnel. Tap the tube gently on the counter to settle layers cleanly.
- Seal and wipe the glass. A clean tube looks ten times more premium.
Pro Tips (the “looks like a store product” stuff)
- Keep petals to a pinch per tube. Pretty, not clogged-pipe energy.
- If you want that layered look, fill slowly and alternate textures, but don’t overdo it.
- Add a small note card: “Pour into warm bath, soak 15 to 20 minutes.”
Shelf life: 6 months if stored dry and sealed.
Neutral aesthetic packaging (clean and coordinated)
- Use cream minimalist labels with simple text:
- “Lavender Bath Soak”
- “Epsom + Mineral Salts”
- Tie a linen ribbon around the tube neck or cork.
- Add one focal detail:
- tiny dried sprig tucked under the ribbon, or
- a simple tag with bath instructions
Optional upgrade: bundle 2 to 3 tubes together with a kraft belly band and ribbon.
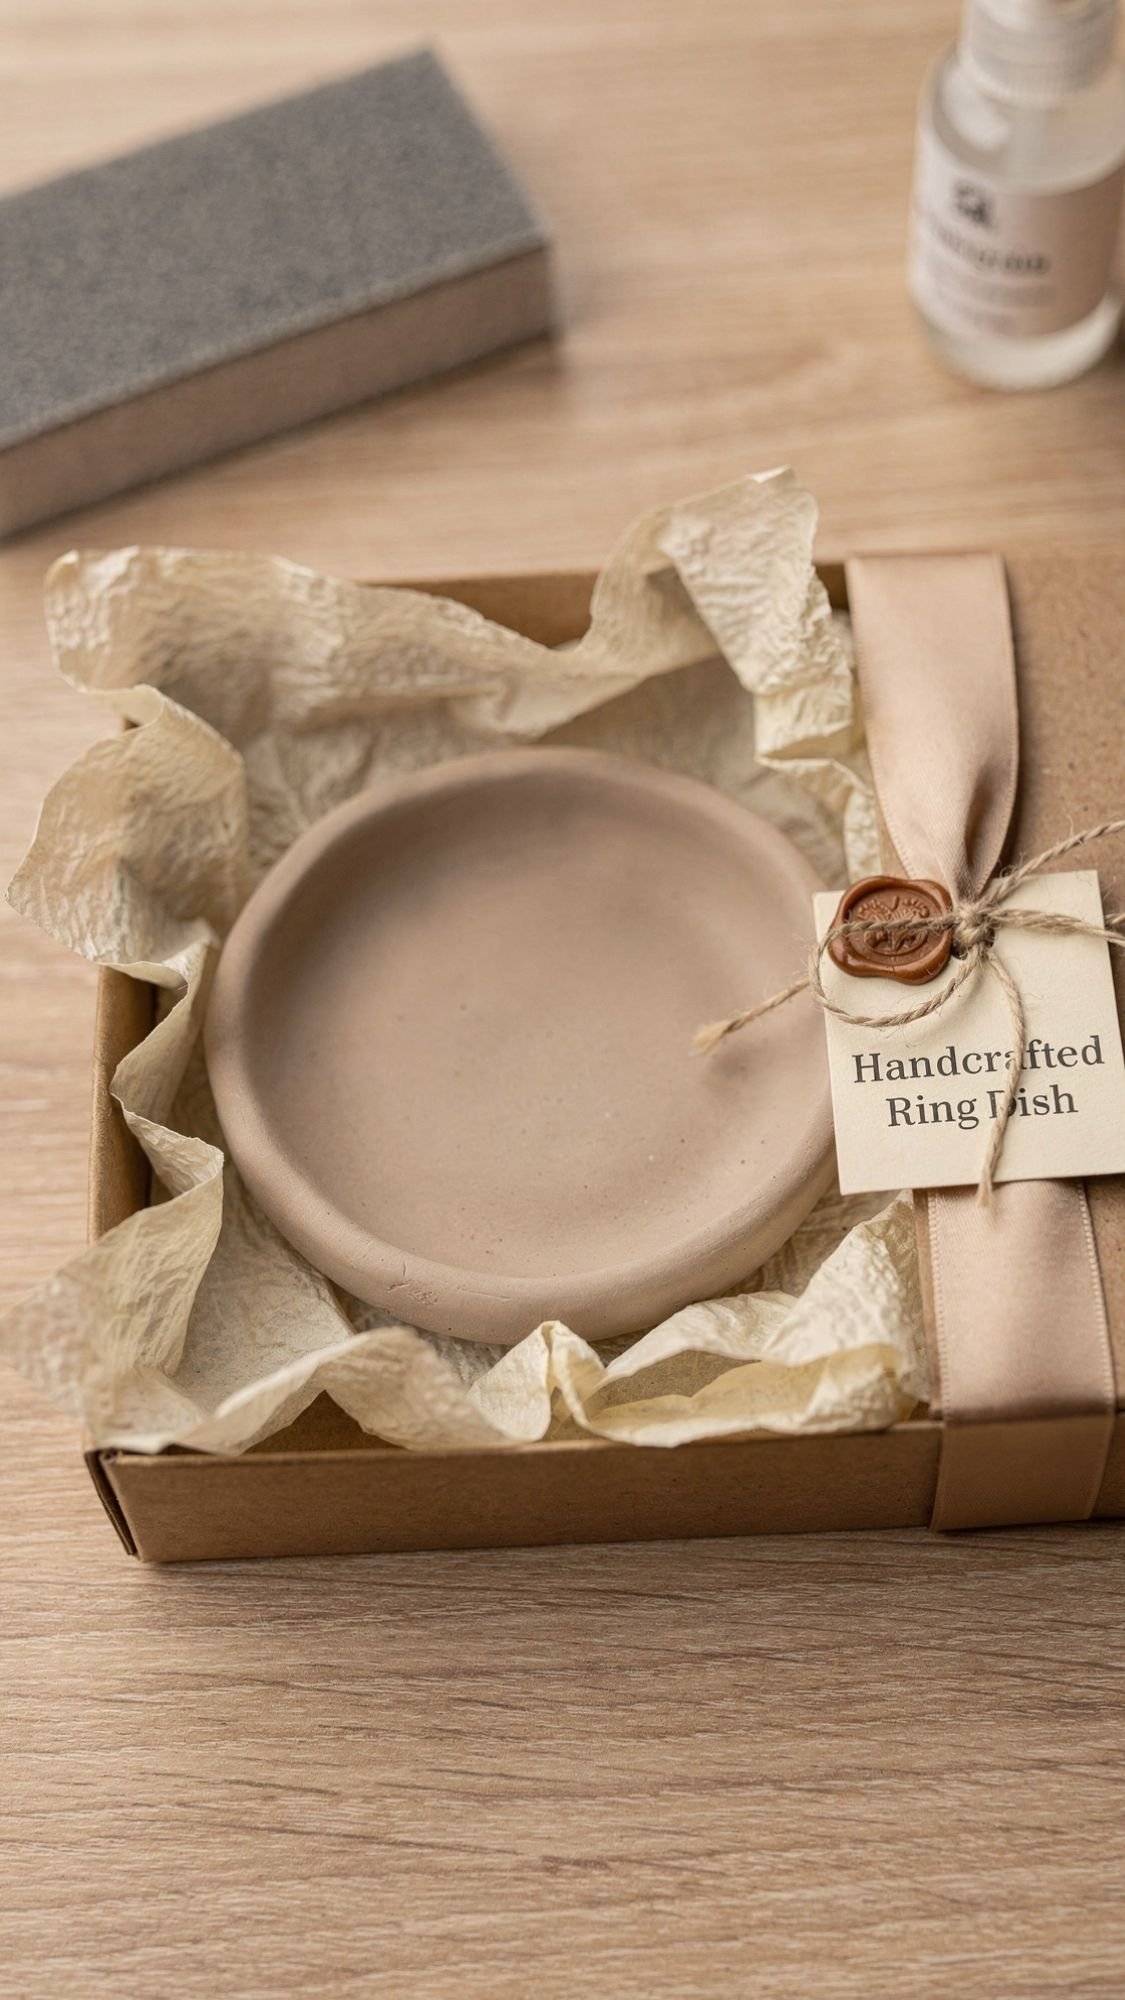
7) Air-Dry Clay Ring Dish: Tiny gift, big “aww” reaction
This is the kind of gift that looks small but feels personal, because Mom will actually use it daily. It’s also perfect for neutral aesthetic packaging since clay already lives in that soft, minimal world. The only thing that can ruin it is rushing the dry time, clay loves to humble people.
What you’ll need
- Air-dry clay (white, stone, or “natural” tone)
- Rolling pin (or a smooth bottle)
- Craft knife or clay cutter
- Small bowl (to shape the dish)
- Fine grit sandpaper (220 to 400)
- Acrylic paint or metallic leaf pen (optional)
- Sealer (water-based polyurethane, Mod Podge, or a clear acrylic spray)
- Optional: rubber stamp for a texture edge, stencil for initials
Why this works
- Air-dry clay gives you that handmade ceramic look without a kiln.
- A simple shallow dish shape makes it practical for rings, earrings, or keys.
Steps
- Roll clay to an even thickness. Aim for about 1/4 inch. If it’s too thin, it warps. If it’s too thick, it takes forever to dry.
- Cut your shape. Circle, oval, soft square, whatever fits your style.
- Smooth the edges now. Use a damp finger to soften the edge while the clay is still workable.
- Shape it in a bowl. Place the clay cutout inside a small bowl so it curves gently.
- Dry fully before sanding. Most air-dry clay needs 24 to 48 hours depending on thickness and humidity.
- Sand smooth. Light sanding gives you that “store-bought” finish.
- Seal it. This step matters. Without sealer, the dish can stain and absorb moisture.
Pro Tips (so it doesn’t look like a kindergarten art project)
- Keep your hands and surface lightly damp, not wet. Too much water makes clay mushy.
- Sand edges in small circles, don’t dig in, or you’ll create flat spots.
- Seal in thin coats. Thick coats can dry cloudy.
Neutral aesthetic packaging (simple and luxe)
- Nestle the dish in a small kraft box with cream tissue.
- Add a thin satin ribbon across the box.
- Add one focal detail:
- wax seal on a tag, or
- minimalist label on the box lid
Optional upgrade: include a tiny microfiber jewelry cloth in matching neutral tones.
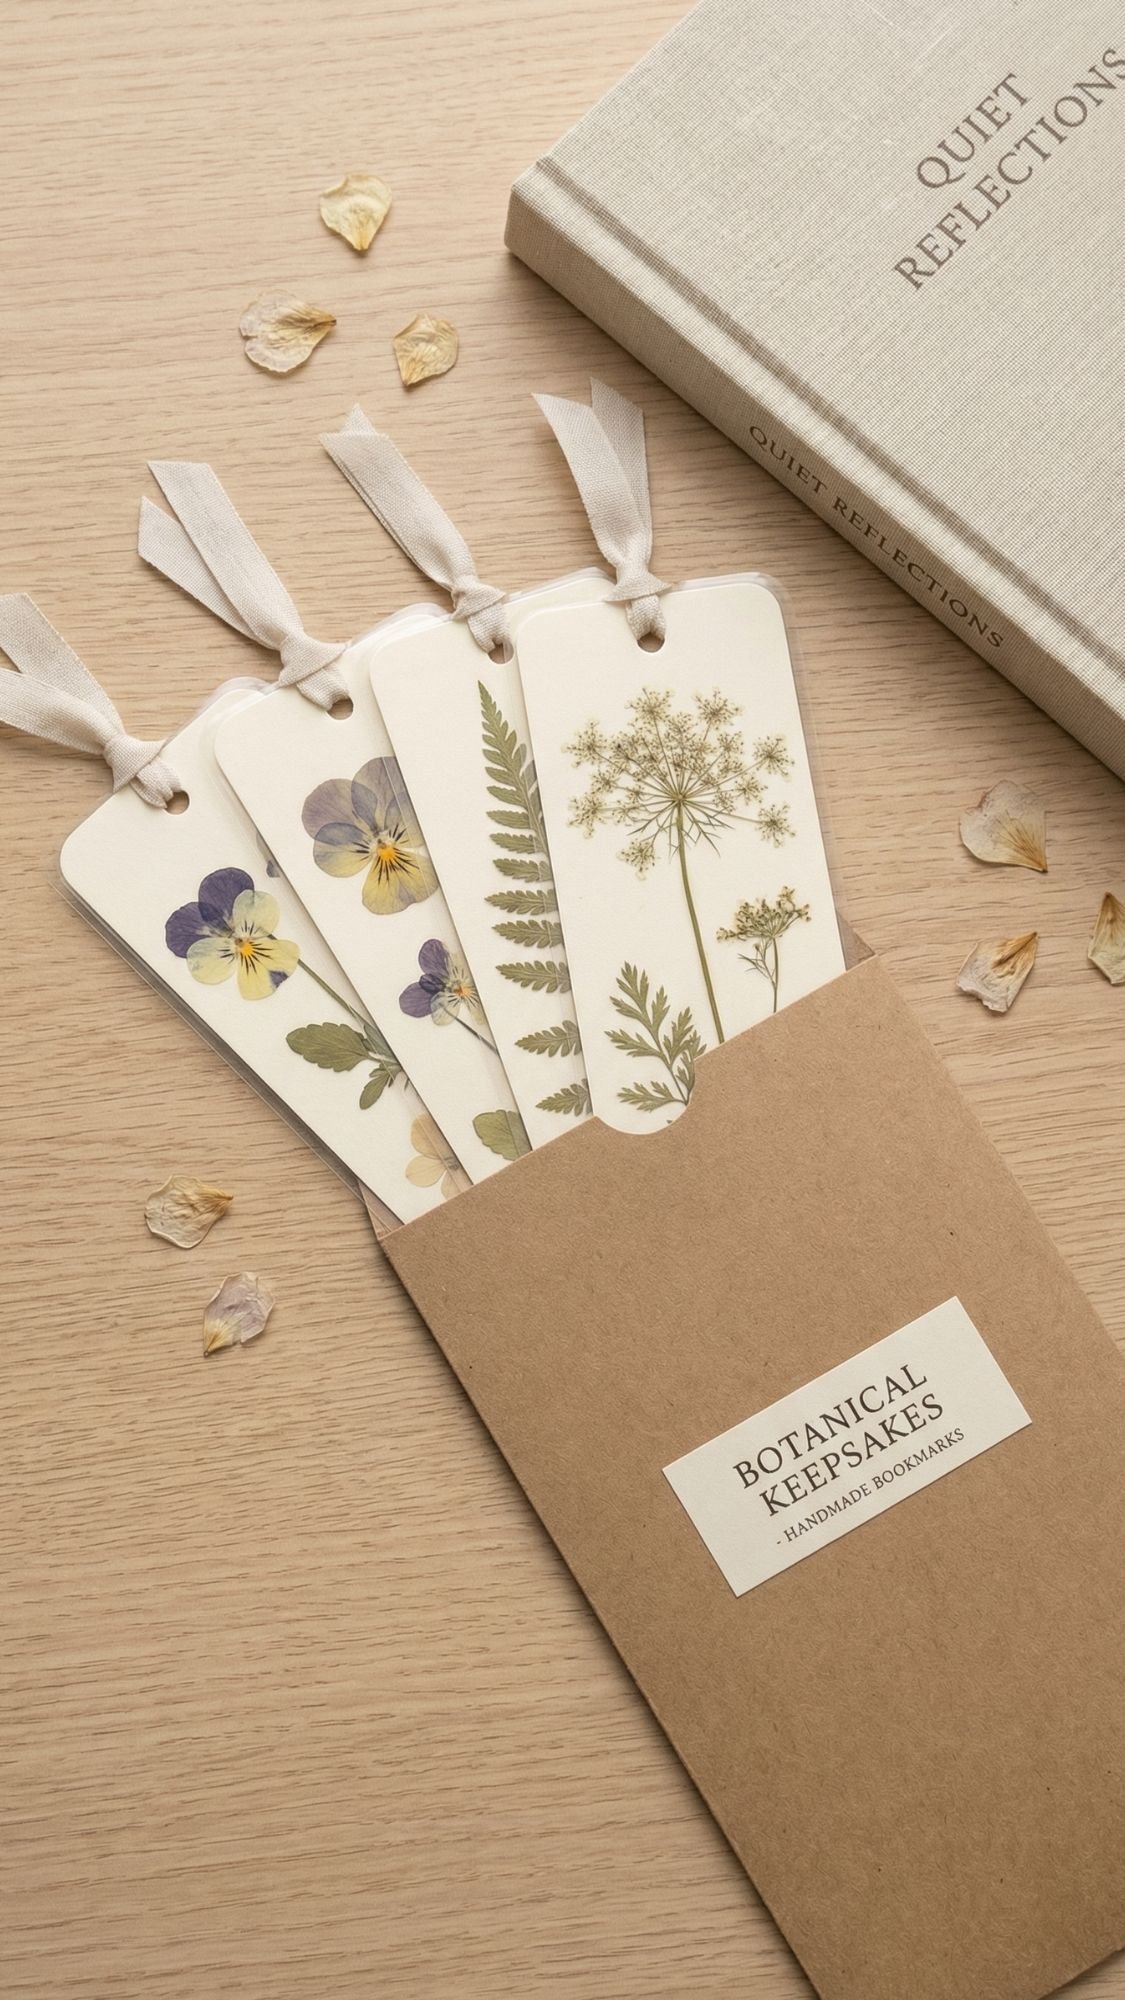
8) Pressed Flower Bookmark Set: Pretty, flat, and actually useful
These are sweet, lightweight, and easy to bundle into a gift that looks intentional. They also fit the neutral aesthetic perfectly because you can keep the base creamy and let the flowers be the soft accent. Plus, bookmarks are one of those gifts moms actually use, because they’re not “clutter,” they’re “I’m reading and thriving.” 🙂
What you’ll need
- Pressed flowers or leaves (fully dried)
- Heavy cardstock in cream, beige, or white
- Clear laminating sheets, self-adhesive laminating pouches, or clear film
- Scissors or paper trimmer
- Corner rounder (optional but makes it look pro)
- Hole punch
- Linen ribbon or thin cotton string
- Kraft sleeve or small box for packaging
Why these turn out well (and why they sometimes don’t)
Pressed flowers look best when they’re totally dry. If they hold any moisture, they brown or create cloudy spots under laminate. The clean cardstock base keeps the look modern, even if the flowers are delicate.
Steps
- Cut your cardstock blanks. Bookmark sizes that work well: roughly 2 x 6 inches or 2 x 7 inches.
- Arrange pressed flowers on the card. Keep it minimal, one main stem and maybe one tiny accent.
- Seal with laminate or clear film. Smooth from the center outward to avoid bubbles.
- Trim cleanly. Leave a small clear border around the edges so the seal stays strong.
- Round corners and punch a hole.
- Tie a linen ribbon tail. Keep it short and neat so it doesn’t look messy.
Pro Tips (for clean, boutique-level results)
- Use tweezers to place flowers so you don’t smudge or crack petals.
- If bubbles appear, press them out with a credit card edge before the laminate fully sets.
- Skip chunky flowers. Flat petals look cleaner and laminate better.
Neutral aesthetic packaging (gift shop vibes)
- Stack 3 to 5 bookmarks and tie them with linen ribbon.
- Slide into a kraft sleeve or wrap in a narrow band of cream paper.
- Add a minimalist tag:
- “Pressed Flower Bookmarks”
- “Set of 5”
- Optional: “Made for your next cozy read”
Optional upgrade: add a tiny note card with suggested reads or a favorite quote, keep it short.
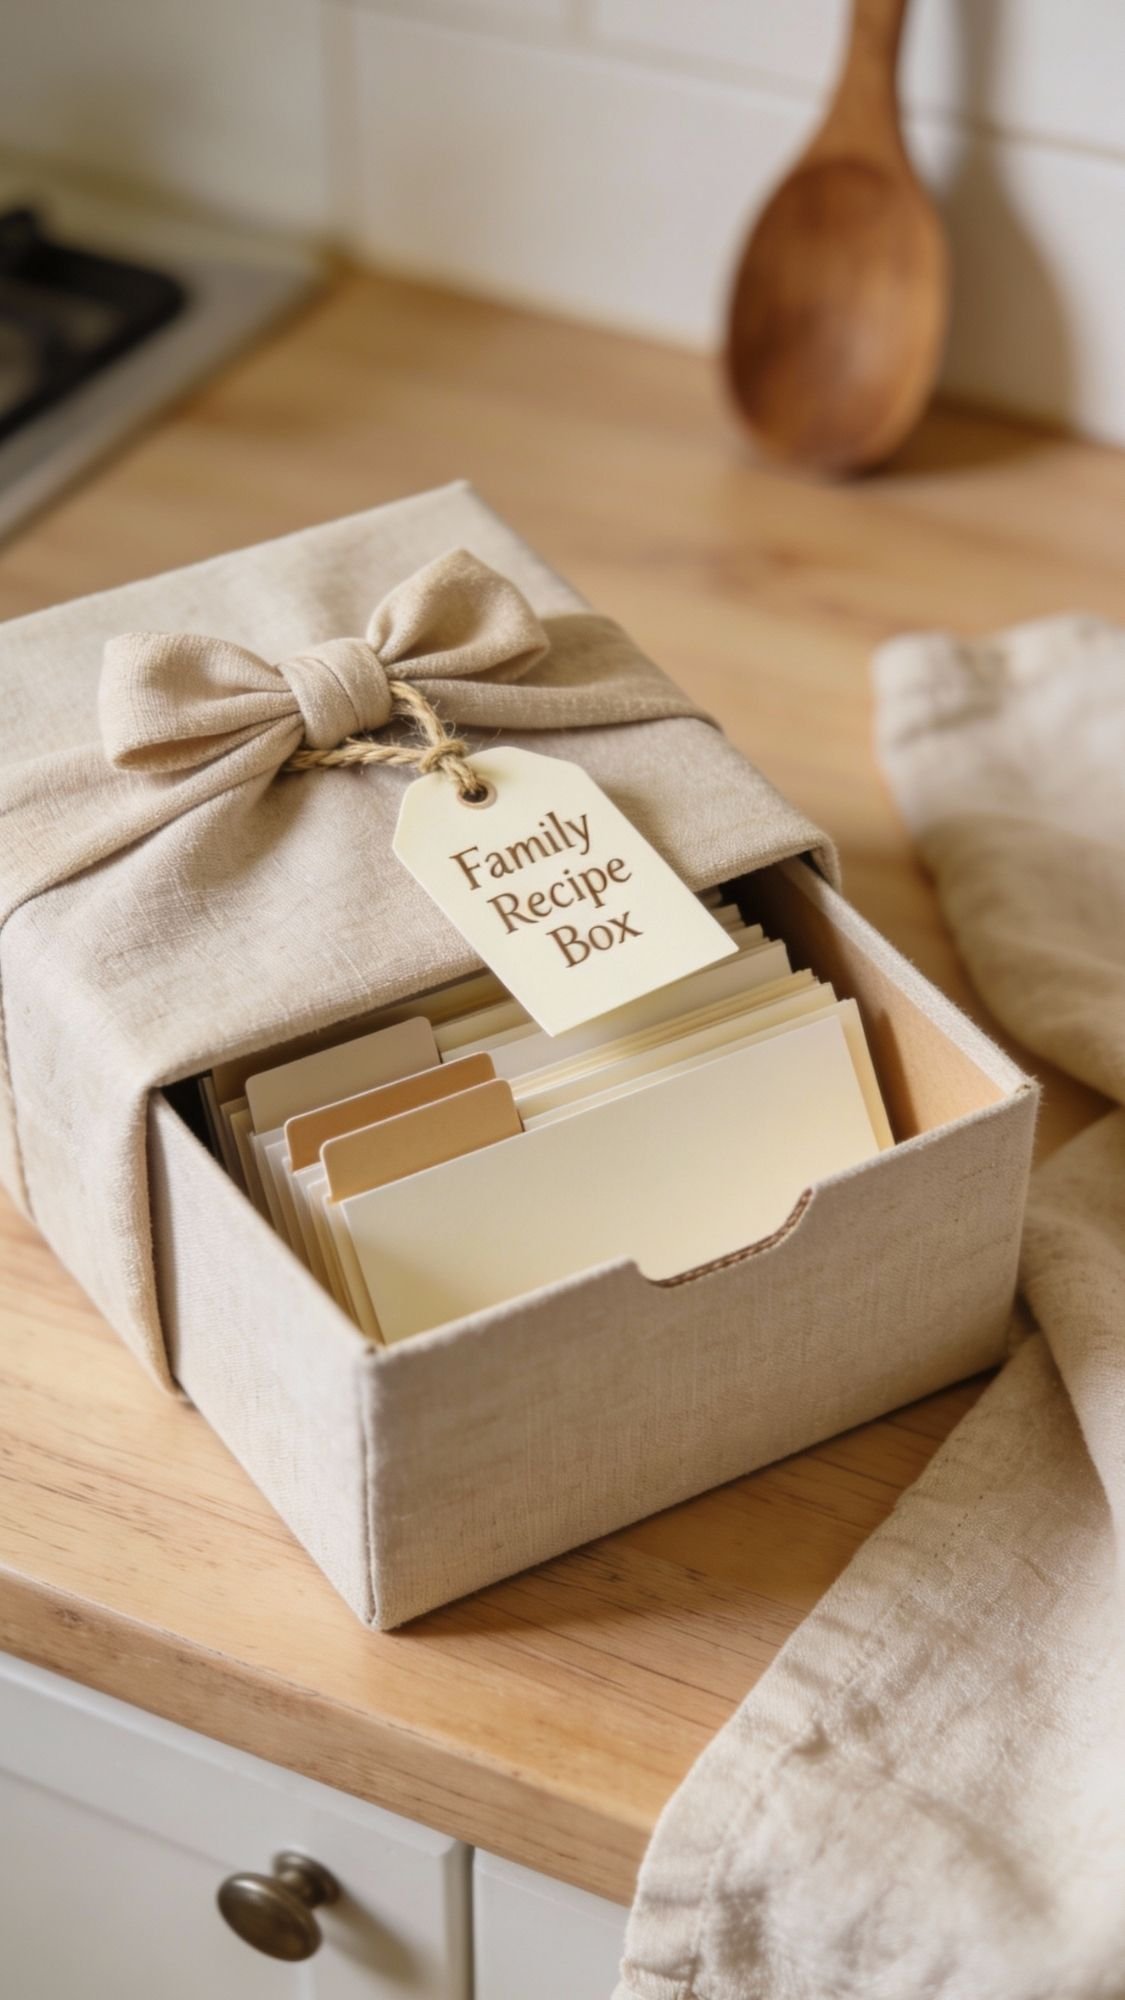
9) Personalized Recipe Card Box: Sentimental, practical, and not cheesy
This is the gift that makes Mom pause for a second, in a good way. It’s useful, it’s personal, and it doesn’t turn into shelf clutter because she can actually keep adding to it over time. Also, a neutral recipe box looks so clean on a counter, it basically decorates itself.
What you’ll need
- Recipe cards (4×6 works great)
- Archival pen (so ink does not smear over time)
- Small recipe box (wood, kraft, or linen-style)
- Optional dividers (Breakfast, Dinner, Desserts, Family Favorites)
- Optional extras:
- corner rounder
- label maker or stamped label
- thin ribbon or twine
What makes this gift feel truly personal
A blank box feels unfinished. A box with a few starter cards feels like a gift. You want Mom to open it and immediately think, “Oh, I can use this.”
Steps
- Pick a theme for the starter set. Examples: “Family Favorites,” “Comfort Meals,” or “Sunday Baking.”
- Write 5 to 8 starter recipe cards. Include a few easy wins, plus one sentimental one.
- Add 3 to 5 prompt cards. These make it easier for Mom to keep going.
- Organize with dividers. Keep it simple, too many categories gets ignored.
- Add one short note card. One sentence is enough. You’re not writing a novel.
Starter card ideas (quick wins)
- A breakfast recipe she already makes
- A “busy night” dinner
- A holiday favorite
- A dessert everyone requests
- A drink recipe (tea blend, hot cocoa, iced coffee)
Prompt cards that get used
- “A recipe I learned from my mom”
- “The meal that feels like home”
- “What I make when I want to celebrate”
- “The dish I make when someone feels sick”
- “My go-to potluck recipe”
Pro Tips (so it looks polished, not scrapbook-y)
- Use consistent formatting on each card:
- Title
- Ingredients
- Steps
- Notes
- Leave space at the bottom for “Make it again?” notes.
- If you use a wooden box, lightly sand rough edges so it feels smooth in-hand.
Neutral aesthetic packaging (clean, boutique, gift-ready)
- Wrap the recipe box in a neutral fabric wrap and tie a simple knot.
- Add a cream tag with clean text:
- “Recipe Box”
- “Family Favorites”
- Place it in a kraft box if you want extra protection, then add one focal detail like a wax seal tag.
Optional upgrade: include a tiny bundle of blank cards tied with ribbon inside the box so Mom can start immediately.

10) Stamped Muslin Gift Bags: The packaging becomes part of the gift
This is one of my favorite “why does this look so expensive?” tricks because you’re not just wrapping a gift, you’re giving Mom reusable packaging she’ll actually keep. Muslin bags can become travel organizers, seed storage, purse catch-alls, or those mysterious “I’ll use this later” bags every mom hoards forever.
What you’ll need
- Plain muslin drawstring bags (small or medium)
- Rubber stamp (simple shapes or minimal text)
- Fabric ink pad or fabric paint + foam sponge
- Scrap cardboard (to put inside the bag while stamping)
- Iron (for heat-setting if your ink requires it)
- Linen ribbon or twine
- Cream tags for labeling
Why this works
Muslin already reads neutral, soft, and elevated. Add one clean stamp and suddenly it looks like custom boutique packaging, not “I grabbed a bag.” The key is keeping the design minimal so it stays modern.
Steps
- Pre-press the bag. Quick iron = cleaner stamp impression and prettier photos.
- Insert cardboard inside the bag. This prevents bleed-through and keeps the surface flat.
- Test your stamp on scrap muslin first. You want even pressure, not a blotchy stamp moment.
- Stamp the bag in one confident press. Press down, hold 2 seconds, lift straight up.
- Let it dry fully. Then heat-set if required by your ink.
Pro Tips (for crisp stamps, not blurry mess)
- Use fabric ink, not regular stamp ink. Regular ink tends to bleed and fade.
- Less ink beats more ink. Over-inking is the fastest way to a fuzzy stamp.
- If the stamp looks uneven, don’t keep re-stamping in the same spot. Let it dry, then stamp a fresh bag. Trust me.
Neutral aesthetic packaging idea (how to gift them)
You can gift these on their own as a set, or use them to hold any of the other DIY gifts in this post.
- Stack 3 muslin bags (small, medium, large if you have them)
- Tie with linen ribbon
- Add a cream tag with “Uses” like:
- “Travel pouch”
- “Seed storage”
- “Purse organizer”
- “Charging cords”
Optional upgrade: tuck a small sprig of dried lavender or eucalyptus under the ribbon knot.
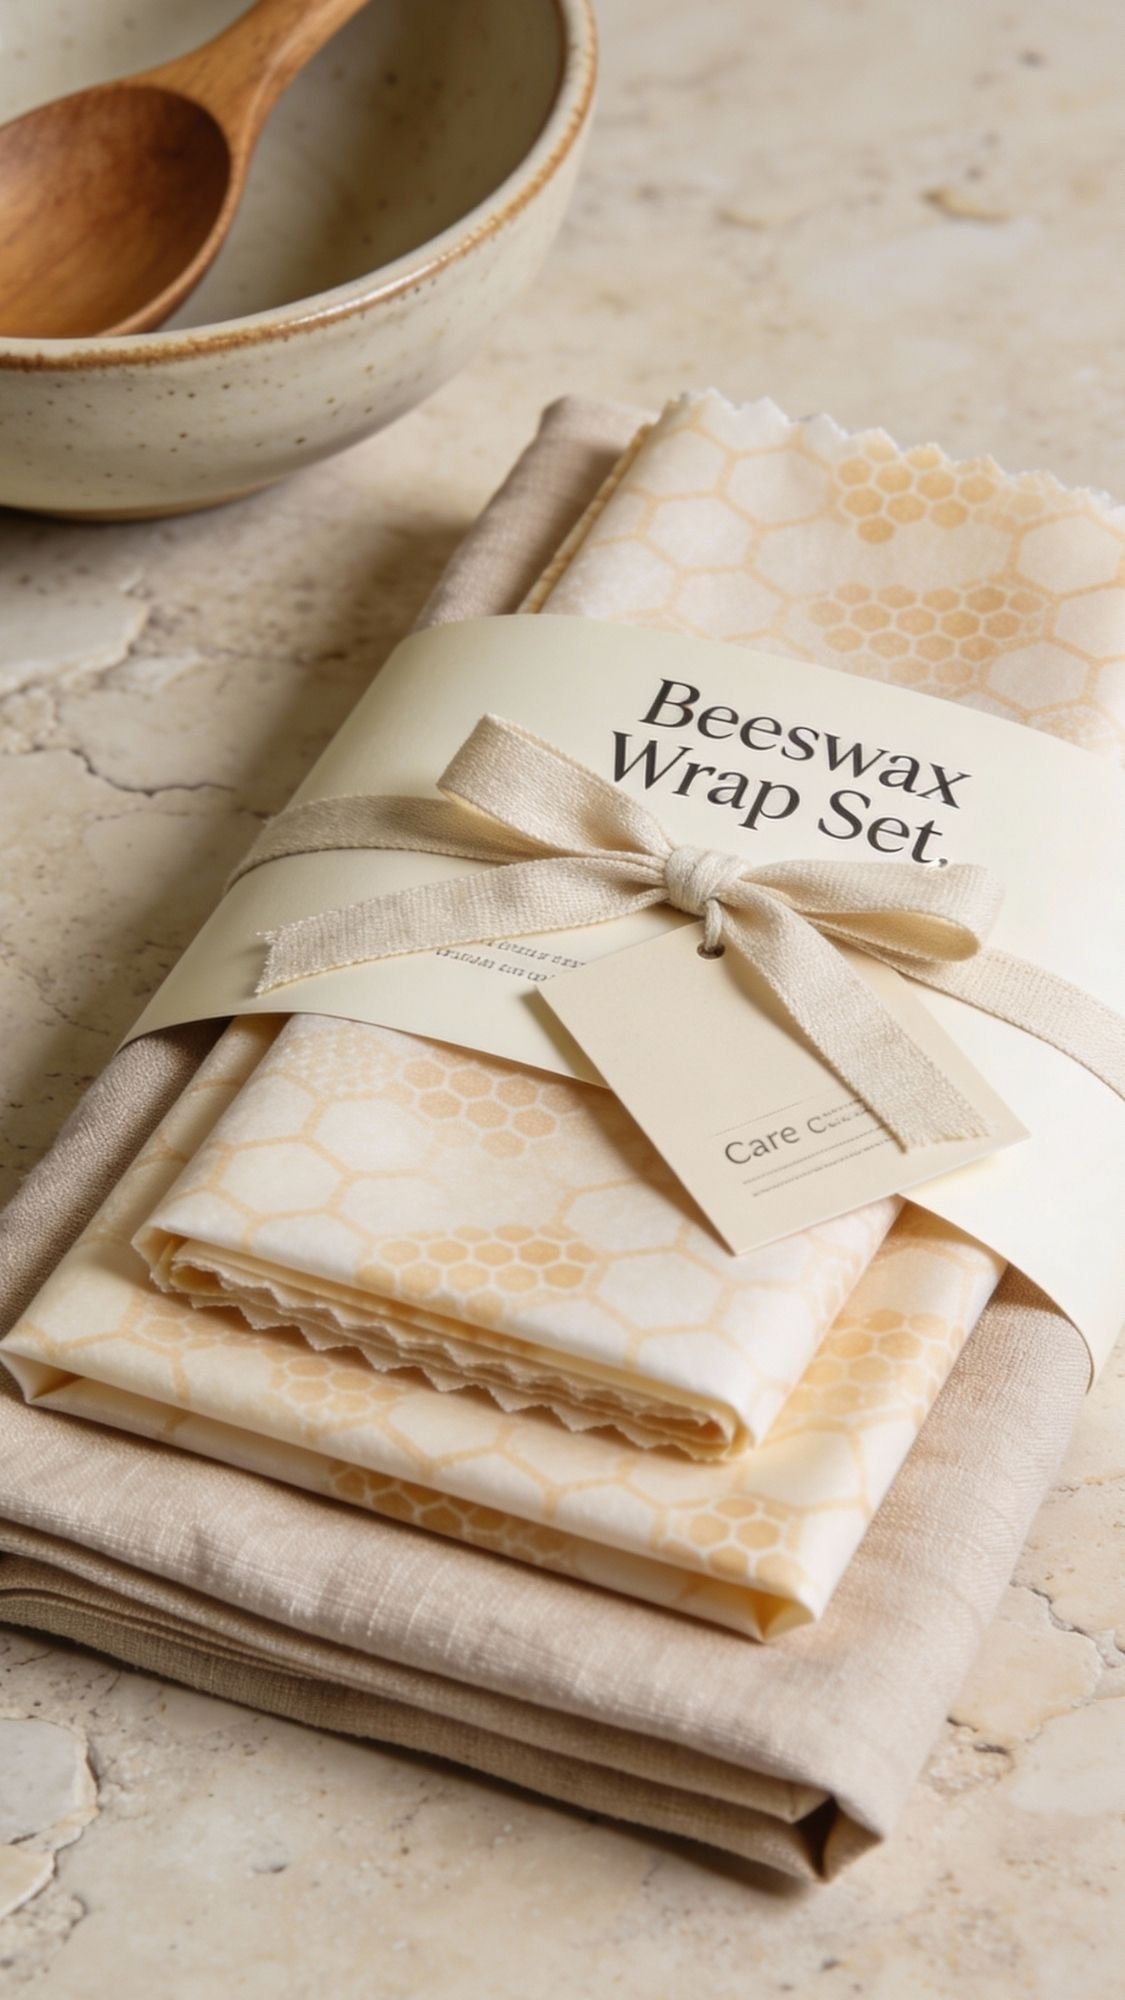
11) Beeswax Wrap Set: Zero-waste, useful, and looks so polished in neutrals
This one feels like a “real” product gift, especially when you package it like a little set. Moms who cook, meal prep, or just hate wasting plastic wrap will actually use these. And neutral fabric prints with beeswax wraps look clean and modern, not crunchy.
What you’ll need
- 100% cotton fabric (neutral print or solid, pre-washed)
- Beeswax pellets (or a beeswax wrap bar)
- Optional: pine resin (adds stickiness) + jojoba oil (adds flexibility)
- Parchment paper
- Baking sheet or iron
- Scissors or rotary cutter
- Kraft sleeve or small box for packaging
- Linen ribbon + tag
Why these work (and why some turn out stiff and weird)
Beeswax wraps need a thin, even wax layer. Too much wax makes them stiff and greasy. Too little wax makes them dry and not sticky enough to seal around bowls. The “sweet spot” is an even coat that still lets the fabric flex.
Steps (oven method, easiest to control)
- Cut fabric into a set
- Small: about 7×7 (snacks)
- Medium: about 10×10 (bowls)
- Large: about 13×13 (bread or bigger bowls)
- Place fabric on parchment-lined baking sheet.
- Sprinkle a light, even layer of beeswax pellets.
- Bake at low heat until wax melts.
- Use a brush to spread wax evenly if needed.
- Lift and wave gently to cool.
- It sets quickly as it cools.
Pro Tips (for flexible wraps that actually work)
- Use a neutral fabric with small print, big prints can look busy when wax deepens color.
- If the wrap feels patchy, reheat it for a short time and smooth again.
- If it feels too waxy, place between parchment and iron briefly to redistribute and absorb excess.
Neutral aesthetic packaging (clean set, gift-ready)
- Stack wraps by size and fold into neat rectangles.
- Slide into a kraft sleeve or wrap with a cream belly band.
- Tie with linen ribbon and add a tag:
- “Beeswax Wrap Set”
- “Handwash cold, air dry”
- “Do not use with raw meat”
Optional upgrade: include a small care card tucked inside the band.
Care instructions (so Mom doesn’t ruin them on day one)
- Wash in cool water with mild soap.
- Air dry only.
- Avoid heat, hot water, and dishwashers.
- Refresh later with a short warm oven cycle if needed.
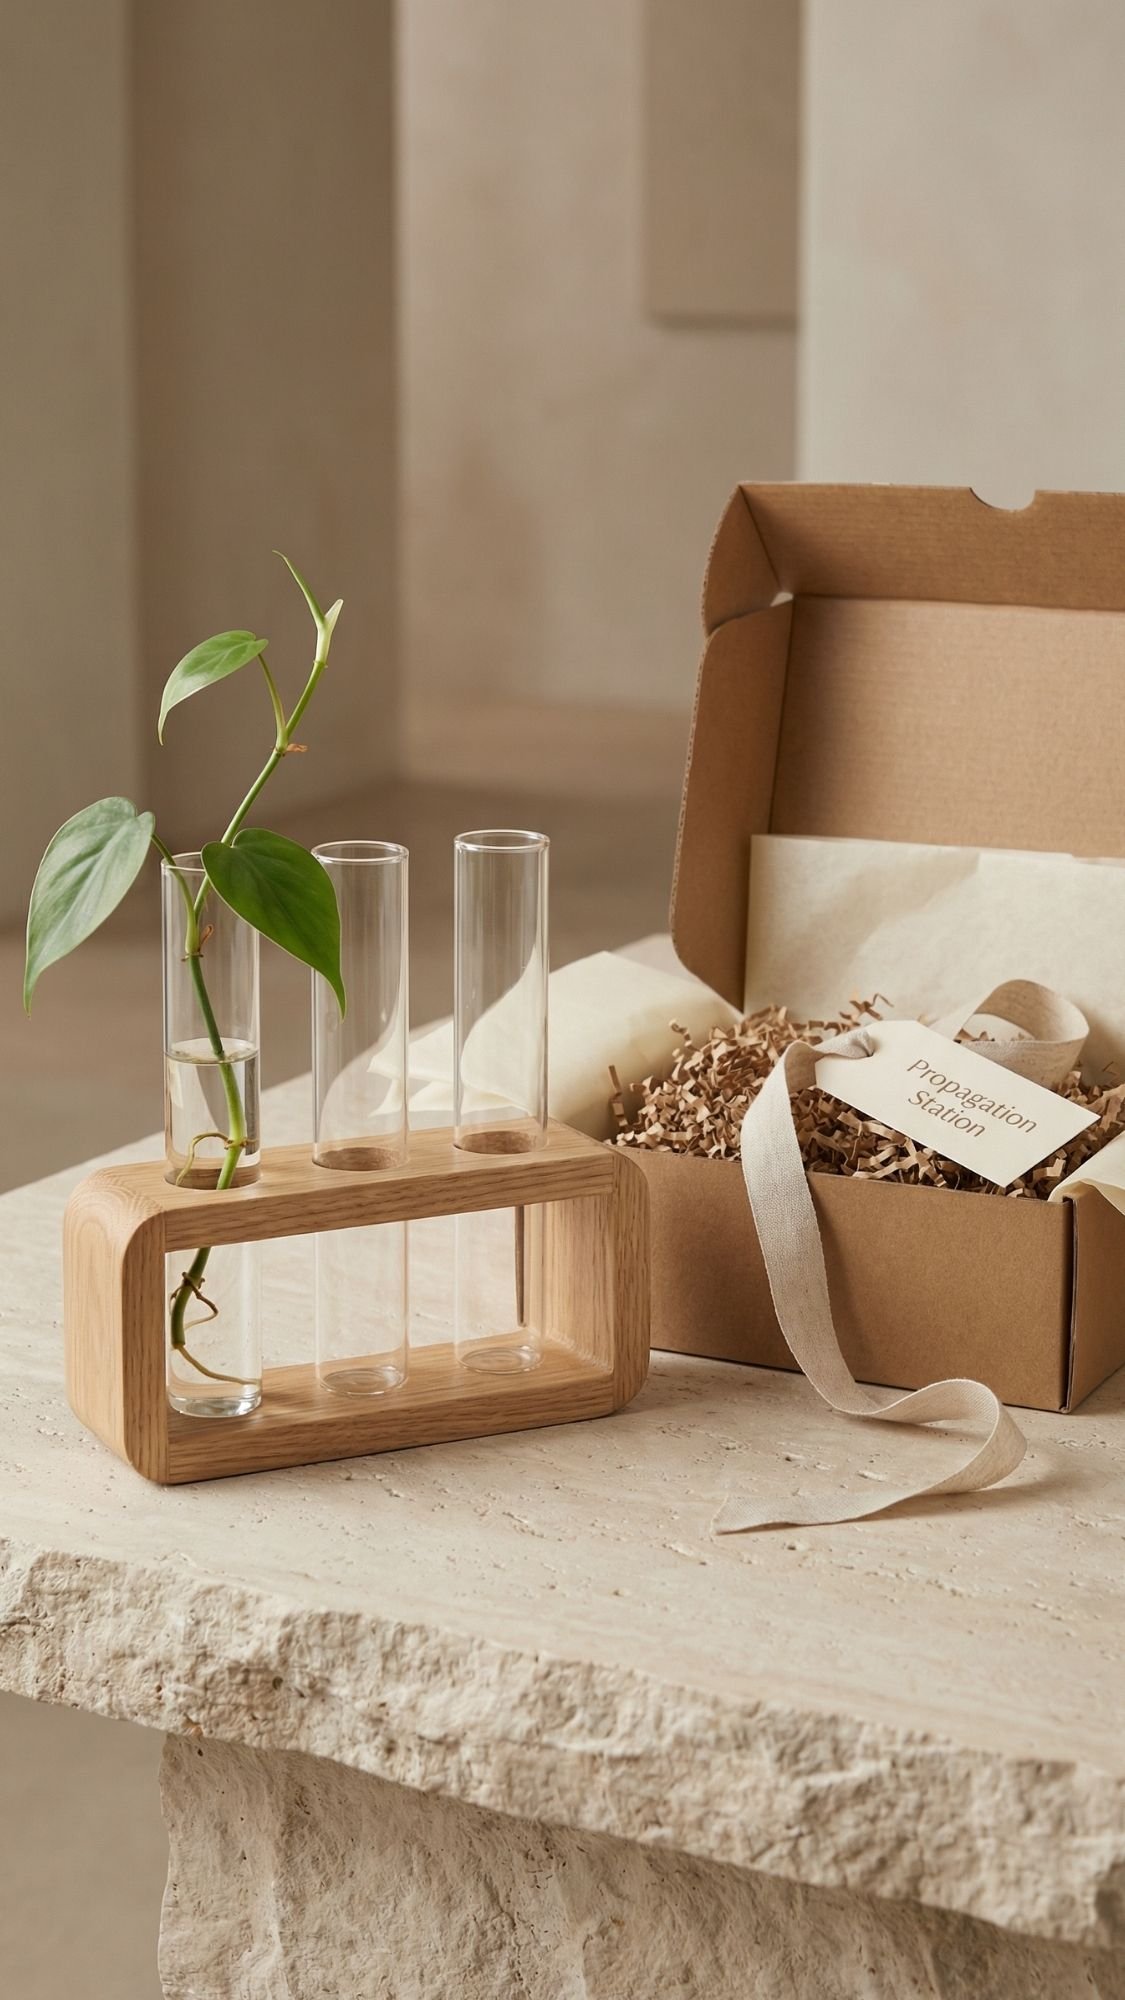
12) Mini Propagation Station: Plant mom gift that looks designer
This gift feels way more impressive than it is, which is honestly the best kind of DIY. It’s functional, looks sleek in neutrals, and gives Mom a little daily joy watching roots grow. Also, it looks like something you’d spot at a modern home store and immediately justify buying. Now you’re making it instead.
What you’ll need
- Small wood block (about 6 to 10 inches long)
- 2 to 3 small glass tubes (for cuttings)
- Drill + drill bit sized to the tube diameter
- Sandpaper (120 then 220 grit)
- Finish oil or wood sealer (matte looks best for neutral aesthetic)
- Felt pads (for the bottom)
- Optional: small plant cutting starter card
Why this works
- The contrast of warm wood + clear glass feels modern and minimal.
- It’s useful, not decorative clutter, so it earns its counter space.
Steps
- Mark tube placement evenly. Use a ruler so it looks intentional, not “close enough.”
- Drill tube holes slowly. Drill straight down and test-fit the tube as you go.
- Sand all surfaces smooth. Rounded edges feel more finished and gift-worthy.
- Apply a matte finish oil or sealer. Let it cure fully, because sticky wood finish is not the vibe.
- Add felt pads underneath. This stops scratching and helps it sit steady.
- Insert tubes and add a cutting. A tiny cutting makes the gift feel complete right away.
Pro Tips (so it looks designer)
- Choose a clean-grain wood like maple or oak for that light neutral look.
- Keep finish matte, glossy can feel less modern and shows fingerprints.
- If the tube fit feels loose, add a thin wrap of clear tape around the tube where it sits in the hole. Hidden and stable.
Neutral aesthetic packaging (safe and polished)
- Place the station in a kraft box with shredded kraft paper filler.
- Wrap tubes separately in cream tissue so nothing clinks and breaks.
- Tie the box with linen ribbon and add a minimal tag:
- “Propagation Station”
- “Add water, add cutting, watch it grow”
Optional upgrade: include a tiny care card with 3 easy cutting suggestions.
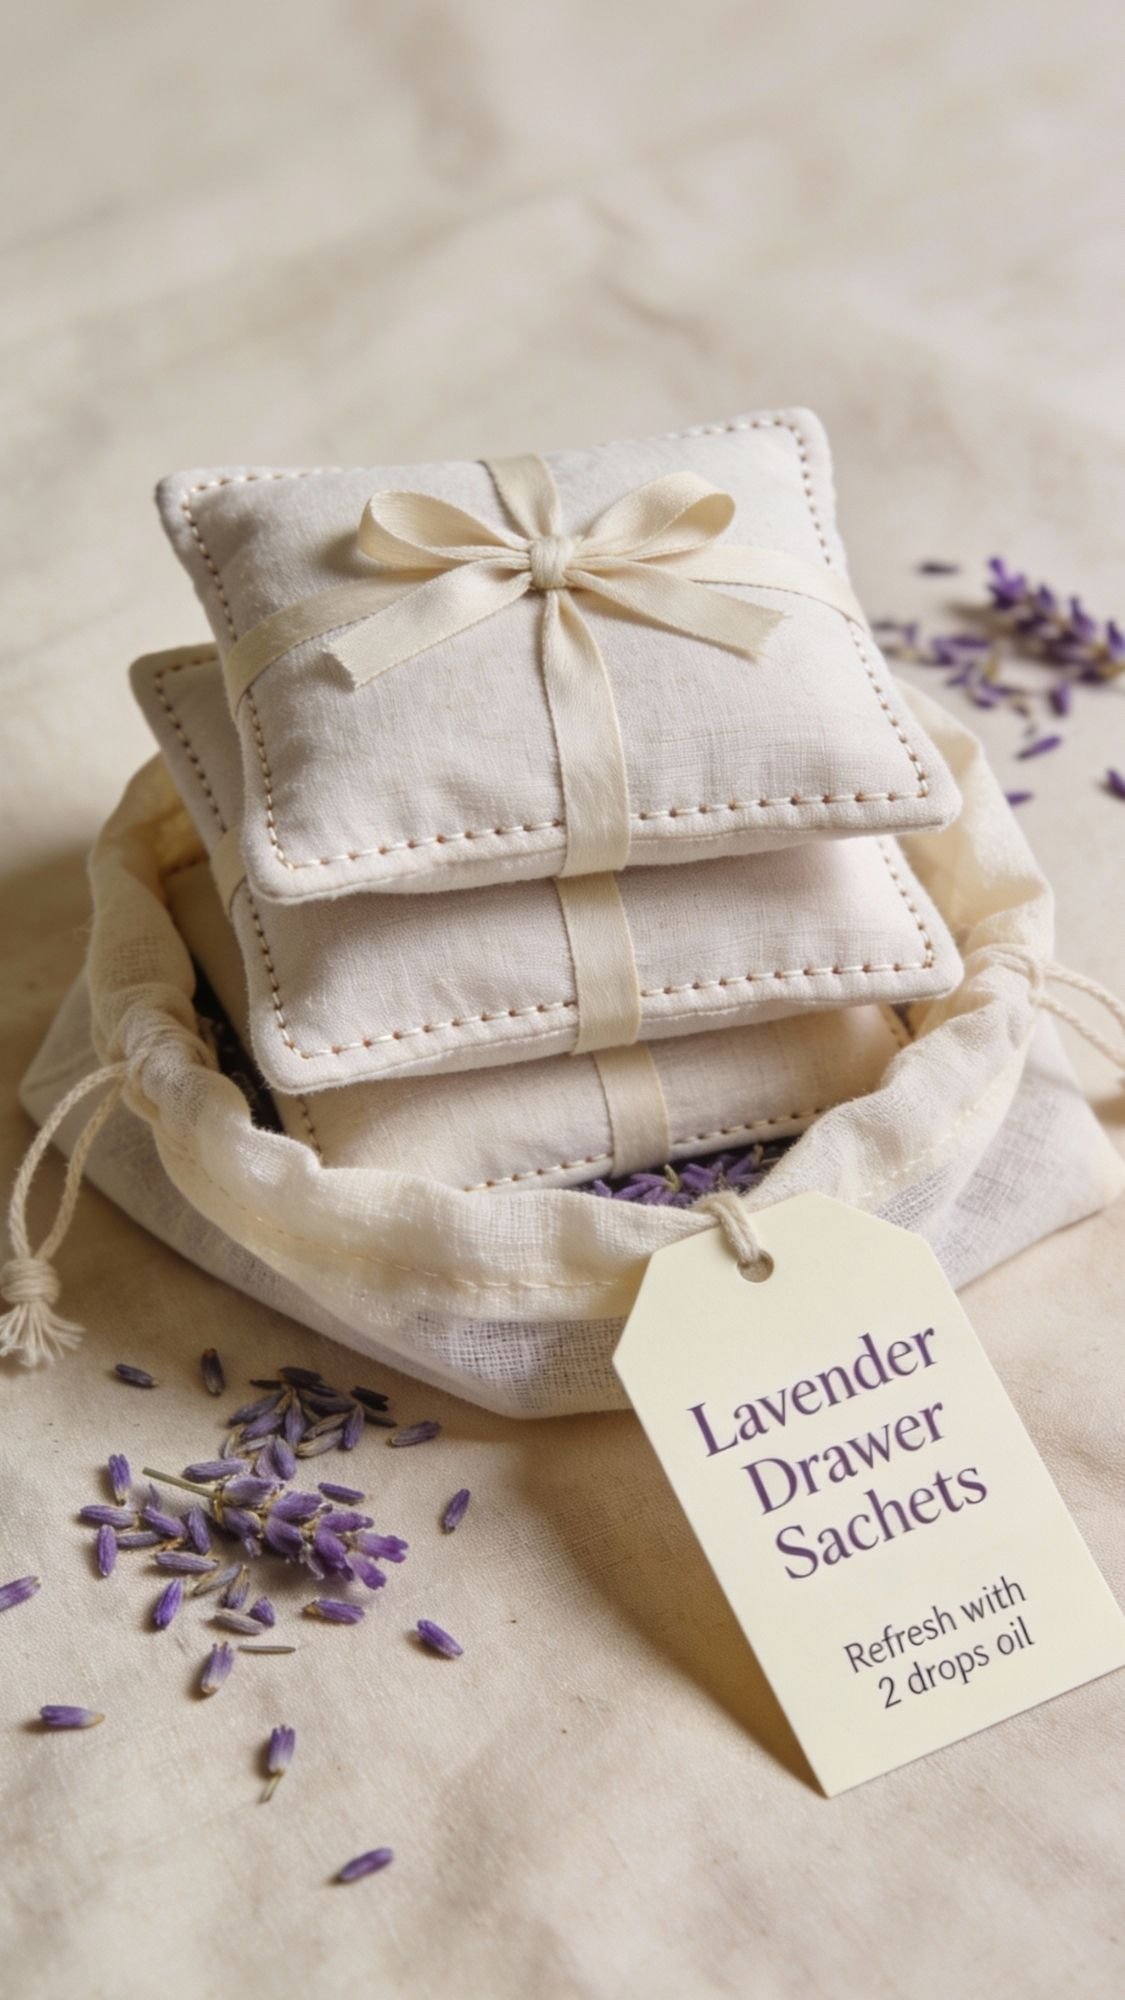
13) Linen Sachets for Drawers: The “your towels smell amazing” gift
This is one of those small gifts that feels quietly thoughtful. It’s not loud, it’s not clutter, it’s just a nice little upgrade Mom notices every day. Linen sachets also fit the neutral aesthetic perfectly because they look soft, simple, and intentional.
What you’ll need
- Linen or cotton fabric scraps (neutral tones look best)
- Dried lavender buds (or a calming blend: lavender + chamomile)
- Needle + thread, or fabric glue for a no-sew version
- Scissors
- Funnel or spoon
- Optional: twine, small tag, tiny ribbon tail
Why this works
- Linen lets scent breathe without spilling the contents everywhere.
- A small sachet lasts longer than loose dried herbs tossed in a drawer, and it looks a lot more polished.
Steps
- Cut fabric rectangles. A good size is about 4×6 inches, you can adjust bigger or smaller.
- Place pieces right sides together and sew around the edges. Leave a 1 to 2 inch opening so you can fill it.
- Turn right side out.
- Fill with dried lavender. Don’t overstuff, you want it flexible.
- Close the opening. Stitch closed, or fold and glue if you’re doing no-sew.
Pro Tips (so it looks clean and lasts)
- Double-stitch corners so the seam doesn’t pop open later.
- If you’re doing no-sew, use fabric glue and let it cure fully before filling.
- Add 2 to 3 drops of essential oil to the lavender for a stronger scent, but let it dry before sealing so it doesn’t spot the fabric.
Shelf life: 2 to 3 months strong scent, then refresh.
How to refresh (super easy)
- Add a few drops of essential oil directly to the sachet.
- Or open one seam and replace the fill if you want a full refresh.
Neutral aesthetic packaging (simple set, gift-ready)
- Make 3 sachets, stack them neatly.
- Place them in a muslin bag or wrap in cream tissue.
- Tie with linen ribbon and add a small tag:
- “Drawer Sachets”
- “Lavender Linen”
- “Refresh with 2 drops oil”
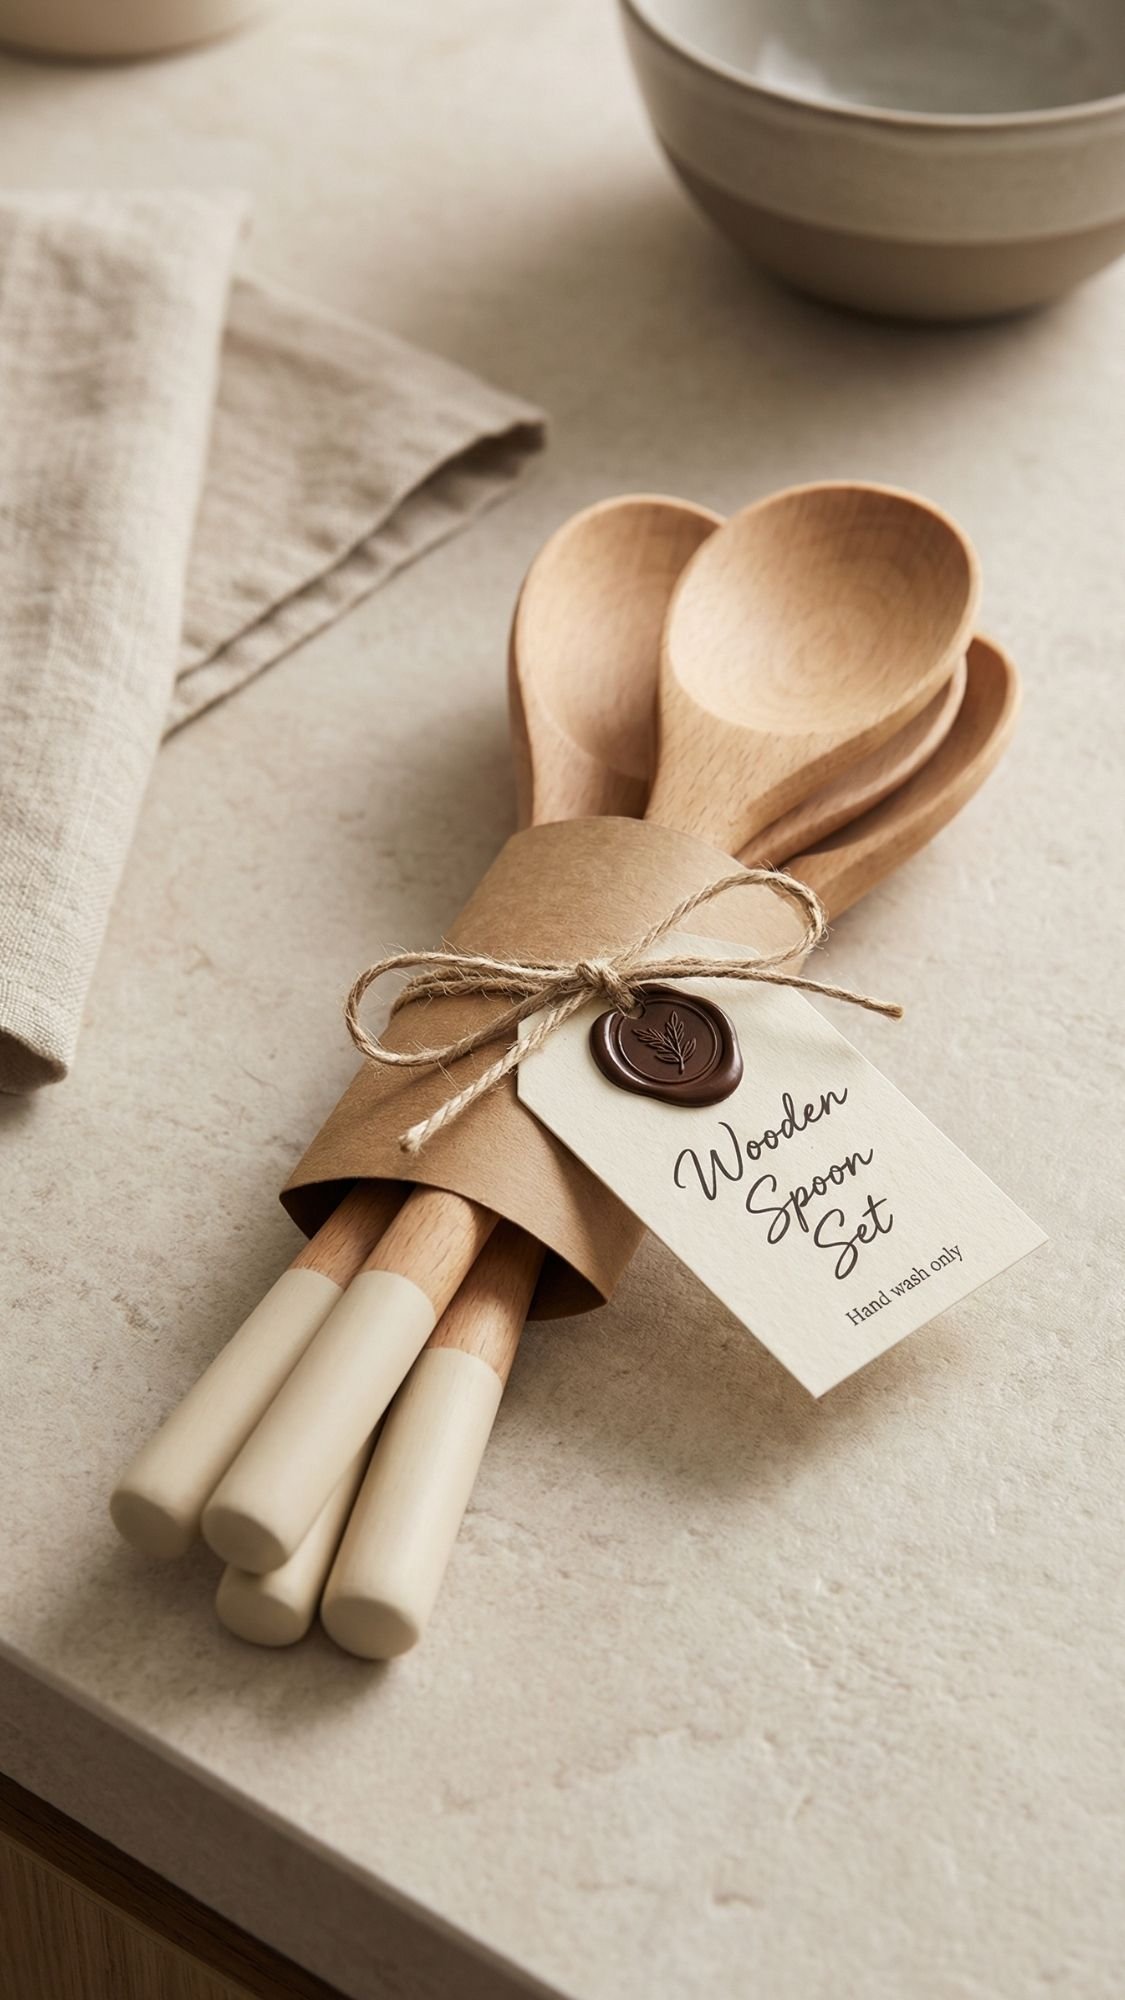
14) Hand-Painted Wooden Spoon Set: Useful, cute, and not hard
This one feels personal without being overly sentimental. It’s practical, it lives in the kitchen where Mom actually sees it, and it looks gift-worthy fast if you keep the design minimal. The biggest mistake people make is using the wrong paint or skipping the seal, then the spoons get sad after one wash.
What you’ll need
- 3 to 5 wooden spoons (bamboo or beech both work)
- Fine sandpaper (220 grit)
- Food-safe paint or stain (or a wood burning tool)
- Painter’s tape (for clean lines)
- Food-safe sealer (this is the non-negotiable)
- Kraft band or small kraft box for packaging
- Linen ribbon or twine, cream tag
Why this works
- Wood already fits the neutral aesthetic, you’re just adding a subtle design detail.
- A small painted tip or stripe looks modern and keeps it from feeling busy.
Steps
- Sand the spoons lightly. This smooths rough spots and helps paint adhere.
- Wipe off dust completely. Paint hates dust, and dust makes finishes gritty.
- Tape off your design.
- Simple ideas:
- a dipped handle end
- a thin stripe
- tiny dots near the top
4. Paint in thin coats. Let each coat dry before the next, thick paint chips faster.
5. Seal with a food-safe finish. Follow the product’s cure instructions, don’t rush this step.
Pro Tips (so they hold up)
- Use a paint made for craft surfaces, then seal properly. Regular acrylic without sealing will not last.
- Thin coats beat one thick coat every time.
- Add a tiny care note: “Hand wash, do not soak.” That alone saves your work.
Neutral aesthetic packaging (simple, boutique-ready)
- Bundle spoons together with a kraft paper band around the handles.
- Tie with twine or linen ribbon.
- Add a cream tag that says:
- “Wooden Spoon Set”
- “Hand wash only”
- Optional focal detail: a small wax seal on the tag.

15) Photo Memory Mini Prints Box: Small, Emotional, Powerful
This gift hits hard in the best way because it feels personal without demanding a big speech. Mom opens a tiny box and finds a stack of moments she actually loves. Who doesn’t want that?
What you’ll need
- 20 to 40 mini photo prints (wallet size or 2×3)
- Small rigid box (cream, kraft, or linen texture)
- Cream tissue paper
- Optional: corner rounder, washi dots, photo-safe pen
- 5 to 10 mini journaling cards (cream cardstock)
- Satin ribbon or linen ribbon
- Minimal tag, wax seal tag if you want the extra polish
How to build the set so it feels intentional
- Pick a theme. Options that always work: “Family,” “Trips,” “Grandkids,” “Little Moments.”
- Choose a clean mix. Include a few close-ups, a few wide shots, a few silly ones.
- Add 5 prompt cards. Keep them short so they feel easy to use.
Prompt card ideas (simple, not corny)
- “I love that you…”
- “I still laugh when…”
- “My favorite tradition is…”
- “A moment I’ll never forget…”
- “Thank you for…”
Pro Tips (so it looks polished, not messy)
- Print all photos in the same size for a clean stack.
- Round the corners if you want a boutique feel, sharp corners catch and bend.
- Use a photo-safe pen if you write on the back, ink bleed ruins the vibe fast.
Neutral aesthetic packaging (clean and luxe)
- Line the box with cream tissue.
- Stack prints neatly, then place prompt cards on top.
- Tie a satin ribbon around the closed box.
- Add one focal detail:
- a cream tag with minimal text, or
- a wax seal tag attached to the ribbon
Tag text ideas:
- “For Mom”
- “Little Memories”
- “Open when you need a smile”

16) Homemade Granola in a Jar: Looks store-bought, Tastes better
This is the gift that feels cozy and useful, and it doesn’t sit on a shelf collecting dust. It also works great for neutral packaging because granola looks pretty in a jar and the label can stay clean and minimal. Bonus, it’s easy to scale if you’re making gifts for multiple moms.
What you’ll need
- 3 cups rolled oats
- 1 cup chopped nuts (almonds, pecans, or walnuts)
- 1/3 cup maple syrup (or honey)
- 1/4 cup neutral oil (avocado or melted coconut oil)
- 1 tsp cinnamon
- 1/2 tsp salt
- Optional add-ins after baking:
- dried cranberries
- dried cherries
- coconut flakes
- mini chocolate chips (if you want “fun mom” granola)
- Baking sheet, parchment paper
- Large bowl, spatula
- Glass jars with lids (8 to 16 oz)
- Label or tag, linen ribbon
Why this works
- The maple syrup and oil coat the oats evenly so you get clumps.
- Baking low and stirring at the right time prevents bitter edges.
Steps
- Preheat oven to 325°F.
- Mix dry ingredients in a big bowl.
- Whisk maple syrup and oil, then pour over oats.
- Stir until everything looks evenly coated.
- Spread on a parchment-lined baking sheet.
- Bake 18 to 25 minutes, stirring once halfway. Don’t stir too often or you’ll break clumps.
- Cool completely on the pan. This is where clumps form. If you jar it warm, it turns soft fast.
- Add dried fruit after cooling, then jar it.
Pro Tips (so it stays crisp)
- Let it cool fully before sealing. Warm granola creates condensation.
- If you want bigger clusters, press it gently flat before baking and don’t stir too much.
- Add chocolate chips only after it cools, unless you want chocolate dust everywhere.
Shelf life: 2 to 3 weeks in an airtight jar.
Neutral aesthetic packaging (clean pantry-core)
- Use a kraft belly band or cream label with simple text:
- “Homemade Granola”
- “Maple Cinnamon”
- “Best within 3 weeks”
- Tie a linen ribbon around the jar neck.
- Add a small tag with serving ideas:
- yogurt topping
- oatmeal add-in
- snack by the handful
Optional upgrade: include a tiny wooden spoon tied into the ribbon.
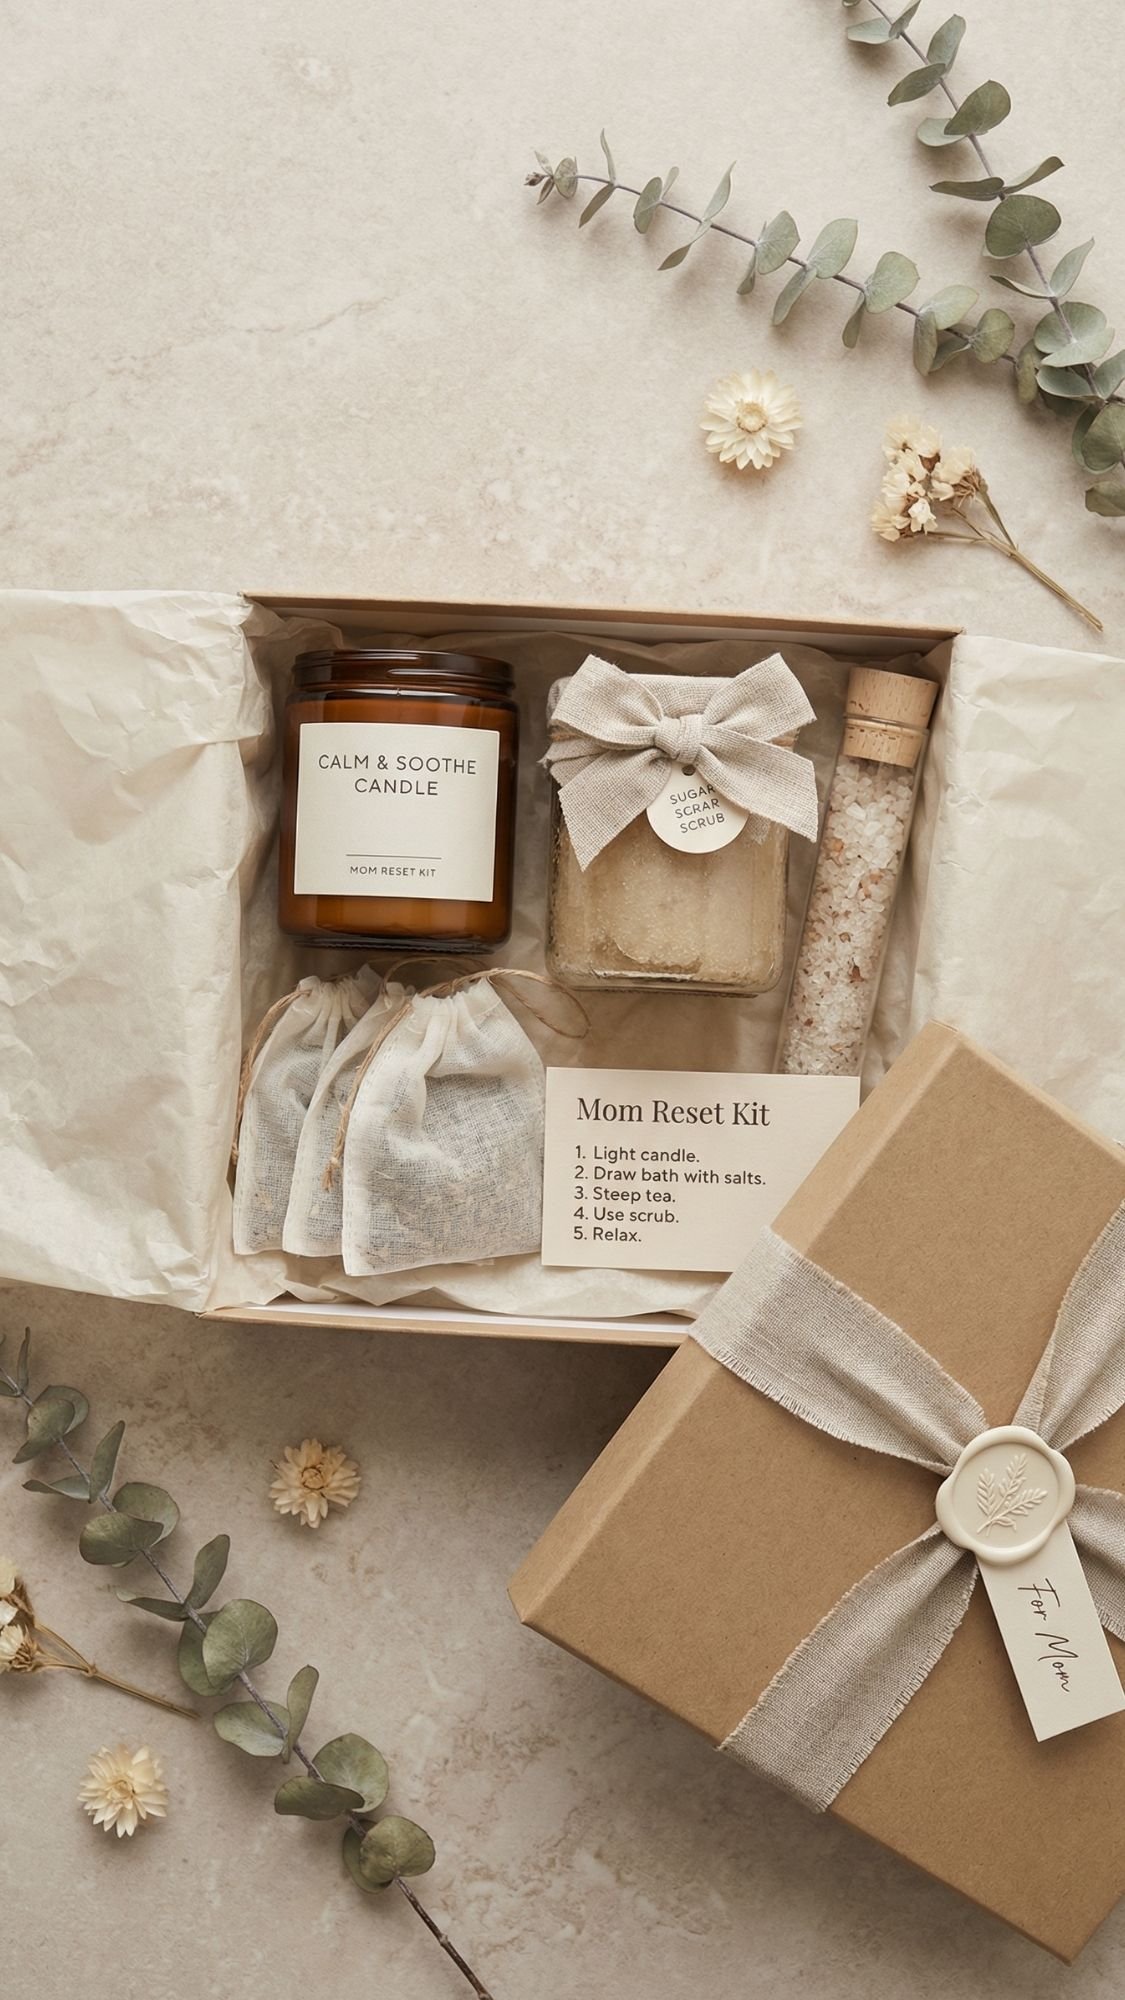
17) “Mom Reset Kit” Bundle: Coordinated, calming, and looks insanely giftable
This is the grand finale because it pulls everything together into one cohesive, neutral, boutique-looking box. The trick is simple: keep the items small, keep the packaging consistent, and make it feel like a mini ritual. Moms love a reset moment, even if it’s just ten minutes and a locked bathroom door.
What you’ll include (pick 4 to 6 items)
Choose from the gifts you already made, or mix in one store-bought neutral item to round it out.
DIY options from this post
- Mini soy candle
- Rosemary mint sugar scrub
- Lavender linen spray
- Tea sachets
- Linen drawer sachet
- Mini bath salt tube
Optional “supporting” extras (keep them neutral)
- Mini match bottle or matchbook
- Small hand cream tube
- Neutral lip balm
- Microfiber cloth or small face towel
- A short note card
How to make it look cohesive (this matters more than the items)
- Stick to one label style across everything.
- Stick to one ribbon texture (linen or satin).
- Choose one focal detail for the whole kit (wax seal tag or dried botanical).
- Use the same font style and placement on every label so it looks like a product line.
Assembly steps
- Line a kraft gift box with cream tissue.
- Place the tallest item first (usually candle or spray) to build balance.
- Add smaller items around it so nothing looks like it’s floating.
- Tuck in filler lightly (shredded kraft paper or tissue folds). You want support, not chaos.
- Add a single ribbon wrap across the box and tie cleanly.
- Attach one tag with the kit name. Keep it simple and readable.
Tag ideas (short, clean, not cheesy)
- “Mom Reset Kit”
- “A little calm in a box”
- “Take 10 minutes”
Pro Tips (so it feels like a real luxe set)
- Add one small “instruction” card that tells her how to use it:
- Light the candle
- Spritz linens
- Steep tea
- Use scrub
- Keep it to 4 steps max, no one wants homework.
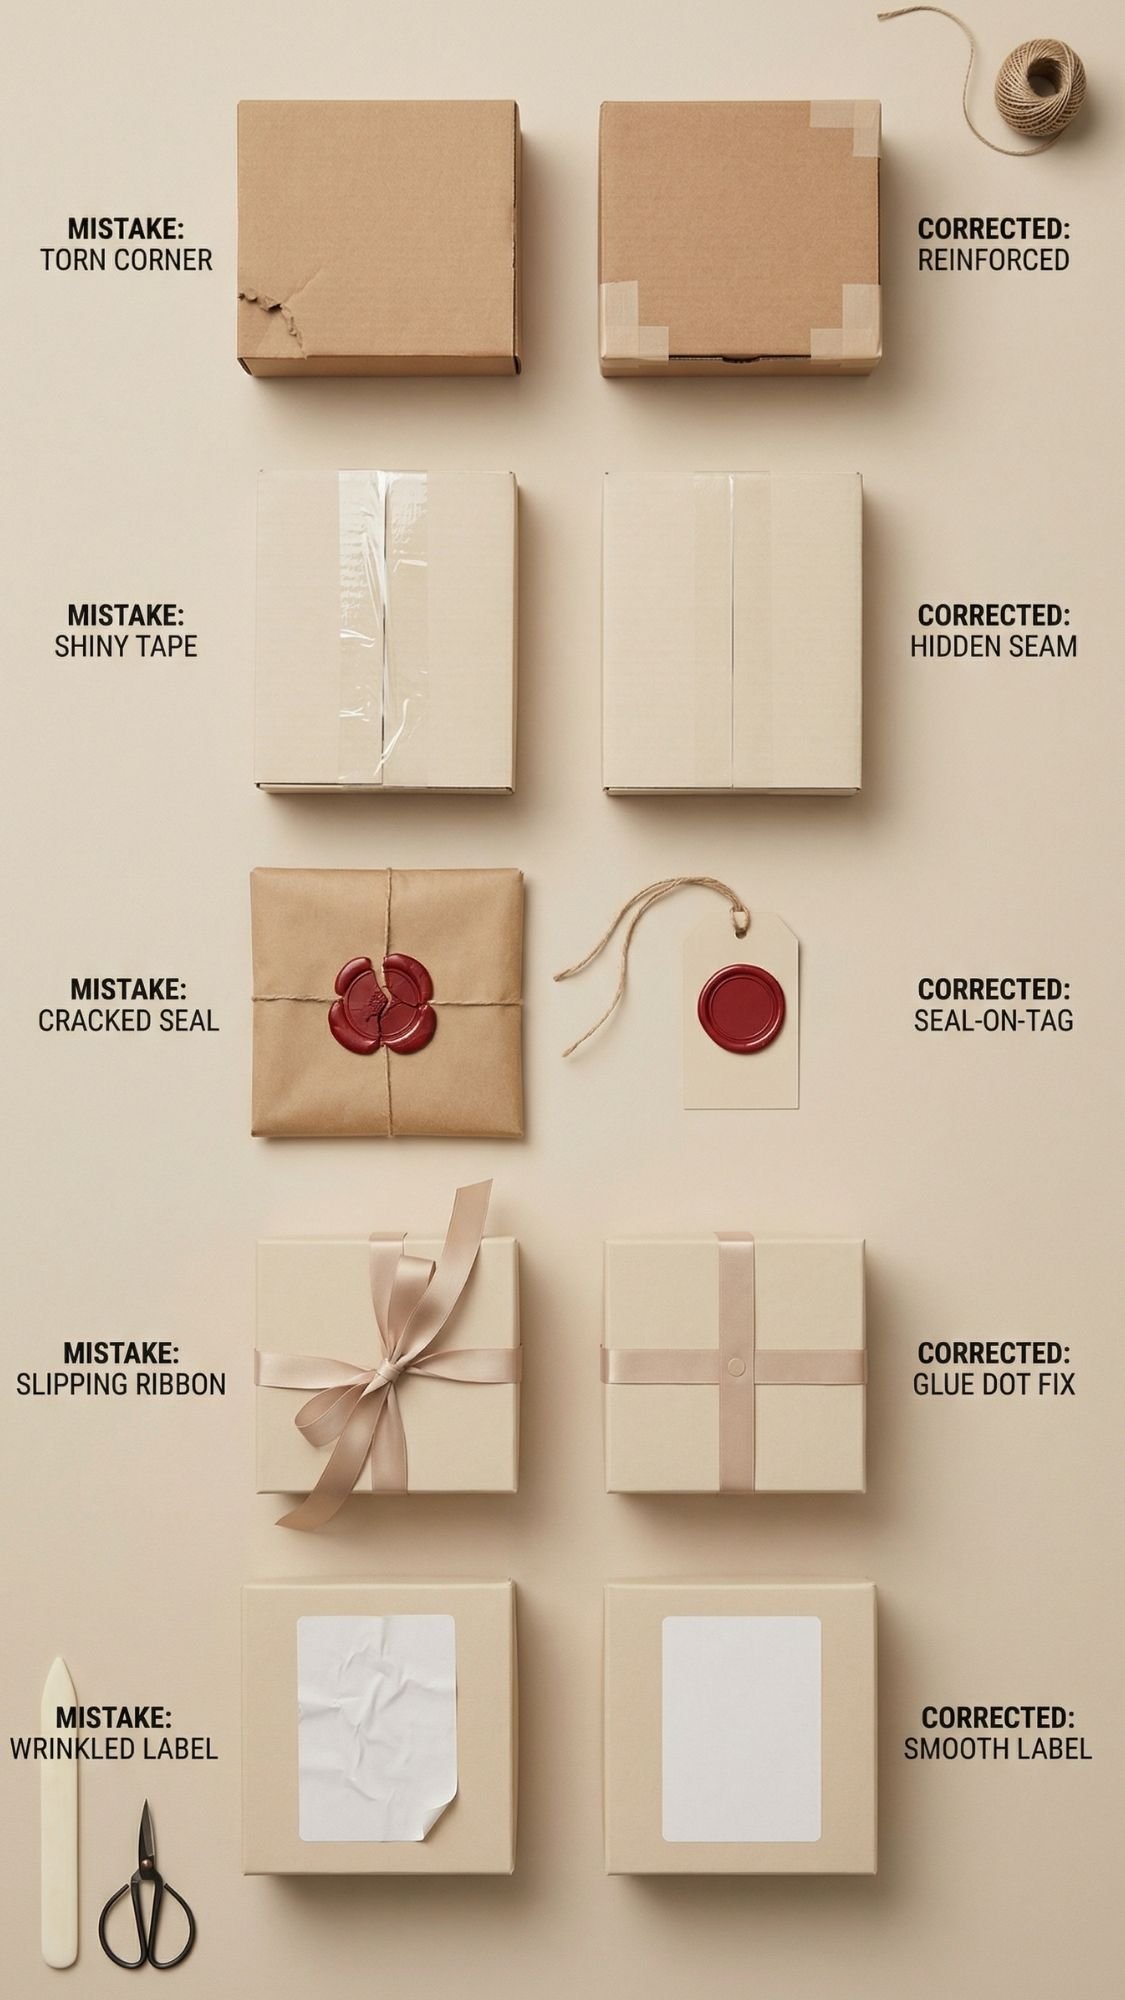
Troubleshooting: Neutral Packaging Problems: And how to fix them fast
This section saves projects. When something looks off, it’s usually one of these issues. I’m giving you the quick fix plus what to do next time so you don’t repeat the same pain.
1) Tape shows on the outside
- Symptom: You can see shiny tape lines, especially on cream paper.
- Likely cause: Clear tape on top of the wrap, or thin paper that shows adhesive.
- Fix: Peel it back carefully and switch to double-sided tape on the underside seam only.
- Prevention next time: Keep tape on hidden seams, and use slightly thicker matte paper.
2) Paper tears at the corners
- Symptom: Corners rip while folding or tightening ribbon.
- Likely cause: Paper is too thin, box corners are sharp, or you pulled too tight.
- Fix: Patch the inside corner with a small strip of double-sided tape, then re-fold gently.
- Prevention next time: Score folds first, and reinforce sharp box edges with an extra layer of paper inside.
3) Wrapping looks puffy, not crisp
- Symptom: The gift looks bulky, with weird bumps and loose panels.
- Likely cause: Too much paper overlap, sloppy folds, or you skipped creasing.
- Fix: Rewrap with less excess paper, and burnish folds with a gift card edge.
- Prevention next time: Measure and trim before wrapping, crease every fold deliberately.
4) Ribbon keeps sliding and your bow won’t stay put
- Symptom: Bow loosens, ribbon shifts, knot won’t hold.
- Likely cause: Smooth satin on smooth paper, ribbon is too narrow, or knot is weak.
- Fix: Place a tiny glue dot under the knot and tighten again.
- Prevention next time: Use linen, velvet, or cotton twill for more grip, or choose a slightly wider ribbon.
5) Bow looks limp or messy
- Symptom: The bow droops, twists, or looks uneven.
- Likely cause: Ribbon is wrinkled, cut unevenly, or you tied it too tight.
- Fix: Re-tie with longer tails, trim with sharp scissors, and steam the ribbon lightly if needed.
- Prevention next time: Cut ribbon tails at an angle cleanly and don’t over-tighten.
6) Wax seal cracks or pops off
- Symptom: The seal breaks, lifts, or falls off when you tighten ribbon.
- Likely cause: You sealed directly onto textured paper, or the wax was not fully cooled.
- Fix: Make the seal on a smooth tag and attach the tag to the ribbon. If needed, use adhesive wax seal stickers.
- Prevention next time: Always seal on smooth cardstock, and let it cool completely before touching.
7) Dried flowers crumble or fall off
- Symptom: Little bits everywhere, or the sprig falls off the bow.
- Likely cause: Fragile botanicals, crushed under ribbon, or weak adhesive.
- Fix: Attach botanicals with glue dots first, then tie ribbon over them gently.
- Prevention next time: Choose sturdier sprigs like eucalyptus, and add them last.
8) Labels wrinkle, bubble, or peel
- Symptom: Label looks wavy, edges lift, bubbles form.
- Likely cause: Surface was dusty, oily, damp, or the label was applied too fast.
- Fix: Wipe the container with rubbing alcohol, dry fully, then apply label slowly from one edge.
- Prevention next time: Label only on fully dry, clean surfaces, and avoid touching the adhesive.
9) Stamp ink bleeds on muslin bags
- Symptom: Stamp looks fuzzy, spreads, or fades.
- Likely cause: Wrong ink type, over-inking, or pressing too hard.
- Fix: Switch to fabric ink, use less ink, and heat set if required.
- Prevention next time: Test on scrap muslin first and press straight down once.
10) Tissue paper looks messy inside the box
- Symptom: Tissue looks wrinkled, torn, or chaotic.
- Likely cause: Too much tissue, rushed folding, or overstuffing.
- Fix: Remove and reset. Use one layer, fold edges inward, and place items with intention.
- Prevention next time: Use fewer layers, and pre-crease tissue for cleaner folds.
Finishing + Sealing + Care: So it looks professional and lasts
This section is what separates “cute DIY” from “wow, this feels like a real product.” Finishing matters, cure times matter, and care instructions make your gift last longer. Also, a tiny care card makes everything feel more premium, even if the gift itself was quick.
How to finish it professionally (by gift type)
For paper wrap + labels
- Use double-sided tape for seams so the outside stays clean.
- Burnish folds with a gift card edge for crisp corners.
- If you’re using tags, punch clean holes and trim ribbon tails evenly.
For clay (ring dishes)
- Sand edges smooth after fully dry.
- Seal with thin coats so the finish stays clear and not cloudy.
- Let it cure before stacking or boxing so it doesn’t stick to tissue.
For wood (spoons, propagation station base)
- Sand lightly, then wipe dust off before sealing.
- Use a matte finish if you want modern neutral vibes.
- Let the finish cure fully before packing, or it can imprint onto tissue paper.
For jars and bottles (scrub, syrup, spray)
- Clean rims and wipe fingerprints off glass before wrapping.
- Make labels water-resistant if the item lives in a bathroom or kitchen.
- Always cool contents fully before sealing or wrapping.
Dry time vs cure time (plain language)
- Dry time: It feels dry to the touch. You can handle it gently.
- Cure time: It reaches full hardness and durability. This is when it’s actually “done.”
Examples that matter:
- A sealer can feel dry in an hour but still need 24 to 72 hours to cure depending on humidity and product.
- Wax can feel set quickly, but it stays fragile until it cools all the way through.
- Paint can feel dry but still scratch easily until it cures.
Packaging safety, how not to ruin your own work
- Don’t wrap freshly sealed items tight in tissue. Let them cure first.
- Don’t stack jars when the outside still feels slick or oily.
- Don’t put botanicals directly against damp items, it can stain.
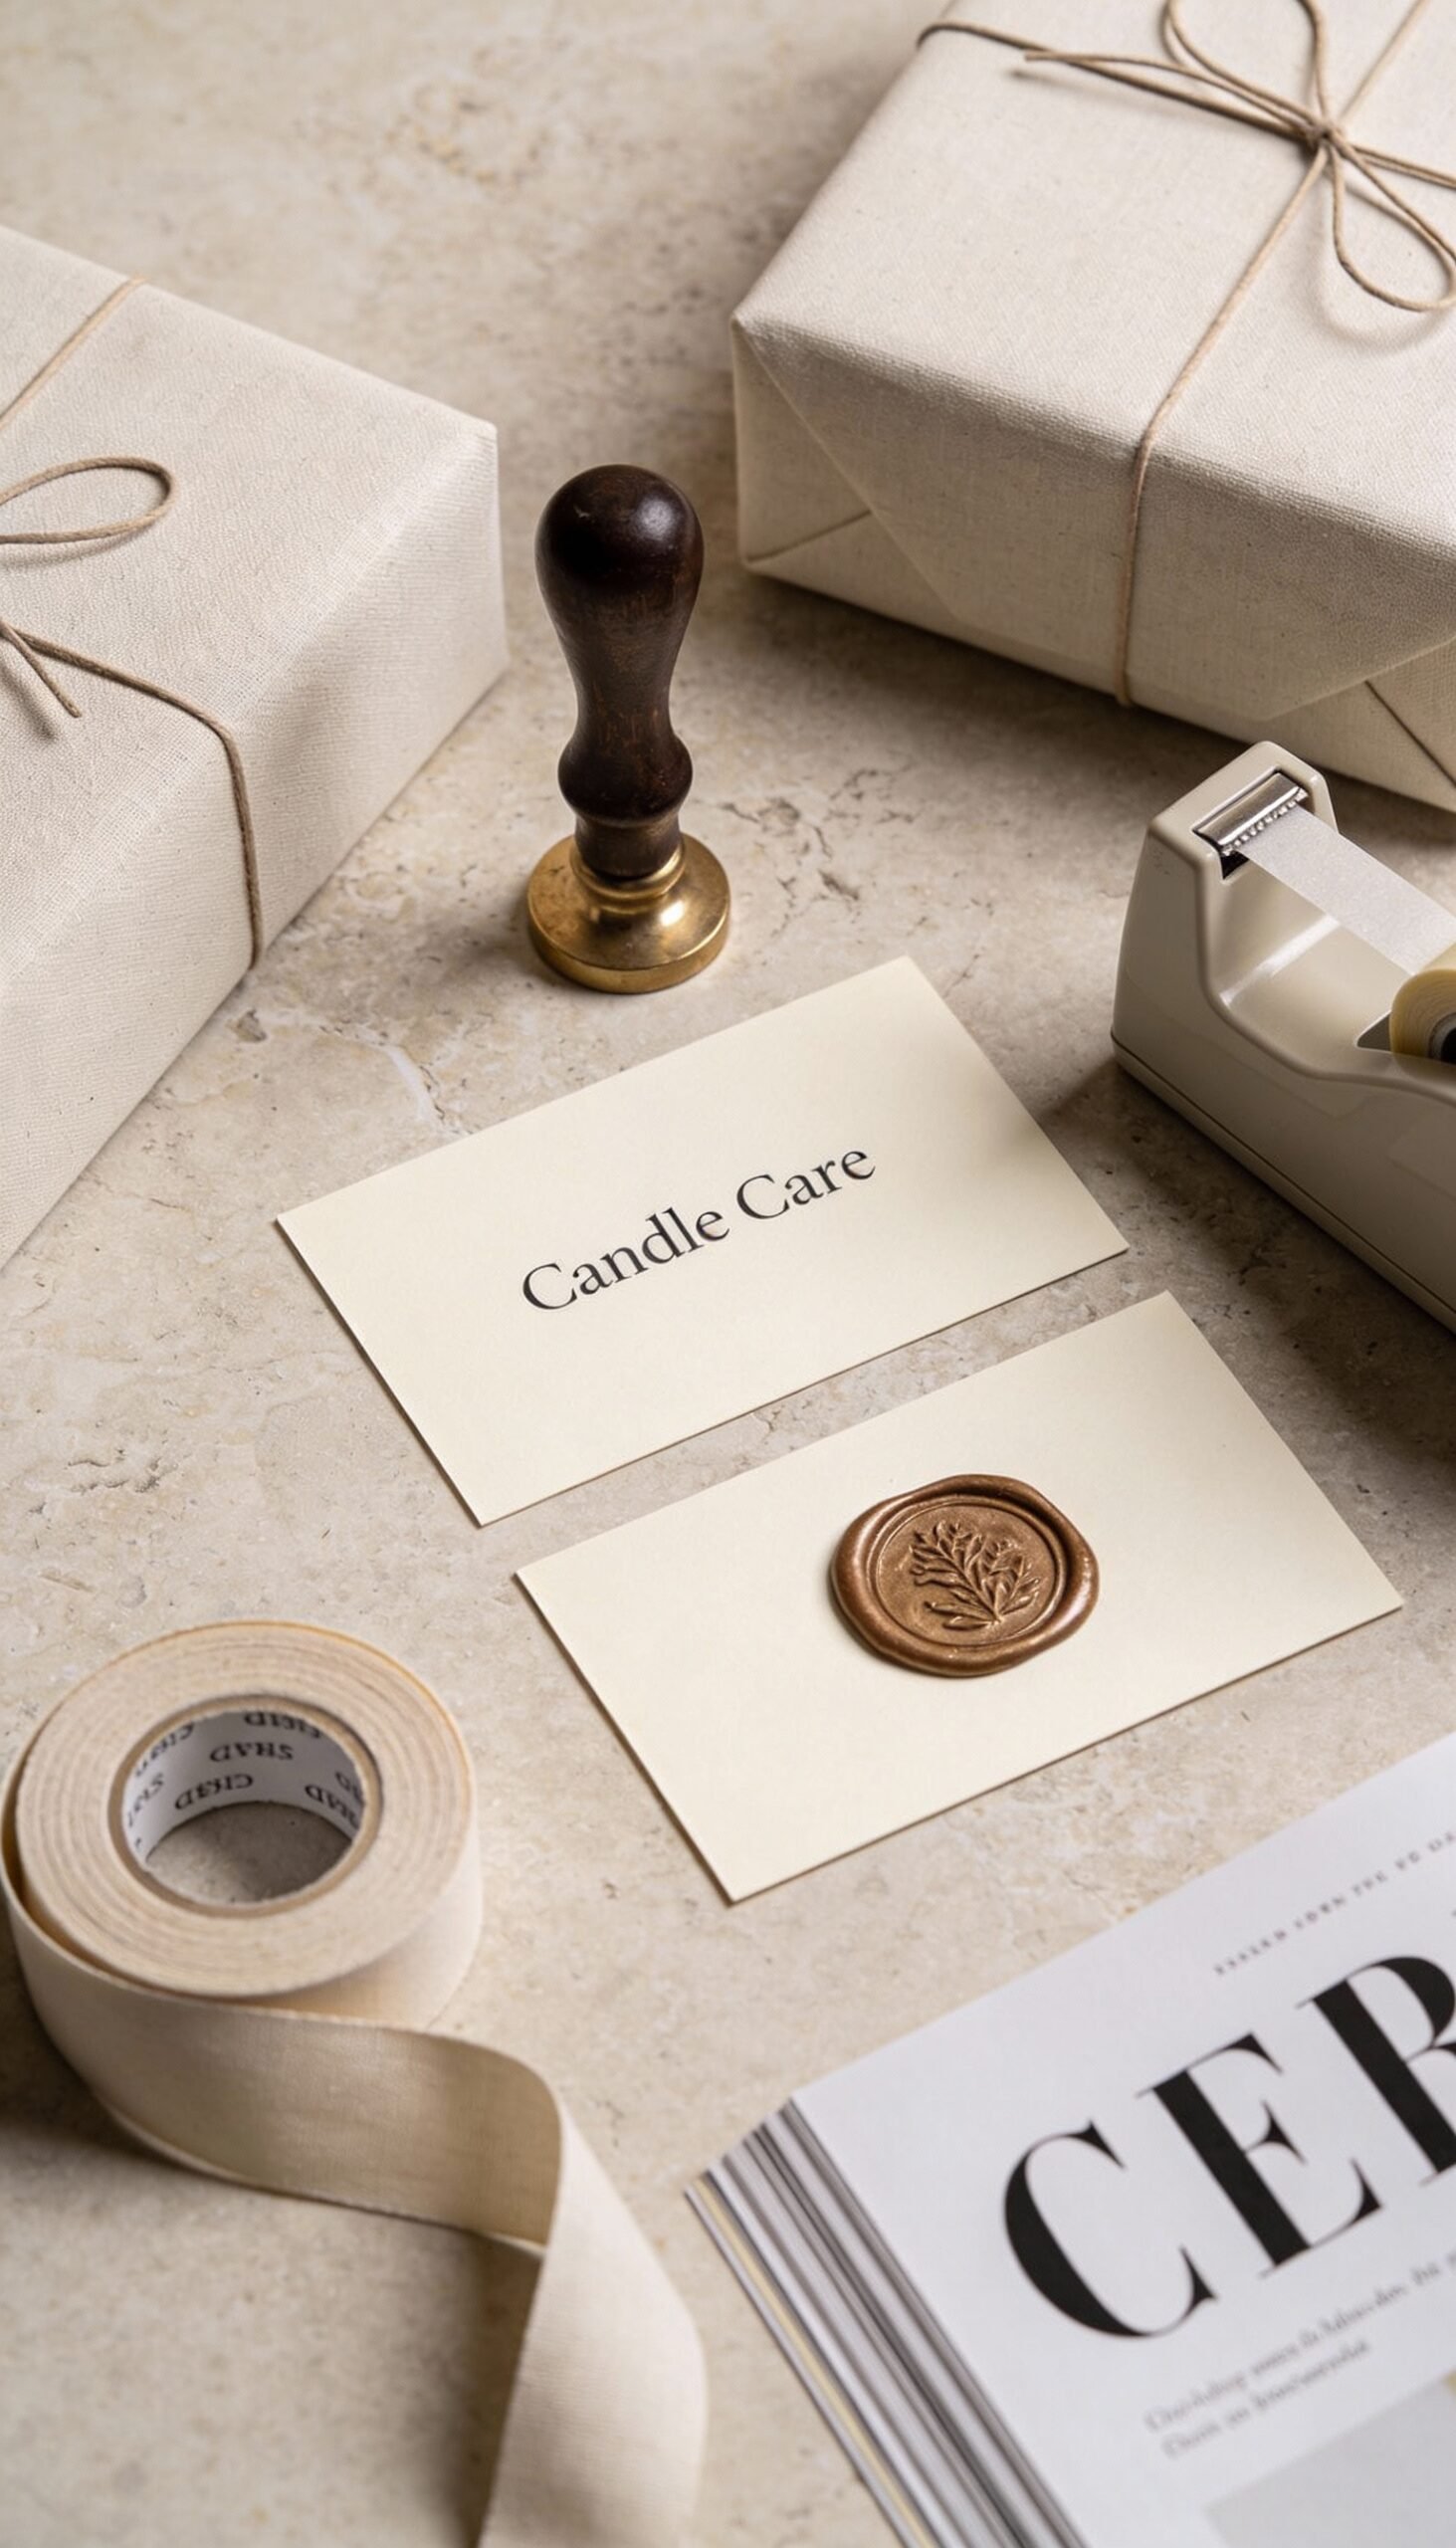
Care instructions you can include (tiny card, big impact)
Pick the ones that match what you made, keep it short:
Candle care
- First burn: 2 to 3 hours
- Trim wick before each burn
- Stop burning with 1/2 inch wax left
Sugar scrub care
- Keep water out of jar
- Use a clean spoon
- Store closed, room temp
Linen spray care
- Shake before use
- Spray on linens, not skin
- Patch test delicate fabrics
Beeswax wrap care
- Wash cold, mild soap
- Air dry only
- Keep away from heat
Wood spoon care
- Hand wash only
- Do not soak
- Re-oil if it looks dry
How long it lasts and how to refresh
- Linen sachets: refresh with 2 drops essential oil every few weeks.
- Wax seals: store out of heat so they don’t soften.
- Tissue and ribbon: steam lightly to re-crisp before gifting.
- Beeswax wraps: refresh with a short warm oven cycle later if needed.
Customization Ideas: 3 variations, still neutral, still pretty
You can keep the whole article “neutral aesthetic” and still make it feel personal. The trick is choosing one direction per gift and committing to it, not mixing every style at once.
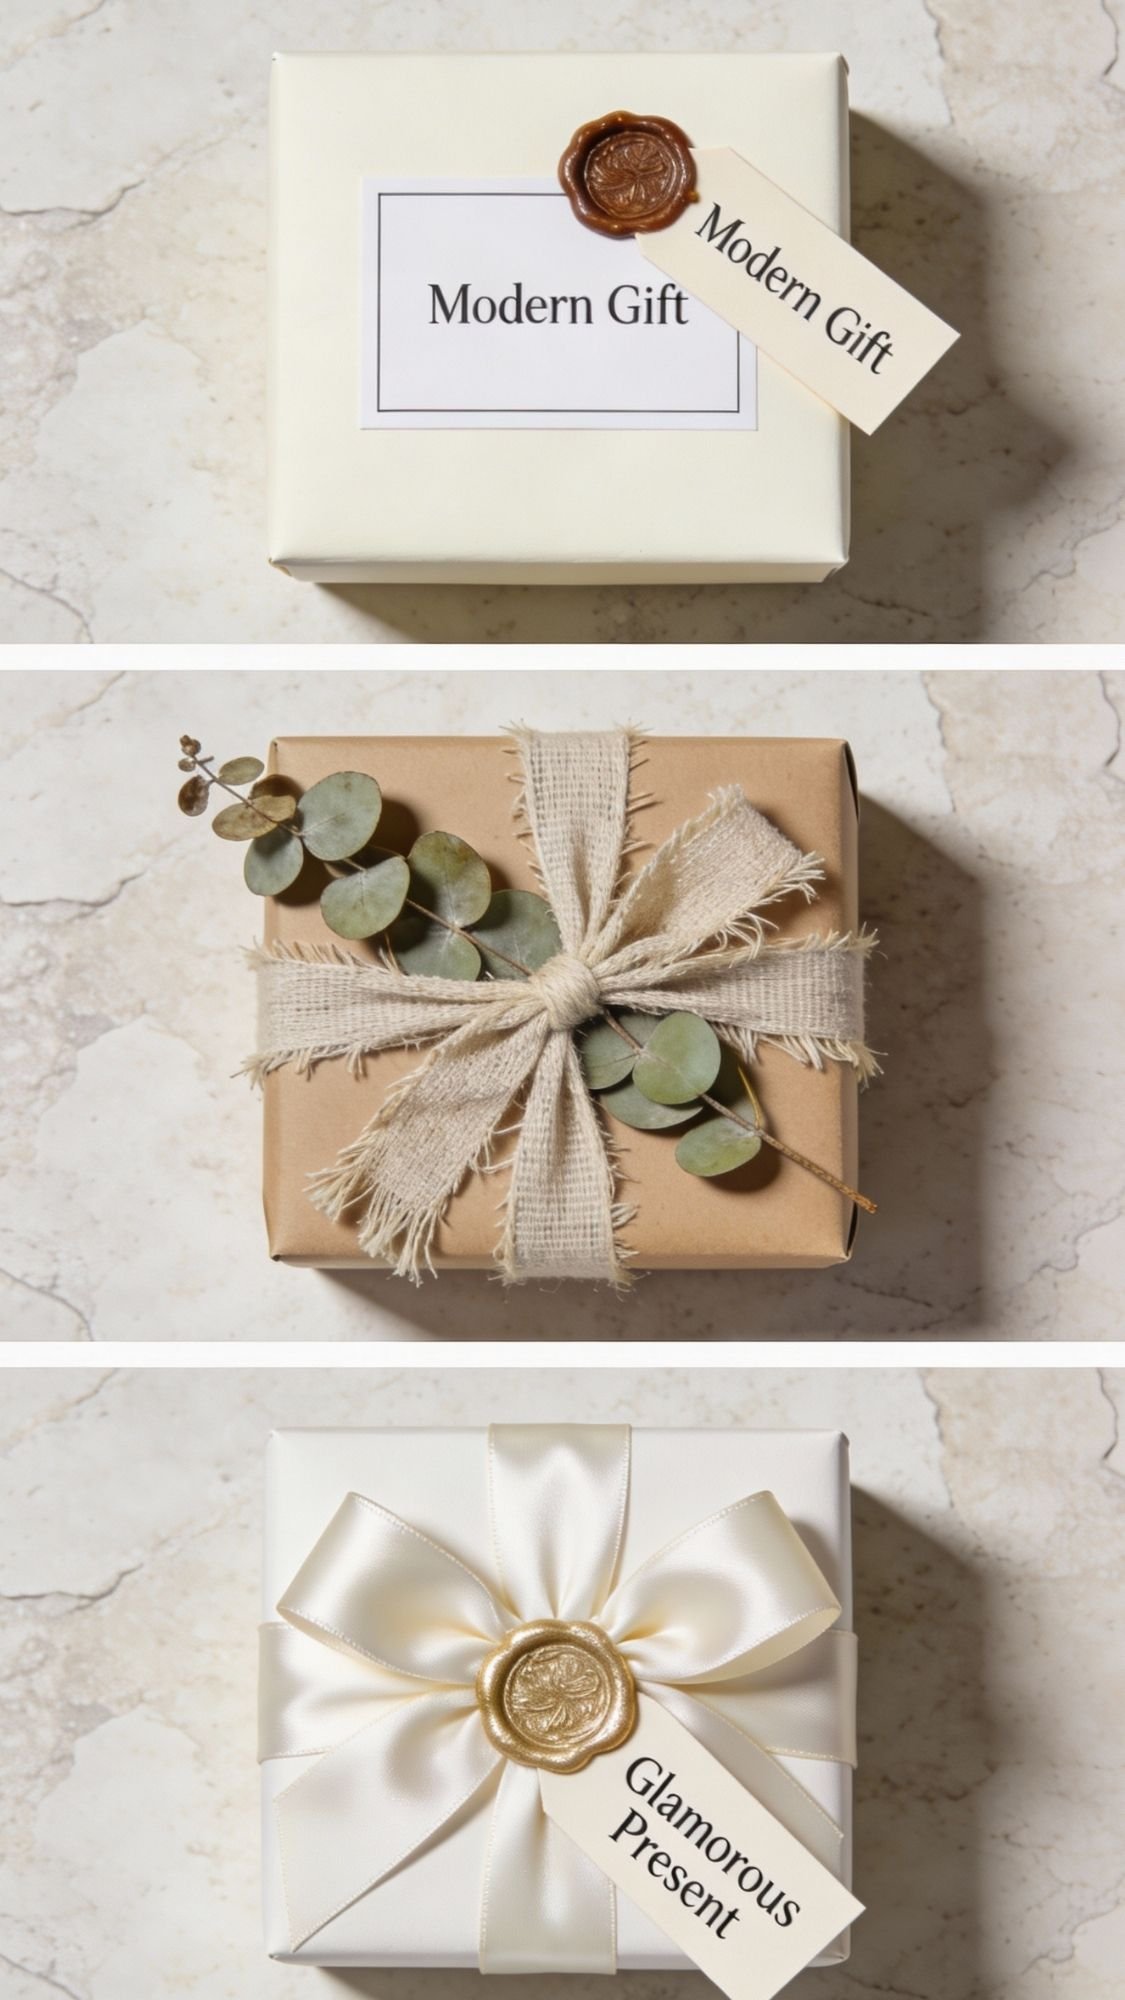
Variation 1: Style swaps (modern, boho, farmhouse, glam)
Modern
- Cream wrap, sharp folds, minimal label
- One slim ribbon (linen or satin)
- One focal detail like a wax seal tag
Boho
- Kraft wrap, frayed linen ribbon, dried botanicals
- Soft textures, slightly imperfect edges on tags
- One natural accent like eucalyptus
Farmhouse
- Kraft paper, twine, simple handwritten tag
- Optional: tiny gingham ribbon only if it stays neutral and subtle
- Clean, cozy, no fuss
Glam
- Cream wrap, satin ribbon, metallic wax seal (gold or champagne)
- Keep everything else plain so it doesn’t feel overdone
Variation 2: Neutral color palette ideas that always photograph well
- Cream + kraft + taupe
- Oatmeal + ivory + soft sage
- Stone gray + cream + champagne ribbon
- Warm white + beige + black ink stamping (very modern)
Variation 3: Personalization options (names, monograms, themes, upgrades)
- Names or initials
- Minimal monogram on tags, or stamped initials on muslin bags
- Theme labels
- “Mom Reset Kit,” “Morning Ritual,” “Cozy Night In”
- Material upgrades
- Swap paper wrap for a reusable fabric wrap
- Upgrade ribbon to velvet for one gift only as the “hero” item
- Add a wax seal tag as the signature detail across the set
FAQ
1) How do I wrap a gift in a neutral aesthetic without it looking boring?
Use texture and contrast, not more colors. Pick a matte base wrap, add one textured ribbon, then finish with one focal detail like a wax seal tag or a dried sprig.
2) What colors count as neutral gift wrapping?
Cream, beige, kraft, oatmeal, taupe, soft gray, muted sage, and warm white. The goal is a calm palette that doesn’t fight the gift.
3) What ribbon looks best with neutral wrapping?
Linen ribbon, cotton twill, velvet ribbon, and soft satin all work. If you want a crisp structured bow, go wider. If you want minimal, go narrow and keep tails clean.
4) How do I hide tape on wrapping paper?
Use double-sided tape on the underside seam only. If you need extra hold, add a tiny strip inside the fold, never across the front.
5) Do wax seals actually stay on gift wrap?
They do if you use them correctly. Make the wax seal on a smooth cardstock tag, let it cool fully, then attach the tag to the ribbon. Wax seals pop off textured paper more easily.
6) What is the easiest neutral DIY gift that still looks expensive?
A sugar scrub jar, linen spray bottle in a muslin bag, or bath salt tubes. All three look high-end with a clean label and one ribbon tie.
7) How do I keep dried flowers from falling off gift wrapping?
Attach the botanical with a glue dot first, then tie the ribbon over it gently. Add botanicals last so you don’t crush them while wrapping.
8) How do I wrap a set of small items so it looks cohesive?
Use one box, one tissue color, one ribbon, and one tag. Keep label style consistent across the whole set so it feels like a curated kit.
9) How do I ship neutral-wrapped gifts without crushing the bow?
Pack the gift in a box with filler, then tie the bow after it arrives if you can. If you must ship it tied, protect the top with extra tissue so the bow doesn’t flatten.
10) How do I make my DIY gifts look store-bought?
Keep the wrap clean, use a consistent label style, wipe fingerprints off jars, and add a small care card. Those details make it feel like a product, not a craft.
11) What’s the best eco-friendly neutral wrapping option?
Reusable fabric wrap, muslin bags, and kraft paper. These look great and feel intentional, not wasteful.
12) How can I personalize neutral gifts without ruining the minimalist vibe?
Use subtle personalization like a monogram tag, a stamped initial, or a short phrase on a label. Keep it small and readable.
Neutral aesthetic packaging works because it keeps things calm and intentional, and it makes your DIY work look polished instead of chaotic. You don’t need a giant pile of supplies either. Pick one wrap style, one ribbon texture, and one focal detail, then repeat it across your gifts like you planned it that way all along.
If you only do one thing after reading this, do the invisible seam trick with double-sided tape and keep your labels consistent. That alone takes your gifts from “cute” to “wait, did you buy this?” And honestly, watching Mom open something that looks boutique-level before she even sees what’s inside feels pretty great.

