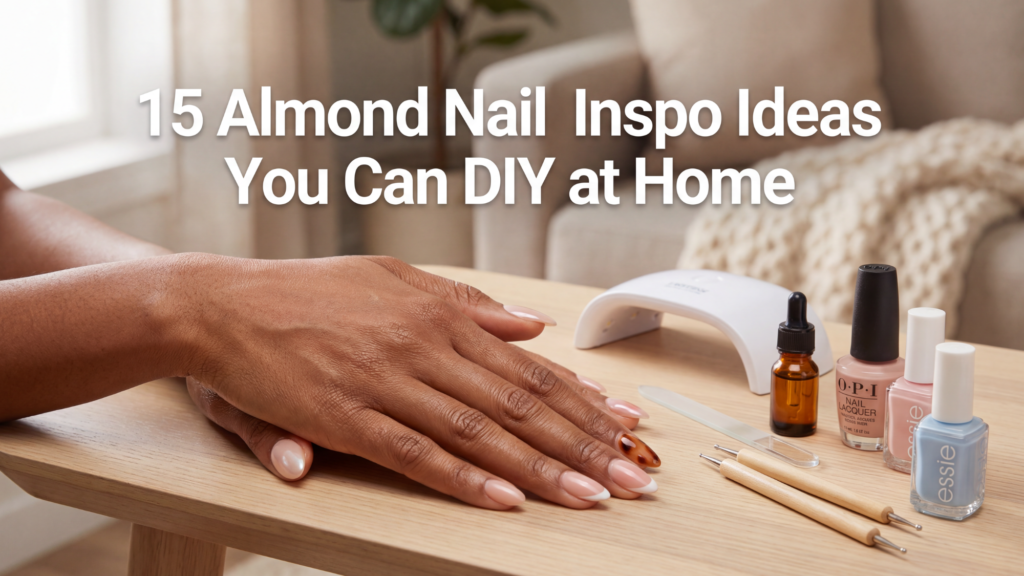
Screenshots of almond nail inspo flood every feed right now, but regular salon visits drain time and money faster than a spilled bottle of top coat. Almond-shaped nails sit right in that sweet spot between classy and cool, so the pressure to “get them perfect” often feels intense. The good news? With the right shape, a little patience, and a few smart tricks, those Pinterest-level looks can happen at home, no professional lightbox or nail tech required.
Almond nails flatter almost every hand because the tapered sides and soft tip create that instant finger-lengthening effect. The shape looks chic with barely-there polish, full-on chrome, or tiny detailed art, so one basic almond set unlocks a whole menu of looks. Instead of chasing a new shape every trend cycle, readers can keep this one and just switch colors, finishes, and small design tweaks. That approach saves time, protects nail health, and still keeps every selfie or coffee-cup shot on trend.
This article breaks down 15 almond nail inspo ideas you can DIY at home, starting with super-simple looks and building up to designs that feel more advanced but still stay approachable. Each idea focuses on what works best on the almond shape, which tools actually help, and which shortcuts keep things beginner-friendly. Expect soft glazed finishes, micro French tips, aura gradients, latte tones, tiny florals, and even press-on hacks for anyone whose nails refuse to grow. Ready to let that saved “almond nail inspo” folder finally earn its keep?
Almond-Shaped Nails 101: Why This Shape Wins for DIY
Almond nails sit right between oval and stiletto on the shape scale, so they look sleek without feeling dramatic or “claw-like.” The sides taper gently in and meet at a soft point, which gives fingers that elongated, elegant look that shows up in every “almond nail inspo” scroll. This shape works with short, medium, and long lengths, so everyday life still happens (typing, parenting, opening cans) while the nails stay cute. Almond nails also flatter almost every hand because the curve feels softer than a harsh square edge. Instead of fighting the natural curve of the fingertip, the shape follows it, so polish and nail art sit in a way that feels balanced and expensive.
For DIY, almond nails make life easier because the tip forgives tiny filing mistakes more than a sharp stiletto point. A slight wobble in the line still reads as “soft and rounded,” not “oops.” The shape frames simple designs—French tips, chrome fades, aura blends, tiny florals—so even basic ideas look intentional. When nails chip, the rounded tip hides wear better than a squared-off edge, especially on short and medium lengths. That means more time between full redos and less panic over one rough corner. Ever notice how one clean almond set instantly upgrades every ring stack and coffee-cup photo? That effect happens on purpose.
Quick Shape Guide (No Salon Needed)
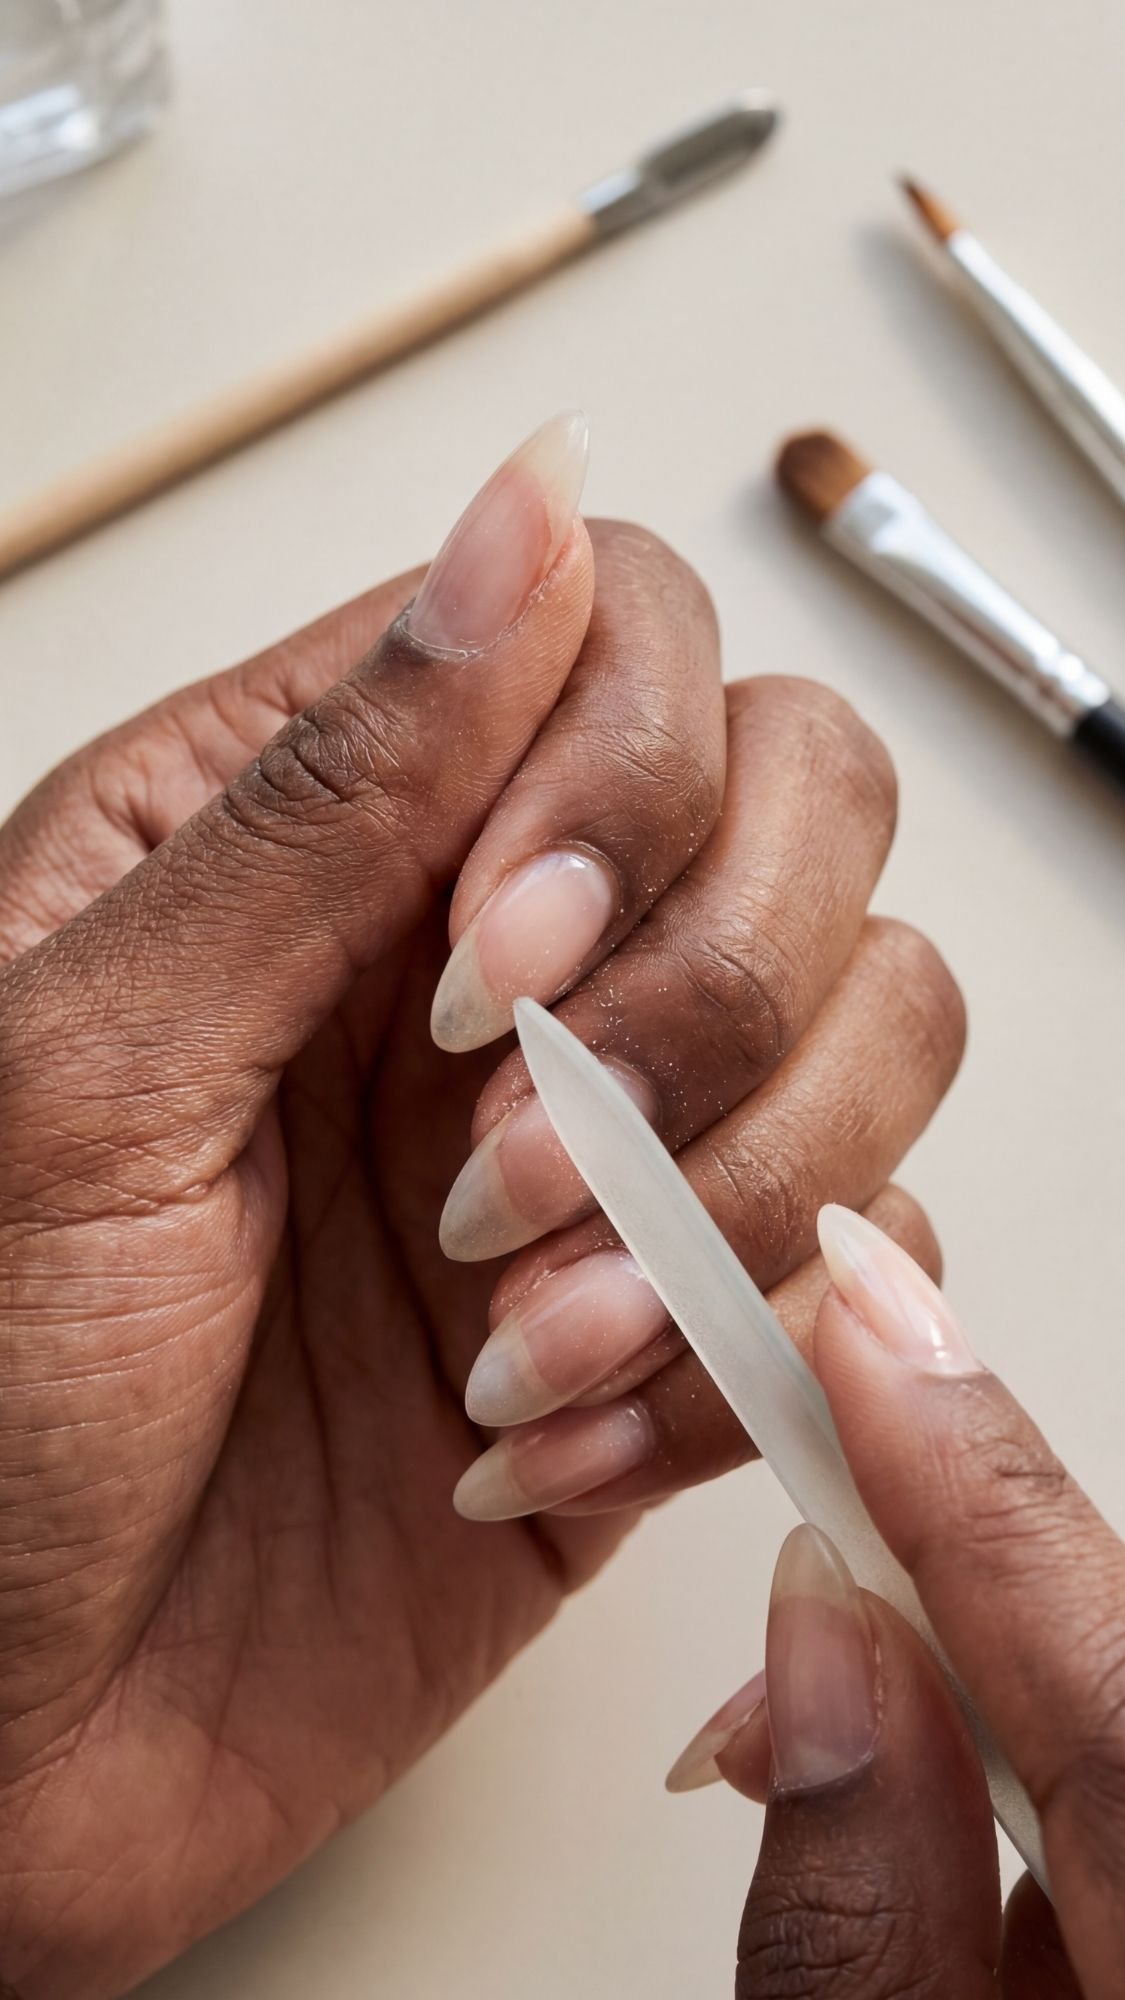
Shaping into almonds at home feels doable when the steps stay simple and repeatable. Start with short square or rounded nails rather than uneven, jagged tips. Hold the file at a slight angle and file each side toward the center in one direction, not back and forth, so the nail edge stays smooth. Switch hands often and check symmetry by holding both hands at arm’s length; the tips should match in length and curve. Soften the point into a gentle rounded tip instead of a sharp spike, especially for everyday wear. Finish with a buffer over the free edge to smooth any roughness and keep the almond shape from catching on fabrics.
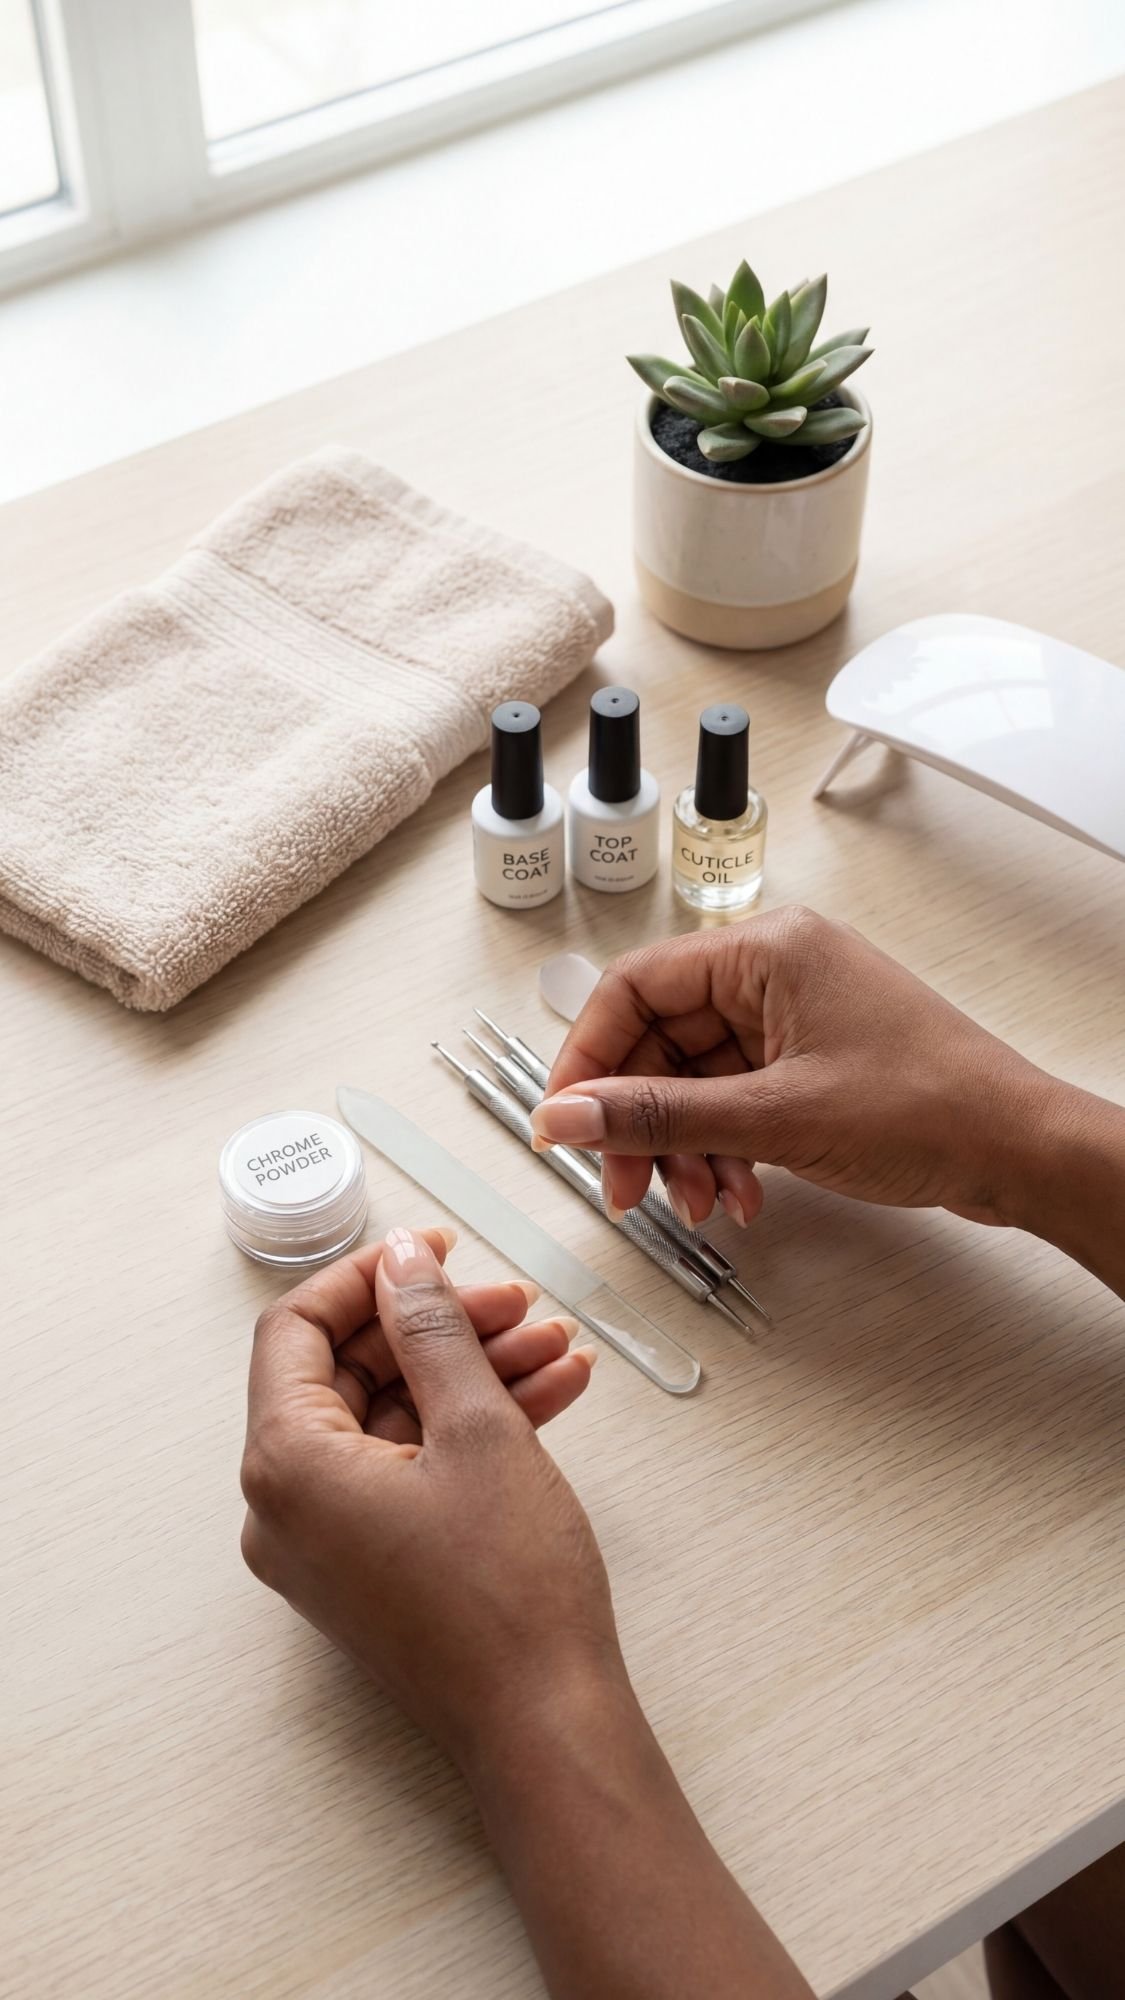
Your DIY Almond Nail Tool Kit
A cute almond nail inspo idea falls flat fast if the basics go wrong, so a simple kit makes a huge difference. The goal never revolves around buying every fancy tool on the internet; a few solid staples carry almost every look in this guide. Think smooth shape, clean cuticles, and a glossy base before any design even hits the nail. When prep stays consistent, polish glides on better, designs last longer, and chips annoy everyone a little less. A small, well-chosen kit also makes at-home manicures feel like a mini ritual instead of a chaotic scramble for half-dried bottles. Want salon-level results from the couch? The kit starts that story.
Basic Nail Prep Essentials
A strong almond shape starts with prep, not polish. These core pieces cover almost every DIY almond nail inspo look:
- Glass or crystal nail file for smooth, precise shaping
- Cuticle remover and cuticle pusher to gently tidy the nail bed
- Buffer block to even out ridges and create a soft, grippy surface
- Base coat to protect the natural nail and boost wear time
- Top coat (regular or gel) for shine and chip resistance
- Acetone and non-acetone remover for cleanup and full removal
- Tiny clean-up brush or cotton swabs to sharpen lines around the cuticle
Clean nails, pushed-back cuticles, and a smoothed surface help every almond nail design look intentional instead of messy. A good base coat also reduces staining from darker colors and keeps the nail plate stronger over time.
Fun Extras for Trendy Almond Nail Inspo
Once the essentials sit in place, a few extras unlock the more “screenshot-worthy” ideas. No need to grab everything at once; starting with one or two accents already moves designs into full inspo territory.
- Chrome powder or chrome top coat for that glazed, mirror, or pearl finish
- Magnetic cat-eye polish and a magnet wand for velvet, shifting shimmer
- Dotting tools and a striping brush for micro French tips, dots, and abstract lines
- Makeup sponges for ombré, aura nails, and soft gradients
- Floral decals or tiny stickers for easy coquette and seasonal looks
- Beginner gel kit (optional) for anyone who wants options that hold up longer
These extras help almond nail inspo ideas feel “trendy” without demanding serious art skills. A single tool, like a striping brush or chrome powder, upgrades multiple designs in this list, so everything works harder than a one-off gadget.
Safety & Nail Health Reminders
Cute almond nails still need healthy nail beds underneath. A few easy habits protect nails while everyone experiments with shapes and finishes. Limit soaking nails in pure acetone; short, focused removal sessions protect the skin and nail plate. File in one direction instead of a harsh sawing motion to avoid peeling and splitting. Leave cuticle cutting to professionals and focus on softening and gently pushing back instead. Give nails regular breaks from heavy layers if they start to feel thin or sore. Healthy natural nails make every almond nail inspo idea look smoother, shinier, and more expensive. 🙂

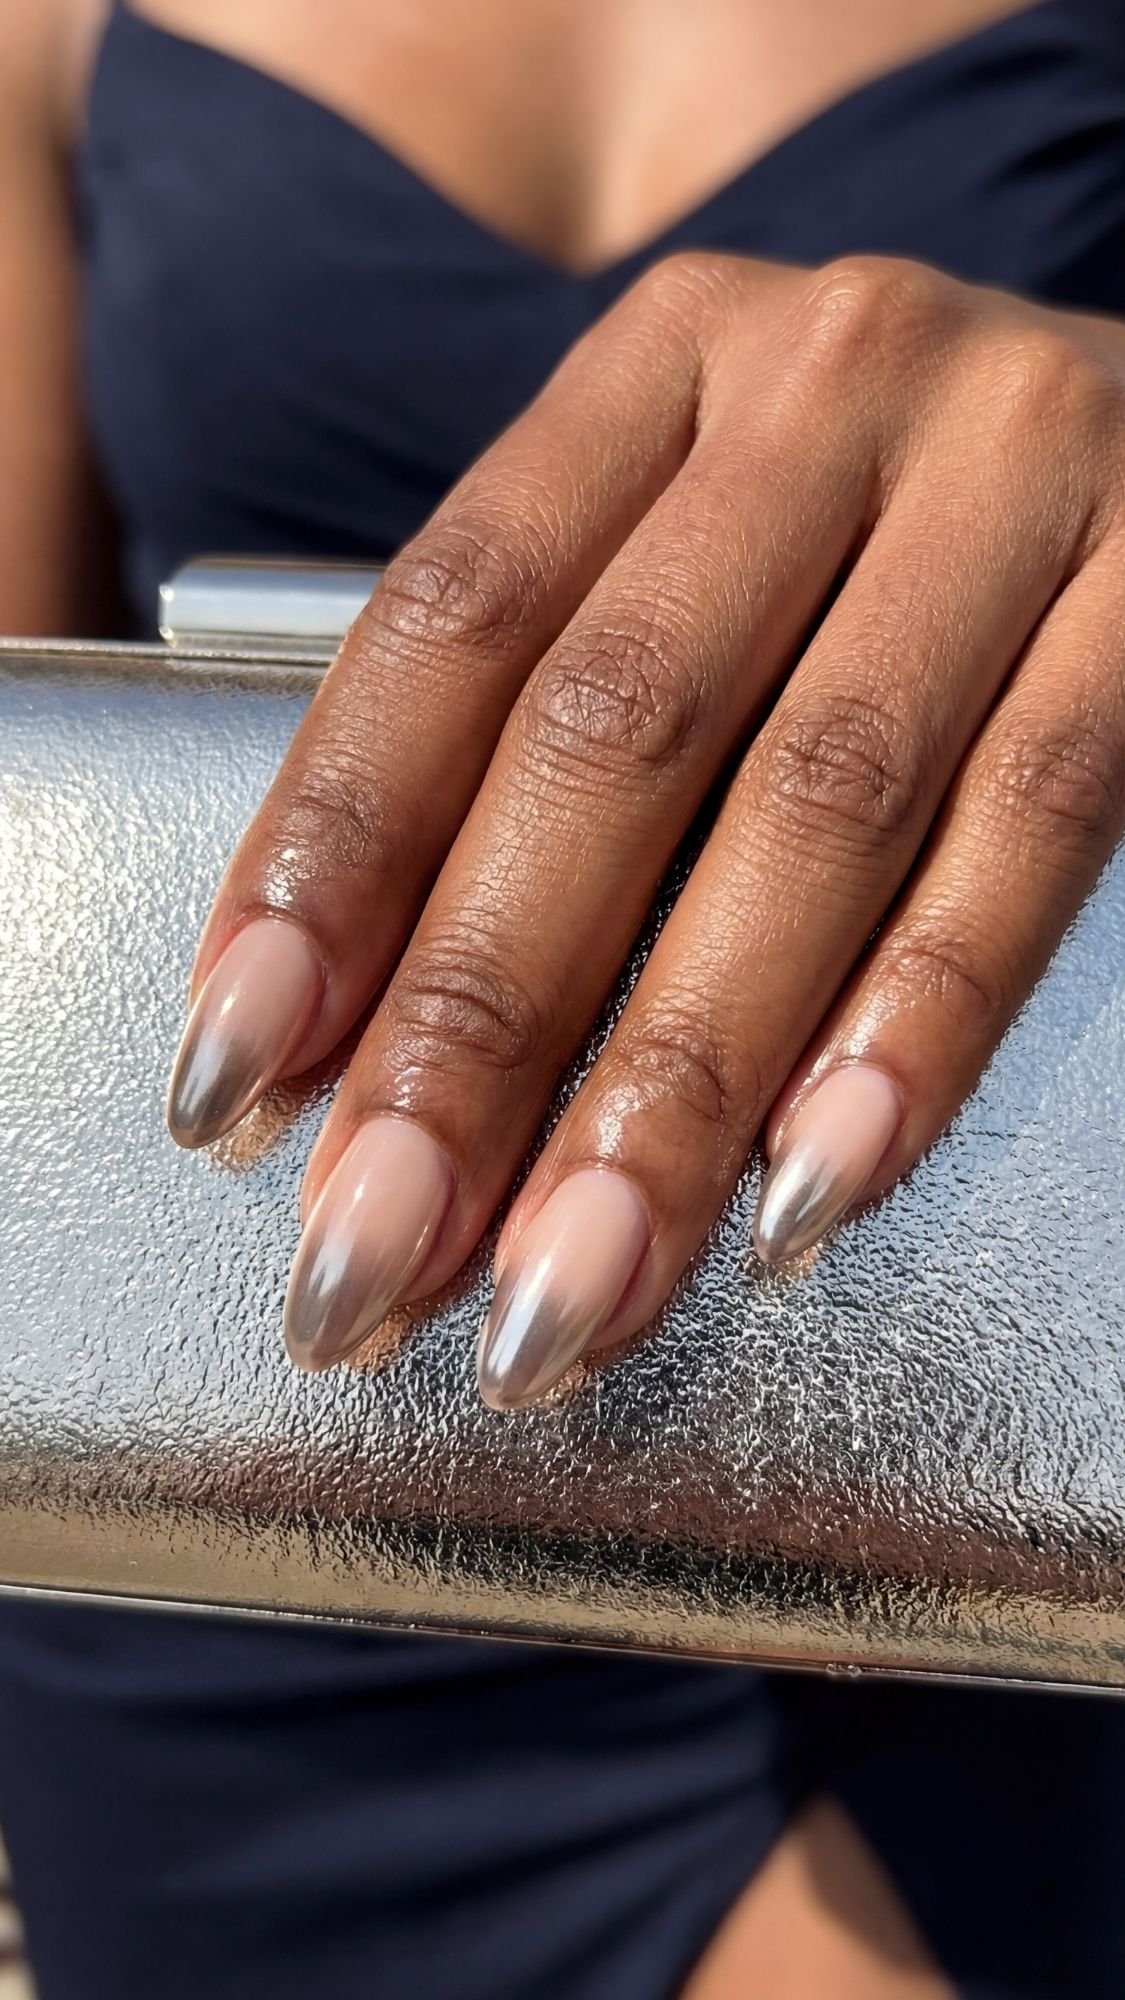
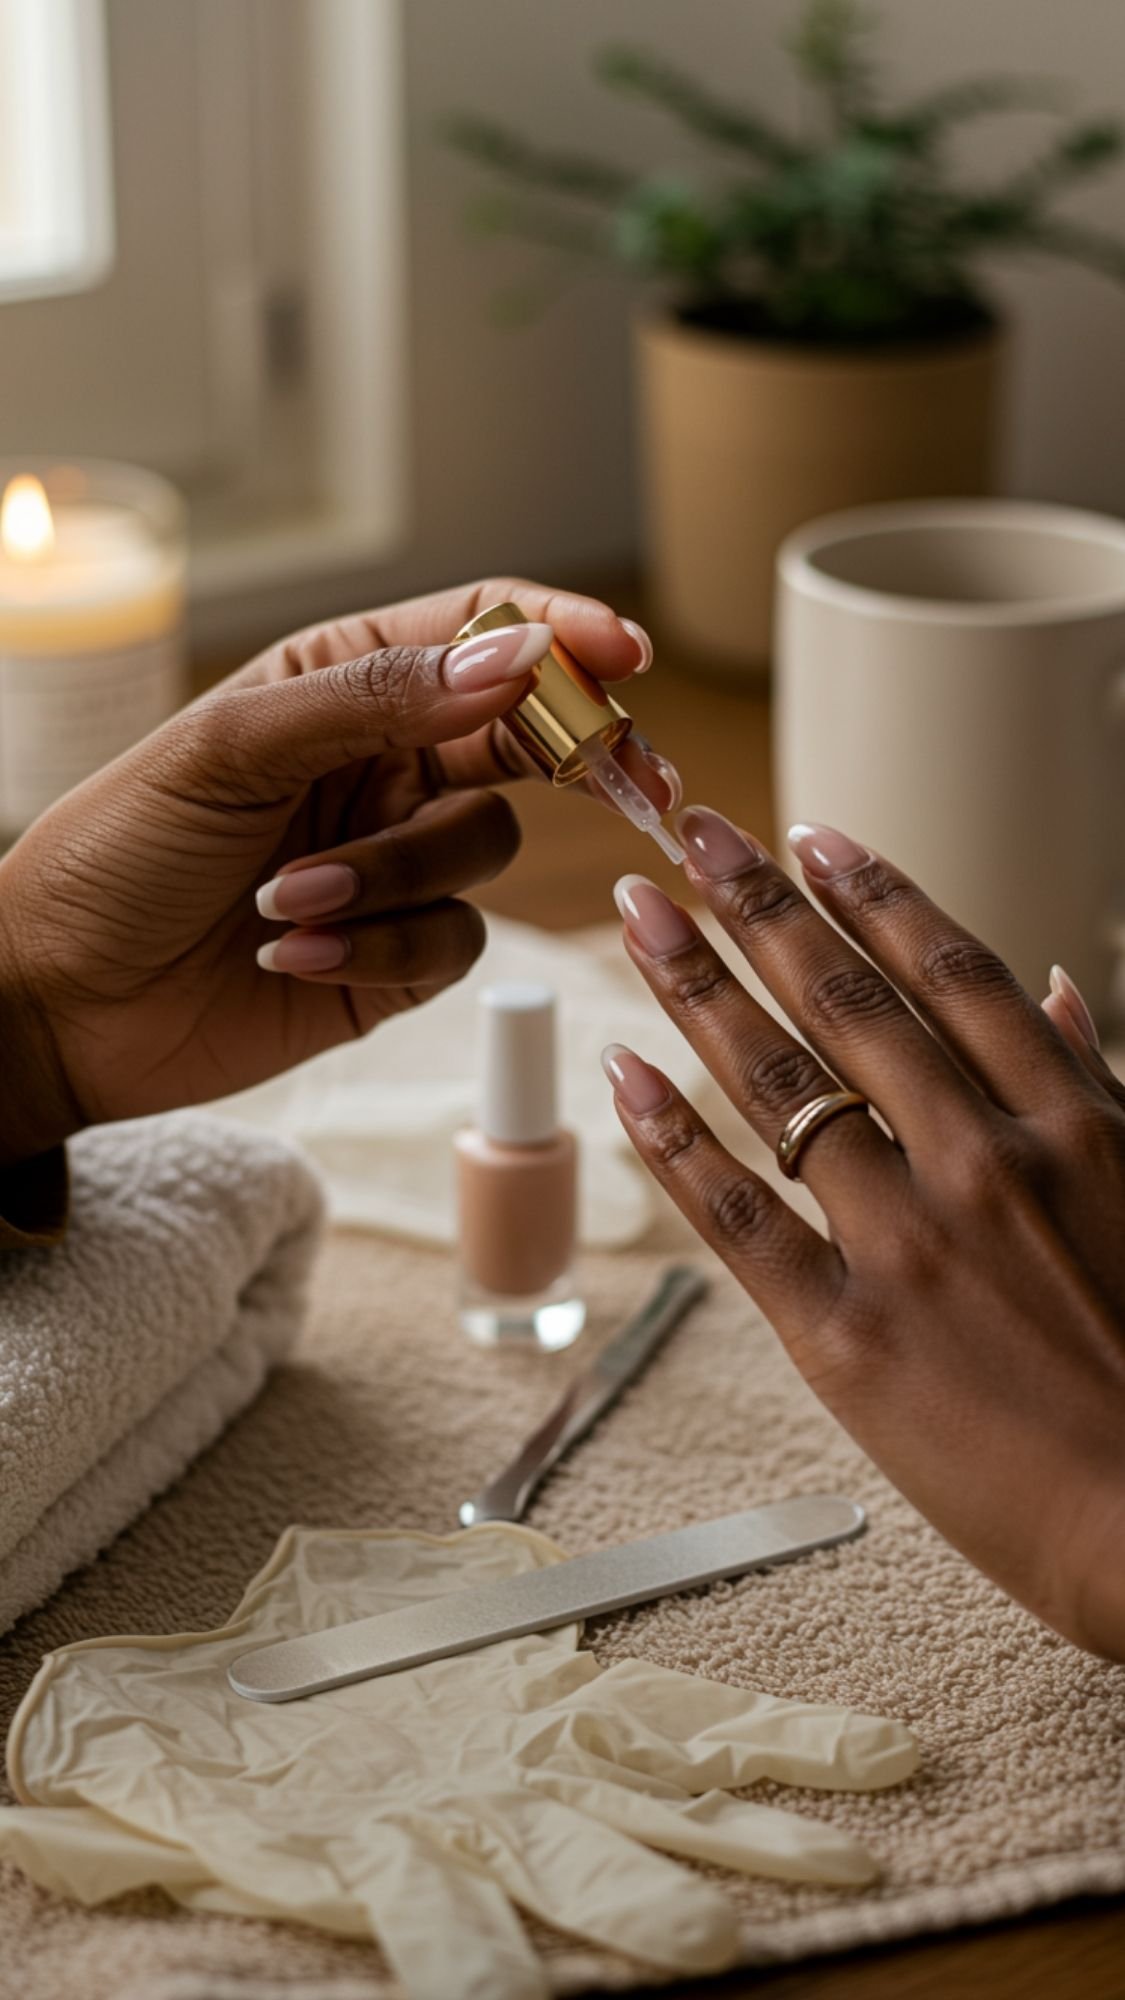
1.) Milky Glazed Almond Nails (Clean-Girl Classic)
Milky glazed almond nails stay on every “save for later” board because they look clean, soft, and expensive with almost no effort. The combo of a sheer, milky base and a pearly chrome layer gives that fresh, glazed finish that catches light in the prettiest way. On almond-shaped nails, the gloss follows the curve from cuticle to tip and makes fingers look longer instantly. The look fits every vibe: work meetings, date nights, errands in leggings, even formal events. Want nails that glow in every selfie without full rhinestone drama? Milky glazed almond nails deliver that exact energy.
This design loves almond nails because the rounded tip and tapered sides already feel elegant. A simple milky base turns that shape into a quiet luxury mani that never screams for attention but still photographs beautifully. The chrome layer adds just enough shine without making nails look chunky or overbuilt. Short almond nails look polished and understated with this style, while longer almonds lean more editorial and glassy. The best part for DIY: small wobbles along the edge barely show through the soft, sheer color and reflective top.
What This Look Needs
- Milky nude or sheer pink polish for the base
- Pearl or champagne chrome powder or a chrome-effect top coat
- Base coat and glossy top coat
- Soft buffer (if using chrome powder with gel)
- Clean-up brush and remover for crisp cuticle lines
A neutral milky shade keeps this almond nail inspo versatile, so the same manicure pairs with nearly every outfit. Chrome in pearl, soft gold, or champagne tones keeps the finish warm and flattering on many skin tones.
Step-by-Step: Milky Glazed Almond Nails at Home
- Shape nails into smooth almonds with a glass file, then lightly buff the surface.
- Apply base coat and let it dry or cure fully so the color grips well.
- Paint 1–2 thin coats of milky nude or sheer pink, keeping layers light to avoid streaks.
- If using chrome powder with gel, apply a no-wipe top coat, cure, and gently rub chrome powder over each nail, focusing along the curve of the almond tip.
- If using a chrome-effect top coat, add a thin layer over the milky base and let it dry or cure.
- Seal everything with a glossy top coat, then clean edges with a small brush dipped in remover.
Quick Tips for a Smooth Glazed Finish
- Keep layers thin so the almond shape stays slim and elegant.
- Cap the free edge with every coat to protect the tip and keep chips away longer.
- Choose a milky color that matches the natural nail bed rather than fighting it; the glaze looks softer that way.
- Add cuticle oil after everything dries to finish the “fresh from the salon” look.
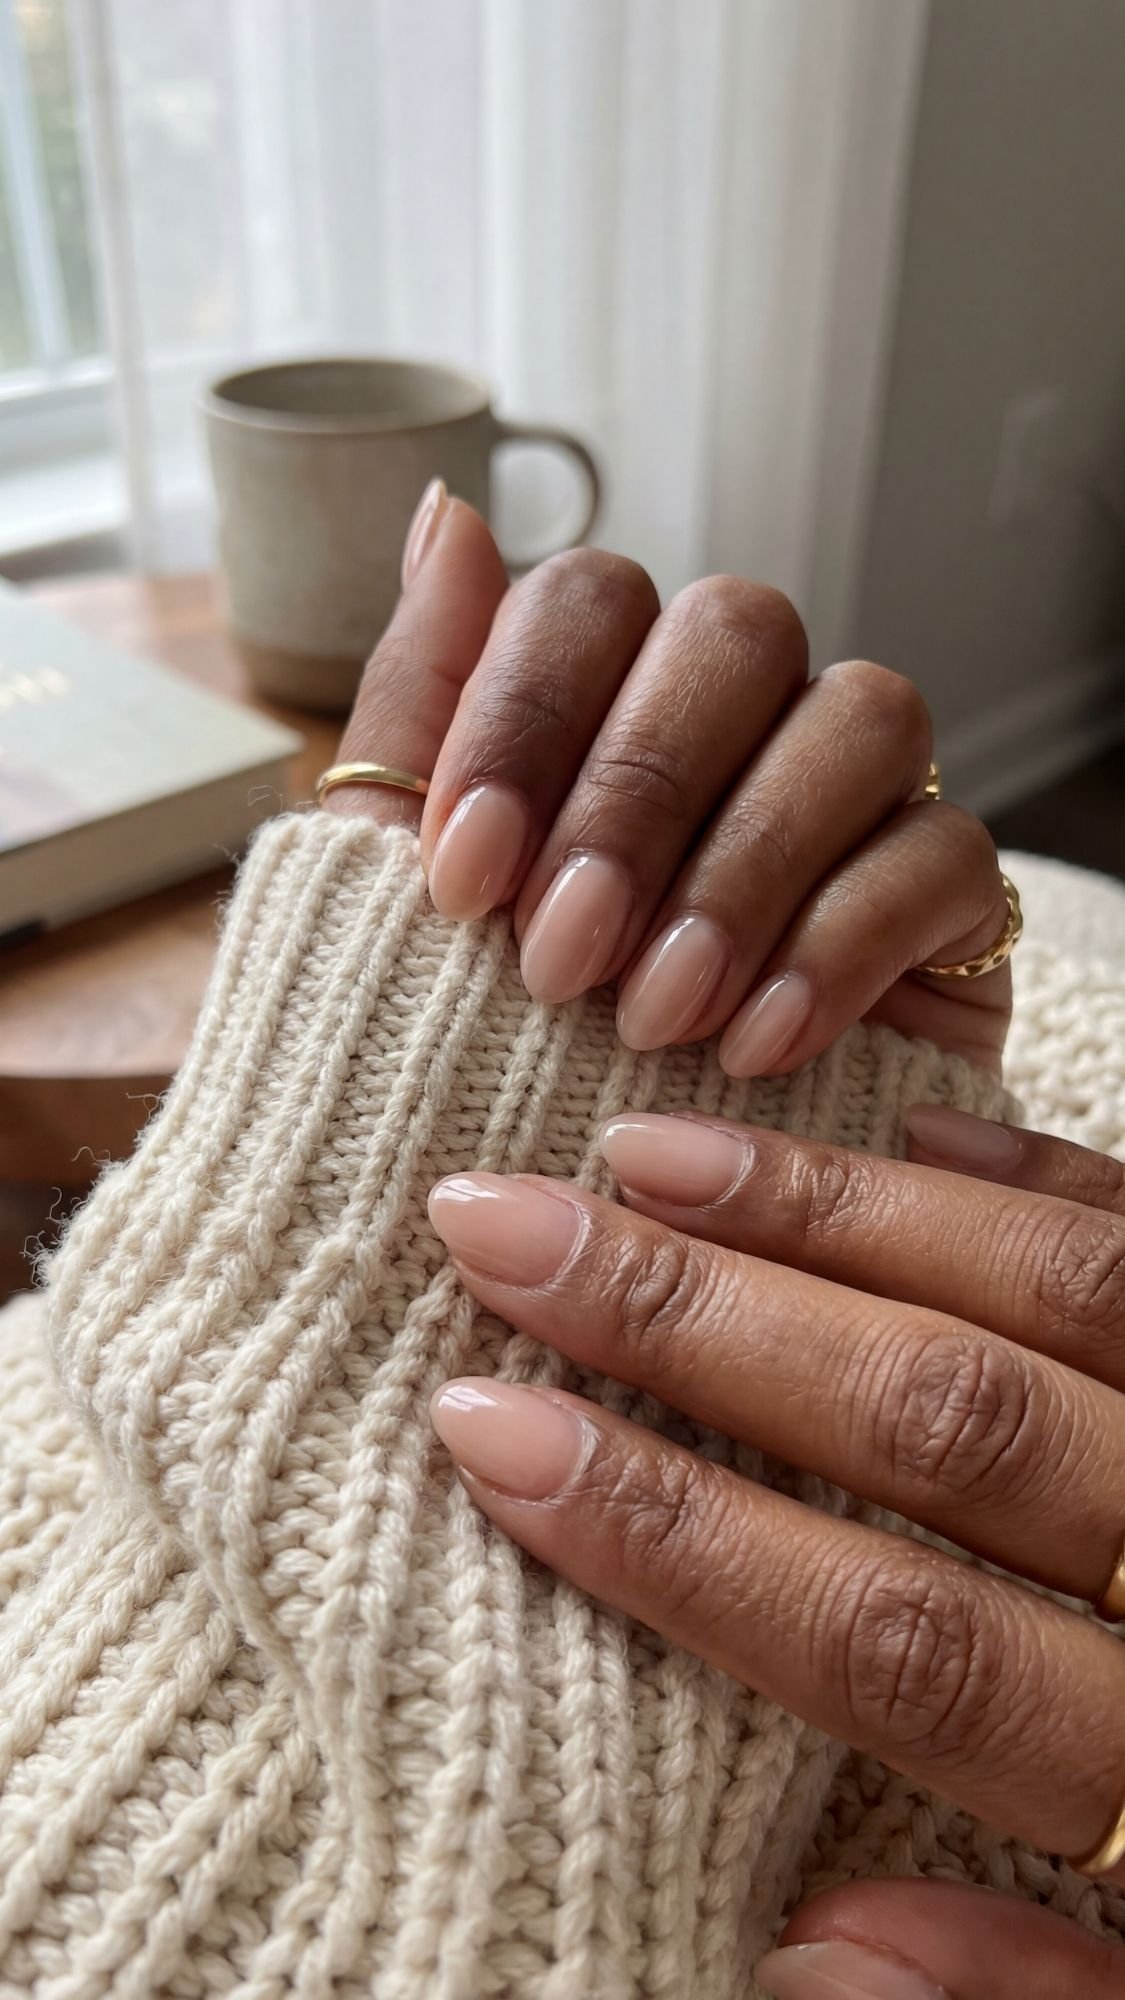
2. Short Naked Almond Nails (Low-Maintenance, High Polish)
Short naked almond nails give that “naturally put together” look with almost zero drama. The nails stay close to fingertip length, the color looks barely there, and the finish still reads as polished and intentional. This style works perfectly for anyone who types all day, handles kids, or simply dislikes long nails but still wants the almond shape and all that subtle elegance. The sheer, “naked” finish also pairs with absolutely everything—gym sets, office outfits, date-night dresses—without ever clashing or feeling too much. Think of this as the base-level almond nail inspo that quietly upgrades every hand shot.
Almond shaping takes this naked look from “just clean nails” to “effortless manicure” instantly. The soft taper and rounded tip stretch the nail visually, so even a short length looks elongated and refined. Because the color stays sheer, small chips and regrowth blend in instead of screaming for a redo, which keeps maintenance low. The overall effect feels like a skincare routine for nails: subtle, glowing, and designed to enhance what already exists. For anyone just starting with DIY almond nail ideas, short naked almonds offer a forgiving, beginner-friendly option that still photographs beautifully.
What This Look Needs
- Sheer beige, soft pink, or neutral “naked” polish
- Ridge-filling base coat for a smooth surface
- Glossy top coat for shine and protection
- Glass file and buffer for neat almond shaping
- Cuticle oil to finish the look
Choosing a sheer shade that matches or slightly enhances the natural nail bed keeps the effect seamless. A ridge-filling base smooths out any texture so the sheer polish doesn’t highlight bumps or lines.
Step-by-Step: Short Naked Almond Nails
- File nails into short almonds that extend just past the fingertip, tapering gently toward a rounded point.
- Lightly buff the surface to smooth ridges and help polish grip.
- Apply a ridge-filling base coat and let it dry completely.
- Paint 1–2 thin coats of sheer nude or pink, keeping strokes long and straight for an even finish.
- Seal everything with a glossy top coat, making sure to cap the free edge to prevent tip wear.
- Once dry, massage cuticle oil around each nail for extra glow and hydration.
Tips to Keep Short Naked Almond Nails Looking Fresh
- Trim and reshape every week or so to keep the almond silhouette clean and even.
- Use a gentle, non-acetone remover for quick polish refreshes without stripping the nail.
- Swap between slightly different sheer shades (cool pink, warm beige, milky nude) to keep the look interesting while staying minimal.
- Pair this mani with simple rings to highlight the almond shape and glossy “naked” finish.
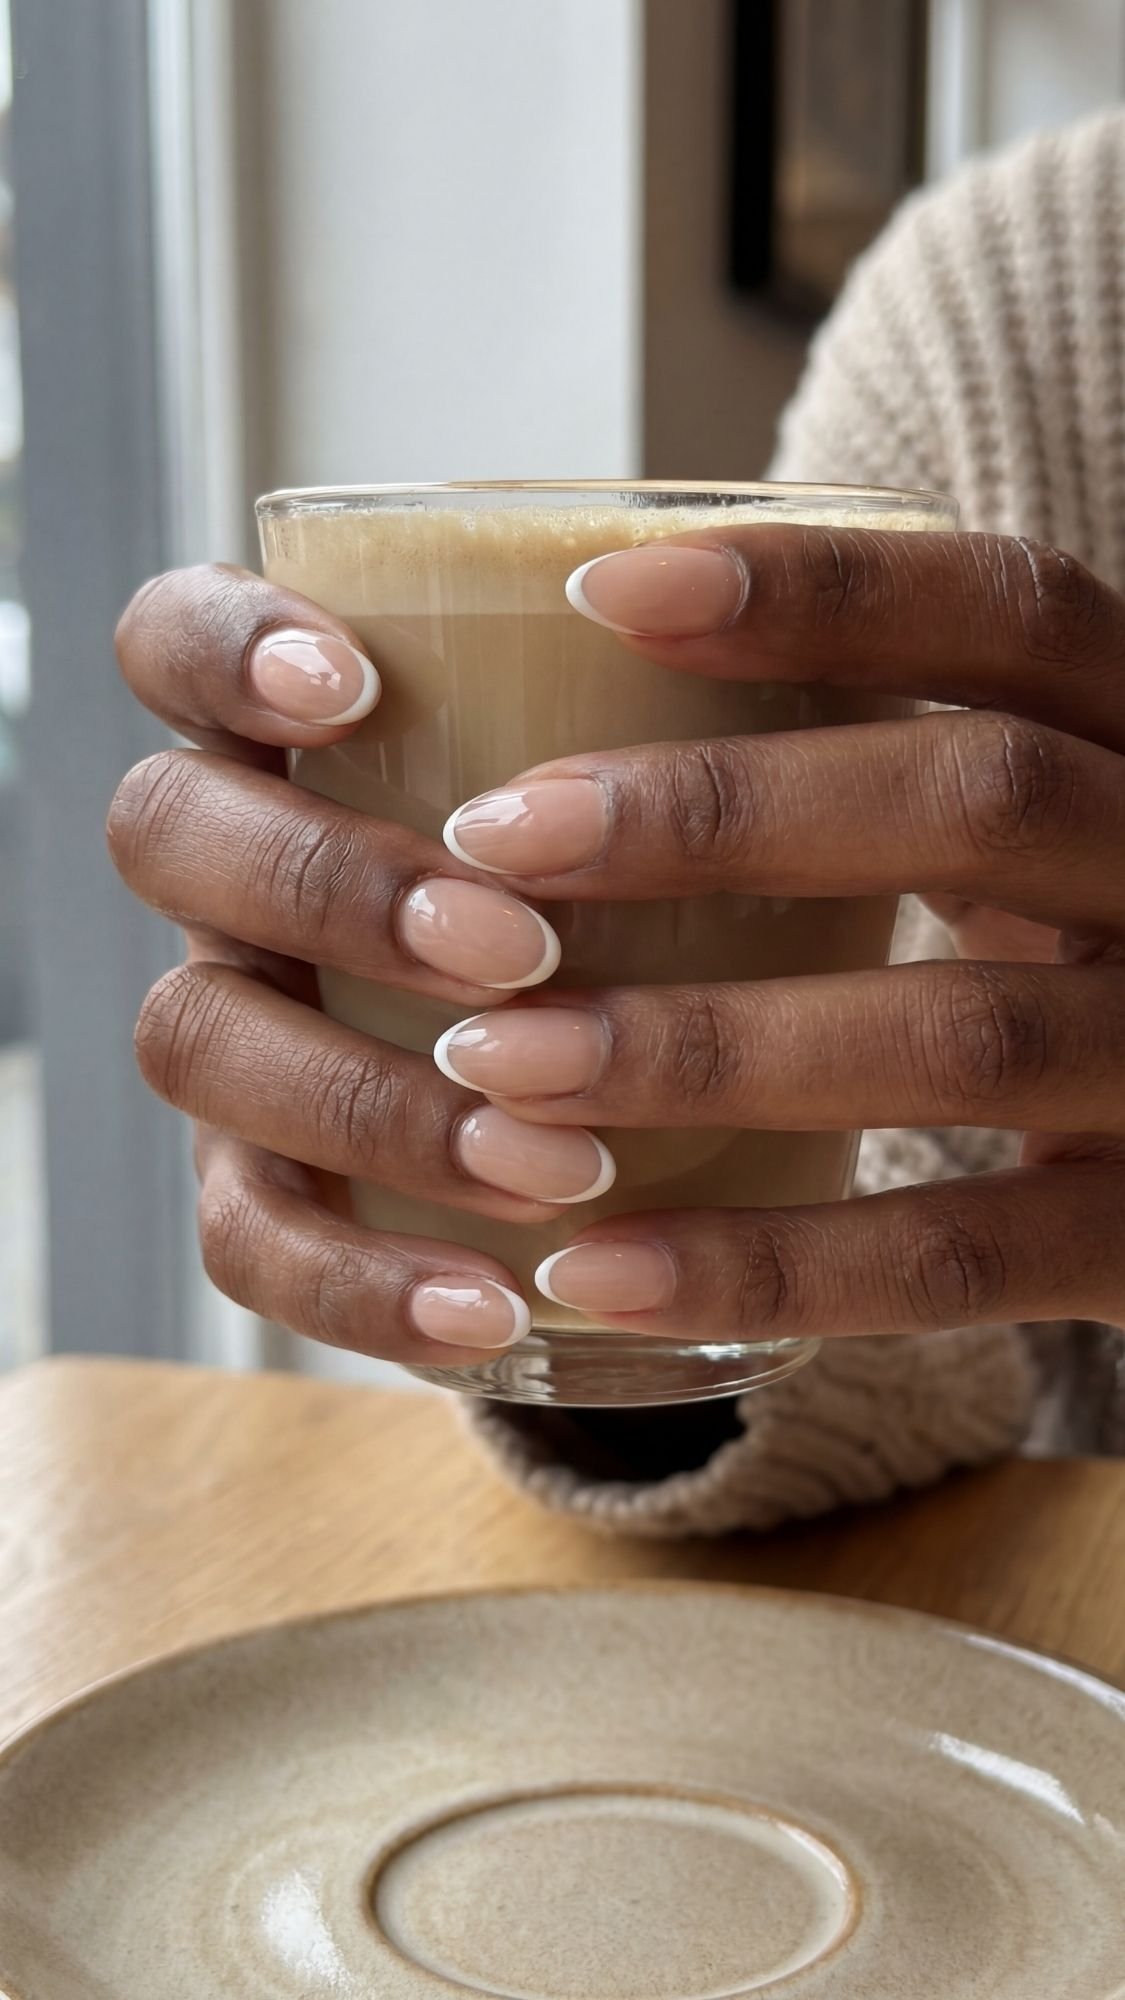
3. Micro French Almond Tips (Barely-There French)
Micro French almond tips take the classic French manicure and shrink it down into a thin, delicate outline that hugs the very edge of the nail. The result feels soft, modern, and a little bit “quiet luxury.” On almond-shaped nails, that slim arc follows the natural curve of the tip, so even a super subtle line still looks chic. This design suits short and medium almond lengths, which keeps things practical for everyday life while still giving serious almond nail inspo for close-up pics. Anyone who wants something clean and minimal but not plain nude finds a sweet spot here.
The magic of this look comes from contrast and restraint. The base stays sheer and natural, while the tip wears a whisper-thin stripe of white or color. That tiny pop defines the almond shape without turning the tip into a chunky block. Even neutral versions still read as polished and thoughtful, which works perfectly for work, weddings, or “running errands but still cute” days. Colored micro tips lean more playful, so shades like chocolate, soft pink, or deep navy give the same sleek outline with a twist. Either way, the nails keep a refined silhouette that looks expensive without needing salon-level skills.
What This Look Needs
- Sheer nude, beige, or soft pink base polish
- White or colored polish for the micro tip
- Thin liner brush or micro-French brush
- Base coat and glossy top coat
- Clean-up brush and remover for crisp edges
A thin, pigmented polish works best for the tip, because one smooth stroke creates the line without thick buildup. A nude base that matches the nail bed keeps the focus on the curved edge of the almond tip.
Step-by-Step: Micro French Almond Tips
- Shape nails into short or medium almonds with smooth, even sides and a rounded tip.
- Apply base coat and let it dry fully to avoid dragging.
- Paint 1–2 thin coats of sheer nude or pink, keeping the surface smooth and streak-free.
- Load a liner brush with white or colored polish and trace a very thin line along the free edge of each almond tip, following the natural curve.
- Clean any wobbles with a tiny brush dipped in remover, sharpening the smile line.
- Seal the design with a glossy top coat, floating it gently over the tip to avoid smearing the micro line.
Tips for Smooth, Even Micro Tips
- Rest elbows on a table so hands stay steady while the brush glides along the edge.
- Start with a thinner line than expected; adding a tiny bit more feels easier than fixing an overly thick stripe.
- Try soft colors like mocha, blush, or dusty blue for a twist on the traditional white French.
- Keep all nails the same curve and thickness at the tip so the almond shape looks cohesive from every angle.
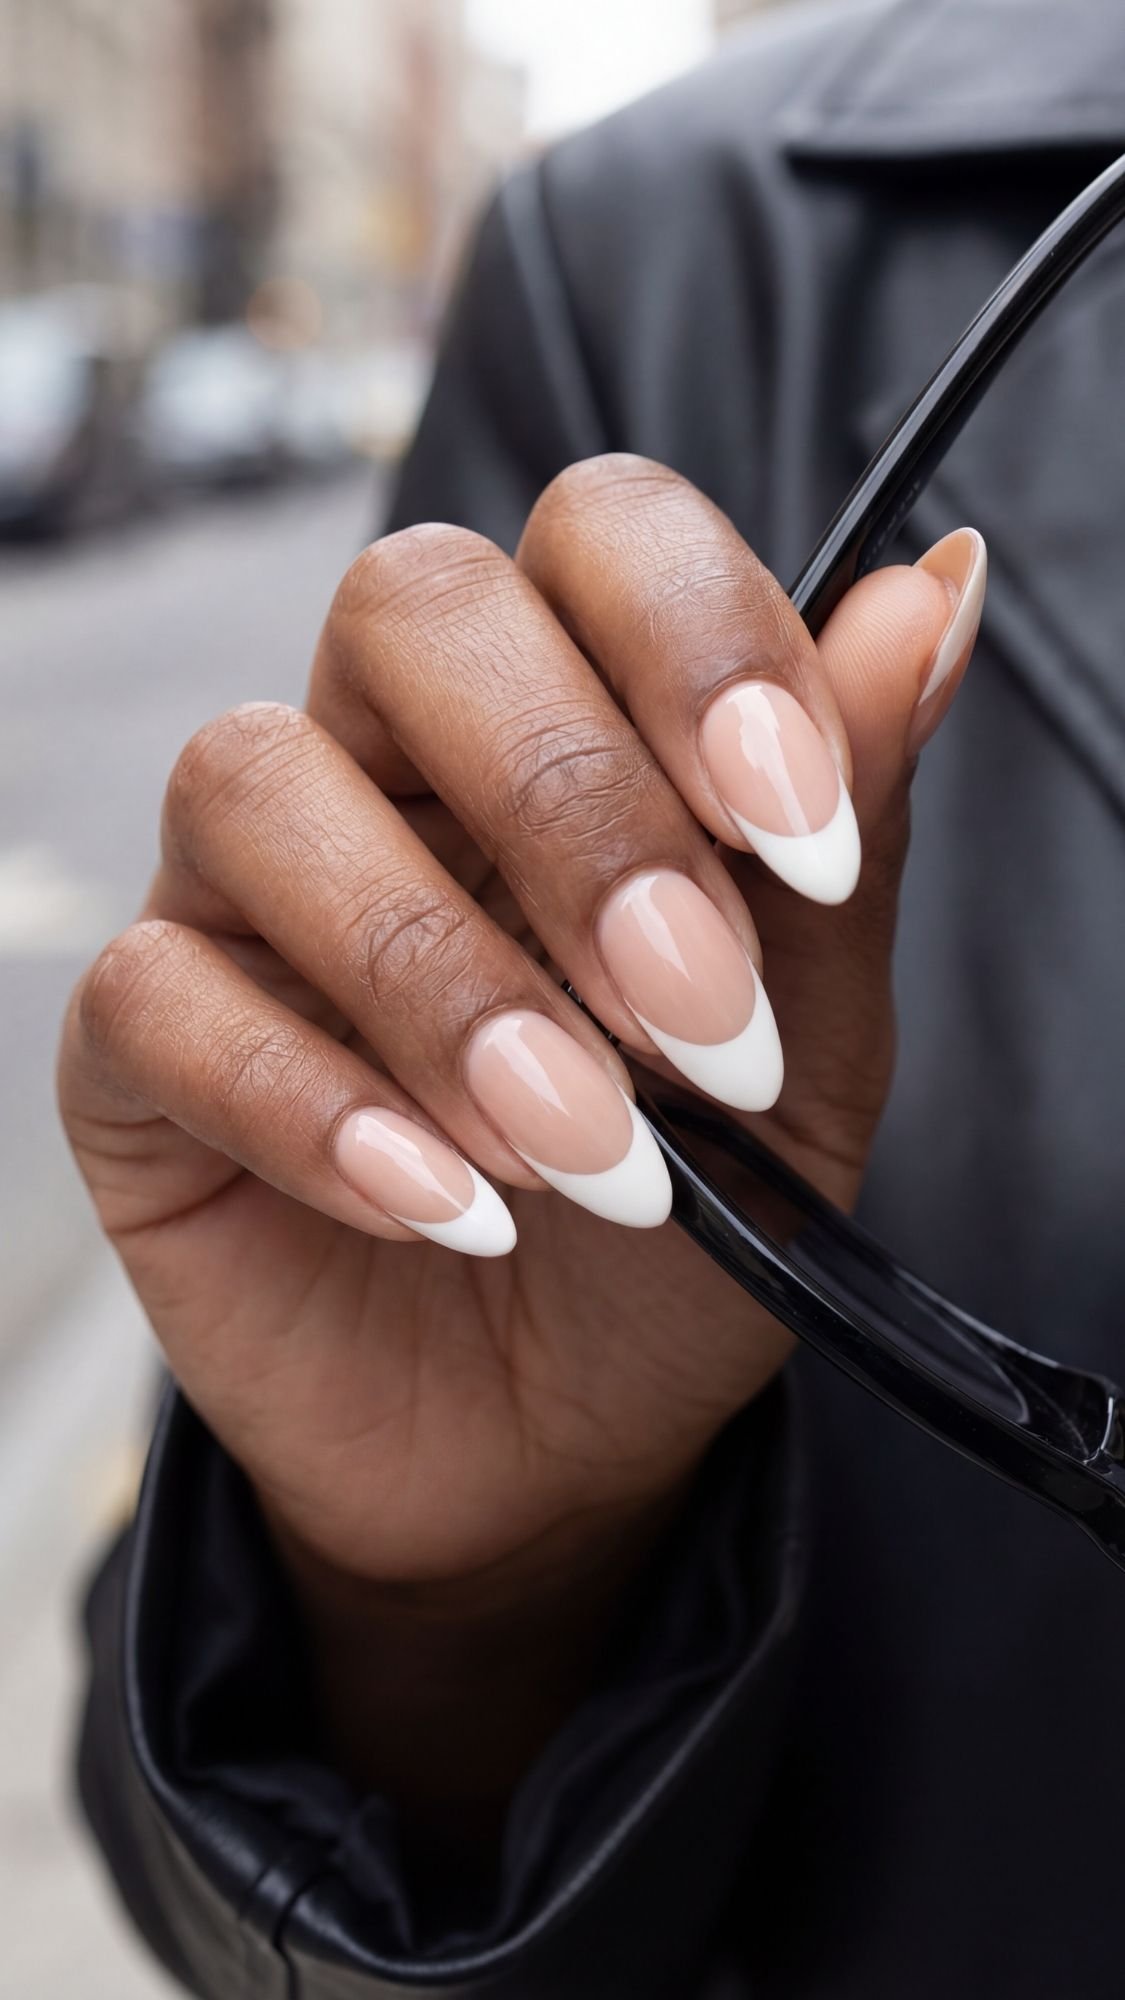
4. Deep ’90s French on Almond Nails (Retro, Not Basic)
Deep ’90s French nails bring that nostalgic, almost supermodel energy that keeps popping up in almond nail inspo feeds. Instead of a thin little line, the tip turns bold and defined, almost chunky on purpose. On almond-shaped nails, this thicker French tip looks softer and more luxe than the squared-off version from old photos. The base stays neutral and glossy, so the bright or opaque tip stands out without looking harsh. Anyone craving a mani that feels classic, dramatic, and still wearable all week can lean straight into this design.
Almond nails elevate the ’90s French because the rounded tip matches the curve of the smile line. The thicker band of color wraps around the almond edge and elongates the nail visually, especially at medium or longer lengths. A soft beige or sheer base keeps the design from feeling heavy, even when the tip sits pretty deep on the nail. Shades like crisp white, creamy vanilla, or even soft mocha deliver that throwback feel; bolder colors twist the trend into something newer. Either way, this style suits office days, nights out, and every “hands around a cocktail” photo.
What This Look Needs
- Nude, beige, or sheer pink base polish
- Opaque white or colored polish for the deep tip
- French guide stickers or curved nail vinyls
- Base coat and glossy top coat
- Detail or clean-up brush with remover
French guides help keep the smile line consistent and symmetrical, especially on the first attempt. An opaque, smooth formula for the tip shade covers in one or two strokes and keeps the thick band even.
Step-by-Step: Deep ’90s French on Almond Nails
- Shape nails into medium or long almonds, keeping both sides balanced and the tip softly rounded.
- Apply base coat and let it dry completely.
- Paint 1–2 thin coats of nude, beige, or sheer pink base and allow them to dry.
- Place French guide stickers lower than a standard French line to create that deep ’90s-style tip.
- Fill in the exposed tip area with opaque white or another chosen color, then gently remove the guides while the polish still feels wet.
- Clean up the smile line with a small brush and remover if needed.
- Seal everything with a glossy top coat, capping the free edge for extra durability.
Tips for a Smooth Retro French
- Match the depth of the tip across all nails so the French band sits at the same height.
- Choose a base tone that complements the natural nail bed; that choice keeps the thicker tip from overwhelming the nail.
- Experiment with soft latte, chocolate, or muted berry shades for the tip to give a modern spin on the classic white.
- Keep cuticles neat and hydrated so the bold French tip stays the star of the design instead of any dryness near the base.
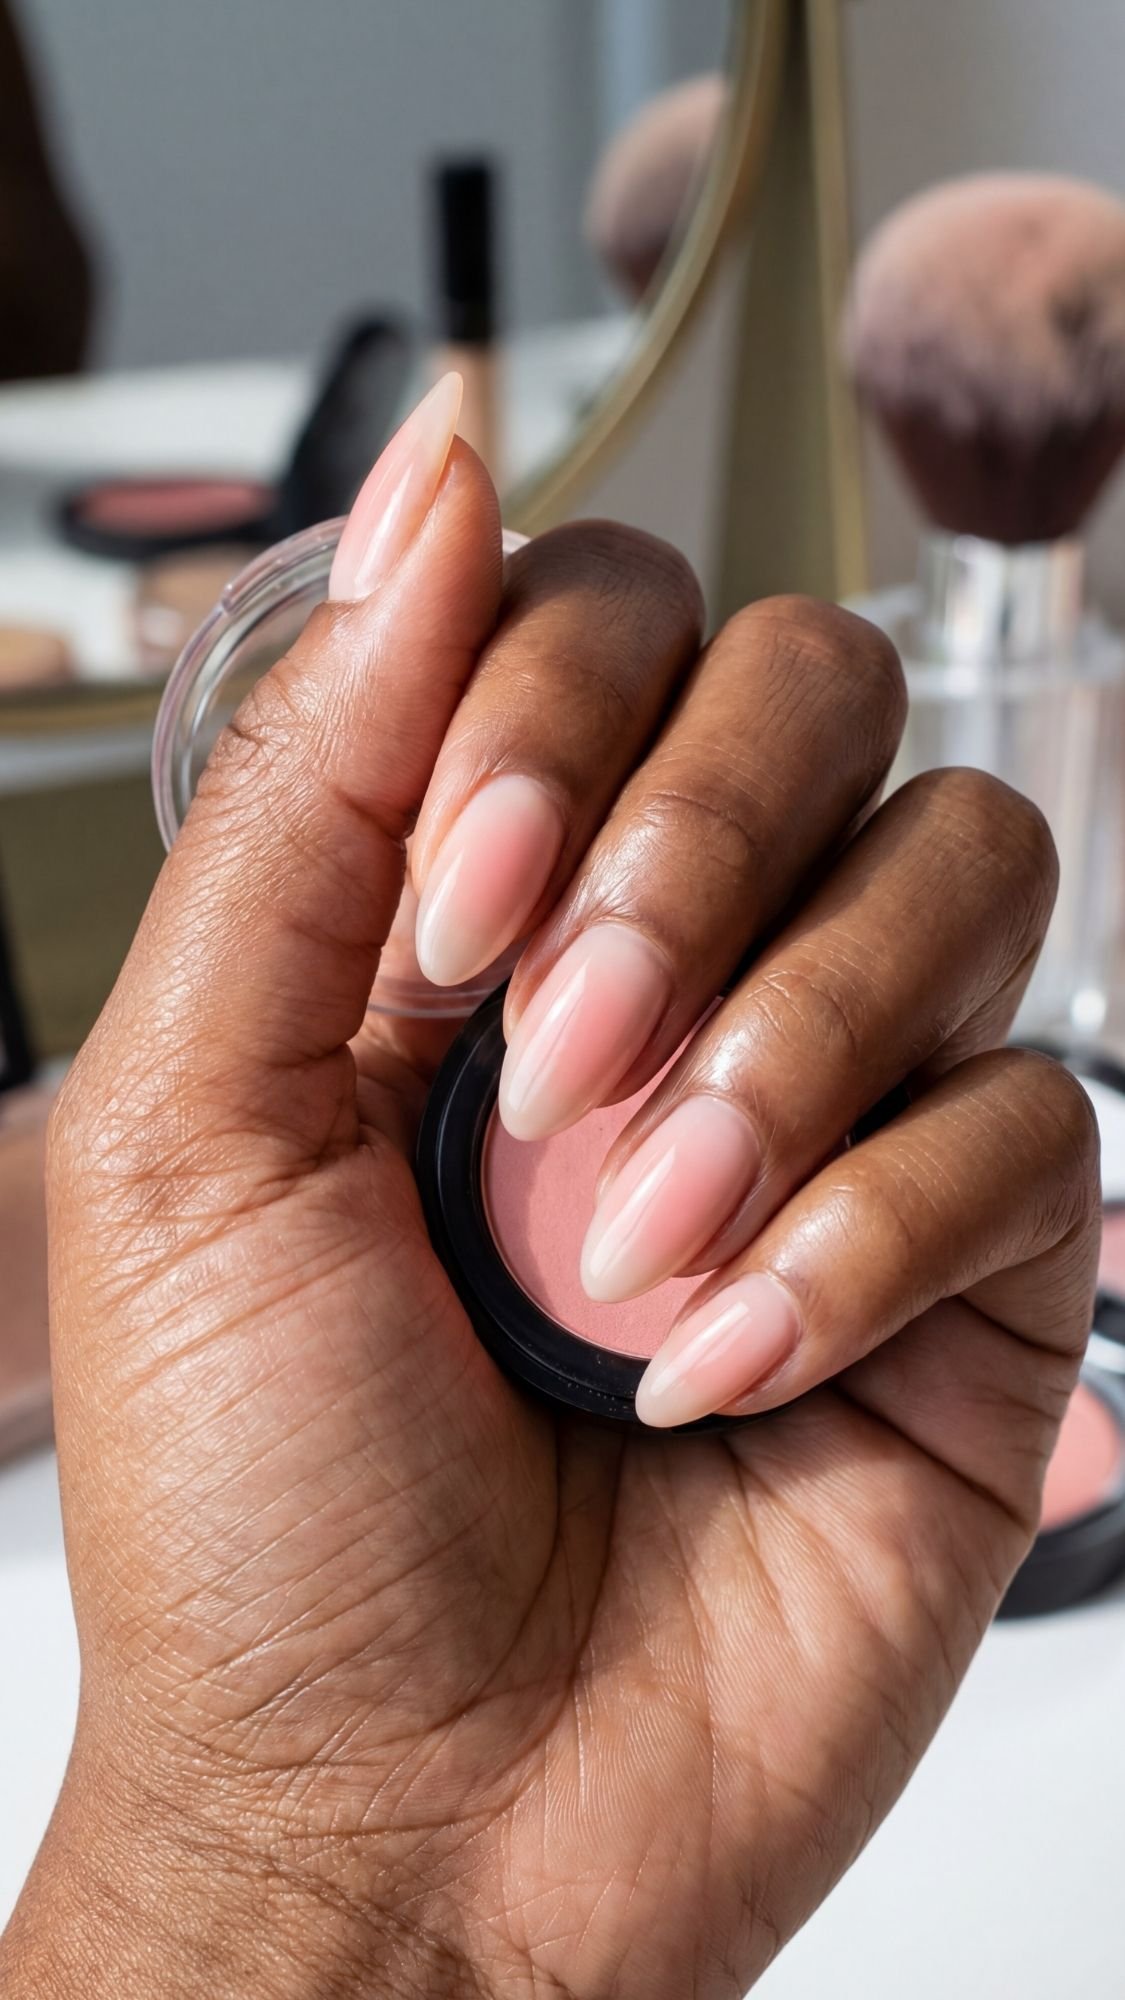
5. Blush Aura Almond Nails (Soft-Glow Gradient)
Blush aura almond nails give that “soft filter” look in real life, which explains why aura designs stay all over almond nail inspo searches. A sheer base and a hazy pop of blush or peach in the center create a glow-from-within gradient that looks romantic and dreamy. On almond-shaped nails, the rounded tip echoes the blurred edges of the aura, so the whole nail feels cohesive instead of patchy. The design suits neutral lovers and color fans at the same time, because the blush tone stays gentle while still adding interest. Short and medium almond lengths keep the look everyday-friendly, while longer almonds push it into more ethereal territory. Ever scroll past an aura manicure and think it looks mysterious but not overcomplicated? This design proves that impression right.
Aura nails flatter many skin tones because the blush center can shift from soft rose to peach or warm berry. The sheer base keeps the overall effect light, so the center color never feels heavy or blocked. The almond shape does a lot of visual lifting here: it stretches the gradient, so the color seems to radiate from the middle of the nail toward the tapered tip. This effect makes the manicure look airbrushed, even when a simple makeup sponge handles all the blending. A glossy top coat finishes everything off and locks in that “lit from within” shine that shows up beautifully on camera and in regular room light.
What This Look Needs
- Sheer nude, off-white, or milky base polish
- Blush, pink, or peach polish for the aura center
- Makeup sponge or small nail art sponge
- Base coat and glossy top coat
- Clean-up brush and remover for tidy edges
Choosing a blush shade that echoes the natural flush of the skin around the nail keeps the aura feeling soft and believable. A sheer base reduces harsh lines and makes blending easier, even for beginners.
Step-by-Step: Blush Aura Almond Nails
- Shape nails into smooth almonds, then buff lightly to create an even surface.
- Apply base coat and let it dry fully.
- Paint 1–2 thin coats of sheer nude or off-white base, keeping the surface smooth and streak-free.
- Dab a small amount of blush or peach polish onto a makeup sponge and press it gently into the center of each nail, keeping the edges soft and hazy.
- Add another very thin layer of sheer base or a clear topper over the entire nail to blur the edges of the aura.
- Seal the design with a glossy top coat, capping the tip to protect the almond edge.
- Clean up around the cuticles with a small brush dipped in remover for a crisp, professional finish.
Tips for a Smooth Aura Gradient
- Tap off excess polish on a paper towel before sponging so the center color stays soft, not blobby.
- Keep the most intense color just off the middle of the nail, slightly closer to the tip, to emphasize the almond shape and length.
- Experiment with different blush tones—cool rose, peach, or soft berry—to see which shade complements the skin tone best.
- Add a very thin layer of pearl or champagne chrome over the finished gradient for a subtle, glossy glow.
6. Chrome Ombre Almond Tips (Soft Metal Edge)
Chrome ombre almond tips blend soft neutral polish with a swipe of metal at the ends, so the nails catch light without looking heavy or costume-like. The base stays natural and smooth, while the metallic fade starts near the tip and melts toward the middle of the nail. On almond shapes, that chrome gradient follows the curve of the taper, so the ends look extra sleek and reflective. This design works perfectly for anyone who loves “clean girl” nails but still wants a bit of edge—office-friendly in softer tones, and full-night-out ready in bolder metals. The whole look reads like jewelry for the fingertips, not just polish.
Almond nails give the chrome ombre room to shine because the tip narrows gently rather than ending in a flat block. The reflective pigment hugs the pointed end and creates a soft spotlight effect right where the nail tapers. Short almonds keep the metal subtle and chic; medium and long almonds turn the ombre into more of a statement. When the base color stays neutral—think sheer beige, milky nude, or soft blush—the chrome layer can shift from silver to rose gold to champagne without clashing. One set of tools can carry multiple almond nail inspo looks just by swapping metal shades.
What This Look Needs
- Neutral nude, beige, or soft pink base polish
- Chrome powder in silver, rose gold, or champagne or a chrome-effect top coat
- No-wipe top coat (for gel chrome powder application)
- Sponge applicator or silicone tool
- Base coat and glossy top coat
- Clean-up brush and remover
A neutral base keeps the chrome ombre elegant, while a smooth, no-wipe top coat helps the powder grip evenly when using gel. A soft sponge or silicone applicator helps blend the metallic fade so the chrome does not stop in a harsh line.
Step-by-Step: Chrome Ombre Almond Tips
- Shape nails into almonds and buff the surface lightly for a smooth starting point.
- Apply base coat and let it dry or cure completely.
- Paint 1–2 thin coats of neutral base color, making sure the finish looks even and glossy.
- If using chrome powder with gel, add a no-wipe top coat, cure, and then tap chrome powder onto the top third to half of each nail, focusing more product near the tip and blending downward with lighter pressure.
- If using a chrome-effect top coat, brush a thin layer over just the tip area and drag the remaining product slightly down the nail to create a fade.
- Seal everything with a glossy top coat, capping the almond tip to protect the edge and lock in shine.
- Clean around the cuticles with a small brush and remover so the chrome looks tidy and intentional.
Tips for a Soft, Seamless Metal Fade
- Start with a light touch when applying chrome and build intensity gradually toward the tip.
- Keep the highest concentration of metal on the narrow almond edge so the shape looks longer and more defined.
- Choose rose gold or champagne chrome for a softer, more wearable everyday look; reach for silver or gunmetal chrome for night-out energy.
- Maintain thin layers so the almond nails stay slim and elegant instead of bulky.
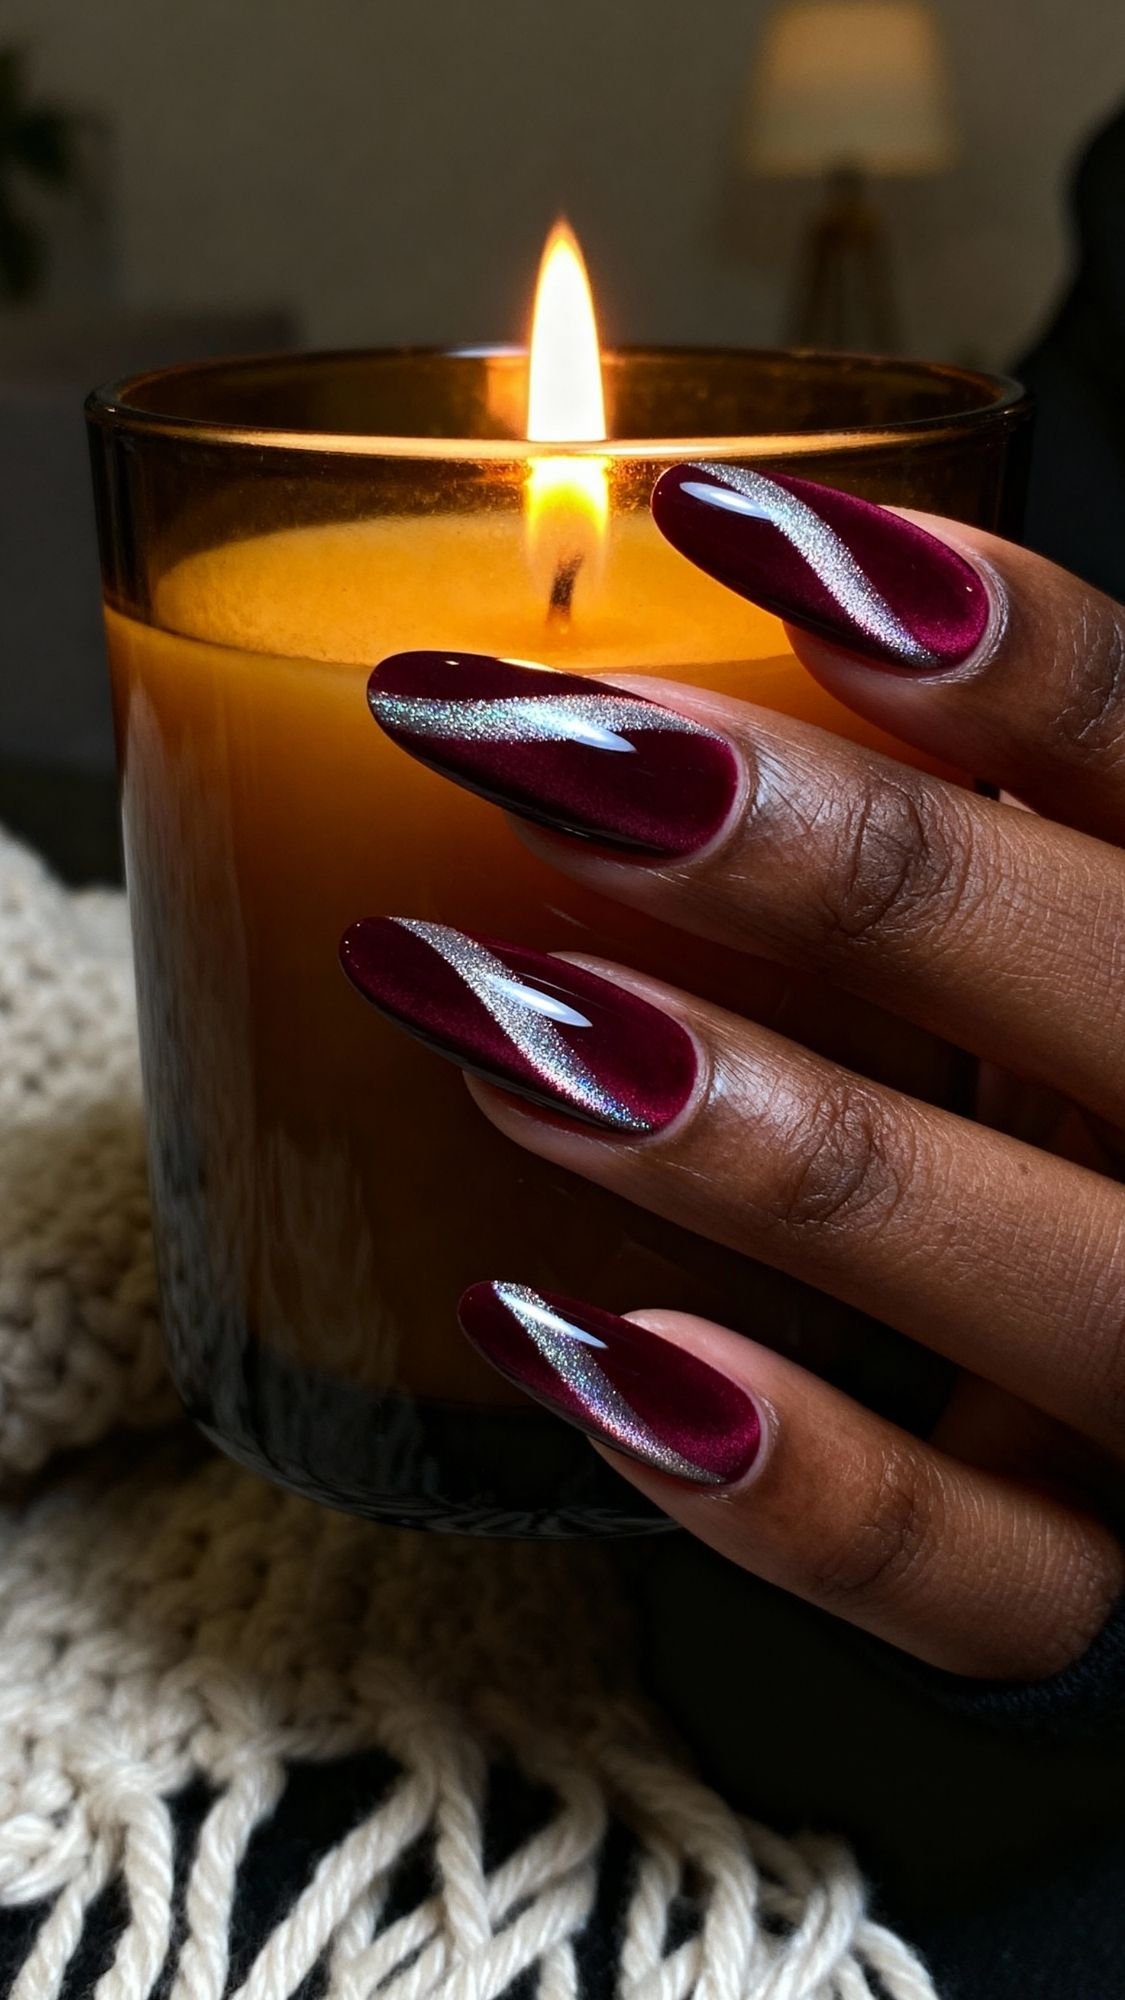
7. Velvet Cat-Eye Almond Nails (Magnetic Glow)
Velvet cat-eye almond nails bring that rich, shimmery glow that looks like light moves under the polish. A magnetic shimmer line stretches across each nail and shifts with every hand movement, so the manicure always feels alive. On almond-shaped nails, the cat-eye stripe echoes the slim, tapered silhouette and turns even a simple hand pose into a moment. Deep shades like cocoa, plum, forest green, or midnight blue give maximum impact, while softer tones keep the effect more subtle. Anyone who loves moody, cozy, or evening-ready almond nail inspo will gravitate straight to this look.
This design works beautifully on almond nails because the shape already gives an elegant, elongated base for the shimmer line. The magnet pulls the reflective pigment into a diagonal or S-curve that runs along or across the tip, which makes the almond point stand out even more. Dark backgrounds create major dimension, so the nails read almost like velvet fabric under soft lighting. Short almonds feel polished and mysterious; medium and long almonds lean dramatic and glamorous. A glossy top coat seals everything in and enhances that velvety shift every time light hits the nails from a new angle.
What This Look Needs
- Dark cat-eye gel polish in plum, cocoa, green, or navy
- Magnet wand (straight or multi-directional)
- Base coat and glossy gel top coat
- Gel lamp for curing
- Clean-up brush and gentle gel-safe cleanser
A deeply pigmented cat-eye polish ensures the shimmer line shows clearly over the base. A strong magnet wand allows multiple designs—straight line, diagonal slash, or soft curve—without changing products.
Step-by-Step: Velvet Cat-Eye Almond Nails
- Shape nails into smooth almonds and lightly buff the surface.
- Apply a thin layer of base coat and cure fully under the lamp.
- Paint a thin coat of dark cat-eye gel polish and cure to create depth.
- Add a second coat of cat-eye polish, then immediately hold the magnet wand close to the nail (without touching) to pull the shimmer into a diagonal or curved line that flatters the almond tip.
- Once the shimmer line looks even, cure the nail to lock the pattern in place.
- Repeat on each nail, adjusting the magnet angle to keep the overall look cohesive.
- Finish with a glossy gel top coat, cure again, and cleanse any tacky layer according to product instructions.
Tips for a Smooth, Dimensional Cat-Eye Effect
- Keep color layers thin so the almond nails stay lightweight and refined.
- Angle the magnet so the shimmer line flows along the length of the nail, which enhances the slim, tapered almond shape.
- Use a slightly different angle on one or two accent nails for subtle variety without breaking the overall look.
- Pair deeper shades with simple jewelry and soft textures so the glowing nails stay the main statement.
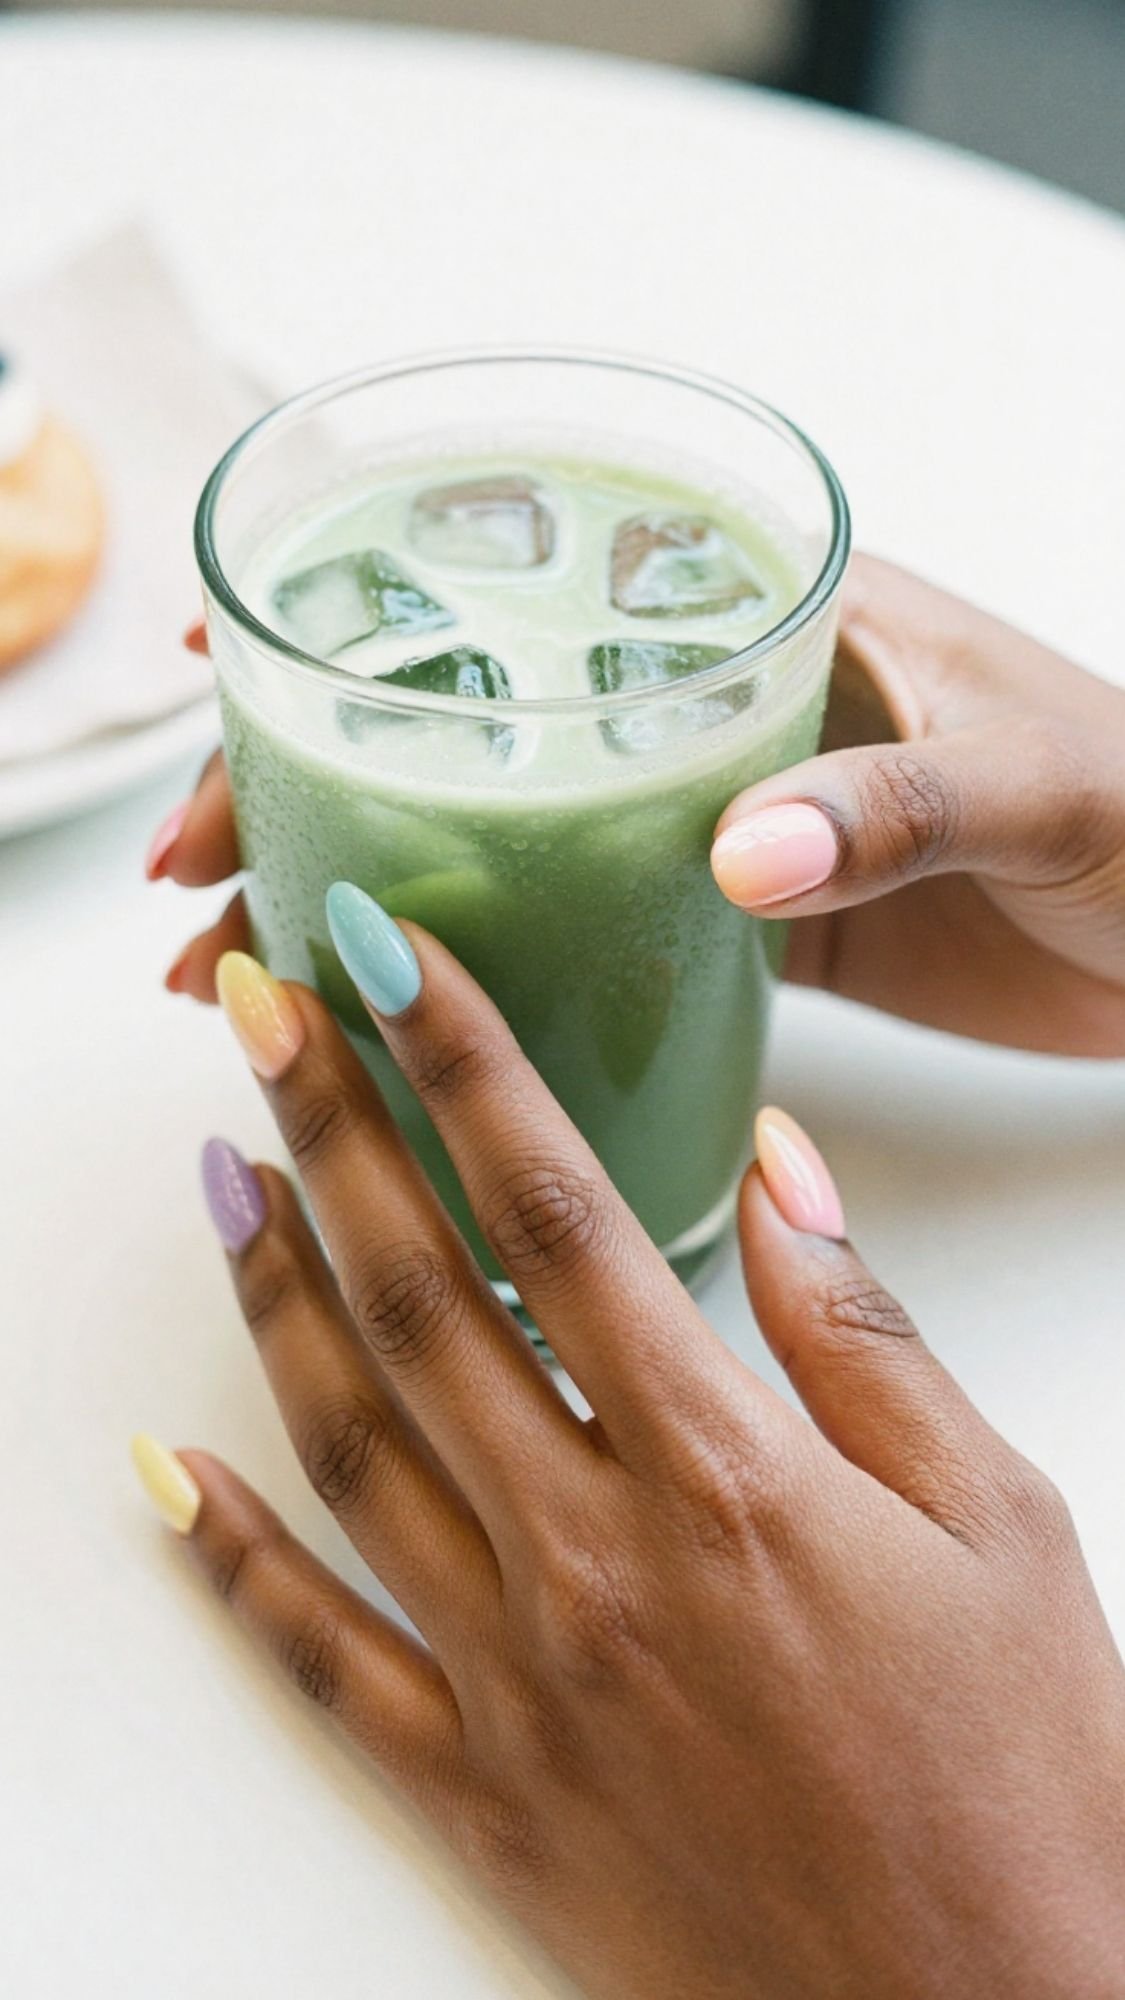
8. Pastel Skittle Almond Nails (Soft Rainbow Vibes)
Pastel Skittle almond nails turn every hand shot into a soft, candy-colored moment without sliding into full chaos. Each nail wears a different pastel shade, yet the consistent almond shape keeps the whole set cohesive and intentional. The look feels playful and light but still polished enough for work, brunch, or that “holding-the-iced-latte” photo. Pastel Skittles also solve indecision fast: instead of choosing just one color from the pastel row, the mani borrows several and turns them into a gradient across both hands. Anyone who loves color but still wants a soft, diffused vibe finds serious almond nail inspo here.
Almond nails carry this look well because the tapered tip and rounded edge already give a sleek, grown-up base for fun shades. Pastels like lilac, butter yellow, mint, baby blue, and soft peach stay gentle enough to complement different skin tones while still reading as a rainbow. Short almond nails keep the effect subtle and wearable; medium lengths lean slightly more editorial without losing practicality. A glossy top coat pulls everything together so the set looks like one curated palette instead of random colors. Ever scroll through a pastel Skittle manicure and feel instant mood-lift? This design recreates that feeling every time the nails appear in a photo.
What This Look Needs
- 5–10 coordinating pastel polishes (lilac, mint, baby blue, peach, butter yellow, soft pink, etc.)
- Base coat and glossy top coat
- Glass file and buffer for neat almond shaping
- Clean-up brush and remover for sharp edges
A cohesive undertone—mostly cool pastels or mostly warm pastels—helps the colors blend visually even when each nail wears a different shade.
Step-by-Step: Pastel Skittle Almond Nails
- Shape nails into short or medium almonds with smooth, balanced sides and a rounded tip.
- Apply base coat and let it dry thoroughly.
- Choose 5–10 pastel shades and line them up in the order they will appear across both hands.
- Paint each nail with 2 thin coats of its assigned pastel color, keeping strokes even and controlled.
- Clean any polish on the skin with a small brush dipped in remover so every almond edge looks neat.
- Seal the entire set with a glossy top coat, capping the free edge to protect the pastel tips.
Tips for a Balanced Skittle Palette
- Pick either an all-cool palette (mint, baby blue, lavender) or an all-warm palette (peach, butter yellow, warm pink) for harmony.
- Repeat the same color order on both hands so the set looks intentional in photos.
- Keep lengths consistent and almond tips symmetrical; a unified shape lets the colors shine without looking busy.
- Add a very subtle shimmer top coat over everything for a soft, fairy-like glow without hiding the pastel tones.
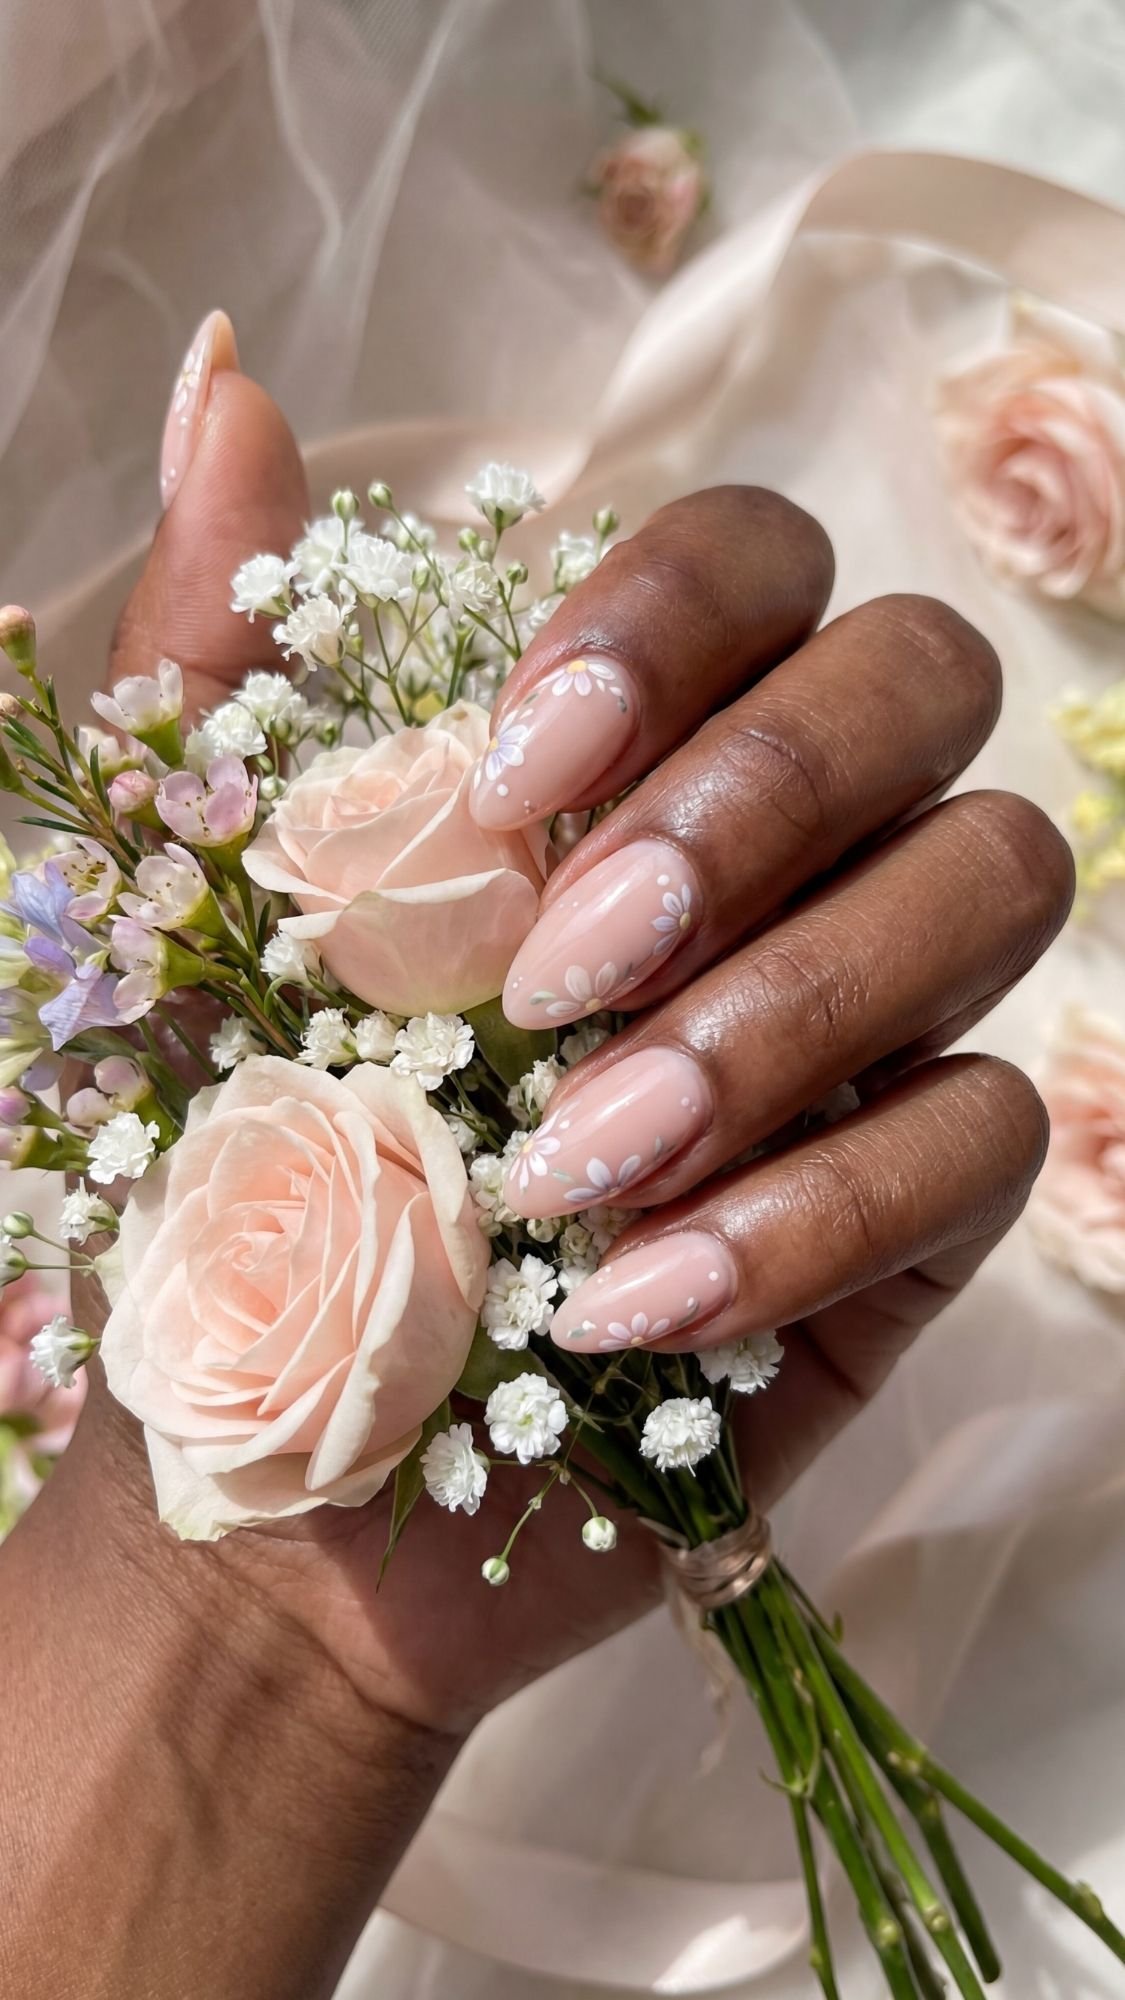
9. Coquette Floral Almond Tips (Soft Girly Statement)
Coquette floral almond tips turn the nails into tiny, soft-focus bouquets without requiring full-on painter skills. A sheer or blush base teams up with petite flowers scattered near the tips or corners, so the design feels romantic, light, and feminine. On almond-shaped nails, the tapered tip gives those tiny blooms a natural frame, which keeps the overall look delicate instead of busy. This style fits spring, weddings, picnics, and “soft girl” outfits, but it still stays wearable with jeans and a tee. Anyone who saves endless floral almond nail inspo and wants a DIY-friendly version lands right here.
Almond nails carry floral details beautifully because the curved edge lets flowers hug the tip or side of the nail in a flattering way. A blush or nude base creates a “your nails but prettier” backdrop, while white and pastel petals pop just enough for the details to show in photos. Short and medium almonds work especially well here, because the length gives enough room for tiny blossoms without needing long, high-maintenance tips. A glossy top coat ties everything together and gives the flowers a smooth, glassy finish that looks charming and intentional.
What This Look Needs
- Nude, blush, or sheer pink base polish
- White and pastel polishes (soft pink, lilac, butter yellow, mint) for petals and centers
- Dotting tools in small sizes
- Fine nail art brush (optional for more defined petals)
- Base coat and glossy top coat
- Floral stickers or decals (optional for ultra-easy version)
Dotting tools keep the floral shapes simple, so the design stays approachable even for beginners. Stickers or decals offer a quick shortcut for anyone who wants floral almond nails without freehand drawing.
Step-by-Step: Coquette Floral Almond Tips
- Shape nails into short or medium almonds with smooth, even sides and a soft, rounded tip.
- Apply base coat and let it dry thoroughly.
- Paint 1–2 thin coats of nude, blush, or sheer pink polish and allow them to dry.
- Use a small dotting tool to place tiny dots in a loose circle or cluster near the tips or one corner of each nail to create petals.
- Add a smaller dot in the center of each flower with a contrasting shade (gold, yellow, or deeper pink) to define the blossom.
- Leave some nails with one or two flowers and keep others bare to maintain a light, airy feel.
- Finish with a glossy top coat, floating it gently over the floral design so the details stay crisp.
Tips for Soft, Pretty Floral Details
- Keep flower clusters small—three to five petals—so the design looks dainty on the almond tip.
- Choose pastel shades that echo the outfit palette or season for a coordinated vibe.
- Focus flowers near the free edge or one side of the nail and leave negative space near the cuticle for a more elevated look.
- Use decals on just two accent nails and keep the rest simple if time runs short before an event.
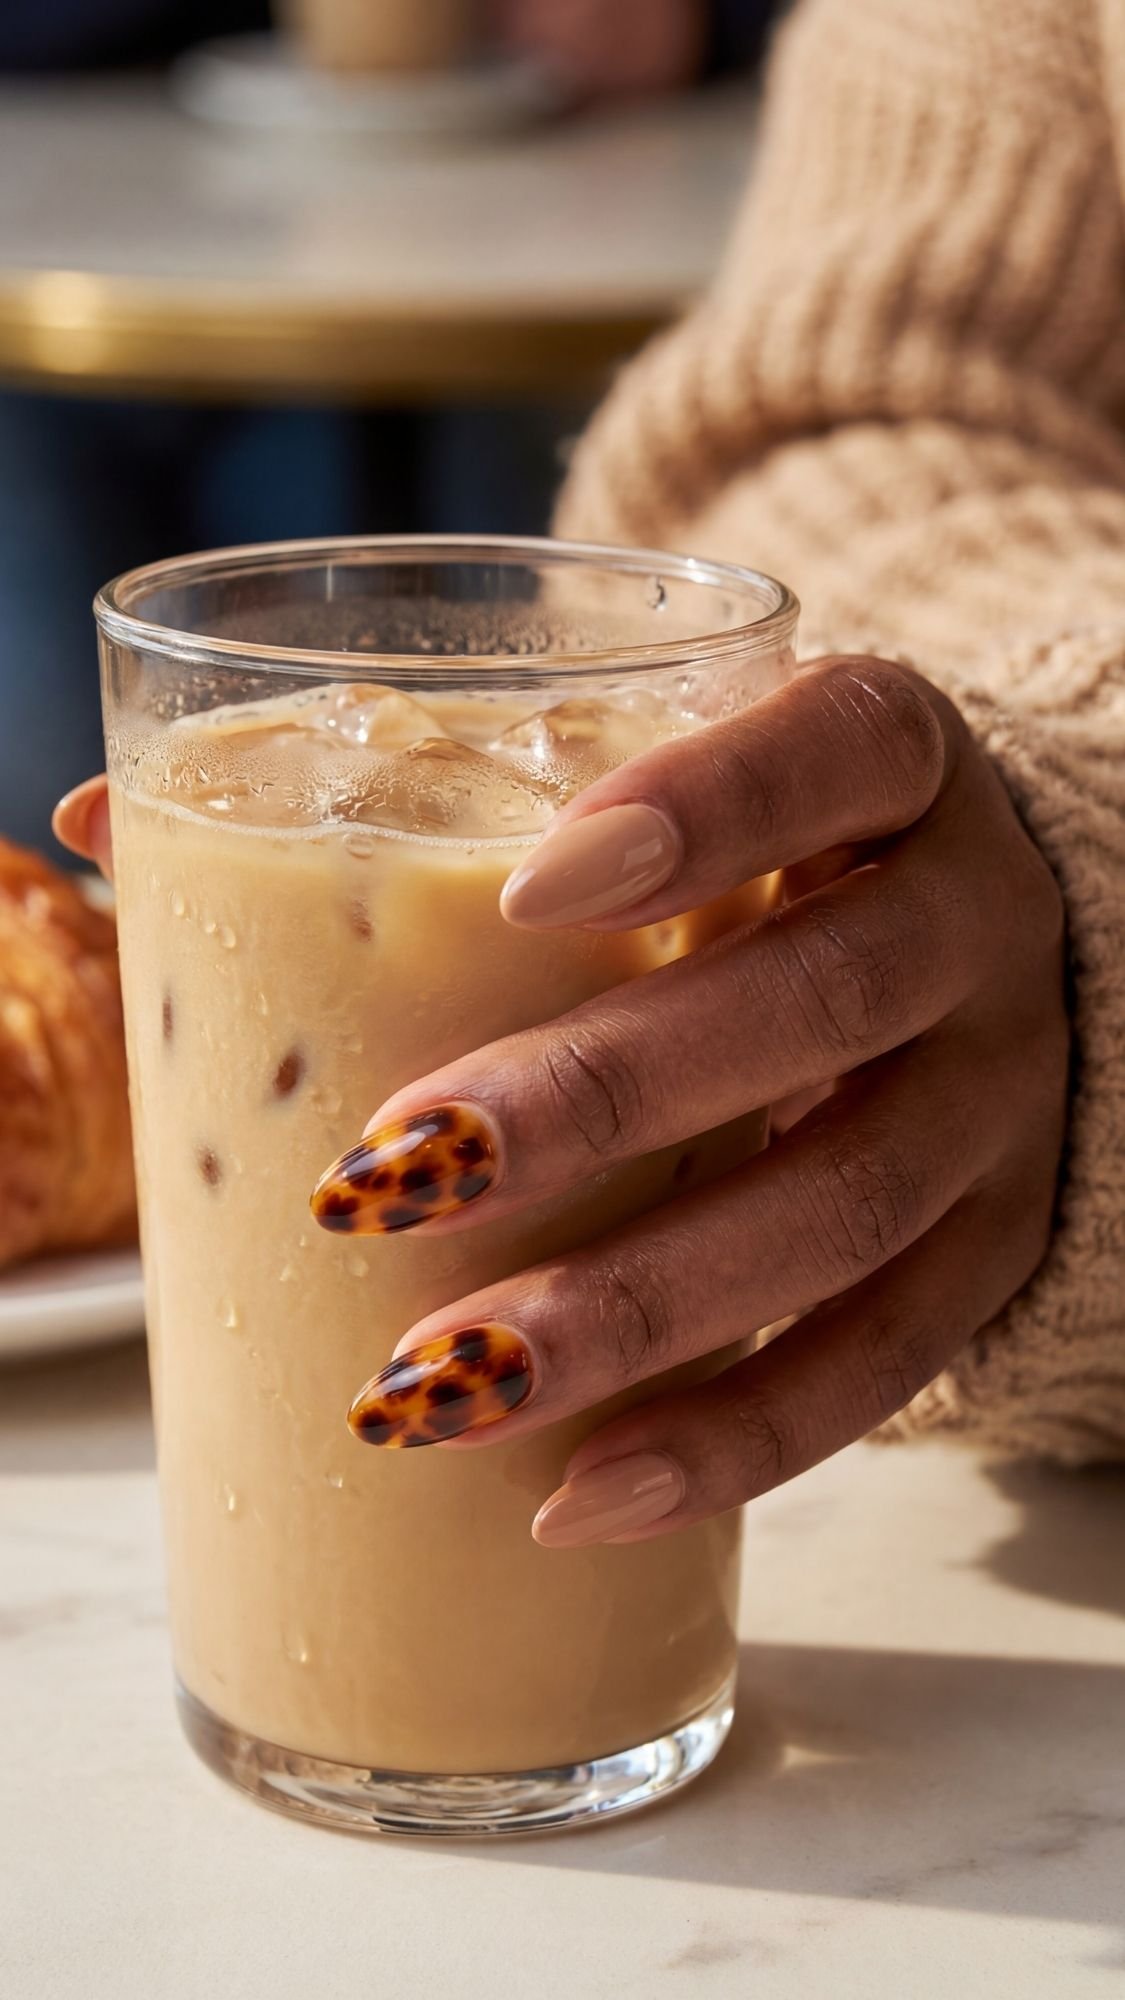
10. Tortoiseshell Latte Almond Accent (One Detailed Nail, Big Impact)
Tortoiseshell latte almond accents give cozy café energy without turning every nail into a full-on pattern situation. Most of the set stays soft and neutral—think latte, cappuccino, or milky caramel—while one or two nails wear that swirled tortoiseshell design. On almond-shaped nails, the tapered tip and curved sides frame the pattern so it looks rich and intentional rather than loud. The combo feels ideal for fall and winter, but it still works year-round for anyone who loves warm browns and glossy finishes. This style instantly upgrades simple nude almond nails with just a couple of detailed accent nails.
Almond nails suit tortoiseshell perfectly because the pattern naturally stretches along the length of the nail. The mix of caramel, chocolate, and deeper brown spots flows with the curve of the almond tip, which creates a luxe, almost glassy effect. A latte-toned base on the rest of the nails keeps the whole manicure grounded and wearable. Short almonds make the accents look subtle and chic; medium and long almonds turn the pattern into more of a statement. A high-shine top coat finishes everything off so the accent nails resemble polished resin or glossy coffee swirls. Ever notice how a single detailed nail makes the whole set look more “done”? This design leans into that trick.
What This Look Needs
- Latte nude or milky beige polish for most nails
- Sheer caramel or amber polish for the tortoiseshell base
- Chocolate brown and deep brown or black polish for spots and depth
- Fine nail art brush or small detailing brush
- Base coat and glossy top coat
- Clean-up brush and remover
Sheer caramel or amber shades keep the tortoiseshell layers from looking muddy. Darker spots in chocolate or almost black tones add depth and make the pattern look more realistic and dimensional.
Step-by-Step: Tortoiseshell Latte Almond Accent
- Shape all nails into smooth almonds and lightly buff the surface.
- Apply base coat and let it dry thoroughly.
- Paint most nails with 2 thin coats of latte nude or milky beige and set them aside to dry.
- On one or two accent nails per hand, apply a thin coat of sheer caramel or amber polish as the base.
- While that layer still feels slightly tacky, use a fine brush to add irregular blobs and spots of chocolate brown, leaving gaps between them.
- Tap a tiny bit of deeper brown or black into some of those spots to create dimension, then lightly layer another sheer caramel coat over everything to soften and blend the pattern.
- Let the accents dry fully, then apply a generous glossy top coat over every nail, capping the almond tips for shine and protection.
Tips for a Realistic Tortoiseshell Effect
- Keep the spots soft and uneven; perfect circles flatten the design.
- Vary the size and spacing of the darker patches so no two accent nails look identical.
- Focus more color and depth slightly closer to the tip to enhance the almond shape and length.
- Pair the pattern with simple latte nude on the rest of the nails so the accents stand out instead of competing with other designs.
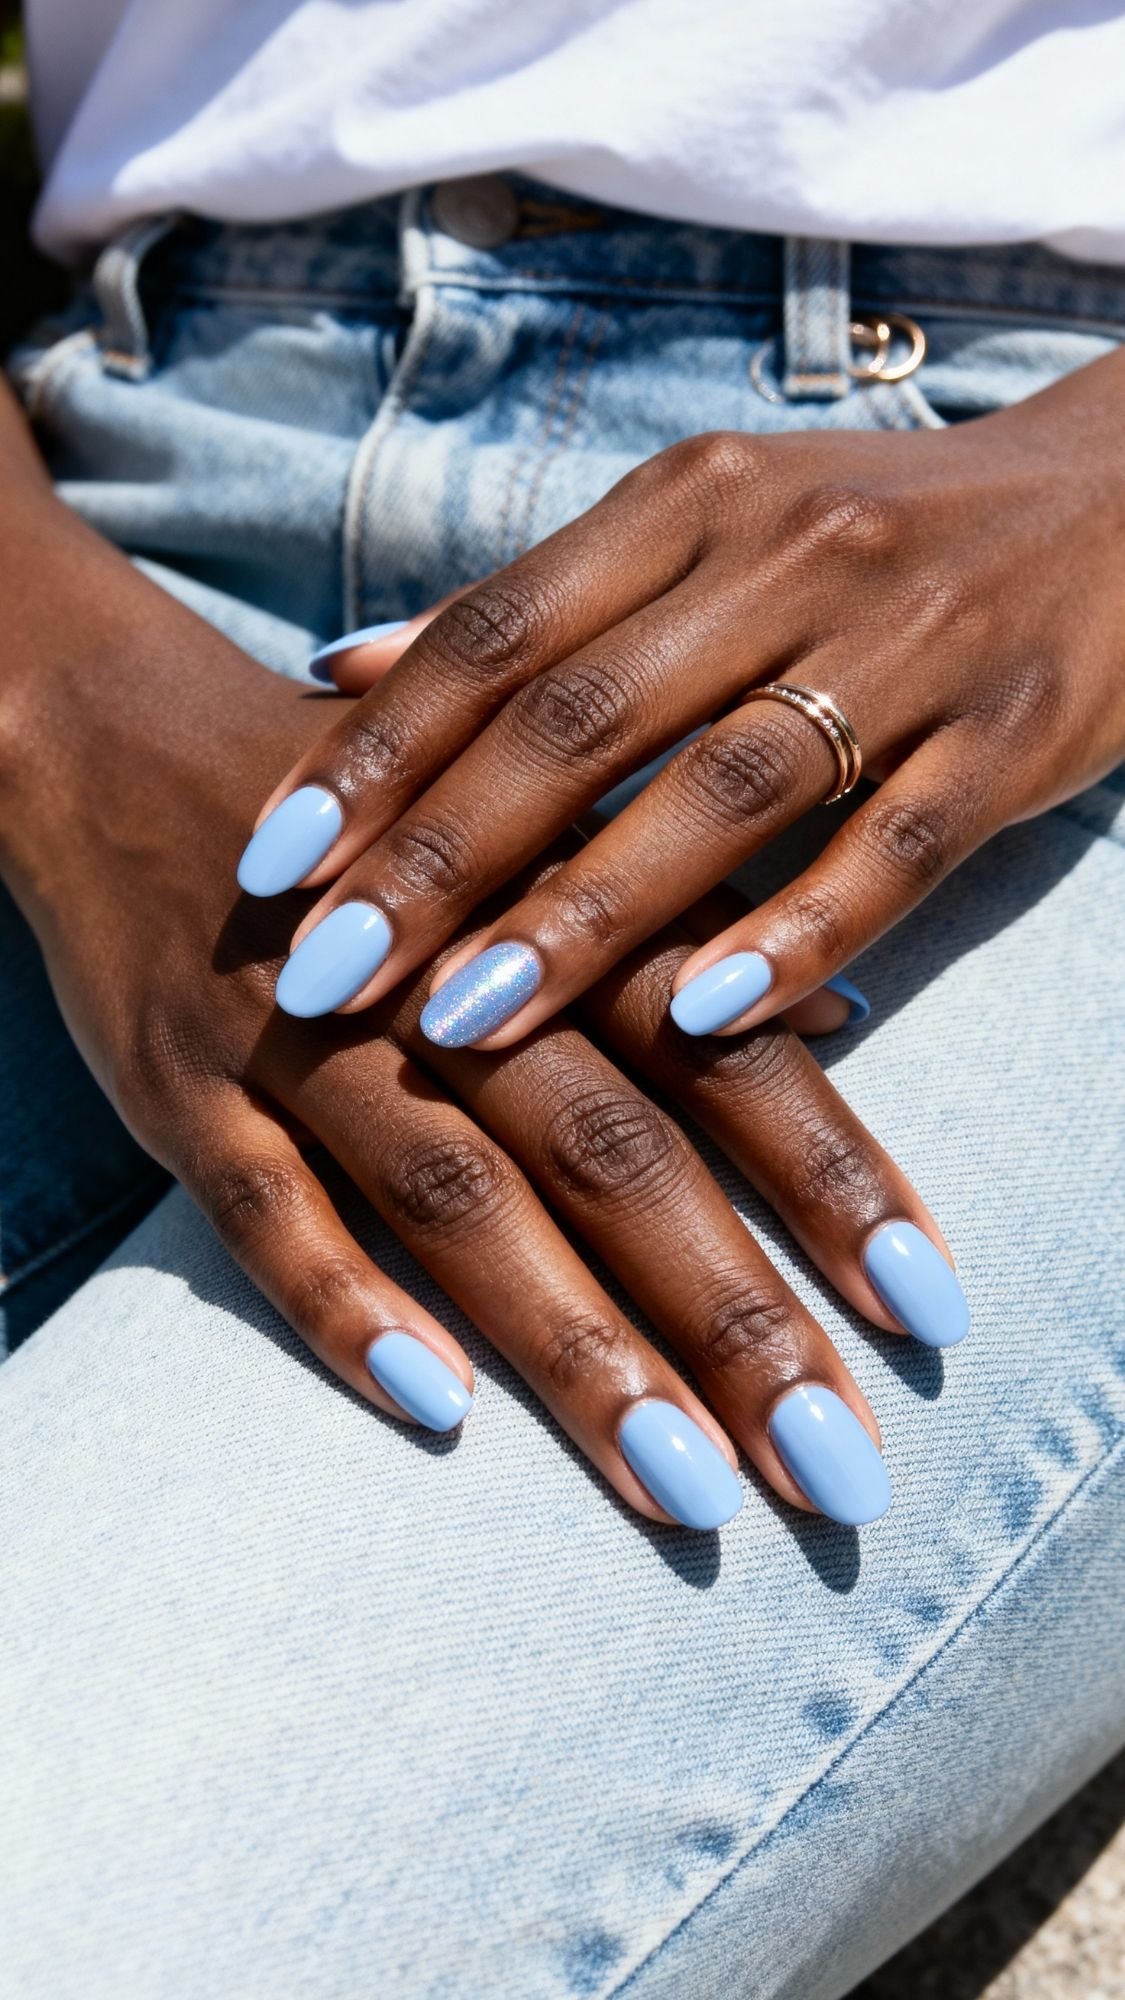
11. Blueberry Milk Almond Nails (Soft Color Pop)
Blueberry milk almond nails give a gentle hit of color without abandoning the soft, milky vibe everyone loves. The shade sits somewhere between baby blue and pastel cornflower, so the nails feel dreamy instead of neon. On almond-shaped nails, that cool tone stretches along the tapered tip and instantly brightens the whole hand, especially against brown, caramel, or neutral wardrobes. The look suits spring and summer perfectly, but it also refreshes winter outfits that lean heavy or dark. Anyone who wants color but still loves minimal, clean nail inspo can lean on blueberry milk as a go-to.
Almond nails flatter this shade because the curved sides and rounded tip soften the cool blue. The shape keeps the manicure chic and grown-up, not cartoonish. Short almonds give a cute, wearable version that pairs well with everyday jewelry and denim; medium almonds turn the color into more of a statement while staying easy to live with. A glossy finish and well-hydrated cuticles push the whole manicure into that “fresh and intentional” lane. Ever hold a pastel latte or a matcha and notice how a blue nail pops perfectly in the photo? Blueberry milk almond nails create that moment on purpose.
What This Look Needs
- Milky or pastel blue polish (blueberry milk tone)
- Base coat and glossy top coat
- Glass file and buffer for shaping into almonds
- Clean-up brush and remover
- Optional fine glitter or shimmer topper for one accent nail
A blue with a creamy, slightly milky base keeps the color soft. A formula that covers in two thin coats creates a smooth, even finish across the almond shape.
Step-by-Step: Blueberry Milk Almond Nails
- Shape nails into short or medium almonds, then buff lightly for a smooth surface.
- Apply base coat and let it dry completely.
- Paint the first thin coat of milky blue on every nail, using long, even strokes from cuticle to tip.
- Add a second thin coat to build up the soft color and cover any streaks.
- For optional accents, tap a tiny amount of fine glitter or shimmer onto one or two nails while the second coat still feels tacky, focusing near the tip.
- Seal everything with a glossy top coat, capping the almond edge to protect the color.
- Clean any polish on the skin with a small brush dipped in remover so the blue stands out against neat cuticles.
Tips for a Soft, Wearable Blue Pop
- Pair this shade with neutral outfits—denim, white tees, beige knits—so the nails act as the main color moment.
- Keep the almond length practical, especially for new DIY fans; the color still feels bold even on shorter tips.
- Use a sheer, milky base under very pale blue polishes to avoid patchy spots.
- Add a single chrome or glitter accent nail if extra sparkle sounds fun, and let the rest stay creamy and simple.

12. Minimal Line Art Almond Nails (Graphic but Easy)
Minimal line art almond nails turn simple nude polish into something graphic and artsy with just a few strokes. A sheer or neutral base sets the stage, while one or two abstract lines curve along each nail to add interest. On almond-shaped nails, those lines follow the natural taper and instantly highlight the shape without needing complex patterns. The overall look stays clean and modern, not busy, which makes it perfect for everyday wear, office settings, and outfit photos. Anyone who wants nail art that feels creative but still quick and DIY-friendly finds a solid option in this style.
Almond nails support line art beautifully because the curved sides and rounded tip give each line a natural path. A single swoop along one edge of the nail can make the almond length look longer and slimmer. Neutral bases—nude, beige, or milky pink—keep the design elevated, while contrast shades like white, chocolate, or black create that graphic pop. Short almonds look understated and chic with minimal lines; medium almonds feel more editorial and artsy. A glossy top coat brings everything together so the lines sit under a smooth, glassy surface.
What This Look Needs
- Nude, beige, or sheer pink base polish
- Contrasting polish in white, brown, or black for the lines
- Striping brush or fine nail art brush
- Base coat and glossy top coat
- Clean-up brush and remover
A slightly thicker, pigmented polish for the line color helps the brush create smooth strokes without needing multiple passes. A striping brush with long, fine bristles glides along the almond edge and makes curves easier to control.
Step-by-Step: Minimal Line Art Almond Nails
- Shape nails into short or medium almonds and buff lightly to smooth the surface.
- Apply base coat and let it dry completely.
- Paint 1–2 thin coats of nude or sheer base color on every nail, keeping the finish even and streak-free.
- Load a striping brush with the contrasting polish and draw one or two curved lines along the side or diagonally across each nail, following the almond contour.
- Vary the placement slightly—some nails can carry a single curve, others a double line—to keep the design interesting while still cohesive.
- Clean any uneven edges with a small brush dipped in remover, sharpening the lines where needed.
- Seal everything with a glossy top coat, floating it over the design to avoid dragging the line art.
Tips for Clean, Chic Line Art
- Rest hands on a flat surface so the brush moves steadily along the almond shape.
- Keep lines thin and intentional; thick lines can crowd the nail and hide the delicate almond tip.
- Stick to one or two colors for the line art to maintain a minimalist, elevated feel.
- Leave plenty of negative space so the almond nail inspo reads modern, not cluttered.
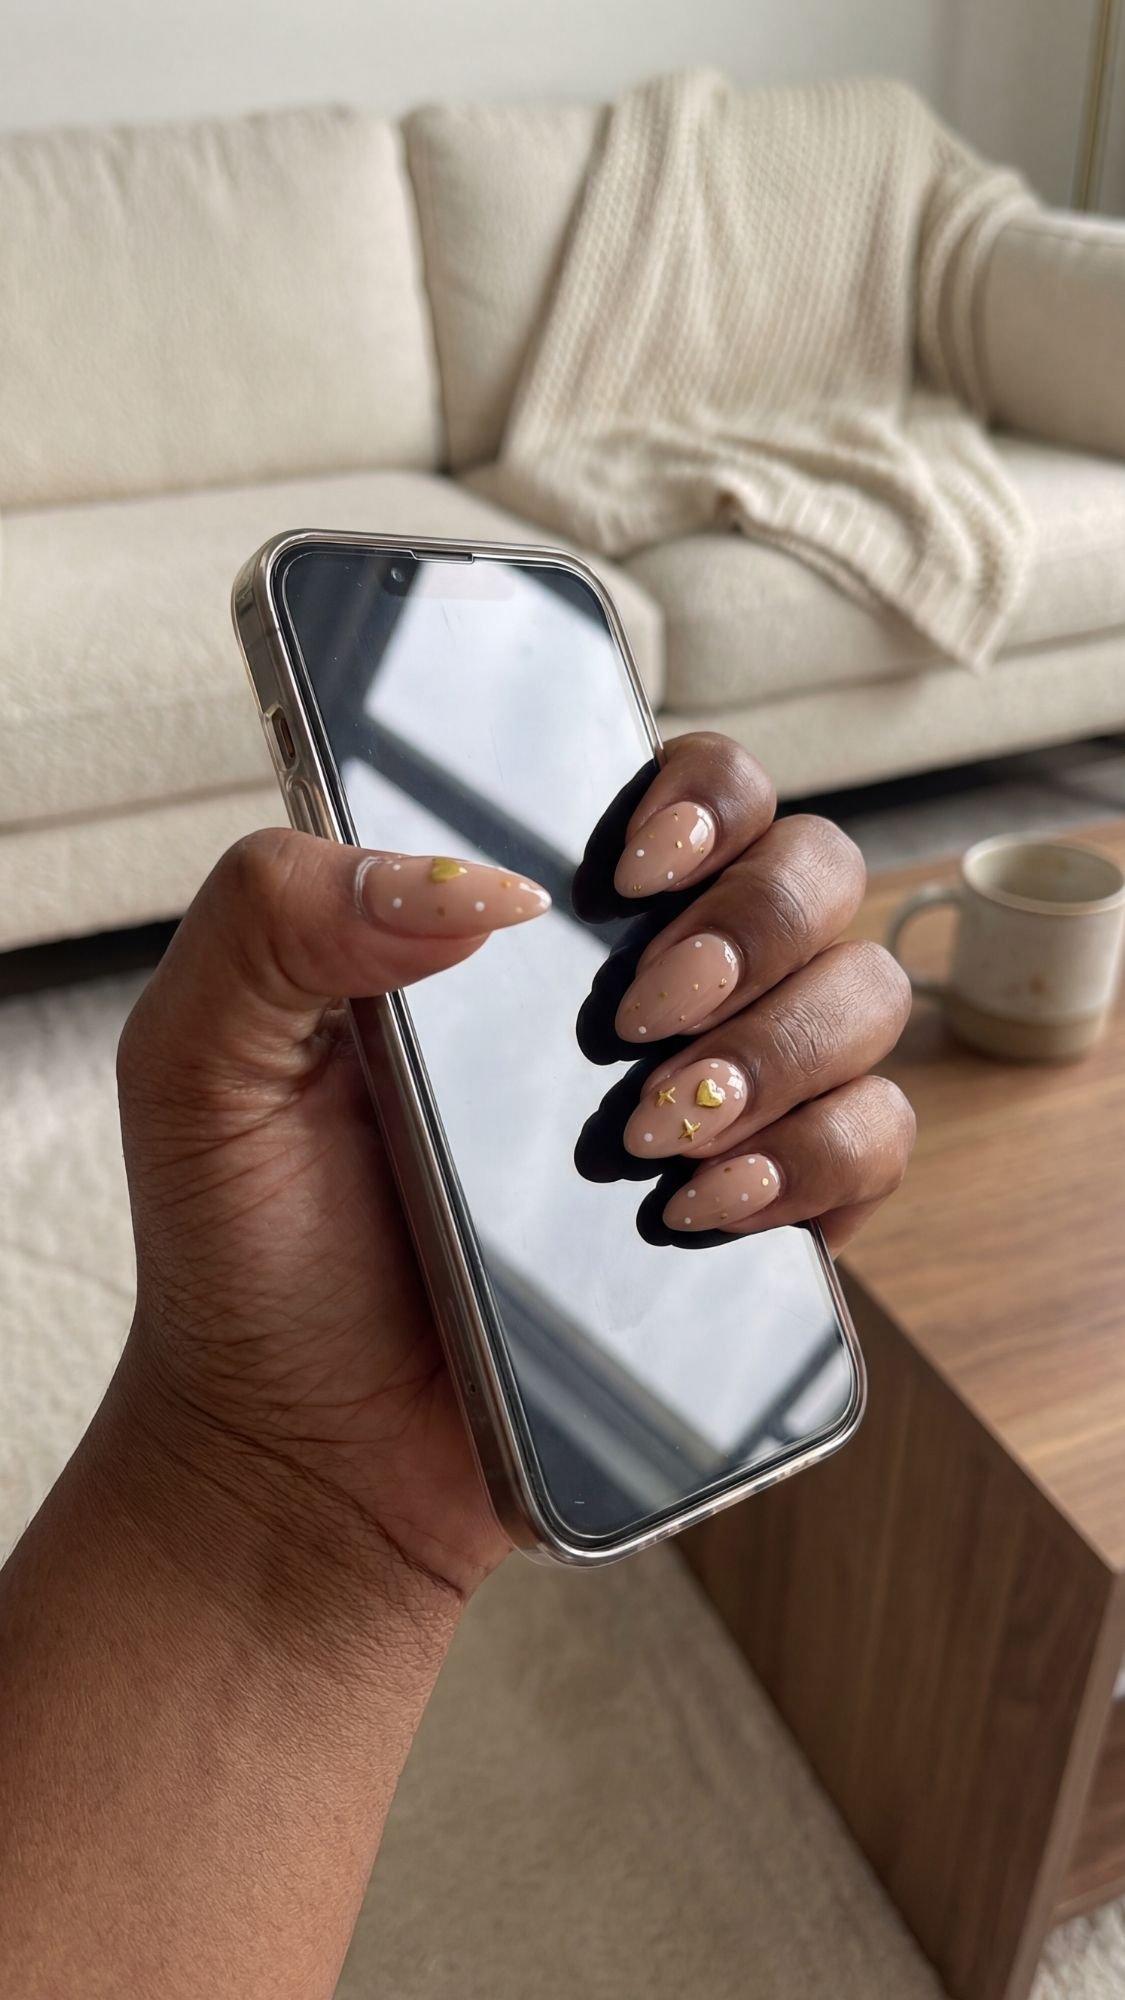
13. Mismatched Dots & Mini Charms on Almond Nails
Mismatched dots and mini charms on almond nails create that “effortlessly creative” look without demanding full-on nail art skills. A simple base color teams up with tiny dot patterns and a few delicate charms, so the design feels playful and stylish at the same time. On almond-shaped nails, the tapered tip gives those details room to breathe, which keeps the set from looking crowded. This style fits busy weeks, casual weekends, and content days where hands stay in the frame a lot. Anyone who loves the idea of nail art but wants something quick, forgiving, and DIY-friendly can grab this inspo and run with it.
Almond nails handle mismatched details well because the shape already looks polished and intentional. Dots scattered near the cuticle, along the tip, or down one side of the nail emphasize the curve of the almond silhouette. One or two tiny charms—think flat gold studs, hearts, or stars—add just enough texture without turning the manicure into a full 3D situation. Short almonds keep the look subtle and cute; medium lengths give more space for patterns while still staying practical. A glossy top coat locks everything in place so dots stay crisp and charms stay put.
What This Look Needs
- Neutral, nude, or pastel base polish
- One or two accent colors for dots (white, black, gold, or brights)
- Dotting tools in small and extra-small sizes
- Tiny flat nail charms or studs (hearts, stars, circles, tiny pearls)
- Base coat and strong glossy top coat
- Tweezers for placing charms
- Clean-up brush and remover
A neutral base keeps the overall vibe cohesive while the dots and charms do the talking. Flat, lightweight charms sit best on almond nails and stay comfortable for everyday tasks.
Step-by-Step: Mismatched Dots & Mini Charms
- Shape nails into short or medium almonds with smooth, even sides and a rounded tip.
- Apply base coat and let it dry completely.
- Paint 1–2 thin coats of nude, neutral, or pastel base color on every nail and allow them to dry.
- Use a small dotting tool to place tiny dots along one side of the nail, near the cuticle, or just above the tip on each nail, mixing patterns slightly from finger to finger.
- Dip a smaller dotting tool into a second color and add a few accent dots to create depth and variation.
- Add a thin layer of top coat to one nail at a time, then use tweezers to place a tiny charm on one or two accent nails per hand while the top coat still feels wet.
- Once dots and charms sit where they belong, seal the entire set with another layer of strong glossy top coat, capping the almond tips and floating the brush gently over the charms.
Tips for Cute, Balanced Mismatched Details
- Keep dot clusters small and spaced out so the almond shape still shows clearly.
- Stick to one or two charm shapes so the design looks curated, not random.
- Place charms closer to the cuticle or center of the nail instead of at the very tip to avoid snagging.
- Repeat similar dot patterns across both hands—just in different placements—so the nails feel mismatched in a stylish, intentional way.
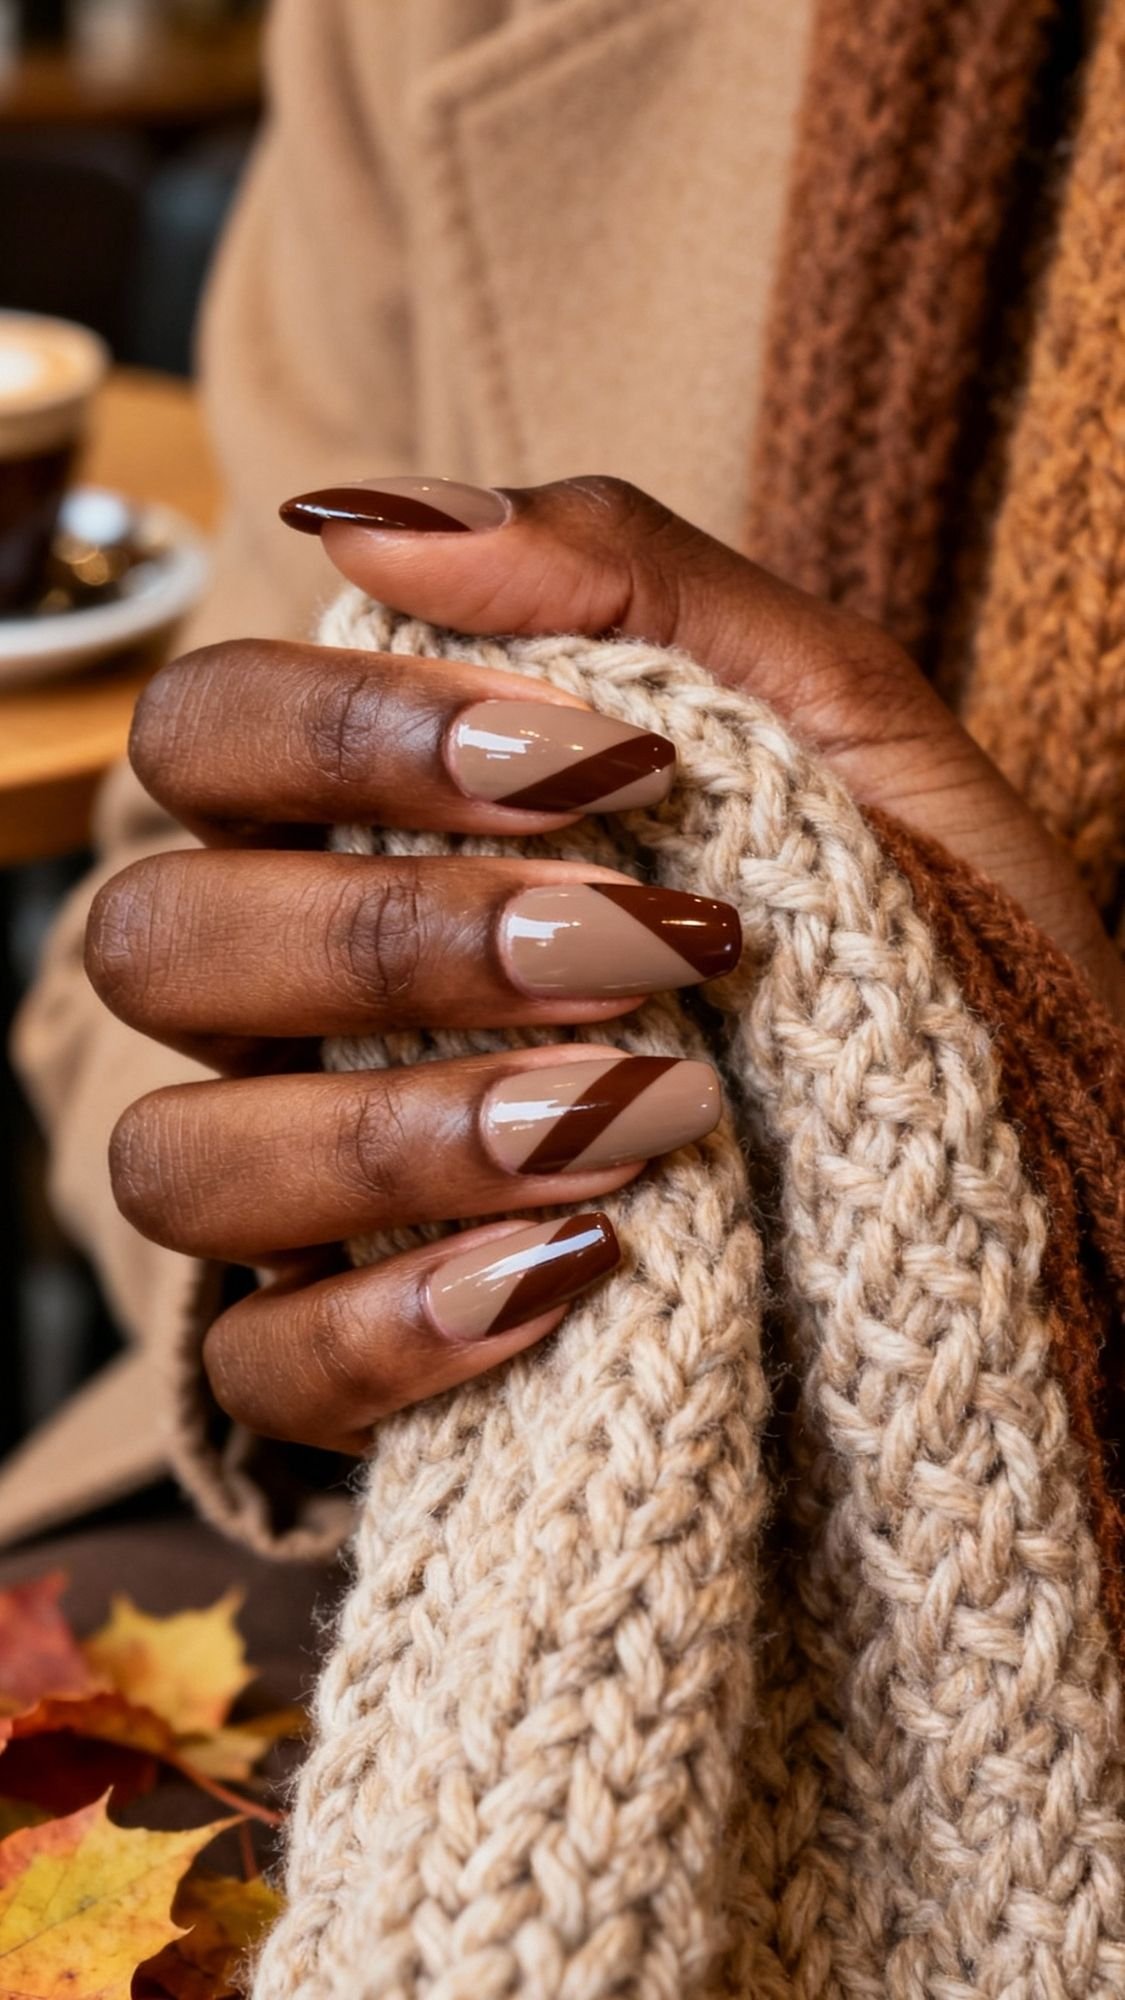
14. Seasonal Color-Block Almond Nails (Easy Switch-Up)
Seasonal color-block almond nails keep one simple technique and swap colors with the weather, which turns DIY manicures into a repeatable ritual. Each nail wears two shades that meet in a clean diagonal or side-blocked line, so the design feels graphic but still simple enough for beginners. On almond-shaped nails, that diagonal slice follows the taper of the tip and makes the nails look longer and sleeker. Fall versions lean into taupe and chocolate; winter sets pull in deep wine and soft gray; spring and summer sets use mauve, peach, or pastel combos. Anyone who wants high-impact almond nail inspo without complicated art can rotate this look all year.
The almond shape does a lot of the styling work here. A diagonal or side block of color hugs the curve of the nail and emphasizes the slim tip, so even short almonds look elongated. A neutral base pair, like taupe and cocoa or rose and mauve, keeps the manicure polished enough for the office while still reading trendy. Bolder contrasts—cream and forest green, nude and navy, beige and terracotta—push the mani into more editorial territory. A glossy top coat smooths the line where the two shades meet and makes the color block look sharp and intentional instead of messy.
What This Look Needs
- Two coordinating polishes per season, for example:
- Fall: taupe + chocolate brown
- Winter: muted gray + deep wine
- Spring: mauve + soft pink
- Summer: nude + coral or beige + terracotta
- Base coat and glossy top coat
- Striping tape, French guides, or nail vinyls for clean lines
- Glass file and buffer for almond shaping
- Clean-up brush and remover
Striping tape or nail vinyls help create sharp edges, especially along diagonal lines. Coordinated shades with similar depth but different tones keep the color block grown-up rather than cartoonish.
Step-by-Step: Seasonal Color-Block Almond Nails
- Shape nails into almonds with smooth, balanced sides and a rounded tip, then buff lightly.
- Apply base coat and let it dry completely.
- Paint all nails with two thin coats of the lighter shade and allow them to dry fully.
- Place striping tape or a nail vinyl diagonally across each nail (from one sidewall toward the opposite tip) or vertically for a side block.
- Paint the exposed section with the deeper coordinating shade, working in thin, even strokes.
- Remove the tape or vinyl while the polish still feels wet so the line stays crisp.
- Clean any tiny smudges with a small brush dipped in remover.
- Seal the entire nail with a glossy top coat, capping the almond tip to protect the edge and blend the surface.
Tips for Polished, Seasonal Color Blocks
- Keep the diagonal angle similar on every nail so the almond nail inspo reads cohesive in photos.
- Choose shades with similar finish (all creams or all soft shimmers) to avoid a clash of textures.
- Rotate color combos with the seasons while keeping the same placement and technique for a quick refresh.
- Pair the mani with simple rings and knit sleeves in cooler months, or linen and gold jewelry in warmer months, so the nails tie into the overall look.

15. Press-On Almond Nail Inspo Hack (When Nails Stay Short IRL)
Press-on almond nails solve the “nails never grow past nubs” problem in one sitting. Pre-shaped tips already come in that flattering almond silhouette, so the main job just involves sizing, gluing, and styling. This hack lets every almond nail inspo idea in a saved folder show up in real life, even when natural nails stay short, peel easily, or break on door handles. Press-ons also make experiments feel low-risk: try chrome one week, aura the next, and tortoiseshell accents after that without long-term commitment or salon prices. When the shape arrives ready-made, all focus can go straight to color and design.
Almond press-ons work especially well because the taper and length stay consistent across each set, which instantly delivers that balanced, salon-like look. A neutral or clear set can act as a blank canvas for any design in this guide—glazed, French, floral, or cat-eye—so one box stretches across multiple manicures. Short or medium almond press-ons still feel practical for typing and daily life, while longer sets lean full glam. With good prep and careful removal, this hack can protect natural nails underneath and give them time to strengthen.
What This Look Needs
- Pre-shaped almond press-on nails (clear, nude, or natural)
- Nail glue or adhesive tabs
- Nail dehydrator or alcohol wipes
- Glass file and buffer
- Base coat, chosen polishes, and top coat for designs
- Cuticle oil for aftercare
A nude or clear press-on set pairs best with DIY designs, because polish colors show true and sit smoothly over the surface. Quality glue and proper prep keep the nails secure and comfortable.
Step-by-Step: Press-On Almond Nail Inspo Hack
- Clean hands thoroughly, then gently push back cuticles and lightly buff the surface of each natural nail.
- Wipe nails with dehydrator or an alcohol pad to remove oils so the press-ons grip better.
- Lay out the press-on almonds and size each tip to the natural nail, filing the sidewalls of the press-ons if needed for a perfect fit.
- Apply a thin layer of glue to both the natural nail and the inside of the press-on (or place an adhesive tab on the nail if glue-free wear sounds better).
- Start at the cuticle area, press the tip down at a slight angle, and rock it toward the free edge while holding firm pressure for 10–20 seconds so air bubbles stay out.
- Repeat on every nail, then lightly file the ends to tweak the almond length or refine the taper if needed.
- Once the press-ons sit secure, apply base coat and recreate any design from this list—glazed, French, aura, floral, or chrome—directly on top.
- Finish with a glossy top coat and a little cuticle oil around the edges for a smooth, nourished look.
Tips for Comfortable, Long-Lasting Press-On Almonds
- Choose sizes that match the nail width exactly; oversized tips can lift at the sides and feel uncomfortable.
- Focus glue in the center and near the cuticle while keeping it away from the skin to avoid irritation.
- When removal time arrives, soak nails in warm, soapy water or oil and gently wiggle the press-ons free instead of forcing or prying.
- Save any intact tips for another round of DIY almond nails, especially for favorite designs.
How to Make DIY Almond Nail Inspo Last Longer
Cute almond nail inspo feels great on day one, but the real win shows up when the manicure still looks fresh a week later. A few simple habits keep polish from chipping, tips from snapping, and designs from looking dull before their time. This section covers the small, everyday moves that stretch wear time—without turning daily life into a “don’t touch anything” situation. Ready to keep those glazed, French, aura, and tortoiseshell looks around a little longer?
Daily Habits That Protect Almond Nails
Nails deal with more stress than most people realize, so small tweaks in routine protect every design in this guide.
- Wear gloves for dishes, cleaning, and anything that involves hot water or harsh cleaners.
- Apply cuticle oil once or twice a day to keep the nail area hydrated and flexible instead of brittle.
- Tap with fingertips, not nail tips, when typing, opening drawers, or using a phone screen.
- Keep nails at a practical length so the almond shape looks elegant but still suits everyday tasks.
- Book mini “maintenance moments” at home—file rough edges, add cuticle oil, and wipe nails clean of lotion or product build-up.
These small moves protect both natural nails and press-ons, so every almond design looks smoother and glossier for longer.
Quick Fixes for Chips, Dulls, and Regrowth
Even the best manicures face small chips or dull spots, especially at the almond tip. Quick fixes keep the set alive instead of forcing a full redo.
- Patch tiny chips by lightly filing the edge, then dabbing polish only on the chipped area before topping the whole nail with clear coat.
- Refresh shine by adding a thin layer of glossy top coat every few days, especially on chrome, glazed, or cat-eye looks.
- Turn chips into accents—for example, convert a chipped French tip into a full chrome or glitter accent nail.
- Blur regrowth on sheer or “naked” looks with a thin layer of sheer nude over the entire nail so the base blends with the new growth.
- Hide minor wear on dark almond nails with a micro French or thin line art along the tip.
These tricks stretch the life of each manicure and reduce how often readers need to strip everything back to bare nails.
When to Soak Off and Start Fresh
Every manicure reaches a point where a full reset makes more sense than another fix. Knowing when to switch from patching to soaking protects nail health and keeps future almond nail inspo looking better.
- Watch for lifting, bubbling, or peeling at the sides or around the cuticle area; those signs mean the mani needs removal.
- Check thickness; if layers from repeated touch-ups feel bulky, the set deserves a fresh start.
- Plan gentle removal with warm soapy water, acetone soaks, or oil-based soak-off methods instead of peeling or prying.
- Give nails short breaks between heavy gel or press-on cycles—use that time for sheer “naked” almond manicures and extra cuticle oil.
- File the almond shape lightly after removal to smooth edges and prep for the next design from this list.
Healthy natural nails handle more creativity, more designs, and more trends. Strong, smooth nail beds make every glazed, aura, French, floral, or chrome almond manicure look instantly more polished.
Screenshot-Worthy Almond Nail Inspo Without the Salon
Almond nails stay popular for a reason: the shape flatters almost every hand, works at short, medium, and long lengths, and turns even simple polish into a pulled-together, elegant look. With a little shaping practice, a small DIY kit, and the right inspo, salon-level designs stop feeling out of reach. Glazed finishes, micro and deep French tips, aura gradients, chrome ombré, velvet cat-eye, pastel Skittles, coquette florals, tortoiseshell latte accents, blueberry milk, minimal line art, dots and charms, seasonal color-blocks, and press-on hacks all prove one thing: DIY almond nail inspo at home can look polished, intentional, and on-trend.
The real magic comes from matching designs to real life. Short naked almonds and micro French tips suit busy schedules and keyboard days. Chrome ombré, velvet cat-eye, and tortoiseshell accents lean into moodier, evening-ready moments. Aura gradients, blueberry milk, pastel Skittles, and floral tips deliver softer, playful energy for brunches, content shoots, and sunny weekends. Press-on almond sets quietly handle everything when natural nails refuse to cooperate. Pair those ideas with smart habits—gloves for chores, regular cuticle oil, gentle soak-offs, and quick chip fixes—and every manicure earns extra days of wear.
Now the saved folder of almond nail inspo ideas no longer lives only on a phone screen; those designs can sit on actual hands, wrapped around coffee cups, keyboards, steering wheels, and champagne glasses. The only real question now: which almond design steps onto the nail table first—glazed, French, aura, tortoiseshell, or a mix of two in one set? Screenshots, polish, and a little patience already wait for the answer.