What if you could bottle summer’s magic and hang it on your wall? Transforming delicate blooms into lasting decor isn’t just possible—it’s a joyful way to celebrate nature’s fleeting beauty. Whether you’re preserving wedding bouquet petals or garden treasures, this craft turns ordinary moments into timeless keepsakes that whisper stories for years.
Imagine artwork that adapts to your style—soft neutrals for minimalist spaces, vibrant hues for eclectic rooms. These creations shine in tiny homes and sprawling houses alike, proving you don’t need square footage to make meaningful design choices. That empty wall above your reading nook? It’s about to become your favorite conversation starter.
The process itself becomes therapy. Sorting petals slows your pulse. Arranging them sparks creativity. You’ll craft gifts that outshine store-bought cards—personalized pieces showing loved ones you truly see what matters to them. Best part? You need just basic supplies to begin your nature-inspired journey.
Ready to turn forgotten blooms into heirloom-worthy displays? Let’s explore how this meditative art form brings calm, connection, and seasonal charm to any space—no fancy skills required.
Getting Started with Your Flower Art Project
Ever wondered how to capture a sunset’s glow in your home decor? This hands-on craft lets you preserve nature’s fleeting beauty through thoughtful design. You’ll need just three essentials: meaningful botanicals, basic tools, and a dash of creativity.
Overview of the DIY Process
Begin by gathering blossoms that spark joy—maybe daisies from your morning walk or roses from an anniversary bouquet. Press them between book pages for 1-2 weeks, transforming vibrant petals into delicate keepsakes. The magic happens when you arrange these treasures, creating compositions that feel like visual poetry.
Inspiration from Summer Memories and Farmhouse Styles
That wildflower crown from your beach vacation? Those peonies from Grandma’s garden? They become more than decor—they’re time capsules of cherished moments. For farmhouse flair, pair muted tones with rustic frames. Think lavender sprigs beside vintage ledger paper, or Queen Anne’s lace against weathered wood.
Timing matters: collect blooms in late morning after dew dries. Work in batches so you’ll always have materials ready. Whether you’re crafting solo or hosting a girls’ night, this project adapts beautifully. The real reward? Watching strangers lean closer to your wall art, asking “Tell me the story behind these…”
Essential Materials and Tools

Ever stared at a gorgeous bloom and thought “This deserves more than a vase”? Your toolkit makes all the difference. Let’s unpack supplies that turn fleeting beauty into gallery-worthy displays—without draining your wallet or patience.
Choosing the Right Frames and Pressing Books
Glass-front displays act as jewelry for your botanicals. Floating styles—like NCYP’s 5”x7” options—create depth by sandwiching stems between two panes. Prefer texture? Try linen-backing frames for a tactile finish. Your book choice matters too: thrifted encyclopedias absorb moisture better than novels, while dedicated presses like Berstuk’s wooden model offer adjustable pressure.
Must-Have Supplies: Flowers, Glue, and Mod Podge
Not all adhesives play nice with delicate petals. Mod Podge’s matte formula grips without wrinkling—watch the white vanish as it dries. Keep Reynolds wax paper handy for microwave pressing (yes, that’s a thing!). Tweezers? Some swear by precision tips, but fingertips often feel more intuitive for organic arrangements.
Pro tip: Source acid-free paper for long-term preservation. Those dollar-store frames? Upgrade their glass—thinner panels distort light. Remember, your materials should elevate nature’s art, not compete with it. Now where’d you stash those garden clippings…
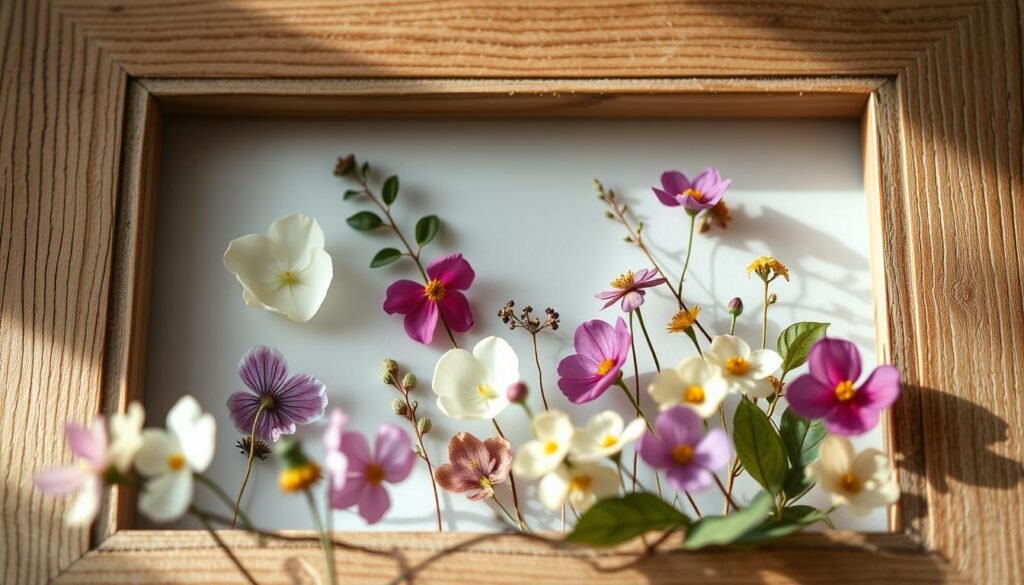
Creating Your Own pressed flower frame

Transform garden treasures into art that lasts longer than their bloom cycle. This hands-on process combines patience with playfulness—like solving a living puzzle where every petal finds its perfect place.
Step-by-Step Guide to Pressing Flowers
Start with fresh botanicals free of morning dew. For classic results, tuck stems between your heaviest book pages—cookbooks work wonders. Layer wax paper sheets if preserving multiple pieces to prevent color transfer. Weight the tome with bricks or stacked dishes for even pressure.
Need faster results? The microwave method cuts drying time to minutes. Sandwich blooms between paper towels and microwave-safe plates, heating in 30-second bursts. Watch closely—overheated peonies smell like regret.
Tips for Arranging Flowers in the Frame
Lay out your crispy-dry specimens on a light surface matching your frame size. Odd numbers create visual harmony—try three focal blooms surrounded by smaller accents. Use tweezers dipped in glue for stubborn stems, but don’t fear finger placement—organic asymmetry adds charm.
When applying sealant, mod podge techniques matter most. Swipe brushes away from fragile edges to prevent curling. Let each layer dry completely—yes, even if you’re itching to finish—to make sure colors stay true for years.
Design Techniques and Creative Arrangements

Your preserved botanicals deserve a showcase as unique as their stories. Let’s explore how different preservation and display methods transform fragile petals into gallery-ready artwork that reflects your personality.
Four Paths to Perfect Preservation
Victorian crafters swore by wooden presses—layering blooms between thin papers and tightening screws daily. Today’s options? Book pages work for patient creators (think 3-4 weeks drying time), while microwaves zap thick peonies dry in 90 seconds. Iron lovers: sandwich stems in parchment paper and press gently—no steam!
Glass Magic & Background Brilliance
Floating displays let light dance through petals, ideal for translucent poppies. Double-glass frames create depth for 3D arrangements. For rustic charm, try tea-stained paper backdrops. Linen adds texture without competing with delicate pieces.
Composition Secrets from Studio Artists
Odd-number groupings create visual harmony—try five forget-me-nots circling one showstopper rose. Layer ferns beneath blooms for depth. Tweezers help position stubborn stems, but finger placement adds organic charm. Glue? Essential for vertical displays—prevents summer’s ghosts from sliding into winter’s dust.
Conclusion
Your journey from garden clippings to gallery-ready art begins here. With the skills you’ve gained, every petal becomes a brushstroke in nature’s canvas—a way to freeze cherished moments in elegant displays. Whether crafting heirlooms or gifts, these creations turn fleeting beauty into legacy pieces that spark conversations.
Remember: UV-blocking glass preserves colors best, while wood accents add rustic charm. Our step-by-step guide ensures your arrangements stay vibrant for years. Keep them away from direct sunlight—your future self will thank you when those daisies still blush pink decades later.
Now’s your moment. Grab that forgotten bouquet or wildflower stash. Mix textures, play with negative space, let glue dry completely. Your walls crave stories told through crisp hydrangeas and velvety rose petals. What memory will you immortalize first?

