Ever crafted something beautiful only to watch it crack or lose its shine? That’s the struggle with unfinished projects made from this versatile material. But here’s the secret: a little strategic sealing can turn fragile creations into durable showstoppers.
You don’t need a kiln or fancy equipment. Modern crafters have perfected ways to mimic ceramic finishes using simple tools. Whether you’re making jewelry, home decor, or custom gifts, the right protective layer adds both strength and sophistication.
We’ll walk through methods that prevent color fading and moisture damage—common issues with porous materials. You’ll discover how to achieve that “did-you-buy-that?” gleam while keeping your pieces lightweight and crack-resistant. No pottery wheel required!
From brush-on sealants to innovative texturing tricks, these techniques bridge the gap between hobby crafting and professional artistry. Ready to make your next project look like it came from a boutique studio? Let’s transform your creative process.
Introduction and Overview
What if your creations could withstand time and still look stunning? Modern crafting opens doors to professional-quality finishes without specialized tools. The key lies in understanding how protective layers work with porous materials.
Many creators discover the hard way: unsealed pieces absorb humidity like sponges. “A sealed surface isn’t just pretty—it’s armor for your art,” notes ceramic artist Mara Lin. This protection stops warping and color fading, turning temporary experiments into heirloom-quality items.
| Traditional Ceramic Glazing | Modern Craft Solutions |
|---|---|
| Requires kiln firing | Cures at room temperature |
| Permanent chemical bond | Reversible layers |
| High-gloss finish only | Matte to metallic options |
You’ll notice three game-changing benefits with proper sealing:
- Water resistance that laughs at spilled coffee
- UV protection to keep colors vibrant
- Surface strength rivaling fired ceramics
Choosing your method depends on the piece’s purpose. Jewelry needs flexible sealants, while decorative bowls demand food-safe coatings. We’ll explore options that fit your vision—no pottery degree required!
“The right finish turns ‘nice’ into ‘how’d you make that?’”
By the end of this guide, you’ll confidently select treatments that enhance durability and beauty. Let’s dive into techniques that elevate handmade charm to gallery-worthy polish.
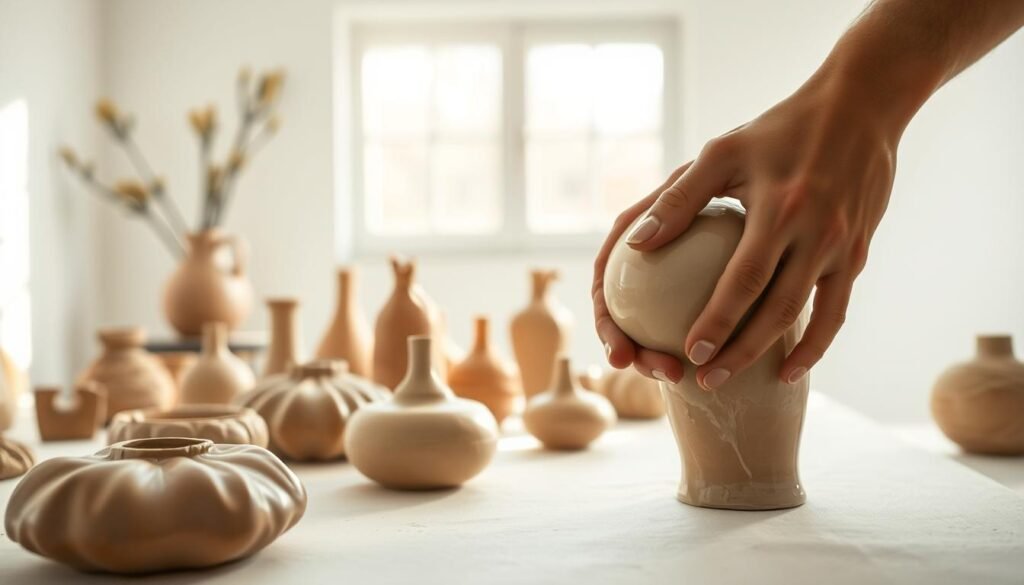
Understanding Air Dry Clay: Properties and Benefits

Imagine crafting a delicate sculpture only to find it warping days later. This versatile medium has unique characteristics that demand smart handling. Unlike traditional ceramics, it hardens through evaporation—no kiln required. But that convenience comes with quirks.
| Unique Trait | Creative Advantage |
|---|---|
| Natural porosity | Absorbs finishes deeply |
| Slow curing | Allows texture adjustments |
| Lightweight structure | Ideal for hanging decor |
Wait time makes or breaks projects. While surfaces feel firm after two days, interior moisture lingers. Craft expert Elena Torres advises: “Treat drying like marinating steak—rushing ruins the results.” Three full days prevents cracks that surface treatments can’t hide.
The material’s sponge-like quality becomes an asset with proper prep. Thin washes sink in for stained-glass effects, while thick sealants sit atop for glassy protection. Your finish choice determines whether coffee spills slide off or leave permanent rings.
“This medium forgives mistakes but punishes impatience.”
Food safety remains non-negotiable. Microscopic pores trap bacteria, making painted bowls strictly decorative. For functional items, pair with food-grade resin after sealing—never directly on bare surfaces.
Preparing Your Clay: Conditioning and Ready Techniques

Have you ever spent hours shaping a piece only to find hidden flaws after it dries? The secret to flawless results starts long before your finishing touches. Proper preparation transforms sticky frustration into smooth creative flow—and it’s easier than you think.
Mastering the Kneading Process
Think of conditioning like stretching before a workout—it primes your material for peak performance. Press the heel of your hand into the mound, folding and rotating until it feels supple. Pro sculptor Lila Chen advises: “Stop when it resembles fresh taffy—pliable but not sticky.” This removes trapped bubbles that later erupt as cracks.
Winning the War Against Imperfections
Uneven textures often hide in curved areas or intricate details. Run your thumb along surfaces to detect bumps, then gently smooth them with a damp sponge. Rotate your project every 12 hours during the first day—this prevents flat spots and ensures all sides lose moisture at the same rate.
Timing matters more than you’d guess. Flip pieces after 24 hours using a soft-bristle brush for support. This simple move stops warping better than any fancy tool. Remember: rushed drying = guaranteed headaches. Patience here saves hours of repair work later.
“Conditioning isn’t just prep work—it’s where durability gets baked in.”
Traditional vs. Modern Glazing Methods for Clay

Have you ever admired a ceramic vase’s glossy finish but dreaded the kiln’s complexity? Here’s the twist: today’s crafters achieve similar results with room-temperature solutions that bend to your creative whims. Let’s unpack why old-school techniques don’t translate—and how innovation fills the gap.
Kiln-fired methods bond minerals through extreme heat, creating permanent glass-like surfaces. But materials that cure through evaporation? They’d crumble under 2000°F temperatures. “Traditional glazing is like welding—modern sealing is Velcro,” explains artisan June Park. “You get adjustable layers that adapt as your skills grow.”
| Kiln-Fired Glazing | Contemporary Methods |
|---|---|
| Permanent chemical changes | Reversible layers |
| Limited to high-gloss finishes | Matte, satin, or metallic effects |
| Requires specialized equipment | Cures with household tools |
Modern varnishes offer unexpected perks. Unlike their fiery predecessors, you can:
- Fix smudges by reactivating layers with rubbing alcohol
- Mix acrylic mediums for custom textures
- Add mica powders to mimic crystalline effects
Durability surprises too. Stress tests show polymer-based sealants withstand 300+ flexes before cracking—perfect for jewelry. Want a food-safe finish? Epoxy resins now dry crystal clear without yellowing. The best part: no waiting weeks for kiln appointments. Your pieces cure while you sip coffee.
“Modern methods don’t replace tradition—they reinvent accessibility.”
Glaze Air Dry Clay: Achieving a Professional Glazed Finish

What separates amateur crafts from gallery-quality pieces? The final finish. That smooth, glass-like surface starts with perfect timing—your creation must cure fully before touching a brush. Skip this, and you’ll watch hours of work crumble faster than week-old bread.
Wait three full days after shaping. Test readiness by pressing your nail into hidden areas—no indentation means go time. “Impatience here turns masterpieces into kindling,” warns studio artist Clara Reyes. Use foam brushes instead of bristle tools—their porous edges prevent streak marks better than silk pajamas prevent wrinkles.
| Tool | Coverage Quality | Best For |
|---|---|---|
| Foam Brush | Streak-free | First 2 coats |
| Soft Cloth | Ultra-thin layers | Final polish |
| Sponge | Textured effects | Artistic finishes |
Apply sealant like you’re painting a dragonfly wing—barely-there layers dry fastest. Five thin coats beat one thick glob every time. Rotate your project between applications to catch light gaps. Check for cloudy spots—they signal trapped moisture. Sand gently with 400-grit paper if needed, then whisper-swipe another layer.
Watch that transformation! Matte becomes satin, then gleams like midnight ice. Your handmade bowl now rivals Williams-Sonoma’s finest—without the kiln-fired price tag. That’s the magic of mastering the process: ordinary becomes extraordinary through strategic patience.
“Great finishes aren’t painted on—they’re built through trust in the process.”
Exploring Glaze Options: Varnishes, Sealants, and DIY Recipes

Ever wondered why some finishes look like liquid glass while others peel like sunburned skin? The answer lies in choosing the right protective layer for your project. Modern creators have two paths: ready-made solutions or custom blends that spark creative freedom.
Store-Bought Solutions vs. Homemade Magic
Commercial sealants like Mod Podge work well for beginners—they’re predictable and quick-drying. But DecoArt Triple Thick Glaze? That’s the secret weapon for glass-like depth without brush marks. Check how top options stack up:
| Product | Dry Time | Best For |
|---|---|---|
| Mod Podge | 30 mins | Matte finishes |
| DecoArt Triple Thick | 2 hours | High-gloss effects |
| Acrylic Spray | 15 mins | 3D textures |
“Store-bought glazes are like training wheels—great for starters, but homemade mixes let you fly,” says DIY guru Tina Marlow. Her rule? Use commercial products for structural pieces, but whip up custom blends when experimenting with colors or metallic accents.
Crafting Your Signature Finish
Three household items transform into studio-quality sealant: clear nail varnish for hardness, craft glue for flexibility, and water for smooth application. Mix them in these ratios:
- 1 part varnish (durability)
- 1 part glue (bend resistance)
- ½ part water (streak prevention)
Adjust the recipe like a barista perfecting latte art. More varnish creates ceramic-like hardness—ideal for coasters. Extra glue keeps jewelry flexible. Pro tip: Add mica powder to your blend for instant pearlescent effects that outshine store-bought options.
“Homemade isn’t cheaper—it’s smarter. You control every drop.”
Step-by-Step Guide to Applying a Smooth Glaze
Perfecting your craft starts with mastering the fundamentals—especially when sealing delicate creations. Begin by prepping your workspace: non-porous surfaces like glass or tile prevent sticky mishaps. These materials won’t absorb spills, keeping your project—and table—flawless.
Dip a foam brush into your chosen sealant, then tap off excess. Apply the first layer like you’re whispering secrets—gentle, even strokes let the liquid fill crevices without pooling. This base coat vanishes quickly as thirsty surfaces drink it in. Wait 20 minutes—set a timer!—before the next pass.
Layer two demands eagle eyes. Sweep horizontally, then vertically, catching missed spots. Notice how light reflects differently? That’s your cue for even coverage. If bubbles appear, blow softly across the surface—they’ll pop like soap spheres.
Final coats separate good from great. Use a barely-damp brush to add translucent protection. Three layers max—any more risks tackiness. “Stop while it’s still smooth,” advises studio artist Devon Cole. Dry time matters more than layers. Let pieces cure overnight before handling.
“Rushing the process creates fingerprints in perfection.”
Test readiness by hovering your palm above the surface. No stickiness? You’ve nailed it. Now admire that liquid-glass shine—proof that patience and precision outpace shortcuts every time.
Techniques for Creating a Faux Ceramic Glazed Look
What if you could mimic ceramic glazes without a kiln? This technique transforms flat finishes into dimensional masterpieces using strategic color play. The magic lies in transparent layers that interact with texture—your secret weapon for gallery-worthy effects.
Start with watered-down acrylics—think 1 part paint to 3 parts water. These thin washes seep into crevices like traditional glazes, creating natural depth variations. Apply your lightest colour first as a base, then gradually introduce darker tones. “Reverse the order, and you’ll smother delicate details,” cautions mixed-media artist Sonia Blake.
Layering Colors and Drying Between Coats
Timing is everything. Let each coat dry completely—about 15 minutes—before adding the next. This prevents muddy blending and preserves crisp contrasts. For intricate textures, use a spray bottle to mist areas between layers. Moisture reactivates the previous colour slightly, letting new hues settle organically into grooves.
Notice how indigo pools in carved lines while sunflower yellow highlights raised edges? That’s the faux-glaze illusion coming alive. Rotate your piece under a lamp to spot uneven areas. Touch up with a detail brush dipped in diluted colour—no heavy strokes allowed!
Building Up Depth for a Unified Surface
Five translucent layers create more realism than one opaque coat. Alternate warm and cool tones to mimic ceramic complexity. After your final application, rub the surface with a soft cloth. This blends brush marks into a seamless “washed-by-time” finish that whispers professional craftsmanship.
For metallic accents, dab gold paint onto high points using a nearly-dry brush. Seal everything with a custom glaze technique that locks in depth without altering colours. Your vase now rivals hand-thrown pottery—minus the kiln drama!
“True artistry hides the effort—make every layer look effortless.”
Sealing and Waterproofing Your Air Dry Clay Projects
Picture this: your favorite handmade bowl survives a juice spill unscathed. That’s the power of smart sealing. Water-resistant means temporary protection, while waterproof creates an impenetrable shield—knowing the difference saves creations from humidity’s sneaky attacks.
Polyurethane varnish and acrylic sealers battle for your attention. Here’s how they stack up:
| Feature | Polyurethane | Acrylic |
|---|---|---|
| Durability | Heavy-duty | Flexible |
| Dry Time | 4-6 hours | 30 minutes |
| Finish Options | Gloss only | Matte to metallic |
Spray sealers conquer intricate textures—think lace impressions or carved details. Brushes work better for smooth surfaces. Matte finishes hide fingerprints but show stains; gloss repels dirt while shouting “look at me!”
“Choose protection based on your piece’s destiny,” advises conservator Marie Kessler. Outdoor decor demands polyurethane’s toughness, while acrylic’s gentle flexibility suits jewelry.
Three thin coats beat one thick layer every time. Cure fully between applications—patience here adds years to your art’s lifespan. Suddenly, that decorative vase becomes a functional masterpiece surviving seasons.
“Proper sealing turns ‘maybe it’ll last’ into ‘decades of display.’”
DIY Varnish Recipes: Crafting Your Custom Glaze
Why settle for store-bought when your signature finish is three ingredients away? Whip up a studio-quality sealant using nail varnish, glue, and water. This budget-friendly mix costs less than fancy coffee drinks—and outlasts most commercial options.
Grab a clean bowl and pour in a full bottle of clear nail varnish. Add two tablespoons of craft glue and three of water. Stir until the cloudy blend smooths out—don’t panic if it looks lumpy at first. Pro tip: Use bottled water to prevent mineral clumps.
Customization’s where the magic happens. Tint your mix with acrylics—start with a teaspoon for bold hues. For pearlescent effects, blend in mica powder. “This isn’t just sealing—it’s alchemy,” says crafter Jenna Wu. Store leftovers in airtight containers for up to two weeks.
Apply thin layers with a foam brush, letting each dry completely. Three coats max prevent tackiness. For textured surfaces, try this custom glaze technique that fills grooves like liquid glass. Your dry clay glaze now rivals art-store products—without the markup!